

Air Campaigns
Want to start or join a group build? This is where to start.
Want to start or join a group build? This is where to start.
Hosted by Frederick Boucher, Michael Satin
Part two Down low tank busting official tread

Blackwulf

Joined: April 20, 2004
KitMaker: 215 posts
AeroScale: 120 posts
Posted: Tuesday, May 15, 2007 - 09:58 PM UTC
@ Eetu I don't see any reason why you can't enter your P-47 into the campaign. As long as it was only partially built into pieces I don't think Jesper would take issue with it. Plus, we are all here to have fun so it would be nice to add another P-47 to the growing stable of Jugs. Like I have told others though--you have some decent competition with the P-47 since some real beauties have already been built!! Keep us posted with pics if possible--would like to see both planes.

Phantom2

Joined: April 18, 2006
KitMaker: 708 posts
AeroScale: 678 posts
Posted: Thursday, May 17, 2007 - 03:10 AM UTC
Hi all! 
@Eetu;
Interior should be a Dark Dull Green, I use Humbrol 149.
For the Yellow zink chromate, I use Humbrol 81.
YZC parts; Lower part inside the front cowling, wheel wells, inside all gear doors, other interior parts.
Can´t help much with the cammo colors, but I´m pretty sure they used British colors that were easily found.
I´ll look around and see if I can find anything useful for you.
I believe (really not sure here!) the French version had an American standard cammo of Olive Drab over Neutral Grey.
Now I have done almost all subassemblies and are about to close up the fuselage!
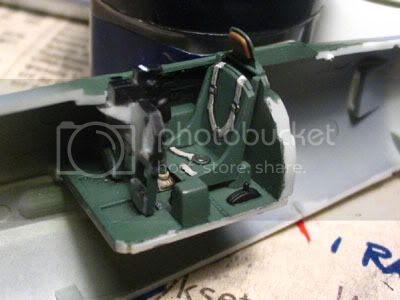
We start as usual with the cockpit, basic assy, painted in Humbrol 149 Bronze Green, wich are a very good match for the Dark Dull Green used by Republic.
Curtiss did use a interior green cockpit color, but those were all Razorbacks and were only used stateside and never saw any combat.

I used Eduards etched seatbelts to spice up the seat, drybrushed with silver and a black wash.

I painted the instrument panel gloss black, and the I cheated a bit, I used the kit decals for the instrument panel!
With some Micro-sol, they snuggled down over the raised details perfectly.
Then I painted the panel with clear matt, and finished by a drop of future in every dial to simulate glass.

Finally I added some wires on the backside as these will be easy to see from the outside later.

Here´s some pics of the completed cockpit;


I know this P-47D-25-RE should have the earlier, corrugated floor, but I didn´t have any suitable plastic struts at home and I simply didn´t want to wait so I have to live with It!
To prevent a "see-trough" look in the ducting outlets, I decided to box them in with some plasticard.
Later, I will paint the box black and add a "roof", also painted black.

Here´s the rest of the build;

Lots of big parts and everything fits so good so you think your´e in modelling heaven!


Carlos, you asked how big the P-47 was in 1/32.
Length is 396mm, span is 392mm and the kit consists of 167 parts and 12 polycaps (4 x large and 8 x small).
But only the numbers doesn´t tell the whole tail as this is a really fat body with wide chord wings behind an enourmous engine!
The mustang is dwarfed beside it;

More pics coming soon....
Cheers!
Stefan E
@Eetu;
Interior should be a Dark Dull Green, I use Humbrol 149.
For the Yellow zink chromate, I use Humbrol 81.
YZC parts; Lower part inside the front cowling, wheel wells, inside all gear doors, other interior parts.
Can´t help much with the cammo colors, but I´m pretty sure they used British colors that were easily found.
I´ll look around and see if I can find anything useful for you.
I believe (really not sure here!) the French version had an American standard cammo of Olive Drab over Neutral Grey.
Now I have done almost all subassemblies and are about to close up the fuselage!
We start as usual with the cockpit, basic assy, painted in Humbrol 149 Bronze Green, wich are a very good match for the Dark Dull Green used by Republic.
Curtiss did use a interior green cockpit color, but those were all Razorbacks and were only used stateside and never saw any combat.
I used Eduards etched seatbelts to spice up the seat, drybrushed with silver and a black wash.
I painted the instrument panel gloss black, and the I cheated a bit, I used the kit decals for the instrument panel!
With some Micro-sol, they snuggled down over the raised details perfectly.
Then I painted the panel with clear matt, and finished by a drop of future in every dial to simulate glass.
Finally I added some wires on the backside as these will be easy to see from the outside later.
Here´s some pics of the completed cockpit;
I know this P-47D-25-RE should have the earlier, corrugated floor, but I didn´t have any suitable plastic struts at home and I simply didn´t want to wait so I have to live with It!
To prevent a "see-trough" look in the ducting outlets, I decided to box them in with some plasticard.
Later, I will paint the box black and add a "roof", also painted black.
Here´s the rest of the build;
Lots of big parts and everything fits so good so you think your´e in modelling heaven!
Carlos, you asked how big the P-47 was in 1/32.
Length is 396mm, span is 392mm and the kit consists of 167 parts and 12 polycaps (4 x large and 8 x small).
But only the numbers doesn´t tell the whole tail as this is a really fat body with wide chord wings behind an enourmous engine!
The mustang is dwarfed beside it;
More pics coming soon....
Cheers!
Stefan E

Siderius
Joined: September 20, 2005
KitMaker: 1,747 posts
AeroScale: 1,673 posts
Posted: Thursday, May 17, 2007 - 04:01 AM UTC
Hi there, I built that 1/72 scale P-47M and I used polly scale colors. Aluminum on the underside. Then for the top colors I used simply Blue and British Azure Blue, it came out pretty well I think. Don't forget the red nose the cowling, I went back and repainted the nose almost a year after building the model! The red really sets off the blue. Hope this helps a little bit. All the best. Russell

Siderius
Joined: September 20, 2005
KitMaker: 1,747 posts
AeroScale: 1,673 posts
Posted: Thursday, May 17, 2007 - 04:03 AM UTC
One more thing Emeritus, the P-47M was used strictly as a fighter. It was never even equipped with the rockets that come with the kit. At least that was the information I found on it. Don't know if you might want to switch to a D model Thunderbolt for a tank buster. Take care. Russell

Emeritus

Joined: March 30, 2004
KitMaker: 2,845 posts
AeroScale: 1,564 posts

Posted: Thursday, May 17, 2007 - 05:44 PM UTC
Thanks for the info.
Looking at T-bolt interior pics in this and a few other threads, I think xtracrylics' medium green should be suitable. I may have to lighten it a bit, but the appears to be about right.
Edit: IPMS stockholm's reference articles say the medium green is the same thing as dark dull green.
Siderius, a good point. I'll reconsider doing an M-variant. Since the difference in the revell D-30 and M-kits is the gearbox, I think I can easily make it a D either by modifying the engine front or just swapping decals if I'm feeling lazy.
I'll check at a LHS for suitable decals, or then I'll do the french plane from the D-kit.
Emeritus
Joined: March 30, 2004
KitMaker: 2,845 posts
AeroScale: 1,564 posts
Posted: Sunday, May 20, 2007 - 06:25 PM UTC

Decaling completed.
I also got started on the 1:72 Thunderbolt. The cockpit's ready and I'll close the fuselage when the superglue on the antenna has dried. Kind of dumb engineering here. The mast is designed to be glued before glueing the fuselage halves together, making it easy to accidentally knock off the delicate part.

Nothing fancy this time, just a simple paint job since I'm planning to close the canopy.
Blackwulf
Joined: April 20, 2004
KitMaker: 215 posts
AeroScale: 120 posts
Posted: Sunday, May 20, 2007 - 09:39 PM UTC
You all are doing great work on your planes!! Nice to see all the in progress pics.
Emeritus
Joined: March 30, 2004
KitMaker: 2,845 posts
AeroScale: 1,564 posts
Posted: Monday, May 21, 2007 - 08:29 PM UTC
My thunderbolt's coming along quickly & nicely. The fuselage halves, wings and stabilizers fit nicely. The only part that caused any trouble was the supercharger air outlet (?), the resulting gap seemed very tricky to putty and sand so I glued in a piece of thin styrene sheet.

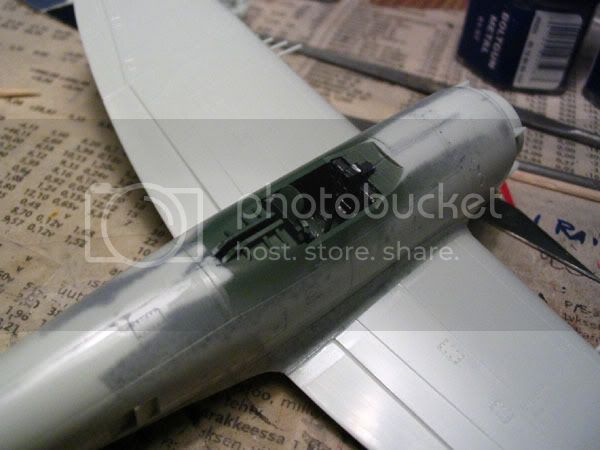
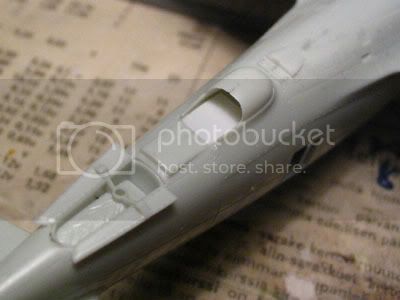
And guess what? Despite especially taking care not to damage the radio mast, I knocked off. Well, that's quickly fixed by making a new mast from stiff wire. Next I'll finish painting the cockpit opening, attach the canopy and start priming.
I still have to scratch-build the brace that goes inside the canopy, though. I lost that when building the first kit so I took the part from this one. Actually, I originally bough this whole kit just to get a national insignia decal to replace one I ruined.

alpha_tango

Joined: September 07, 2005
KitMaker: 5,609 posts
AeroScale: 5,231 posts
Posted: Sunday, May 27, 2007 - 08:26 PM UTC
Hello Jesper, Patrick and all other participants
i seldom finish a model in a few weeks .. well, this time I did. My Focke Wulf Fw 190 F-1 Tunisia edition was finished it in about 3 weeks. All info and 40 pix can be found in the build thread:
Hasegawa Fw 190F-1 (Down Low)
Here are just a few of the finished model .. BTW I put on the biggest bomb it could carry
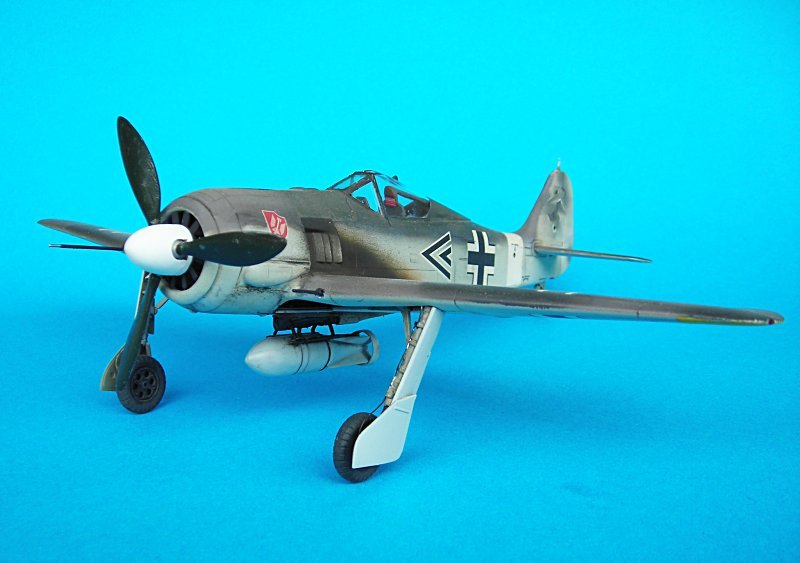
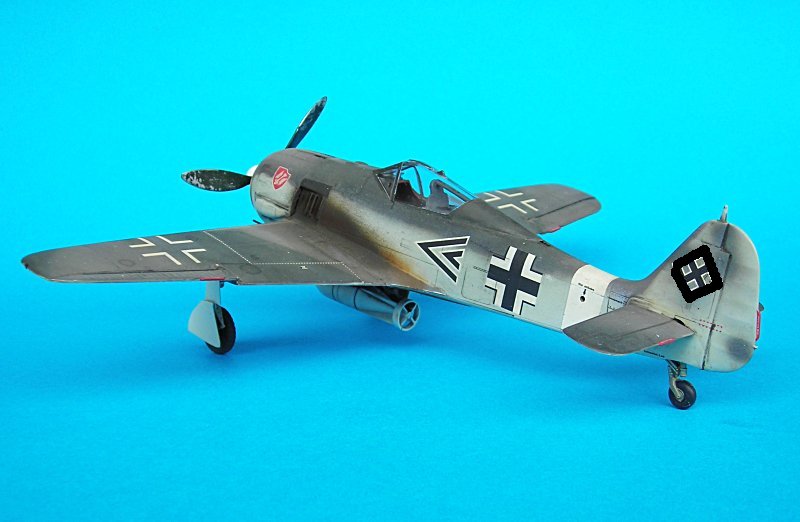

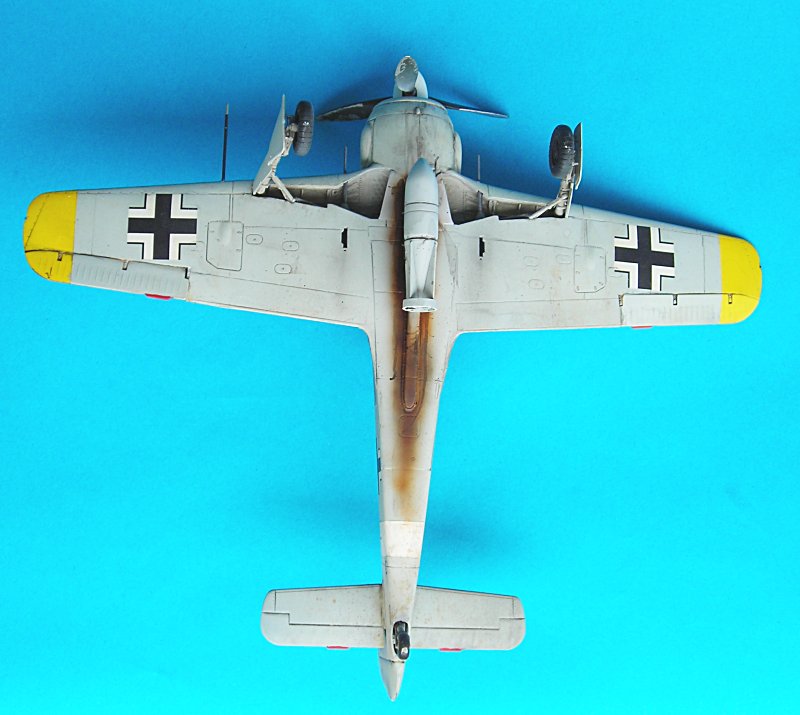
best wishes
Steffen
i seldom finish a model in a few weeks .. well, this time I did. My Focke Wulf Fw 190 F-1 Tunisia edition was finished it in about 3 weeks. All info and 40 pix can be found in the build thread:
Hasegawa Fw 190F-1 (Down Low)
Here are just a few of the finished model .. BTW I put on the biggest bomb it could carry
best wishes
Steffen

SGTJKJ

#041

Joined: July 20, 2006
KitMaker: 10,069 posts
AeroScale: 3,788 posts

Posted: Sunday, May 27, 2007 - 11:12 PM UTC
Hey guys, now I am back from holiday to Tibet and China. - and yes, Trumpeter and Dragon models were really really cheap so just expanded my stash with 16 kits  I simply could not carry any more......
Good to see Patrick has had things under control in the campaign and to see so much great progress. Thanks for participating guys
@Steffen: great FW 190. The bomb is definently big enough to take out any tank!
I simply could not carry any more...... Good to see Patrick has had things under control in the campaign and to see so much great progress. Thanks for participating guys
@Steffen: great FW 190. The bomb is definently big enough to take out any tank!


klimmer

Joined: May 16, 2003
KitMaker: 250 posts
AeroScale: 207 posts
Posted: Tuesday, May 29, 2007 - 12:30 AM UTC
I have been follwoingt this campain since the beginning and let me say that the work I have seen so far has been quiute frankly outstanding.
I am almost afraid to post my work.
I finally started my P-47, and hopefully will have it completed by the deadline, it is the 1/48th offering from Academy. It will be an OOB build.

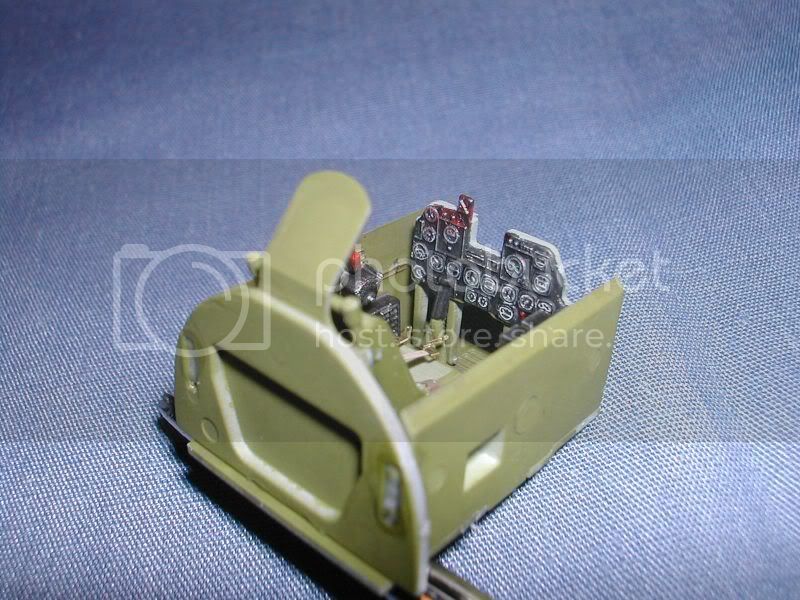
As usual I began with the front office.
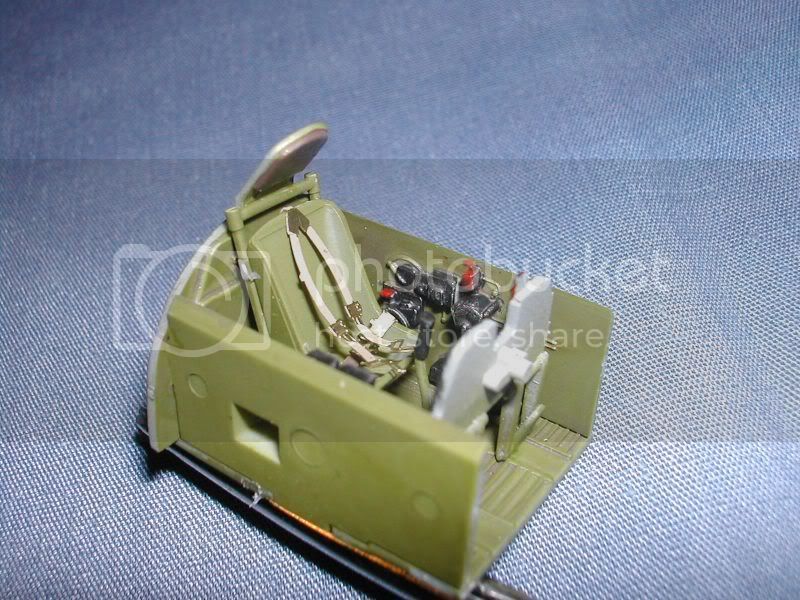


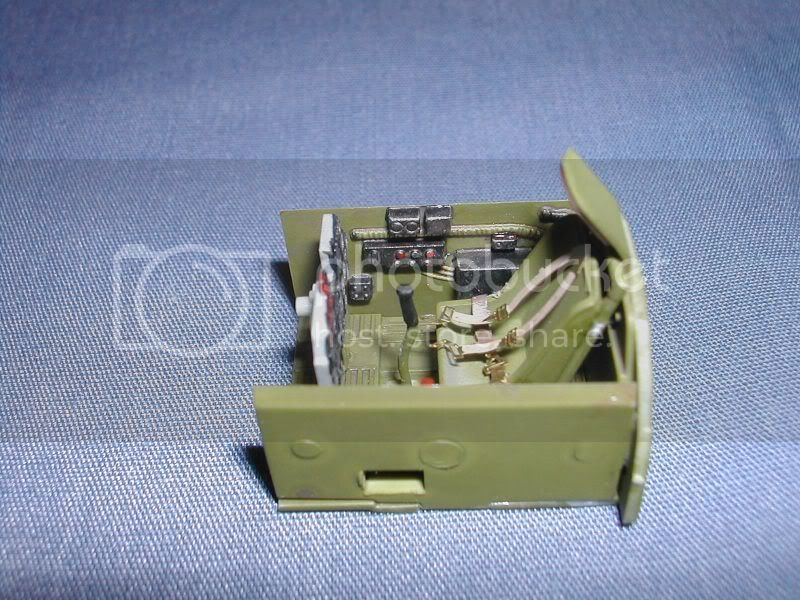
And the engine and gun bays...................I am thinking of leaving the bays open, what do you guys think?


I am planning to paint the kit accroding to the box art and use the kit decals, but would like to add invasion stripes, does anyone know if this aircraft was ever painted with the invasion stripes?
Well thanks for looking. I will be posting more as I get more done
Ted
I am almost afraid to post my work.
I finally started my P-47, and hopefully will have it completed by the deadline, it is the 1/48th offering from Academy. It will be an OOB build.
As usual I began with the front office.
And the engine and gun bays...................I am thinking of leaving the bays open, what do you guys think?
I am planning to paint the kit accroding to the box art and use the kit decals, but would like to add invasion stripes, does anyone know if this aircraft was ever painted with the invasion stripes?
Well thanks for looking. I will be posting more as I get more done
Ted
Emeritus
Joined: March 30, 2004
KitMaker: 2,845 posts
AeroScale: 1,564 posts
Posted: Tuesday, May 29, 2007 - 12:23 PM UTC
Looking nice so far.
Do whatever you feel, I think open gun bay(s) would be cool.
Btw, have you planned to wire the engine?
That cockpit looks very nice too, just remember to glue the end of the shoulder harness to the bottom of the seat before installing the cockpit module in the fuselage, they look like floating in the air now.
To my knowledge, the invasion stripes were painted fully (completely around wings and fuselage) before the invasion to prevent friendly fire casualties.
The stripes were ordered to be removed from the top of the wings and fuselage when beachheads were established and forward airfields secured.
Then, remaining stripes were phased out with varying pace, with some aircraft still having remains as late as early 1945.
The box art shows the plane having partial D-day stripes. I'm no expert on the subject, but I think you can paint on full stripes, use the kit decals and not worry about it.
Sticking to the subject of thunderbolts, mine is coming along nicely. I'm almost ready to prime now, all I have to do is make a new radio mast and a pitot tube. While I was sanding the seam on the leading edge of the wing, I knocked off one of the mg barrels. I briefly thought about simply replacing it with styrene rod. But since the plane id going to have yellow bands that go over the mg's, I decided to go ahead and replace all of the molded-on barrels with hypodermic needles. Not only do they look much better than the originals, they also make the yellow stripes easier to mask and paint (I'll most probably paint the yellow stripes on the wings and tail first, and that would make masking the wing stripes trickier with the machine gun barrels in the way.
I'll be posting some pics soon.
Edit:
Oh, I forgot this.
What color should I paint the inside of the cowling? Revell's instructions aren't of much help, only pointing out anthrazit for the firewall and a mixed color for the cowling that I suspect to refer to interior green.
I looked at some walkarounds I found and they don't agree on the case.
http://www.aircraftresourcecenter.com/AWA1/301-400/walk384_P-47/walk384.htm
^ This one looks like neutral grey.
http://www.ipmsstockholm.org/magazine/1999/01/stuff_eng_detail_p47.htm
^ While this looks something like interior green or greenish zinc chromate.
What should it be?
Do whatever you feel, I think open gun bay(s) would be cool.
Btw, have you planned to wire the engine?
That cockpit looks very nice too, just remember to glue the end of the shoulder harness to the bottom of the seat before installing the cockpit module in the fuselage, they look like floating in the air now.
Quoted Text
I am planning to paint the kit accroding to the box art and use the kit decals, but would like to add invasion stripes, does anyone know if this aircraft was ever painted with the invasion stripes?
To my knowledge, the invasion stripes were painted fully (completely around wings and fuselage) before the invasion to prevent friendly fire casualties.
The stripes were ordered to be removed from the top of the wings and fuselage when beachheads were established and forward airfields secured.
Then, remaining stripes were phased out with varying pace, with some aircraft still having remains as late as early 1945.
The box art shows the plane having partial D-day stripes. I'm no expert on the subject, but I think you can paint on full stripes, use the kit decals and not worry about it.
Sticking to the subject of thunderbolts, mine is coming along nicely. I'm almost ready to prime now, all I have to do is make a new radio mast and a pitot tube. While I was sanding the seam on the leading edge of the wing, I knocked off one of the mg barrels. I briefly thought about simply replacing it with styrene rod. But since the plane id going to have yellow bands that go over the mg's, I decided to go ahead and replace all of the molded-on barrels with hypodermic needles. Not only do they look much better than the originals, they also make the yellow stripes easier to mask and paint (I'll most probably paint the yellow stripes on the wings and tail first, and that would make masking the wing stripes trickier with the machine gun barrels in the way.
I'll be posting some pics soon.
Edit:
Oh, I forgot this.
What color should I paint the inside of the cowling? Revell's instructions aren't of much help, only pointing out anthrazit for the firewall and a mixed color for the cowling that I suspect to refer to interior green.
I looked at some walkarounds I found and they don't agree on the case.
http://www.aircraftresourcecenter.com/AWA1/301-400/walk384_P-47/walk384.htm
^ This one looks like neutral grey.
http://www.ipmsstockholm.org/magazine/1999/01/stuff_eng_detail_p47.htm
^ While this looks something like interior green or greenish zinc chromate.
What should it be?
SGTJKJ
#041
Joined: July 20, 2006
KitMaker: 10,069 posts
AeroScale: 3,788 posts
Posted: Tuesday, May 29, 2007 - 04:39 PM UTC
@Ted: Great cockpit! Looks very nice with lots of cool details.
Regarding the invasion stripes I do not know if this particular aircraft had the invasion stripes but the box art is a good indicator that you could just go ahead. If you feel like invasion stripes go for it 
Regarding the invasion stripes I do not know if this particular aircraft had the invasion stripes but the box art is a good indicator that you could just go ahead.
If you feel like invasion stripes go for it klimmer
Joined: May 16, 2003
KitMaker: 250 posts
AeroScale: 207 posts
Posted: Tuesday, May 29, 2007 - 08:20 PM UTC
Thanks for the kind words guys.
Eetu, thanks for the tip on the shoulder harness, I will make sure that I glue it down. Regarding the colour inside the cowling, The Academy instructions call for silver for the inside of the cowl, which I have already done, but with the links that you so kindly provided I am not sure if this is the correct colour

As far as the wiring of the engine, I am not sure if I will try to wire the engine (I have never attempted it before). I will dry fit the cowl over the engine to see how much is visible, and decide whether to try it or not, but thanks for the suggestion.
I am going to go with the open gun bays, and full invasion stripes, hopefully they will compliment the look of my "Jug".
Thanks Again
Ted
Eetu, thanks for the tip on the shoulder harness, I will make sure that I glue it down. Regarding the colour inside the cowling, The Academy instructions call for silver for the inside of the cowl, which I have already done, but with the links that you so kindly provided I am not sure if this is the correct colour
As far as the wiring of the engine, I am not sure if I will try to wire the engine (I have never attempted it before). I will dry fit the cowl over the engine to see how much is visible, and decide whether to try it or not, but thanks for the suggestion.
I am going to go with the open gun bays, and full invasion stripes, hopefully they will compliment the look of my "Jug".
Thanks Again
Ted Emeritus
Joined: March 30, 2004
KitMaker: 2,845 posts
AeroScale: 1,564 posts
Posted: Thursday, May 31, 2007 - 03:25 PM UTC
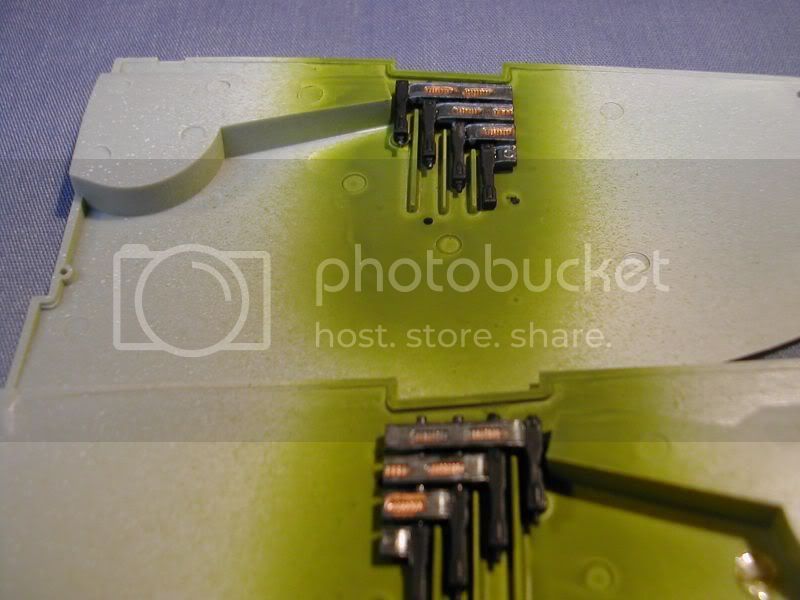
I got the airframe of my thunderbolt primed, and vallejo's aerosol primer got me quite pissed off.

There, I hope the sorry results of the primer are visible in the pic.
It all started well, I started painting with an almost empty can of primer, I painted the drop tank and got a few spays of paint to the belly of the plane before it ran out.
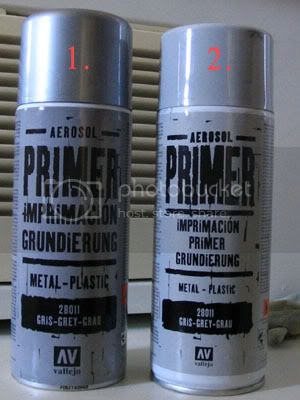
You see, the almost-empty can was number two, with the grey cap.
I had another can of the stuff which I shook up and continued priming, assuming the stuff would be the same (same product number and all).
How could I be!
The new can (silver cap, number one) was apparently of a whole different formula. It smelled different, sprayed on differently, and worst of all, started bubbling when it hit some of the old stuff already on the model!
Fortunately, the reaction calmed down and the surface smoothed adequately. I then continued on to the upper side.
What a strangely behaving product. When I tested it first on my cardboard box-spraybooth, it looked like the spray would have been good. Usually brand-new cans shoot the paint out like there's no tomorrow, but this one looked to have a pleasant flow.
I was so wrong again... The spray made a thick coat, which had this amazing orange-peel surface!
With the earlier grey-capped stuff, all that was needed after priming was a quick rub with some fine sandpaper to make sure it's good to go.
Now I have to do some serious sanding to get rid of the orange peel and re-scribe a few panel lines to undo the filling the primer did.
And this is the second time vallejo has changed their grey spray primer. The stuff I first tried was yellowy grey and left slightly coarse finish which smoothed down very nicely with a hard paper napkin.
Then, it changed to the actually grey stuff (number two in the pic). This was good stuff too, didn't have the initial coarseness and made smooth coat.
And then, here we have this silver-capped stuff...
I'm going to write an email to Vallejo and ask why do they change the formula for the worse and have the same product number to confuse customers.
Looks like I have to find a new primer.
There, I hope the sorry results of the primer are visible in the pic.
It all started well, I started painting with an almost empty can of primer, I painted the drop tank and got a few spays of paint to the belly of the plane before it ran out.
You see, the almost-empty can was number two, with the grey cap.
I had another can of the stuff which I shook up and continued priming, assuming the stuff would be the same (same product number and all).
How could I be!
The new can (silver cap, number one) was apparently of a whole different formula. It smelled different, sprayed on differently, and worst of all, started bubbling when it hit some of the old stuff already on the model!
Fortunately, the reaction calmed down and the surface smoothed adequately. I then continued on to the upper side.
What a strangely behaving product. When I tested it first on my cardboard box-spraybooth, it looked like the spray would have been good. Usually brand-new cans shoot the paint out like there's no tomorrow, but this one looked to have a pleasant flow.
I was so wrong again... The spray made a thick coat, which had this amazing orange-peel surface!
With the earlier grey-capped stuff, all that was needed after priming was a quick rub with some fine sandpaper to make sure it's good to go.
Now I have to do some serious sanding to get rid of the orange peel and re-scribe a few panel lines to undo the filling the primer did.
And this is the second time vallejo has changed their grey spray primer. The stuff I first tried was yellowy grey and left slightly coarse finish which smoothed down very nicely with a hard paper napkin.
Then, it changed to the actually grey stuff (number two in the pic). This was good stuff too, didn't have the initial coarseness and made smooth coat.
And then, here we have this silver-capped stuff...
I'm going to write an email to Vallejo and ask why do they change the formula for the worse and have the same product number to confuse customers.
Looks like I have to find a new primer.

TedMamere

Joined: May 15, 2005
KitMaker: 5,653 posts
AeroScale: 4,347 posts

Posted: Thursday, May 31, 2007 - 04:24 PM UTC
Hi Eetu!
Wow! Sorry to hear about that. I never had any problem with primers... I never used some! Maybe that's the solution
Jokes aside, I'm sure you will save your model. Good luck for your rescue mission
Jean-Luc
Wow! Sorry to hear about that. I never had any problem with primers... I never used some! Maybe that's the solution
Jokes aside, I'm sure you will save your model. Good luck for your rescue mission
Jean-Luc

Emeritus
Joined: March 30, 2004
KitMaker: 2,845 posts
AeroScale: 1,564 posts
Posted: Thursday, May 31, 2007 - 05:24 PM UTC
I'm sure I'll get the surface fixed. Looks like the orange peel has smoothed down, but there's still some to be sanded and the coat seems quite heavy.
Fortunately, no panel lines seem to be lost, although I think I'll go through them with a needle just to be sure I won't lose any to the sanding.
It really seems they've changed the formula of the primer, it hasn't dried completely yet, while the earlier stuff dried faster (or it's just the heavy coat).
I'll do some experimenting with the spray on some sprue to see how it works (or not)
Emeritus
Joined: March 30, 2004
KitMaker: 2,845 posts
AeroScale: 1,564 posts
Posted: Friday, June 01, 2007 - 04:49 AM UTC
Guess what? I got a reply from Vallejo. They said that while they make their own paints, spray paints are bought from a separate manufacturer. The aerosol formula has been changed several times because of some EU laws. Now they just got a formula that's OK with all European countries, and would like to send me a sample can and then hear my comments about it.
Now that's customer service!
It's really a shame that those EU laws are always complicating things. I heard that there's a law that puts on massive extra tolls to Tamiya paints, because their considered childrens' toys and get the tolls for being toxic.
Well, when have paints been good for your heath when consumed?
And at the same time, toxic car paints can be imported just as before, because they go to the proper paints category.

spongya

Joined: February 01, 2005
KitMaker: 2,365 posts
AeroScale: 71 posts

Posted: Friday, June 01, 2007 - 06:57 AM UTC
Don't complain about the EU... I got my ID checked in Walmart for an acrylic Testors paint. Which came from the toy isles...
Emeritus
Joined: March 30, 2004
KitMaker: 2,845 posts
AeroScale: 1,564 posts
Posted: Friday, June 01, 2007 - 08:38 PM UTC
I was first going to write about some stores here in Finland too keep spray paints in lockers and don't sell to minors, but then I looked at your post again.
Acrylic paints? And they aks for your ID?
Here, revell enamel paints, solvents and styrene cement are being sold in ordinary toy stores with no fuss.
I bet some authorities there would totally freak out of this.
Acrylic paints? And they aks for your ID?
Here, revell enamel paints, solvents and styrene cement are being sold in ordinary toy stores with no fuss.
I bet some authorities there would totally freak out of this.
Emeritus
Joined: March 30, 2004
KitMaker: 2,845 posts
AeroScale: 1,564 posts
Posted: Sunday, June 03, 2007 - 03:19 AM UTC
There, finally the primer dried. I hope the newest formula is better.

I think I got most of the orange peel fixed. Now, the brush-applied preshade is on and I'm ready to start the painting with the canopy frames (canopy I'll be masking and attaching next), yellow bands and wheel wells.
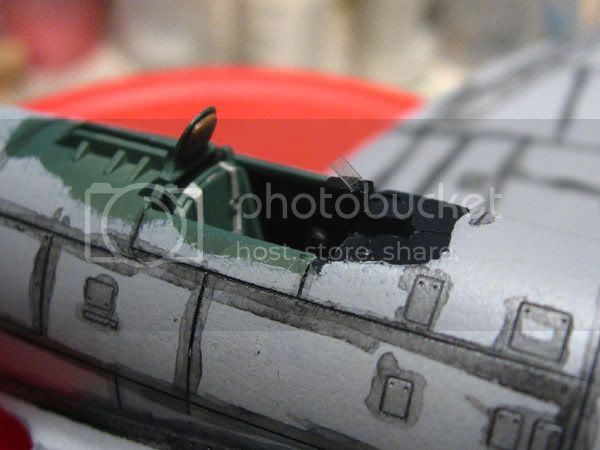
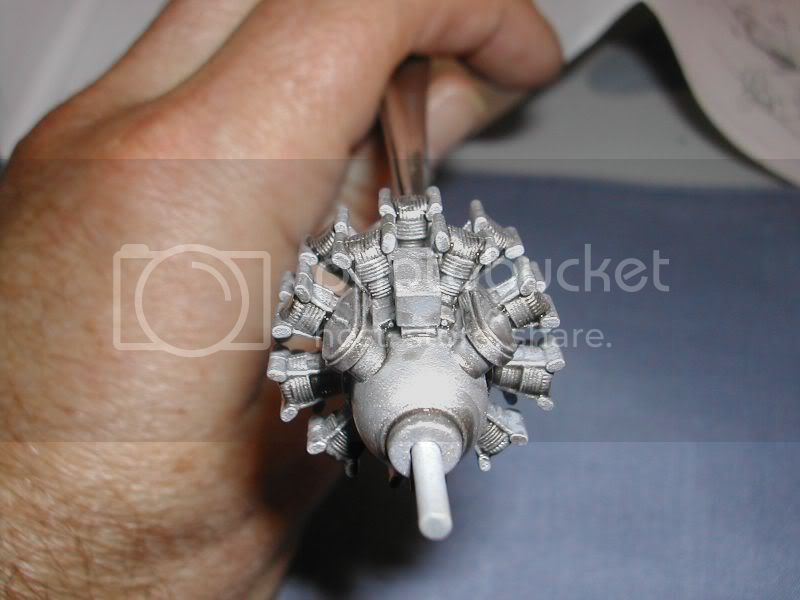
The gunsight in the kit was moulded in one piece with the instrument panel. In addition, the glass portion was damaged so cut it off and made a new glass from acetate film.

I couldn't keep my busy hands off the engine and landing gear either, where I added brake lines and ingition wires. Half of the engine wiring is now done, the wires going to the second bank of sylinders is still to be done.
I think I got most of the orange peel fixed. Now, the brush-applied preshade is on and I'm ready to start the painting with the canopy frames (canopy I'll be masking and attaching next), yellow bands and wheel wells.
The gunsight in the kit was moulded in one piece with the instrument panel. In addition, the glass portion was damaged so cut it off and made a new glass from acetate film.
I couldn't keep my busy hands off the engine and landing gear either, where I added brake lines and ingition wires. Half of the engine wiring is now done, the wires going to the second bank of sylinders is still to be done.
spongya
Joined: February 01, 2005
KitMaker: 2,365 posts
AeroScale: 71 posts
Posted: Sunday, June 03, 2007 - 12:32 PM UTC

My entry in progress. The cockpit actually looks much better than in the photo...
SGTJKJ
#041
Joined: July 20, 2006
KitMaker: 10,069 posts
AeroScale: 3,788 posts
Posted: Sunday, June 03, 2007 - 08:46 PM UTC
@Eetu: Good to see that you solved the primer problems and are moving ahead with your build. Looking forward to see more
@Andras: Looks good. Your cockpit looks very nice in the photo so if it is even better in real life, it is great. Will be great to see your Mustang with a bomb. Have you decided on a colour scheme yet?
@Andras: Looks good. Your cockpit looks very nice in the photo so if it is even better in real life, it is great.
Will be great to see your Mustang with a bomb. Have you decided on a colour scheme yet?
lampie
#029

Joined: December 23, 2005
KitMaker: 6,249 posts
AeroScale: 3,270 posts

Posted: Monday, June 04, 2007 - 09:47 AM UTC
Finished Entry
Tamiya 1:72 Razorback all tooled up and ready for some serious Down Low action!
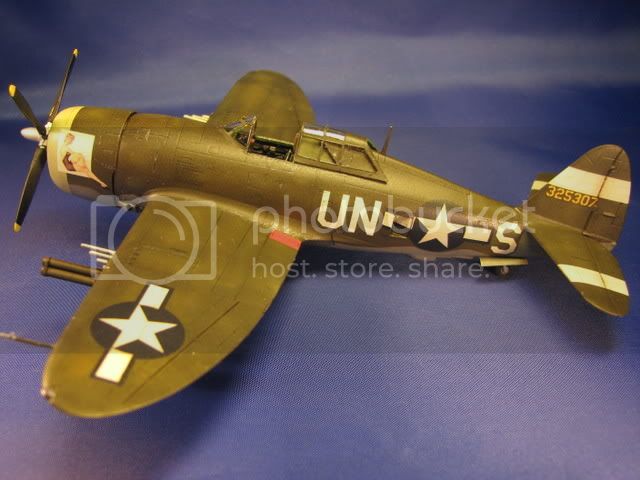
More photos can be found HERE
Ive really enjoyed this campaign so far. Hopefully the Pacific Campaign will get the go ahead later in the year and I can build another P47. I have some great " pin up" decals for a NMF P47N
Nige
Tamiya 1:72 Razorback all tooled up and ready for some serious Down Low action!
More photos can be found HERE
Ive really enjoyed this campaign so far. Hopefully the Pacific Campaign will get the go ahead later in the year and I can build another P47. I have some great " pin up" decals for a NMF P47N
Nige

WingTzun
Joined: February 01, 2006
KitMaker: 853 posts
AeroScale: 137 posts

Posted: Monday, June 04, 2007 - 11:25 AM UTC
Beautiful job Nigel. I've always prefered the Razorback to the bubble top. Hope I can do as well with mine when I get around to it.
 |

WEB HOSTING BY


Copyright ©2021 AeroScale and Kitmaker Network, a subsidiary of Silver Star Enterprises
All Rights Reserved. Please read our Conditions of Use and Privacy Policy.
All Rights Reserved. Please read our Conditions of Use and Privacy Policy.