OFFICIAL: Hangar Queen 2 Campaign
Ontario, Canada
Joined: February 04, 2008
KitMaker: 2,507 posts
AeroScale: 1,814 posts
Posted: Wednesday, August 08, 2012 - 08:02 AM UTC
Hi Jessica
Rigging looks good!
I have rigged my southampton as per Stephen Lawsons guide and
have found that the line has sagged after a few days!I have read to go at it with a hair dryer but I do not want to melt the wings!

" The Die Hards"
43rd MIDDLESEX REGIMENT
MACHINE GUN CORPS
XXX CORP
The most effective way to do it, is to do it.
- Amelia Earhart
Wisconsin, United States
Joined: September 11, 2009
KitMaker: 1,917 posts
AeroScale: 563 posts
Posted: Wednesday, August 08, 2012 - 10:53 AM UTC
Better control with a freshly extinguished match (or cigarette)?
Current: model railroad layout
Stalled a while ago:
. 1950's Chrome, WW II Twins
Last completed: Police Car
Ontario, Canada
Joined: February 04, 2008
KitMaker: 2,507 posts
AeroScale: 1,814 posts
Posted: Wednesday, August 08, 2012 - 11:02 AM UTC
Thanks Sean
I will give it a try!
" The Die Hards"
43rd MIDDLESEX REGIMENT
MACHINE GUN CORPS
XXX CORP
The most effective way to do it, is to do it.
- Amelia Earhart
Georgia, United States
Joined: August 08, 2011
KitMaker: 410 posts
AeroScale: 409 posts
Posted: Friday, August 10, 2012 - 09:07 AM UTC
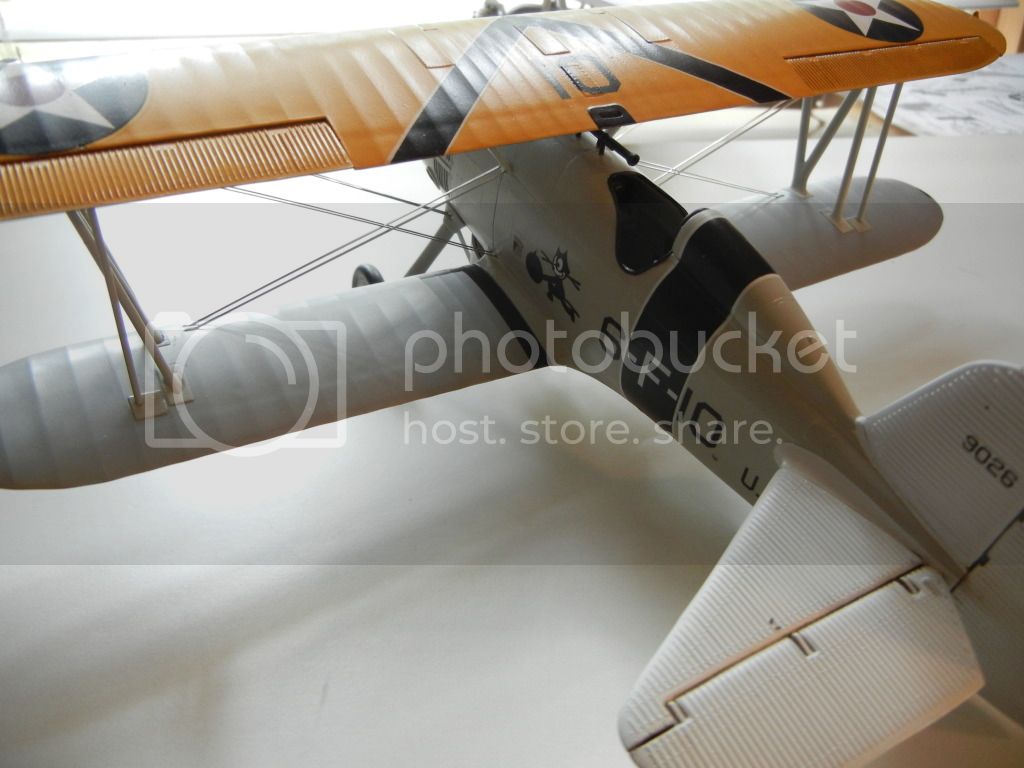
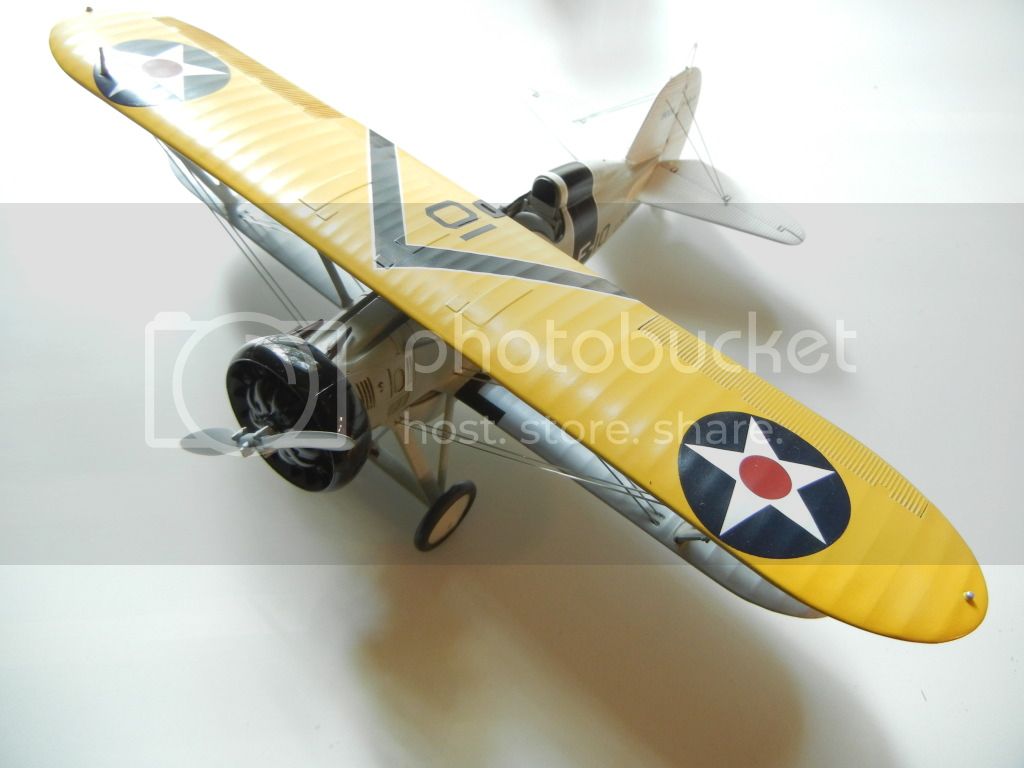
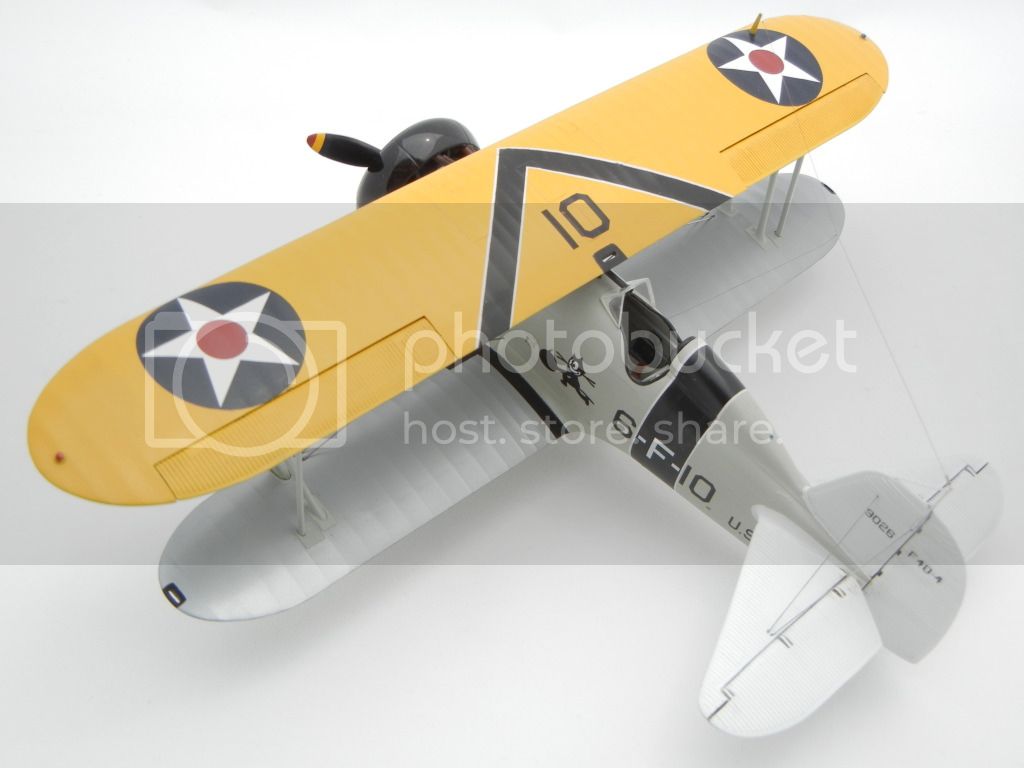
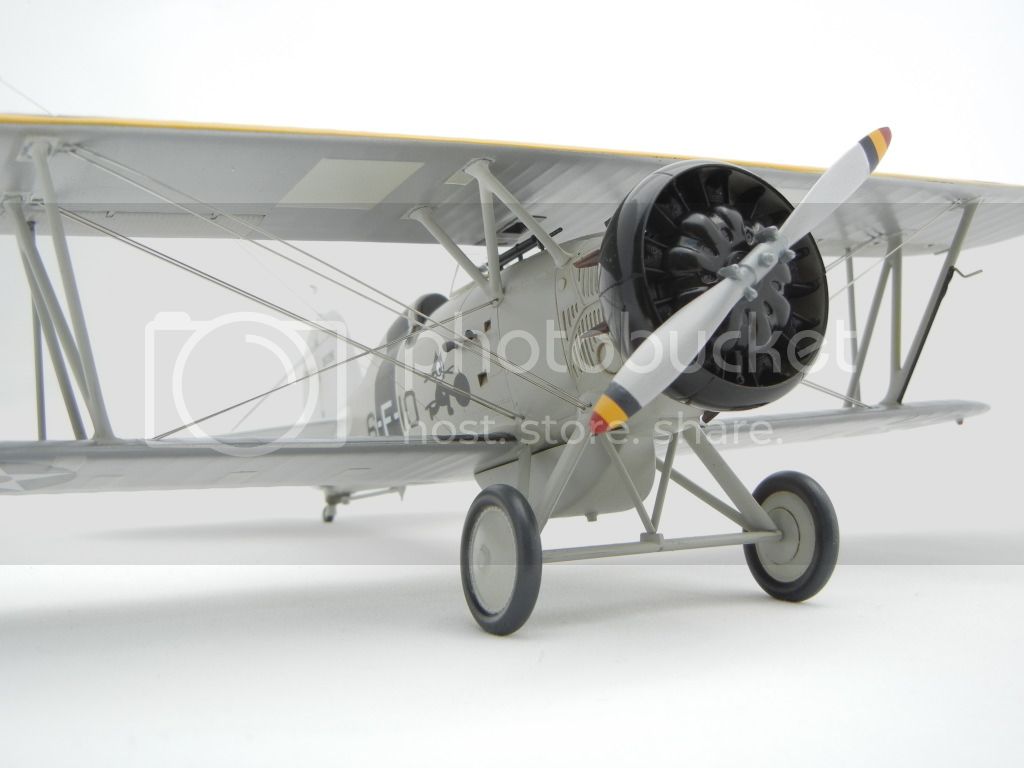
Update time, got back to where I was before the F4B was attacked by the window blind:
More in my
Build Blog Doug
Bayern, Germany
Joined: January 02, 2011
KitMaker: 279 posts
AeroScale: 239 posts
Posted: Saturday, August 11, 2012 - 02:03 AM UTC

!
I started to put the decals on:
Originally I planned to take the decals from an Xtradecals sheet that I had ordered from a shop in New York. But they broke into pieces when in contact with water. So I take the AirDoc decals (
RAF Germany Phantom Decals 1:48 )
I combine them with the stencils form the Revell sheet. There are quite a lot of decals, so it will take some time I think.
Regards,
Sebastian
LtCol Henry Blake: "Radar, whatever it is: sign it, cancel it or order five more!"
Ontario, Canada
Joined: November 14, 2009
KitMaker: 270 posts
AeroScale: 264 posts
Posted: Saturday, August 11, 2012 - 04:18 PM UTC
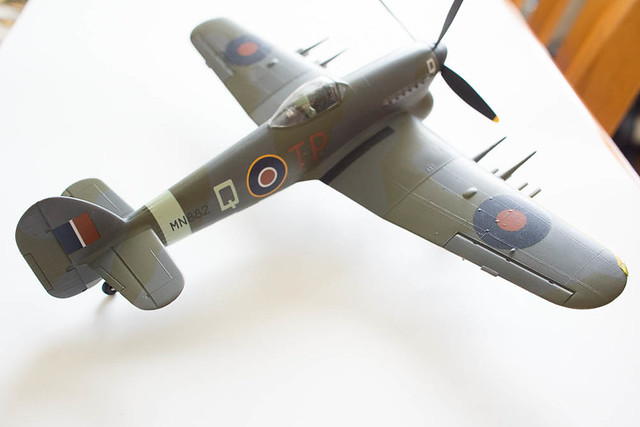
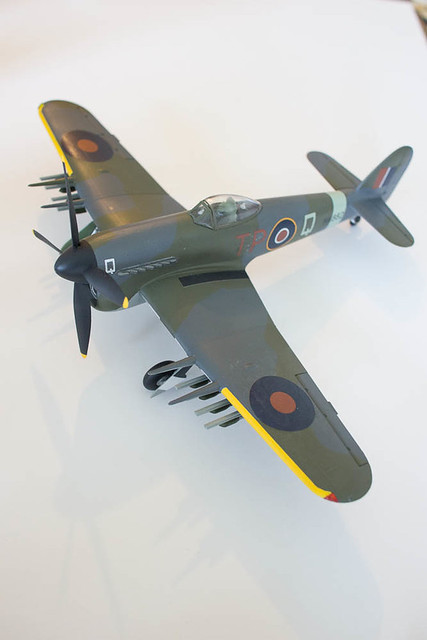
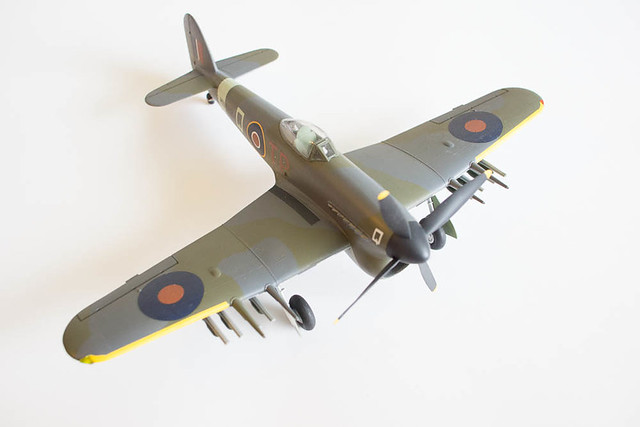
The Rafale B is back on the shelf due to an unfortunate glue joint failure, the main gear bays are currently detached.
But the build I originally entered got a kick in the paints. Been meaning to spray the DG for quite a while, finally got around to it today, and shot the leading edges too
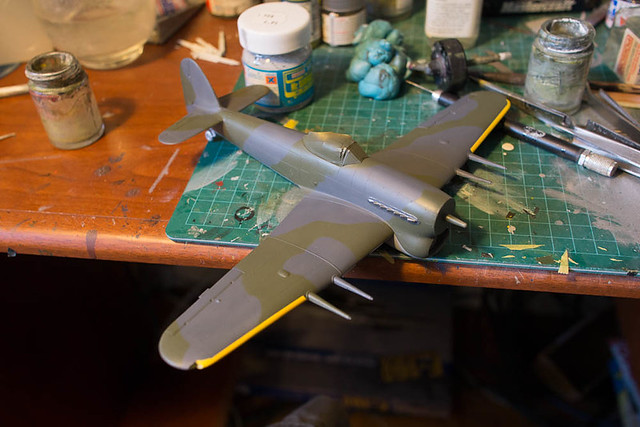 Monograom Hawker Typhoon 1b 1/48
 by
mawz_models, on Flickr
That prompted me to keep going and here she is, with the decals done as well
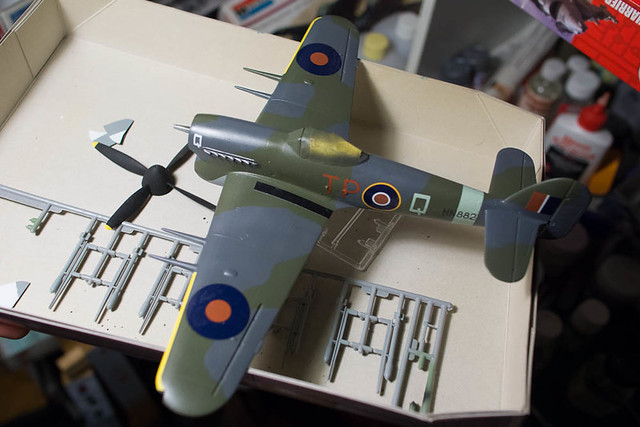 Monograom Hawker Typhoon 1b 1/48
 by
mawz_models, on Flickr
Finishing up the tires tomorrow, then it's just painting the rockets and final assembly.
Wisconsin, United States
Joined: September 11, 2009
KitMaker: 1,917 posts
AeroScale: 563 posts
Posted: Sunday, August 12, 2012 - 03:27 AM UTC
Richard's been quiet for a while. I hope I didn't steer him wrong!
Doug that looks great. Nice recovery.
Sebastian, the scheme you're piecing together looks great.
Adam, too bad about the Rafale, but nice looking Typhoon so far! A little more to go.
-Sean H

Current: model railroad layout
Stalled a while ago:
. 1950's Chrome, WW II Twins
Last completed: Police Car
Ontario, Canada
Joined: February 04, 2008
KitMaker: 2,507 posts
AeroScale: 1,814 posts
Posted: Sunday, August 12, 2012 - 03:52 AM UTC
Hi Sean
I am working on three campaigns at the same time

I will post photos soon!
" The Die Hards"
43rd MIDDLESEX REGIMENT
MACHINE GUN CORPS
XXX CORP
The most effective way to do it, is to do it.
- Amelia Earhart
Ontario, Canada
Joined: November 14, 2009
KitMaker: 270 posts
AeroScale: 264 posts
Posted: Sunday, August 12, 2012 - 08:06 AM UTC
British Columbia, Canada
Joined: September 03, 2009
KitMaker: 6,965 posts
AeroScale: 6,247 posts
Posted: Tuesday, August 14, 2012 - 05:44 PM UTC
Wow, what a beautifully clean Tiffie! Those are rare as hen's teeth

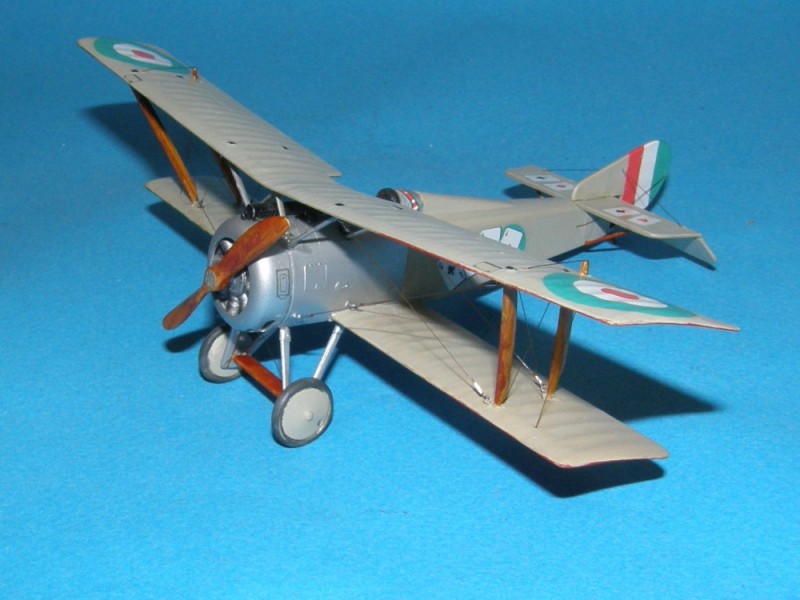
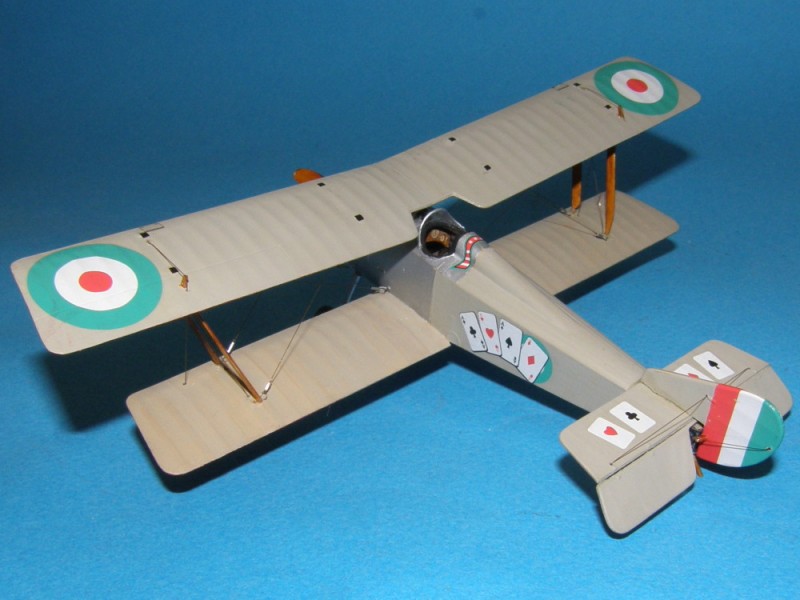
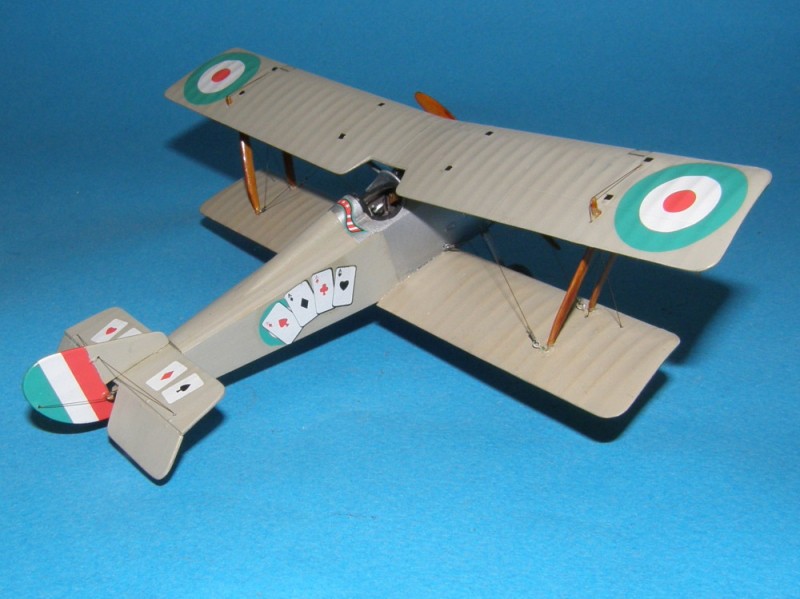
The Hanriot's nearly done. I just have to wait until the glue is fully cured on the control horns before I glue the control wires, and then go around the whole airplane with the touch-up paint and final little bits of finishing.
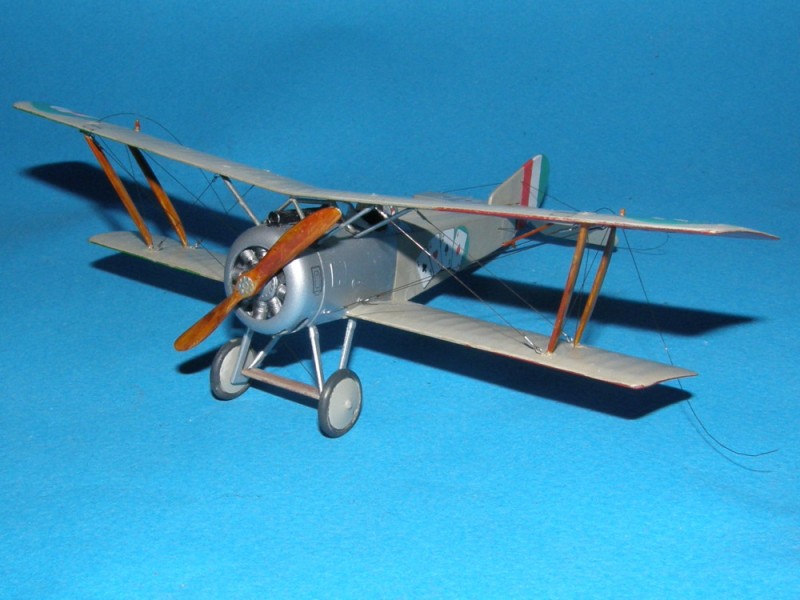
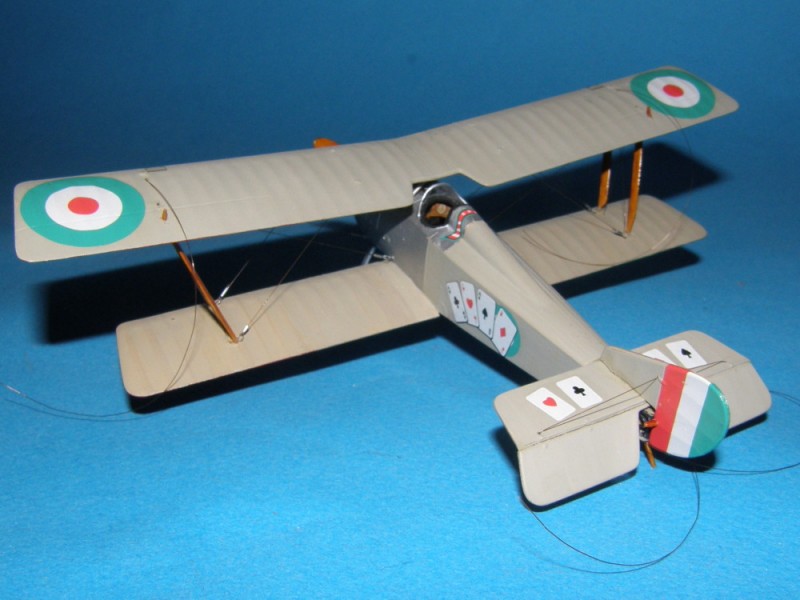
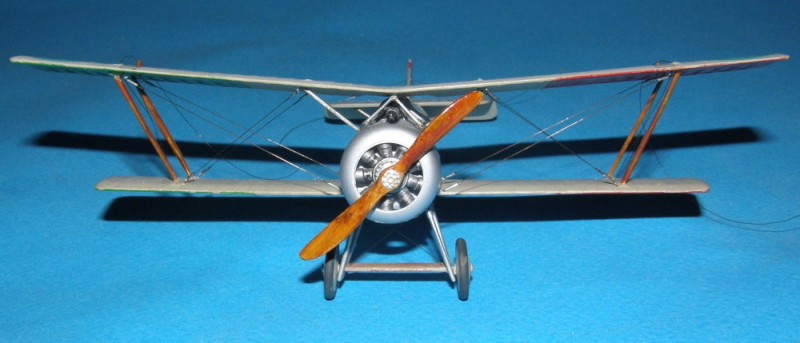
The interplane rigging was a tense, fiddly job. I'm glad it's over.
When once you have tasted flight you will walk the Earth with your eyes turned skyward.
For there you have been, and there you will always long to return.
-Leonardo Da Vinci
Ontario, Canada
Joined: February 04, 2008
KitMaker: 2,507 posts
AeroScale: 1,814 posts
Posted: Tuesday, August 14, 2012 - 11:14 PM UTC
Nice work on the rigging!
I am rigging my Southampton and as this is my first attempt it's two steps forward and one back!!
" The Die Hards"
43rd MIDDLESEX REGIMENT
MACHINE GUN CORPS
XXX CORP
The most effective way to do it, is to do it.
- Amelia Earhart
Georgia, United States
Joined: August 08, 2011
KitMaker: 410 posts
AeroScale: 409 posts
Posted: Wednesday, August 15, 2012 - 05:33 AM UTC
Nice rigging Jessica! I personally find it a relaxing, while at the same time it can get tense when something is not working as planned
Made a bit more progress, just a couple more things to take care of and this one will be a "Hanger Queen" no more
More info in my
Build Blog Doug
British Columbia, Canada
Joined: September 03, 2009
KitMaker: 6,965 posts
AeroScale: 6,247 posts
Posted: Wednesday, August 15, 2012 - 09:00 AM UTC
When once you have tasted flight you will walk the Earth with your eyes turned skyward.
For there you have been, and there you will always long to return.
-Leonardo Da Vinci
Wisconsin, United States
Joined: September 11, 2009
KitMaker: 1,917 posts
AeroScale: 563 posts
Posted: Wednesday, August 15, 2012 - 12:29 PM UTC
Doug, that's looking great.
Jessie, that's remarkable! The turnbuckles and wood grain details and out-of-ordinary decals all help add up to a real visual treat!
Current: model railroad layout
Stalled a while ago:
. 1950's Chrome, WW II Twins
Last completed: Police Car
Georgia, United States
Joined: August 08, 2011
KitMaker: 410 posts
AeroScale: 409 posts
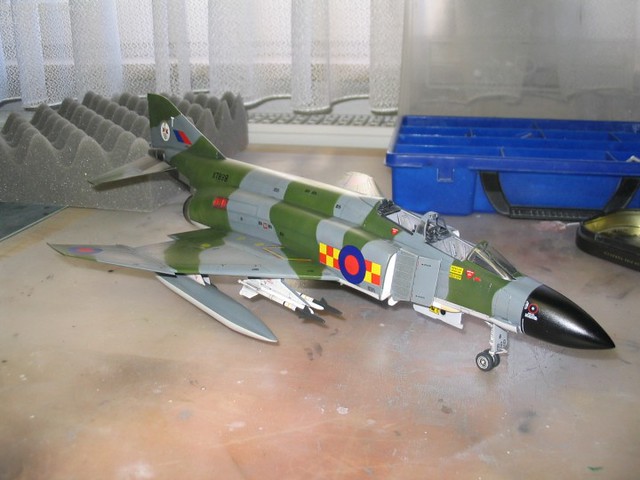
Posted: Thursday, August 16, 2012 - 05:54 AM UTC
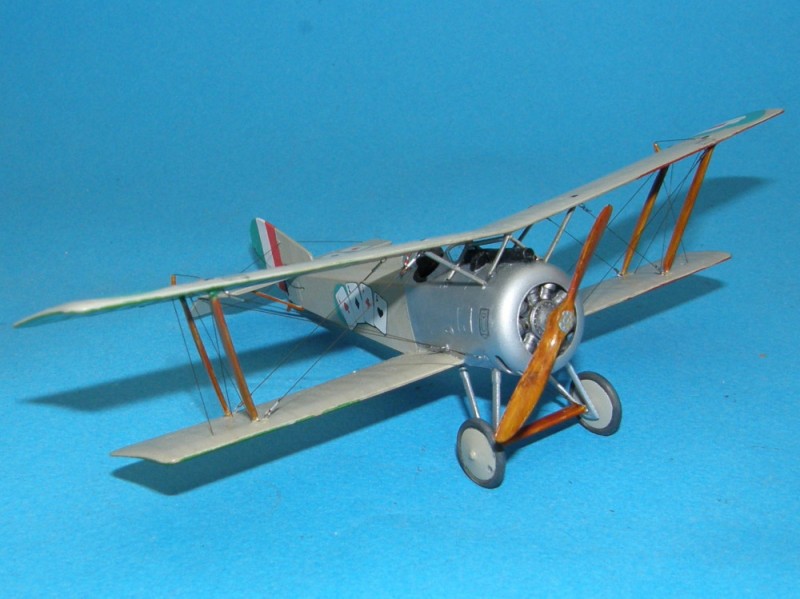
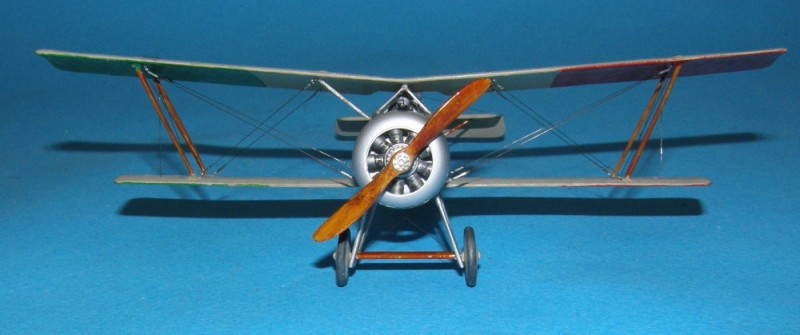
I am pleased to report that this one is finally done!
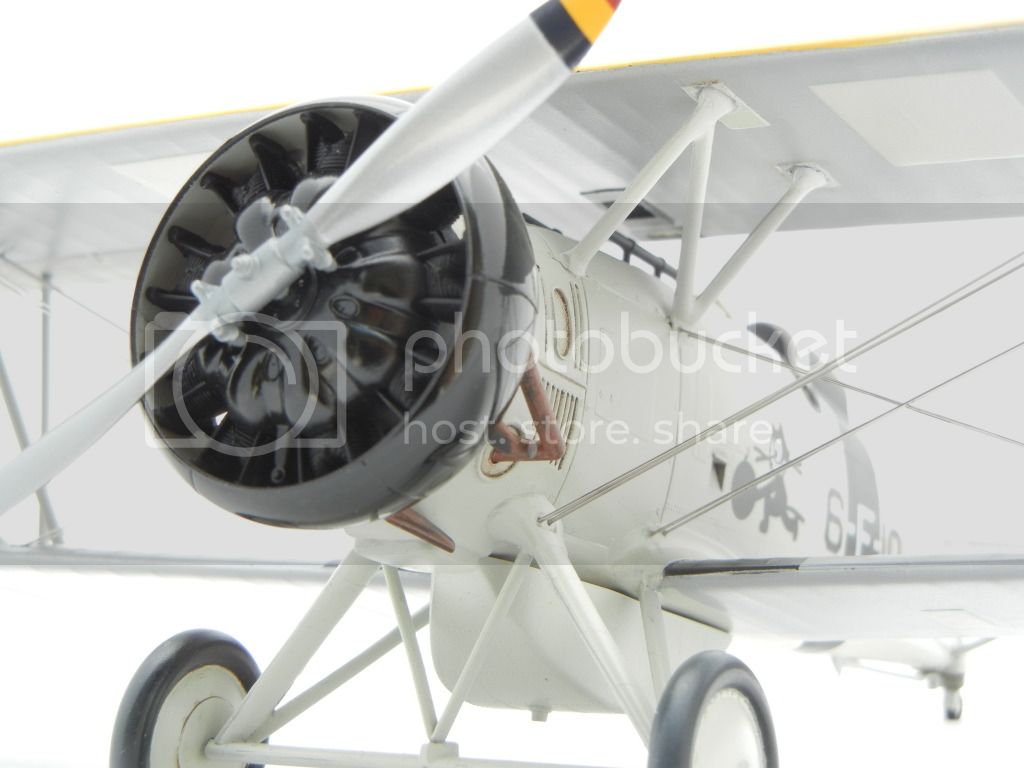
I'll post a couple more photos in the Gallery
Doug
British Columbia, Canada
Joined: September 03, 2009
KitMaker: 6,965 posts
AeroScale: 6,247 posts
Posted: Thursday, August 16, 2012 - 06:41 AM UTC
That's a really delightful model. It makes me want to dig mine out of the pile for Knights of the Sky III...

When once you have tasted flight you will walk the Earth with your eyes turned skyward.
For there you have been, and there you will always long to return.
-Leonardo Da Vinci
Utah, United States
Joined: May 27, 2003
KitMaker: 1,026 posts
AeroScale: 215 posts
Posted: Thursday, August 16, 2012 - 03:22 PM UTC
@Jessie- Your cable job looks great except it looks like you may have pulled the center wires too taught...the upper wing is a bit bent in the middle! 😄 But seriously, it came out really well, especially considering the angles of the struts and other hardware.
@Doug- Ditto on the F4B. And beautiful pics. What do you use for a studio?
@Adam- Double ditto on the good looking Typh.
Keith
Build 'em better than the box art!
Wisconsin, United States
Joined: September 11, 2009
KitMaker: 1,917 posts
AeroScale: 563 posts
Posted: Friday, August 17, 2012 - 12:20 AM UTC
Doug, I second Keith's comment-- beautiful photos of a beautiful build. Your plane looks flawless no matter how closely you look. (Mine you have to close one eye and look really fast for best effect.

) Remember to post in the gallery!
Everyone, the gallery is
here . So far campaign completers in the gallery are: 29Foxtrot, cinzano, Jclapp, Jessie_C, md72, MLD, and mykroft. If you don't see your name, and you think it should be there, speak up, and I'll double-check my list.
Plenty of time between now and the new year to pick an old hangar queen from the back of the stash and get her to the front of your display shelf! (Okay, I'm talking mostly to myself here.

I'll get mine started eventually...)
-Sean H.
Current: model railroad layout
Stalled a while ago:
. 1950's Chrome, WW II Twins
Last completed: Police Car
Bayern, Germany
Joined: January 02, 2011
KitMaker: 279 posts
AeroScale: 239 posts
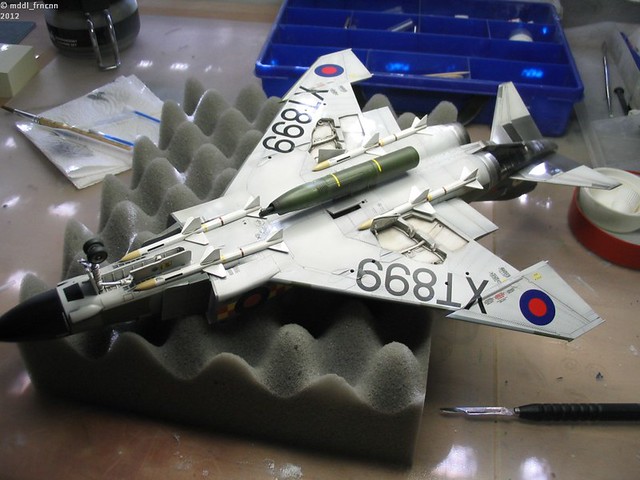
Posted: Sunday, August 19, 2012 - 01:01 AM UTC
Hi!
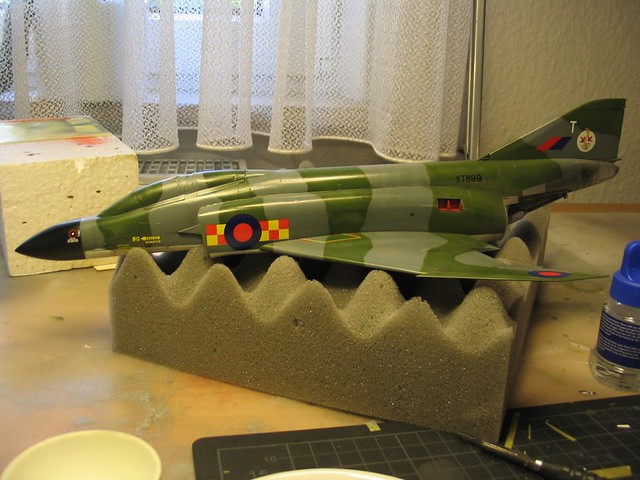
I have finished decaling my Phantom. After having sprayed on a coat of semi matte clear cote I started the final assembly.
My favourite glue for attaching already painted parts is UHU Plus Acrylit, a 2K glue. It does not cure immediately like CA so the parts are still movable a little bit. That makes it easier for example to bring the landing gear in place.
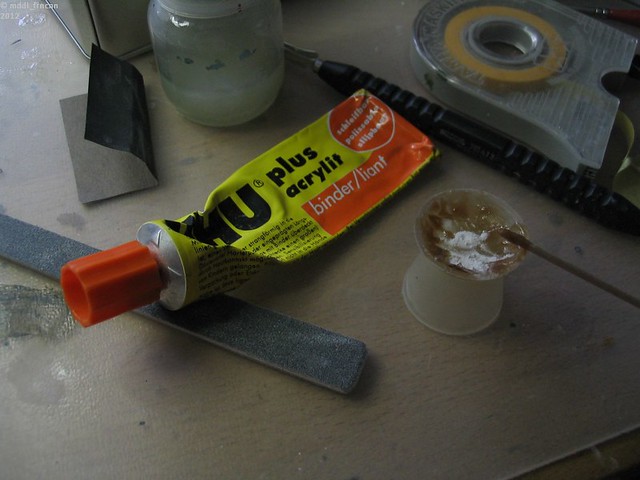
If it is appropiate I also use thin plastic cement and let a few drops on the parts already in place. But you have to be careful because it melts everything. A drop on the wrong place can not be removed without spoiling the surface. The 2K glue of UHU still can be removedd carfully if necessary.
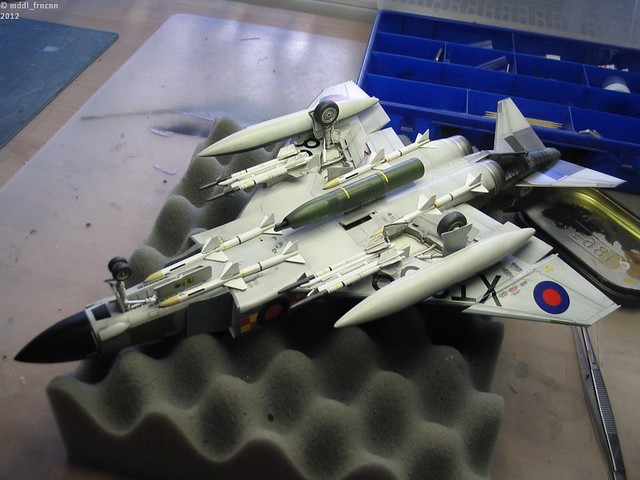
Ta-daaah!

Standing on its own feet the first time! And no tailsitter

!
The remaining parts will follow. I hope I can finish the Phantom today!
Regards,
Sebastian
LtCol Henry Blake: "Radar, whatever it is: sign it, cancel it or order five more!"

#042
England - North East, United Kingdom
Joined: November 18, 2006
KitMaker: 2,828 posts
AeroScale: 1,720 posts
Posted: Sunday, August 19, 2012 - 08:54 AM UTC
OK I'm In,
There's a bit of a story to my entry.... first the kit
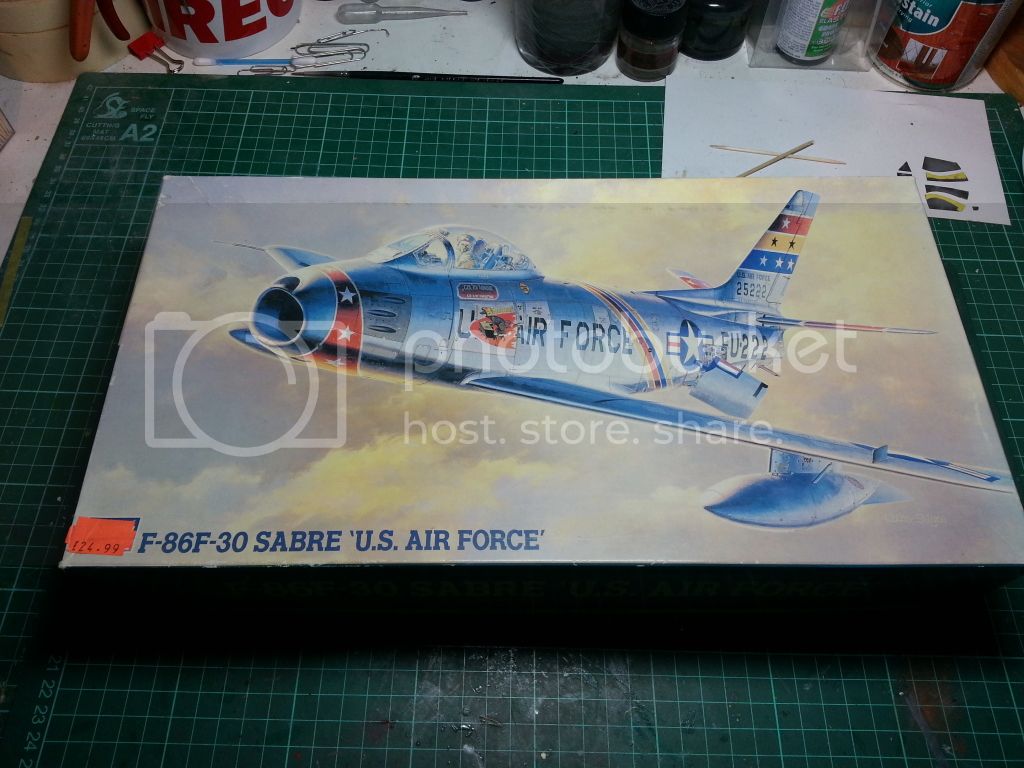
This kit was got as far as the decalling started and put top one side some 10 years ago I picked it up again a couple of years ago to find the decals had faded on one side. so i purchased some Cutting Edge AM decals, disassembled the kit as best I could and paint stripped the majority of parts. then the kit ended up back in the box until now.
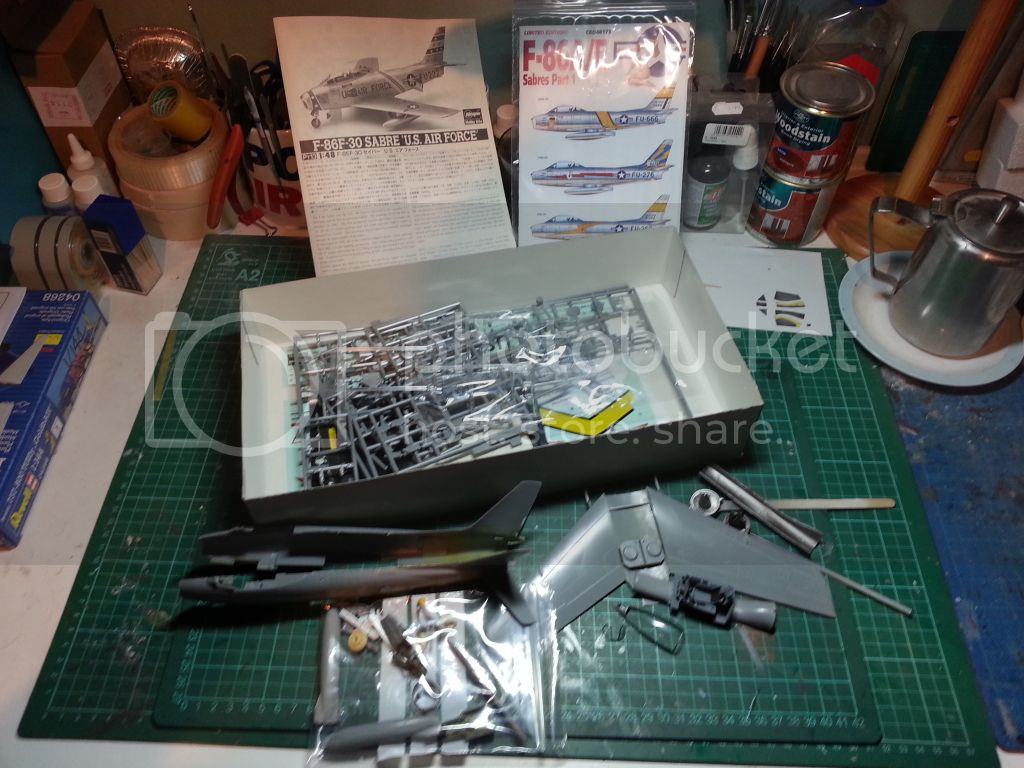
I have a week off work this week so hopefully I'll get some done between the redecorating of the Aeroscale Campaign HQ (aka my office)
Modellers Creed: This is my toolbox. There are many like it, but this one is mine. My toolbox is my best friend. It is my life. I must master it as I must master my life. My toolbox, without me, is useless. Without my toolbox, I am useless.
Wisconsin, United States
Joined: September 11, 2009
KitMaker: 1,917 posts
AeroScale: 563 posts
Posted: Sunday, August 19, 2012 - 12:16 PM UTC
Whoa, Sebastian! That's some fine work. Well done.
Allen! Welcome aboard. That's quite a tale of woe. Having an administrator lends credibility to the rest of us in the campaign!
-Sean H.
Current: model railroad layout
Stalled a while ago:
. 1950's Chrome, WW II Twins
Last completed: Police Car
#042
England - North East, United Kingdom
Joined: November 18, 2006
KitMaker: 2,828 posts
AeroScale: 1,720 posts
Posted: Tuesday, August 21, 2012 - 08:53 AM UTC
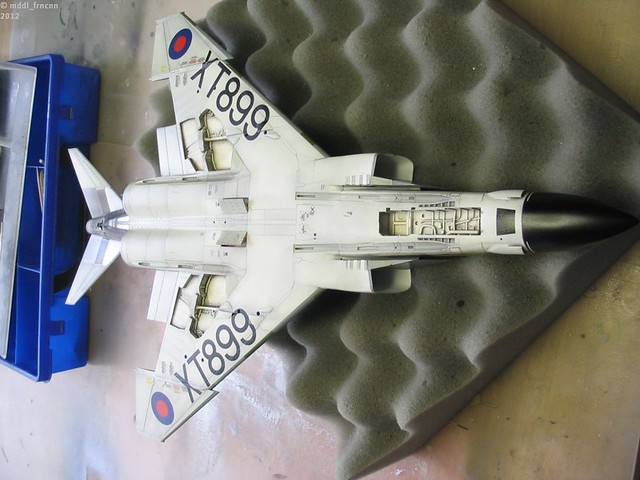
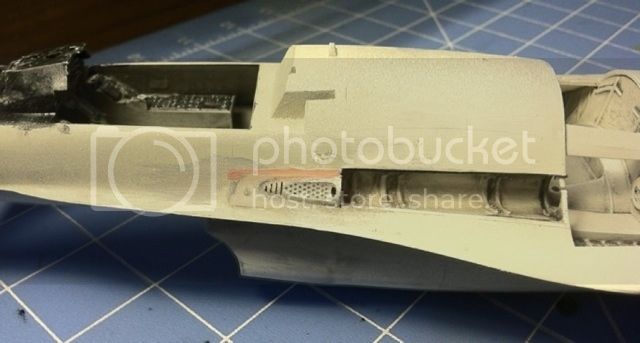
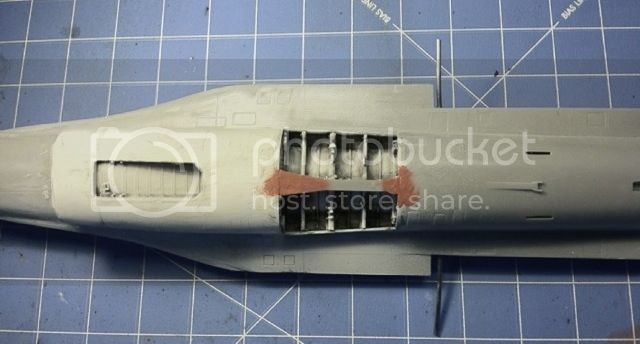
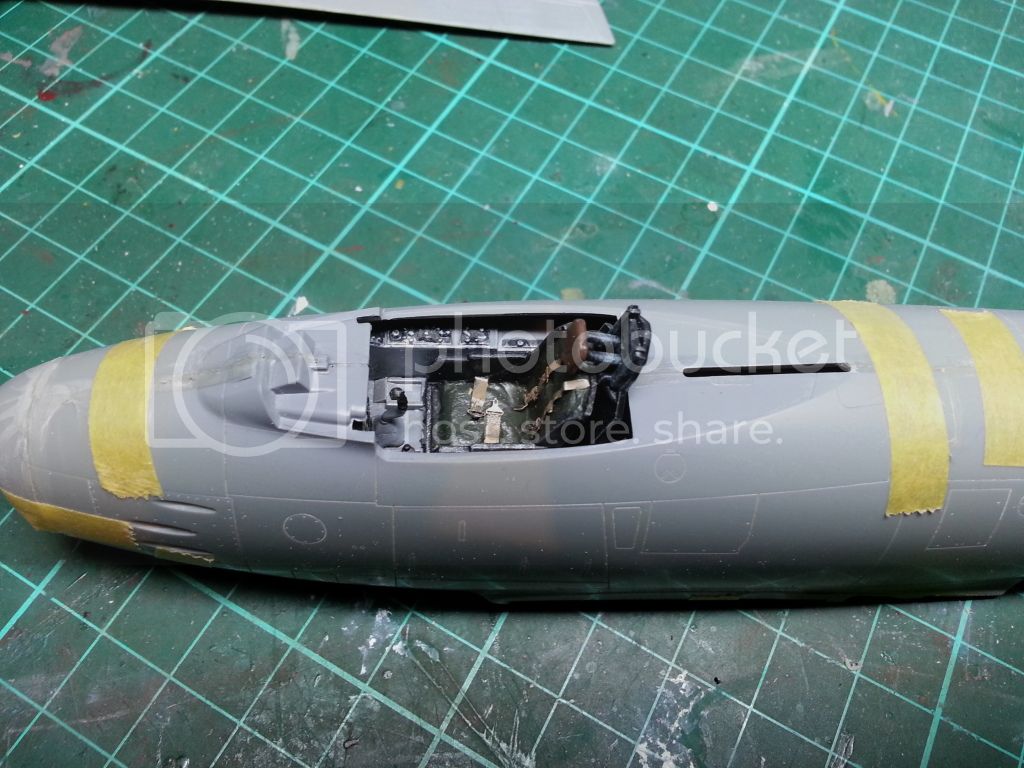
While waiting for the gloss paint to dry on the skirting boards in Campaign HQ I decided to have a crack at the sabre today.
First the exhaust and intakes were painted with Alclad paints and glued together

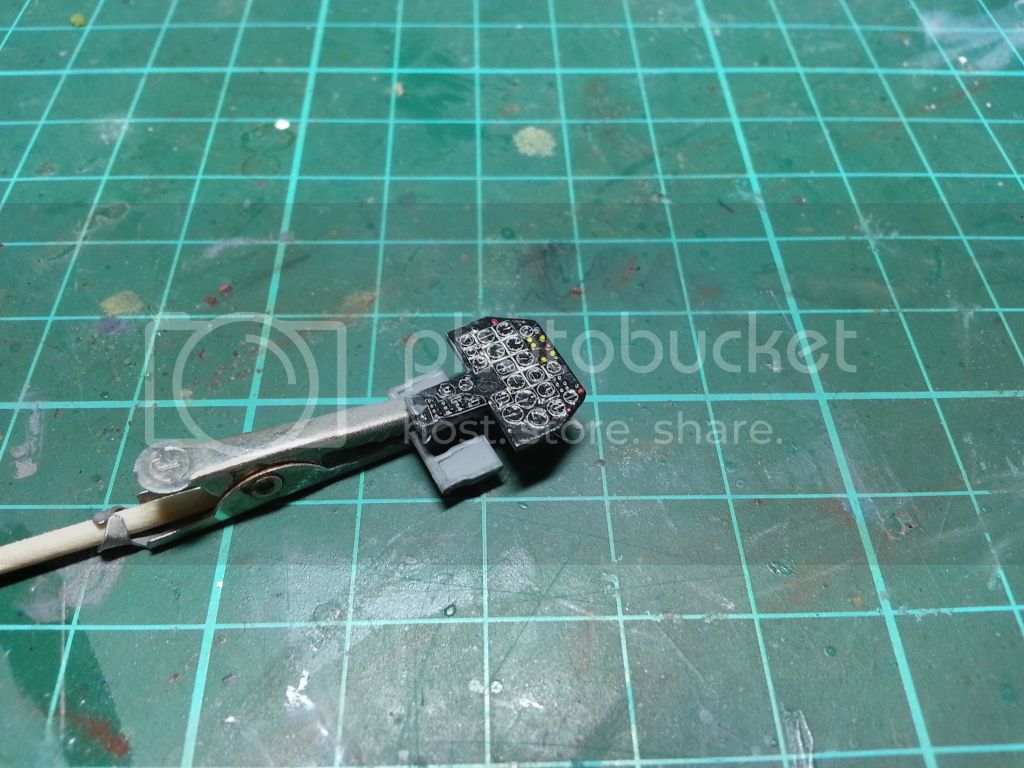
The cockpit was painted neutral greay and after looking at images of the seat online I decided to add some seat cushions out of milliput to give a little bit of interest in the cockpit
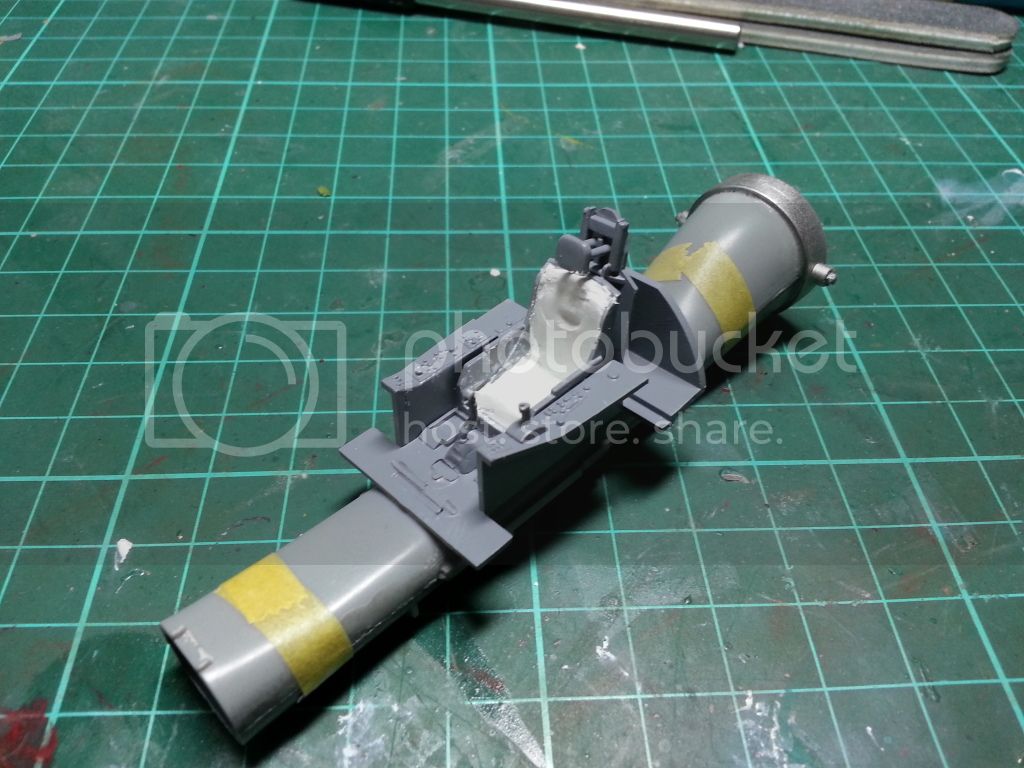
The decal was starting to peel of the instrument panel so some judicial application of Microsol solved that
Gear bays and air brake bays have been painted interior green and detail painting done as well.
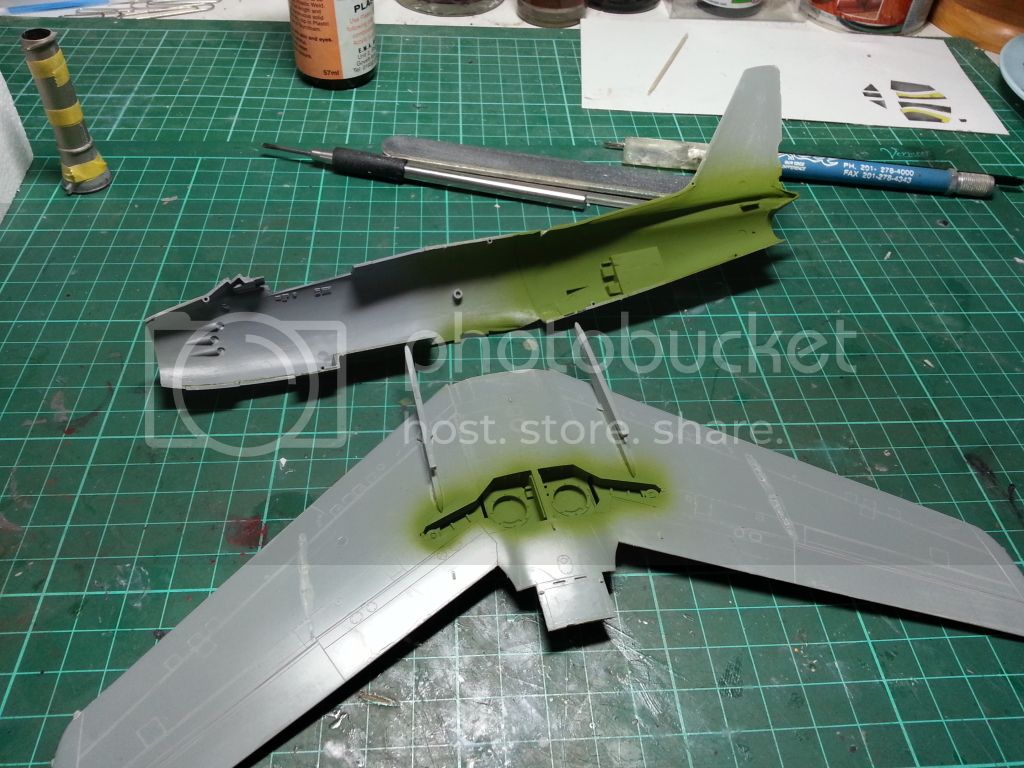
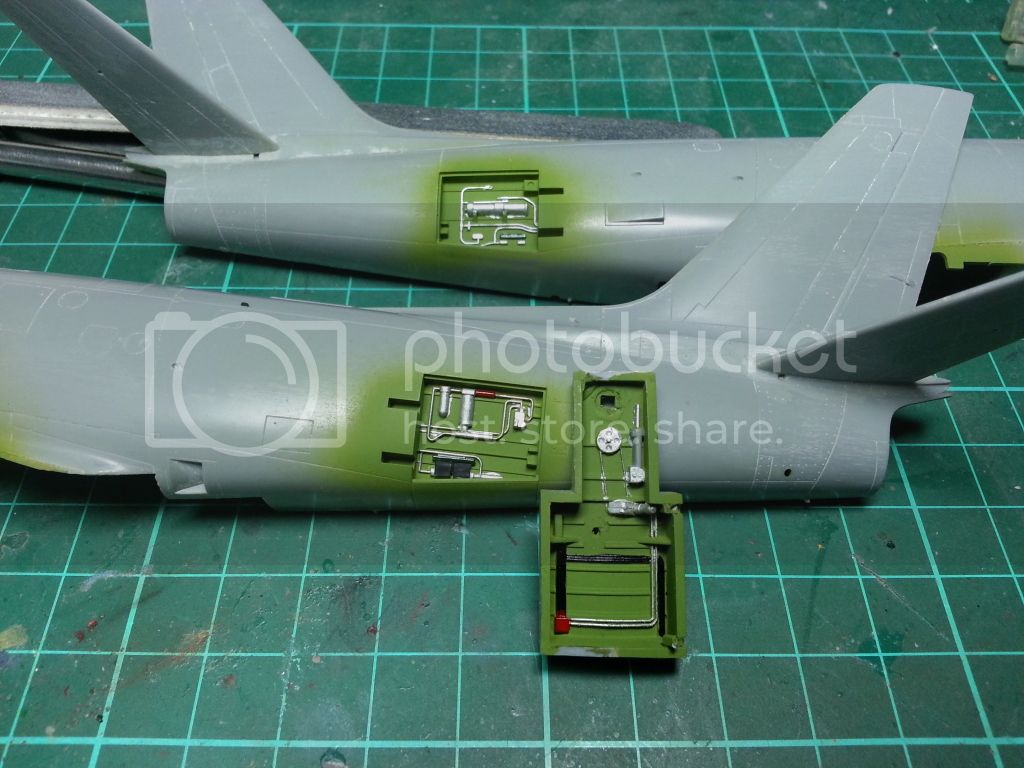
Finally for today the seat and cushion has been painted and some spare etch seatbelts added.

Next up will be a wash and highlights on the cockpit.
As always comments, suggestions and critique is welcomed
Modellers Creed: This is my toolbox. There are many like it, but this one is mine. My toolbox is my best friend. It is my life. I must master it as I must master my life. My toolbox, without me, is useless. Without my toolbox, I am useless.
Utah, United States
Joined: May 27, 2003
KitMaker: 1,026 posts
AeroScale: 215 posts
Posted: Tuesday, August 21, 2012 - 03:41 PM UTC
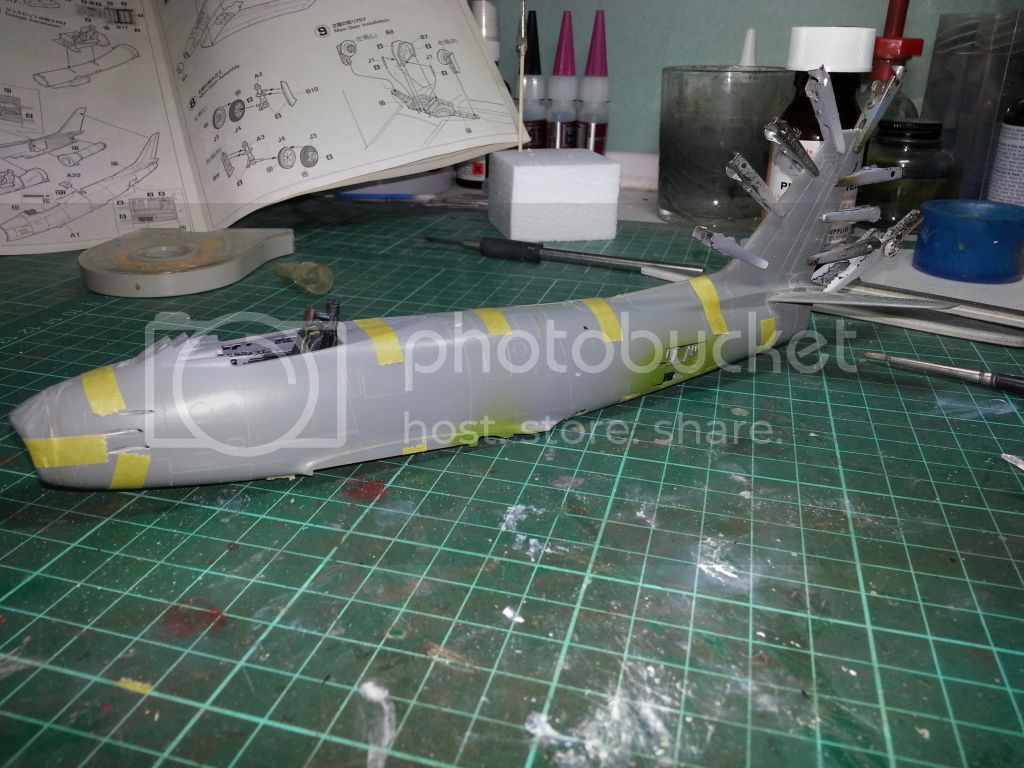
After being OBE by life, the universe, and everything the past few weeks I'm back to huffing paint and sniffing glue--with proper ventilation of course.
Puttying and sanding continues on the fuselage:
Not much, but it's a start. If all goes well I hope to have a coat of primer gray on it by early next week.
Keith
Build 'em better than the box art!
#042
England - North East, United Kingdom
Joined: November 18, 2006
KitMaker: 2,828 posts
AeroScale: 1,720 posts
Posted: Thursday, August 23, 2012 - 10:08 AM UTC
Quick update while waiting for more paint to dry in Campaign HQ I got a little more done to the Sabre.
Basically the cockpit is finished for now and the fuselage is buttoned up.
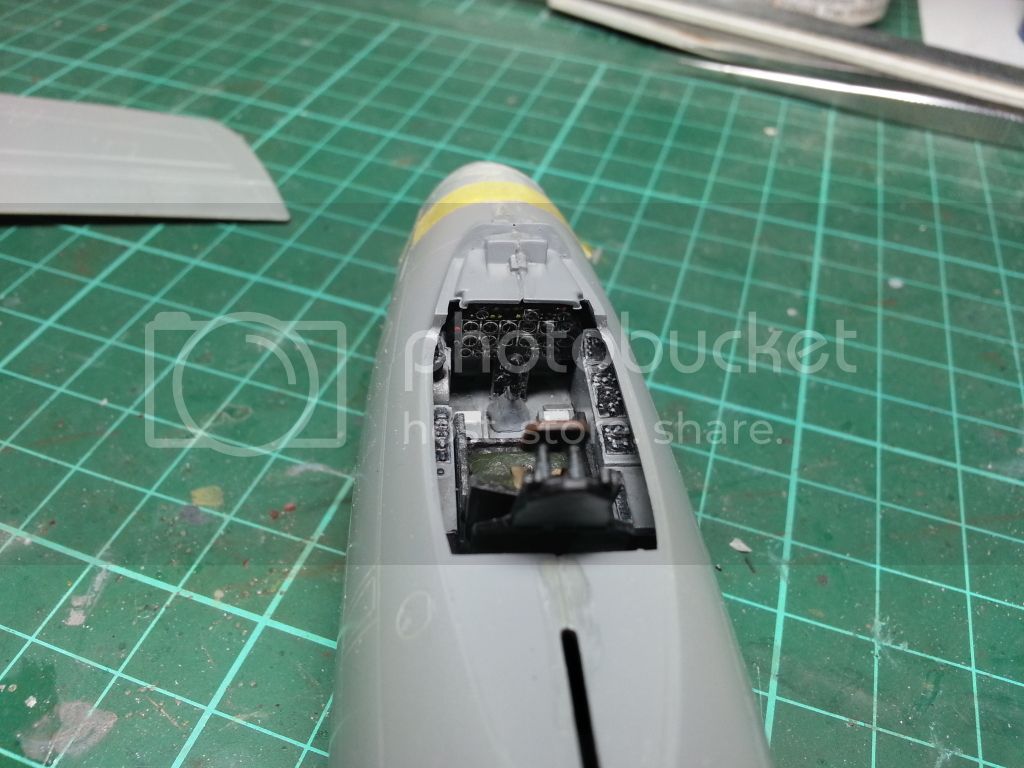
Next up is seem cleaning and re-attaching the wings.
Modellers Creed: This is my toolbox. There are many like it, but this one is mine. My toolbox is my best friend. It is my life. I must master it as I must master my life. My toolbox, without me, is useless. Without my toolbox, I am useless.
Tennessee, United States
Joined: September 20, 2005
KitMaker: 1,747 posts
AeroScale: 1,673 posts
Posted: Thursday, August 23, 2012 - 10:21 AM UTC
Sebastian, that Phantom looks awesome! Great work there. Jessica, a very neat little bi plane. Doug, I'm glad that the window blind didn't consume your airplane model! Everyone is doing quite well, really enjoy looking at the work. Russell
P.S. Adam, the Typhoon is a great looking bird too!
To Thine Own Self Be True
Siderius
A.K.A., RTA