OFFICIAL: Hangar Queen 2 Campaign
Texas, United States
Joined: February 22, 2008
KitMaker: 5,026 posts
AeroScale: 2,811 posts
Posted: Thursday, September 13, 2012 - 05:35 PM UTC
If it aint broke dont fix it.
Utah, United States
Joined: May 27, 2003
KitMaker: 1,026 posts
AeroScale: 215 posts
Posted: Friday, September 14, 2012 - 08:40 AM UTC
Bob R.,
Your Piper is quite the build. At first I thought it was really shiny, like it was covered in a silver doped cloth. Or a rendition of a silver doped cloth. Then I realized that the fuselage was molded in...clear!? Interesting, intriguing, and cool.
Another baffling build of which I can't wait to see the outcome.
Keith
Build 'em better than the box art!
Removed by original poster on 09/15/12 - 02:35:05 (GMT).
Texas, United States
Joined: February 22, 2008
KitMaker: 5,026 posts
AeroScale: 2,811 posts
Posted: Friday, September 14, 2012 - 02:34 PM UTC
@ Keith: the clear fuselage at first was a pain, but it does make the windscreen installation much easier just tape and paint. I had to setup a new media account at Snipfish since my Photobucket account would not work all day. I hope the photos post so here goes and if the photos do post this is after using my A/B after having it instorage in almost a year. I had some problems with not having cleaned the gun well enough when it was packed away.


Bob
If it aint broke dont fix it.
Utah, United States
Joined: May 27, 2003
KitMaker: 1,026 posts
AeroScale: 215 posts
Posted: Friday, September 14, 2012 - 04:36 PM UTC
Quoted Text
@ Keith: the clear fuselage at first was a pain, but it does make the windscreen installation much easier just tape and paint. I had to setup a new media account at Snipfish since my Photobucket account would not work all day. I hope the photos post so here goes and if the photos do post this is after using my A/B after having it instorage in almost a year. I had some problems with not having cleaned the gun well enough when it was packed away.
Bob
In a way a clear fuselage makes sense. I'd say at least 90% of all builders paint their kits anyway, so why mess with installing clear windows/windscreens when all you have to do is mask away?! This might also force many of the youngsters to start painting earlier in their model building careers.
OD Green! It looks like your airbrush is no worse for wear after being in storage and it is working just fine. Looking forward to the next step.
Keith
Build 'em better than the box art!
Texas, United States
Joined: February 22, 2008
KitMaker: 5,026 posts
AeroScale: 2,811 posts
Posted: Sunday, September 16, 2012 - 03:44 PM UTC
Down to the wire:
Pledge, Decals, wheels, exhaust.


Next will be another coat of Pledge then some pin wash and finally a coat of flat. The prop will be the last piece to attach.
Bob
If it aint broke dont fix it.
Cordoba, Argentina
Joined: January 27, 2011
KitMaker: 268 posts
AeroScale: 264 posts
Posted: Tuesday, September 18, 2012 - 10:24 AM UTC
Hello,
Here I have some small items, dealing with the finnish look... I saprys some blue over the Drop...

Finnish the Prop...

And the Engine, preserved but never shared, from a coeple of week ago...

See you soon, it's time for dinner...

Wisconsin, United States
Joined: September 11, 2009
KitMaker: 1,917 posts
AeroScale: 563 posts
Posted: Wednesday, September 19, 2012 - 04:08 AM UTC
Bob and Diego,
Excellent work! That's the stuff we like to see here. A big thanks for sharing!
-Sean H.
Current: model railroad layout
Stalled a while ago:
. 1950's Chrome, WW II Twins
Last completed: Police Car
Texas, United States
Joined: February 22, 2008
KitMaker: 5,026 posts
AeroScale: 2,811 posts
Posted: Wednesday, September 19, 2012 - 11:56 AM UTC
I am calling it finished:
Piper J3/L4


I will post a photo to the gallery as soon as I can remember how, it has been a whil.
Bob
If it aint broke dont fix it.

#439
Washington, United States
Joined: November 05, 2005
KitMaker: 4,950 posts
AeroScale: 3,192 posts
Posted: Wednesday, September 19, 2012 - 03:28 PM UTC
Looks good Bob. Guess you're getting back into it.
Hanger Queens in Waiting:
Monogram 1/72 F8F-1
Corsair the Sky Pirate - 1/72 Ace A-7D
Century Series - Airfix 1/72 F-105G
Anti Shipping - Academy 1/72 PBJ-1D
Academy 1/72 F-84E
Cordoba, Argentina
Joined: January 27, 2011
KitMaker: 268 posts
AeroScale: 264 posts
Posted: Saturday, September 22, 2012 - 02:07 AM UTC
Yes, It's a cool Piper; Bob...

Congrats..!!!!

Diego
Victoria, Australia
Joined: September 19, 2003
KitMaker: 708 posts
AeroScale: 674 posts
Posted: Sunday, September 23, 2012 - 03:04 PM UTC
Hi All.
Bob.
Great looking Piper you finished.
I'm still waiting on my local to get me the paint masks for the Catalina, as I have built both the 'Black' and 'Green Cat's' as RAAF subjects. The pic is a close up of the Universal Carrier that I added under the main wing section, for a little added realism.

President:- Southern Model Club.
Those who never learn from history will always repeat it.
"When you go home tell them of us and say.
For your tomorrow we gave our today."
New South Wales, Australia
Joined: January 27, 2006
KitMaker: 251 posts
AeroScale: 179 posts
Posted: Sunday, September 30, 2012 - 12:42 PM UTC
Hi all
Joining in late, after very, very average start to this year which killed most of my motivation.
I'll have to spend some time going back through the thread and catching up on all the finished builds.
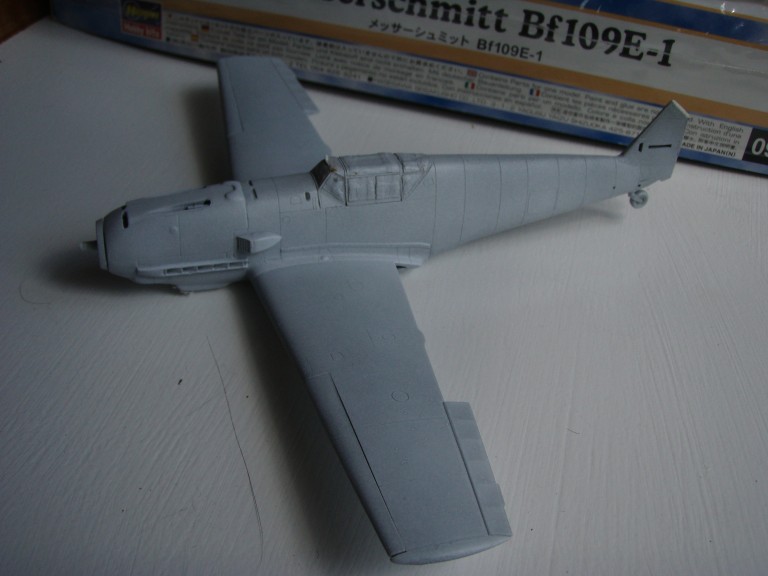
My entry will be the 1/48 Hasegawa BF109E-1 OOB, except the repositioning of the rudder (which is what stopped its progress in the first instance.)
Cheers
Damian

"Life is a big canvas. Throw all the paint you can at it."
- Br Mac (Br Vivial Justus Macdonald)
Texas, United States
Joined: February 22, 2008
KitMaker: 5,026 posts
AeroScale: 2,811 posts
Posted: Sunday, September 30, 2012 - 02:21 PM UTC
If it aint broke dont fix it.
#439
Washington, United States
Joined: November 05, 2005
KitMaker: 4,950 posts
AeroScale: 3,192 posts
Posted: Sunday, September 30, 2012 - 03:43 PM UTC
Hey Bob, I haven't forgotten, found the Otaki / Arii P-47 instructions.
Hanger Queens in Waiting:
Monogram 1/72 F8F-1
Corsair the Sky Pirate - 1/72 Ace A-7D
Century Series - Airfix 1/72 F-105G
Anti Shipping - Academy 1/72 PBJ-1D
Academy 1/72 F-84E
Tennessee, United States
Joined: September 20, 2005
KitMaker: 1,747 posts
AeroScale: 1,673 posts
Posted: Monday, October 01, 2012 - 10:15 AM UTC
Bob, your desert 109 looks sharp! Good work there, looking forward to getting to see a finished product. Russell
To Thine Own Self Be True
Siderius
A.K.A., RTA
New South Wales, Australia
Joined: January 27, 2006
KitMaker: 251 posts
AeroScale: 179 posts
Posted: Monday, October 08, 2012 - 10:49 PM UTC
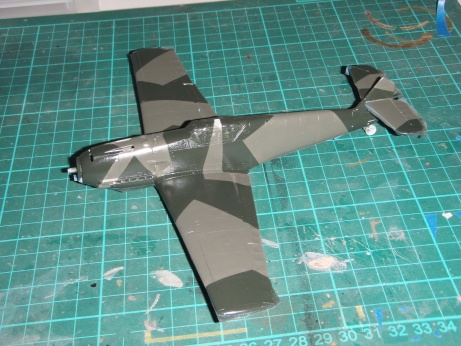
After a very long weekend due to illness for which I was told to rest I managed to get some colour on my 109
A quick in progress shot. Forgive the quality, I'm using a happy snaps type camera.
Cheers
Damian
"Life is a big canvas. Throw all the paint you can at it."
- Br Mac (Br Vivial Justus Macdonald)
Wisconsin, United States
Joined: September 11, 2009
KitMaker: 1,917 posts
AeroScale: 563 posts
Posted: Tuesday, October 09, 2012 - 01:39 AM UTC
Damian and Bob, cool new crop of Bf109's here. Excellent paint work.
Bob, no, the photos don't show any blemishes in your edge lines-- they look crisp and perfect to me! I like seeing how this is turning out. I hope the P-47D gets back on track too.

Damian, welcome aboard. I've got you and your 109 on my campaign tracking list. You seem to have a good handle on it. Keep up the great work.
thanks, all!
-Sean

Current: model railroad layout
Stalled a while ago:
. 1950's Chrome, WW II Twins
Last completed: Police Car
Texas, United States
Joined: February 22, 2008
KitMaker: 5,026 posts
AeroScale: 2,811 posts
Posted: Tuesday, October 09, 2012 - 01:59 AM UTC
@ Damian: nice splinter effect, how was tape to remove, what type did you use, and how was the kit to build. I have never been one for 109s but after this kit I may build more and give the mottle camo a try.
@ Sean: if I can find the decals for the P-47 or find some under $2.00 USD I will finish this big bird

or just put it up for another (8) years
Bob
If it aint broke dont fix it.
New South Wales, Australia
Joined: January 27, 2006
KitMaker: 251 posts
AeroScale: 179 posts
Posted: Tuesday, October 09, 2012 - 10:32 PM UTC
Quoted Text
@ Damian: nice splinter effect, how was tape to remove, what type did you use, and how was the kit to build. I have never been one for 109s but after this kit I may build more and give the mottle camo a try.
@Rob - Thanks for the comments. I use painter's tape for masking, the "for delicate surfaces" type. I also tend to make it even less tacky by applying it to my jeans briefly before applying it to the model. Not the most techincal solution but hey it works! The only time I've had problems with paint lifting is when I've used enamel metallics as a base for acrylics.
The kit went together well, the cockpit's pretty basic. Also the Hasegawa 109E-1 kit is actually a 109E-3 kit so you have to remove the underwing bulge. If you want to do a mottle camo then you may as well avoid the hassle of the kit surgery to make the Hasegawa E-1 and go E-3 and upwards ...or there's the Tamiya E-4/7 Trop with the North Africa mottle scheme; might look nice next to your Airfix F?
I made the kit a little harder by separating the rudder and then making the rookie mistake of not removing as much plastic from the kit as I added in styrene to round off the rudder ends. As a result the rudder doesn't quite fit but I am hoping this will be unnoticeable when positioned off-centre (fingers crossed)
Cheers
Damian
"Life is a big canvas. Throw all the paint you can at it."
- Br Mac (Br Vivial Justus Macdonald)
New South Wales, Australia
Joined: January 27, 2006
KitMaker: 251 posts
AeroScale: 179 posts
Posted: Wednesday, October 10, 2012 - 08:08 PM UTC
Oh and thanks Sean for the welcome and the comments.
D.
"Life is a big canvas. Throw all the paint you can at it."
- Br Mac (Br Vivial Justus Macdonald)
Texas, United States
Joined: February 22, 2008
KitMaker: 5,026 posts
AeroScale: 2,811 posts
Posted: Thursday, October 11, 2012 - 03:56 AM UTC
@ Damian: I think that I remember the trick with the jeans and tape, but forgot it until you mentioned the process, Thanks for the information on the kit E1 and E3, if I remember that when I purchase a Hasegawa kit. I wanted not to use the scheme on my F but, the kit decals dictated it. I was looking forward to painting an upper of sand or mottle not this split blue/sand, but it is growing on me.
Bob
If it aint broke dont fix it.
Cordoba, Argentina
Joined: January 27, 2011
KitMaker: 268 posts
AeroScale: 264 posts
Posted: Friday, October 12, 2012 - 12:00 PM UTC
Hi,
Small Update:
Saturation process...


A Wing it's done...


And the Fuselage...


It needs some works, Corections & Touchs ups, but I'm really happy whit this Blue Bird...!!!!

Thanks
Bye

Wisconsin, United States
Joined: September 11, 2009
KitMaker: 1,917 posts
AeroScale: 563 posts
Posted: Friday, October 12, 2012 - 02:50 PM UTC
Diego, I'm happy with your blue bird too! Really nice undertones. Thanks for sharing your painting jig idea too. Well done!
-Sean.
Current: model railroad layout
Stalled a while ago:
. 1950's Chrome, WW II Twins
Last completed: Police Car
Cordoba, Argentina
Joined: January 27, 2011
KitMaker: 268 posts
AeroScale: 264 posts
Posted: Saturday, October 13, 2012 - 04:34 AM UTC
Hello Sean,
Thanks, Thanks you...
I must lets you know obout the Paint Jig Device... It's not MY idea, I take it from an intresting webb site in Spain, Model 34...
It's a cool pleace from Madird Asociation of Modelers, How teach a lot for the Spanish Speakers...
Any Way, Thanks for your words, and Thanks to Model 34 people for the original idea too..
See You Soon


