1⁄32Song of the Swallow
2
Comments
STEP 22-24 Fuselage Interior and Assembly
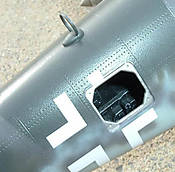
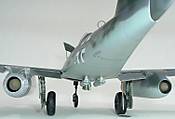
Twenty-two pieces make up the oxygen system, radios and avionics. These can be seen through the separate fuselage access panel. Check your references as these radios have more color upon them than I knew of when I built them. The mounting panel is indicated as RLM02, but I read somewhere they were actually a zinc chromate yellow. Then a site member with a ME-262 book told me many were made of wood. I believe the nice fresh wood color is mistaken for the yellow primer the other source cited, as I am not aware of the Luftwaffe using yellow or green zinc chromates. This main avionics panel mounts easily onto one side of the fuselage. However, the oxygen system and compass affix into the same side but also have to fit into slots on the other half. Tricky. The instructions show the oxygen system as yellow, but I believe the Luftwaffe used light blue. Two unidentified bottle parts (E25 and E28) fit on the fuselage next to the cockpit tub. Plenty of piping options here, as well as wiring E26, the electrical bus on the other fuselage half. The instructions show the fuselage interior RLM 02. I read the Germans were using an electro-treated aluminum on some -262’s, which negated the need to prime the interior airframe skinning. This treatment produced a goldish cast, described like the inside of a soup can, though the ribs and stringers were RLM 02. Now join the fuselage halves. Remember, parts E11, compass base (said to be varnished, unpainted wood) and E12, oxygen spheres mount, fit in slots on both fuselage halves. Align carefully. The cockpit assembly and gun bay/nose gear structure fit into both sides of the fuselage via large tabs and slots. Very sturdy, and my fit was so tight that I did not use glue. This does hold the fuselage halves together for easy of gluing, at least from the cockpit forward. However, you may have to squeeze the fuselage halves together to get a good tight seam. Notice that along the bottom-side of the fuselage are raised mold lines. A word of caution. Check and double-check the dry-fit of these halves along these interior structures. The fore and mid gun bay bulkheads (parts D22 and D35) form ledges for C8, the gun bay top cover to rest upon. Mine did not fit smooth and tight because of my slight misalignment of the bulkheads. Parts D1 and D22 hold the gun access covers C6 & 7. Though these covers do not fit flush with the fuselage if you install the ammo feeds to the Mk-108s, they should if you leave those parts off--unless you slightly misalign them, too. I suspect that if you shave the detail from the inner covers, that they will fit snuggly even over the ammo feeds. Pay close attention to the alignment of parts A37 and D34, the cockpit fore and aft bulkheads. The front one may be essential for the proper form of the fuselage bottom to mate smoothly with the front of the bottom wing. More about that soon. Learning from Pixilator, et al, I aligned and glued the fuselage in isolated segments, letting each dry before gluing the next segment. The fuselage went together tight with nary a seam line in all but a few small spots. However, despite all of my tricks, the turtleback portion of the rear cockpit did not align smoothly, leaving a step there that can cause trouble setting the rear canopy. The very tip of the nose is also slightly off in the alignment of the fine recessed panel lines. The bottom of the rear fuselage has more of a seam than I would ordinarily allow, but the photo I found of that area of the airframe shows such a lap in the skin. This is a good time to address some aspects of the kit in regards to handling, modeling techniques and philosophy. This model has very fine, beautifully molded rivet and screw and bolt detail as well as its fine panel lines. The components of the ME-262, like the Bf-109, were intended to have a layer of putty to smooth the joints for better airflow. An Schwalbe finished to factory specifications should be devoid of any panel lines, except around moving or removable parts. The realities were that many were built hastily, with dwindling materials, often by slave labor. A ME-262 fan related a story that one of the quality control engineers alerted the boss to the poor state of finish of many (One report is of an empennage wedged onto the fuselage crooked, blended with putty, and sent to a unit!), and was sacked! I primed the entire plane with high-build gap-filling auto primer, which, surprisingly, did not obscure that wonderful surface detail. However, after poring over photos of operational ME-262s, I noticed the real deal has some definite and obvious gaps and panel lines here and there: around the gun access covers, along the UPPER half of the top gun cover (part C-8), the underside of the rear fuselage, the panel ahead of the windscreen, part G1, and the fairings of the nacelles into the wings. Any gapping gaps noticed in these areas are filled in that no light shows through, but not to the extent of filling and sanding smooth. Handling the model was tricky for my fumbling fat fingers. The fuselage is smooth and triangular. I am surprised how difficult it is to grasp the structure with a good grip. Clamping is thus frustrating. Prepare to patiently use your hands more than you may be used to. When the wings are joined, this is exacerbated. Though she’s a big model, there is surprisingly little area to firmly hold once the wings are there, especially if you follow the direction’s order of adding antennas, gear and other protrusions. I painted the wings before joining the fuselage and planned to paint the fuselage beforehand, too. Then I realized that the triangular shape would allow fine freehand airbrushing without the wing getting in the way. Painting the wing did relieve the need to mask the wheel wells--remember, they open into the fuselage and expose the cockpit tub. Please consider your building and painting technique carefully. Those of you familiar with my models know that I am happy to beat them senseless, weathering-wise. Weathering my Schwalbe is restrained for two main reasons. I want to present it to you as a display model. The other is that I surmise this one would be better kept being Heinz Bar’s plane, and despite all I have written about relative wear-N-tear, paint fade, paint chipping, etc., I figure that these planes were not used enough to suffer. Photos, black & white and color, of operational and captured Schwalben do not show much finish deterioration. I did accent the panels of the rear bottom fuselage, and will do some elsewhere, ASAP.Comments
Hello Everyone,
I hope you enjoy my building review of my two sixty-two.
Additionally, here is Merlin's In-Box Review
and my building-in-progress 'blogs': Fred's In-progress Building Post URLs
Merlin also reviewed the Eagle Cal decals: Messerschmitt Me 262 Decal Sheets (1:32)
...and newly built flying Schwalben...OFFICIAL Me 262 PROJECT UPDATES
APR 11, 2006 - 03:50 AM
Copyright ©2021 by Fred Rick Boucher. Images also by copyright holder unless otherwise noted. The views and opinions expressed herein are solely the views and opinions of the authors and/or contributors to this Web site and do not necessarily represent the views and/or opinions of AeroScale, KitMaker Network, or Silver Star Enterrpises. Images also by copyright holder unless otherwise noted. Opinions expressed are those of the author(s) and not necessarily those of AeroScale. All rights reserved. Originally published on: 2006-04-10 00:00:00. Unique Reads: 22115


