

1⁄32Song of the Swallow
2
Comments
Early praise, the windscreen is molded as a single piece of the canopy and fuselage, engineered to fit along a natural panel line eliminating the trouble of gaps between the clear part and the fuselage. Armored glass to fit inside the windscreen is easily mounted into the inside of this forward part.
The landing gear is provided in both styrene and in white metal. Photo-etched parts for the cockpit and jet engine starters. Vinyl tires. Way to go, Trumpeter!
STEP 1-3, The Cockpit
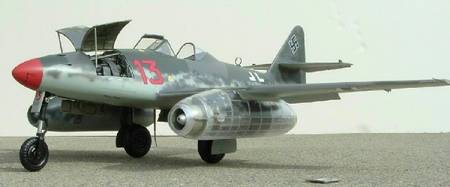
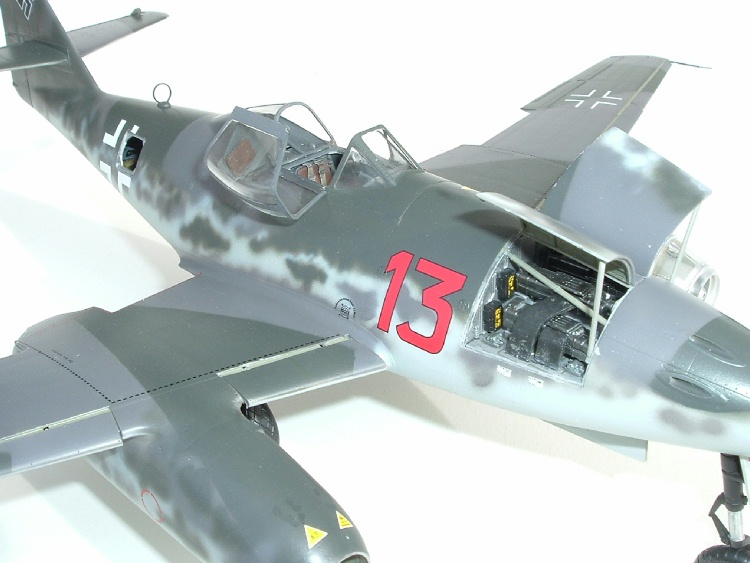
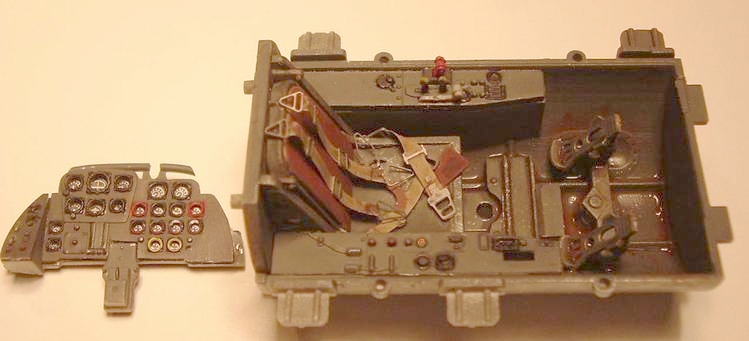
You will be starting with the seat, rudder petals, instrument panel and consoles, all that are set into the ME-262s cockpit tub, which is affixed to detailed bulkheads fore and aft. Everything assembles without much fuss. The seat is provided with photo-etched seatbelts and you are immediately presented with some of the kits questionable painting references. Every color and b/w photo Ive found of the seat shows the backrest a leather (dark) color, not tan as the shown; everything I have read about the -262 indicates that Luftwaffe directives on colors and markings in the cockpit seem to have been taken as suggestions. Overall, the crew area is RLM 66, a dark gray that seems similar to the Panzer Grau of the Heers. This includes the instrument panel, though I found a restored one in which the flight instruments bezels are black. As a struggling rivet counter I dont want to say do what looks good to you, but the Schwalbe proves there is a prototype for anything. There are some mold holes on the seat frame and elsewhere, but none can be seen after assembly. Six small levers and knobs are provided for throttles and other controls. The instrument panel is a clear plastic-film-styrene sandwich. I put it together and behold, the beautiful instrument dial film is hardly seen due to the thickness of the clear facing. I separated it, sanded it thin, and reassembled. There is no painting guide for what color the bezels should be, yet again color and b/w photos of real and museum planes show a variety of markings. Most show the engine gauges to have markings along the edge of the bezels. The gun sight--if you put it on now, you run the risk of breaking it off later. It was the fifth-last item I attached--after the windscreen! It has two small reflector lenses to attach, very easy considering small clear parts. Photos show a power cord dangling out from it, routed under the main panel, the only extra detail I have added. Finally, the cockpit tubs exterior was unpainted. Makes a nice contrast inside the otherwise RLM 02 fuselage interior. Or not; please see step 22-24, Fuselage Interior and Assembly for another interior color idea! Speaking of the interior, the -262 was rather airy inside, and for those of you inclined, there is plenty of room for you to string bundles of straw-colored wiring throughout this machine.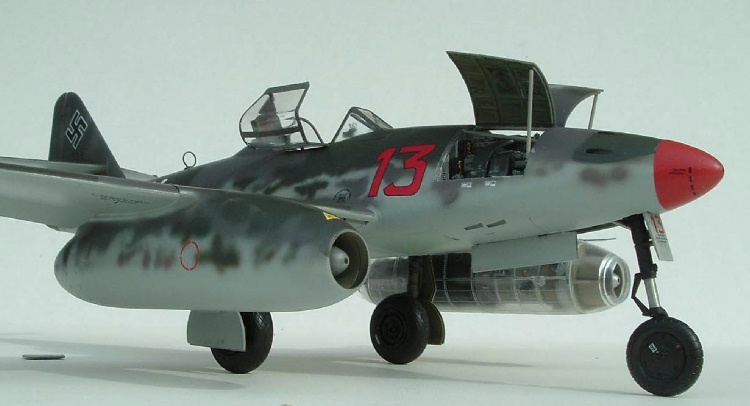


About the Author


FROM: TENNESSEE, UNITED STATES
I'm a professional pilot with a degree in art. My first model was an AMT semi dump truck. Then Monogram's Lunar Lander right after the lunar landing. Next, Revell's 1/32 Bf-109G...cried havoc and released the dogs of modeling! My interests--if built before 1900, or after 1955, then I proba...
Comments

Hello Everyone,
I hope you enjoy my building review of my two sixty-two.
Additionally, here is Merlin's In-Box Review
and my building-in-progress 'blogs': Fred's In-progress Building Post URLs
Merlin also reviewed the Eagle Cal decals: Messerschmitt Me 262 Decal Sheets (1:32)
...and newly built flying Schwalben...OFFICIAL Me 262 PROJECT UPDATES
APR 11, 2006 - 03:50 AM
Copyright ©2021 by Fred Rick Boucher. Images also by copyright holder unless otherwise noted. The views and opinions expressed herein are solely the views and opinions of the authors and/or contributors to this Web site and do not necessarily represent the views and/or opinions of AeroScale, KitMaker Network, or Silver Star Enterrpises. Images also by copyright holder unless otherwise noted. Opinions expressed are those of the author(s) and not necessarily those of AeroScale. All rights reserved. Originally published on: 2006-04-10 00:00:00. Unique Reads: 22115

WEB HOSTING BY


Copyright ©2021 AeroScale and Kitmaker Network, a subsidiary of Silver Star Enterprises
All Rights Reserved. Please read our Conditions of Use and Privacy Policy.
All Rights Reserved. Please read our Conditions of Use and Privacy Policy.