

Early Aviation
Discuss World War I and the early years of aviation thru 1934.
Discuss World War I and the early years of aviation thru 1934.
Hosted by Jim Starkweather
Grigorovich M-5 Flying Boat

thegirl

Joined: January 19, 2008
KitMaker: 6,743 posts
AeroScale: 6,151 posts
Posted: Wednesday, August 13, 2008 - 03:05 PM UTC
Mark , where do you get your Brass strut material from . I can only find it in plastic from which at times is not very suitable for strenght .
guitarlute101

Joined: December 18, 2006
KitMaker: 1,121 posts
AeroScale: 1,063 posts
Posted: Wednesday, August 13, 2008 - 03:47 PM UTC
Terri,
Go to : www.rollmodels.com and type in Strutz in the searchable catalog. It's $18 a pack.
Mark
Go to : www.rollmodels.com and type in Strutz in the searchable catalog. It's $18 a pack.
Mark
guitarlute101
Joined: December 18, 2006
KitMaker: 1,121 posts
AeroScale: 1,063 posts
Posted: Thursday, August 14, 2008 - 07:35 AM UTC
Here's some work on the tailplane. It wasn't lining up like I'd hoped so I disassembled it and started with a new jig.
I measured the leading and trailing edges and made 4 supports to cradle the horizontal tailplane. The leading edge at 2.5cm and the trailing at 2.1cm.


I made the supports out of .30 sheet and some left over resin pour blocks cut and glued to the bottom of the support.. I made them a little high so I could cut a notch at the correct height for each support.

Here's one cut to 2.1 cm.


Here's the tailplane resting on the supports over the fuselage tail with no struts..........


Now that the tailplane is lined up with the scale drawing and fuselage, I can attach the forward strut................


I'll be adding the rest of the struts and painting the tailplane over the next few days.
Mark
guitarlute101
Joined: December 18, 2006
KitMaker: 1,121 posts
AeroScale: 1,063 posts
Posted: Friday, August 15, 2008 - 03:57 AM UTC
I've done the seatbelts. I used .008 lead foil and some left over photo-etch parts from my 1/48 Etrich Taube build.


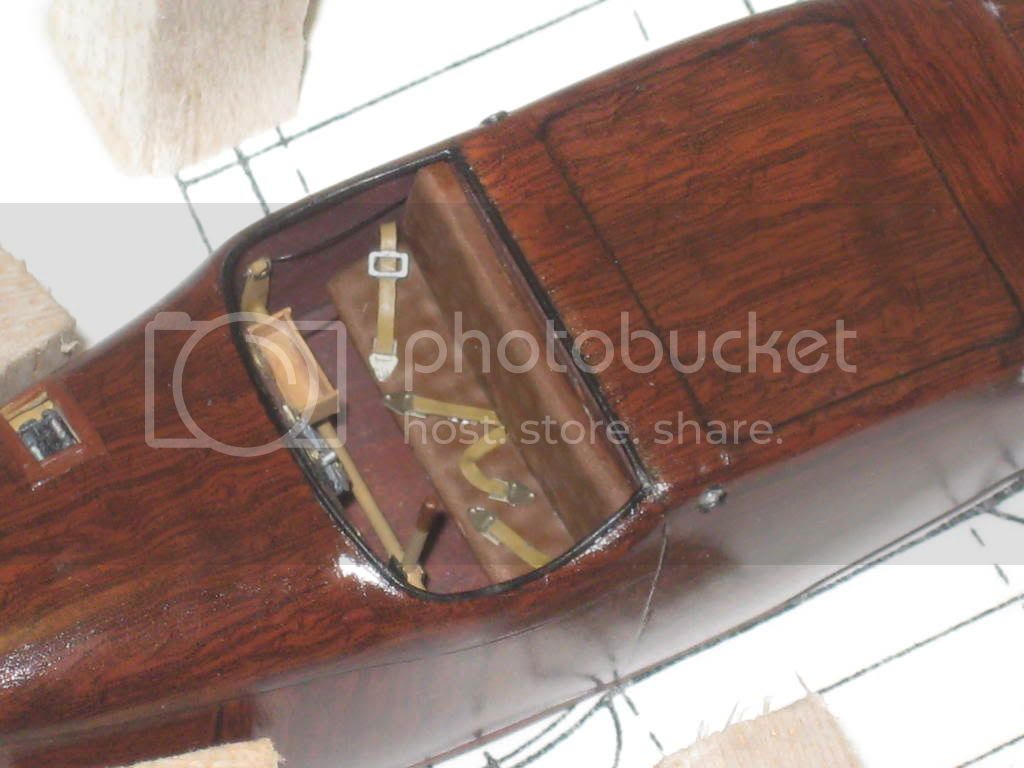
My air compressor regulator arrived by UPS as I was working on the seatbelts. I'll hopefully get some painting done today.
Mark
guitarlute101
Joined: December 18, 2006
KitMaker: 1,121 posts
AeroScale: 1,063 posts
Posted: Friday, August 15, 2008 - 10:02 AM UTC
Hello all,
Here's one last post for the day. I couldn't wait to get the regulator on the airbrush and start airbrushing so I'm getting the bottom of the lower wings ready for the wing floats and roundels. I first airbrushed them Tamiya Medium Grey as a primer then pre-shaded with black then painted them Misterkit WW1 Russian Doped Linen.
.....primer...

......pre-shade.....

......doped linen.........

You can see the lines I've scribed into the bottom of the wing now.
more soon,
Mark
Here's one last post for the day. I couldn't wait to get the regulator on the airbrush and start airbrushing so I'm getting the bottom of the lower wings ready for the wing floats and roundels. I first airbrushed them Tamiya Medium Grey as a primer then pre-shaded with black then painted them Misterkit WW1 Russian Doped Linen.
.....primer...
......pre-shade.....
......doped linen.........
You can see the lines I've scribed into the bottom of the wing now.
more soon,
Mark
guitarlute101
Joined: December 18, 2006
KitMaker: 1,121 posts
AeroScale: 1,063 posts
Posted: Saturday, August 16, 2008 - 10:50 AM UTC
Hello all,
I've painted the roundels on the lower wings today.
Frisket paper..............

Measure with a circle cutter...........

Cut the circles on the frisket paper......

A little touch up and it's done.......

This was my first time making roundel masks. It turned out better than I'd hoped.
More later,
Mark
I've painted the roundels on the lower wings today.
Frisket paper..............
Measure with a circle cutter...........
Cut the circles on the frisket paper......
A little touch up and it's done.......
This was my first time making roundel masks. It turned out better than I'd hoped.
More later,
Mark
guitarlute101
Joined: December 18, 2006
KitMaker: 1,121 posts
AeroScale: 1,063 posts
Posted: Sunday, August 17, 2008 - 03:34 AM UTC
I got the wing floats on today, Here are the floats..

I drilled holes to accept the struts and line and pulled the lines through the wing, taped them down and superglued the holes in the wing on the top and bottom.


Next I'll clean up the top of the wings and paint them..
Send out some comments, please. I need to weather the wings some, let me know if anyone out there has any ideas for me for any techniques to weather Clear Doped linen (CDL). I have a few ideas in mind but I'd like to hear from some others who have any weathering techniques they find useful.
Mark
I drilled holes to accept the struts and line and pulled the lines through the wing, taped them down and superglued the holes in the wing on the top and bottom.
Next I'll clean up the top of the wings and paint them..
Send out some comments, please. I need to weather the wings some, let me know if anyone out there has any ideas for me for any techniques to weather Clear Doped linen (CDL). I have a few ideas in mind but I'd like to hear from some others who have any weathering techniques they find useful.
Mark

JackFlash
Joined: January 25, 2004
KitMaker: 11,669 posts
AeroScale: 11,011 posts
Posted: Sunday, August 17, 2008 - 06:47 AM UTC
Wow Mark! Most impressive. A 1/72 vacuform kit of the Short 184 won the Mike Fritz award this year at the IPMS USA Nats. This build would be a definate contender. Please Model on!
thegirl
Joined: January 19, 2008
KitMaker: 6,743 posts
AeroScale: 6,151 posts
Posted: Sunday, August 17, 2008 - 12:04 PM UTC
Hi Mark , I'm new to weathering some what It's something that I didn't do alot of . How I do my dope linen : I do my preshading and the spray CDL after this has dried for a few days I go back over the ribs with a lighter shade , clear with dull coat and then I use pastle chaclks to blend all that in . seal it future add decals and the to light washes then the final dull coat .
I'm still learning about this myself but I do hope that I was able to give you some guide line to go by .
I'm still learning about this myself but I do hope that I was able to give you some guide line to go by .
guitarlute101
Joined: December 18, 2006
KitMaker: 1,121 posts
AeroScale: 1,063 posts
Posted: Saturday, August 23, 2008 - 04:19 PM UTC
Thanks for the comments Stephen and Terri.
Here's the jig to hold the top wing............
supports....................

Leading edge supports glued down....................

Here are the wings suspended on the supports..............


I measured the gap and used a part of the bottom lower wing that I didn't use to make a piece to connect the wings.....................

test fit a few struts......................

I had a little extra time so I made a center support that connects the wing and fuselage. I used a pin vice to drill holes in the struts for the pins. The rear support will also be the engine support............


More later...............
Mark
Here's the jig to hold the top wing............
supports....................
Leading edge supports glued down....................
Here are the wings suspended on the supports..............
I measured the gap and used a part of the bottom lower wing that I didn't use to make a piece to connect the wings.....................
test fit a few struts......................
I had a little extra time so I made a center support that connects the wing and fuselage. I used a pin vice to drill holes in the struts for the pins. The rear support will also be the engine support............
More later...............
Mark

TedMamere

Joined: May 15, 2005
KitMaker: 5,653 posts
AeroScale: 4,347 posts

Posted: Saturday, August 23, 2008 - 06:26 PM UTC
Hi Mark!
Very, very, very nice... and a thread full of informations and techniques. Thanks a lot for sharing!
Jean-Luc
Very, very, very nice...
and a thread full of informations and techniques. Thanks a lot for sharing!Jean-Luc

guitarlute101
Joined: December 18, 2006
KitMaker: 1,121 posts
AeroScale: 1,063 posts
Posted: Sunday, August 24, 2008 - 12:25 AM UTC
Thank you Jean-Luc. I've been checking in on your Siebel Si204 thread and I have to tell you it is second to none. You've made that kit look like it was a state of the art injection molded kit that was released this summer. Excellent work. Kind words from you are most appreciated.
Mark
guitarlute101
Joined: December 18, 2006
KitMaker: 1,121 posts
AeroScale: 1,063 posts
Posted: Monday, August 25, 2008 - 12:11 PM UTC
I painted the bottom of the fuselage. Some of my sources said the hull bottoms were painted light grey or light blue. I masked off the top of the fuselage and I went with light grey...............


Mark
guitarlute101
Joined: December 18, 2006
KitMaker: 1,121 posts
AeroScale: 1,063 posts
Posted: Saturday, August 30, 2008 - 04:57 AM UTC
Hello all,
Here's some work on the lower wings. Here's how I generally weather the wings to get contrasting colors. I lightened the color of the wing ribs with a lighter color of the wing CDL.
I use Rembrant pastel chalks.. mainly Gold Ochre (not pictured), Grey, Yellow Ochre, Raw Umber, Burnt Umber, and Burnt Sienna.

I use a curved exacto blade and scrape off some chalk onto a pallet.

I use a semi-stiff brush and "paint" the pastels on.

Here's the wing before pastel shading..............................

Here it is after shading.............................

The idea is to vary the shading and try not to be symetrical.


More soon,
Mark
Here's some work on the lower wings. Here's how I generally weather the wings to get contrasting colors. I lightened the color of the wing ribs with a lighter color of the wing CDL.
I use Rembrant pastel chalks.. mainly Gold Ochre (not pictured), Grey, Yellow Ochre, Raw Umber, Burnt Umber, and Burnt Sienna.
I use a curved exacto blade and scrape off some chalk onto a pallet.
I use a semi-stiff brush and "paint" the pastels on.
Here's the wing before pastel shading..............................
Here it is after shading.............................
The idea is to vary the shading and try not to be symetrical.
More soon,
Mark
JackFlash
Joined: January 25, 2004
KitMaker: 11,669 posts
AeroScale: 11,011 posts
Posted: Saturday, August 30, 2008 - 05:40 AM UTC
Most impressive Mark! Model On! Please.
thegirl
Joined: January 19, 2008
KitMaker: 6,743 posts
AeroScale: 6,151 posts
Posted: Sunday, August 31, 2008 - 03:20 AM UTC
very nice job done on the weathering on the lower wings .  Looking forward on seeing more .
Looking forward on seeing more . guitarlute101
Joined: December 18, 2006
KitMaker: 1,121 posts
AeroScale: 1,063 posts
Posted: Monday, September 01, 2008 - 04:07 AM UTC
Thanks Stephen and Terri, I appreciate your comments.
Here's a way to simulate the metal bands on struts. (I'd previously painted the struts usuing the same painting method I used for the floor of the cockpit.)
Here's a few pics of the Grigorovich struts......


There are 5 bands on each strut. I measured the struts and come up with 3.8 cm...


Here you see my math. I divided 3.8 cm by six to locate the points where the bands should be located. It came to 6.3 mm. I marked the location with lines..........

Next I colored some bare metal foil with a black Sharpie and allowed it to dry.

Then I cut thin strips and used small tweezers to attach the foil to the struts using the marks on the paper for a guide so they would be symetrical.

Here's the finished struts, not great pics but you can get the idea.........


More soon,
Mark
Here's a way to simulate the metal bands on struts. (I'd previously painted the struts usuing the same painting method I used for the floor of the cockpit.)
Here's a few pics of the Grigorovich struts......
There are 5 bands on each strut. I measured the struts and come up with 3.8 cm...
Here you see my math. I divided 3.8 cm by six to locate the points where the bands should be located. It came to 6.3 mm. I marked the location with lines..........
Next I colored some bare metal foil with a black Sharpie and allowed it to dry.
Then I cut thin strips and used small tweezers to attach the foil to the struts using the marks on the paper for a guide so they would be symetrical.
Here's the finished struts, not great pics but you can get the idea.........
More soon,
Mark
guitarlute101
Joined: December 18, 2006
KitMaker: 1,121 posts
AeroScale: 1,063 posts
Posted: Monday, September 01, 2008 - 08:40 AM UTC
I've also had time to mask and paint the roundels on the top wing............................


Mark
guitarlute101
Joined: December 18, 2006
KitMaker: 1,121 posts
AeroScale: 1,063 posts
Posted: Sunday, September 07, 2008 - 03:04 PM UTC
Hello all,
Here's a little work on the bottom of the lower wing. I'm using Part turnbuckle photo-etch for rigging attachment points on the wings.

Here's the wing and PE.......


Mark
Here's a little work on the bottom of the lower wing. I'm using Part turnbuckle photo-etch for rigging attachment points on the wings.
Here's the wing and PE.......
Mark

MerlinV

Joined: November 26, 2006
KitMaker: 608 posts
AeroScale: 602 posts

Posted: Sunday, September 07, 2008 - 10:19 PM UTC
Bl**dy hell Mark...
I don't know where you find the time for this kind of stuff, wht with this and the Gotha going at once...
This is going to finish up a museum piece!
Cheers,
Hugh
I don't know where you find the time for this kind of stuff, wht with this and the Gotha going at once...
This is going to finish up a museum piece!
Cheers,
Hugh
thegirl
Joined: January 19, 2008
KitMaker: 6,743 posts
AeroScale: 6,151 posts
Posted: Monday, September 08, 2008 - 03:52 AM UTC
Excellent work Mark , i'm really enjoying your thrend on this build ! The rib tapping stands out so well , will be trying the clear tape method myself
Cheers Mark
Cheers Mark
guitarlute101
Joined: December 18, 2006
KitMaker: 1,121 posts
AeroScale: 1,063 posts
Posted: Monday, September 08, 2008 - 12:57 PM UTC
Thanks Hugh and Terri.
I just bought Issue 24 No. 2 of Windsock Worldwide and it had 2 Grig pics I'd never seen before and they answered a lot of rigging questions I was struggling with. These things were rigged like spider webs. Wait 'til you see my new home made turnbuckles................
Mark
I just bought Issue 24 No. 2 of Windsock Worldwide and it had 2 Grig pics I'd never seen before and they answered a lot of rigging questions I was struggling with. These things were rigged like spider webs. Wait 'til you see my new home made turnbuckles................
Mark
guitarlute101
Joined: December 18, 2006
KitMaker: 1,121 posts
AeroScale: 1,063 posts
Posted: Thursday, September 11, 2008 - 02:57 AM UTC
Hello everyone,
I decided to make rigging attachment points on each strut instead of "through the wing" rigging.
I used 1/48 Part photo-etch turnbuckles....................

Cut in half and bent with tweezers......................

Here are a few installed...........................................

Test fit a spare strut.........looks good......................


More soon,
Mark
I decided to make rigging attachment points on each strut instead of "through the wing" rigging.
I used 1/48 Part photo-etch turnbuckles....................
Cut in half and bent with tweezers......................
Here are a few installed...........................................
Test fit a spare strut.........looks good......................
More soon,
Mark
MerlinV
Joined: November 26, 2006
KitMaker: 608 posts
AeroScale: 602 posts
Posted: Thursday, September 11, 2008 - 11:31 AM UTC
Cool!
What a great Idea. I might have to steal that one.
Cheers,
Hugh
What a great Idea. I might have to steal that one.
Cheers,
Hugh
JackFlash
Joined: January 25, 2004
KitMaker: 11,669 posts
AeroScale: 11,011 posts
Posted: Thursday, September 11, 2008 - 01:43 PM UTC
Great ! Now I am going to need an electron microsope to do as well. 
 |

WEB HOSTING BY


Copyright ©2021 AeroScale and Kitmaker Network, a subsidiary of Silver Star Enterprises
All Rights Reserved. Please read our Conditions of Use and Privacy Policy.
All Rights Reserved. Please read our Conditions of Use and Privacy Policy.