

Early Aviation
Discuss World War I and the early years of aviation thru 1934.
Discuss World War I and the early years of aviation thru 1934.
Hosted by Jim Starkweather
Grigorovich M-5 Flying Boat

JackFlash

Joined: January 25, 2004
KitMaker: 11,669 posts
AeroScale: 11,011 posts
Posted: Monday, October 27, 2008 - 02:26 PM UTC
Mark just a quick note as I am sure you are aware, but others might not know. The propeller for a pusher set up has a reverse pitch from the ones that would be on tractor type ingine setups. On the latest "Fly" Macchi M5 they seemed to have missed this.

thegirl

Joined: January 19, 2008
KitMaker: 6,743 posts
AeroScale: 6,151 posts
Posted: Monday, October 27, 2008 - 04:31 PM UTC
wonderful job done so far Mark . Can't help with the engine . I have never seen the back side myself sorry , but some one around here should know !

nosewrit
Joined: November 30, 2007
KitMaker: 86 posts
AeroScale: 69 posts
Posted: Monday, October 27, 2008 - 11:16 PM UTC
guitarlute101
Joined: December 18, 2006
KitMaker: 1,121 posts
AeroScale: 1,063 posts
Posted: Tuesday, October 28, 2008 - 12:11 AM UTC
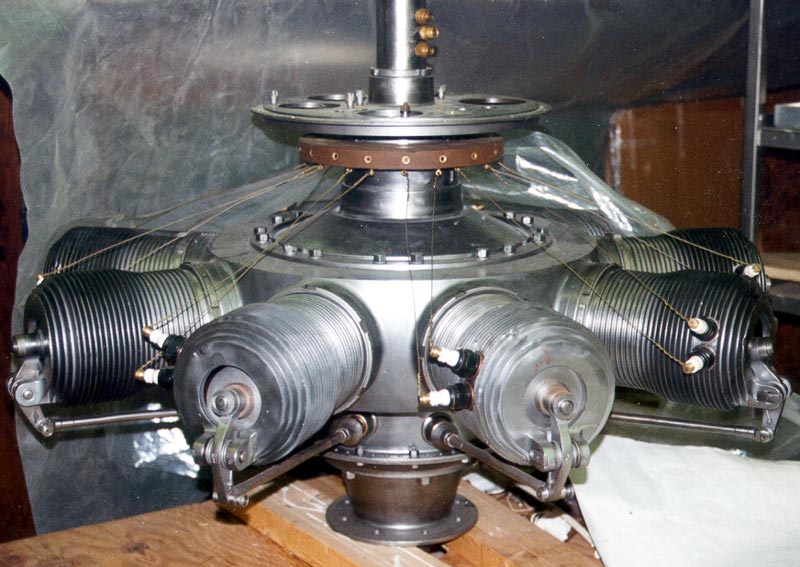
Thank you, Matthew. I hadn't seen that picture before.
A very good friend emailed me a sketch that I can work from. I should have a close approximation of the details.
Mark
A very good friend emailed me a sketch that I can work from. I should have a close approximation of the details.
Mark
guitarlute101
Joined: December 18, 2006
KitMaker: 1,121 posts
AeroScale: 1,063 posts
Posted: Tuesday, October 28, 2008 - 09:33 AM UTC
I made the outer wing struts. I found a pair of wire cutters that cut the strut at an angle on the end.....................


You can cut the sides of the bottom at an angle to get close to a "V" shape then sand the end to fit...................


This was much faster than using the Dremel. Here they are test fitted to the wings.............


More soon,
Mark
thegirl
Joined: January 19, 2008
KitMaker: 6,743 posts
AeroScale: 6,151 posts
Posted: Wednesday, October 29, 2008 - 03:59 AM UTC
Very nice work done so far on the engine .
Thanks for sharing the pic Matthew it will be very helpful in the future .
Thanks for sharing the pic Matthew it will be very helpful in the future .
guitarlute101
Joined: December 18, 2006
KitMaker: 1,121 posts
AeroScale: 1,063 posts
Posted: Friday, October 31, 2008 - 03:26 AM UTC
Here's the wing walks for servicing the engine, .005 styrene and CSM Bolt heads......


Here's the back of the engine, very simple.....................


Real copper wire for the fuel line................


Inner struts added to engine bearing struts..................

More later. Thanks for checking in.
Mark
Here's the back of the engine, very simple.....................
Real copper wire for the fuel line................
Inner struts added to engine bearing struts..................
More later. Thanks for checking in.
Mark
guitarlute101
Joined: December 18, 2006
KitMaker: 1,121 posts
AeroScale: 1,063 posts
Posted: Friday, October 31, 2008 - 06:02 AM UTC
Hello everyone,
I finished the wing walk strips and glued them in place and finished mounting the engine.


Mark
I finished the wing walk strips and glued them in place and finished mounting the engine.
Mark
guitarlute101
Joined: December 18, 2006
KitMaker: 1,121 posts
AeroScale: 1,063 posts
Posted: Friday, October 31, 2008 - 09:17 AM UTC
It's been a good day to build. Here's the back of the engine with the hand crank added and wing tip struts finished. I made a guide for the crank shaft out of styrene for the front strut. I'll add the handle later near the end of the build.


Mark
guitarlute101
Joined: December 18, 2006
KitMaker: 1,121 posts
AeroScale: 1,063 posts
Posted: Saturday, November 01, 2008 - 09:37 AM UTC
Hello everyone,
I finished up the engine section. all struts and supporting rods are in place and painted. Here's pics of the front, back and complete, painted installation.............


Next I moved on to more rigging. Here are some drawings to show what other rigging I had to do, not very good drawings, I know, but you'll get the idea...........


Black lines are what was already there...

Here they are on the bird, hopefully you can make out the newest rigging. I'll have to do this on both wings, front and back struts.


More soon,
Mark
thegirl
Joined: January 19, 2008
KitMaker: 6,743 posts
AeroScale: 6,151 posts
Posted: Saturday, November 01, 2008 - 11:58 AM UTC
Outstanding , just love this build Mark ! sure is a lot of rigging to do ..................
Cheers to you !
Cheers to you !
guitarlute101
Joined: December 18, 2006
KitMaker: 1,121 posts
AeroScale: 1,063 posts
Posted: Sunday, November 02, 2008 - 01:02 PM UTC
Thanks, Terri. I'm really having fun with this build.
Here's a pic of the front and back rigging. All of the careful measuring in the early stages of the build paid off as you can see with the horizontal rigging line crossing the "X" exactly in the crosshairs in the front and back.

Next I'll be attaching the ailerons and control wires for them on the upper wing.
Mark

TedMamere

Joined: May 15, 2005
KitMaker: 5,653 posts
AeroScale: 4,347 posts

Posted: Sunday, November 02, 2008 - 08:49 PM UTC
Hi Mark,
Here you see why the early planes were called "cages à poules" in France at that time...
Fantastic work on the rigging!
Jean-Luc
Here you see why the early planes were called "cages à poules" in France at that time...
Fantastic work on the rigging!
Jean-Luc

guitarlute101
Joined: December 18, 2006
KitMaker: 1,121 posts
AeroScale: 1,063 posts
Posted: Tuesday, November 04, 2008 - 02:23 AM UTC
Thanks Jean-Luc. Your comment at the bottom of your postings is one to live by as a modeller.......
Better think one hour and build five minutes...
Than think five minutes and build an hour!
I spend a lot of my time contemplating my next move on the build. In my last post I said I'd be putting the ailerons on but as I think about it, I'll have to wait. The jig supports are in the way of the rigging that i need to attach and I can't remove them and expect the tail to line up correctly so it will be the tail next.
Mark
thegirl
Joined: January 19, 2008
KitMaker: 6,743 posts
AeroScale: 6,151 posts
Posted: Wednesday, November 05, 2008 - 02:16 AM UTC
I'm going crossed eyed from the rigging ! how about we make deal here . When My order from CSM comes in . I'll do the building and you can do the rigging for me ! The most rigging that I have ever done so far is on a Camel . now I'm really getting scared , having Rodens Felixstowe in stash and the amount of rigging on that one is over whelming .
How do you do this with out going insane and pulling your hair out !
How do you do this with out going insane and pulling your hair out !
guitarlute101
Joined: December 18, 2006
KitMaker: 1,121 posts
AeroScale: 1,063 posts
Posted: Wednesday, November 05, 2008 - 04:16 AM UTC
It's really no problem, Terri. Just do a little everyday and expect it to take longer than a build with less rigging. The results are well worth it and your rigging technique will improve immeasurably.
Mark

Dwaynewilly
Joined: December 15, 2006
KitMaker: 365 posts
AeroScale: 344 posts
Posted: Wednesday, November 05, 2008 - 09:20 PM UTC
Mark,
This is just an amazing build. Craftsmanship of the highest caliber. You are a true artisan. Looking forward to the completion of this outstanding project.
Regards, Dwayne
This is just an amazing build. Craftsmanship of the highest caliber. You are a true artisan. Looking forward to the completion of this outstanding project.
Regards, Dwayne
guitarlute101
Joined: December 18, 2006
KitMaker: 1,121 posts
AeroScale: 1,063 posts
Posted: Thursday, November 06, 2008 - 10:47 AM UTC
Thanks Dwayne, I appreciate the kind words. I'm just doing the best I can. I think the really tough part is over, that being, making sure the wings, struts and engine are all in alignment. I would have never got it true without the jig.
I'll have more soon,
Mark
guitarlute101
Joined: December 18, 2006
KitMaker: 1,121 posts
AeroScale: 1,063 posts
Posted: Friday, November 07, 2008 - 02:24 AM UTC
I've made the control horns out of styrene strip. Here's what the real things looked like..........

Here's the strip and basic shapes........

One done to use as a master to make the others look like.............

I use Proweld to glue. This stuff really melts the plastic together.......

Here are the finished control horns...............

More soon,
Mark
thegirl
Joined: January 19, 2008
KitMaker: 6,743 posts
AeroScale: 6,151 posts
Posted: Thursday, November 13, 2008 - 04:08 AM UTC
Are you going to do the attachment points with turnbuckles ?
guitarlute101
Joined: December 18, 2006
KitMaker: 1,121 posts
AeroScale: 1,063 posts
Posted: Thursday, November 13, 2008 - 05:04 AM UTC
Hi Terri,
Yes, I'll be using turnbuckles there, too. Right now I'm re-doing the tail section to match the wings and getting ready to post some progress on the 1/32 SE5a with Hisso engine.
Mark
Yes, I'll be using turnbuckles there, too. Right now I'm re-doing the tail section to match the wings and getting ready to post some progress on the 1/32 SE5a with Hisso engine.
Mark
guitarlute101
Joined: December 18, 2006
KitMaker: 1,121 posts
AeroScale: 1,063 posts
Posted: Sunday, November 16, 2008 - 12:06 PM UTC
I've finished the tail plane today. I didn't think the first one I made matched the wings. The wings have tape ribs and the tail had embossed ribs. So I made the parts from .30 styrene card cut to shape and meaured top and bottom so that the ribs had equal spacing.


Then I cut thin strips of packing tape for the ribs.


Next I'll paint and install the tail.
Mark
Then I cut thin strips of packing tape for the ribs.
Next I'll paint and install the tail.
Mark
thegirl
Joined: January 19, 2008
KitMaker: 6,743 posts
AeroScale: 6,151 posts
Posted: Sunday, November 16, 2008 - 12:38 PM UTC
I really like the packing tape method , it's just right for 48 scale . Looking forward on seeing more of the model ..................
Cheers !
Cheers !
guitarlute101
Joined: December 18, 2006
KitMaker: 1,121 posts
AeroScale: 1,063 posts
Posted: Sunday, November 16, 2008 - 03:05 PM UTC
Here's a little more. I decided to go ahead and glue the control horns on.


Mark
-Ocsi-

Joined: November 11, 2008
KitMaker: 25 posts
AeroScale: 24 posts
Posted: Monday, November 17, 2008 - 08:21 AM UTC
It's realy an impressive work you do. Respect!
/Ö
/Ö
 |

WEB HOSTING BY


Copyright ©2021 AeroScale and Kitmaker Network, a subsidiary of Silver Star Enterprises
All Rights Reserved. Please read our Conditions of Use and Privacy Policy.
All Rights Reserved. Please read our Conditions of Use and Privacy Policy.