World War II
Discuss WWII and the era directly before and after the war from 1935-1949.
Hosted by Rowan Baylis
Helldiver, all out build!
Frigate
_VISITCOMMUNITY
West Virginia, United States
Joined: April 22, 2006
KitMaker: 500 posts
AeroScale: 243 posts
Posted: Wednesday, December 19, 2007 - 06:58 AM UTC
Chuck,
Absolutely an outstanding build so far !!!! I really take my hat off to you. I normally build in small scale, (1/144th and a few 1/72) but I have to admit you make me think more about 1/48th !
Please do keep us advised on this build, quite a few of us are extremely interested. Thanks and keep 'em coming............................Bruce
f1matt
_VISITCOMMUNITY
Manitoba, Canada
Joined: August 13, 2006
KitMaker: 1,021 posts
AeroScale: 184 posts
Posted: Wednesday, December 19, 2007 - 05:14 PM UTC
That fuel tank with all the copper pipes is incredible. It's almost a shame to paint it. Ah go ahead and paint it. I know it'll look great. Now I have to go and wipe the drool from my face. Your Helldiver is too darn pretty to look at!

-Matt
JWViguers
Joined: April 08, 2007
KitMaker: 7 posts
AeroScale: 6 posts
Posted: Friday, December 21, 2007 - 03:25 AM UTC
wow....that's insane! :-)
goldenpony
_VISITCOMMUNITY
Zimbabwe
Joined: July 03, 2007
KitMaker: 3,529 posts
AeroScale: 54 posts
Posted: Friday, December 21, 2007 - 04:23 AM UTC
I see builds like this and I ask myself, "Why do I bother?"

Fantastic work!!
chukw1
_VISITCOMMUNITY
California, United States
Joined: November 28, 2007
KitMaker: 817 posts
AeroScale: 729 posts
Posted: Monday, December 24, 2007 - 02:59 PM UTC
Thanks, Calvin- your little Beast looks just fine to me, and that was quite selfless of you to give it one who has served. My hat's off to you.

Bruce, Matt, JW and Jim- Thank you all very much! Here's some more for you-

Well, I've gotten all my shopping, decorating, gift wrapping and cleaning done, so it's time for some Christmas Eve modeling! I worked up the gunner's port sidewall today- lots of photo examination gave me a basic idea of how the reserve hydraulic system worked. The central part was a reservoir tank, linked to a selector switch and a hand-operated wobble pump. I started with the tank.

Here's an overall view- the body of the pump came from a plastic model railroad part, a classic tip from modeling grandmaster Shep Paine.

The selector switch is a simple assembly of styrene bits. Pre-drilling holes will greatly help when fitting the wire plumbing.

Plumbing commences. I have no idea what that puch is, but is in the photo, so...

After some practice the wirebending gets to be a lot of fun!

Here's the assembly all knitted together. I'll add the actual pump handle later, to spare myself the fun of breaking it off and regluing, breaking it off and regluing, ... :blink:


More to follow in the coming days- until then, Merry Christmas and Happy Holidays to all!
chukw1
_VISITCOMMUNITY
California, United States
Joined: November 28, 2007
KitMaker: 817 posts
AeroScale: 729 posts
Posted: Sunday, December 30, 2007 - 08:22 AM UTC
Happy New Year to all!

A lot of folks have been saying how much they appreciate the how-to end of this build, so this installment is for them! Photo-etch can seem like some mystic art if you you've never tried it before, but it's really not that tough- all you need are the right tools. I use the Mission Models Etch-Mate and love it, but I know several guys who work wonders with a pair of flat-jawed pliers alone. This series of photos will show you the basics of bending PE, so read along as I build up the rear gunner's ammo boxes. Apologies if you've heard this one before! ;D


So that's it for now- hope this didn't bore the pants off you!
I've got to get back to the bench (and help clean up for dinner guests later... )

chukw1
_VISITCOMMUNITY
California, United States
Joined: November 28, 2007
KitMaker: 817 posts
AeroScale: 729 posts
Posted: Tuesday, January 01, 2008 - 02:26 PM UTC
On of the focal points of any military planes is the gun turret- there's just something visceral about a pair of menacing machine guns that makes the inner child run around buzzing "rat-tat-tat!" I started working on the rear gunner's seat and ring and, well, my inner child took over. I've found good reference, and that always makes the kit parts look a little sparse to my AMS eye. Iwas really only going to replace the telescoping elevation leg...

Brass was the answer, and that meant breaking out my soldering gear!


While I had the gear out, why not replace the seat mounting frame? I couldn't sleep last night (partying neighbors), and thought this process through.


Next, I'll knit this assembly together- stay tuned, and the best to you and yours in 2008!
AIRGUNNER
_VISITCOMMUNITY
England - South East, United Kingdom
Joined: September 27, 2006
KitMaker: 246 posts
AeroScale: 234 posts
Posted: Wednesday, January 02, 2008 - 03:42 AM UTC
You, Sir, Really are quite mad. But I do love your build... this is such special work..
TedMamere
_VISITCOMMUNITY
Moselle, France
Joined: May 15, 2005
KitMaker: 5,653 posts
AeroScale: 4,347 posts
Posted: Wednesday, January 02, 2008 - 09:26 AM UTC

Quoted Text

You, Sir, Really are quite mad.


Yes, mad, but in a good way... Again, this is fantastic stuff!

Jean-Luc
ejclide
_VISITCOMMUNITY
Ohio, United States
Joined: January 03, 2008
KitMaker: 150 posts
AeroScale: 119 posts
Posted: Wednesday, January 02, 2008 - 10:16 PM UTC
This is truly rediculous. I thought I had seen a lot, but evidently I haven't.

Upon first looking through this thread I really wanted to head downstairs to pull out my pro modeler sb2c, But now i feel inadequate.

Don't worry, I won't let it stop me. But you are truly amazing. I don't see this kinda stuff in finescale modeler. you are truly gifted.
chukw1
_VISITCOMMUNITY
California, United States
Joined: November 28, 2007
KitMaker: 817 posts
AeroScale: 729 posts
Posted: Sunday, January 06, 2008 - 02:14 PM UTC
Thanks to you, kameraden! The madness may proceed apace- I've gotten my sticky little mitts on the pilot's manuals for this fabulous contraption. It's nice to actually know what the tiny bit you're slathering superglue on really functioned as in the real bird...

Meanwhile, back in rear pit, Gunner Joey Olafson is getting tired of standing out on the wing, so let's get that seat put together. Styrene to the rescue!

I tried to de-solder one of the two- left-handed armor plates with a butane torch- bad move! The part was largely burned up! I made another armor panel form styrene, but in comparing and test-fitting the parts I felt they weren't long enough- Joey deserves decent armor protection from those deadly Zero attacks! I made two all-new armor panels- penance for my flub with the torch...


This PE part needed some support, as well as beefing up in the thickness department. Man, do I hate to bend music wire! I've got all these little stab wounds in my fingertips- be careful, kids.

Using a jig is the best way to assemble the fiddley bits- and this was fiddely! :o


In the end, I think this was worth it, but whew!
drizzt73
_VISITCOMMUNITY
New South Wales, Australia
Joined: April 15, 2006
KitMaker: 158 posts
AeroScale: 70 posts
Posted: Tuesday, January 08, 2008 - 10:56 AM UTC
Awesome work there Chuck!
I've seen this level of detail done in 1/35 panzers but never in a plane before. Look forward to seeing this build to completion. It will almost be a shame to paint all that brass, P.E ans resin and cover it up!
hopefully most of it will still be visible once the fuselage is sealed up.
cheers
chukw1
_VISITCOMMUNITY
California, United States
Joined: November 28, 2007
KitMaker: 817 posts
AeroScale: 729 posts
Posted: Sunday, January 13, 2008 - 03:02 PM UTC
Thanks, Anthony- that' an apt analogy if I ever heard one. An unholy marriage of aviation and armor modeling- it's a world gone mad!

Speaking of going mad, I got copies of the pilot's manuals for this birdie and now that I know what all these odd little gizmos are I moved on to the pilot's port sidewall. What an amazing conglomeration of controls scattered about the walls and floor! These guys had to be sharp- and flexible- as well as brave and cool in battle. Image reaching for an oddly-placed lever in a screaming dive as flak hammered up at you- WOW! Talk about sheer courage...

The Eduard color PE is very nice, but sometimes the parts let you down a bit- the throttle quadrant has no sides! Gotta take care of that...


A bunch of PE work later....

There are components on the floor as well as the sidewall.


That's all for now- see you soon!
f1matt
_VISITCOMMUNITY
Manitoba, Canada
Joined: August 13, 2006
KitMaker: 1,021 posts
AeroScale: 184 posts
Posted: Sunday, January 13, 2008 - 03:42 PM UTC
This is a very fun thread to read. Love all the notes right on the photos. Makes it real easy to follow.

-Matt
chukw1
_VISITCOMMUNITY
California, United States
Joined: November 28, 2007
KitMaker: 817 posts
AeroScale: 729 posts
Posted: Sunday, January 20, 2008 - 03:25 PM UTC
Thanks, Matthew- I love a good caption myself. Cheers!

I had the chance to park my butt at my bench yesterday and today several hours. I did a lot of little bits here and there- there's so many little sub-assemblies and such... :o

Furnace tape is wonderful stuff- it's like duct tape but made of heavy-guage aluminum foil. I got a roll at Home Depot and have actually used it on the ducting for the dryer, but it made a dandy life raft-

It's finally time ti start painting in ernest- whoo-hoo! That means masking and finding ways of holding all the little doo-dads while spraying paint at them.


Wow! A little paint makes a HUGE difference!

If you've never done any post-shading before, here's a little how-to info.


We're rolling now- more fun detailing to come!

TedMamere
_VISITCOMMUNITY
Moselle, France
Joined: May 15, 2005
KitMaker: 5,653 posts
AeroScale: 4,347 posts
Posted: Sunday, January 20, 2008 - 06:33 PM UTC
Hi Chuck!

Impressive painting technique...

Jean-Luc
f1matt
_VISITCOMMUNITY
Manitoba, Canada
Joined: August 13, 2006
KitMaker: 1,021 posts
AeroScale: 184 posts
Posted: Sunday, January 20, 2008 - 07:46 PM UTC
Another great update Chuck. I've never tried rubbing alcohol for airbrushing but I think I'm gonna pick some up and try it out. Your H-diver (because I clearly don't have time to type out Helldiver, obviously ) looks absolutely gorgeous.

-Matt
Holdfast
Staff MemberPresident
IPMS-UK KITMAKER BRANCH
#056
_VISITCOMMUNITY
England - South West, United Kingdom
Joined: September 30, 2002
KitMaker: 8,581 posts
AeroScale: 4,913 posts
Posted: Monday, January 21, 2008 - 10:00 AM UTC
Superb stuff Chuck, not only great modelling but great entertainment as well, I'm loving every caption and picture
Mal
vanize
_VISITCOMMUNITY
Texas, United States
Joined: January 30, 2006
KitMaker: 1,954 posts
AeroScale: 1,163 posts
Posted: Wednesday, January 23, 2008 - 12:44 PM UTC
wow, this has got to be the densest bit of modeling how too i have ever seen in a forum.

pure genius in an insanity wrapper.
Florre
_VISITCOMMUNITY
West-Vlaaderen, Belgium
Joined: February 11, 2003
KitMaker: 980 posts
AeroScale: 12 posts
Posted: Thursday, January 24, 2008 - 01:03 AM UTC
Once in a while I pop in here to have a look, and boy I'm happy I've been luckily enough to stumble into this truly unbelievable thread. You're a gifted and inspiring modeller, obviously a talented illustrator, and a gifted wordmaster as well. What pleasure to read this thread! I'll try to keep on following this one.

Rattler
_VISITCOMMUNITY
Texas, United States
Joined: November 23, 2002
KitMaker: 512 posts
AeroScale: 104 posts
Posted: Thursday, January 24, 2008 - 06:04 PM UTC
well I don't much come to the wing thingy side, but from time to time I do .... I've seen this WIP pop up each time I've come in an checked the boards.. so tonight I came to see what it was all about.

I can't think of muc to say excpet what I said to one of my sgt when I caught him doing something really dumb with a frag once... " Holy [auto-censored] " I am truely stunned at the level of detail that you are putting into this kit. I have the same kit but haven't opend it. wow....

I look forward to see more of this WIP.


Automaton
_VISITCOMMUNITY
United States
Joined: August 12, 2007
KitMaker: 153 posts
AeroScale: 139 posts
Posted: Friday, January 25, 2008 - 11:55 AM UTC
Hi Chuck

This is an excellent thread. I'll definitely be following this one, both for the sheer entertainment value and to steal ideas from you. Also, if you don't mind, I'd like to pick your brain about something . . .
I checked out your website link to your Huckbein build, and was noticing your experiment with Rain-X to prevent tip dry. Do you still use that technique? Have you ever had any issues with fisheyes, etc. from the silicone?

Cheers
Automaton
chukw1
_VISITCOMMUNITY
California, United States
Joined: November 28, 2007
KitMaker: 817 posts
AeroScale: 729 posts
Posted: Saturday, January 26, 2008 - 02:37 PM UTC
Guys- I'm having issues with my browser- Firefox is redlining CPU uasage on my box and I can barely type in the reply window. Any help? I'm writing this in a letter and will copy and paste...
Thanks, Jean-Luc- That's a feather in my cap, coming from a modeler like you! Your Nick is my inspiration. Maybe we can dogfight 'em later!
Matt, I know what it's like to be so bsy as to have to abrvi8 evrything my sympathies- and thnks to U, 2!
Thanks, Mal- much appreciated
Vance, dense just may the very best word to describe me, I mean, this thread. Thanks!
Glad you're enjoying it, Hans- we're lucky you stopped by- cheers!
I'm always careful with my frags, Chris- you be safe here.
Automaton: Thanks so much- and yes, when I'm having a sticky time with the airbrush I still put a bit of Rain-X on the needle. It seems to really keep paint from building up on the tip, and I've never had an issue with contamination on the model- the silicon stays on the needle. Thanks!

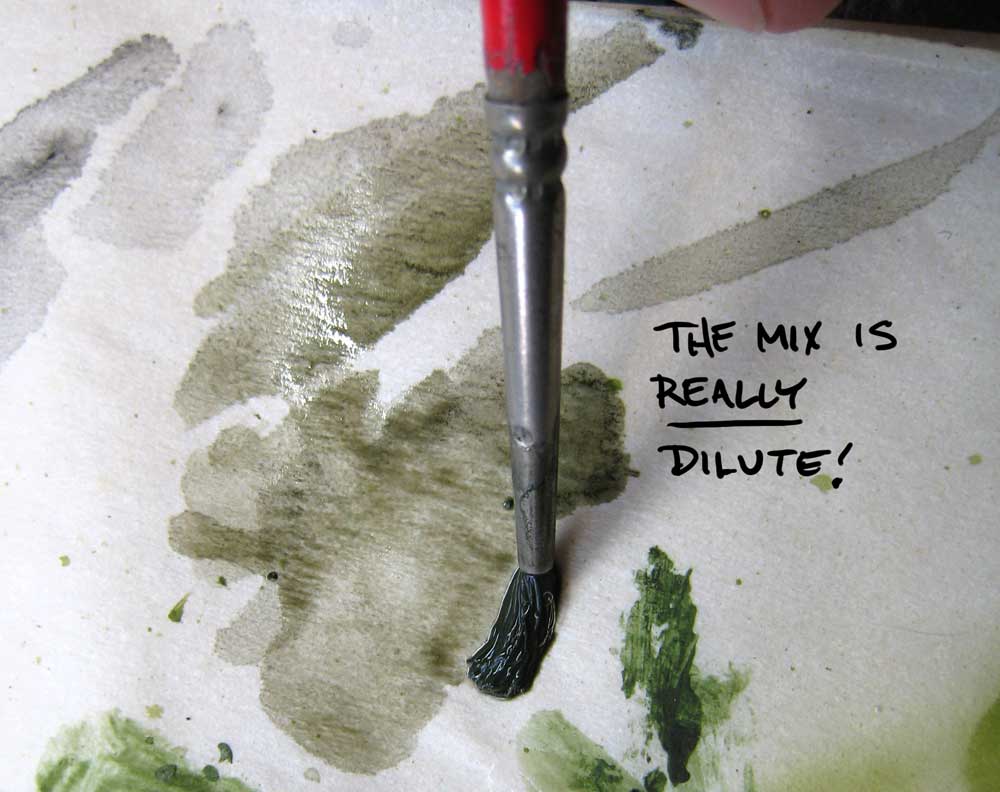
Now, the last thing I did after painting was to give the green areas a good coat of Future floor wax. Sprayed without dilution at about 8 psi, it provided an armor plate against the oil wash I'll detail now.
To help emphasize detail and break up the monotone of the base color I applied a wash of dark, brown-green oil paint. My oils are from student days in the dim recesses of the last century- they'll last a long time in their tubes! Be wary of using straight turpentine- it'll eat through all your paint coats!


Next: a matte coat and drybrushing- don't touch that dial!
chukw1
_VISITCOMMUNITY
California, United States
Joined: November 28, 2007
KitMaker: 817 posts
AeroScale: 729 posts
Posted: Sunday, February 03, 2008 - 01:10 PM UTC
I've been hammering away at the interior- there's just so much of it in there! My flat coat, btw, is Humbrol Matt Cote.


_H_Dori
_VISITCOMMUNITY
England - East Anglia, United Kingdom
Joined: November 09, 2006
KitMaker: 295 posts
AeroScale: 276 posts
Posted: Sunday, February 03, 2008 - 11:43 PM UTC
Lol, this is fantastic!! Blast that giant penny!!

I'm really enjoying this build and once again another Aeroscaler in a long long list to aspire to.

Thank you for such an enjoyable thread.

H