1/32 Roden GB 2008 Fokker D.VI
Indiana, United States
Joined: May 14, 2007
KitMaker: 3,117 posts
AeroScale: 2,270 posts
Posted: Sunday, July 20, 2008 - 09:22 AM UTC
"Treat 'em Rough", Current Builds--Wingnut Rumpler
I am frequently seen with blood shot eyes from staying up past my nap time to get the right colour scheme on my latest WWI model?
Colorado, United States
Joined: January 25, 2004
KitMaker: 11,669 posts
AeroScale: 11,011 posts
Posted: Sunday, July 20, 2008 - 09:33 AM UTC
Yep but is read from right to left.

". . .The most important thing is to know why you build and then get the most that you can out of building." via D.D.
Colorado, United States
Joined: January 25, 2004
KitMaker: 11,669 posts
AeroScale: 11,011 posts
Posted: Wednesday, August 06, 2008 - 10:46 PM UTC
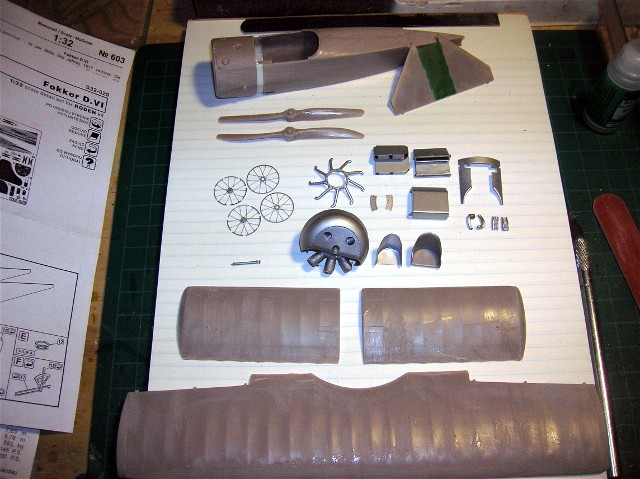
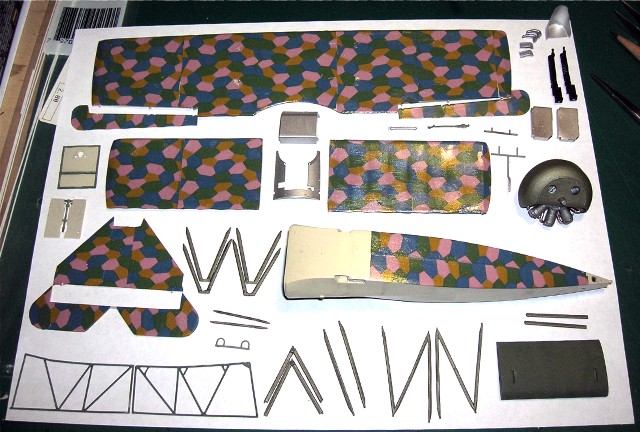
Just to keep everyone in the loop. Here are some kit and Part of Poland etch metal items I have been working on.
". . .The most important thing is to know why you build and then get the most that you can out of building." via D.D.
Colorado, United States
Joined: January 25, 2004
KitMaker: 11,669 posts
AeroScale: 11,011 posts
Posted: Thursday, August 21, 2008 - 08:21 AM UTC
Greetings all;
Starting on the interior pieces and framing. Once I skin the interior with the lozenge and the fuselage formers I will have to put the cockpit tub in one side at a time then add the flooring. After that the details. Note to all! Once you start modifiying a kit you have to keep being creative. Lengthening the fuselage the way I did caused me to think outside the box uh er fuselage, uh in the fuselage. You know. . .

". . .The most important thing is to know why you build and then get the most that you can out of building." via D.D.
Colorado, United States
Joined: January 25, 2004
KitMaker: 11,669 posts
AeroScale: 11,011 posts
Posted: Wednesday, August 27, 2008 - 07:31 PM UTC
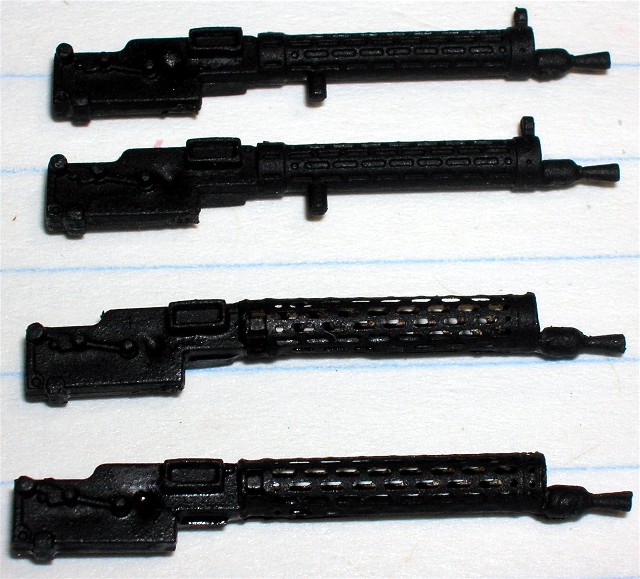
Working on the Spandau Machine Guns! Note all plastic items show a depth variation / step down from the collars to the fretted jackets. These should be pretty much the same down the whole length. The bad thing is that if you do this it leaves a gap at the bottom near the gun barrel. The good thing is that you can use the gun barrel to fill in this gap.
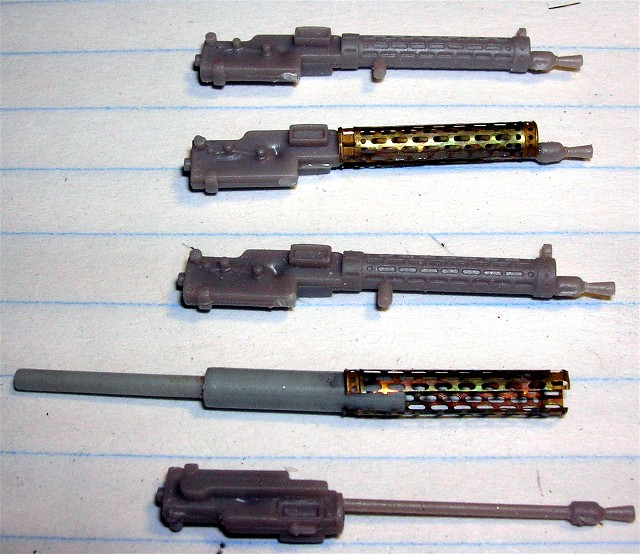
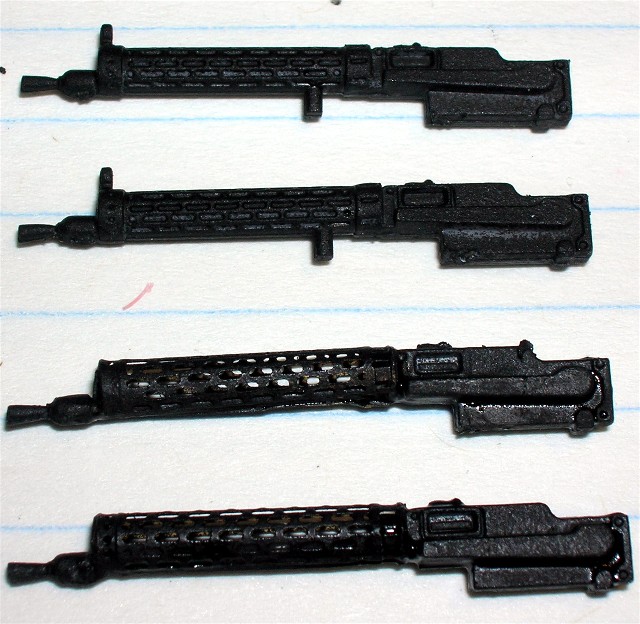
There is a sink mark in the right side of the breeches.
". . .The most important thing is to know why you build and then get the most that you can out of building." via D.D.
Colorado, United States
Joined: January 25, 2004
KitMaker: 11,669 posts
AeroScale: 11,011 posts
Posted: Saturday, August 30, 2008 - 04:20 PM UTC
Greetings all;
Just a comparison for now. But the interior side structures are going to have to be dealt with so I thought I might show you what I will have to do.
Below is the standard kit side wall structure provided in Roden's 1/32 Fok. Dr.I & Fok. D.VI kits
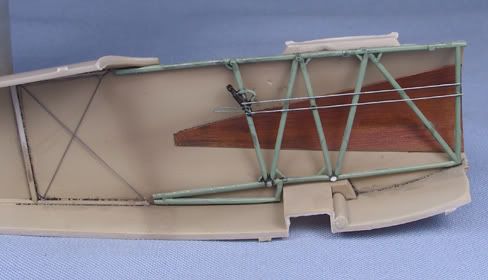
Below is the interior of the Eduard Fokker E.V kit #8096 I did back in April 2006. This interior structure is very close for both the Fok. E.V / D.VIII and the Fok. D.VI kits due to the longer nose areas.
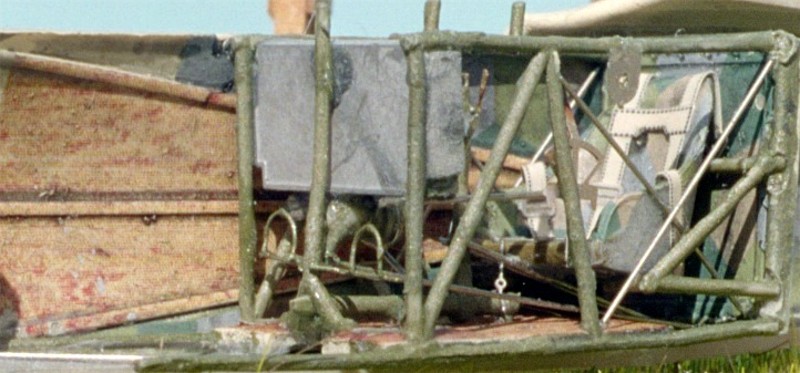
So you can see I will have to do some alterations. Because I lengthened the nose.
". . .The most important thing is to know why you build and then get the most that you can out of building." via D.D.
North Carolina, United States
Joined: June 19, 2007
KitMaker: 604 posts
AeroScale: 600 posts
Posted: Sunday, August 31, 2008 - 02:37 AM UTC
Stephen, I know that a pro like you will make short work of this once you get started. A little plastic rod and soon its done,

RAGIII
Indiana, United States
Joined: May 18, 2008
KitMaker: 210 posts
AeroScale: 80 posts
Posted: Saturday, September 06, 2008 - 07:08 PM UTC
Hello JackFlash,
Amazing! This Fokker DVI is going to be awesome. Will be checking in on all the Roden 1/32 builds. Really a cool idea. Thanks!
Best Regards,
"I don't give a d@mn what command says about anything, I'll tell'em when to hold!" Big Joe
Colorado, United States
Joined: January 25, 2004
KitMaker: 11,669 posts
AeroScale: 11,011 posts
Posted: Tuesday, September 23, 2008 - 07:55 PM UTC
Greetings all;
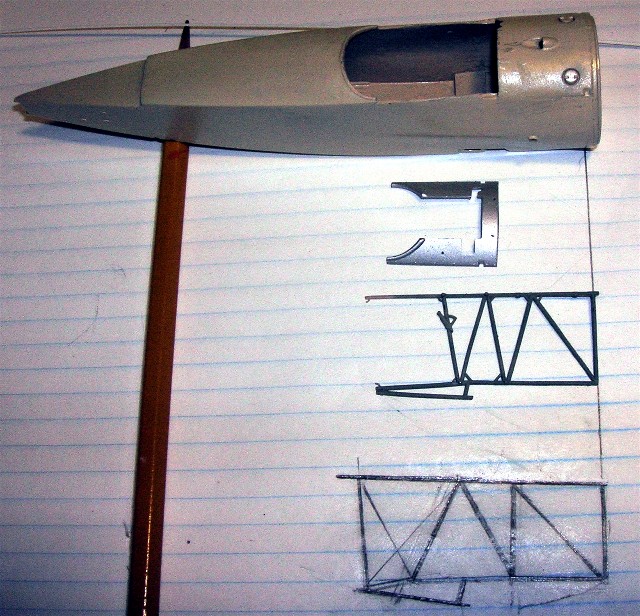
Just a bit of an update. And I didn't want to get too far behind.

Here is the difference between the Fokker Dr.I and the Fok. D.VI fuselage.
". . .The most important thing is to know why you build and then get the most that you can out of building." via D.D.
Colorado, United States
Joined: January 25, 2004
KitMaker: 11,669 posts
AeroScale: 11,011 posts
Posted: Wednesday, September 24, 2008 - 08:13 PM UTC
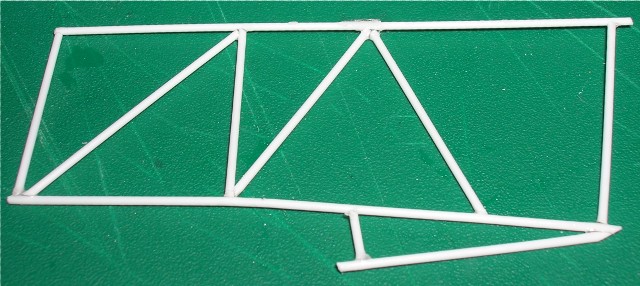
Here is my first attempt at the basic side wall of the Fokker D.VI as it should be.
". . .The most important thing is to know why you build and then get the most that you can out of building." via D.D.
North Carolina, United States
Joined: June 19, 2007
KitMaker: 604 posts
AeroScale: 600 posts
Posted: Thursday, September 25, 2008 - 10:55 AM UTC
Looks good!
Just like I said, a little plastic rod and your done

RAGIII
Colorado, United States
Joined: January 25, 2004
KitMaker: 11,669 posts
AeroScale: 11,011 posts
Posted: Thursday, September 25, 2008 - 01:52 PM UTC
I am going to need some 1/32 five colour lozenge myself.
". . .The most important thing is to know why you build and then get the most that you can out of building." via D.D.
Victoria, Australia
Joined: November 26, 2006
KitMaker: 608 posts
AeroScale: 602 posts
Posted: Thursday, September 25, 2008 - 03:39 PM UTC
Hi Stephen,
You might want to have a play on the Aerodrome (Losenge Fabric test for all) thread regarding this.
Our mate Wojtec posted a beautiful pattern that printed up a treat for me.
Cheers,
Hugh
Alberta, Canada
Joined: January 19, 2008
KitMaker: 6,743 posts
AeroScale: 6,151 posts
Posted: Monday, September 29, 2008 - 04:29 AM UTC
Nice work on the frame Stephen .
Colorado, United States
Joined: January 25, 2004
KitMaker: 11,669 posts
AeroScale: 11,011 posts
Posted: Wednesday, October 01, 2008 - 01:01 PM UTC
I have done some work on the undersurface lozenge for the wings. I have to say I am very pleased with the 1/32 lozenge Roden has for this kit. Very resilient! It tends to stretch like fabric. It takes careful handling and with care any folds or creases can be smoothed out before you add any solvents. Images later. I will work on the top surfaces later tonight.
". . .The most important thing is to know why you build and then get the most that you can out of building." via D.D.
Victoria, Australia
Joined: November 26, 2006
KitMaker: 608 posts
AeroScale: 602 posts
Posted: Wednesday, October 01, 2008 - 02:47 PM UTC
Stephen,
How is Roden's colour on these decals? In the past there has been a lot of discussion abou the veracity of their lozenge colours.
Cheers,
Hugh
Colorado, United States
Joined: January 25, 2004
KitMaker: 11,669 posts
AeroScale: 11,011 posts
Posted: Wednesday, October 01, 2008 - 08:19 PM UTC
Not too bad. I think the undersurface decals came out too orange in this image . Due to my flash.
". . .The most important thing is to know why you build and then get the most that you can out of building." via D.D.
Alberta, Canada
Joined: January 19, 2008
KitMaker: 6,743 posts
AeroScale: 6,151 posts
Posted: Thursday, October 02, 2008 - 06:05 AM UTC
I have only seen Rodens 48 Lozenge which comes with the Fokker kits . So this is the first time on viewing them in 32 and it is a vast improvment over there 48 .
Still they are better then the ones that come with the Battleaxe kit .
How would these compair with Techmods 32 Lozenge ?
Good progess on the build , can't wait to see the work in the office
Victoria, Australia
Joined: November 26, 2006
KitMaker: 608 posts
AeroScale: 602 posts
Posted: Thursday, October 02, 2008 - 11:28 AM UTC
I'm wondering how he is going to get the office in. . . Now that he had closed up the fuselage...
Techmod? In my experience. . . limited as it is, these decals are very difficult to use. You need to at least give them a coat of something to strengthen them up a bit.
Also, the 1/48 5 colour are very bright . . . Need a lot of toning down.
Cheers,
Hugh
Colorado, United States
Joined: January 25, 2004
KitMaker: 11,669 posts
AeroScale: 11,011 posts
Posted: Thursday, October 02, 2008 - 03:10 PM UTC
Quoted Text
I'm wondering how he is going to get the office in. . . Now that he had closed up the fuselage. . . Cheers,
Hugh
Its all done with mirrors. Nothing up my sleeve presto!
". . .The most important thing is to know why you build and then get the most that you can out of building." via D.D.
Östergötland, Sweden
Joined: April 04, 2006
KitMaker: 1,058 posts
AeroScale: 1,004 posts
Posted: Friday, October 03, 2008 - 10:43 PM UTC
Yep, this is looking real good. I just hope that you can get all theese bits together without that white paper. I think you fooled the camera to focus on the white paper. Often I find taking good photos harder than building models. The nice part is that this is a fourm for modellers and models
Your build Stephen is the best
Larsa
Colorado, United States
Joined: January 25, 2004
KitMaker: 11,669 posts
AeroScale: 11,011 posts
Posted: Saturday, October 04, 2008 - 03:13 PM UTC
Larsa your kind words are a healing ointment to my tattered mind.
". . .The most important thing is to know why you build and then get the most that you can out of building." via D.D.
Colorado, United States
Joined: January 25, 2004
KitMaker: 11,669 posts
AeroScale: 11,011 posts
Posted: Sunday, October 05, 2008 - 04:33 PM UTC
The tough part is going to be the 1/32 rib tapes. I may not have enough material.
". . .The most important thing is to know why you build and then get the most that you can out of building." via D.D.
North Carolina, United States
Joined: June 17, 2006
KitMaker: 478 posts
AeroScale: 391 posts
Posted: Sunday, October 05, 2008 - 10:27 PM UTC
OK Stephen, you can stop anytime now............
All this chit chat about Lozenge stuff is "making" me look in that direction. It may not be my NEXT build......Abbie is next for me, but later......................

It would need to be in 1/32...............I've even considered making my own. Even photoshopped a few not too bad looking candidates (in my oppinion). The problem seems to lie in decal paper. I've used some before in my inkjet printer but it proved to be rather thick. Even laying flat, it took a lot of solvaset and future to hide them. Suggestions on a GOOD THIN paper?
Anywho..........it's fun watching you work the magic with the Lozenge.............plus I wanna see all that "stuff" stuffed into the fuselage.
Regards
Steve
1/350 USS San Francisco on Slipways
1/350 HMS Warspite in Research Mode
1/32 P-39D stalled
Victoria, Australia
Joined: November 26, 2006
KitMaker: 608 posts
AeroScale: 602 posts
Posted: Sunday, October 05, 2008 - 11:13 PM UTC
Hey Steve,
There is a whole big discussion on making your own Losenge decals over on the Aerodrome...
http://www.theaerodrome.com/forum/models/37519-losenge-decal-test-all-10.html This is the page that I was most intersted in... And I printed Wojteks examples on Microscale paper with my Kodak Ink Jet. Though thick (the paper) I was very pleased with the results.
Try it!
Cheers,
Hugh


