

Stephen,
I can smell the castor oil and the clear dope on the linen............CONTACT!!!!!!
Regards, Dwayne
Early Aviation
Discuss World War I and the early years of aviation thru 1934.
Discuss World War I and the early years of aviation thru 1934.
Hosted by Jim Starkweather
1/32 Roden GB 2008 Fokker D.VI

Dwaynewilly

Joined: December 15, 2006
KitMaker: 365 posts
AeroScale: 344 posts
Posted: Tuesday, November 11, 2008 - 05:45 AM UTC

JackFlash
Joined: January 25, 2004
KitMaker: 11,669 posts
AeroScale: 11,011 posts
Posted: Wednesday, November 12, 2008 - 10:19 PM UTC
Greetings all;
Thank you for your continuing support.
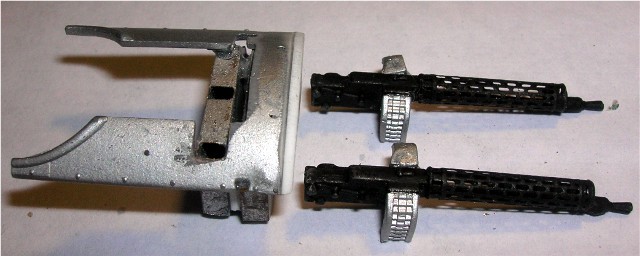
I hate it when I screw up. For instance with all the modifications and notes I make to myself here is a faux paux I could have avoided. The forward vertical uppright ( 22C ) that is supposed to hold the horizontal support for the forward end of the gun breeches should not go in as the instructions note if you extended the fuselage.
That veritcal support should go between the ammo box and the empty belt box. So to fix this you have to cut off the guide block on the lower end of 22 C and add the rudder bar ( 14 C ) to that side.
Below I did not catch it until after I had added the photoetch C -yokes, turnbuckles and rigging wires.
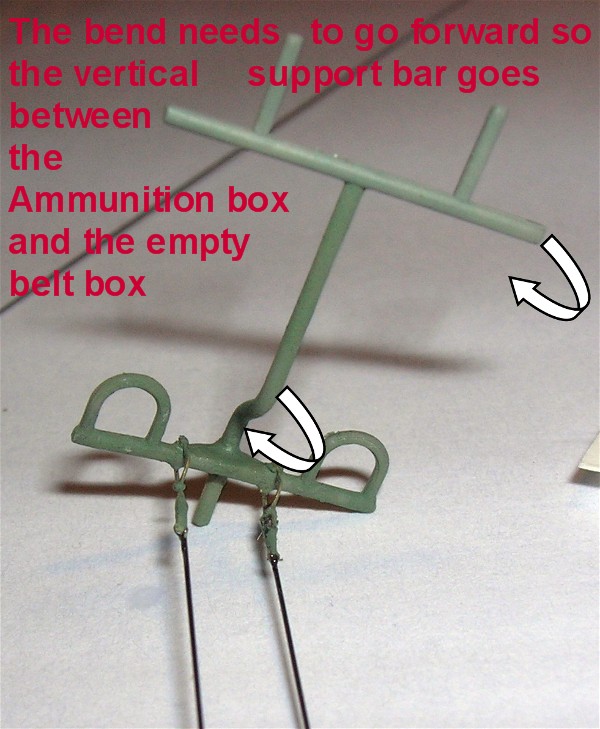
Note - the rudder bar is ok its just the vertical support bar is facing the wrong way.
Thank you for your continuing support.
I hate it when I screw up. For instance with all the modifications and notes I make to myself here is a faux paux I could have avoided. The forward vertical uppright ( 22C ) that is supposed to hold the horizontal support for the forward end of the gun breeches should not go in as the instructions note if you extended the fuselage.
That veritcal support should go between the ammo box and the empty belt box. So to fix this you have to cut off the guide block on the lower end of 22 C and add the rudder bar ( 14 C ) to that side.
Below I did not catch it until after I had added the photoetch C -yokes, turnbuckles and rigging wires.
Note - the rudder bar is ok its just the vertical support bar is facing the wrong way.
JackFlash
Joined: January 25, 2004
KitMaker: 11,669 posts
AeroScale: 11,011 posts
Posted: Wednesday, November 12, 2008 - 10:26 PM UTC
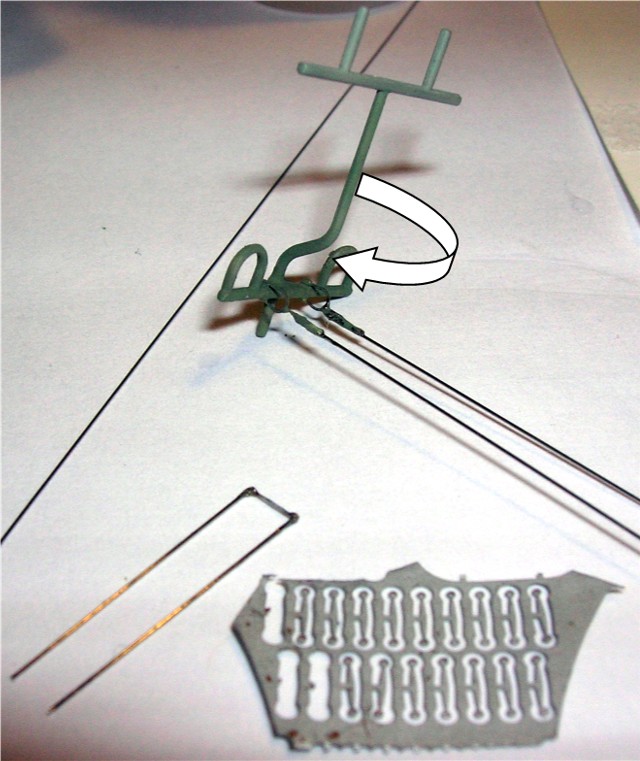
Luckily I had not installed it yet so I was able to use my sprue cutters and nip it off and turn the bend toward the front of the fuselage and all was right wi the world.
Now to the vertical support for the forwar end of the gun breeches. While I nipped of the vertical support (22 C ) I went ahead and nipped of the horizontal bar and made it lay between the ammo box and the empty belt box. Then I shortened its verticals and will add the PE for the forward gun flanges.
Now to the vertical support for the forwar end of the gun breeches. While I nipped of the vertical support (22 C ) I went ahead and nipped of the horizontal bar and made it lay between the ammo box and the empty belt box. Then I shortened its verticals and will add the PE for the forward gun flanges.
Hatter50
Joined: June 17, 2006
KitMaker: 478 posts
AeroScale: 391 posts

Posted: Wednesday, November 12, 2008 - 10:31 PM UTC
Hmmmm....a new "Rule"? A modification early on always requires repairs to a later part of the build.
Thanks for sharing the "Fix". Quite a nice build.
Regards
Steve
Thanks for sharing the "Fix". Quite a nice build.
Regards
Steve
JackFlash
Joined: January 25, 2004
KitMaker: 11,669 posts
AeroScale: 11,011 posts
Posted: Wednesday, November 12, 2008 - 10:34 PM UTC
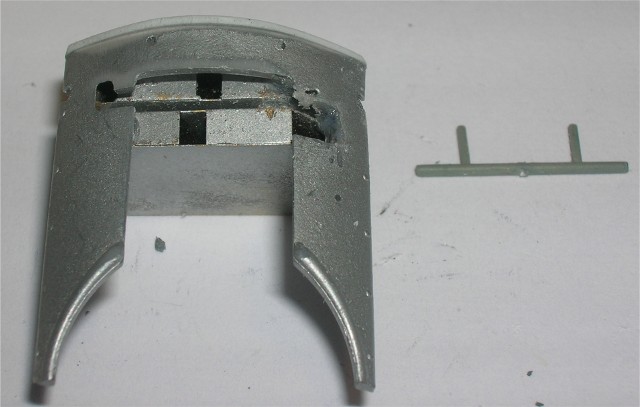
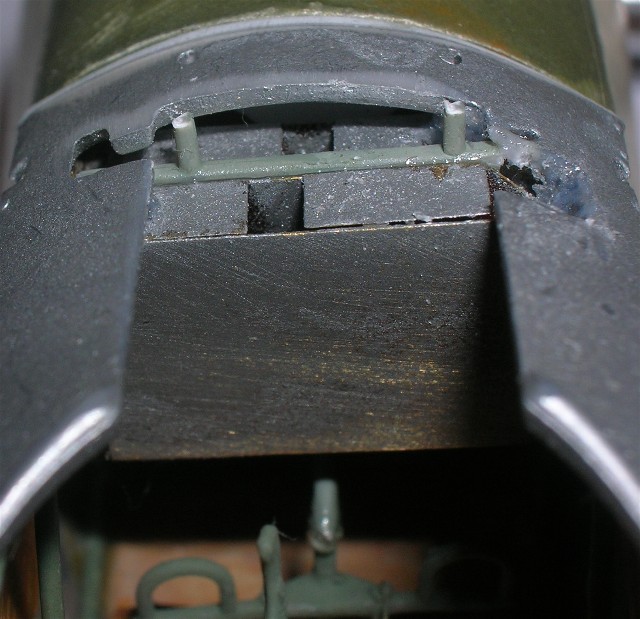
Then after dry fitting everything I got out my Dremel and ground down some rough spots and drilled out the upper cowling to better take the Spandau machine guns and their feeds and empty belt tubes. I also repainted and touched up a few areas as well.
JackFlash
Joined: January 25, 2004
KitMaker: 11,669 posts
AeroScale: 11,011 posts
Posted: Wednesday, November 12, 2008 - 10:39 PM UTC
Quoted Text
Hmmmm....a new "Rule"? A modification early on always requires repairs to a later part of the build. Thanks for sharing the "Fix". Quite a nice build.
Regards
Steve
Thanks Steve. I would not call it a rule. Though it will find its way into the "Laws of Modeling 101". Thats a guarantee. "When you modify one part you will have to fix everything else it relates to."
JackFlash
Joined: January 25, 2004
KitMaker: 11,669 posts
AeroScale: 11,011 posts
Posted: Wednesday, November 12, 2008 - 10:43 PM UTC
Eeeeek I have made it to page three and I am just now adding rib tapes. Roden really took care of me on this. Yes I have been chit chatting with them on what is needed in that arena. Had one of them quote me a post in the Lozenge 101 thread. Yes they are watching us.

thegirl

Joined: January 19, 2008
KitMaker: 6,743 posts
AeroScale: 6,151 posts
Posted: Thursday, November 13, 2008 - 02:59 AM UTC
Awesome Stephen , turning out to be a fantastic build . lozenge looks good with the rib taping add . Was it common for the Fokker factory to use strips of lozenge for the rib taping other then using the blue and pink , or was this done on the basis of what was on hand ?
Can't wait to see the finished model .
Can't wait to see the finished model .
JackFlash
Joined: January 25, 2004
KitMaker: 11,669 posts
AeroScale: 11,011 posts
Posted: Thursday, November 13, 2008 - 05:16 AM UTC
Greetings Terri,
Fokker Schwerin used lozenge strips.
Albatros Johannistahl used Salmon . pink (possibly lavender as well) and lozenge.
OAW - East Alb. Werke used lt. blue or lozenge.
I just finished texuring the top wing upper surface. More later.
Fokker Schwerin used lozenge strips.
Albatros Johannistahl used Salmon . pink (possibly lavender as well) and lozenge.
OAW - East Alb. Werke used lt. blue or lozenge.
I just finished texuring the top wing upper surface. More later.
thegirl
Joined: January 19, 2008
KitMaker: 6,743 posts
AeroScale: 6,151 posts
Posted: Saturday, November 15, 2008 - 02:42 AM UTC
so this aricraft was built at all three factories then ?

Kalt

Joined: June 14, 2006
KitMaker: 222 posts
AeroScale: 219 posts

Posted: Saturday, November 15, 2008 - 05:11 AM UTC
No, it was built at Fokker Schwerin. The strips were cut from the same lozenge fabric used for covering of the plane.
JackFlash
Joined: January 25, 2004
KitMaker: 11,669 posts
AeroScale: 11,011 posts
Posted: Saturday, November 15, 2008 - 06:37 AM UTC
Quoted Text
so this aricraft was built at all three factories then ?
Kalt is correct Terri. Fokker Schwerin was to only one to produce this variant. There were only sixty airframes that were completed before the D.VI contract was terminated in favor of more D.VII types.
Now the "Fokker factory" as we call it was divided into several business locations owned by Anthony Fokker. The wings were built in one location at a former piano works. Now the fuselages and its components were built at the Schwerin factory itself. Then there was Gorries. It appears to be more a warehouse / storage and test facility also owned by Fokker.

RAGIII
Joined: June 19, 2007
KitMaker: 604 posts
AeroScale: 600 posts
Posted: Saturday, November 15, 2008 - 01:22 PM UTC
Stephen,
The wings are looking great. Lozenge is certainly one of your strongest points in your modeling! If only I could take what seems to be something too bright and off color and make it look like you do!
RAGIII
The wings are looking great. Lozenge is certainly one of your strongest points in your modeling! If only I could take what seems to be something too bright and off color and make it look like you do!
RAGIII
thegirl
Joined: January 19, 2008
KitMaker: 6,743 posts
AeroScale: 6,151 posts
Posted: Saturday, November 15, 2008 - 02:08 PM UTC
Hey thanks Kalt and Stephen . I knew about the different factories , I only asked because I have seen some on line builds of this airframe and the build(ers) used the coloured rib tapes which ended up confusing me . So thank-you for clearing that up for me . 
JackFlash
Joined: January 25, 2004
KitMaker: 11,669 posts
AeroScale: 11,011 posts
Posted: Sunday, November 16, 2008 - 03:54 PM UTC
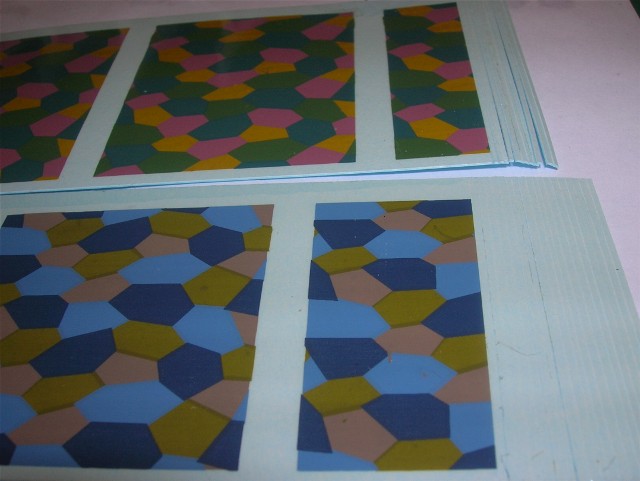
Since I am busy applying the "extra lozenge" to the kit wings here would be a good point to discuss their unique application requirements. Specifically Roden sent me some of their older lozenge decal sets that don't match the performance of the new items. Mostly this is in the adhesive, glue or sticking neeeds of general use decals. The new loznge decals work great have their own handling issues even though they are better. Both are four colour and very simialr in colouring.
The new lozenge decals tend to have only one concern. To start with they were given an immediate clear gloss coating and let dry. Several light coats is advisable. The concern comes if they fold over on themselves, it takes good effort to get them laid out correctly. BUT they are sturdy enough to take the pulling , pushing and prodding. Almost tear resistant and I would say vinyl like. But very thin and react well to liberal amounts of Micro Sol & Set.
The older lozenge decals Need immediate clear gloss coating and let dry. Several light coats is advisable. They are thin and brittle. Also when I began cutting them in strips the outer edge tended to fracture on each section I tried. Then I started cutting the strips out using light strokes instead of digging in and trying to get it in one or two strokes.
In the former case the strip always curled and would fracture before settling down. The the former instance where I used several light strokes it did not dig t=very deep but cut through the decal. The lack of glue / adhesive on the old sheets allowed for the cut strip to come up completely from the paper backing, without any immersion in water. Their reaction to the sol & set was impressive.. They stuck hard and fast to the wing ribs without any water, just sol & set. But I do recommend a 50 / 50 % mix of water and white school glue if you don't use sol & set.

CaptainA
Joined: May 14, 2007
KitMaker: 3,117 posts
AeroScale: 2,270 posts
Posted: Monday, November 17, 2008 - 09:20 AM UTC
How did the D.VI compare in performance to the D.VII?
Based on what you have seen in this kit. Do you think there might be a D.VII in the works at Castle Roden?
Based on what you have seen in this kit. Do you think there might be a D.VII in the works at Castle Roden?

JackFlash
Joined: January 25, 2004
KitMaker: 11,669 posts
AeroScale: 11,011 posts
Posted: Monday, November 17, 2008 - 04:04 PM UTC
Greetings Carl;
There were two classes of aircraft at Adlershof. Rotaries & inlines. This breaks down to low altitude and high altitude. Its a bit like comparing apples and oranges. For their class limitations and what the manufacturers designed them for, they were tops in their class and horsepower.
At the First Fighter Competition at Adlershof in January 1918 it was decided to manufacture the Fokker D.VI as a move to insure enough rotary engine fighters would be available for frontline operations. Since the Oberursel Ur.III 145hp and the Goebel Goe III 160hp or the Siemens-Halske Sh III 160-220hp were still in short supply due to production concerns, the Fokker V.13 with its very reliable Oberursel Ur.II 120hp was chosen to go into production.
Make no mistake, while there are physical similarities between the Fokker companys Dr.I and the D.VI, one was not developed from the other. Like any engineering concern the Fokker designers had formulas that they used for aircraft specifications, especially concerning the type and weight of an installed motor in an airframe. The closest similarity to the D.VI (rotary) is the D.VII (inline six.) Fokker built one for type testing in the low altitude operations class and one for higher altitude operations class.
The Fokker D.VI was to make up the partial compliment of Jagdstaffel 80b. In Jasta 64w (Fokker D.VI 1679/18), Kest 4b (Fokker D.VI 1648/18 ? ) and in Kest 1a, single examples were used for rotary engine familiarization flights by its pilots. These units were designated to receive the new Pfalz D.VIII with the Sh III 160-220hp and had been flying Albatros D.Va types with worn-out inline six Mercedes D.IIIaü 180hp.
Concerning the possibility of a 1/32 Fokker D.VII, if I was at liberty to say it I would.
JackFlash
Joined: January 25, 2004
KitMaker: 11,669 posts
AeroScale: 11,011 posts
Posted: Tuesday, November 18, 2008 - 06:23 PM UTC
Quoted Text
Since I am busy applying the "extra lozenge" to the kit wings here would be a good point to discuss their unique application requirements. Specifically Roden sent me some of their older lozenge decal sets that don't match the performance of the new items. Mostly this is in the adhesive, glue or sticking neeeds of general use decals. The new loznge decals work great have their own handling issues even though they are better. Both are four colour and very simialr in colouring.
The new lozenge decals tend to have only one concern. To start with they were given an immediate clear gloss coating and let dry. Several light coats is advisable. The concern comes if they fold over on themselves, it takes good effort to get them laid out correctly. BUT they are sturdy enough to take the pulling , pushing and prodding. Almost tear resistant and I would say vinyl like. But very thin and react well to liberal amounts of Micro Sol & Set.
The older lozenge decals Need immediate clear gloss coating and let dry. Several light coats is advisable. They are thin and brittle. Also when I began cutting them in strips the outer edge tended to fracture on each section I tried. Then I started cutting the strips out using light strokes instead of digging in and trying to get it in one or two strokes.
In the former case the strip always curled and would fracture before settling down. The the former instance where I used several light strokes it did not dig t=very deep but cut through the decal. The lack of glue / adhesive on the old sheets allowed for the cut strip to come up completely from the paper backing, without any immersion in water. Their reaction to the sol & set was impressive.. They stuck hard and fast to the wing ribs without any water, just sol & set. But I do recommend a 50 / 50 % mix of water and white school glue if you don't use sol & set.
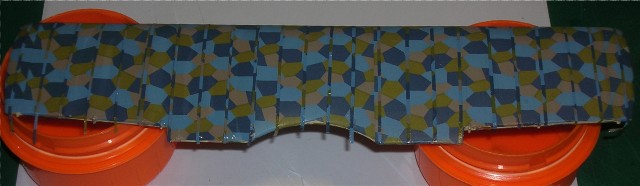
Here is the current state of the wings with rib tapes. This is the lower surface areas.
Note here the ailerons and lower wing "upper surfaces" are not textured yet.
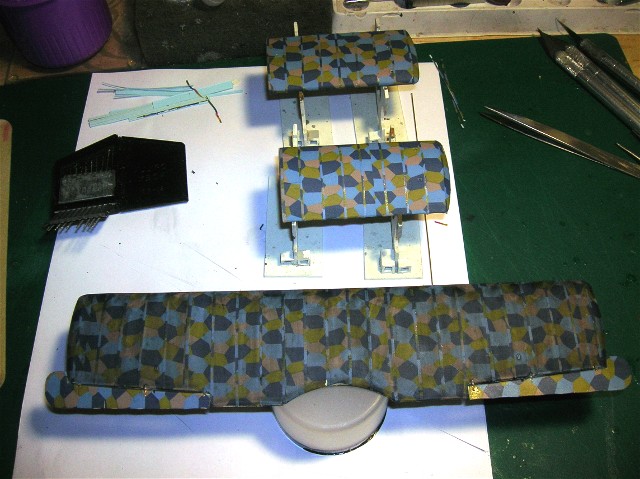
The edging tapes are next.
JackFlash
Joined: January 25, 2004
KitMaker: 11,669 posts
AeroScale: 11,011 posts
Posted: Tuesday, November 18, 2008 - 10:32 PM UTC
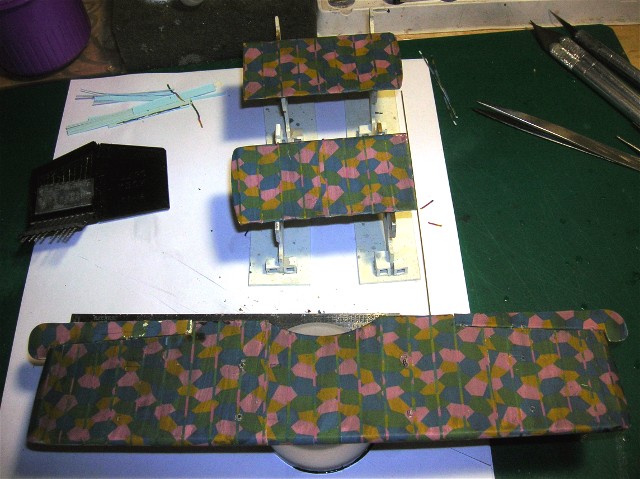
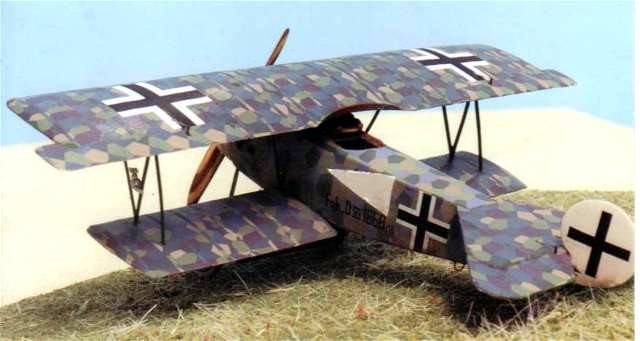
This is a 1:48 scale build of what I am going for in the 1:32 build.
thegirl
Joined: January 19, 2008
KitMaker: 6,743 posts
AeroScale: 6,151 posts
Posted: Wednesday, November 19, 2008 - 03:00 AM UTC
As always Stephen i'm impressed with your lozenge texturing . You sure do take it to the next level .
On the 1/48 build , is that the Eduard kit ?
On the 1/48 build , is that the Eduard kit ?

Repainted

Joined: April 04, 2006
KitMaker: 1,058 posts
AeroScale: 1,004 posts
Posted: Wednesday, November 19, 2008 - 06:18 AM UTC
You´re the master of Lozenge Stephen, Just love it.Someday I´ll start up this kit myself, so all you show here is saved on the computer.
Larsa Q
Larsa Q
JackFlash
Joined: January 25, 2004
KitMaker: 11,669 posts
AeroScale: 11,011 posts
Posted: Wednesday, November 19, 2008 - 08:14 AM UTC
Quoted Text
As always Stephen i'm impressed with your lozenge texturing . You sure do take it to the next level . On the 1/48 build , is that the Eduard kit ?
Thank you Terri, No it is the Tom's Modelworks resin kit He did a vac & resin kits.
JackFlash
Joined: January 25, 2004
KitMaker: 11,669 posts
AeroScale: 11,011 posts
Posted: Wednesday, November 19, 2008 - 08:15 AM UTC
Quoted Text
You´re the master of Lozenge Stephen, Just love it.Someday I´ll start up this kit myself, so all you show here is saved on the computer. Larsa Q
Thanks for your kind words Larsa, as always its good to hear from you.
CaptainA
Joined: May 14, 2007
KitMaker: 3,117 posts
AeroScale: 2,270 posts
Posted: Wednesday, November 19, 2008 - 08:25 AM UTC
Quoted Text
Concerning the possibility of a 1/32 Fokker D.VII, if I was at liberty to say it I would.
Consider my curiosity piqued.
JackFlash
Joined: January 25, 2004
KitMaker: 11,669 posts
AeroScale: 11,011 posts
Posted: Monday, December 01, 2008 - 02:56 PM UTC
The cockpit was closed up last night. Images later tomorrow night or early in the AM the next day.
 |

WEB HOSTING BY


Copyright ©2021 AeroScale and Kitmaker Network, a subsidiary of Silver Star Enterprises
All Rights Reserved. Please read our Conditions of Use and Privacy Policy.
All Rights Reserved. Please read our Conditions of Use and Privacy Policy.