_GOTOBOTTOM
Early Aviation
Discuss World War I and the early years of aviation thru 1934.
1/32 Roden GB 2008 Fokker D.VI
JackFlash
_VISITCOMMUNITY
Colorado, United States
Joined: January 25, 2004
KitMaker: 11,669 posts
AeroScale: 11,011 posts
Posted: Saturday, February 16, 2008 - 07:51 AM UTC

‘Filling the ranks, standing in the gap’
At the First Fighter Competition at Adlershof in January 1918 it was decided to manufacture the Fokker D.VI as a move to insure enough rotary engine fighters would be available for front line operations. Since the Oberursel Ur.III 145hp and the Goebel Goe III 160hp or the Siemens-Halske Sh III 160-220hp were still in short supply due to production concerns, the Fokker V.9 with an engine change to the very reliable Oberursel Ur.II 120hp was chosen to go into production. Make no mistake, while there are physical similarities between the Fokker company’s Dr.I and the D.VI, one was not developed from the other. Like any engineering concern the Fokker designers had formulas that they used for aircraft specifications, especially concerning the type and weight of an installed motor in an airframe. The closest similarity to the D.VI (rotary) is the D.VII (inline six.) Fokker built one for type testing in the ‘low altitude operations class’ and one for ‘higher altitude operations class.’ The Fokker D.VI was to make up the partial compliment of Jagdstaffel 80b. In Jasta 64w (Fokker D.VI 1679/18), Kest 4b (Fokker D.VI 1648/18 ? ) and in Kest 1a, single examples were used for rotary engine familiarization flights by its pilots. These units were designated to receive the new Pfalz D.VIII with the Sh III 160-220hp and had been flying Albatros D.Va types with worn-out inline six Mercedes D.IIIaü 180hp.

It was on a night as cold as a money lender’s heart, deep in the Ukraine, during the worst blizzard in 100 years, an icy wind tore across the massive frozen lake surrounding castle Roden. Its deep howl was like that of a prehistoric black wolf from the high frozen Steppes. In the laboratory at the top of the old weather beaten west tower, the black robed, design wizards huddled over a boiling cauldron and poured liquid styrene into their newest molds. In the eerie half light of the whirring, hissing and sparking- high voltage machinery, magic wands are waved, switches are thrown and an gnarled and twisted hand spreads techno-dust in to the bubbling soup. Then a gaunt, pale, half crazed figure in a medical smock steps up to the mold box and holds his stethoscope to the outer casing. As he listens he commands, “. . .SILENCE!” A minion wizard turns to the aged 1913 Philco radio and turned down the amp-ed up blasts of “Manheim Steamroller.” Moments later, suddenly, the doctor cries out, “. . .Its Alive!!! . . . its alive!!! Thus another scale wonder is borne in to this world.
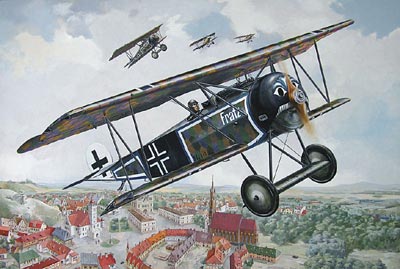


In recent years interest in larger 1/32 scale WWI aircraft kits has flourished. This is possibly due to the fact that the youngsters that were building 1/72 scale in the 1960's are struggling with changing eyesight due to age. We are a stubborn lot, we fanatics of the first world war flying machines. That is what we like to build. Fortune smiles on us with the out put of Roden of the Ukraine. This kit review will deal specifically with their Roden Fokker D.VI kit # 603. Roden’s all plastic kits seem to be aimed at the average modeler with an eye for detail. Begin by a thorough clean up of all parts in warm water and dish soap, scrub ( use an old toothbrush) and rinse thoroughly. Antibacterial soap is a good idea when using acrylic paints.
CaptainA
_VISITCOMMUNITY
Indiana, United States
Joined: May 14, 2007
KitMaker: 3,117 posts
AeroScale: 2,270 posts
Posted: Sunday, March 02, 2008 - 11:08 AM UTC
So, when will this one be flying?
JackFlash
_VISITCOMMUNITY
Colorado, United States
Joined: January 25, 2004
KitMaker: 11,669 posts
AeroScale: 11,011 posts
Posted: Sunday, March 02, 2008 - 12:07 PM UTC
I am fitting parts even as we speak.
JackFlash
_VISITCOMMUNITY
Colorado, United States
Joined: January 25, 2004
KitMaker: 11,669 posts
AeroScale: 11,011 posts
Posted: Thursday, March 27, 2008 - 04:22 PM UTC
Step 1a & b.) It starts with modifying the seat side support frames ( 6 D ). These are identical molds and need to be altered by taking off an “outside facing peg.” The inside facing pegs will serve to support the seat front edge.

Step 1c.) Unites the rear cockpit screen /frame (2 B ), side frames (6 D X 2 ) and the seat 24 C ) into one assembly. As parachutes came into use, the seat was made deeper to accommodate the chute pack as a cushion. You will need to add .060 to the underside of the seat. This will mean the removal of the harness retaining studs if present. Use a motor tool cutter to thin the inner face of the back and arm rest. The outer face would be aluminum. The addition to the seat underside may raise it but still keep it well within the cockpit. The seat back was covered in fabric that was attached at its edges to eyelets in the seat’s outer rim. I made the seat supports with brass-rod sections and added a cross brace to rest the seat front edge on. The harness assemblies are heated to easily anneal them into place. Begin with the harness buckles and work out to the other ends. Once shaped the item can be glued into place again starting with the buckles and working outward anneal them in place, move to the other end annealing as I go. Then glue them down using thin cyanoacrylate. Cockpit rear bulkhead has holes for rudder and elevator control cables to pass through. The screen/bulkhead can be decaled to represent ‘four-colour lozenge’ fabric. The reinforcement edge was leather. The horizontal bar on the rear cockpit screen ( 2 B ) is the connecting top of the seat support frame.
JackFlash
_VISITCOMMUNITY
Colorado, United States
Joined: January 25, 2004
KitMaker: 11,669 posts
AeroScale: 11,011 posts
Posted: Saturday, May 10, 2008 - 05:27 PM UTC
Need a math check here folks. The Roden kit fuselage is a modified Fokker Dr .I item I need to lengthen it in front of the lower wing. I have a 1/32 scale kit .

The Dr.I length at 5770mm.
The Fokker D.VI fuselage is 5900mm.
That is a difference of 130mm in full size.

What would 130mm be in 1/32 scale inches? 4/32 is ".124.00". Roughly 1/8 of an inch?

The longer length was to account for the second lower wing spar.
MerlinV
_VISITCOMMUNITY
Victoria, Australia
Joined: November 26, 2006
KitMaker: 608 posts
AeroScale: 602 posts
Posted: Saturday, May 10, 2008 - 10:39 PM UTC
I get .1599" Stephen.

That's actually more like 5/32"

Cheers,

Hugh
JackFlash
_VISITCOMMUNITY
Colorado, United States
Joined: January 25, 2004
KitMaker: 11,669 posts
AeroScale: 11,011 posts
Posted: Sunday, May 11, 2008 - 02:03 PM UTC

Quoted Text

I get .1599" Stephen. That's actually more like 5/32" Cheers, Hugh


I can live with that! Thanks Hugh!
MerlinV
_VISITCOMMUNITY
Victoria, Australia
Joined: November 26, 2006
KitMaker: 608 posts
AeroScale: 602 posts
Posted: Sunday, May 11, 2008 - 03:33 PM UTC
No Probs. When I did my apprenticeship (Tool Making) I had to learn to think in inches and millimeters both at the same time... I'm a little out of practice now that I sit at at desk all day, but you can't go far wrong if you think of a millimeter as near as damnit .040".

Cheers,

Hugh
thegirl
_VISITCOMMUNITY
Alberta, Canada
Joined: January 19, 2008
KitMaker: 6,743 posts
AeroScale: 6,151 posts
Posted: Sunday, May 11, 2008 - 03:36 PM UTC
I've been following this post and have a question , If you where to kit bash this aircraft in 1/48 . Would the fuselage of a Fokker E.V work . The wings seem to be the same as Fokker D.VII . I have a spare airframe of the DR.1 and the E.V as well as flying surfaces . Which would be the best option for this . Thanks .
JackFlash
_VISITCOMMUNITY
Colorado, United States
Joined: January 25, 2004
KitMaker: 11,669 posts
AeroScale: 11,011 posts
Posted: Sunday, May 11, 2008 - 08:56 PM UTC

Quoted Text

I've been following this post and have a question , If you where to kit bash this aircraft in 1/48 . Would the fuselage of a Fokker E.V work . The wings seem to be the same as Fokker D.VII . I have a spare airframe of the DR.1 and the E.V as well as flying surfaces . Which would be the best option for this . Thanks .


For a kit crash you need the;

Fokker Dr.I prop, engine, cowling, fuselage horizontal tail unit & rudder.

Fokker D.VII upper and lower wings (cut down shorter)

Struts need to be scratchbuilt.
thegirl
_VISITCOMMUNITY
Alberta, Canada
Joined: January 19, 2008
KitMaker: 6,743 posts
AeroScale: 6,151 posts
Posted: Monday, May 12, 2008 - 01:58 AM UTC
Thanks Stephen . Having all the parts I need already is a good start for this project . This gives me more time to find the ref's that I will need . Cheers
JackFlash
_VISITCOMMUNITY
Colorado, United States
Joined: January 25, 2004
KitMaker: 11,669 posts
AeroScale: 11,011 posts
Posted: Monday, May 12, 2008 - 09:18 AM UTC

Quoted Text

Thanks Stephen . Having all the parts I need already is a good start for this project . This gives me more time to find the ref's that I will need . Cheers


Here is a bit of fun in 1/48.
Click Here.
thegirl
_VISITCOMMUNITY
Alberta, Canada
Joined: January 19, 2008
KitMaker: 6,743 posts
AeroScale: 6,151 posts
Posted: Monday, May 12, 2008 - 10:21 AM UTC
Thanks Stephen , having some photos of a built kit helps out . My main point for ref's is the top decking in front of the cockpit . It appears to the same as the E.V or was there slight variations .
JackFlash
_VISITCOMMUNITY
Colorado, United States
Joined: January 25, 2004
KitMaker: 11,669 posts
AeroScale: 11,011 posts
Posted: Tuesday, May 13, 2008 - 06:54 AM UTC
Here are some of the references I will use.

References:
Corrugated Fokker by R. Houchin, Scale R/C Modeler Vol.5 #4 1979.
Fokker D.VI by R Houchin pt.I, World War 1 Aero #77, June 1980.
Fokker D.VI by R Houchin pt.II, World War 1 Aero #85, January 1981.
Fokker D.VI by P. Grosz, Windsock Datafile 84, Albatros Pub. Ltd. 1986.
Fokker Facts and Opinions, a plea... by Cross & Cockade USA Vol.5 #3, Pp.213-220, 1964.
Fokker Fighters of WWI by A. Imrie, Osprey,Vintage Warbirds #6, Photos #60-1, 79,92-3, 1986.
German Army Air Service in WWI by R.Rimell, Osprey, Vint. Warbirds #2, Photos 40-1, 1985.
‘Kest 1a - a thirty-two day tour of duty’ by S. T. Lawson, Cross & Cockade Int. Vol.22 #2, 1991.
Kofl Report for Jasta 64w 1918.
Pictorial History of the German Army Air Service by A. Imrie, Ian Allen Pub. 1971.
Scale Model Aircraft in Plastic Card by H.Woodman, Model & Allied Pub., 1975.
WWI Warplanes Vol. 1 by R. Rimell, Albatros Productions Ltd. Pp.40-7, 1992.
thegirl
_VISITCOMMUNITY
Alberta, Canada
Joined: January 19, 2008
KitMaker: 6,743 posts
AeroScale: 6,151 posts
Posted: Tuesday, June 17, 2008 - 06:42 PM UTC
I would like to give RagIII a big thanks for the Eduard kit and to Stephen for the list of ref ...
Thanks guys !! not to many now , have to work in the morning !
JackFlash
_VISITCOMMUNITY
Colorado, United States
Joined: January 25, 2004
KitMaker: 11,669 posts
AeroScale: 11,011 posts
Posted: Wednesday, July 09, 2008 - 10:29 PM UTC
Here I begin with stretching the kit fuselage 5/32.


RAGIII
_VISITCOMMUNITY
North Carolina, United States
Joined: June 19, 2007
KitMaker: 604 posts
AeroScale: 600 posts
Posted: Thursday, July 10, 2008 - 11:40 AM UTC
Stephen,
I happen to agree with you about the extension and the work looks great! I was wondering if you had read the thread on the aerodrome when this kit was first released. many claimed there was no difference in length. The drawings I had access to at the time confirmed what you have done! Just curious,
RAGIII
JackFlash
_VISITCOMMUNITY
Colorado, United States
Joined: January 25, 2004
KitMaker: 11,669 posts
AeroScale: 11,011 posts
Posted: Thursday, July 10, 2008 - 07:47 PM UTC

Quoted Text

Stephen,
I happen to agree with you about the extension and the work looks great! I was wondering if you had read the thread on the aerodrome when this kit was first released. many claimed there was no difference in length. The drawings I had access to at the time confirmed what you have done! Just curious,
RAGIII


Greetings Rick,

Yes my quoted sources helped bring me to this conclusion. Roy Houchin and Dan San Abbott and the late Peter Grosz all held prima facia data on the subject.

At the First Fighter Competition at Adlershof in January 1918 it was decided to manufacture the Fokker D.VI as a move to insure enough rotary engine fighters would be available for frontline operations. Since the Oberursel Ur.III 145hp and the Goebel Goe III 160hp or the Siemens-Halske Sh III 160-220hp were still in short supply due to production concerns, the Fokker V.13 with its very reliable Oberursel Ur.II 120hp was chosen to go into production. Make no mistake, while there are physical similarities between the Fokker company’s Dr.I and the D.VI, one was not developed from the other. Like any engineering concern the Fokker designers had formulas that they used for aircraft specifications, especially concerning the type and weight of an installed motor in an airframe. The closest similarity to the D.VI (rotary) is the D.VII (inline six.) Fokker built one for type testing in the ‘low altitude operations class’ and one for ‘higher altitude operations class.’

References:
Corrugated Fokker by R. Houchin, Scale R/C Modeler Vol.5 #4 1979.
Fokker D.VI by R Houchin pt.I, World War 1 Aero #77, June 1980.
Fokker D.VI by R Houchin pt.II, World War 1 Aero #85, January 1981.
Fokker D.VI by P. Grosz, Windsock Datafile 84, Albatros Pub. Ltd. 1986.
Fokker Facts and Opinions, a plea... by Cross & Cockade USA Vol.5 #3, Pp.213-220, 1964.
Fokker Fighters of WWI by A. Imrie, Osprey,Vintage Warbirds #6, Photos #60-1, 79,92-3, 1986.
German Army Air Service in WWI by R.Rimell, Osprey, Vint. Warbirds #2, Photos 40-1, 1985.
‘Kest 1a - a thirty-two day tour of duty’ by S. T. Lawson, Cross & Cockade Int. Vol.22 #2, 1991.
Kofl Report for Jasta 64w 1918.
Pictorial History of the German Army Air Service by A. Imrie, Ian Allen Pub. 1971.
Scale Model Aircraft in Plastic Card by H.Woodman, Model & Allied Pub., 1975.
WWI Warplanes Vol. 1 by R. Rimell, Albatros Productions Ltd. Pp.40-7, 1992
JackFlash
_VISITCOMMUNITY
Colorado, United States
Joined: January 25, 2004
KitMaker: 11,669 posts
AeroScale: 11,011 posts
Posted: Saturday, July 12, 2008 - 05:01 PM UTC
One of the other concerns with stretching the nose on this kit is that, the landing gear legs (PP 12 & 13 B ) will also have to be altered to fit. The result will be a profile that is lower to the ground than the other Fokker single seater BUT with the same length propeller.
JackFlash
_VISITCOMMUNITY
Colorado, United States
Joined: January 25, 2004
KitMaker: 11,669 posts
AeroScale: 11,011 posts
Posted: Saturday, July 12, 2008 - 05:15 PM UTC

Quoted Text

No Probs. When I did my apprenticeship (Tool Making) I had to learn to think in inches and millimeters both at the same time... I'm a little out of practice now that I sit at at desk all day, but you can't go far wrong if you think of a millimeter as near as damnit .040".

Cheers, Hugh


Egads I just saw this. It took me the better part of 15 minute to figure my measurements out originally. Glad I am not doing surgical tool designs.
JackFlash
_VISITCOMMUNITY
Colorado, United States
Joined: January 25, 2004
KitMaker: 11,669 posts
AeroScale: 11,011 posts
Posted: Monday, July 14, 2008 - 04:04 PM UTC
Gentle folk you won't believe this. Ok so I was looking at the thread for Brad Cancian (good fellows that he is.) It seems the Part of Poland for the 1/32 Fokker F.I and the Eduard 1/48 instructions say that a "Bosch" starting magneto should down low near on the floor boards.

The "Bosch" starting magneto they include (that they tell you to put near the pilot's foot) is bogus. It was designed for inline motors.

The starting magneto for a rotary engine ( a round bare metal disk shape on a metal flange) should be put at the pilot's left shoulder. It is molded there in the DML & Eduard Fokker Dr.I kits. (Yes Eduard gives you the PE "Bosch" version and tells you to add it near the floor boards too.)

Here is the fun part. In my kit here, using the Part of Poland PE. . . step "AE" not only do they tell you to put the wrong type of starting magneto in the wrong place, BUT. . . .wait for it. They tell you to install it with the crank handle facing away from the pilot. Yes, the poor scale pilot will have to reach down by his foot, reach over the top of the magneto and find the crank on the other side and remember to turn it in the correct direction. If he gets stuck down there between the guns and the control column they will have to hacksaw him out.

IPMS judges will have a field day with this.
MerlinV
_VISITCOMMUNITY
Victoria, Australia
Joined: November 26, 2006
KitMaker: 608 posts
AeroScale: 602 posts
Posted: Tuesday, July 15, 2008 - 11:21 AM UTC

Quoted Text

IPMS judges will have a field day with this.


Now I'm not one for entering comps but I was a virgin judge at the IPMS Australian Model Expo a few weeks ago.

I guess it depends on what the builder includes as their references.
If you include the Part Instructions as a reference, and then don't include the Bosch magneto switch or by chance get it around the right way, then you are going to get marked down.
If you build it as you know it should be; with the correct switch placed at the pilots left shoulder, and don't iclude the Part instructions as one of your references, then you will have no probs... then again, you could note on the Part Instructions that this part is spurious and that your otehr references show the reality.

Did I read somewhere that there was actually no real standard for where bits went in Fokker cockpits?

Cheers,

Hugh
JackFlash
_VISITCOMMUNITY
Colorado, United States
Joined: January 25, 2004
KitMaker: 11,669 posts
AeroScale: 11,011 posts
Posted: Tuesday, July 15, 2008 - 03:02 PM UTC
They had specific areas for rotary engine instrument attachment to the fuselage structure, so all the lines (electrical & fuel) and actuation rods would be cut the same lengths for each aircraft. Positions had to be standardized so pilots could react in an appropriate manner in the heat of combat. The historian that said there was no standard was less than informed himself. But then again That was over forty years ago since it was written. Thanks to Alex Imrie, we have so much more information today than back then.
CaptainA
_VISITCOMMUNITY
Indiana, United States
Joined: May 14, 2007
KitMaker: 3,117 posts
AeroScale: 2,270 posts
Posted: Thursday, July 17, 2008 - 09:55 AM UTC

Quoted Text

Yes, the poor scale pilot will have to reach down by his foot, reach over the top of the magneto and find the crank on the other side and remember to turn it in the correct direction.


I think they had left handed Gefreiters to do that.
JackFlash
_VISITCOMMUNITY
Colorado, United States
Joined: January 25, 2004
KitMaker: 11,669 posts
AeroScale: 11,011 posts
Posted: Saturday, July 19, 2008 - 04:57 PM UTC

Quoted Text

". . .I think they had left handed Gefreiters to do that.


From the left handed Gefreiter's book of rules 1918 (faux)
Auchtung! Das machinen ist nicht fur das gefinger poken! Das rubbern necken sightseer keepen die handen im das pocketen. Relax un vatch das blinken lichts! Von ordernungen.
 _GOTOTOP