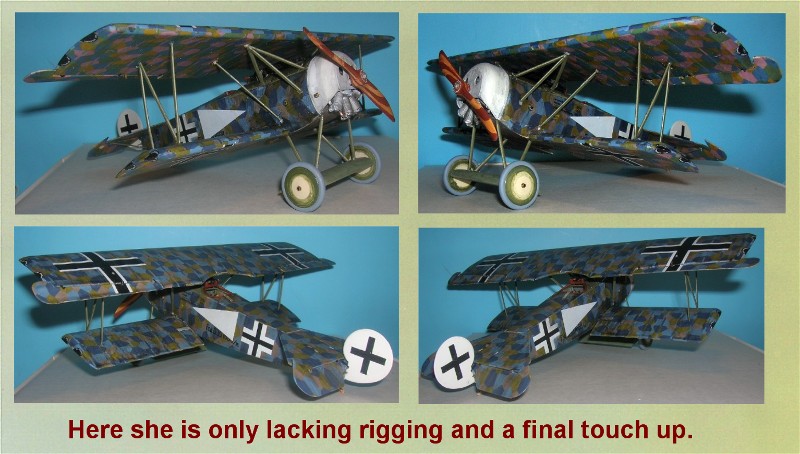
Early Aviation
Discuss World War I and the early years of aviation thru 1934.
1/32 Roden GB 2008 Fokker D.VI
JackFlash
_VISITCOMMUNITY
Colorado, United States
Joined: January 25, 2004
KitMaker: 11,669 posts
AeroScale: 11,011 posts
Posted: Wednesday, December 03, 2008 - 05:50 PM UTC
Here are some progress shots.


Kalt
_VISITCOMMUNITY
Mendoza, Argentina
Joined: June 14, 2006
KitMaker: 222 posts
AeroScale: 219 posts
Posted: Wednesday, December 03, 2008 - 06:11 PM UTC
It's almost ready, congratulations Stephen wonderful model !
You didn't have problems with the density of the decals, did you?

I need to hurry with my Dr.1 build....

thegirl
_VISITCOMMUNITY
Alberta, Canada
Joined: January 19, 2008
KitMaker: 6,743 posts
AeroScale: 6,151 posts
Posted: Thursday, December 04, 2008 - 02:45 AM UTC
Looking wonderful so far Stephen , however I'm a little disappointed that your pic's are not all that clear this time around . You were up late with eyegore drinking beer so Steve would have some empty cans weren't you !
RAGIII
_VISITCOMMUNITY
North Carolina, United States
Joined: June 19, 2007
KitMaker: 604 posts
AeroScale: 600 posts
Posted: Thursday, December 04, 2008 - 10:44 AM UTC
In a word,Outstanding!
RAGIII
JackFlash
_VISITCOMMUNITY
Colorado, United States
Joined: January 25, 2004
KitMaker: 11,669 posts
AeroScale: 11,011 posts
Posted: Thursday, December 04, 2008 - 02:56 PM UTC

Quoted Text

It's almost ready, congratulations Stephen wonderful model ! You didn't have problems with the density of the decals, did you? I need to hurry with my Dr.1 build.. . .


Greetings Claudio,
No real problems with the "new set" that came in the review kit. I had to gloss coat the additional sets (extras from their early issues that they replaced with the new sets.) I thoroughly soaked them in set & sol. The base surface was gloss coated as well.
JackFlash
_VISITCOMMUNITY
Colorado, United States
Joined: January 25, 2004
KitMaker: 11,669 posts
AeroScale: 11,011 posts
Posted: Thursday, December 04, 2008 - 02:58 PM UTC

Quoted Text

Looking wonderful so far Stephen , however I'm a little disappointed that your pic's are not all that clear this time around . You were up late with eyegore drinking beer so Steve would have some empty cans weren't you !


You see the problem with shooting obliquely with limited light sources on compound surfaces.
JackFlash
_VISITCOMMUNITY
Colorado, United States
Joined: January 25, 2004
KitMaker: 11,669 posts
AeroScale: 11,011 posts
Posted: Thursday, December 04, 2008 - 02:59 PM UTC

Quoted Text

In a word,Outstanding! RAGIII


Thank You Rick still a little facade work I want to do though.
thegirl
_VISITCOMMUNITY
Alberta, Canada
Joined: January 19, 2008
KitMaker: 6,743 posts
AeroScale: 6,151 posts
Posted: Thursday, December 04, 2008 - 03:21 PM UTC
Yes Stephen I understand what you mean by light source . I was able to get some more lighting and a co-work made a suggestion of using a mirror on top and this will help get rid of the shadows . Haven't tried this yet so I really can't comment on the out come of this process .
I didn't mean any harm , was just surprised , it threw me off balance .
JackFlash
_VISITCOMMUNITY
Colorado, United States
Joined: January 25, 2004
KitMaker: 11,669 posts
AeroScale: 11,011 posts
Posted: Thursday, December 04, 2008 - 05:51 PM UTC
Terri, no offense taken. No worries. One thing about a mirror you want be careful of glare. It comes roaring at you when the flash from the camera goes off. Often when we use an instance light source the glare gets intensified when you use a mirror. At the wrong angle its like staring into the sun. AAAAaaaahhhh! Then you walk around seeing flashes everywhere for a bit.
thegirl
_VISITCOMMUNITY
Alberta, Canada
Joined: January 19, 2008
KitMaker: 6,743 posts
AeroScale: 6,151 posts
Posted: Thursday, December 11, 2008 - 02:43 AM UTC
Stephen , how goes the build ? I'm looking forward to seeing the finished results .
JackFlash
_VISITCOMMUNITY
Colorado, United States
Joined: January 25, 2004
KitMaker: 11,669 posts
AeroScale: 11,011 posts
Posted: Thursday, December 11, 2008 - 06:50 AM UTC
Greetings all and Terri;

It goes well. I had to do a bit more patching on the lozenge than I expected but it is fixed. Somehow I wound up with lacquer thinner in a bottle I use for airbrush thinner. Lacquer thinner tends to have a hotter bite and it tore up the lozeneg in one or two places. I finished the repair last night and added the Spandau machine guns feeds and empty belt chutes.

The kit control column is a late model Fokker type. For asthetics I scratchbuilt one of the early types seen on the Fokker Dr.I and early & mid production D.VII types. I almost forgot to add the Bowden cables for the triggers. I'll be painting the porpeller to represent the laminations. Drilling for the strut locations is almost complete. The landing gear wing axle needs a slight bit of alteration as the rear gear struts kick back further than normal due to extending the fuselage. Images later when it has dried enough.
Mgunns
_VISITCOMMUNITY
Arizona, United States
Joined: December 12, 2008
KitMaker: 1,423 posts
AeroScale: 1,319 posts
Posted: Friday, December 12, 2008 - 02:13 AM UTC
Hi: I really like your comments, and step by step commentary on your builds. I am getting back into the hobby after a 5 year hiatus from modelling, and about a 30 year hiatus from WWI. Taking baby steps, and seeing your work and reading your texts is very helpful and motivating. Keep up the good work.
JackFlash
_VISITCOMMUNITY
Colorado, United States
Joined: January 25, 2004
KitMaker: 11,669 posts
AeroScale: 11,011 posts
Posted: Sunday, December 14, 2008 - 06:46 PM UTC
Welcome Mark (Mgunns)

We all started somewhere. We are glad you chose here. Now on with the show right here in center ring we have the Saga of the Roden D.VI at least in this thread.

Note the lower wing and forward fuselage repair I mentioned.


JackFlash
_VISITCOMMUNITY
Colorado, United States
Joined: January 25, 2004
KitMaker: 11,669 posts
AeroScale: 11,011 posts
Posted: Sunday, December 14, 2008 - 06:52 PM UTC
The brighter lozenges give you an indication on the stark difference in the texturing and the untouched decal.

JackFlash
_VISITCOMMUNITY
Colorado, United States
Joined: January 25, 2004
KitMaker: 11,669 posts
AeroScale: 11,011 posts
Posted: Sunday, December 14, 2008 - 06:57 PM UTC
More of the cockpit and guns. Note the scratchbuilt early version of the control yoke.


The lozenge from the pilot's left side.


Yes I see it too. I need to go back and texture the cockpit interior on the pilot's right side.
JackFlash
_VISITCOMMUNITY
Colorado, United States
Joined: January 25, 2004
KitMaker: 11,669 posts
AeroScale: 11,011 posts
Posted: Monday, December 15, 2008 - 12:46 AM UTC
Here are a couple more shots.


Hatter50
_VISITCOMMUNITY
North Carolina, United States
Joined: June 17, 2006
KitMaker: 478 posts
AeroScale: 391 posts
Posted: Monday, December 15, 2008 - 01:09 AM UTC
Very Very nice Stephen! Thanks for the UP CLOSE hi rez photos. Looks like it's ready to go fly.

Regards
Steve
thegirl
_VISITCOMMUNITY
Alberta, Canada
Joined: January 19, 2008
KitMaker: 6,743 posts
AeroScale: 6,151 posts
Posted: Monday, December 15, 2008 - 01:42 AM UTC
Wow what an awesome build so far Stephen ! Have you encounter the same troubles with the Roden decals as Hugh and Lars did ? I just love your texturing
JackFlash
_VISITCOMMUNITY
Colorado, United States
Joined: January 25, 2004
KitMaker: 11,669 posts
AeroScale: 11,011 posts
Posted: Monday, December 15, 2008 - 10:32 AM UTC

Quoted Text

Wow what an awesome build so far Stephen ! Have you encounter the same troubles with the Roden decals as Hugh and Lars did ? I just love your texturing


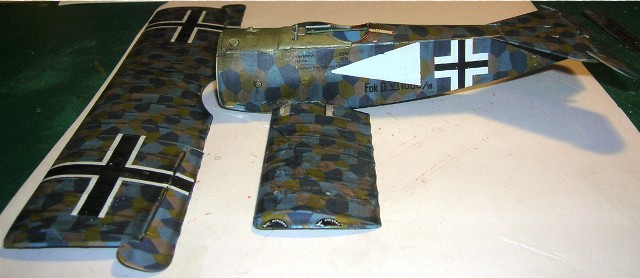
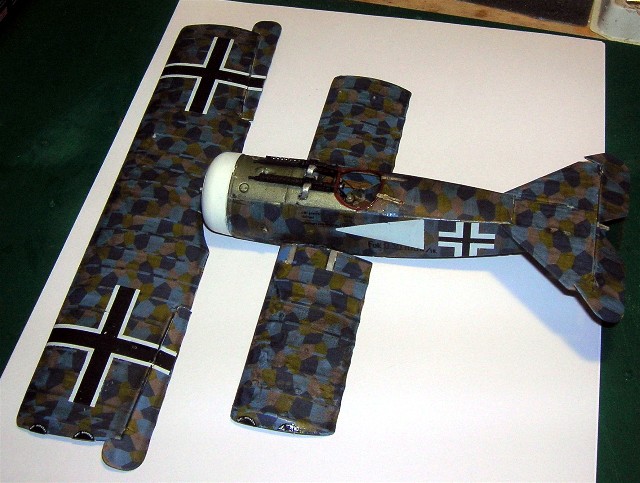
Since I applied the "extra lozenge" to the kit wings here would be a good point to discuss their unique application requirements. Specifically Roden sent me some of their older lozenge decal sets that don't match the performance of the new items. Mostly this is in the adhesive, glue or sticking neeeds of general use decals. The new loznge decals work great have their own handling issues even though they are better. Both are four colour and very simialr in colouring.

The 
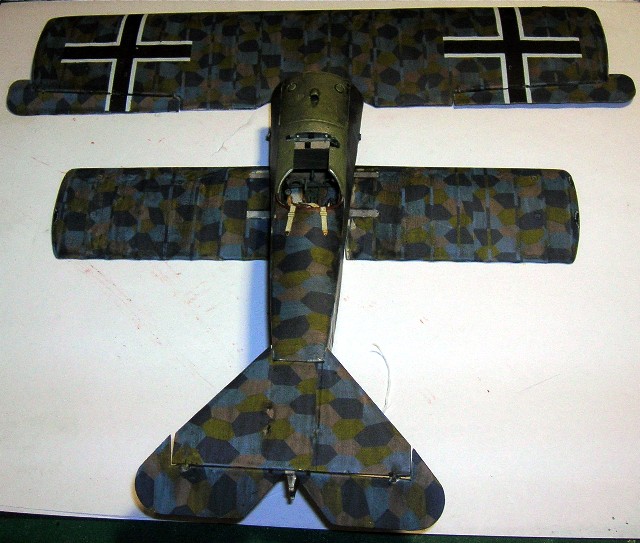
new lozenge decals tend to have only one concern. To start with they were given an immediate clear gloss coating and let dry. Several light coats is advisable. The concern comes if they fold over on themselves, it takes good effort to get them laid out correctly. BUT they are sturdy enough to take the pulling , pushing and prodding. Almost tear resistant and I would say vinyl like. But very thin and react well to liberal amounts of Micro Sol & Set.

The older lozenge decals Need immediate clear gloss coating and let dry. Several light coats is advisable. They are thin and brittle. Also when I began cutting them in strips the outer edge tended to fracture on each section I tried. Then I started cutting the strips out using light strokes instead of digging in and trying to get it in one or two strokes.

In the former case the strip always curled and would fracture before settling down. The the former instance where I used several light strokes it did not dig t=very deep but cut through the decal. The lack of glue / adhesive on the old sheets allowed for the cut strip to come up completely from the paper backing, without any immersion in water. Their reaction to the sol & set was impressive.. They stuck hard and fast to the wing ribs without any water, just sol & set. But I do recommend a 50 / 50 % mix of water and white school glue if you don't use sol & set.
JackFlash
_VISITCOMMUNITY
Colorado, United States
Joined: January 25, 2004
KitMaker: 11,669 posts
AeroScale: 11,011 posts
Posted: Monday, December 15, 2008 - 11:00 PM UTC
The guns and surrounding upper deck are done.


Here the top wing is added. Due to the original rules I kept the kit struts.
thegirl
_VISITCOMMUNITY
Alberta, Canada
Joined: January 19, 2008
KitMaker: 6,743 posts
AeroScale: 6,151 posts
Posted: Tuesday, December 16, 2008 - 01:47 AM UTC
Stephen it's awesome . I have enjoyed watching this thread on this build and look forward to seeing the final progress pic's of her .

Cheers
Repainted
_VISITCOMMUNITY
Östergötland, Sweden
Joined: April 04, 2006
KitMaker: 1,058 posts
AeroScale: 1,004 posts
Posted: Tuesday, December 16, 2008 - 05:45 AM UTC

Quoted Text

Stephen it's awesome . I have enjoyed watching this thread on this build and look forward to seeing the final progress pic's of her .

Cheers


I´m on Terri´s side here Stephen, you turned this into a awesome build, you just made me want to start build this one.Lovely
Larsa Q
JackFlash
_VISITCOMMUNITY
Colorado, United States
Joined: January 25, 2004
KitMaker: 11,669 posts
AeroScale: 11,011 posts
Posted: Tuesday, December 16, 2008 - 11:43 PM UTC
Thanks everyone for your kind words of support!

Hatter50
_VISITCOMMUNITY
North Carolina, United States
Joined: June 17, 2006
KitMaker: 478 posts
AeroScale: 391 posts
Posted: Wednesday, December 17, 2008 - 12:10 AM UTC
"Only lacking rigging" he says..............

Mighty fine Stephen.

Regards
Steve
Repainted
_VISITCOMMUNITY
Östergötland, Sweden
Joined: April 04, 2006
KitMaker: 1,058 posts
AeroScale: 1,004 posts
Posted: Wednesday, December 17, 2008 - 12:11 AM UTC
That´s "build me factor" in this.Got to have me some spare time, and not been distracted off the Internet.
Let see an Internet free 2009, how´s that sounds= Lot´s off models completed
The better side off me say- That sounds like the boring stoneage

Very nice

Larsa