1/32 Roden GB 2008 Fokker D.VI
North Carolina, United States
Joined: June 17, 2006
KitMaker: 478 posts
AeroScale: 391 posts
Posted: Sunday, October 05, 2008 - 11:47 PM UTC
Hugh,
Been there, done that, and inputted my "design". I'm hiding under a different name there.

Regards
Steve
1/350 USS San Francisco on Slipways
1/350 HMS Warspite in Research Mode
1/32 P-39D stalled
Alberta, Canada
Joined: January 19, 2008
KitMaker: 6,743 posts
AeroScale: 6,151 posts
Posted: Tuesday, October 07, 2008 - 03:04 AM UTC
Hugh , thanks for sharing the link . Images have been saved and as soon as I get new ink cartridges for the printer I will be giving them a try .
Victoria, Australia
Joined: November 26, 2006
KitMaker: 608 posts
AeroScale: 602 posts
Posted: Tuesday, October 07, 2008 - 10:26 AM UTC
Good Luck Terri.
I found that The Images that Wojtek posted printed up very nicely on our printer. Just make sure that you have the intensity set on the upper limit.
Cheers,
Hugh
Alberta, Canada
Joined: January 19, 2008
KitMaker: 6,743 posts
AeroScale: 6,151 posts
Posted: Tuesday, October 07, 2008 - 02:34 PM UTC
Thanks Hugh , And yes I will try it out on plain paper first before I use decal paper .
No Blond moment shall happen durning the printing process !
Östergötland, Sweden
Joined: April 04, 2006
KitMaker: 1,058 posts
AeroScale: 1,004 posts
Posted: Friday, October 10, 2008 - 03:55 AM UTC
Hm
Spada decal did some testshots at this lozengedecals in 32 scale. Is there anyone who have tested Spadas. Mr Lozenge him self? Stephen L.

I think I´ll have some sample off this lozenge someware in my being for my self room
Larsa
Colorado, United States
Joined: January 25, 2004
KitMaker: 11,669 posts
AeroScale: 11,011 posts
Posted: Thursday, October 16, 2008 - 06:16 PM UTC
Greetings Larsa,
The SPADA sheets were only testshots and they habve since put them on hold. Though there is still some interest. I did a small bit of research for one of their Camel profiles. We will see about the future. Hopefully Roden may come through wi an extra sheet for me. I am trying to encourage them to do 5 colour as well.
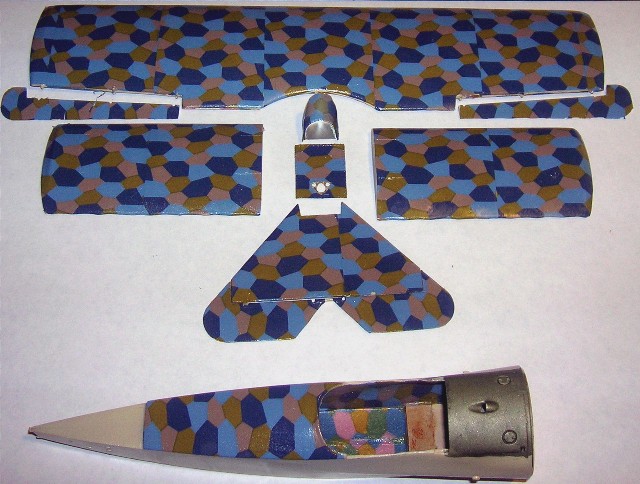
The four colour lozenge on the D.VI is coming along nicely. It seems that Fokker may have actually have done the two piece lozenge rib caps on the Fok. D.VI or at least on some of them. My contention has been that rib tapes were one piece on the Fokker D.VII type (all maufacturers.) Doing a bit more reseaarch on this. It makes sense to me because the Fokker D.VI, D.VII and the Ev were the first airframes to be covered by Fokker in lozenge.
Albatros & OAW had been using one piece solid colour and lozenge tapes on the Alb. D. series previous to Fokkers use on his D series machines listed above.
". . .The most important thing is to know why you build and then get the most that you can out of building." via D.D.
Colorado, United States
Joined: January 25, 2004
KitMaker: 11,669 posts
AeroScale: 11,011 posts
Posted: Sunday, October 19, 2008 - 12:04 AM UTC
Here is a bit more progress.
". . .The most important thing is to know why you build and then get the most that you can out of building." via D.D.
Alberta, Canada
Joined: January 19, 2008
KitMaker: 6,743 posts
AeroScale: 6,151 posts
Posted: Wednesday, October 22, 2008 - 02:22 AM UTC
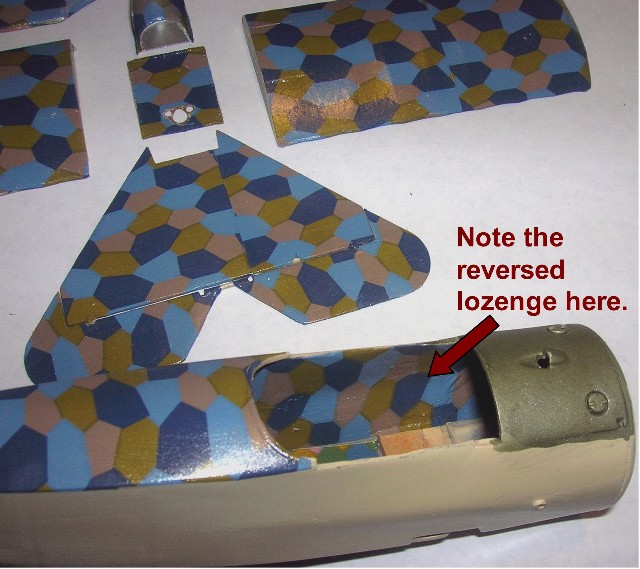
Not bad at all Stephen . It's all coming along rather well . Lozenge looks great , but aren't the top colours a little on the blue side ? Or is it just me ! Just waiting for your texturing magic .
This is the first build that I have seen where lozenge is applied to the bottom of the inside . Never seen any one else do this before . Your attention to the small things is out standing .
Colorado, United States
Joined: January 25, 2004
KitMaker: 11,669 posts
AeroScale: 11,011 posts
Posted: Wednesday, October 22, 2008 - 07:53 AM UTC
Greetings Terri;
Yes the colours will need a bit of tweaking. But I have to say they are one of the best sets of decals issued from Roden in their workability. Thank you for the compliment in this scale details become more and more apparant. Model On!
". . .The most important thing is to know why you build and then get the most that you can out of building." via D.D.
Colorado, United States
Joined: January 25, 2004
KitMaker: 11,669 posts
AeroScale: 11,011 posts
Posted: Thursday, October 23, 2008 - 03:56 PM UTC
Greetings all,
I have some additional images I will post later. The lozenge, cheek fairings, structure sidewalls, rear fabric wall and fuel cell are in. Now it will simply be a process of adding everything from the cockpit floor up to the cockpit rim.
". . .The most important thing is to know why you build and then get the most that you can out of building." via D.D.
Colorado, United States
Joined: January 25, 2004
KitMaker: 11,669 posts
AeroScale: 11,011 posts
Posted: Thursday, October 23, 2008 - 07:45 PM UTC
Here they are.
". . .The most important thing is to know why you build and then get the most that you can out of building." via D.D.
Joined: December 23, 2007
KitMaker: 1,596 posts
AeroScale: 1,275 posts
Posted: Friday, October 24, 2008 - 07:37 AM UTC
Well, what can I say? Please, teach me Master...
Alberta, Canada
Joined: January 19, 2008
KitMaker: 6,743 posts
AeroScale: 6,151 posts
Posted: Saturday, October 25, 2008 - 01:34 PM UTC
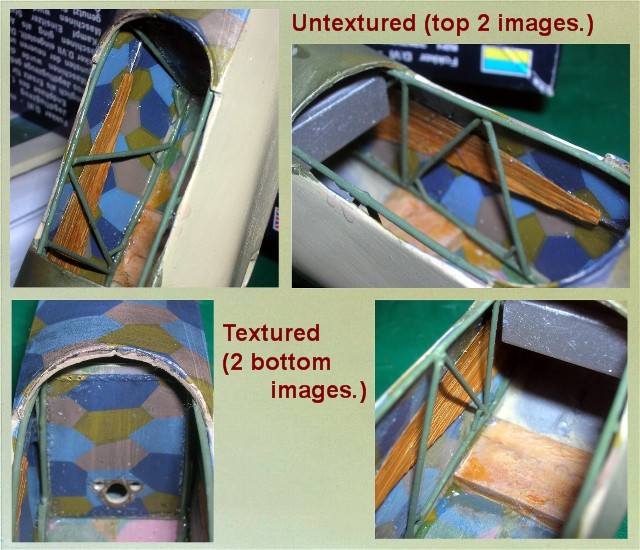
Right on Stephen ! Your texturing sure adds to the over all effect of the linen . This is my second time on seeing the effects of this . I'm getting hook on this !
Colorado, United States
Joined: January 25, 2004
KitMaker: 11,669 posts
AeroScale: 11,011 posts
Posted: Monday, October 27, 2008 - 04:43 PM UTC
Thank you for the kind words. I just wish my camera would not get fooled by the edge of the cockpit and wander out of focus. Any way I added the seat and station framing for the rear of the cockpit. Now for some bits & pieces Will need to add small supports for the flooring and cross members for them to sit on. Similar to the Fokker D.VII layout.
I hope the description is helping those who were wondering if I painted myself into a corner. Luckily 1/32 lets me add pieces easily. Just don't ask me to do anymore radiators for a while.
". . .The most important thing is to know why you build and then get the most that you can out of building." via D.D.
North Carolina, United States
Joined: June 19, 2007
KitMaker: 604 posts
AeroScale: 600 posts
Posted: Tuesday, October 28, 2008 - 11:10 AM UTC
Stephen,
This continues to be an inspiring build. Your work with the lozenge is awesome!
RAGIII
Colorado, United States
Joined: January 25, 2004
KitMaker: 11,669 posts
AeroScale: 11,011 posts
Posted: Thursday, October 30, 2008 - 08:45 AM UTC
Thanks Rick,
I just got word that Roden has consented to sending me and additional sheet of lozenge to do ribtapes. They also promised another surprise in the form of a kit. . . I tell you folks Roden loves us here at Aeroscale.

". . .The most important thing is to know why you build and then get the most that you can out of building." via D.D.
Colorado, United States
Joined: January 25, 2004
KitMaker: 11,669 posts
AeroScale: 11,011 posts
Posted: Tuesday, November 04, 2008 - 05:29 PM UTC
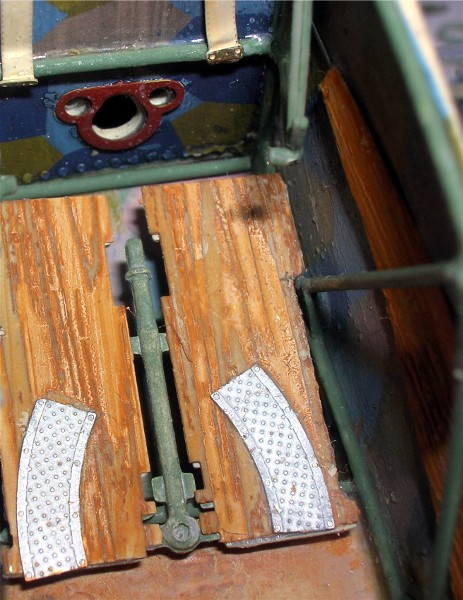
Continuing with the cockpit. Keeping to the perameters of the build, I had to use the kit parts and or PE made for the kit. The floorings is designed in both cases to match the Fokker Dr.I side walls and not the extended fuselage Fok. D.VI. The problem is that the control column has to be located specifically. so the flooring has to be in a specific place to do this. The compass winds up under the seat so it has to be relocated to a spot near the pilot's right side leading edge of the seat.
". . .The most important thing is to know why you build and then get the most that you can out of building." via D.D.
Colorado, United States
Joined: January 25, 2004
KitMaker: 11,669 posts
AeroScale: 11,011 posts
Posted: Tuesday, November 04, 2008 - 05:35 PM UTC
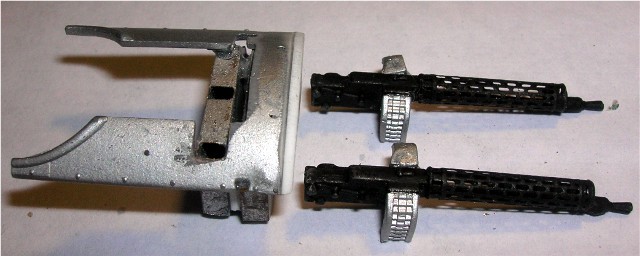
Taking a cue from Roden's 1/48 Fokker D.VII I decided to make the upper forward cowling, ammunition box, empty belt box and etc a sub-assembly. The PE had to be altered to off-set the holes for the emptybelt chutes that will exit from the pilot's left side of the Spandau breeches.
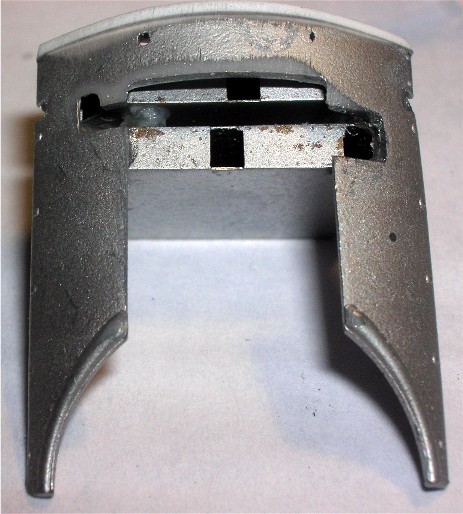
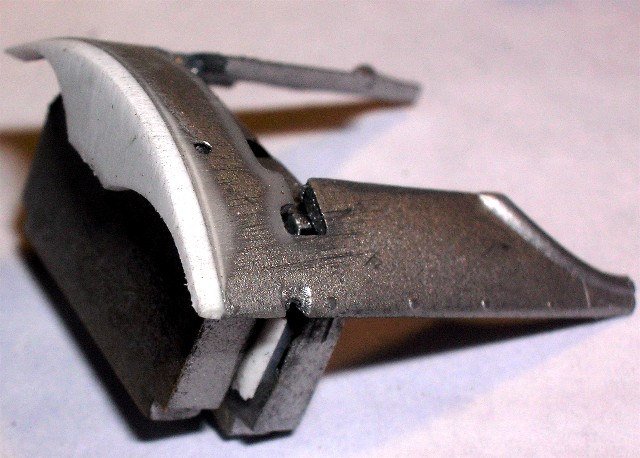
". . .The most important thing is to know why you build and then get the most that you can out of building." via D.D.
Colorado, United States
Joined: January 25, 2004
KitMaker: 11,669 posts
AeroScale: 11,011 posts
Posted: Tuesday, November 04, 2008 - 05:37 PM UTC
The result is as good as I hoped for. I still have to set the rear of the gun breeches in two upright supports and the fuselage cross bracings that hold them.
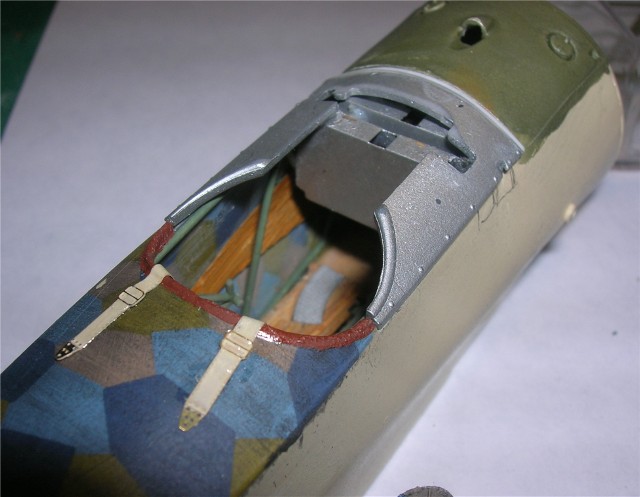
Note the repair I'll have to finish to the decal on the spine.
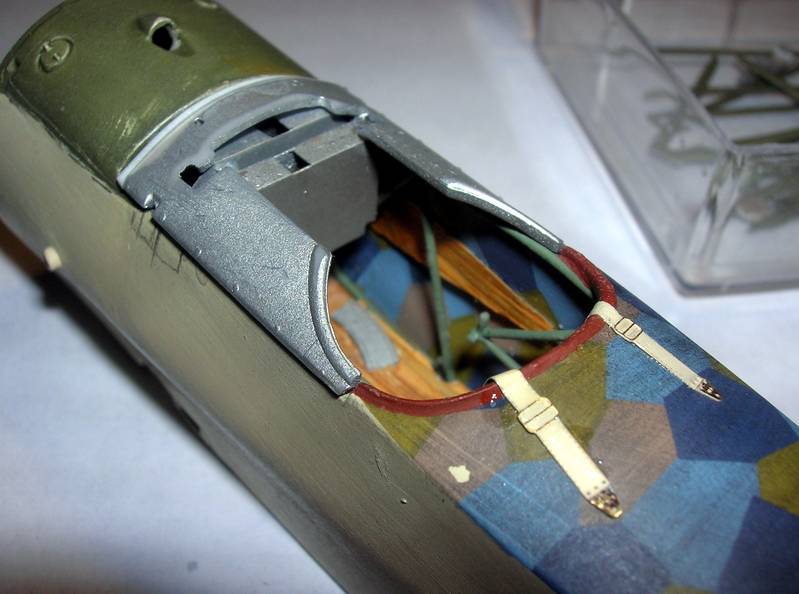
". . .The most important thing is to know why you build and then get the most that you can out of building." via D.D.
Colorado, United States
Joined: January 25, 2004
KitMaker: 11,669 posts
AeroScale: 11,011 posts
Posted: Tuesday, November 04, 2008 - 05:42 PM UTC
The seat is nearly completed. The depth was added to the seat to represent the parachute pack.
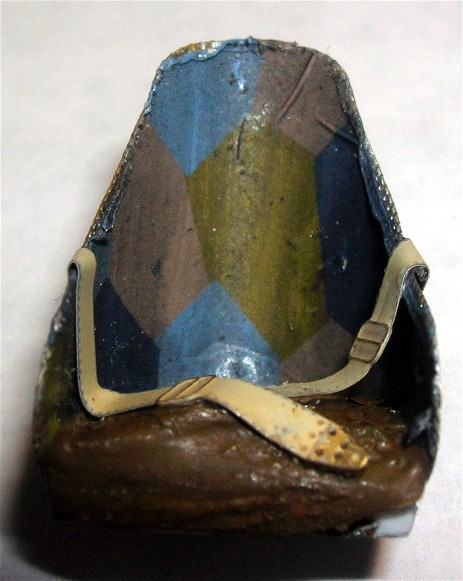
Now the Spandau guns are to be dry fitted to the upper cowling deck.
". . .The most important thing is to know why you build and then get the most that you can out of building." via D.D.
Alberta, Canada
Joined: January 19, 2008
KitMaker: 6,743 posts
AeroScale: 6,151 posts
Posted: Wednesday, November 05, 2008 - 01:50 AM UTC
Fantastic work Stephen ! Coming along really well with this build .
Looking forward on seeing the finished model .
North Carolina, United States
Joined: June 19, 2007
KitMaker: 604 posts
AeroScale: 600 posts
Posted: Thursday, November 06, 2008 - 11:17 AM UTC
Looks most impressive! Keep the pics coming,
RAGIII
Colorado, United States
Joined: January 25, 2004
KitMaker: 11,669 posts
AeroScale: 11,011 posts
Posted: Thursday, November 06, 2008 - 05:13 PM UTC
The extra lozenge has arrived! Now I have to finish it.
". . .The most important thing is to know why you build and then get the most that you can out of building." via D.D.
Östergötland, Sweden
Joined: April 04, 2006
KitMaker: 1,058 posts
AeroScale: 1,004 posts
Posted: Thursday, November 06, 2008 - 06:58 PM UTC
I´m on RagII´s side, you have done this to a gem. impressive keep the pics come
Larsa Q
Indiana, United States
Joined: May 14, 2007
KitMaker: 3,117 posts
AeroScale: 2,270 posts
Posted: Saturday, November 08, 2008 - 09:30 AM UTC
That texture really stands out.
"Treat 'em Rough", Current Builds--Wingnut Rumpler
I am frequently seen with blood shot eyes from staying up past my nap time to get the right colour scheme on my latest WWI model?


