Air Campaigns
Want to start or join a group build? This is where to start.
Twin seat Trainer/Fighter Campaign
magnusf
_VISITCOMMUNITY
Stockholm, Sweden
Joined: May 02, 2006
KitMaker: 1,953 posts
AeroScale: 1,902 posts
Posted: Saturday, February 21, 2009 - 09:39 PM UTC
Really cool choice Stefan! Looking forward to seeing it!


Magnus
VonCuda
_VISITCOMMUNITY
North Carolina, United States
Joined: November 28, 2005
KitMaker: 2,216 posts
AeroScale: 1,080 posts
Posted: Sunday, February 22, 2009 - 08:11 AM UTC
Here is my finished entry for the Twin Seat Trainer campaign. This is the Monogram T-28B in 1/48 scale. Everything is completely OOB even the decals.


This was a fun little kit with not many parts. Best of all is that from start to finish I have less than $15.00 in the total project.

Hermon
LongKnife
_VISITCOMMUNITY
Jönköping, Sweden
Joined: April 25, 2006
KitMaker: 831 posts
AeroScale: 688 posts
Posted: Sunday, February 22, 2009 - 08:34 AM UTC
That's a nice Trojan Hermon. Even more so since cheap is often hard, and yellow allways is.

Tony
Blueheeler
_VISITCOMMUNITY
New South Wales, Australia
Joined: March 18, 2008
KitMaker: 347 posts
AeroScale: 223 posts
Posted: Sunday, February 22, 2009 - 10:16 PM UTC
Finished my entry, a 1/72 Italeri Hawk all OOB as used by the RAAF. Just hope the link works, enjoy


SGTJKJ
#041
_VISITCOMMUNITY
Kobenhavn, Denmark
Joined: July 20, 2006
KitMaker: 10,069 posts
AeroScale: 3,788 posts
Posted: Monday, February 23, 2009 - 01:34 AM UTC
Interesting choice, Eetu. I am looking forward to see it build. I have never heard about this kit or aircraft before!

Fantastic colourful choice, Stefan. This is definitely going to be an impressive model when finished with those markings in a big scale.

Nice lemon you get there, Hermon

My Do 335 is next on my workbench, but work has not begun yet. I am still considering to make it in a "speculative" 1946 scheme, but I am not sure I have the guts for it.
CaptainA
_VISITCOMMUNITY
Indiana, United States
Joined: May 14, 2007
KitMaker: 3,117 posts
AeroScale: 2,270 posts
Posted: Monday, February 23, 2009 - 11:49 AM UTC
Stefan. I got that kit also. I have been wanting to build it up, but haven't managed to start it up yet. Beware, some of the kit decals are off in color. There were some AM decals, but I haven't found them yet. I think the color is off on the tongue, the kit decals being orange instead of red. My Swiss Cheese for brains memory are telling me there was something else off regarding the kit decals. I read this after googling MiG 21 UM. But is is a really cool kit. hth
CaptainA
_VISITCOMMUNITY
Indiana, United States
Joined: May 14, 2007
KitMaker: 3,117 posts
AeroScale: 2,270 posts
Posted: Tuesday, February 24, 2009 - 10:14 AM UTC
Some photos of my build...

The interior went together real good


And the finished model.


VonCuda
_VISITCOMMUNITY
North Carolina, United States
Joined: November 28, 2005
KitMaker: 2,216 posts
AeroScale: 1,080 posts
Posted: Tuesday, February 24, 2009 - 12:01 PM UTC
Carl, WOW! She's a beauty. Nice job.

Hermon
rv1963
_VISITCOMMUNITY
New York, United States
Joined: December 07, 2004
KitMaker: 1,888 posts
AeroScale: 39 posts
Posted: Tuesday, February 24, 2009 - 12:09 PM UTC
Nice work Carl, i didn't know they made 2 seat WW1 fighter like that.
rv1963
_VISITCOMMUNITY
New York, United States
Joined: December 07, 2004
KitMaker: 1,888 posts
AeroScale: 39 posts
Posted: Tuesday, February 24, 2009 - 12:10 PM UTC
Nice finish Hermon, i think i may need sunglasses to view the finished plane.
LongKnife
_VISITCOMMUNITY
Jönköping, Sweden
Joined: April 25, 2006
KitMaker: 831 posts
AeroScale: 688 posts
Posted: Tuesday, February 24, 2009 - 11:09 PM UTC
That's a flashy one Carl. Is the feathering between the colours brushpainted? It takes steady hands and a lot of patience, in that case. Nice.

Tony
SGTJKJ
#041
_VISITCOMMUNITY
Kobenhavn, Denmark
Joined: July 20, 2006
KitMaker: 10,069 posts
AeroScale: 3,788 posts
Posted: Tuesday, February 24, 2009 - 11:33 PM UTC
Great build of a subject that is entirely new to me, Carl. The camouflage is striking and very well done as already pointed out by Tony.

Well done
mj
_VISITCOMMUNITY
Illinois, United States
Joined: March 16, 2002
KitMaker: 1,331 posts
AeroScale: 325 posts
Posted: Wednesday, February 25, 2009 - 03:14 AM UTC
Great job, Carl. That is a beauty.

What did you use for the rigging? Is it wire, or sprue? Looks really good. And the camo...perfect!

Cheers,
Mike
CaptainA
_VISITCOMMUNITY
Indiana, United States
Joined: May 14, 2007
KitMaker: 3,117 posts
AeroScale: 2,270 posts
Posted: Wednesday, February 25, 2009 - 08:36 AM UTC

Quoted Text

That's a flashy one Carl. Is the feathering between the colours brushpainted? It takes steady hands and a lot of patience, in that case. Nice.

It is sprayed. I used a Pasche airbrush at a distance of about half an inch. No masking.


Quoted Text

What did you use for the rigging? Is it wire, or sprue? Looks really good. And the camo...perfect!

The rigging is hobby monofilament for bead jewelry. It is the kind that stretches. I like it because you can put some tension on it to add a little structural stability. And it eliminates sagging. I painted it with steel colored paint.

The kit is Eduards Roland C.II. It is a great kit. This was an old one I have had in my stash for a while. Eduard recently released the Weekend version, and re-released the Walfisch version. I have an old Walfisch and just ordered another one. If you like this build, I can highly recommend this kit. The build took about 6-10 hours to build. I cant tell you the exact time because much of my build time was in front of a TV with a golf tournament on. Hard to concentrate. There is actually a Parabellum machine gun that mounts in the back. I plan on having a ground crew member standing next to the plane holding it on his shoulder. So it was not mounted for the pictures. The low top wing arrangement allowed the rear machine gun to be fired a full 360 degrees. This was a very fast and dangerous aircraft earlier in the war.

Thanks for the kind comments.
Nito74
_VISITCOMMUNITY
Lisboa, Portugal
Joined: March 04, 2008
KitMaker: 5,386 posts
AeroScale: 635 posts
Posted: Friday, February 27, 2009 - 01:13 AM UTC
Is this one ok ?


or this one ?

kiwisoldier
_VISITCOMMUNITY
New Plymouth, New Zealand
Joined: January 29, 2007
KitMaker: 50 posts
AeroScale: 15 posts
Posted: Saturday, February 28, 2009 - 09:23 AM UTC
They are both OK mybe you can get both done , they both look to be a challenge for you I hope not too much
kiwisoldier
_VISITCOMMUNITY
New Plymouth, New Zealand
Joined: January 29, 2007
KitMaker: 50 posts
AeroScale: 15 posts
Posted: Saturday, February 28, 2009 - 09:37 AM UTC
Seems to me that there is going to be some great kits made and also a few people joining this campaign. I will admit that this was a first for me to start something and then watch as more and more people joined . My own enrty is coming along but having trouble locating the Decals for the TA -4K that Gekko(could be spelt wrong) make and are available in my country. HAve looked on the net and found some in CANADA so maybe it's going to be a matter of using the credit card instead of using my fuel card
Nito74
_VISITCOMMUNITY
Lisboa, Portugal
Joined: March 04, 2008
KitMaker: 5,386 posts
AeroScale: 635 posts
Posted: Sunday, March 01, 2009 - 03:01 PM UTC
Sean, I won't make the 2 kits, too many campaigns, not much time lately..

Until last year I could manage at least 1 or 2 hrs / day for modeling, but lately only on weekends
mj
_VISITCOMMUNITY
Illinois, United States
Joined: March 16, 2002
KitMaker: 1,331 posts
AeroScale: 325 posts
Posted: Tuesday, March 03, 2009 - 05:52 AM UTC
Well, here is my Academy ME-163/s Komet. I had a lot of fun with this kit. It goes together really well. Unfortunately, I thought I had finally mastered my new Paasche VL when I went to apply paint, and found I still have a little to learn with it. I had a bit of over-spray, and when attempts to rectify that situation made it worse, I stopped and accepted the ruling of the Gods...it's done, leave it alone.

Fortunately, I have another of this kit, so at some point when my skills advance a bit, I can try to do it a little more justice. Anyway, here it is:


Cheers,
Mike

magnusf
_VISITCOMMUNITY
Stockholm, Sweden
Joined: May 02, 2006
KitMaker: 1,953 posts
AeroScale: 1,902 posts
Posted: Tuesday, March 03, 2009 - 06:27 AM UTC
Mike! That's one two-seater I really didn't think of, cool choice!


Magnus
mj
_VISITCOMMUNITY
Illinois, United States
Joined: March 16, 2002
KitMaker: 1,331 posts
AeroScale: 325 posts
Posted: Tuesday, March 03, 2009 - 06:45 AM UTC
Thank you Magnus. I've been wanting to build this one for quite a while, so I'm glad this Campaign came along when it did. This is a beautiful kit, and with prices going through the roof like they are, this kit really delivers value for the price. It can be built as a single seater, or the two-seat version. I highly recommend it to anyone interested.

Cheers,
Mike
SGTJKJ
#041
_VISITCOMMUNITY
Kobenhavn, Denmark
Joined: July 20, 2006
KitMaker: 10,069 posts
AeroScale: 3,788 posts
Posted: Wednesday, March 04, 2009 - 12:07 AM UTC
Nice job, Mike.

I considered that one as well, but went for another oddball. The Do 335 A-12 anteater.

Nito74
_VISITCOMMUNITY
Lisboa, Portugal
Joined: March 04, 2008
KitMaker: 5,386 posts
AeroScale: 635 posts
Posted: Wednesday, March 04, 2009 - 04:08 AM UTC
Very Nice Mike !!
What scale it is ?
mj
_VISITCOMMUNITY
Illinois, United States
Joined: March 16, 2002
KitMaker: 1,331 posts
AeroScale: 325 posts
Posted: Wednesday, March 04, 2009 - 07:12 AM UTC
Thanks, Jesper. The "Anteater" was my second choice. I think it's a cool looking plane, and look forward to seeing yours.

Thanks, John. The Academy kit is 1/72. It looks a tad smaller to me, but the molding, details, and fit are really well done. It's a little gem of a kit.


Cheers,
Mike
Emeritus
_VISITCOMMUNITY
Uusimaa, Finland
Joined: March 30, 2004
KitMaker: 2,845 posts
AeroScale: 1,564 posts
Posted: Saturday, March 07, 2009 - 07:31 AM UTC

Quoted Text

Interesting choice, Eetu. I am looking forward to see it build. I have never heard about this kit or aircraft before!


Thanks.

Being a trainer and not a glamourous fighter or bomber type, VL Pyry hasn't been subjected to as much attention as it should have, as it's perhaps the most successulf Finnish aircraft ever built so far. Designed prior to WWII in the late 30s, it was one of the primary trainer aircraft used during and after the war. The last flight of the type was made in 1962.

But enough with the history lesson and on to the build progress.

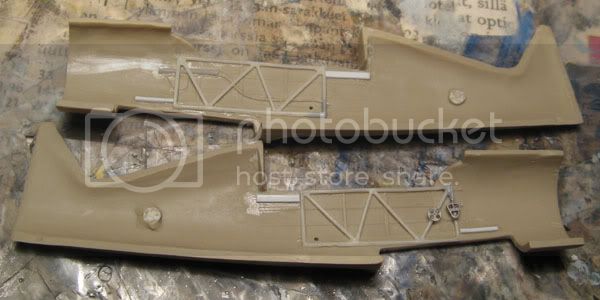
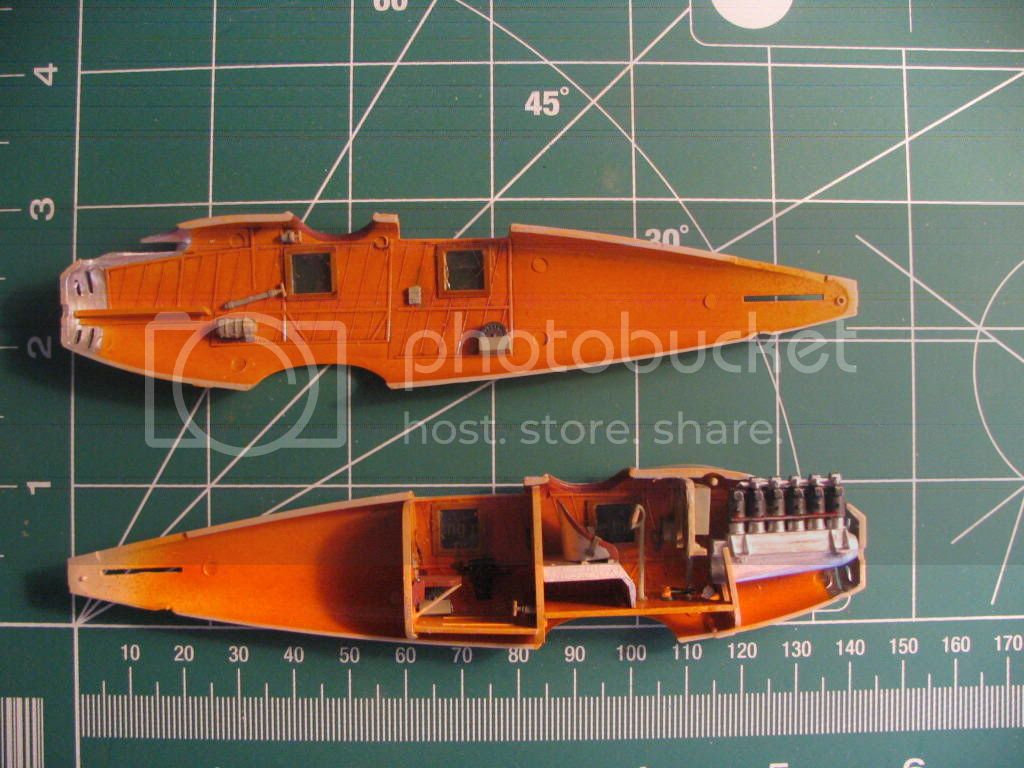
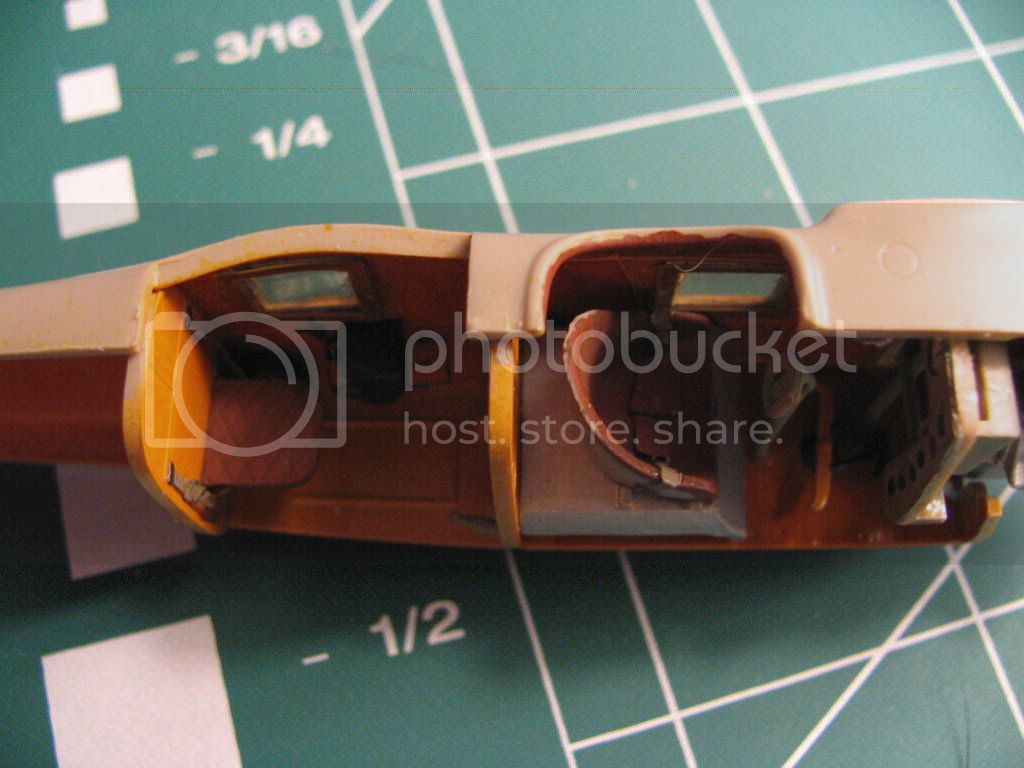
Contrary to the instructions, I glued the cockpit framework to the fuselage sides instead of the cockpit floor. Perhaps all wrong, but assembly looked much easier this way, as supergluing the framing to the floor at the correct angle seemed daunting. Anyway, the cockpit opening is pretty small and it won't be very visible in the finished model.
The framing didn't seem to conform to my reference photos completely, but as I have decided not to stress anything too much with this kit, I left them alone.
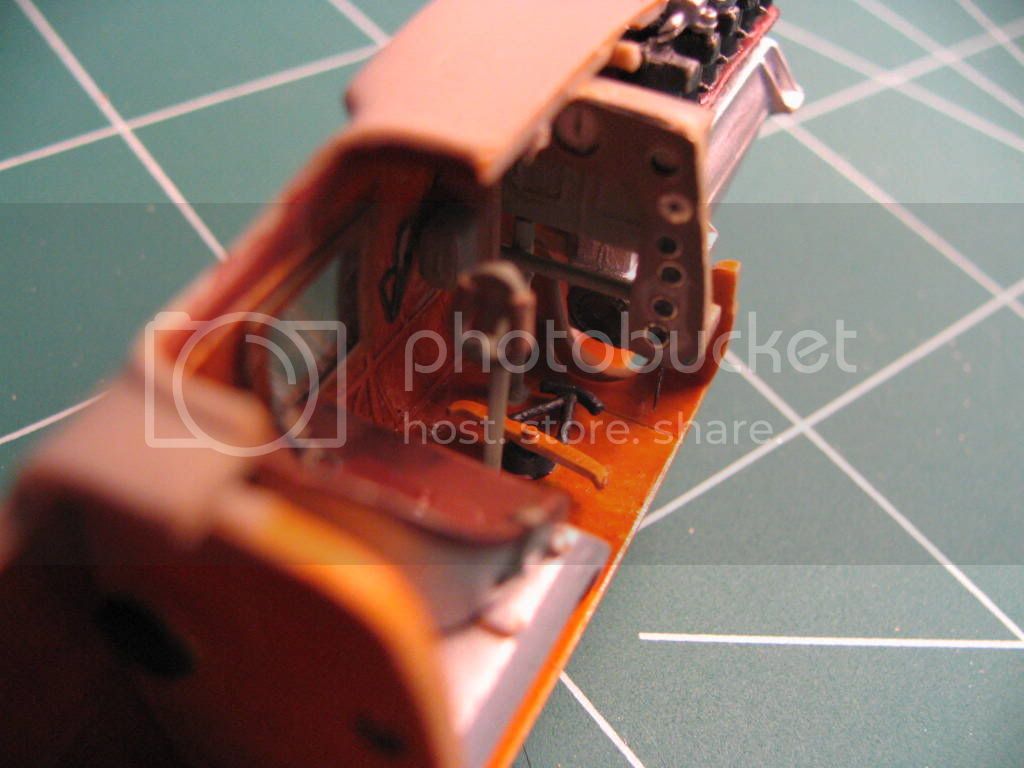
The styrene strips help gluing and aligning the cockpit floor and rear shelf.


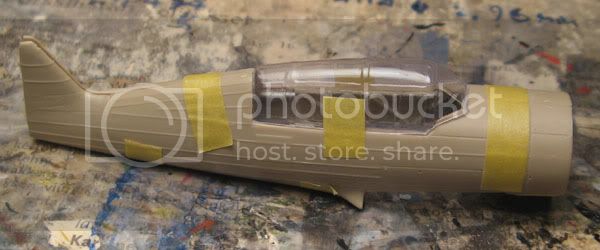
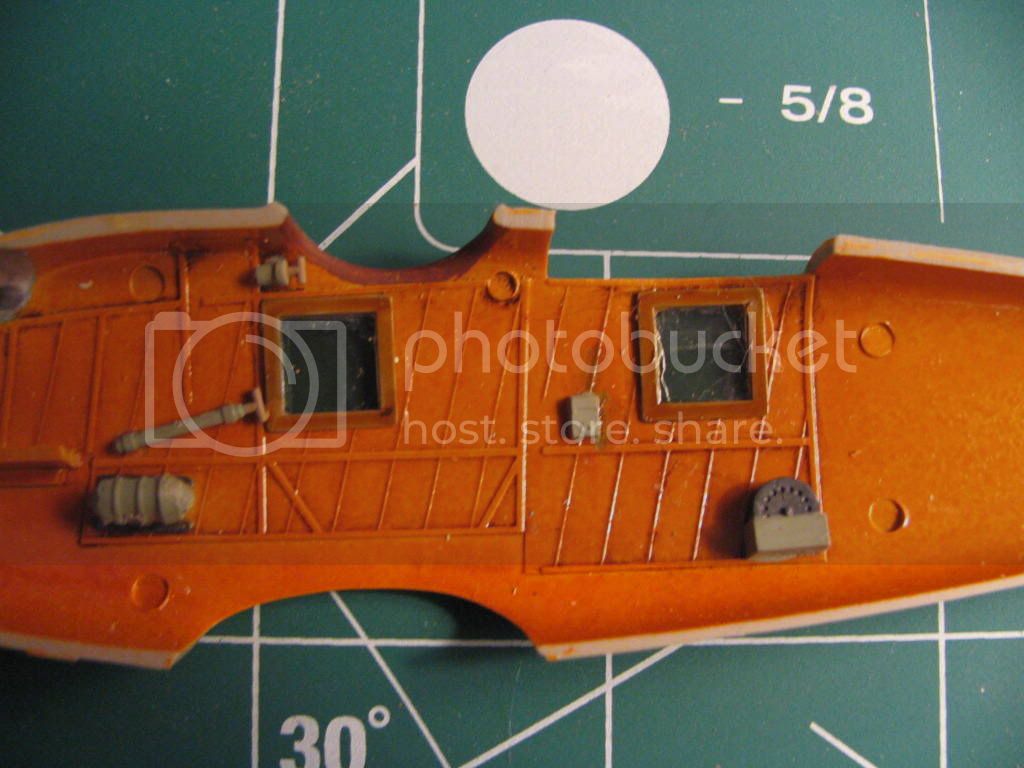
Pretty nice fit with the fuselage halves. As I was dryfitting, I did the initial trimming and dryfitting of the vacform canopy at the same time: nice fit again, although the windscreen area requires some more careful cutting and sanding to minimize the need for filling.
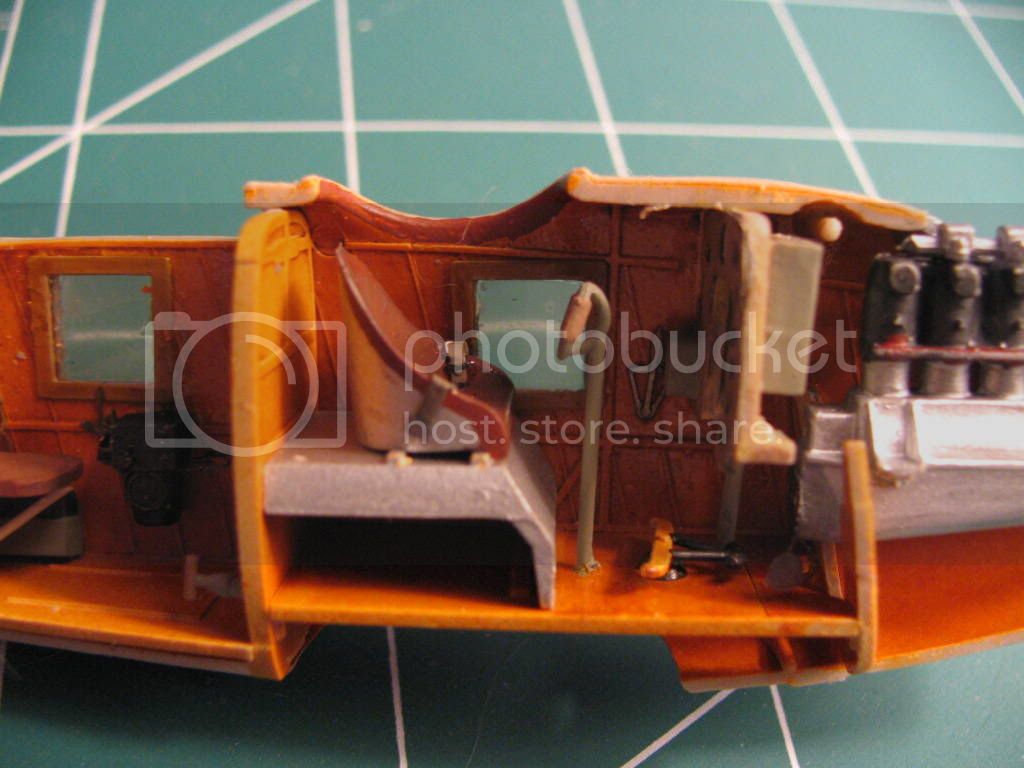
The two canopies provided in the kit would make it easier to pose them opened, but I'll keep them closed on this one. Perhaps I'll do it on another one when I let myself go crazy adding details. (although there's one thing I think I'll just have to make: the prominent roll cage between the seats, omitted from the kit for a reason or another)


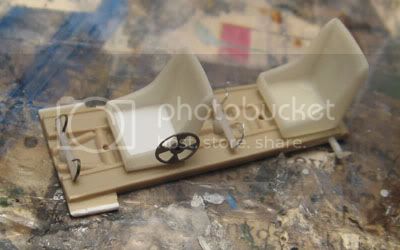
The cockpit floor ready for priming. No rudder pedals were supplied, so I made simple items from styrene rod, scrap PE and thick foil.
Control sticks were also missing from the kit, with directions to make them simply from lengths of styrene rod. Quite strange IMO, as the reference photos in the manufacturer's website clearly show the front cockpit equipped a spade gripped stick and the rear one having a simpler stick with a ball in the end. Some more scratch-building ahead.

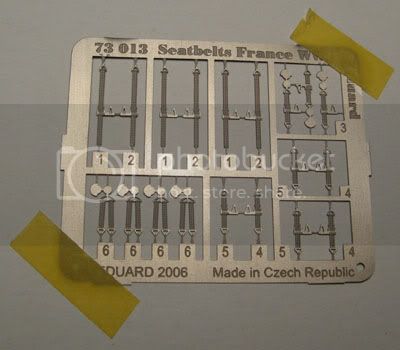
For the missing set of seatbelts, I couln't find anything in my spares that would have fitted in with the provided PE well enough, so I decided to adapt some French seatbelts by Eduard: