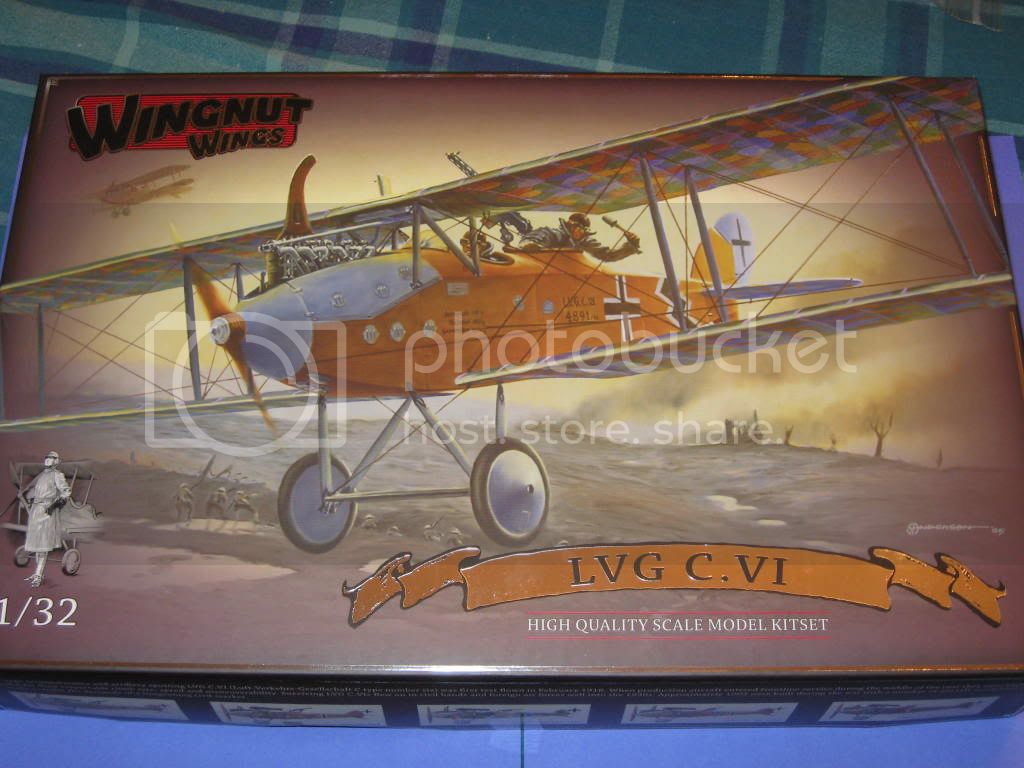
WNW GB 2009 - 10 LVG C.VI Mark
West Virginia, United States
Joined: December 18, 2006
KitMaker: 1,121 posts
AeroScale: 1,063 posts
Posted: Wednesday, April 29, 2009 - 04:34 PM UTC
Victoria, Australia
Joined: July 28, 2004
KitMaker: 10,889 posts
AeroScale: 174 posts
Posted: Wednesday, April 29, 2009 - 05:12 PM UTC
Very nice! These Wingnuts kits really look awesome. Will you be doing the lozenge colour scheme?
If you don't mind me asking, how much does this kit retail for?
Rudi

Beware the populist demagogues at the head of private armies
Alberta, Canada
Joined: January 19, 2008
KitMaker: 6,743 posts
AeroScale: 6,151 posts
Posted: Wednesday, April 29, 2009 - 06:27 PM UTC
Gee Mark I'm still waiting to see the M-5 and the junkers . now you dassle us with a wing nut build ! Cool, really looking forward to your take on this one !!!
England - South East, United Kingdom
Joined: November 06, 2005
KitMaker: 1,667 posts
AeroScale: 1,551 posts
Posted: Wednesday, April 29, 2009 - 07:23 PM UTC
it's a beautiful kit isnt it Mark.......I see you went for the separate pushrods on the engine....nice option, I suppose if you are building the enclosed versions it wouldnt much matter.
I'm building mine alongside the SE5a, I've took up enough forum space already.... so will enjoy watching yours progress. what's your opinion on the lozenge.....I was a little on the fence but have fell off on the positive side...LOL
Is so tempted to do the prototype build and steal the loz for my DIII OAW.
Still can't cure the AMS even with sausage finger implants & olde eyes.
Colorado, United States
Joined: January 25, 2004
KitMaker: 11,669 posts
AeroScale: 11,011 posts
Posted: Wednesday, April 29, 2009 - 08:22 PM UTC
Well now I am having fun! Model On! Please!
". . .The most important thing is to know why you build and then get the most that you can out of building." via D.D.
West Virginia, United States
Joined: December 18, 2006
KitMaker: 1,121 posts
AeroScale: 1,063 posts
Posted: Wednesday, April 29, 2009 - 11:56 PM UTC
Hi everyone,
Rudi, the kit cost me $79 with free shipping. Here's the website:
http://www.wingnutwings.com/ww/ Terri, the Grig and Junkers are still here on my bench. I'll be working on them in tandem. I have a month and a half of free time in front of me. Stay tuned.
Keith and Stephen, I think the kit is a real beauty. I'm looking forward to the build. I'll be doing this one OOB to see how it will finish out without any "goodys" added on. I also have the SE5a. I'll be watching your build, too, Keith.
Mark
West Virginia, United States
Joined: December 18, 2006
KitMaker: 1,121 posts
AeroScale: 1,063 posts
Posted: Thursday, April 30, 2009 - 02:33 AM UTC
Alberta, Canada
Joined: January 19, 2008
KitMaker: 6,743 posts
AeroScale: 6,151 posts
Posted: Thursday, April 30, 2009 - 06:32 AM UTC
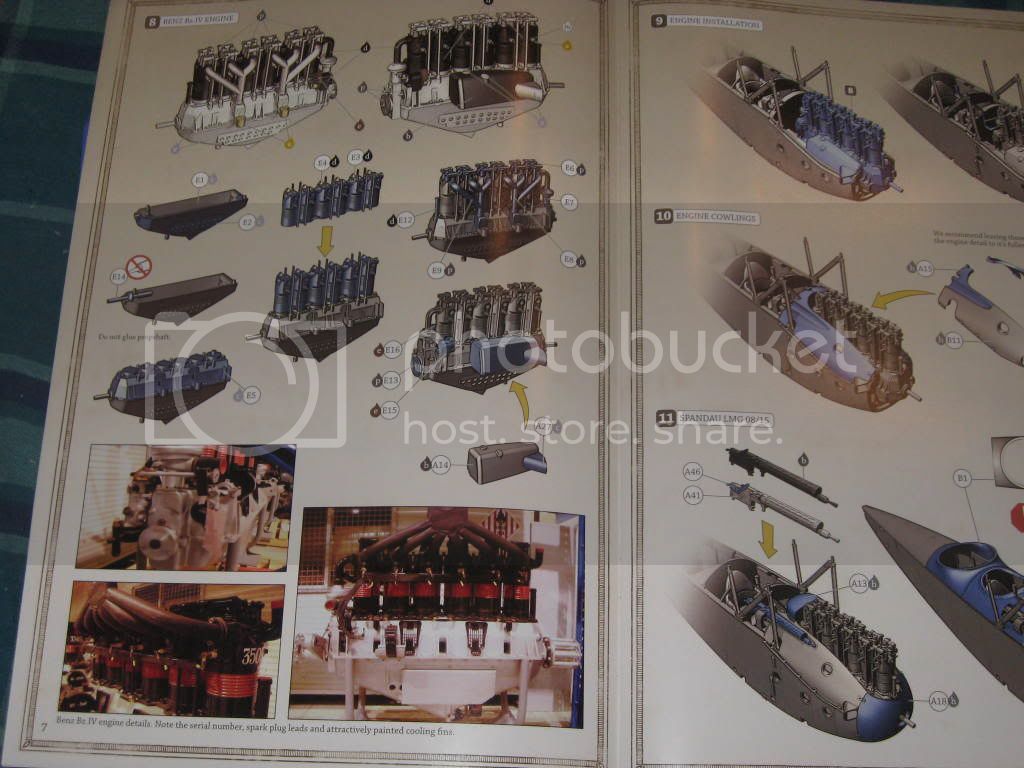
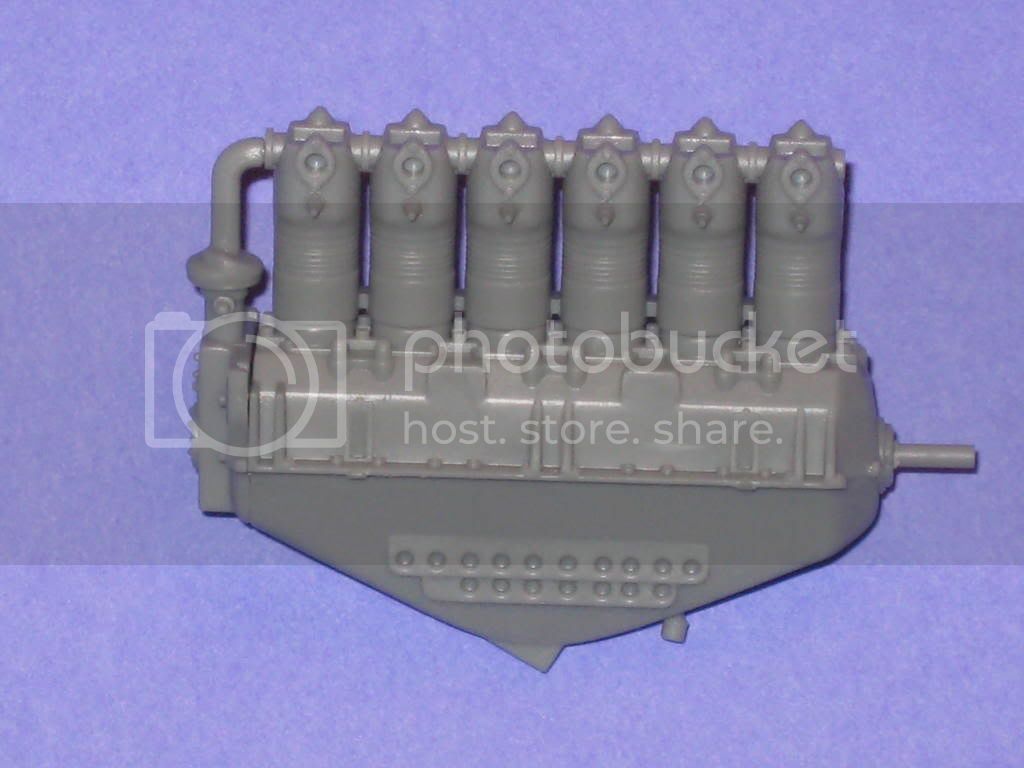
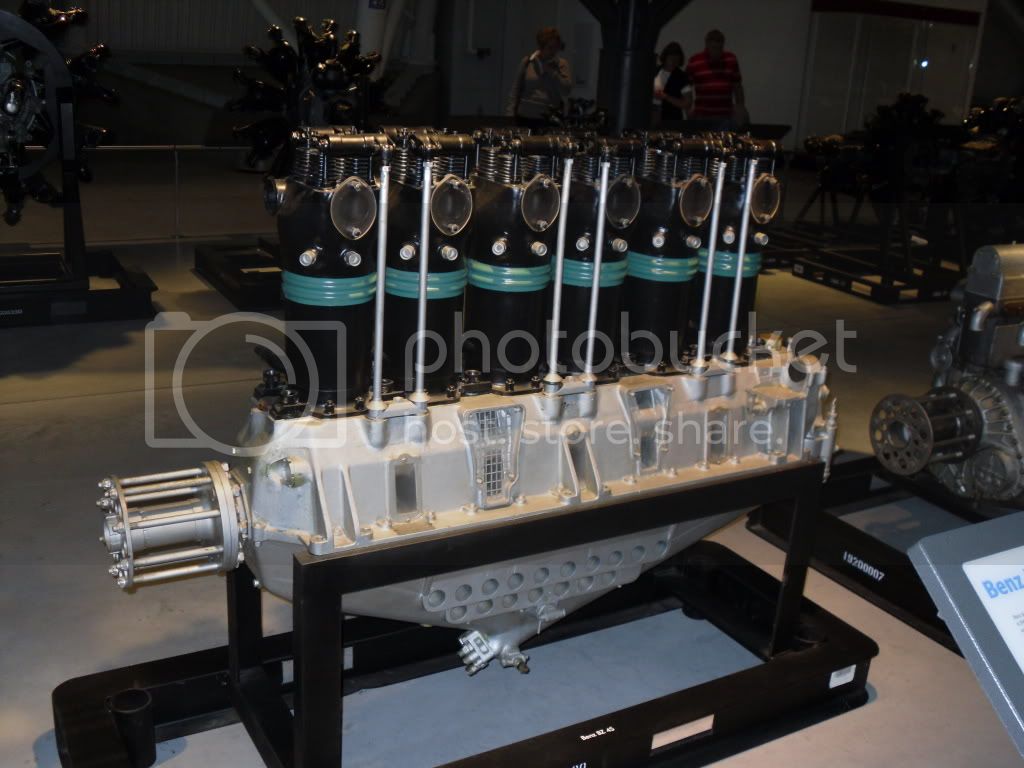
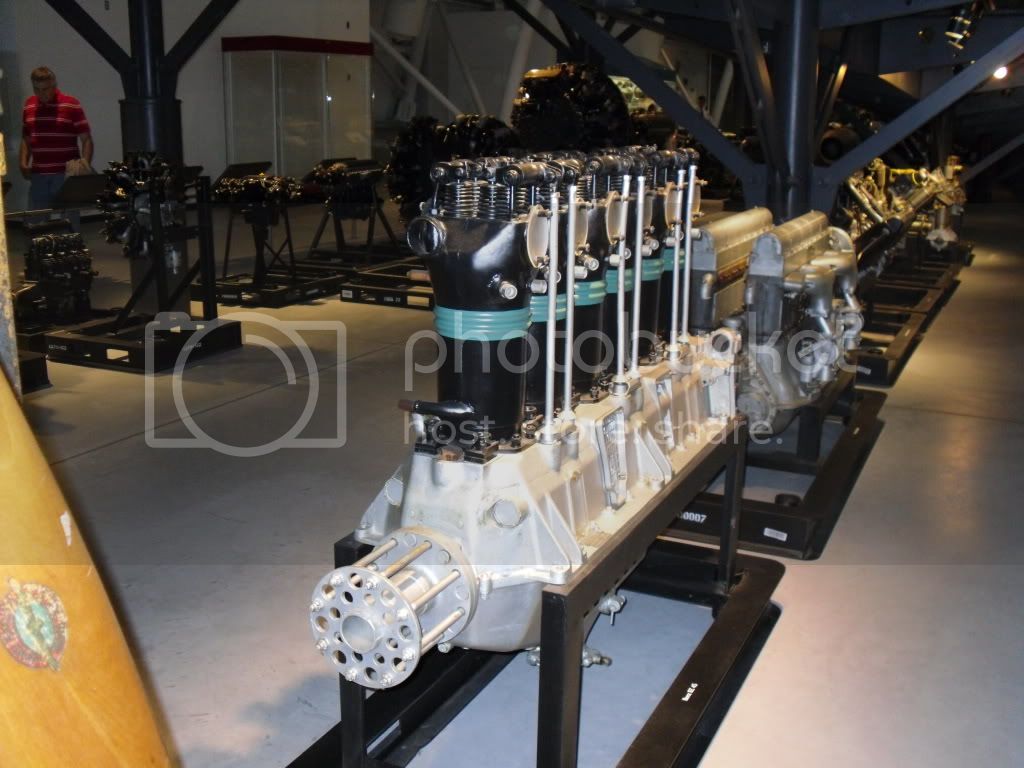
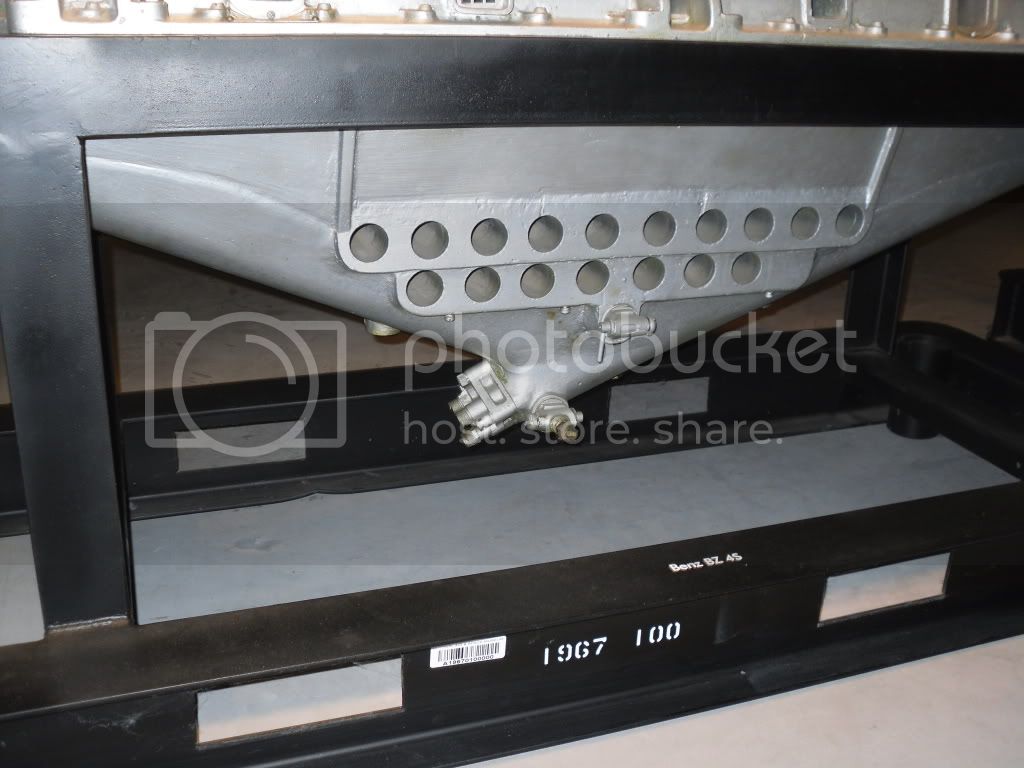
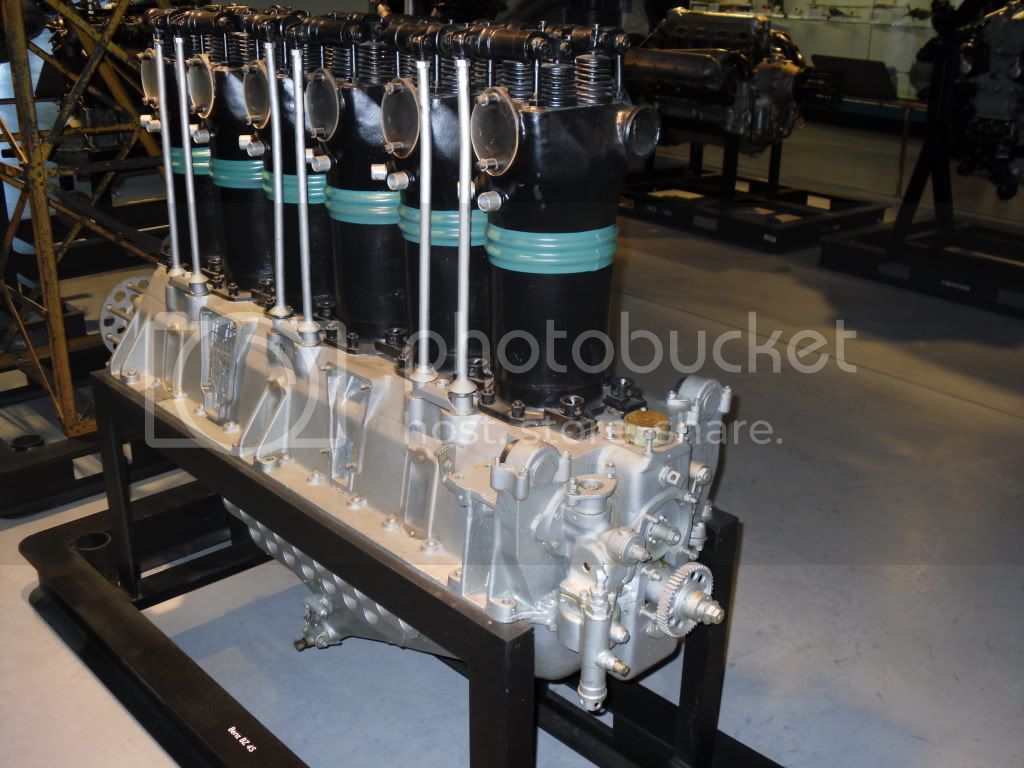
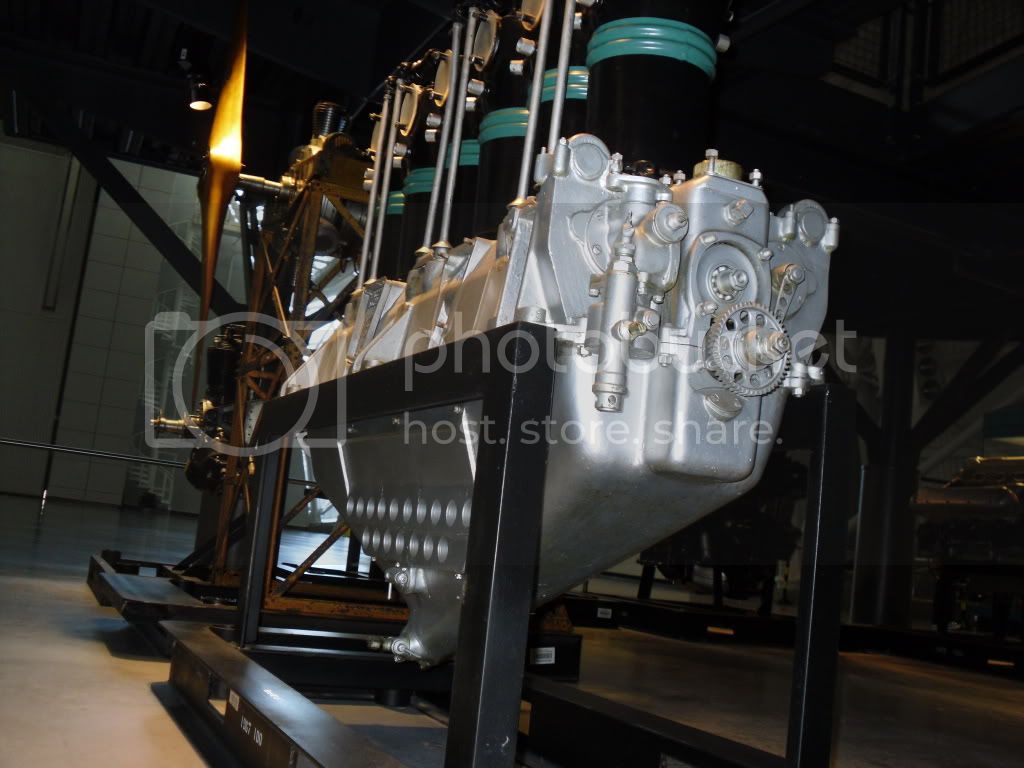
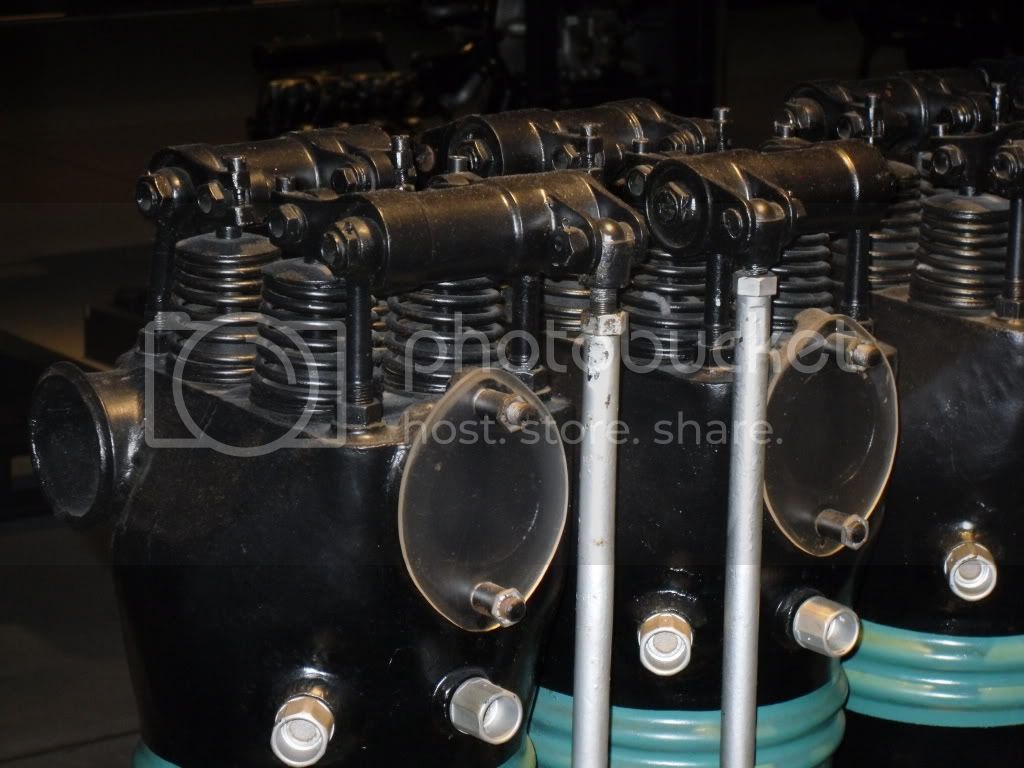
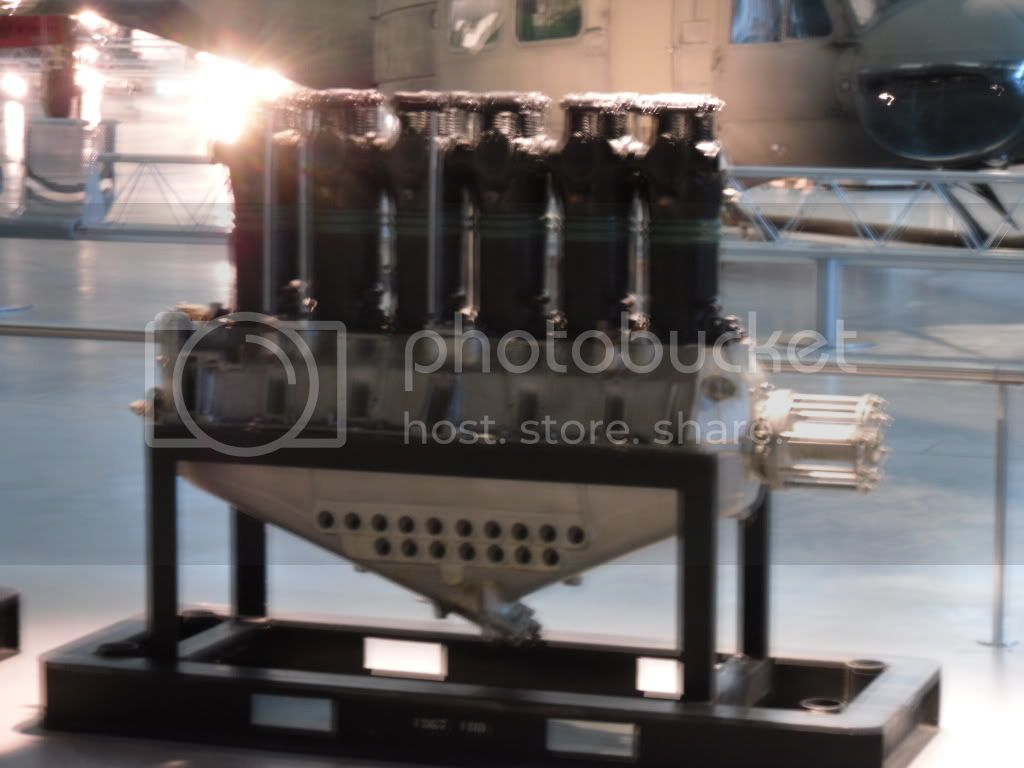
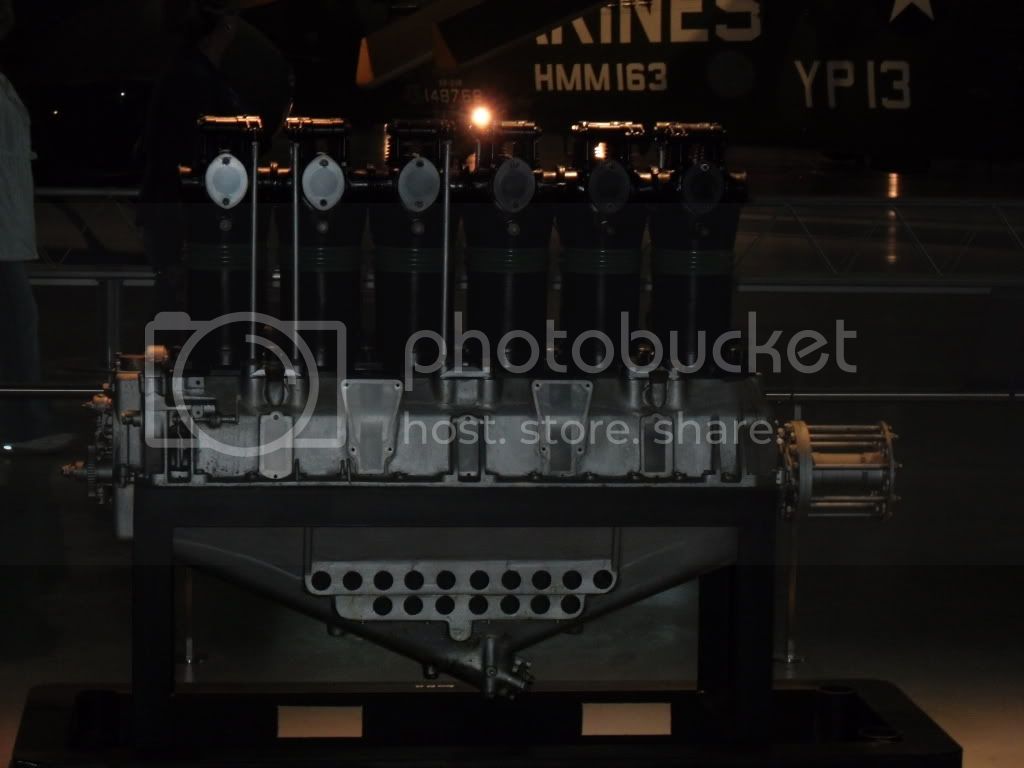
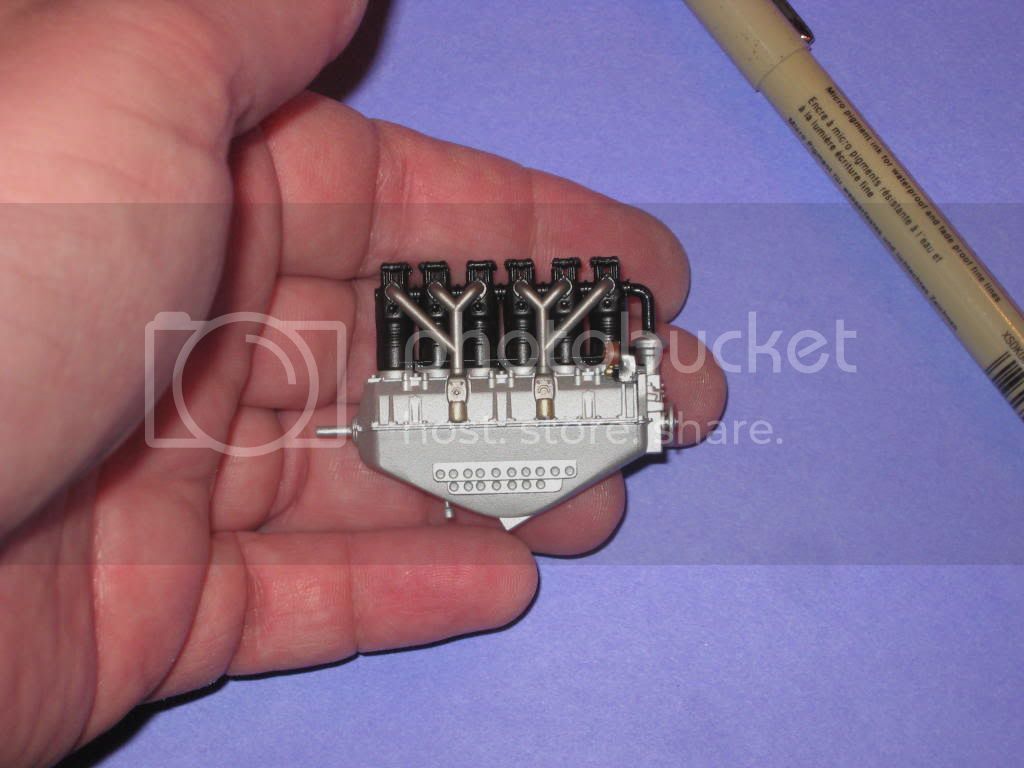
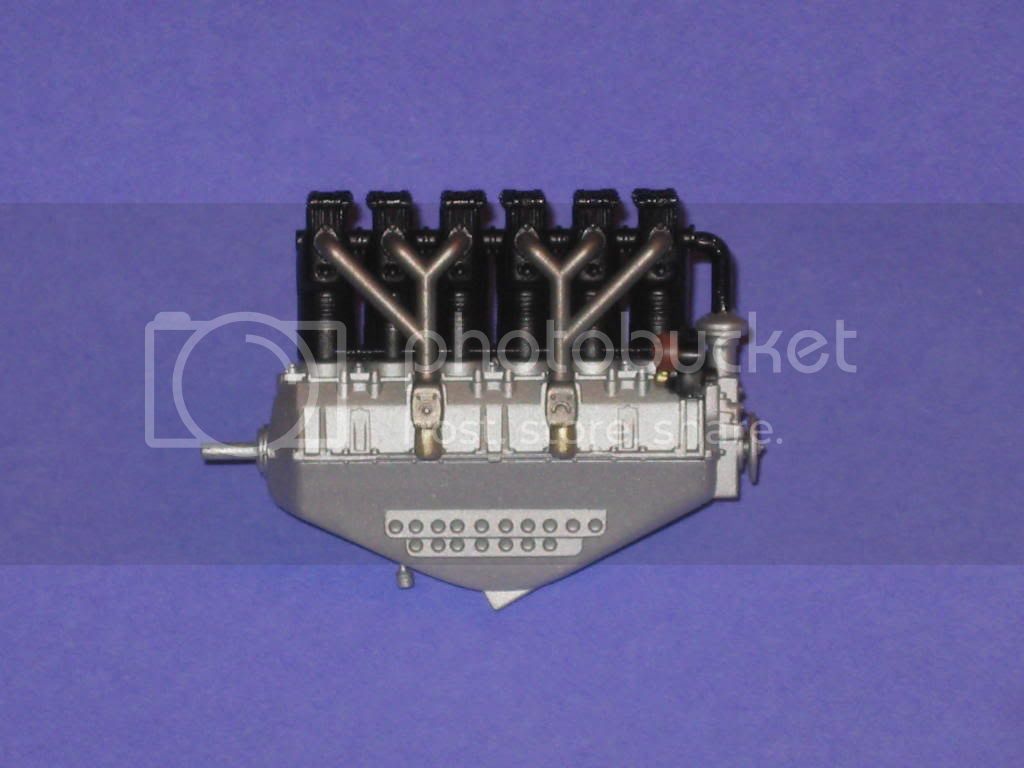
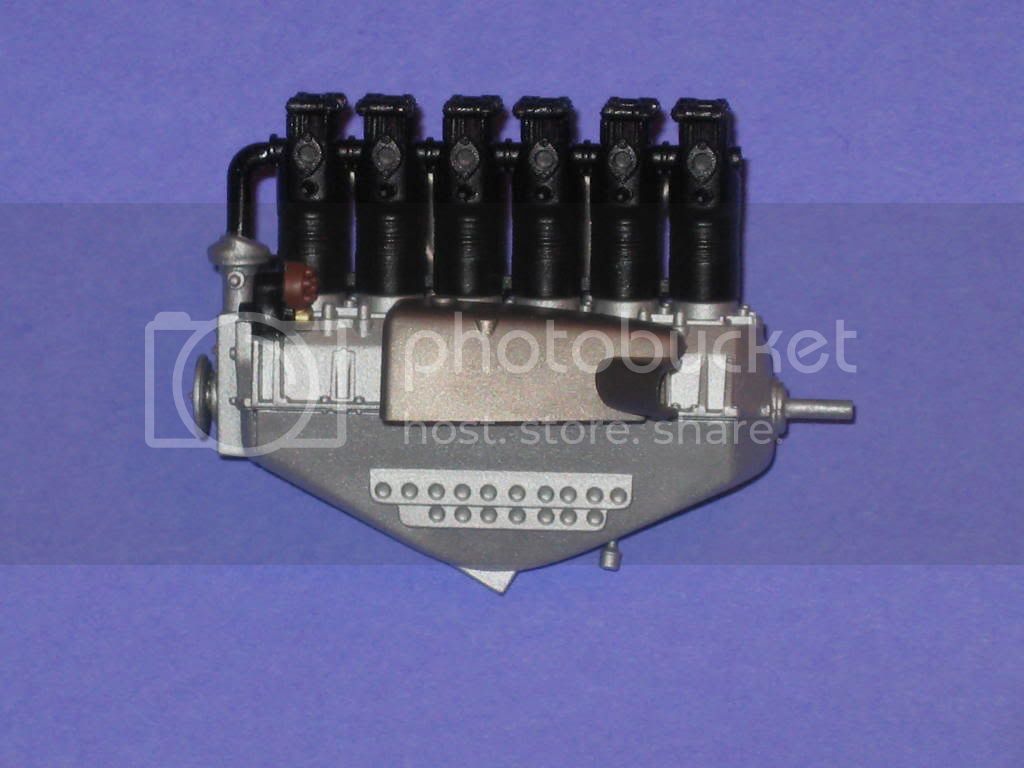
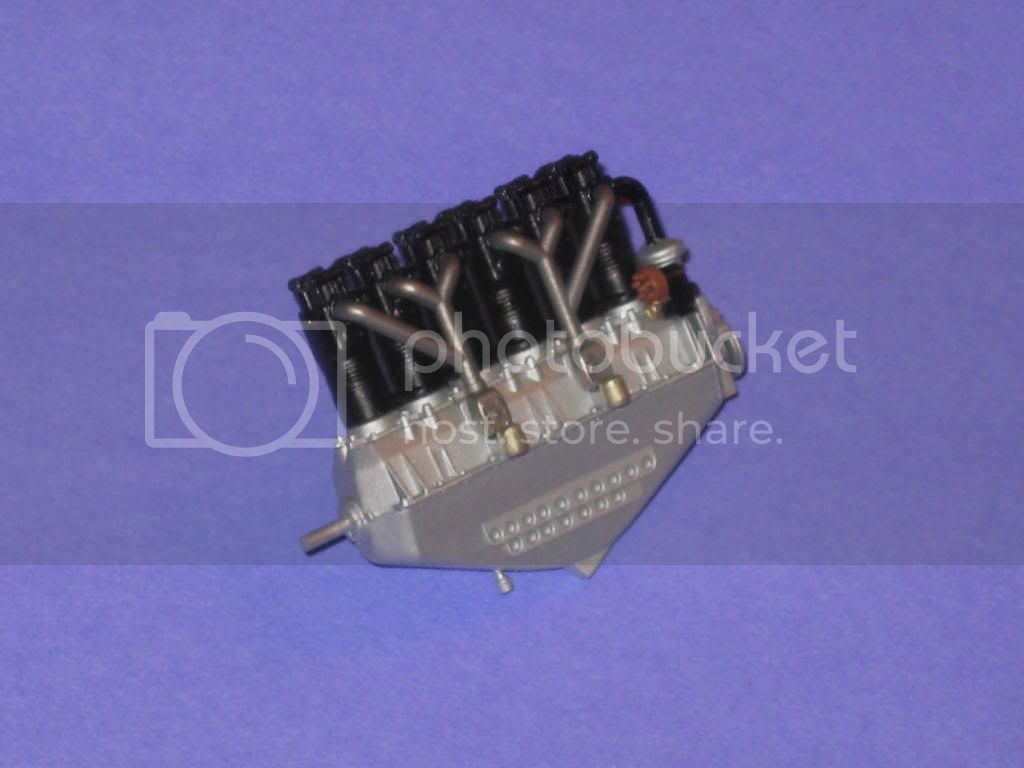
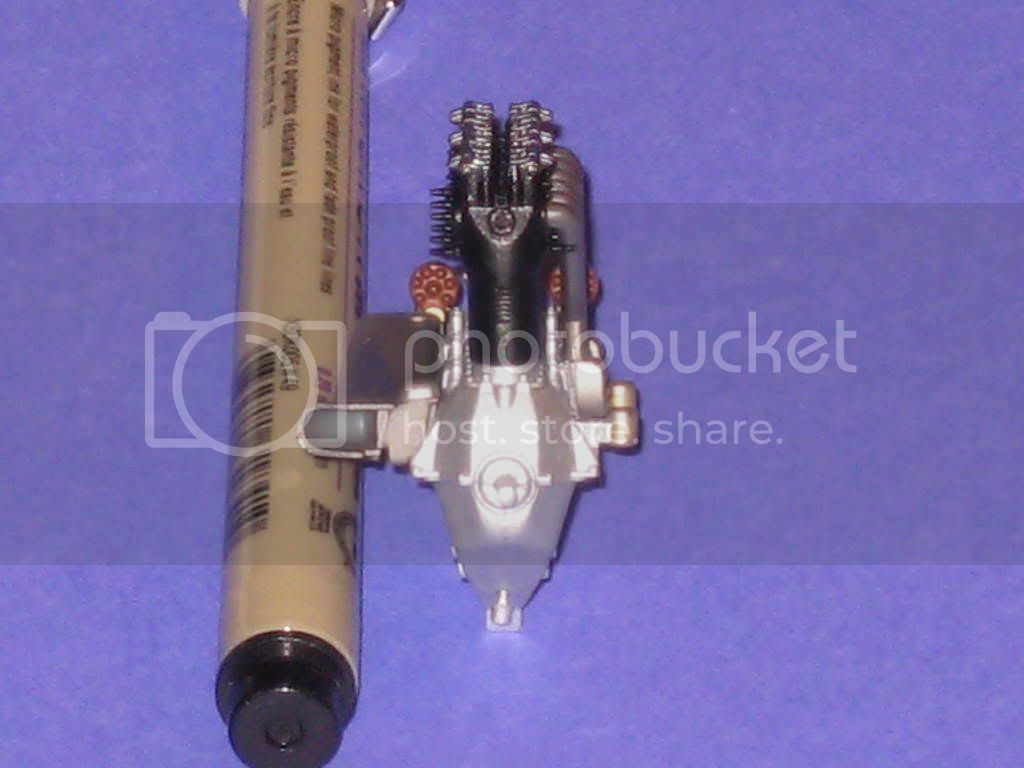
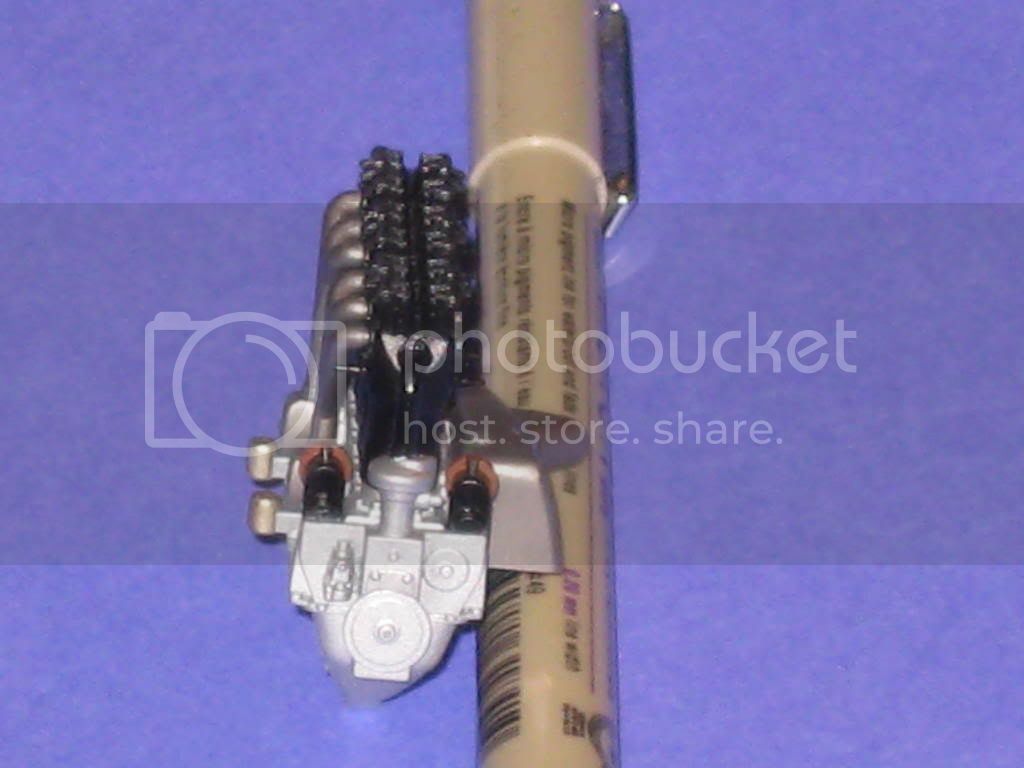
Wow , great pic's of the engine there Mark . Where did you take the pic's . They have a great collection of other ones as well . I would have been trigger happy with the camrea .
On the Wing Nuts kit engine I can see myself adding the valve springs Which really doesn't seem to be on the kit part . Or I'm not looking hard enough and need to get some glasses to fill that grannie roll . All in all though I'm really excited on the builds which Keith and you are doing .
England - South East, United Kingdom
Joined: November 06, 2005
KitMaker: 1,667 posts
AeroScale: 1,551 posts
Posted: Thursday, April 30, 2009 - 06:48 AM UTC
Terri, the engine hasnt got them fitted yet, each cylinder has its own rocker assy to go in top the springs are there, but not overly detailed, but the whole is enough....unless you want to cut the assemblys into bits.
well do ya? lol
http://www.mikerlewis.com/lvgcvi/lvgengine.htmlanuther link...for the anally detail maniacs amongst us
Still can't cure the AMS even with sausage finger implants & olde eyes.
West Virginia, United States
Joined: December 18, 2006
KitMaker: 1,121 posts
AeroScale: 1,063 posts
Posted: Thursday, April 30, 2009 - 06:48 AM UTC
Terri,
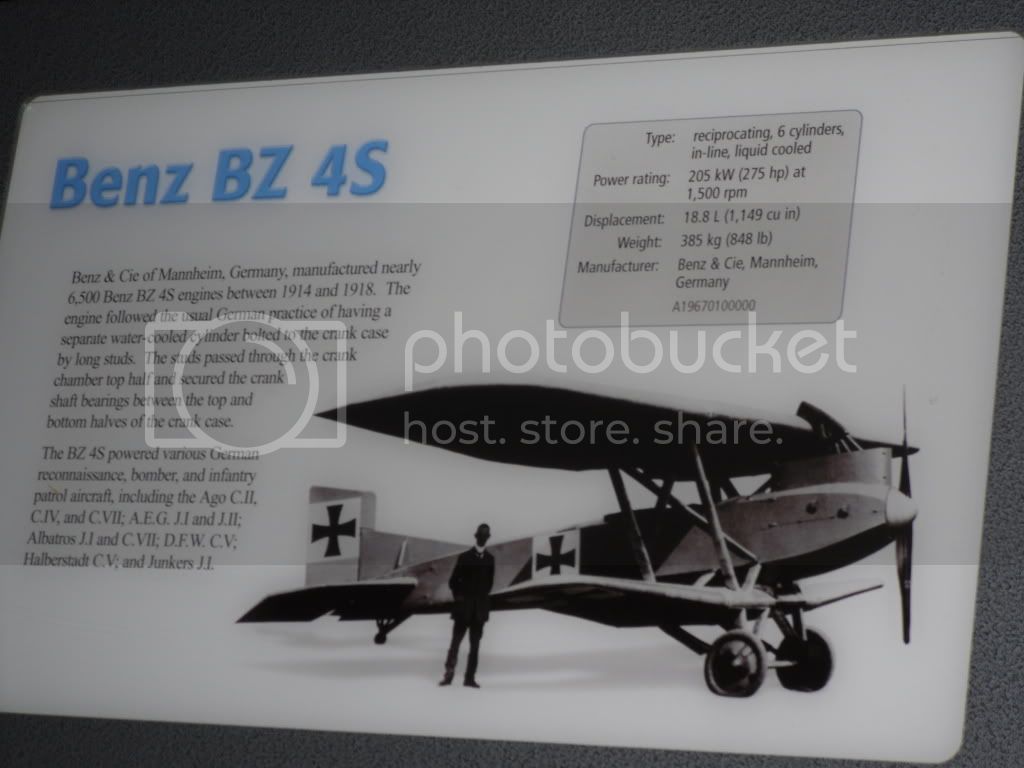
I took the pictures at the Udvar-Hazy Facility near Dulles Airport. I could have spent a week there. The exhibits are incredible.
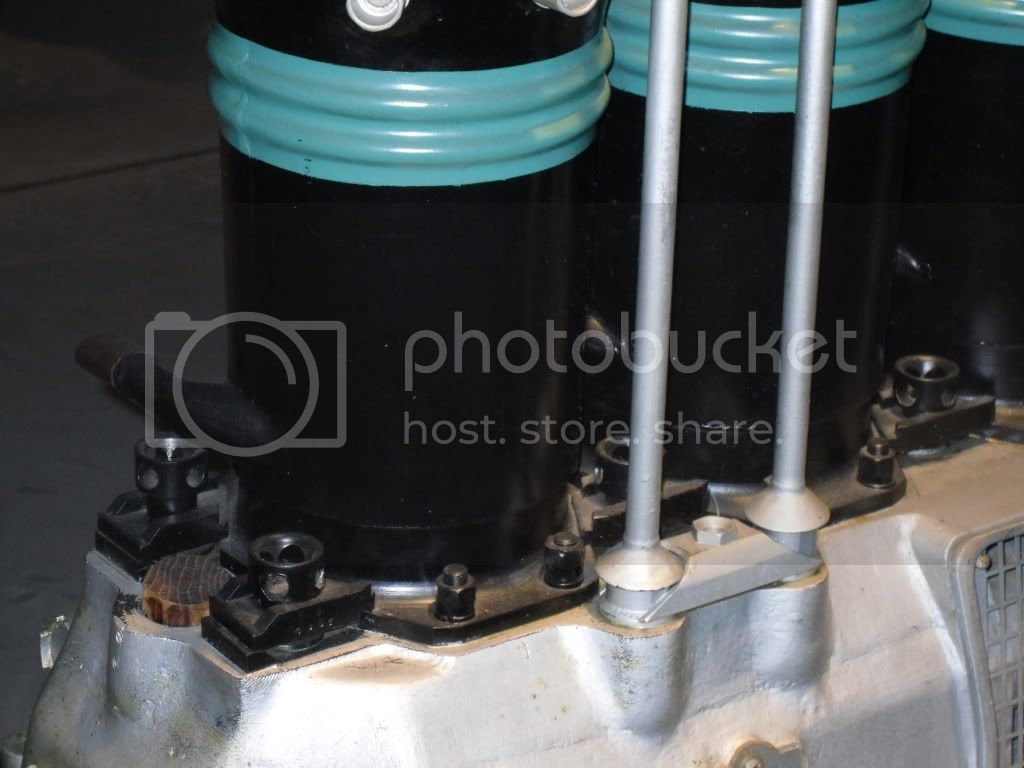
I still don't have all of the parts on the engine. The rocker arms and a few other bits and pieces aren't on in the last pictures I posted. The parts of the engine you see in the picture fit quite nicely. I'll put it all together after I paint some of the parts seperately.
Mark
Alberta, Canada
Joined: January 19, 2008
KitMaker: 6,743 posts
AeroScale: 6,151 posts
Posted: Thursday, April 30, 2009 - 07:01 AM UTC
Thanks Guys , I guess I should really wait until things have been painted and glued !
But nooooooooooo , I just had to have a blond moment

I will have to remember that Mark . I will be in Dallas in the next few months and will make a note of dropping by there , with camrea in hand !
West Virginia, United States
Joined: December 18, 2006
KitMaker: 1,121 posts
AeroScale: 1,063 posts
Posted: Thursday, April 30, 2009 - 08:17 AM UTC
Hi Terri,
It's near Dulles Airport (not Dallas, my dear). It's actually in Virginia.
http://www.nasm.si.edu/UdvarHazy/You would love it there. If you ever get to this part of the country you should consider it a "must stop".
Mark

Alberta, Canada
Joined: January 19, 2008
KitMaker: 6,743 posts
AeroScale: 6,151 posts
Posted: Thursday, April 30, 2009 - 06:15 PM UTC
Thanks Mark !
West Virginia, United States
Joined: December 18, 2006
KitMaker: 1,121 posts
AeroScale: 1,063 posts
Posted: Friday, May 01, 2009 - 01:41 PM UTC
Indiana, United States
Joined: May 14, 2007
KitMaker: 3,117 posts
AeroScale: 2,270 posts
Posted: Friday, May 01, 2009 - 01:52 PM UTC
Engine is looking really good.
"Treat 'em Rough", Current Builds--Wingnut Rumpler
I am frequently seen with blood shot eyes from staying up past my nap time to get the right colour scheme on my latest WWI model?
West Virginia, United States
Joined: December 18, 2006
KitMaker: 1,121 posts
AeroScale: 1,063 posts
Posted: Friday, May 01, 2009 - 02:43 PM UTC
Thanks, Carl. The fit on the engine parts is excellent so far.
Mark
Alberta, Canada
Joined: January 19, 2008
KitMaker: 6,743 posts
AeroScale: 6,151 posts
Posted: Saturday, May 02, 2009 - 06:57 AM UTC
Wow the engine looks fantastic ! Great level of detail and sure looks better with some paint on the parts . I see what you mean by the valve spring and rocker boxes . Looking forward to see the detail pop out even more with a wash or two now .
New York, United States
Joined: December 15, 2006
KitMaker: 365 posts
AeroScale: 344 posts
Posted: Saturday, May 02, 2009 - 10:20 AM UTC
Mark,
Looks like a great start to what I know will be another great build by you. I have this one as well, with the Junkers on its way so I will go to school on you. Glad you have the time for this, right now I'm wrestling with yard work and wallpaper, almost done though. Then its onto the great 1/32 scale modelfest!!!
Regards, Dwayne
England - South East, United Kingdom
Joined: November 06, 2005
KitMaker: 1,667 posts
AeroScale: 1,551 posts
Posted: Saturday, May 02, 2009 - 08:33 PM UTC
Mark, lovely work on this one, as I said I'm building her too, just a little ahead of you, a couple of pointers for you.
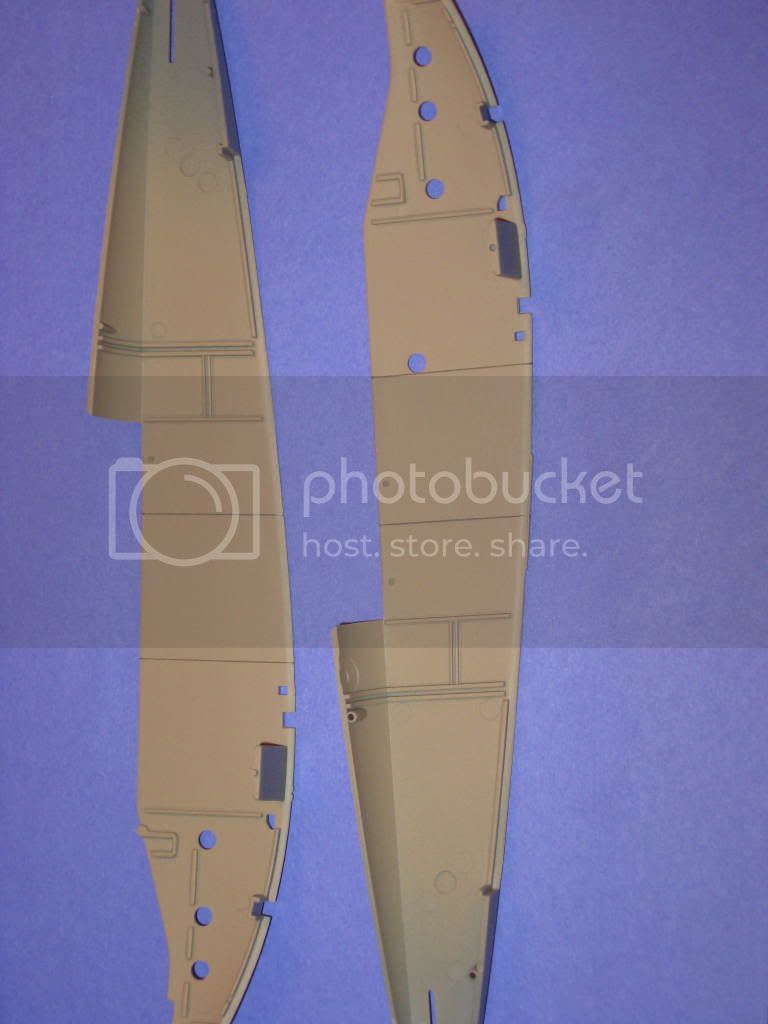
1. the lozenge decal seems quite fragile to me but there again I am not used to using such big sections. and dont forget to trim the very edges 0.5mm or so , there is a dark strip which doesnt show till it's on the kit.
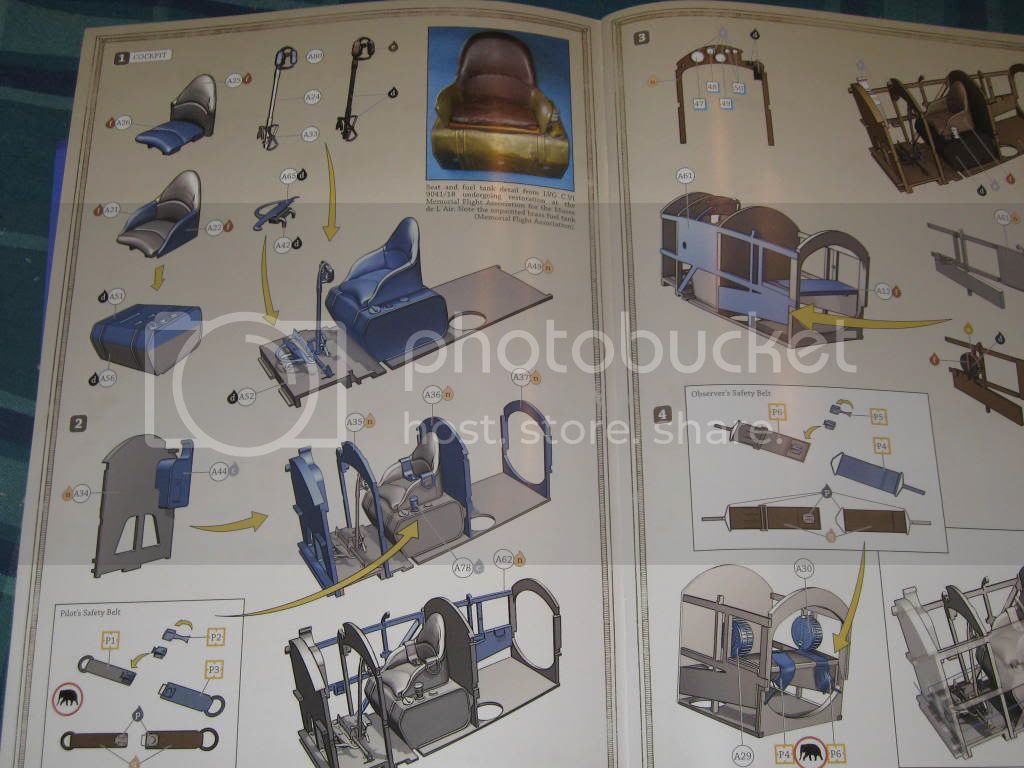
2. the tail plane, centre section is wood not fabric and it has sink marks in it but to my eyes looks way too thiick anyway.I sanded mine downto take out the sink marks, glued it in place before realising it was still too thick. should have looked at the pic at the bottom of P10 in the instruction book LOL.
hope this helps you.
Keith
Still can't cure the AMS even with sausage finger implants & olde eyes.
West Virginia, United States
Joined: December 18, 2006
KitMaker: 1,121 posts
AeroScale: 1,063 posts
Posted: Sunday, May 03, 2009 - 08:44 AM UTC
Thanks Terri and Dwayne, and thanks for the heads up Keith.
Mark
West Virginia, United States
Joined: December 18, 2006
KitMaker: 1,121 posts
AeroScale: 1,063 posts
Posted: Sunday, May 03, 2009 - 11:55 AM UTC
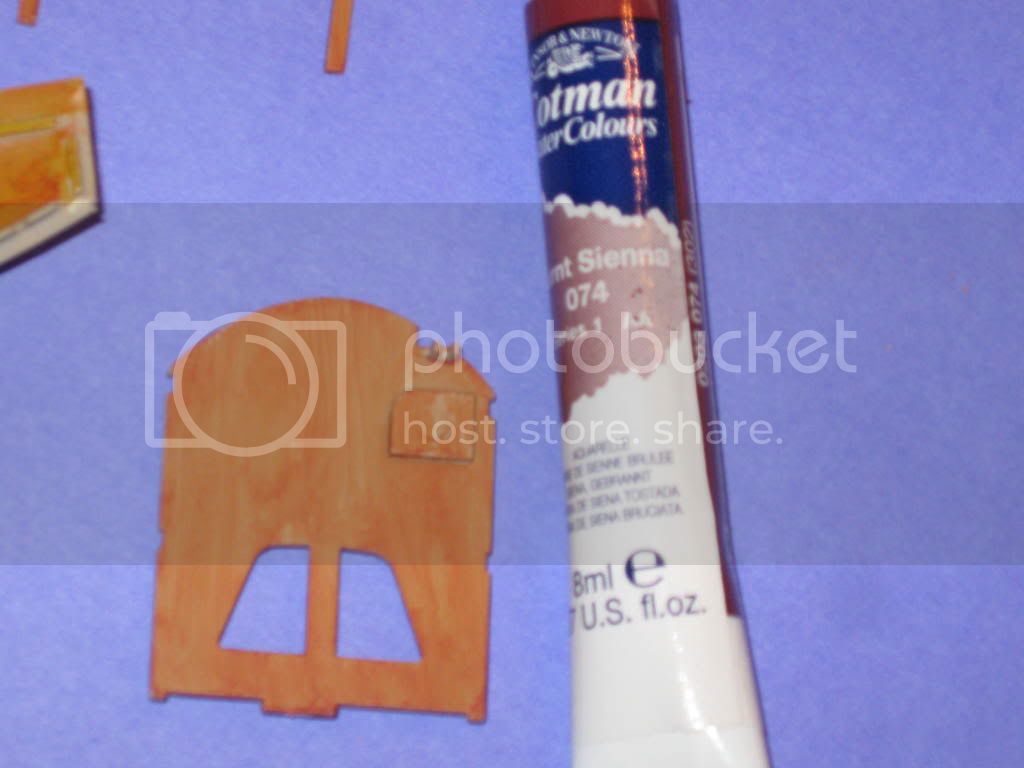
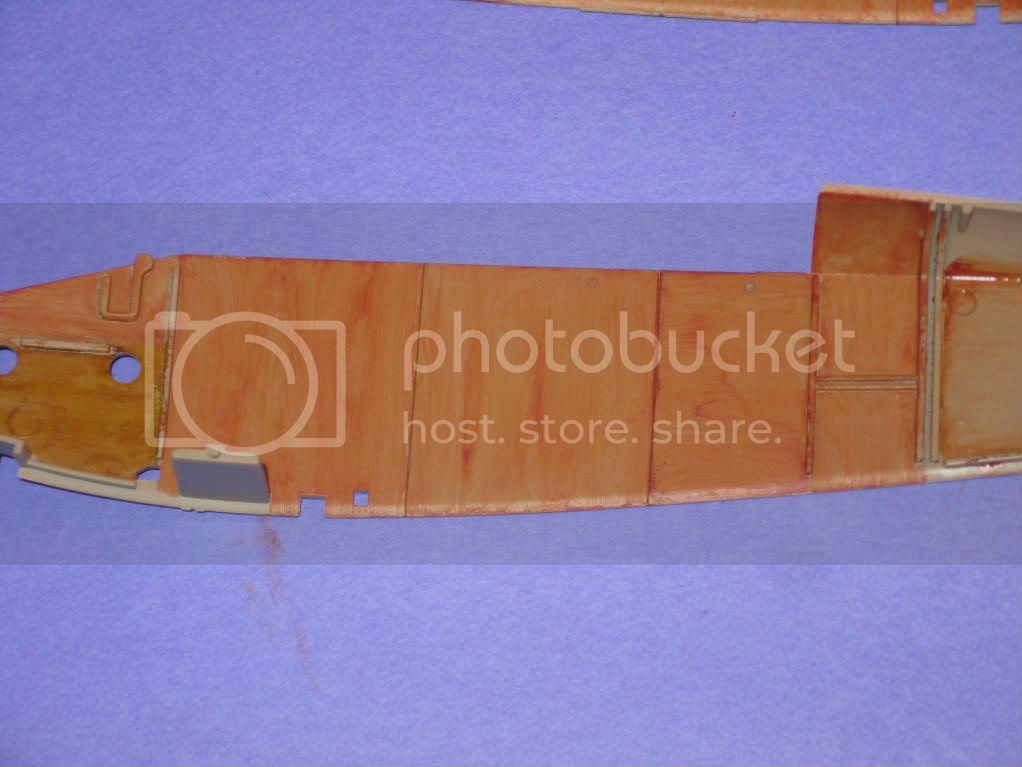
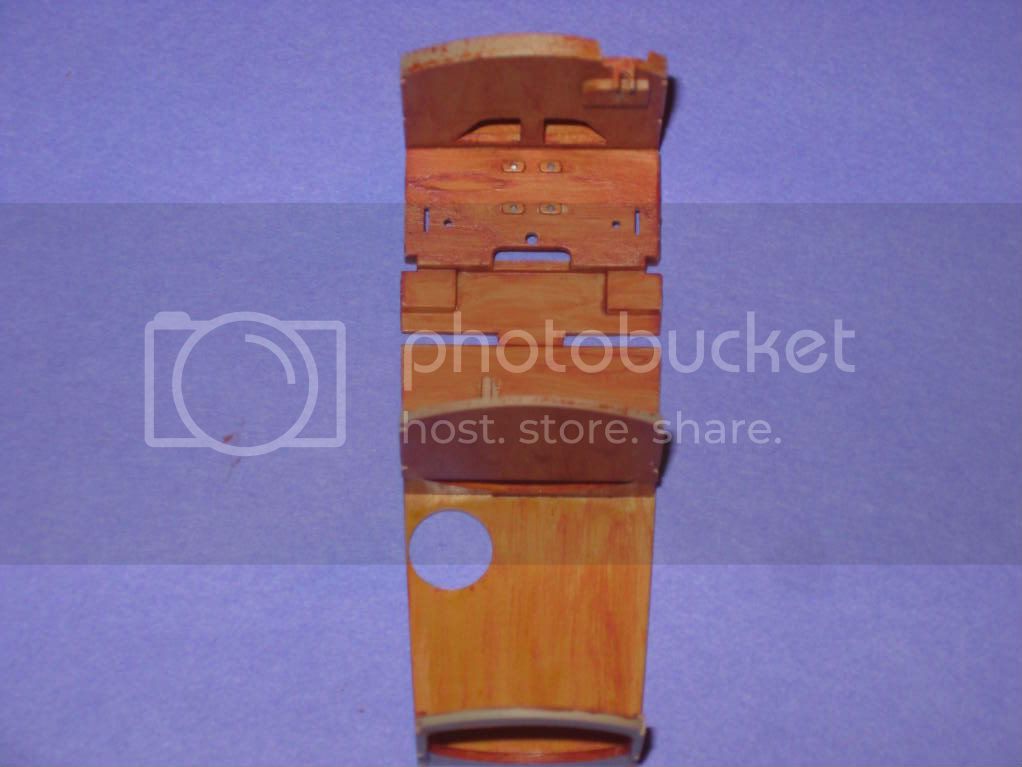
OK, I decided to not use oil paint and have used Watercolors instead. They dry very quickly and are very easy to use and correct if you need to correct the "grain" you've painted on it. I'm using Windsor & Newton "Cotman Watercolours". In this case, burnt sienna over the tamiya tan coat. Here are the results.............
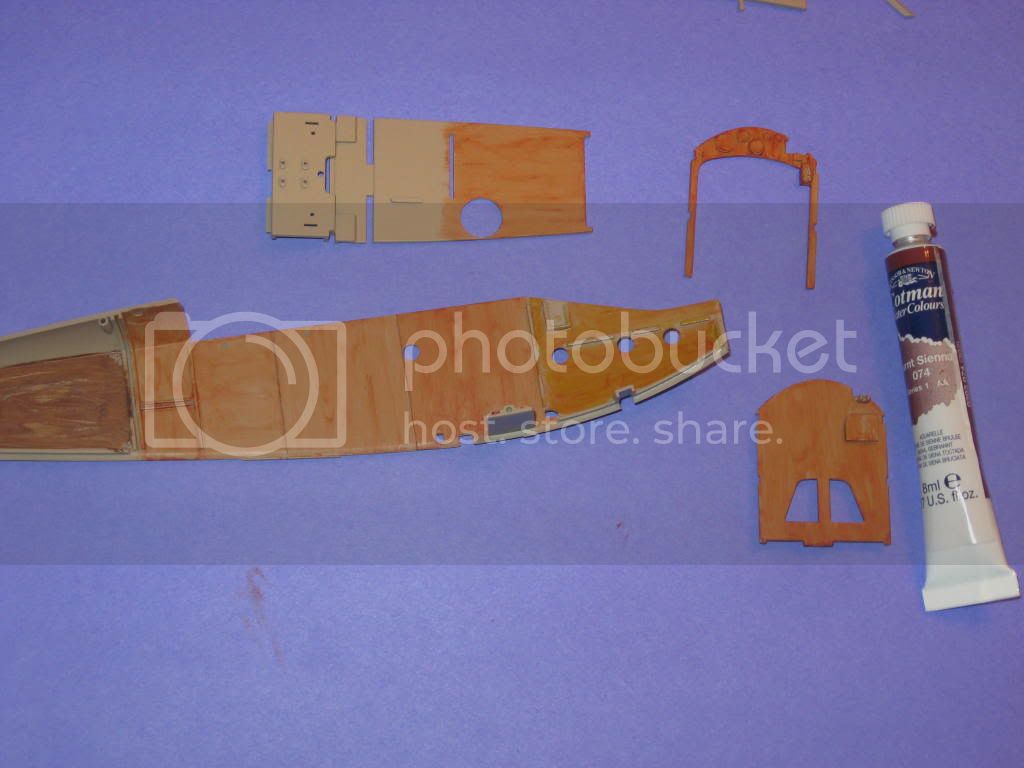
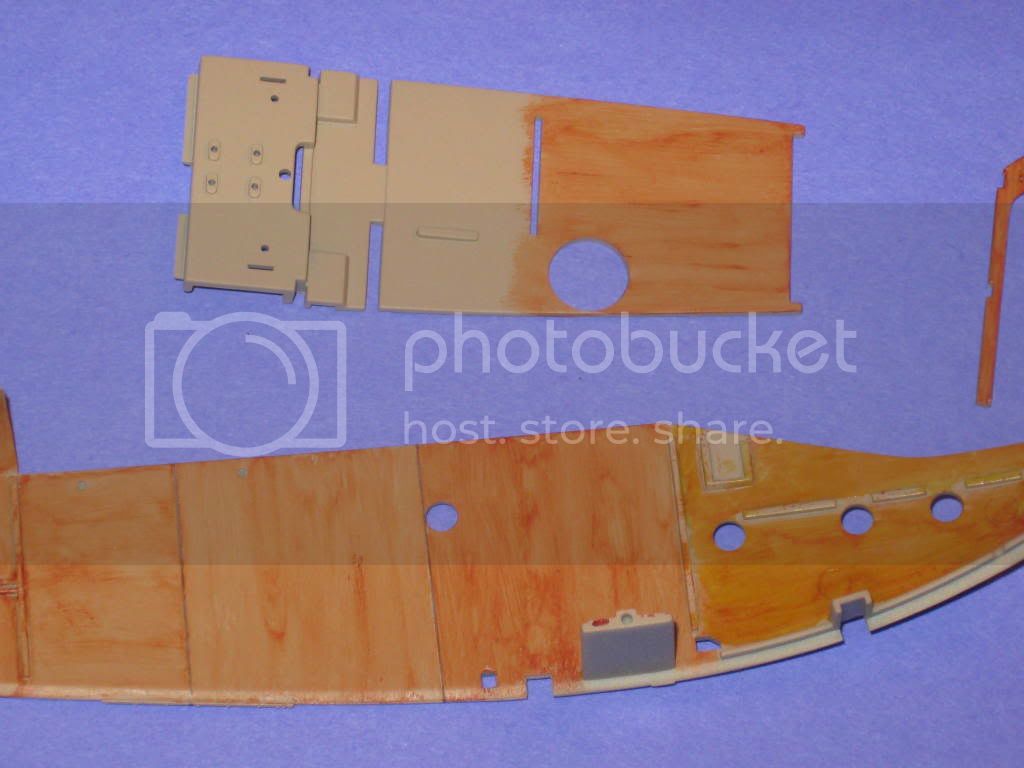
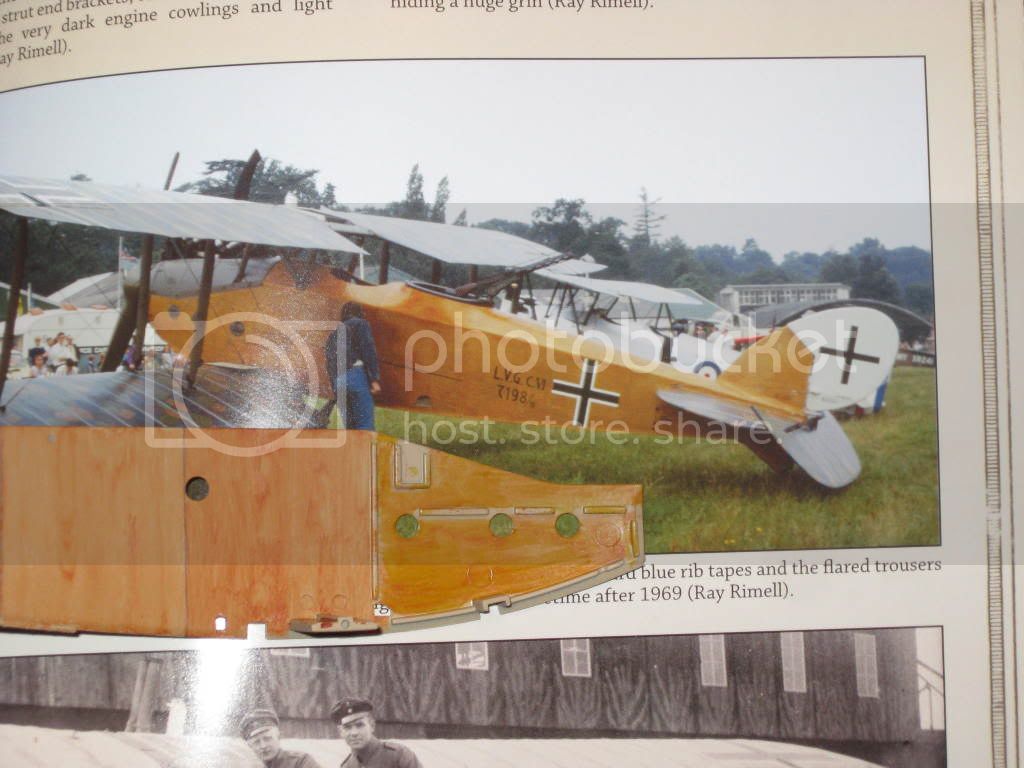
I gave the lower engine area a coat of Tamiya clear yellow and the color matched well with the photo of the Shuttleworth LVG wood................
Mark
West Virginia, United States
Joined: December 18, 2006
KitMaker: 1,121 posts
AeroScale: 1,063 posts
Posted: Sunday, May 03, 2009 - 02:21 PM UTC
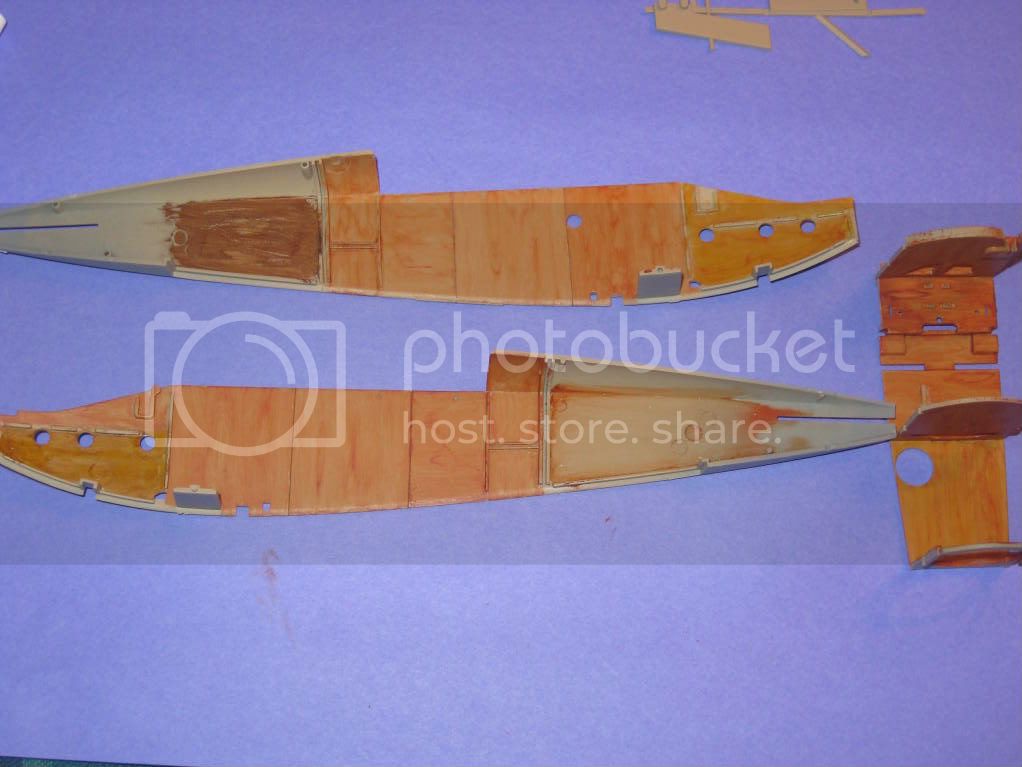
And here are a few more pictures. Nice and easy and it took just under an hour.
more tomorrow,
Mark
England - South East, United Kingdom
Joined: November 06, 2005
KitMaker: 1,667 posts
AeroScale: 1,551 posts
Posted: Sunday, May 03, 2009 - 02:56 PM UTC
I used watercolours for my Roden Albi DI Build exterior. the effect is good for ply, but care needs to be taken not to over apply Klear/Finish over it as it can float.
Mark I love your ply, you caught it just about right I think. once its laquered in it will look just right.
If I hit any glitches I will post them to warn you but upto now only those already posted have come to light, the tailplane is an odd one though, as I cant find any reference at all to support a thickened section like that....still if everything was perfect we would complain cos there was nuthin to correct...laughs.
Keith
Still can't cure the AMS even with sausage finger implants & olde eyes.
New York, United States
Joined: December 15, 2006
KitMaker: 365 posts
AeroScale: 344 posts
Posted: Sunday, May 03, 2009 - 03:53 PM UTC
Mark,
Excellent wood grain, really like that technique. Keep it coming.
Dwayne
Mendoza, Argentina
Joined: June 14, 2006
KitMaker: 222 posts
AeroScale: 219 posts
Posted: Sunday, May 03, 2009 - 08:22 PM UTC
Great work, Mark !
I really like the results you got with the watercolors. I used the same technique on small parts but never over large sections because I found that watercolors (even varnished) can be easily lifted with masking tape. Be careful, I learned that the hard way.

About the color of the wood of the LVG fuselage, check this link:
http://www.theaerodrome.com/forum/camouflage-markings/41019-lvg-c-vi-fuselage-colour.htmlCheers,
Claudio
I have always imagined that Paradise will be a kind of library.
Siempre imagine que el paraíso sería algún tipo de biblioteca.
Jorge Luis Borges