Scotland, United Kingdom
Joined: February 07, 2008
KitMaker: 1,699 posts
AeroScale: 1,384 posts
Posted: Thursday, September 03, 2009 - 08:17 PM UTC
OzReg are sneaky beyond compare. I will try to learn from you

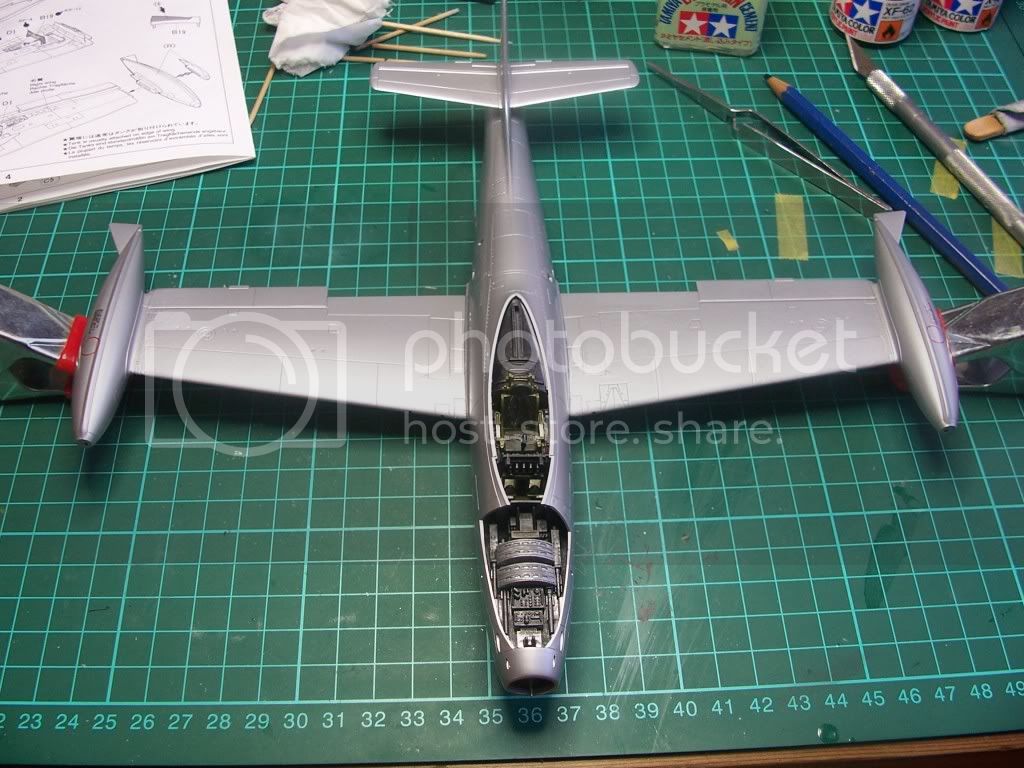
Well here is the start of my metal bird. Just cleaned up some of the flash from the resin
I'll do two of these which will cover the full production run.
I bought them for £15 each which is as much as I've ever spent but was dying to have them
One will go to my dad who worked as a tech in Shorts all his life, and got me into this daft hobby,
the other I'll keep.
I'll smash mold a canopy. There is not much to see in there but the clear plastic/resin is very brittle.
I'll experiment with Bare Metal Foil for one of them and buffing paint for the other. The better one I'll give to my da.
Jönköping, Sweden
Joined: April 25, 2006
KitMaker: 831 posts
AeroScale: 688 posts
Posted: Thursday, September 03, 2009 - 09:52 PM UTC
Interesting little bird you've got there JP. I thought I recognized it from an old book by Erich von Däniken and a googling proved me right.

How old it really is I guess nobody knows.

Tony
Scotland, United Kingdom
Joined: February 07, 2008
KitMaker: 1,699 posts
AeroScale: 1,384 posts
Posted: Thursday, September 03, 2009 - 09:57 PM UTC
I knew my dad was from another planet!
Germany
Joined: September 07, 2005
KitMaker: 5,609 posts
AeroScale: 5,231 posts
Posted: Friday, September 04, 2009 - 10:15 PM UTC
Great find Tony!! ... instantly thought the same

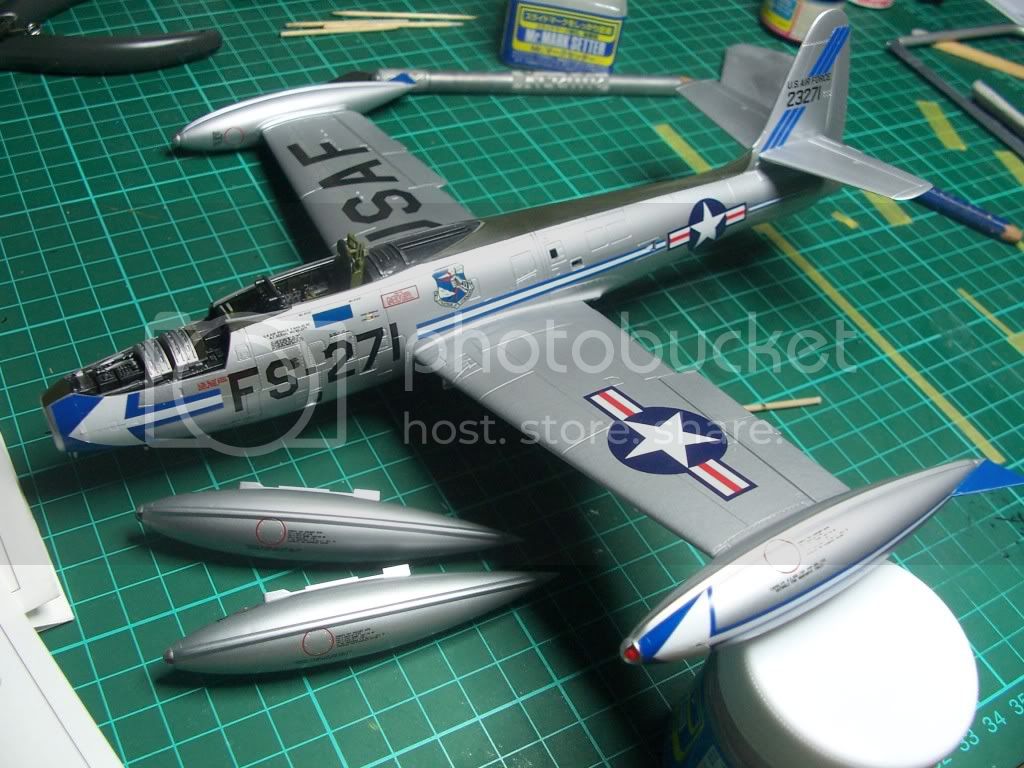
Here is my finished bird

more pictures in the build thread mentioned/linked above.
Do I have to upload a pic anywhere?
all the best
Steffen
DULCE ET DECORUM EST PRO HOBBY MORI
Jönköping, Sweden
Joined: April 25, 2006
KitMaker: 831 posts
AeroScale: 688 posts
Posted: Saturday, September 05, 2009 - 09:04 AM UTC
" Aaah, nicht bewegen Franz. Noch ein bild und dann fahren wir!"
All cool Steffen. That't the picture (of a picture) thet I was hoping for. Nice build, all of it.
Tony
AussieReg
 Associate Editor
#007
Victoria, Australia
Joined: June 09, 2009
KitMaker: 8,156 posts
AeroScale: 3,756 posts
Posted: Saturday, September 05, 2009 - 08:26 PM UTC
Hi guys, progress report incoming . . . . . . .
Fuselage sprayed, wings on, happy so far . . .


Next step is Olive Drab glare panels and on to decals.
Cheers from a very chilly and wet Wattle Glen.
ON the bench
Revell 1/24 '53 Corvette (building as '54)
Revell 1/24 BMW 507 Coupe and Cabrio
Italeri 1/48 Me262 B-1a/U1 Nightfighter
Monogram 1/24 '57 Chevy Nomad
Dragon 1/350 USS Frank Knox DD-742
#041
Kobenhavn, Denmark
Joined: July 20, 2006
KitMaker: 10,069 posts
AeroScale: 3,788 posts
Posted: Thursday, September 10, 2009 - 11:42 PM UTC
Looks good, Damian. Are you going to put any stores on it?
Looking forward to see it with decals.
Campaign'oholic - 252+ campaigns completed
AussieReg
Associate Editor #007
Victoria, Australia
Joined: June 09, 2009
KitMaker: 8,156 posts
AeroScale: 3,756 posts
Posted: Friday, September 11, 2009 - 01:43 AM UTC
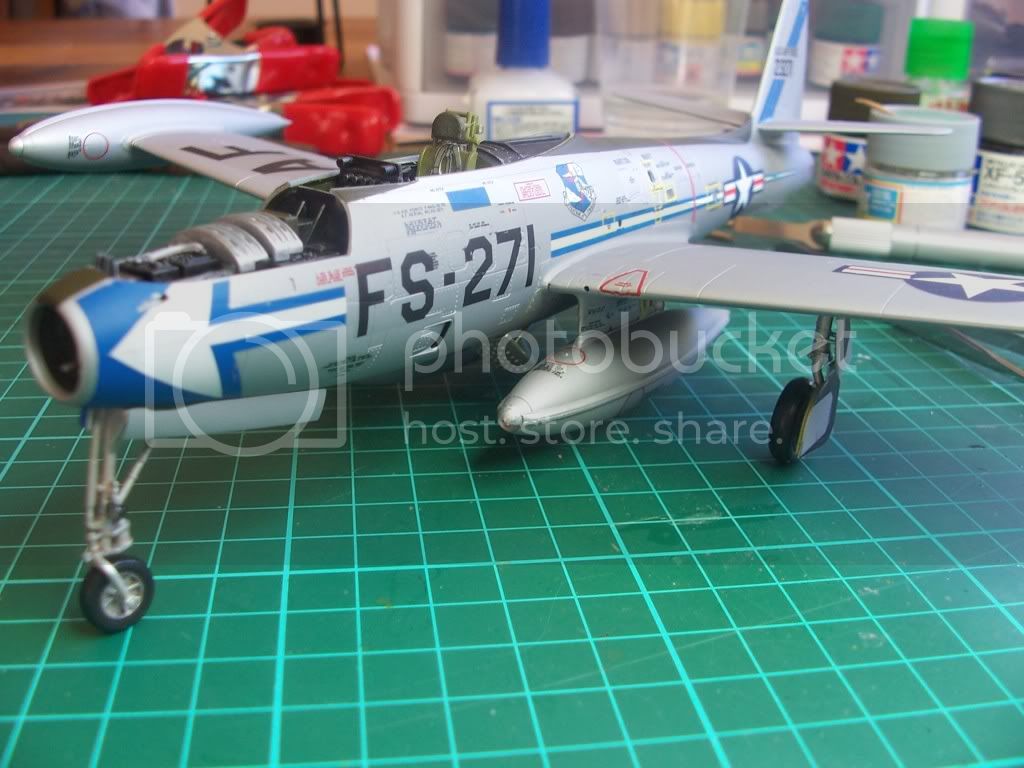
Hi Jesper, you asked for it . . . .
Almost finished LHS decals. I will be going with the drop tanks for maximum Aluminium value, the boring old Olive Drab 500 pounders will go in the spares box.
Thx for the comments, D
ON the bench
Revell 1/24 '53 Corvette (building as '54)
Revell 1/24 BMW 507 Coupe and Cabrio
Italeri 1/48 Me262 B-1a/U1 Nightfighter
Monogram 1/24 '57 Chevy Nomad
Dragon 1/350 USS Frank Knox DD-742
Colorado, United States
Joined: December 25, 2004
KitMaker: 3,770 posts
AeroScale: 201 posts
Posted: Saturday, September 12, 2009 - 04:17 AM UTC
Could I join in with a P-47 EggPlane??
Mike
North Carolina, United States
Joined: November 28, 2005
KitMaker: 2,216 posts
AeroScale: 1,080 posts
Posted: Saturday, September 12, 2009 - 02:19 PM UTC
Nice job Damian. That just happens to be the same exact kit and decal scheme I planned to use.

No worries, I'll just go with a different scheme.
First pic is where my project is now. Second pic is the decal scheme I will be using now.
Again, nice job Damian. I hope my NMF will turn out as well as yours has. NMF always scares me no matter how many of them I do.


Hermon

"Those who would give up Essential Liberty
to purchase a little Temporary Safety,
deserve neither Liberty nor Safety."
Benjamin Franklin
AussieReg
Associate Editor #007
Victoria, Australia
Joined: June 09, 2009
KitMaker: 8,156 posts
AeroScale: 3,756 posts
Posted: Saturday, September 12, 2009 - 02:38 PM UTC
Thanks Hermon, sorry about stealing your plans hehe..
Shhhh, don't tell anybody but I used a Tamiya Rattle can, not confident yet to airbrush NMF.
I think I've also gone astray with the decals, put the blue and white stripes on first then the stencils. . . OOPS. Oh well, my first jet and first kit with such extensive stencilling, we all live and learn !
Yours looks to be coming along nicely. You doing the gun bay closed?
ON the bench
Revell 1/24 '53 Corvette (building as '54)
Revell 1/24 BMW 507 Coupe and Cabrio
Italeri 1/48 Me262 B-1a/U1 Nightfighter
Monogram 1/24 '57 Chevy Nomad
Dragon 1/350 USS Frank Knox DD-742
AussieReg
Associate Editor #007
Victoria, Australia
Joined: June 09, 2009
KitMaker: 8,156 posts
AeroScale: 3,756 posts
Posted: Sunday, September 13, 2009 - 03:28 AM UTC
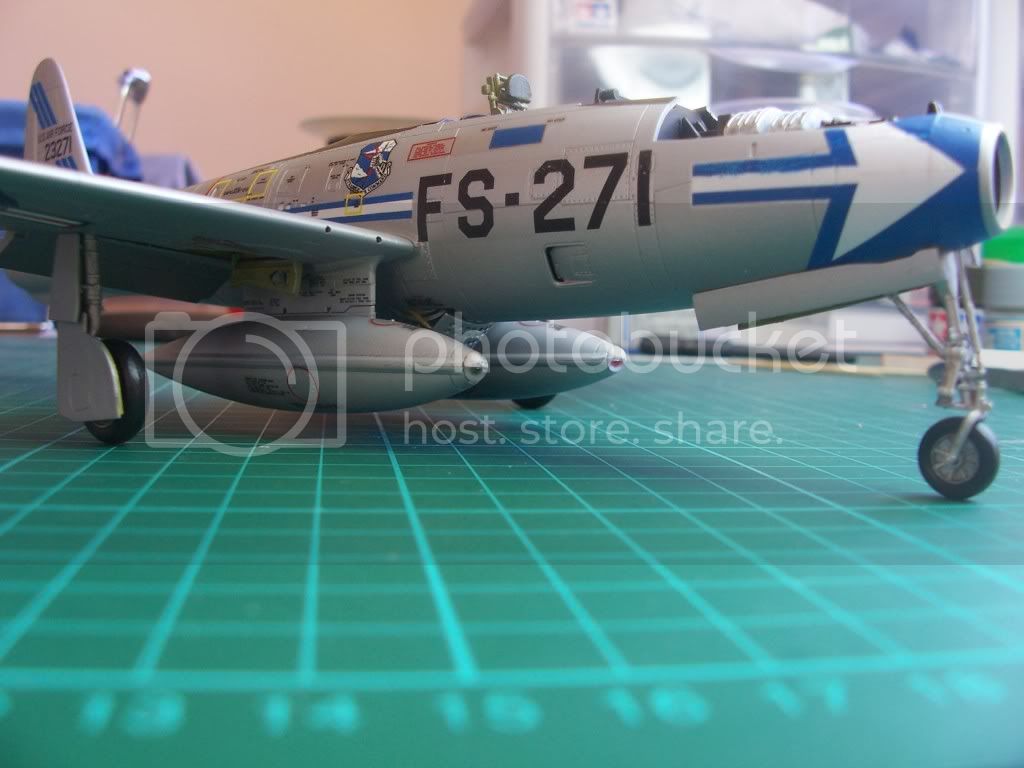
A couple more hours at the bench today and got almost complete on the decalling. That leaves just the Canopy, flat clear and sludge, then attach the wheels and stores.


I have just realised that this will be the first kit I've actually completed in several years. Getting back to the hobby after a long break is like reuniting with an old friend, and being able now to share in this forum and learn from others here adds a whole new dimension.
ON the bench
Revell 1/24 '53 Corvette (building as '54)
Revell 1/24 BMW 507 Coupe and Cabrio
Italeri 1/48 Me262 B-1a/U1 Nightfighter
Monogram 1/24 '57 Chevy Nomad
Dragon 1/350 USS Frank Knox DD-742
North Carolina, United States
Joined: November 28, 2005
KitMaker: 2,216 posts
AeroScale: 1,080 posts
Posted: Tuesday, September 15, 2009 - 12:16 PM UTC
being able now to share in this forum and learn from others here adds a whole new dimension.
Yeah, that's probably 90% of why I keep building these darn kits.
My gunbay will be closed. I have 4 or 5 campaigns going on right now so I'm keeping the detail to a minium. I have the first coat of aluminum on and am waiting on my other Alclad colors to arive so I can do a few panels in other shades.
Hermon
"Those who would give up Essential Liberty
to purchase a little Temporary Safety,
deserve neither Liberty nor Safety."
Benjamin Franklin
AussieReg
Associate Editor #007
Victoria, Australia
Joined: June 09, 2009
KitMaker: 8,156 posts
AeroScale: 3,756 posts
Posted: Friday, September 18, 2009 - 01:21 PM UTC
ON the bench
Revell 1/24 '53 Corvette (building as '54)
Revell 1/24 BMW 507 Coupe and Cabrio
Italeri 1/48 Me262 B-1a/U1 Nightfighter
Monogram 1/24 '57 Chevy Nomad
Dragon 1/350 USS Frank Knox DD-742
AussieReg
Associate Editor #007
Victoria, Australia
Joined: June 09, 2009
KitMaker: 8,156 posts
AeroScale: 3,756 posts
Posted: Friday, September 18, 2009 - 05:37 PM UTC
ON the bench
Revell 1/24 '53 Corvette (building as '54)
Revell 1/24 BMW 507 Coupe and Cabrio
Italeri 1/48 Me262 B-1a/U1 Nightfighter
Monogram 1/24 '57 Chevy Nomad
Dragon 1/350 USS Frank Knox DD-742
Scotland, United Kingdom
Joined: February 07, 2008
KitMaker: 1,699 posts
AeroScale: 1,384 posts
Posted: Friday, September 18, 2009 - 08:12 PM UTC
dontcha just hate that. I've nver had trouble with microsol and future. But it could just be the decal's ink reacting, unlucky.
Don't give up just show her port side nose forward. Looks great.
AussieReg
Associate Editor #007
Victoria, Australia
Joined: June 09, 2009
KitMaker: 8,156 posts
AeroScale: 3,756 posts
Posted: Friday, September 18, 2009 - 10:15 PM UTC
Thanks JP. I'm unable to get Future here in Aus, but I am currently experimenting on some old hack kits with Pledge One Go in combination with the Mr Mark Setter. If I still have issues I will try a different decal setting system.
I am off now to indulge in my all-purpose fixit, a nice glass of red.

ON the bench
Revell 1/24 '53 Corvette (building as '54)
Revell 1/24 BMW 507 Coupe and Cabrio
Italeri 1/48 Me262 B-1a/U1 Nightfighter
Monogram 1/24 '57 Chevy Nomad
Dragon 1/350 USS Frank Knox DD-742
Guatemala
Joined: April 12, 2005
KitMaker: 343 posts
AeroScale: 111 posts
Posted: Saturday, September 19, 2009 - 07:48 AM UTC
Damian: If you want, I can send you the stripes that get ruined, I am building the same aircraft, but diferent scheme. let me know.
I planned to built it for the "Stripes in the Sky" campaing but got a little stuck with the wing tanks. if I do not finnish it before the 9/30, I will post it here.
Byron
If you are not part of the solution, Don't be a part of the problem.
AussieReg
Associate Editor #007
Victoria, Australia
Joined: June 09, 2009
KitMaker: 8,156 posts
AeroScale: 3,756 posts
Posted: Tuesday, September 22, 2009 - 02:04 AM UTC
Hi Byron,
Thanks for that most generous offer, I might just have to take you up on it !! I will send you a PM with my postal details shortly. I only hope that I might be able to offer something in return some day.
Cheers, D
ON the bench
Revell 1/24 '53 Corvette (building as '54)
Revell 1/24 BMW 507 Coupe and Cabrio
Italeri 1/48 Me262 B-1a/U1 Nightfighter
Monogram 1/24 '57 Chevy Nomad
Dragon 1/350 USS Frank Knox DD-742
North Carolina, United States
Joined: November 28, 2005
KitMaker: 2,216 posts
AeroScale: 1,080 posts
Posted: Wednesday, September 23, 2009 - 01:20 PM UTC
Well my Alclad paints finally arrived and I put on a coat of polished aluminium. I'll try and mask off a few panels later on and apply some different shades of metal before I spray the OD on the top of the fuselage.

Hermon
"Those who would give up Essential Liberty
to purchase a little Temporary Safety,
deserve neither Liberty nor Safety."
Benjamin Franklin
AussieReg
Associate Editor #007
Victoria, Australia
Joined: June 09, 2009
KitMaker: 8,156 posts
AeroScale: 3,756 posts
Posted: Wednesday, September 23, 2009 - 08:39 PM UTC
Hi Hermon,
Love that finish, one day soon I will get up the courage to give it a go with my airbrush. I have actually purchased some Testors Metalliser in anticipation.
Did you put a coat of primer or black on first, or just spray the NMF direct ?
ON the bench
Revell 1/24 '53 Corvette (building as '54)
Revell 1/24 BMW 507 Coupe and Cabrio
Italeri 1/48 Me262 B-1a/U1 Nightfighter
Monogram 1/24 '57 Chevy Nomad
Dragon 1/350 USS Frank Knox DD-742
North Carolina, United States
Joined: November 28, 2005
KitMaker: 2,216 posts
AeroScale: 1,080 posts
Posted: Friday, September 25, 2009 - 01:36 PM UTC
Damian, I used Tamiya gloss black as a backing for the Alclad polished alluminium paint.
BTW, I started my decals tonight. So far I'm having trouble making them fit the contours of the wing tanks. Microsol doesn't seem to help much for some reason. These decals are extreeeeeemly thick.
Hermon
"Those who would give up Essential Liberty
to purchase a little Temporary Safety,
deserve neither Liberty nor Safety."
Benjamin Franklin
AussieReg
Associate Editor #007
Victoria, Australia
Joined: June 09, 2009
KitMaker: 8,156 posts
AeroScale: 3,756 posts
Posted: Friday, September 25, 2009 - 03:05 PM UTC
I found the same issue and it took 2 or 3 coats of Mr Mark Setter to settle them in place, I suspect that is what has released the pigments from the decals that then flowed slightly in the clear finish.
Anyway, I'm really looking forward to some shots of your bird with decals.
I have also found that the front windscreen section of the canopy seems to be quite a lot smaller than the fuselage it has to fit on, there is about 1mm difference.
I am now masking the canopy and widscreen, then she's about done !
Cheers, D
ON the bench
Revell 1/24 '53 Corvette (building as '54)
Revell 1/24 BMW 507 Coupe and Cabrio
Italeri 1/48 Me262 B-1a/U1 Nightfighter
Monogram 1/24 '57 Chevy Nomad
Dragon 1/350 USS Frank Knox DD-742
North Carolina, United States
Joined: November 28, 2005
KitMaker: 2,216 posts
AeroScale: 1,080 posts
Posted: Saturday, September 26, 2009 - 01:26 PM UTC
Funny, I found the same fit issue with my kit on the windscreen. I heated it a bit and popped it into place without glue. The slow cool down seems to have kept the windscreen into a somewhat managable shape.
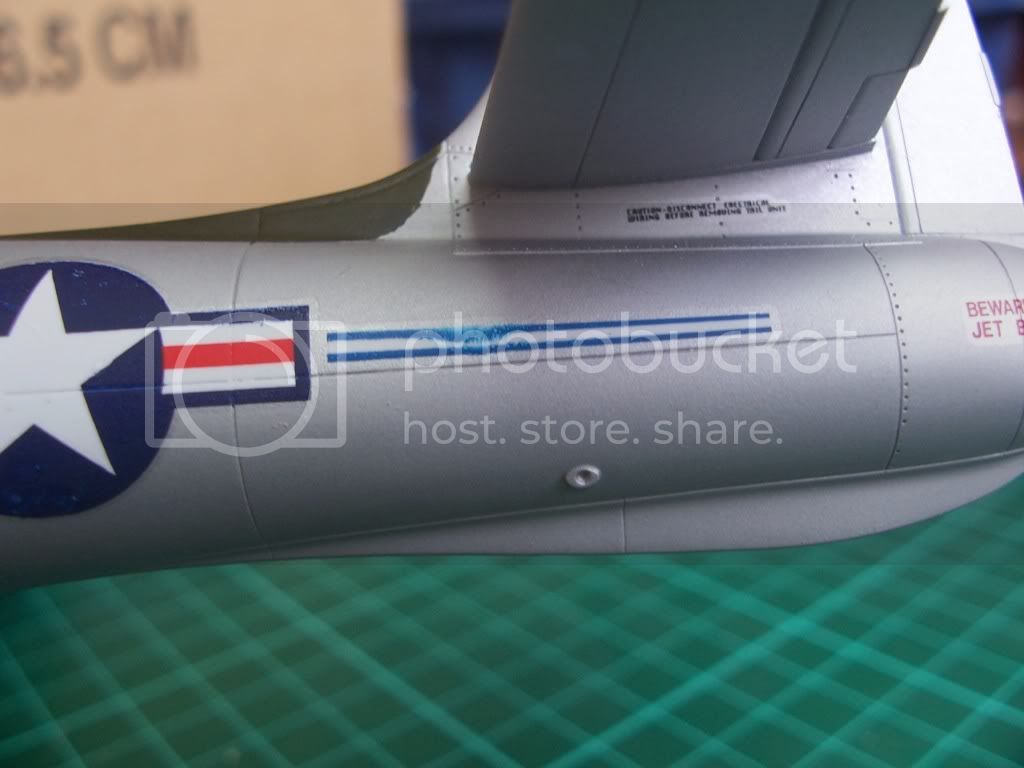
Here is my bird with a few decals on. All in all not so bad. A few tiny wrinkles here and there in the yellow/black ones but nothing that will show up in photos. I'll finish up the bottom side tonight and hopefully start on all the small bits next week.

I'll try and get some better pic's when she's done. The flash is killing any detail I try to pick out because of the shine. Believe it or not I have used 5 different shades of metal paint here and there trying to highlight panels and flaps etc.
Hermon
"Those who would give up Essential Liberty
to purchase a little Temporary Safety,
deserve neither Liberty nor Safety."
Benjamin Franklin
Guatemala
Joined: April 12, 2005
KitMaker: 343 posts
AeroScale: 111 posts
Posted: Wednesday, September 30, 2009 - 04:24 PM UTC
I was building this F-84G for the Stripes in the sky campaign, but got stuck, now I will try to build it for this one.


The problem is that I can't not put metal foil in the wing tanks, I know that they can be painted, but that is my last option.
hope you like it.
Byron
Damian: are you going to need the decals?
If you are not part of the solution, Don't be a part of the problem.