Merlin
 Senior Editor
#017
United Kingdom
Joined: June 11, 2003
KitMaker: 17,582 posts
AeroScale: 12,795 posts
Posted: Thursday, October 22, 2009 - 10:46 AM UTC
Hi Steffen
I will give my "secret project's" Revell decals a chance because, one way or another, I will have to use some of them. Don't get me wrong, I'd like nothing more than to find I can trust them.

Back to my campaign build. A bit of a family crisis has prevented me from modelling since the weekend, but tonight I added some "details" to the torpedo bay. I hasten to add, this is total "gizmology", as Shep Paine christened it. It has no basis in reality and is simply a way to fill a void that I think will be visible around the rear of the torpedo (the front of the bay is effectively masked by the torpedo):
All the best
Rowan

BEWARE OF THE FEW...
As I grow older, I regret to say that a detestable habit of thinking seems to be getting a hold of me. - H. Rider Haggard
European Union
Joined: September 28, 2004
KitMaker: 2,186 posts
AeroScale: 1,587 posts
Posted: Thursday, October 22, 2009 - 10:57 AM UTC
The mission: Beat the stash.
Almost conquered: MIG-29, Blackhawk, Skyray, Skyraider, fouga
Main battle:Demon, Skyhawk, F-14, CH-53
Stash reserve:Blackhawk, CH-46, 47 en 53; SU-7, Eurofighter, mohawk, hellcat, F-16D, 6x Fouga Magister, Voodoo
Merlin
Senior Editor #017
United Kingdom
Joined: June 11, 2003
KitMaker: 17,582 posts
AeroScale: 12,795 posts
Posted: Thursday, October 22, 2009 - 11:12 AM UTC
Hi Drabslab
Careful... I'm a huge fan of Shep!
I know, I'm showing my age, but those Monogram instruction sheets in the 1970s that featured his work, complete with gizmology

, were an inspiration to a generation of modellers because they opened the door to a whole new world of possibilities. His techniques which he outlined in his subsequent books are among the staples of my whole approach to modelling - I just wish I could halfway match Shep's incredible talent...
All the best
Rowan
BEWARE OF THE FEW...
As I grow older, I regret to say that a detestable habit of thinking seems to be getting a hold of me. - H. Rider Haggard
Germany
Joined: September 07, 2005
KitMaker: 5,609 posts
AeroScale: 5,231 posts
Posted: Thursday, October 22, 2009 - 08:02 PM UTC
Quoted Text
Hi Steffen
I will give my "secret project's" Revell decals a chance because, one way or another, I will have to use some of them. Don't get me wrong, I'd like nothing more than to find I can trust them.
Hi Rowan
Well, not sure what kit you have (the new Rafale B with the Chaff & Flare bays surely has good decals) but talking about the M I think chances are high that the decals have cracked or gone bad over time. So it is good to know an alternative. In most cases Revell decals perform o.k. (but not "stellar") ... but then thinking of Zvezda, ICM, Southfront .....
all the best
Steffen
DULCE ET DECORUM EST PRO HOBBY MORI
Merlin
Senior Editor #017
United Kingdom
Joined: June 11, 2003
KitMaker: 17,582 posts
AeroScale: 12,795 posts
Posted: Friday, October 23, 2009 - 09:11 AM UTC
Hi again
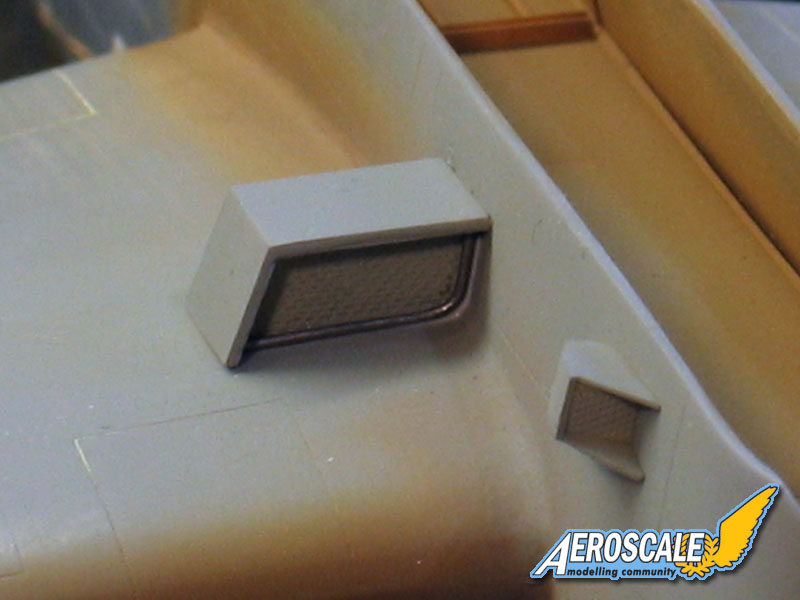
I've been tinkering with the nose:

As moulded, the exhaust shields aren't contoured to the nose at all and need carving to shape. To be honest, I think I should have replaced them with thinner styrene card items while I was at it... Whatever, shields and intakes sprouting all over the nose like warts aren't doing anything for the poor old Laté's looks.
Time permitting, I'll try to see if the floats will fit this weekend...
All the best
Rowan
BEWARE OF THE FEW...
As I grow older, I regret to say that a detestable habit of thinking seems to be getting a hold of me. - H. Rider Haggard
Scotland, United Kingdom
Joined: February 07, 2008
KitMaker: 1,699 posts
AeroScale: 1,384 posts
Posted: Friday, October 23, 2009 - 11:00 AM UTC
Smashing work Rowan, I just recently read a Shep Paine from the library, it was just packed
with construction and painting tips, a couple of armour conversions worked through. Brilliant
and well written.
Picked this up for the first time in months. Painted the tricolore one. Wheels and a few other
bits. Masked the canopy with BMF, I'm really pleased with this technique very easy and quick
and accurate. A little more expensive than tape but cheaper and better than precut masks.
No need to position anything just cover and cut away the framing with a fresh blade point.
Click on the pictures for larger images.
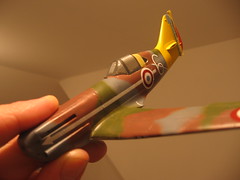
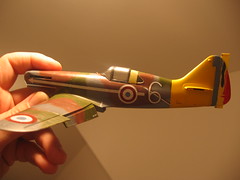
Couple of sessions should finish this up.
Moselle, France
Joined: May 15, 2005
KitMaker: 5,653 posts
AeroScale: 4,347 posts
Posted: Friday, October 23, 2009 - 07:19 PM UTC
Hi all,
Wow, very nice progress, John-Paul and Rowan!
I think it's time I start my entry. November 11th isn't far away...

Jean-Luc

Better think one hour and build five minutes...
Than think five minutes and build an hour!
Merlin
Senior Editor #017
United Kingdom
Joined: June 11, 2003
KitMaker: 17,582 posts
AeroScale: 12,795 posts
Posted: Friday, October 23, 2009 - 08:27 PM UTC
Hi there
Nice going JP - that's looking very tasty!
Jean-Luc - I'm really looking forward to seeing your Bugatti! I'm quite sure you'll finish on time - even if you leave it until the evening before the deadline to start!

I don't know anyone who can match your combination of speed and craftsmanship.
All the best
Rowan
BEWARE OF THE FEW...
As I grow older, I regret to say that a detestable habit of thinking seems to be getting a hold of me. - H. Rider Haggard
Merlin
Senior Editor #017
United Kingdom
Joined: June 11, 2003
KitMaker: 17,582 posts
AeroScale: 12,795 posts
Posted: Tuesday, October 27, 2009 - 12:08 AM UTC
Hi again
Back and tinkering on the beastie!
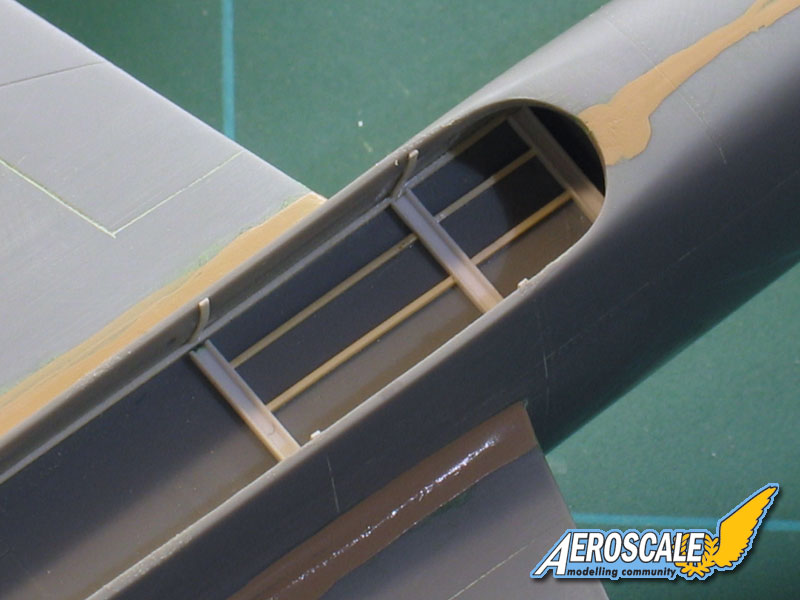
Sometimes, having to take a break from a build helps you see the answer to a problem that had previously got you stymied. In this case it was the underwing radiators; the resin cores don't match the contours of the wing-roots at all, and my rushed and ham-fisted sanding had created gaps that would be a pain to fill.
I'd left the model the other day wondering what on earth to do... This morning, I picked it up to resume work and instantly saw an easy fix - a length of soft wire to form a "frame" for the radiator core.
It might not be true to the original (but, equally, I have no evidence that it's not
), and it definitely looks neater than a gap.
All the best
Rowan
BEWARE OF THE FEW...
As I grow older, I regret to say that a detestable habit of thinking seems to be getting a hold of me. - H. Rider Haggard
Merlin
Senior Editor #017
United Kingdom
Joined: June 11, 2003
KitMaker: 17,582 posts
AeroScale: 12,795 posts
Posted: Tuesday, October 27, 2009 - 08:27 AM UTC
Hi again
I've been a bit critical of some aspects of this kit, but I can't complain about the vacuformed canopy - the fit looks set to be really very good:
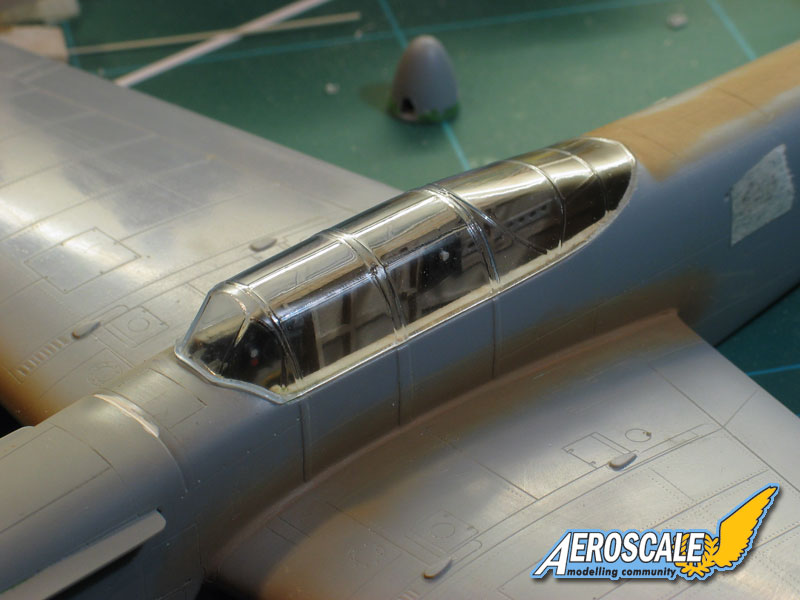
If I were to start over and build this kit again (don't worry, I won't!
), I'd
definitely thin down the cockpit sidewalls massively! They've been worrying me ever since I installed them, and seeing the canopy in place confirms my worst fears - I'm sure the cockpit sills are waaaaay too thick...

Ohh well, there's not a lot I can do about them now. Onwards and downwards.
All the best
Rowan
BEWARE OF THE FEW...
As I grow older, I regret to say that a detestable habit of thinking seems to be getting a hold of me. - H. Rider Haggard
North Carolina, United States
Joined: November 28, 2005
KitMaker: 2,216 posts
AeroScale: 1,080 posts
Posted: Tuesday, October 27, 2009 - 11:39 AM UTC
Merlin, the fuselage isn't too thick. That is just early French thick armour plating.
Looking great as usual. And the wire frame around the radiator core was a cool idea. Wish I'd thought of that on my kit.
Hermon

"Those who would give up Essential Liberty
to purchase a little Temporary Safety,
deserve neither Liberty nor Safety."
Benjamin Franklin
Merlin
Senior Editor #017
United Kingdom
Joined: June 11, 2003
KitMaker: 17,582 posts
AeroScale: 12,795 posts
Posted: Wednesday, October 28, 2009 - 07:50 AM UTC
Cheers Hermon
No dramatic progress today - just lots of messy little jobs in preparation for fitting the floats:

I think I'll probably paint the tailplane tricoleurs and mask them off before adding the floats, because I'm afraid the whole assembly will be just asking to get damaged once they're on...
All the best
Rowan
BEWARE OF THE FEW...
As I grow older, I regret to say that a detestable habit of thinking seems to be getting a hold of me. - H. Rider Haggard
European Union
Joined: September 28, 2004
KitMaker: 2,186 posts
AeroScale: 1,587 posts
Posted: Wednesday, October 28, 2009 - 10:03 AM UTC
Well, I do not believe it myself.
After having lost the refeulling probe (never happened to me before)...
After being confronted with completely useless decals in the original kit
With gratitude to Revell for sending me a new refeulling probe, to the aeroscale folks for directing me to replacement decals and to Skyraider for sending me this fantastic decal set in no time
Here is one Rafale.
I will, as usual, prepare some feature with my bizar views on this model, and the real thing, but for now I am already happy that I made the campaign deadline.

The mission: Beat the stash.
Almost conquered: MIG-29, Blackhawk, Skyray, Skyraider, fouga
Main battle:Demon, Skyhawk, F-14, CH-53
Stash reserve:Blackhawk, CH-46, 47 en 53; SU-7, Eurofighter, mohawk, hellcat, F-16D, 6x Fouga Magister, Voodoo
Merlin
Senior Editor #017
United Kingdom
Joined: June 11, 2003
KitMaker: 17,582 posts
AeroScale: 12,795 posts
Posted: Wednesday, October 28, 2009 - 10:22 AM UTC
Quoted Text
I will, as usual, prepare some feature with my bizar views on this model, and the real thing, ...
Nice work Drabslab!
And here's looking forward to your future Feature.
All the best
Rowan
BEWARE OF THE FEW...
As I grow older, I regret to say that a detestable habit of thinking seems to be getting a hold of me. - H. Rider Haggard
Merlin
Senior Editor #017
United Kingdom
Joined: June 11, 2003
KitMaker: 17,582 posts
AeroScale: 12,795 posts
Posted: Friday, October 30, 2009 - 08:57 AM UTC
Hi again
Well, I've spent a confusing day trying to figure out the shape of the elevators! It was only when I went to mask off the tricoleurs that I realised the kit parts don't match the painting instructions. Looking on the internet wasn't much help and it seems there were two styles and quite when/why/how any change happened... I haven't a clue!

Anyway, painting the stripes was a chance to try out my new
Premi-Air G35 airbrush for real and, I must say, swapping back and forth between it and my Iwata Eclipse only served to prove what a nice piece of kit it is.

In another effort to put off the day when I attach the floats(!), I put the propeller together. The fit was a bit vague, so a simple template ensured each blade was set at the correct angle - and 15p sorted out the pitch.
More tomorrow.
All the best
Rowan
BEWARE OF THE FEW...
As I grow older, I regret to say that a detestable habit of thinking seems to be getting a hold of me. - H. Rider Haggard
Merlin
Senior Editor #017
United Kingdom
Joined: June 11, 2003
KitMaker: 17,582 posts
AeroScale: 12,795 posts
Posted: Sunday, November 01, 2009 - 12:18 AM UTC
Hi again
Well, it's up on the floats... sort of...
I can't say I'm optimistic though - the struts didn't come within a mile of the locating holes without a lot of alteration, and now the angles look all wrong. I think it's going to sit tail low. That's if the float's don't fall off before I can attach the remaining struts!
Ohh well, I predicted this bit was going to be a nightmare...
All the best
Rowan
BEWARE OF THE FEW...
As I grow older, I regret to say that a detestable habit of thinking seems to be getting a hold of me. - H. Rider Haggard
Merlin
Senior Editor #017
United Kingdom
Joined: June 11, 2003
KitMaker: 17,582 posts
AeroScale: 12,795 posts
Posted: Sunday, November 01, 2009 - 12:50 AM UTC
Quoted Text
Well, it's up on the floats... sort of...
Hi again
... and now it's off again!

I think I've found the cause of part of the problem, though; I'd naively used the locating points for the struts that are marked on the floats!
That makes them sir fat too wide apart. I think, once the marks from attempt #1 are repaired, my next try might have a slightly better chance of success... we'll see.
All the best
Rowan
BEWARE OF THE FEW...
As I grow older, I regret to say that a detestable habit of thinking seems to be getting a hold of me. - H. Rider Haggard
Merlin
Senior Editor #017
United Kingdom
Joined: June 11, 2003
KitMaker: 17,582 posts
AeroScale: 12,795 posts
Posted: Sunday, November 01, 2009 - 09:58 PM UTC
Hi again
Right! Today's effort will involve doing things the way I should have done them in the first place! Stage #1 - build a jig. Cue, the handy stash of balsa wood...

More later, I hope.
All the best
Rowan
BEWARE OF THE FEW...
As I grow older, I regret to say that a detestable habit of thinking seems to be getting a hold of me. - H. Rider Haggard
Merlin
Senior Editor #017
United Kingdom
Joined: June 11, 2003
KitMaker: 17,582 posts
AeroScale: 12,795 posts
Posted: Monday, November 02, 2009 - 03:25 AM UTC
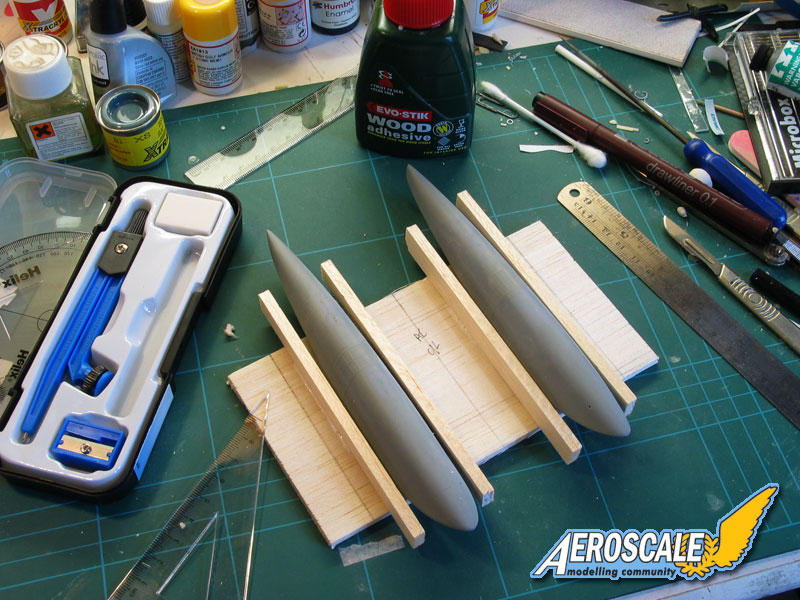
Hi again
Well, as possibly the world's sloppiest and laziest modeller, having to be so methodical is almost painful! But yesterday's disaster proved to me that there's really no choice on this part of the build. No prizes for finishing the edges of the jig tidily, but the angles and dimensions are true and, touch wood, it seems to be working:

I think for more serious projects I'd make the jig out of thick plastic card for absolute accuracy, but even with this set-up the tie-rod across the tips of the floats (not in this pic) fits, and yesterday it didn't come within a mile!
Now, having everything in a nice stable mount means I can actually measure what's going wrong... And, lo and behold! - the impression that the aircraft was sitting tail-low on its floats was no illusion - the kit's rear struts are about 1/8" too short.

All the best
Rowan
BEWARE OF THE FEW...
As I grow older, I regret to say that a detestable habit of thinking seems to be getting a hold of me. - H. Rider Haggard
Merlin
Senior Editor #017
United Kingdom
Joined: June 11, 2003
KitMaker: 17,582 posts
AeroScale: 12,795 posts
Posted: Monday, November 02, 2009 - 05:46 AM UTC
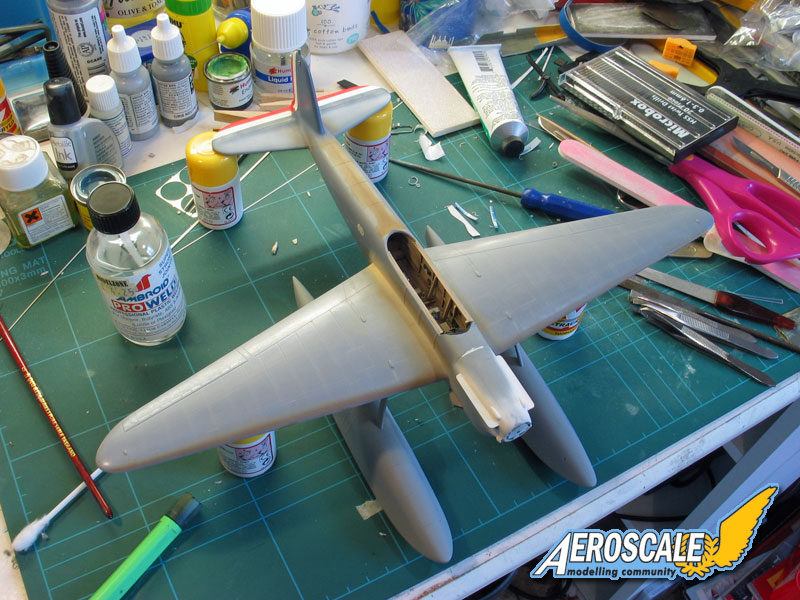
Hi again
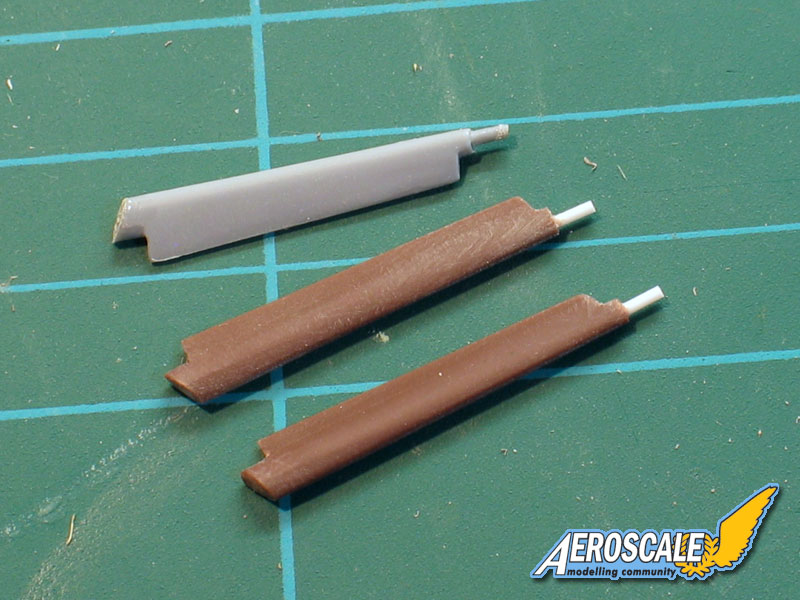
I've made new struts, so it's time to see if it sits any better...
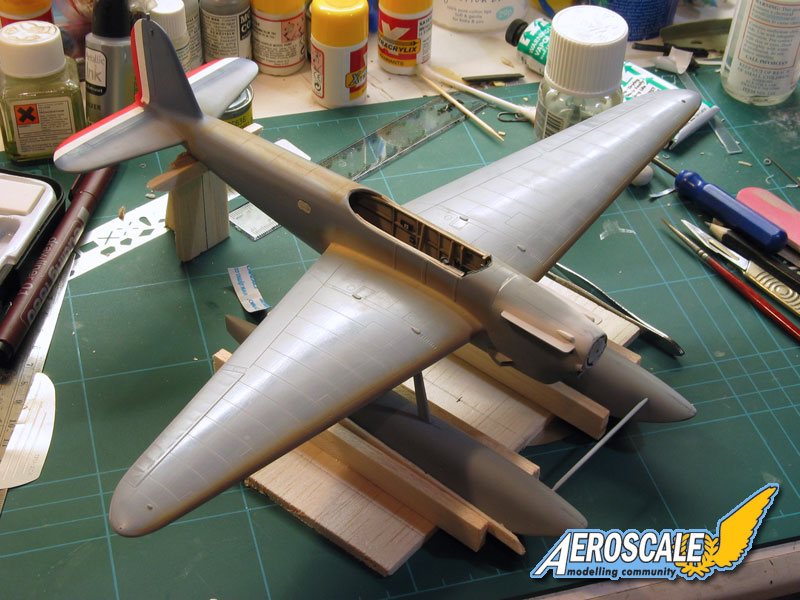
Despite the undeniable sense of déjà vu, that's certainly a lot more encouraging!
I'll let it set and then try to add the auxiliary struts, but I'll tempt fate and say I'm almost optimistic that I've at least broken the back of fitting the floats...
All the best
Rowan
BEWARE OF THE FEW...
As I grow older, I regret to say that a detestable habit of thinking seems to be getting a hold of me. - H. Rider Haggard
Moselle, France
Joined: May 15, 2005
KitMaker: 5,653 posts
AeroScale: 4,347 posts
Posted: Monday, November 02, 2009 - 07:21 AM UTC
Hi Rowan,
You are making updates every couple of hours now...
Is the air of the Isle of Wight different? Anyway, the result is quite spectacular!
Jean-Luc
Better think one hour and build five minutes...
Than think five minutes and build an hour!
Merlin
Senior Editor #017
United Kingdom
Joined: June 11, 2003
KitMaker: 17,582 posts
AeroScale: 12,795 posts
Posted: Monday, November 02, 2009 - 07:52 AM UTC
Cheers Jean-Luc
It's probably the fear that Steffen & Terri will never let me live it down if I don't finish this b*gger and get on with the Halberstadt again!
All the best
Rowan
BEWARE OF THE FEW...
As I grow older, I regret to say that a detestable habit of thinking seems to be getting a hold of me. - H. Rider Haggard
Texas, United States
Joined: January 30, 2006
KitMaker: 1,954 posts
AeroScale: 1,163 posts
Posted: Monday, November 02, 2009 - 12:52 PM UTC
She's really coming along, Rowan!
hmm, i need to get back to work on my entry for this campaign...
Scotland, United Kingdom
Joined: February 07, 2008
KitMaker: 1,699 posts
AeroScale: 1,384 posts
Posted: Monday, November 02, 2009 - 09:59 PM UTC
Wow it is huge! Looking promising now on the jig.
I have a theory that Terri's bark is worst than her bite.
It isn't one I'd want to test though
Merlin
Senior Editor #017
United Kingdom
Joined: June 11, 2003
KitMaker: 17,582 posts
AeroScale: 12,795 posts
Posted: Monday, November 02, 2009 - 11:30 PM UTC
Hi again
Another day... another obstacle! With the floats in place (yes - they were still there, nice and solid in the morning!
), it time to start thinking about the auxiliary struts. The instructions are really hopeless, because they don't give dimensions or show the locations, and there are no locators on the kit parts. The real joke is that you can't check where to fit them until the floats are on but, once they are on, you then can't get at the areas where you need to drill locating holes!
I think I should be building this for the Italian campaign, because in true Michael Caine Italian Job-style it's a case of ""Hang on a minute lads, I've got a great idea! ..."
Dymo Tape, punched out and drilled to make self-adhesive locating eyelets:


I don't know if they'll work, but it's worth a try...
All the best
Rowan
BEWARE OF THE FEW...
As I grow older, I regret to say that a detestable habit of thinking seems to be getting a hold of me. - H. Rider Haggard


