_GOTOBOTTOM
Early Aviation
Discuss World War I and the early years of aviation thru 1934.
Fokker D.VII - downed
edoardo
_VISITCOMMUNITY
Milano, Italy
Joined: November 30, 2007
KitMaker: 642 posts
AeroScale: 382 posts
Posted: Wednesday, September 15, 2010 - 12:19 AM UTC
Hi all!
I told you I would be back with a very ambitious project... so here I am!

All started when I bought, out of desperation, a Roden 1:48 Fokker D VII kit.
I say 'out of desperation' as it was my third choice after I was previously bounced back by a series of 'available' - 'in stock' fuss....

As you may have understood this is not my favourite plane: no rigging and no wood grain. So I was wondering what to do with it till an idea come crippling into my mind: why not trying to model a downed plane?
Of course that would have ment to have a story to tell and do a diorama as well.

I thougt of it for a while as a 'medicine' during my Pfalz near disaster and at last I decided to give it a try.

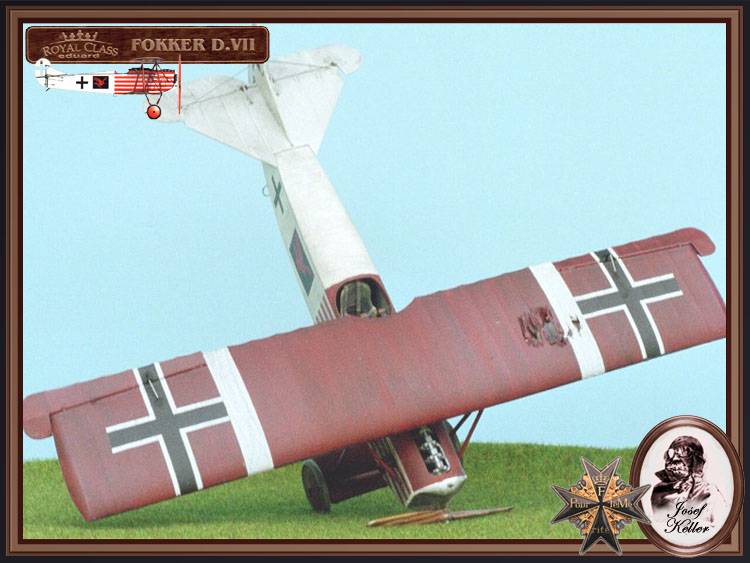
So there is the story line: a French pilot downes a Fokker D VII which falls on a trench near the front. Later the pilot comes back for trophy hounting and for a photo op.

I started a while back with the trench itself (if you like you can find a blog here https://armorama.kitmaker.net/forums/160321&page=1#1380291)
and recently I started on the plane too.

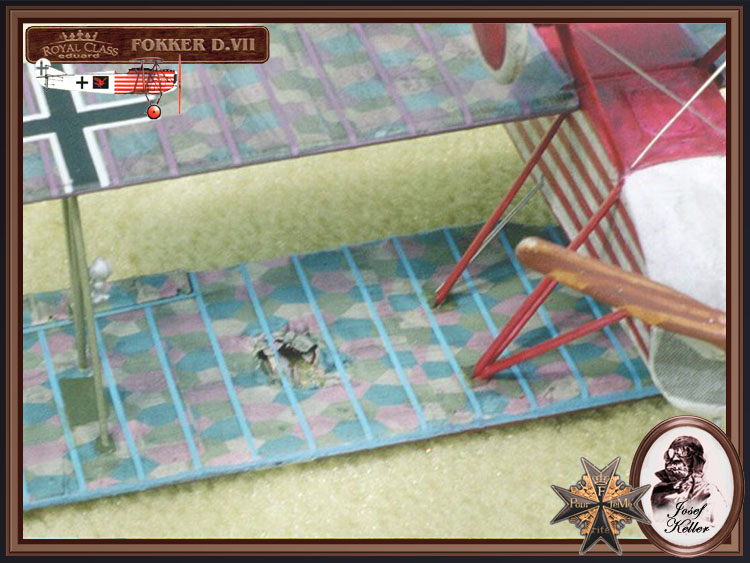
Since I was intrigued by the broken parts I started with those: here are some pics.


This is where a hit will be placed ripping the fabric and exposing the structure of the plane.

The wings will be broken almost in half, leaning into the trench itself: here is the upper wing.

This is the bottom one.
I still have some work to do whit the wings: I am planning to let some ribs show throug the fabric, I am working on a couple of ribs.

I also started to upgrade the engine a bit, here is where it stands now:
.

That is all, for now!
I hope I have intrigued you enough to follow me in this adventure!
ciao
Edo

p.s.
I almost forgot: this is the model kit.
Mgunns
_VISITCOMMUNITY
Arizona, United States
Joined: December 12, 2008
KitMaker: 1,423 posts
AeroScale: 1,319 posts
Posted: Wednesday, September 15, 2010 - 12:59 AM UTC
Hi Edo:

An ambitious project to be sure, but I am sure it will be a fun one and a fun one to watch. Best of luck with it, and keep us posted.

Best

Mark
JackFlash
_VISITCOMMUNITY
Colorado, United States
Joined: January 25, 2004
KitMaker: 11,669 posts
AeroScale: 11,011 posts
Posted: Wednesday, September 15, 2010 - 05:42 PM UTC
Here is a bit of fun on the subject.
wrecked or derelict WWI a/c
Kornbeef
_VISITCOMMUNITY
England - South East, United Kingdom
Joined: November 06, 2005
KitMaker: 1,667 posts
AeroScale: 1,551 posts
Posted: Wednesday, September 15, 2010 - 08:39 PM UTC
Well Edo, you have certainly chose something to get your teeth into this time.
Looks like you have it well planned, I'll follow with interest.

Tissue, paper or tinfoil for the torn fabric or do you plan another method?

Keith
OEFFAG_153
_VISITCOMMUNITY
Västra Götaland, Sweden
Joined: February 19, 2010
KitMaker: 1,473 posts
AeroScale: 1,450 posts
Posted: Wednesday, September 15, 2010 - 09:13 PM UTC
Hi Edo

Wow – a very ambitious project, and you seem to be off to a good start! This will be very interesting to follow – I've often thoght of doing somethimg similar...

Best Regards

Mikael
edoardo
_VISITCOMMUNITY
Milano, Italy
Joined: November 30, 2007
KitMaker: 642 posts
AeroScale: 382 posts
Posted: Wednesday, September 15, 2010 - 09:22 PM UTC
Hi Stephen!
I saw some of those pics, but that thread is very useful! I'll study it in deepth!

Keith! Thank you my friend! I experimented with tinfoil on the spare wing of the Pfaltz and the risults were incourageing (no pictures though...) so I plan to use tinfoil. I wonder wether the decal will stick on it, though...

Mikael! I'd love to see you on a similar project: I'll sure learn something!

ciao
Edo
CaptainA
_VISITCOMMUNITY
Indiana, United States
Joined: May 14, 2007
KitMaker: 3,117 posts
AeroScale: 2,270 posts
Posted: Thursday, September 16, 2010 - 08:50 AM UTC
Edo, Glad to see you tackling something outside the ordinary. I think you will enjoy the build and you will get into one of my favorite things, learning about the structure and building process of the originals. I love how these early aviation subjects were engineered and built. You are off to a great start, and I am looking forward to your updates. Have fun, and as my signature block suggests, Treat 'em rough.
thegirl
_VISITCOMMUNITY
Alberta, Canada
Joined: January 19, 2008
KitMaker: 6,743 posts
AeroScale: 6,151 posts
Posted: Friday, September 17, 2010 - 02:19 AM UTC
Been following this project over on Armour forms and is coming along very nicely .

Looking forward to the next up-date
flugwuzzi
_VISITCOMMUNITY
Lower Austria, Austria
Joined: November 02, 2007
KitMaker: 633 posts
AeroScale: 8 posts
Posted: Saturday, September 18, 2010 - 10:31 AM UTC
Edo, I love this outstanding idea and will follow your build.
start was very well - keep up the good work.

cheers
walter
JackFlash
_VISITCOMMUNITY
Colorado, United States
Joined: January 25, 2004
KitMaker: 11,669 posts
AeroScale: 11,011 posts
Posted: Sunday, September 19, 2010 - 08:28 AM UTC
Here is a early Fok. VII (OAW) from Jasta 62 after being wrecked trying to shoot down an AEF Obs. Balloon.


Here is an Fok. D.VII also crashed. Unknown serial & circumstance. Possibly an early machine as well.
edoardo
_VISITCOMMUNITY
Milano, Italy
Joined: November 30, 2007
KitMaker: 642 posts
AeroScale: 382 posts
Posted: Tuesday, September 21, 2010 - 08:54 PM UTC
Thank you Stephen, those pics are very interesting!
Indeed I was almost ready to apply the tinfoil, but now I have a question.
I am undecided weather to cover all the wing surface, thus avoiding the little bump due to the thikness of the foil itself, but loosing the little detail engreved in the wing, or cover just a thiny bit of it.
To cover or not to cover, that is the question...

Thank you fot the support! More update to come soon...
ciao
Edo
JackFlash
_VISITCOMMUNITY
Colorado, United States
Joined: January 25, 2004
KitMaker: 11,669 posts
AeroScale: 11,011 posts
Posted: Wednesday, September 22, 2010 - 06:44 AM UTC
Here is my Roden build using the Part of Poland brass.


JackFlash
_VISITCOMMUNITY
Colorado, United States
Joined: January 25, 2004
KitMaker: 11,669 posts
AeroScale: 11,011 posts
Posted: Wednesday, September 22, 2010 - 06:47 AM UTC
Just for the sake of having them in one place. For more reading on the various license built Fokker D.VII represented in kit form.
Click here
Click Here II
Click Here III
Click Here IV
Click Here V
Click Here VI.
JackFlash
_VISITCOMMUNITY
Colorado, United States
Joined: January 25, 2004
KitMaker: 11,669 posts
AeroScale: 11,011 posts
Posted: Wednesday, September 22, 2010 - 06:52 AM UTC
From the Royal kit build a damaged wing. Only using stiffened decal.


edoardo
_VISITCOMMUNITY
Milano, Italy
Joined: November 30, 2007
KitMaker: 642 posts
AeroScale: 382 posts
Posted: Wednesday, September 22, 2010 - 08:58 PM UTC
Thank you Stephen!
Very useful stuff!
Ciao
Edo
edoardo
_VISITCOMMUNITY
Milano, Italy
Joined: November 30, 2007
KitMaker: 642 posts
AeroScale: 382 posts
Posted: Thursday, September 30, 2010 - 01:45 AM UTC
Hi all!
I have some updates here for you!
First I'll show you some details of the cockpit


Let's pass to the wings. I have some pictures of the progress I made, and the first results of the lozenge application on the upper wing.
As I said, I used aluminuim foil to represent the CDL. I have to say that it is easyer than I thougth; in fact no junction is visible and, even if some details are obscured, this does not really matter as the lozenge decals would have hidden them anyway. This could also be given by the fact that I used the decals provided with the kit which, as I am told, are not first class.
My little experience also suggest that it is better first to apply the decals on the foil an than glue it to the wing. In this way the decal adheres perfectly to the foil, something that is not assured the other way round. As you could guess this discovery has been made over trial and error ( ) but I am satisfied with the results nevertheless.
Also you can see some texturizing of the lozenge: not very good indeed but at least served to tone the decals a little down, as the are far too brilliant if not painted.

Well enough talking: here are some pictures.


Here is the fusolage where there will be some damage


Ont the lozenge application I tried to follow the Lozenge 101 guide. But I fear I had it wrong. In fact I applied the lozenge like this ^ V in respect of a set of one colour lozenge. Should it be like this ^ ^ instead?

Thank you for looking!
Ciao
Edo
Kornbeef
_VISITCOMMUNITY
England - South East, United Kingdom
Joined: November 06, 2005
KitMaker: 1,667 posts
AeroScale: 1,551 posts
Posted: Thursday, September 30, 2010 - 09:09 PM UTC
Edo,

I'm loving the crumpled effect, it's got my mind turning, which is a good/bad/ thing, good because its creating ideas, bad because that means more work...and I have a stash of half builts that is shameful


Nice progress though and don't worry about loz direction theres always an exception to the rule....maybe covered on a friday afternoon before the bierfest started...or worse after

Keith
OEFFAG_153
_VISITCOMMUNITY
Västra Götaland, Sweden
Joined: February 19, 2010
KitMaker: 1,473 posts
AeroScale: 1,450 posts
Posted: Thursday, September 30, 2010 - 10:29 PM UTC
Hi Edo

Great progress – I really like the effect you're getting with the foil – nice! I can echo what Kornbeef says – this puts ideas in my head

Looking forward to more soon

Best regards

Mikael
CaptainA
_VISITCOMMUNITY
Indiana, United States
Joined: May 14, 2007
KitMaker: 3,117 posts
AeroScale: 2,270 posts
Posted: Friday, October 01, 2010 - 09:19 AM UTC
Wow.

Nice eye for detail.
edoardo
_VISITCOMMUNITY
Milano, Italy
Joined: November 30, 2007
KitMaker: 642 posts
AeroScale: 382 posts
Posted: Friday, October 08, 2010 - 01:40 AM UTC
Hi all!
Thank you for the kind replies!
Keith, Mikael: I can't wait to see what's on your mind! Actually I think Keith has alreay started something

Studying some pics I think I found out, at last, how to manage propeller lamination! My error was to think that a 'long' lamination on one 'arm' of the blade of the prop, should be 'long' also on the other, while instead it should be a short one... Also the laminations should be parallel while I made them cross...
Anyway, something that wolud not be useful this thime as the prop will be broken!

I have also a question for you: betwheen the wheels of the undercarriage there is a wing-like something (actually I don't know the name). What is it made of? Spruce and linen?
Thank you

ciao
Edo
Kornbeef
_VISITCOMMUNITY
England - South East, United Kingdom
Joined: November 06, 2005
KitMaker: 1,667 posts
AeroScale: 1,551 posts
Posted: Friday, October 08, 2010 - 08:24 AM UTC
Hi Edo,

Glad you are making progress on her.

On prop laminations always look at the prop from the side, the lamination lines should be straight and parallel, I know its confusing and correct doesnt always seem correct, been there and done that so many times, and only recently realised the obvious myself.

On the Axle fairing, I'm certain that its skinned with thin plywood and as made by Fokker was one piece though Albatros constructed it split into top and bottom & OAW made it out of two pieces front and back joined above and below the axle with plates. Fokker apparently followed suit later in production (taken from the Windsock DVII Anthology Vol1)

Keith
JackFlash
_VISITCOMMUNITY
Colorado, United States
Joined: January 25, 2004
KitMaker: 11,669 posts
AeroScale: 11,011 posts
Posted: Friday, October 08, 2010 - 03:01 PM UTC

Quoted Text

Hi all! . . .Studying some pics I think I found out, at last, how to manage propeller lamination!


We have several good threads here about propeller laminations.


Quoted Text

I have also a question for you: betwheen the wheels of the undercarriage there is a wing-like something (actually I don't know the name). What is it made of? Spruce and linen?


The "axle wing" had a skeletal structure that was wood like the wings and the skin was 2-3 mm plyood for upper and lower surfaces. The axle was trapped in a channel inside.
edoardo
_VISITCOMMUNITY
Milano, Italy
Joined: November 30, 2007
KitMaker: 642 posts
AeroScale: 382 posts
Posted: Friday, October 08, 2010 - 06:49 PM UTC
Thank you guys! You Are always supportive! And your knowledge is unfathomable
Ciao
Edo
NickZour
_VISITCOMMUNITY
Attica, Greece / Ελλάδα
Joined: May 01, 2008
KitMaker: 1,437 posts
AeroScale: 1,241 posts
Posted: Friday, October 08, 2010 - 10:00 PM UTC
That's a great...... catastrophy

You are giving me ideas for future projects Mr. Edorado


Cheers Nick
edoardo
_VISITCOMMUNITY
Milano, Italy
Joined: November 30, 2007
KitMaker: 642 posts
AeroScale: 382 posts
Posted: Thursday, October 14, 2010 - 08:24 PM UTC
Hi Nick, nice to see you again!

Just a minor update today... but some more will come soon!
ciao
Edo

 _GOTOTOP