1/48 Testors SR-71 Blackbird
England - South East, United Kingdom
Joined: September 15, 2004
KitMaker: 4,728 posts
AeroScale: 1,351 posts
Posted: Sunday, June 16, 2013 - 08:57 PM UTC
Quoted Text
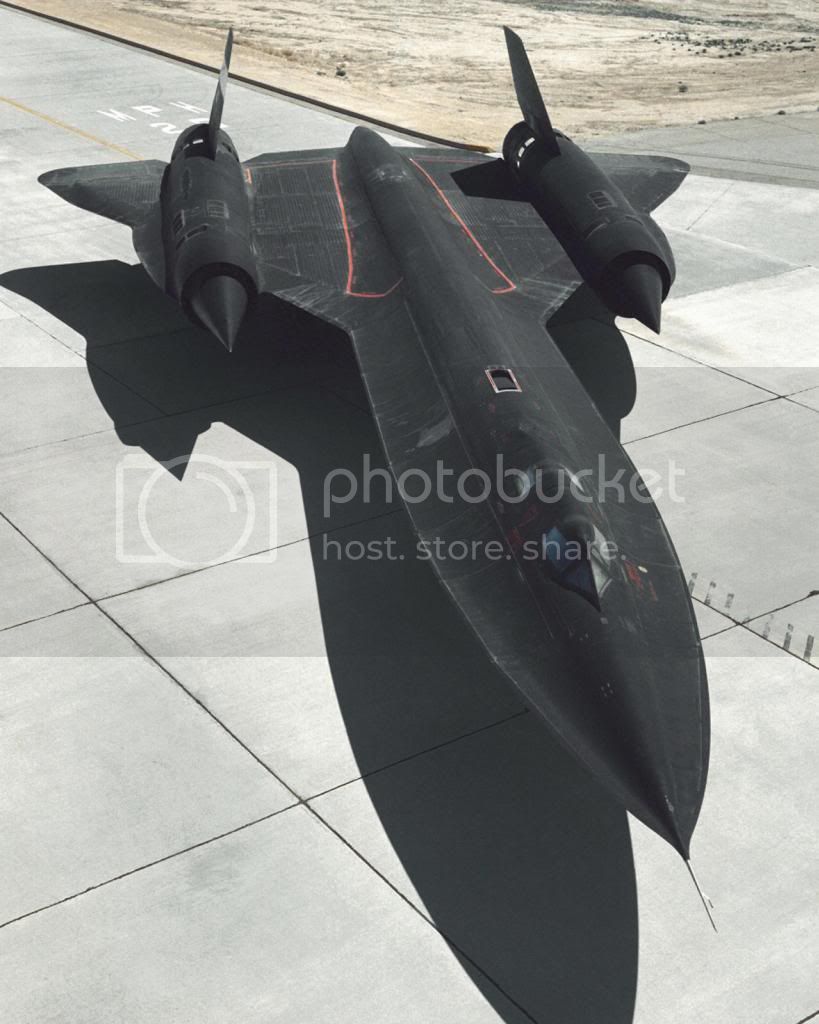
Need some help actually. Does anyone have a good photo of the refueling inlet? I've searched to no avail  I need detail I know its wrong. Also I am doing the SR-71A-1 nose so from the looks of it all I have to do is remove the chines and fill in the camera window thoughts
Wish you'd posted this Saturday Justin, I was at Duxford yesterday and walked round the SR-71 there but didn't take any photos (they have a viewing gallery so you can see above), I'll look back over past photos and see if I have anything.
On the bench...
Italeri A129 Mangusta
British Bulldog Spitfire theme build
Massachusetts, United States
Joined: November 07, 2012
KitMaker: 16 posts
AeroScale: 12 posts
Posted: Sunday, June 16, 2013 - 11:52 PM UTC
These are from a book but might be useful..

Florida, United States
Joined: January 14, 2009
KitMaker: 2,798 posts
AeroScale: 2,443 posts
Posted: Monday, June 17, 2013 - 06:51 AM UTC
Very helpful thank you sir.and man I hope I get to see one in the flesh one day your lucky litt.Again thanks for taking the time guys

"From time to time, the tree of liberty must be watered with the blood of
tyrants and patriots."
- Thomas Jefferson
IPMS#47611
Florida, United States
Joined: January 14, 2009
KitMaker: 2,798 posts
AeroScale: 2,443 posts
Posted: Tuesday, June 18, 2013 - 11:25 AM UTC
here is some more progress ladies and gents. I had some major filling and sanding to finally fit all together properly. After I am done rescribing I will come back and smooth everything out with wet sanding.

also the red circle is where I sanded the star mapping lens flat to give it that look of realism.
Im also working on the nose

which is suppose to look like this
but looks like this


the red lines indicate where the shape should be and on the bottom I will be filling in the camera window my version does not have this. So some major re working going on here I my have to scratch my own
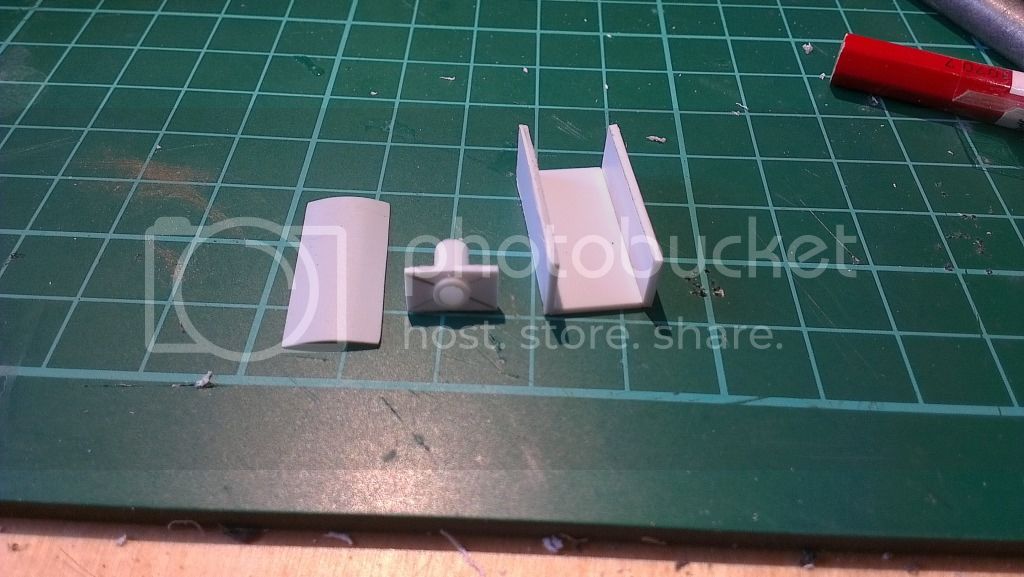
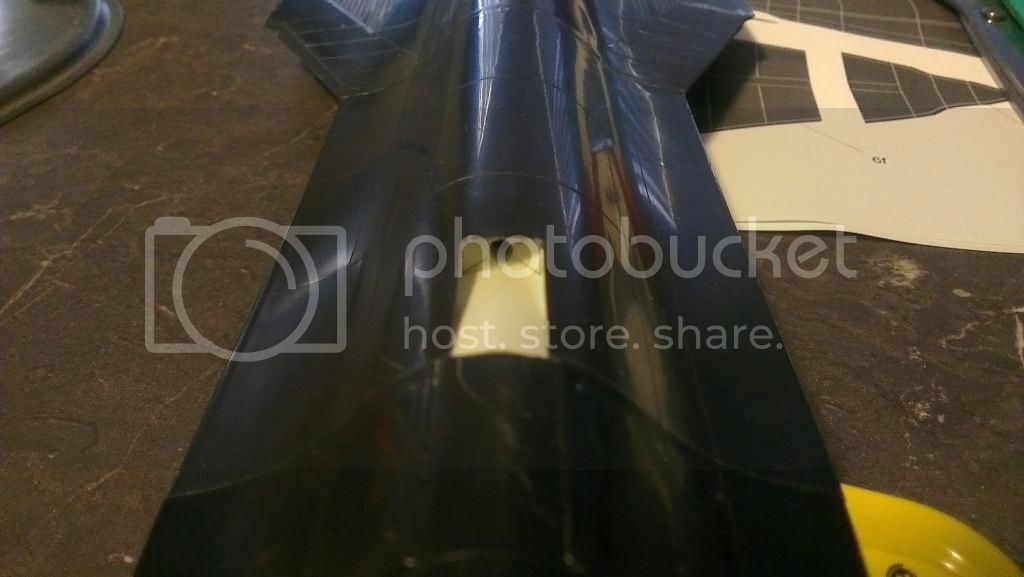
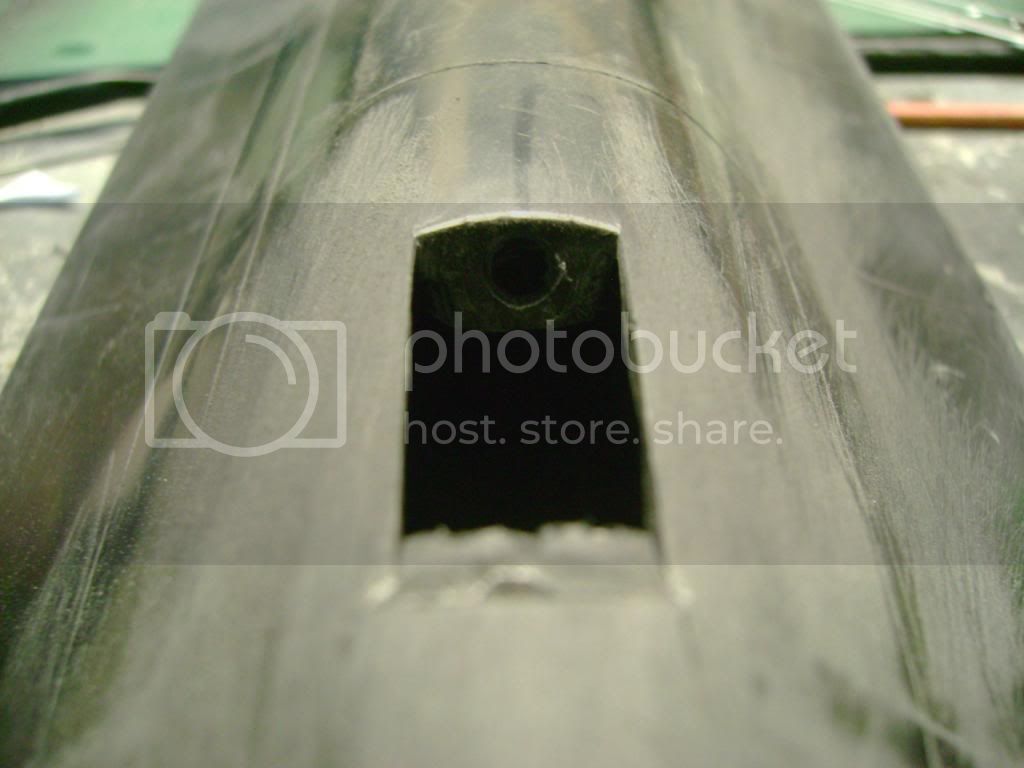
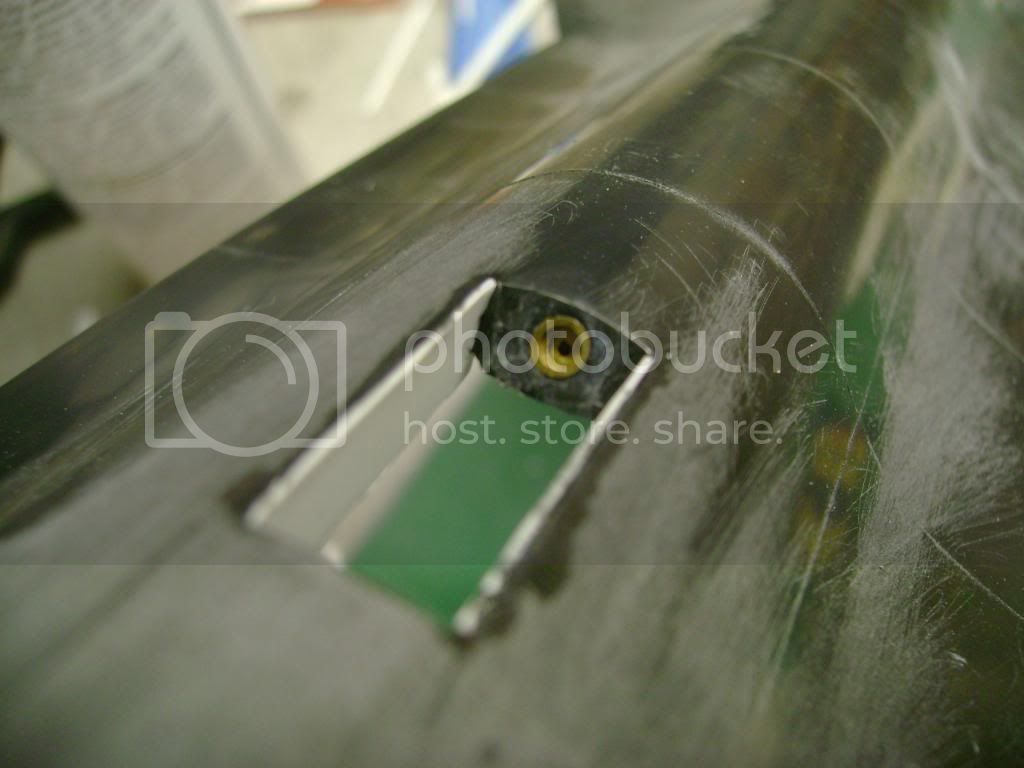
I also have started re working the aerial refueling bay.cut every thing out and made my own.
many miles ahead stay tuned

"From time to time, the tree of liberty must be watered with the blood of
tyrants and patriots."
- Thomas Jefferson
IPMS#47611

#226
British Columbia, Canada
Joined: February 20, 2012
KitMaker: 1,909 posts
AeroScale: 508 posts
Posted: Tuesday, June 18, 2013 - 11:27 AM UTC
Very nice work Justin!

Cheers Rob.
Anything without guns is a target!
27 completed campaigns and counting :)
British Columbia, Canada
Joined: September 03, 2009
KitMaker: 6,965 posts
AeroScale: 6,247 posts
Posted: Tuesday, June 18, 2013 - 02:19 PM UTC
Be careful trimming that nose; remember that there's another part which attaches to the front which carries the pitot tube. If you trim it to those exact lines your model will end up short by a fair margin

Those ECM blisters need to go, but the trimming necessary is much less than shown.
When once you have tasted flight you will walk the Earth with your eyes turned skyward.
For there you have been, and there you will always long to return.
-Leonardo Da Vinci
Florida, United States
Joined: January 14, 2009
KitMaker: 2,798 posts
AeroScale: 2,443 posts
Posted: Tuesday, June 18, 2013 - 02:25 PM UTC
I'm ahead of you jess but since I'm making my own pitot tube I kept what I needed and cut the rest off.I'm going to try and rework the kit part but building my own is becoming a viable option

"From time to time, the tree of liberty must be watered with the blood of
tyrants and patriots."
- Thomas Jefferson
IPMS#47611
Florida, United States
Joined: January 14, 2009
KitMaker: 2,798 posts
AeroScale: 2,443 posts
Posted: Tuesday, June 25, 2013 - 09:06 AM UTC
Update so I still have not received my canopy from testors

but I ordered these today.
http://www.mcssl.com/store/fishermodels/detail-sets-and-accessories/sr-71-super-detailed-wheels-in-148 they look really nice pricey but nice. I will show them off when they come in to compare to the kit parts. Still working on the nose and everything is on hold waiting for the canopy.
"From time to time, the tree of liberty must be watered with the blood of
tyrants and patriots."
- Thomas Jefferson
IPMS#47611
Florida, United States
Joined: January 14, 2009
KitMaker: 2,798 posts
AeroScale: 2,443 posts
Posted: Monday, July 01, 2013 - 07:57 AM UTC
Canopy arrived yesterday
started fitting the fusalge halfs together will post pics soon
"From time to time, the tree of liberty must be watered with the blood of
tyrants and patriots."
- Thomas Jefferson
IPMS#47611
England - South East, United Kingdom
Joined: September 15, 2004
KitMaker: 4,728 posts
AeroScale: 1,351 posts
Posted: Monday, July 01, 2013 - 08:37 AM UTC
Justin it's great to follow your build so much so that I've started mine although I'll not be rescribing or super detailing but I am replacing the landing gear and wheels along with the pilots bang seat. Oh I'm also converting mine to an A-12 so much reshaping of the nose and tail and moving of the inflight refuelling access bay.
On the bench...
Italeri A129 Mangusta
British Bulldog Spitfire theme build
Florida, United States
Joined: January 14, 2009
KitMaker: 2,798 posts
AeroScale: 2,443 posts
Posted: Monday, July 01, 2013 - 09:57 AM UTC
Sweet feel free to post I like to see how other people tackle the issues
"From time to time, the tree of liberty must be watered with the blood of
tyrants and patriots."
- Thomas Jefferson
IPMS#47611
England - West Midlands, United Kingdom
Joined: August 01, 2012
KitMaker: 960 posts
AeroScale: 391 posts
Posted: Monday, July 01, 2013 - 11:44 PM UTC
Great build, I've learned a few 'new to me' techniques.
Ontario, Canada
Joined: March 29, 2010
KitMaker: 1,151 posts
AeroScale: 985 posts
Posted: Tuesday, July 02, 2013 - 03:32 PM UTC
What's that you used for the receiver on the refuelling inlet? Looks fantastic, you'll need to pose this on a mirror so nobody misses all that plumbing you did in the bays.
Florida, United States
Joined: January 14, 2009
KitMaker: 2,798 posts
AeroScale: 2,443 posts
Posted: Tuesday, July 02, 2013 - 03:45 PM UTC
Brass tubing.thank you sir!
"From time to time, the tree of liberty must be watered with the blood of
tyrants and patriots."
- Thomas Jefferson
IPMS#47611
Florida, United States
Joined: January 14, 2009
KitMaker: 2,798 posts
AeroScale: 2,443 posts
Posted: Wednesday, July 03, 2013 - 01:36 PM UTC
received the wheels today. I have to say they are very well cast and very detailed all the way down to the lettering on the sidewalls
"From time to time, the tree of liberty must be watered with the blood of
tyrants and patriots."
- Thomas Jefferson
IPMS#47611
Florida, United States
Joined: January 14, 2009
KitMaker: 2,798 posts
AeroScale: 2,443 posts
Posted: Wednesday, July 03, 2013 - 02:21 PM UTC
"From time to time, the tree of liberty must be watered with the blood of
tyrants and patriots."
- Thomas Jefferson
IPMS#47611
Australia
Joined: January 18, 2012
KitMaker: 42 posts
AeroScale: 41 posts
Posted: Wednesday, July 03, 2013 - 08:11 PM UTC
Love your work Justin! Inspiring.
Florida, United States
Joined: January 14, 2009
KitMaker: 2,798 posts
AeroScale: 2,443 posts
Posted: Thursday, July 04, 2013 - 12:04 AM UTC
"From time to time, the tree of liberty must be watered with the blood of
tyrants and patriots."
- Thomas Jefferson
IPMS#47611
Australia
Joined: January 18, 2012
KitMaker: 42 posts
AeroScale: 41 posts
Posted: Saturday, July 06, 2013 - 01:15 PM UTC
Florida, United States
Joined: January 14, 2009
KitMaker: 2,798 posts
AeroScale: 2,443 posts
Posted: Saturday, July 06, 2013 - 02:18 PM UTC
Nice wish I had those earlier how's yours coming?
"From time to time, the tree of liberty must be watered with the blood of
tyrants and patriots."
- Thomas Jefferson
IPMS#47611
Australia
Joined: January 18, 2012
KitMaker: 42 posts
AeroScale: 41 posts
Posted: Saturday, July 06, 2013 - 06:35 PM UTC
On hold at the moment. Got a couple of commision builds to do first

Sorry I posted so late, I haven't looked in till yesterday so I didn't see your call for info till now.
Australia
Joined: January 18, 2012
KitMaker: 42 posts
AeroScale: 41 posts
Posted: Saturday, July 06, 2013 - 06:41 PM UTC
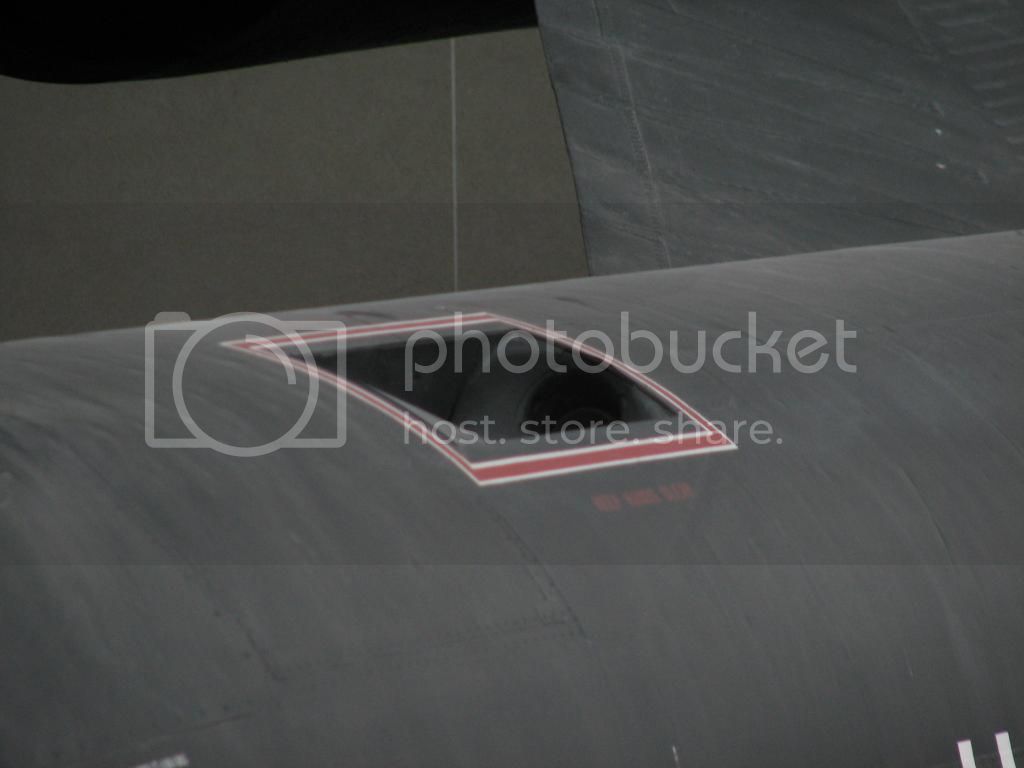
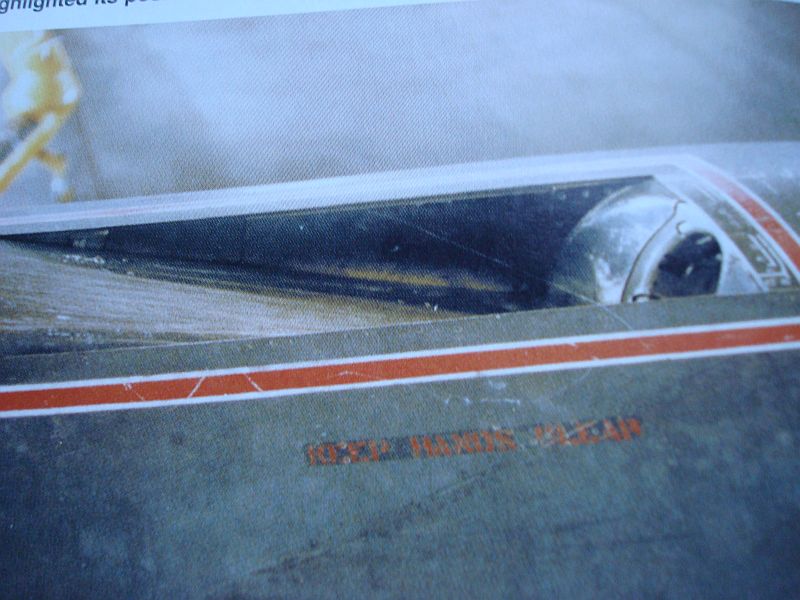
Here is
my personal photos that I took of the bird at Castle AFB museum.
JPTRR
 Managing Editor
#051
Tennessee, United States
Joined: December 21, 2002
KitMaker: 7,772 posts
AeroScale: 3,175 posts
Posted: Saturday, July 06, 2013 - 11:44 PM UTC
Justin, looks great!
Everyone, look at the photo of the refueling inlet DrHibbert posted: Is it just me or did the groundcrew forget to gloss the Blackbird before applying that "Keep Door Clear" decals??? I see decal film!!!!!
Note to self: some decal film is authentic!
If they demand your loyalty, give them integrity; if they demand integrity, give them your loyalty.--Col John Boyd, USAF
Any plan where you lose your hat is a bad plan.
Florida, United States
Joined: January 14, 2009
KitMaker: 2,798 posts
AeroScale: 2,443 posts
Posted: Sunday, July 07, 2013 - 01:58 AM UTC
I certainly seems so lol huh that's interesting
"From time to time, the tree of liberty must be watered with the blood of
tyrants and patriots."
- Thomas Jefferson
IPMS#47611
AussieReg
Associate Editor #007
Victoria, Australia
Joined: June 09, 2009
KitMaker: 8,156 posts
AeroScale: 3,756 posts
Posted: Sunday, July 07, 2013 - 02:50 AM UTC
Quoted Text
Justin, looks great!
Everyone, look at the photo of the refueling inlet DrHibbert posted: Is it just me or did the groundcrew forget to gloss the Blackbird before applying that "Keep Door Clear" decals??? I see decal film!!!!!
Note to self: some decal film is authentic!
Perhaps they used Academy decals
Cheers, D
ON the bench
Revell 1/24 '53 Corvette (building as '54)
Revell 1/24 BMW 507 Coupe and Cabrio
Italeri 1/48 Me262 B-1a/U1 Nightfighter
Monogram 1/24 '57 Chevy Nomad
Dragon 1/350 USS Frank Knox DD-742