Air Campaigns
Want to start or join a group build? This is where to start.
OFFICIAL Matchbox Flying Nostalgia Campaign
Tailor
_VISITCOMMUNITY
Nordrhein-Westfalen, Germany
Joined: May 26, 2008
KitMaker: 1,168 posts
AeroScale: 199 posts
Posted: Monday, March 05, 2012 - 12:01 AM UTC
Rock'n'Roll, Ladies and Gentlemen!
What a whopping start into the campaign. Judging from here this campaign will have a big output.
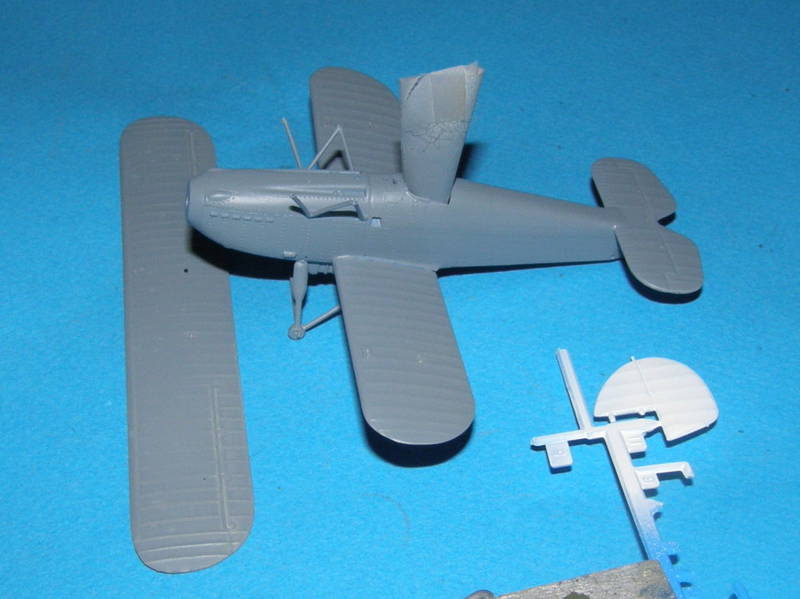
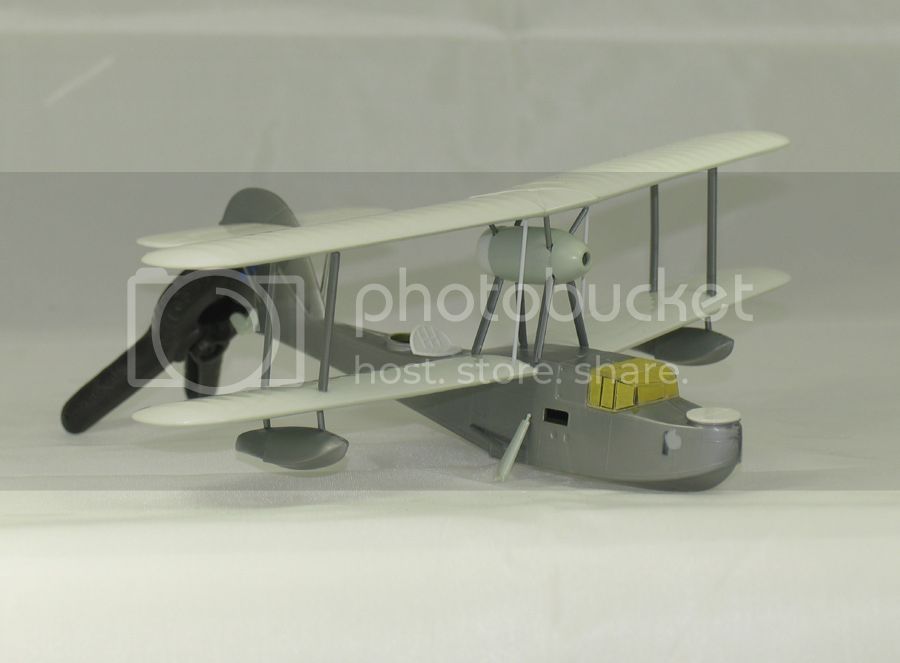
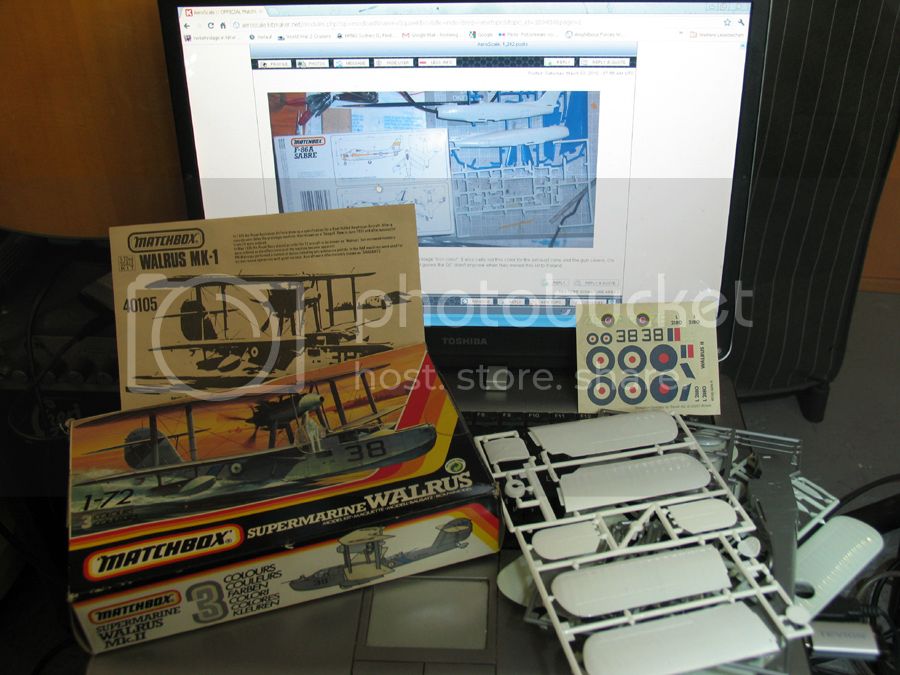
Being between two parts of a model magazine commission I join the fray with my Walrus as a hopefully quick build.
My kit was distributed by Revell Germany at the time of issue (so says the box). As there is no law on marking the country of origin for every product, I can not tell where this shot is from, but the "Made in England" was meltet out, so I guess this must be off a Polish production line, while instruction and decal sheet say "Printed in Germany".
The moulds were in quite good conditon and I have hardly any flesh to get rid of. Unfortunately the Decalsheet does not offer as good a quality as the later direct issue by Revell as shown by Naseby.


I started Saturday following the instruction sheet.
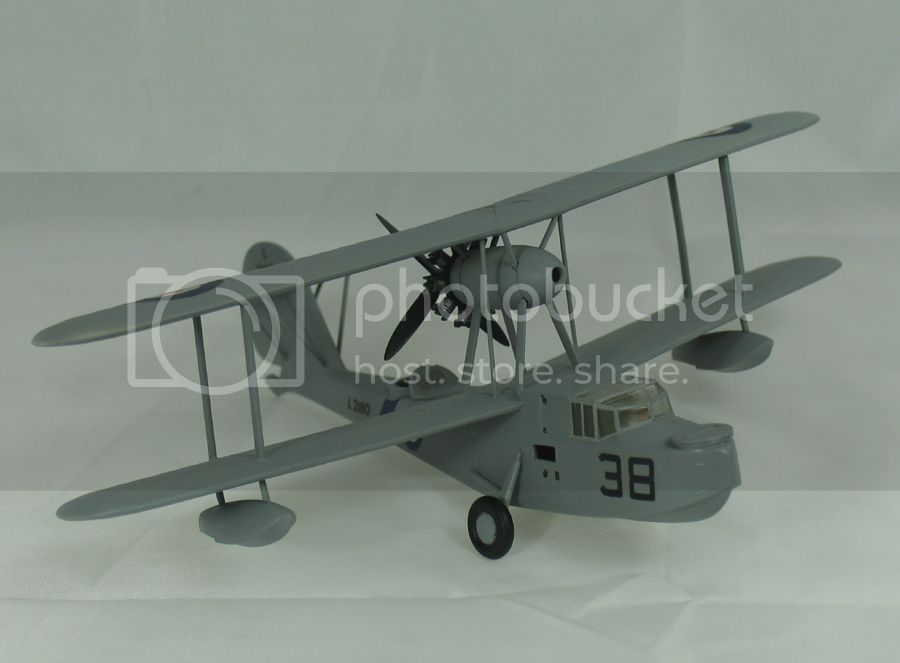
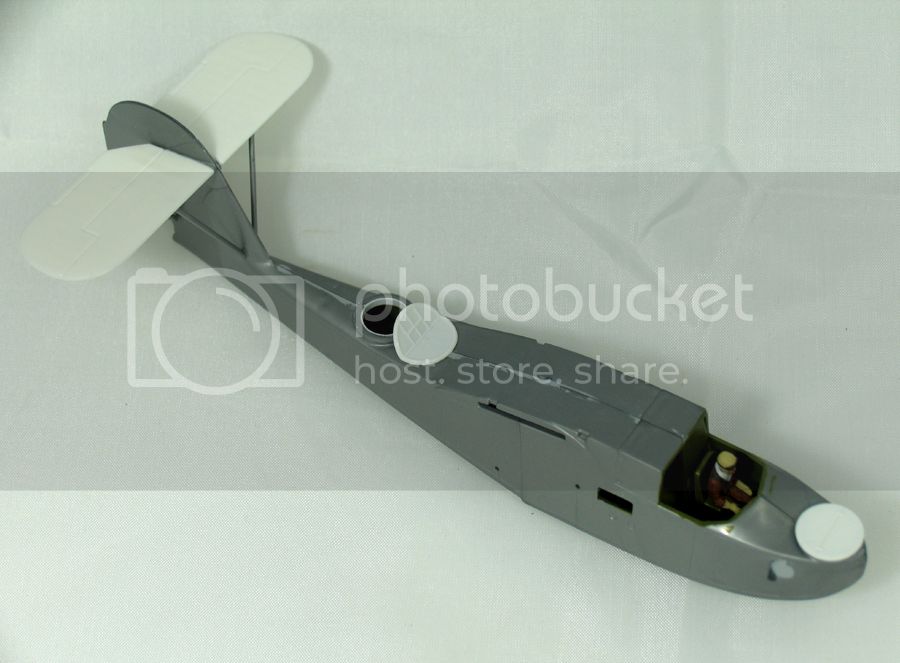
I have cheated twice already by adding a bit of scrap to the cockpit of offer a bit of a backing for the pilot...


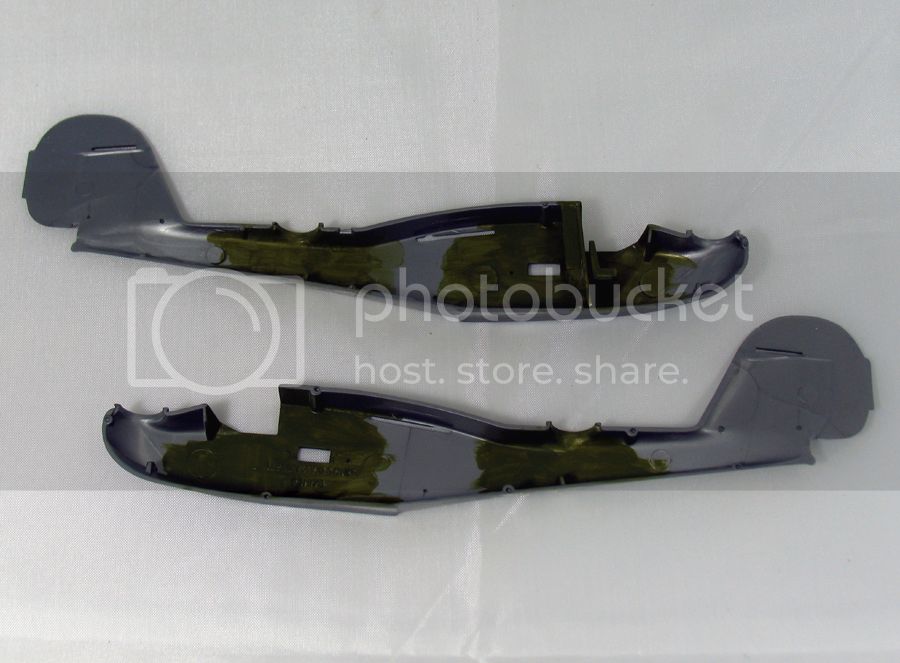
... and added the tiniest strip to make presentable collar for the aft oberver station. I didn't really know any other way to make the opening look at least a bit decent.


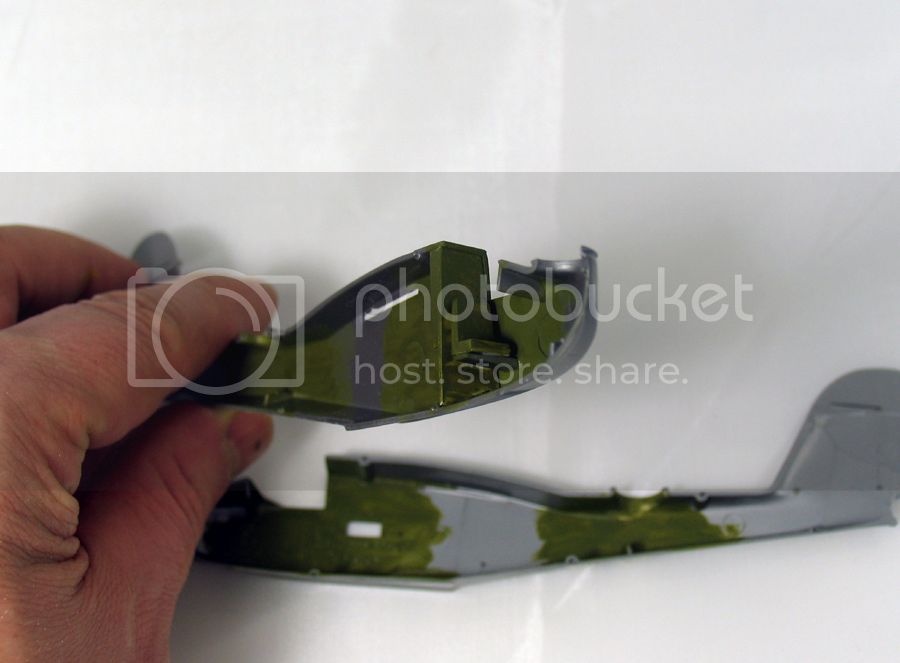
I opened the windows to the radio station behind the pilot to add depth, but didn't add any clear styrene as window to not overstretch by rule bending.


This is a good fun build and I am quite certain that I did already use about 3 time as many hours as I did back in the day.


Cheers,
Guido
AussieReg
Staff MemberAssociate Editor
AUTOMODELER
#007
_VISITCOMMUNITY
Victoria, Australia
Joined: June 09, 2009
KitMaker: 8,156 posts
AeroScale: 3,756 posts
Posted: Monday, March 05, 2012 - 12:20 AM UTC
Excellent progress so far everybody ! I am really glad that this Campaign has created a good deal of activity and enjoyment already.

For the first time EVER I am going to paint the pilot in this build and sit him in place, so please be gentle with me and my experimental figure painting ! Also, thanks for the feedback so far regarding my missing part dilemna. I think that using complete parts from the spares box is a bit too close to using AM goodies, so I am going to use a piece of styrene sheet and try to make it look presentable. I think I can orient it to the bottom of the stabiliser, so hopefuly it won't be inspected too closely

Keep up the great work folks, and please keep the progress reports and coments coming, I'm loving this !

Cheers, D
camogirl
_VISITCOMMUNITY
England - North East, United Kingdom
Joined: October 20, 2005
KitMaker: 1,045 posts
AeroScale: 622 posts
Posted: Monday, March 05, 2012 - 04:03 AM UTC
Well I made a start yesterday


and within 30 mins we got to this stage


went to sort the horse out and managed to get the canopy masked and on


and then this morning I managed to get the plane primed


Think that will pretty much be all the progress till Sunday now with work.
Quite enjoying just doing a OOB easy build for once
md72
#439
_VISITCOMMUNITY
Washington, United States
Joined: November 05, 2005
KitMaker: 4,950 posts
AeroScale: 3,192 posts
Posted: Monday, March 05, 2012 - 04:45 AM UTC
OK, Wot the heck did I do to make my lousy photo of the F-86A box the preferred background for everybody's progress shots???????
Jessie_C
_VISITCOMMUNITY
British Columbia, Canada
Joined: September 03, 2009
KitMaker: 6,965 posts
AeroScale: 6,247 posts
Posted: Monday, March 05, 2012 - 04:47 AM UTC
I don't know, but to make you feel better, I won't do it
Edit: It seems to be a Walrus thing.

The Fury is wearing primer now.
Tailor
_VISITCOMMUNITY
Nordrhein-Westfalen, Germany
Joined: May 26, 2008
KitMaker: 1,168 posts
AeroScale: 199 posts
Posted: Monday, March 05, 2012 - 06:02 AM UTC

Quoted Text

...
Edit: It seems to be a Walrus thing.
...


Naseby
_VISITCOMMUNITY
Slovakia
Joined: October 15, 2010
KitMaker: 825 posts
AeroScale: 476 posts
Posted: Monday, March 05, 2012 - 09:17 AM UTC
@ Mark, this information is of course clasified

@ Guido, good thinking with the barier behind the pilots seat. I already closed the fuselage and may regret it in the future not adding it too. Actualy I will not use the Revell decals since they are not original anyway. I will put something together for a pre-war all silver look.

@ Damian, Im sure You will master the replacement part, did You think about making a copy from resin ?
c4willy
#305
_VISITCOMMUNITY
Christchurch, New Zealand
Joined: February 01, 2006
KitMaker: 1,673 posts
AeroScale: 1,517 posts
Posted: Monday, March 05, 2012 - 10:56 AM UTC
Hi Guys and Gals!
Okay as promised (R.A.N. version for Damian!) here's the Revell re-pop of the 1/32 DH Sea Venom. I must admit to liking the Revell decal offering they're in almost perfect register and printed for Revell in Italy. (I'm hoping that they're done by cartograph!) I'll be using the decals for the instrument panel as they look pretty good and this is out of the box! Here are a couple of pictures of the offending beastie. I'll also be doing a build log of this kit as well just for reference and research purposes. (Who knows D perhaps Josh will want to do one of these too?)

md72
#439
_VISITCOMMUNITY
Washington, United States
Joined: November 05, 2005
KitMaker: 4,950 posts
AeroScale: 3,192 posts
Posted: Monday, March 05, 2012 - 04:55 PM UTC
OK, some actual progress.
Got the canopy covered in Future:


It had a real pebbly appearance, but the Future really cleared it up.
c4willy
#305
_VISITCOMMUNITY
Christchurch, New Zealand
Joined: February 01, 2006
KitMaker: 1,673 posts
AeroScale: 1,517 posts
Posted: Monday, March 05, 2012 - 07:23 PM UTC
Good start so far mark!

Okay well I've made some progress too I started where Revell wanted me too and I've put the engine together such as it is. Made a few errors too, which were easy to rectify as the glue hadn't set at all. The main blunder was assembling the inner parts of the engine thinking I could put the combustion chambers around it once I had, wrong! The engine needs to be assembled in the order specified for it to go together and fit well. So I disassembled it all and started over. Here's the result.

While I was at it I painted the interior of the fuselage and the landing gear. I used Humbrol's 78 interior green acrylic which I thinned to spray and I must say it sprayed damn well. It is however susceptible to Tamiya extra thin cement wrinkling like it'd been hit with paint stripper and peeling back. Once the glue was dry however it went back to being quite resilient. I also painted the cockpit and the interior walls now it's onto assemble the cockpit and hopefully the fuselage.


AussieReg
Staff MemberAssociate Editor
AUTOMODELER
#007
_VISITCOMMUNITY
Victoria, Australia
Joined: June 09, 2009
KitMaker: 8,156 posts
AeroScale: 3,756 posts
Posted: Monday, March 05, 2012 - 11:36 PM UTC
Excellent progress folks, this is what the hobby was about when we all started, pure enjoyment with no pressure. Keep up the great work and we might drag in a few more "back-to-basics" builders.

Cheers, D
windysean
_VISITCOMMUNITY
Wisconsin, United States
Joined: September 11, 2009
KitMaker: 1,917 posts
AeroScale: 563 posts
Posted: Tuesday, March 06, 2012 - 03:17 AM UTC

Quoted Text

Excellent progress folks, this is what the hobby was about when we all started, pure enjoyment with no pressure. Keep up the great work and we might drag in a few more "back-to-basics" builders.

Cheers, D


Well put! I'm watching this campaign.
-Sean H.
Tomcat31
#042
_VISITCOMMUNITY
England - North East, United Kingdom
Joined: November 18, 2006
KitMaker: 2,828 posts
AeroScale: 1,720 posts
Posted: Tuesday, March 06, 2012 - 09:47 AM UTC
I've made some progress with the T55 but no pics as yet.

One question though where do we stand with raised panel lines unfortunately i've managed ton obliterate some extremely fine raised lines with sanding a poor fitting part at the exhausts. I thought I could use some stretched sprue for the bigger ones but can't think of a solution for the finer ones.

The one two options I can think of at the moment is to either re-scribe them to be recessed (not keeping in with the kit) or just to remove them completely. Any other ideas?
AussieReg
Staff MemberAssociate Editor
AUTOMODELER
#007
_VISITCOMMUNITY
Victoria, Australia
Joined: June 09, 2009
KitMaker: 8,156 posts
AeroScale: 3,756 posts
Posted: Tuesday, March 06, 2012 - 09:59 AM UTC
G'day Allen.

On a couple of old Monogram kits I have built recently I had the same dilemna. All I ended up doing was scribing the small section that was lost by sanding and leaving the rest raised. If you are looking from more than a foot or two away you just can't tell the difference.

@Chris, "R.A.N. version for Damian!" - sweeeeeeeeeeeeet !

@Sean, great to see you here mate, we have a few months to run so don't be shy about hunting down a kit and diving in !

Cheers, D
oraora
_VISITCOMMUNITY
Kuching, Malaysia
Joined: June 19, 2002
KitMaker: 216 posts
AeroScale: 128 posts
Posted: Tuesday, March 06, 2012 - 04:00 PM UTC
Some progress of my G-91Y. For such a small aircraft, quite an amount of sanding and puttying is required. The only "foreign" thing i added was a pair of plastic card to the wings' root as they were too loose..


c4willy
#305
_VISITCOMMUNITY
Christchurch, New Zealand
Joined: February 01, 2006
KitMaker: 1,673 posts
AeroScale: 1,517 posts
Posted: Tuesday, March 06, 2012 - 07:43 PM UTC
Okay guys a little further along now got the fuselage and wings together, required a little sanding and grinding work but nothing much. It took me an hour to get to where the engine fit and I was happy with it. But all the parts went together well and there were no glaring fit issues.


Tailor
_VISITCOMMUNITY
Nordrhein-Westfalen, Germany
Joined: May 26, 2008
KitMaker: 1,168 posts
AeroScale: 199 posts
Posted: Tuesday, March 06, 2012 - 09:30 PM UTC
Great to see so much work coming along. It's a pity that at this pace the builds will be finished quickly, too. Two sides of a coin...

With just a few hours input my build has reached ready-to-paint status. Same as 30 years ago the wing alignment is a pain in the back and the result not a lot better than back then.


So I choose to not rigg the model and use the (out of register) decals for the plane aboard HMS Sheffield in 1938 along with the over-all sea grey scheme.

While I write this the first layer of paint is already drying.

Cheers,
Guido

Edit: I replaced the two struts of either side of the engine nacelle woith styrene rod as the kit's parts were about 2mm too short!
Jessie_C
_VISITCOMMUNITY
British Columbia, Canada
Joined: September 03, 2009
KitMaker: 6,965 posts
AeroScale: 6,247 posts
Posted: Wednesday, March 07, 2012 - 05:31 PM UTC
Work proceeds at a Fury-ous pace.


I need to do a trifle of touching up and then the moment of truth as the top wing goes on.
md72
#439
_VISITCOMMUNITY
Washington, United States
Joined: November 05, 2005
KitMaker: 4,950 posts
AeroScale: 3,192 posts
Posted: Wednesday, March 07, 2012 - 06:37 PM UTC
Wow Jesse, you are really hauling along on it.
Tailor
_VISITCOMMUNITY
Nordrhein-Westfalen, Germany
Joined: May 26, 2008
KitMaker: 1,168 posts
AeroScale: 199 posts
Posted: Wednesday, March 07, 2012 - 09:23 PM UTC
Ladies and Gentlemen -

After an evening on finishing moves I call this one finished. It indeed turned out to be as OOP as I was able to restrain myself.
While the start was quite pleasant aligning wings and gear was a b****. The photos shows about the angle, which wouldn't tell tale about all them problems. I'd say that I WILL take part in the next Nostalgia campaign, but THIS was defnitely the last time I build a Matchbox Walrus!


It was an honour flying with you!

Guido
AussieReg
Staff MemberAssociate Editor
AUTOMODELER
#007
_VISITCOMMUNITY
Victoria, Australia
Joined: June 09, 2009
KitMaker: 8,156 posts
AeroScale: 3,756 posts
Posted: Thursday, March 08, 2012 - 12:55 AM UTC
Finished already ? Great work Guido, your Walrus doesn't look like you had any troubles !

Thanks for joining in and setting the pace for us.

Jessica, excellent progress on the Fury. What paint did you use ?

I'm going to try to get some more time at my 109 this weekend, I'll be sure to post up some pics of my attempt at forming up a stabilizer.

Cheers, D
Jessie_C
_VISITCOMMUNITY
British Columbia, Canada
Joined: September 03, 2009
KitMaker: 6,965 posts
AeroScale: 6,247 posts
Posted: Thursday, March 08, 2012 - 03:17 AM UTC
Aw, heck. I was kind of hoping to be the first one finished. Great work, Guido. Aren't biplanes such fun?
Damian, I used Tamiya TS-30 in the rattle can. I discovered it's fairly fragile and can deform under the heat of your hands even after you think it's dry. The trick is to leave it for at least a day before handling, and even then keep the handling to a minimum.

Anyway, the Fury is finished.

Eurgh. Why is it that you don't see the giant glue spills until after the pictures are taken?


It's difficult to take a picture of an all silver airplane; the flash refects right back into the camera, washing out the background.

Yes, I rigged it.
oraora
_VISITCOMMUNITY
Kuching, Malaysia
Joined: June 19, 2002
KitMaker: 216 posts
AeroScale: 128 posts
Posted: Thursday, March 08, 2012 - 04:05 AM UTC
Guido, That's a nice walrus you built and amazingly fast too!

Jessica, superb and fast build. The fury is one of the plane that I always wanted but have not yet managed to buy..

Chris, your sea venom is huge! I'm sure it will look fantastic.

samantha, your mustang is coming together nicely.
Tailor
_VISITCOMMUNITY
Nordrhein-Westfalen, Germany
Joined: May 26, 2008
KitMaker: 1,168 posts
AeroScale: 199 posts
Posted: Thursday, March 08, 2012 - 04:09 AM UTC
Yeap - some fun!
Congrats to a close second, Jessica! In all fairness, I was working late shifts so I had all morning free for modelling ever since Saturday, so... Well it's a personal best, concering building time, anyway!
Ken and Damian: Thank you , guys!

Cheers,
Guido
NickZour
_VISITCOMMUNITY
Attica, Greece / Ελλάδα
Joined: May 01, 2008
KitMaker: 1,437 posts
AeroScale: 1,241 posts
Posted: Thursday, March 08, 2012 - 09:19 AM UTC
Hello fellow aeroscalers

I'll post some photos in a week and I'll start my Wellesley, when I will have finish my "Fortress"

By the way, that's a great Fury Mrs. Jessica


Cheers Nick