Air Campaigns
Want to start or join a group build? This is where to start.
OFFICIAL: Looney Toons Campaign
SaxonTheShiba
_VISITCOMMUNITY
United States
Joined: February 01, 2009
KitMaker: 1,233 posts
AeroScale: 663 posts
Posted: Sunday, May 19, 2013 - 01:15 AM UTC
Jesper----A fine looking -110 indeed. Well done.


I did some more work on my E-Model "Rhino". Got the tails painted and the skunkstripe added on as well, this weekend. Most of the sub-assemblies are done too. I will be using Kinetic AIM-9X Sidewinders and GBU-38 500 lb JDAMS for ordnance.


Best wishes, Ian


SGTJKJ
#041
_VISITCOMMUNITY
Kobenhavn, Denmark
Joined: July 20, 2006
KitMaker: 10,069 posts
AeroScale: 3,788 posts
Posted: Sunday, May 19, 2013 - 03:31 AM UTC
Thanks for the comment, Ian.

Here are some better pictures. The Bf 110C now has two wingmen. They were just finished today for two other campaigns.

BTW: This is Messerschmitt Bf 110C flown by Oblt. Hans Kriegel, staffelkapitan of 7./ZG 76, Stavanger-Sola, February 1941. This aircraft was later damaged in air combat with RAF Beaufighters of No. 252 Sqn. on 16th April 1941.


Hawkeye65
_VISITCOMMUNITY
Western Australia, Australia
Joined: February 11, 2012
KitMaker: 56 posts
AeroScale: 50 posts
Posted: Sunday, May 19, 2013 - 07:48 PM UTC
Hi everyone. I am a very late entry for this campaign, and I will be building the Airfix 1/72 CAC Boomerang of the RAAF. I am building A46-195 QE-A "Phooey" of No.4 Squadron RAAF at Labuan, 1945. The finish will be overall Foliage Green and "Phooey" sported a Donald Duck on a boomerang cartoon marking.

This kit is ancient (1965), but it will be built OOB. I have another one of these kits waiting to build as the Earth Brown/Foliage Green camouflaged version.

Major sub-assemblies

Finished fuselage

Painting


(All my previous posts had links to images from Facebook, and the URLs seemed to change and all the links lost these images. I am using space on my own server for Aeroscale images now!)
Hawkeye65
_VISITCOMMUNITY
Western Australia, Australia
Joined: February 11, 2012
KitMaker: 56 posts
AeroScale: 50 posts
Posted: Sunday, May 19, 2013 - 08:24 PM UTC
And today's accomplishments are decals and a clear matt coat to seal them.
ljames0874
_VISITCOMMUNITY
England - South East, United Kingdom
Joined: August 15, 2012
KitMaker: 408 posts
AeroScale: 365 posts
Posted: Sunday, May 19, 2013 - 08:43 PM UTC
Time for a quick update - desert pink airbrushed on.
SGTJKJ
#041
_VISITCOMMUNITY
Kobenhavn, Denmark
Joined: July 20, 2006
KitMaker: 10,069 posts
AeroScale: 3,788 posts
Posted: Monday, May 20, 2013 - 05:12 AM UTC
Nice progress, Harry. Looks to be a quick build.

Looks great, Lee. Remember a dull coat at the end of the build. It seems like the desert pink was a very dull paint. more dull than normal aircraft paints.
ljames0874
_VISITCOMMUNITY
England - South East, United Kingdom
Joined: August 15, 2012
KitMaker: 408 posts
AeroScale: 365 posts
Posted: Monday, May 20, 2013 - 08:34 PM UTC

Quoted Text


Looks great, Lee. Remember a dull coat at the end of the build. It seems like the desert pink was a very dull paint. more dull than normal aircraft paints.


Cheers! What is the best dull coat to use? I tried Humbrol Matt Cote on my Apache build, but it was no where near Matt in my opinion.
emroglan
_VISITCOMMUNITY
Istanbul, Turkey / Türkçe
Joined: December 16, 2004
KitMaker: 1,163 posts
AeroScale: 255 posts
Posted: Monday, May 20, 2013 - 11:51 PM UTC

Quoted Text


Quoted Text


Looks great, Lee. Remember a dull coat at the end of the build. It seems like the desert pink was a very dull paint. more dull than normal aircraft paints.


Cheers! What is the best dull coat to use? I tried Humbrol Matt Cote on my Apache build, but it was no where near Matt in my opinion.


That might be because the varnish inside was not properly mixed. I used to use Humbrol's matt coats, the old ones in the tin cans and they were matte and nice. The new ones always somehow screwed up, so I switched to Vallejo and/or Microscale. Microscale is easy to apply as you thin it with water, but for me it's harder to apply and then clean it off from the airbrush. I thin Vallejo's matt varnish with Vallejo's airbrush cleaner. Thins well, sprays well, looks matte and dries very quickly. The airbrush can easily be cleaned up using the same airbrush cleaner.
vanize
_VISITCOMMUNITY
Texas, United States
Joined: January 30, 2006
KitMaker: 1,954 posts
AeroScale: 1,163 posts
Posted: Tuesday, May 21, 2013 - 08:32 AM UTC
So I actually started my build about 6 weeks ago, but between apathy and having to reconstruct my home computer twice in that period, I haven't gotten to posting. first the intro to what I am doing.

here is the aircraft, Dragon Betty II:


I am using the Cutting edge decal sheet, largely because i think the colors for the dragon are best reproduced by that brand (tho the yellow still isn't quite as 'day-glo' as the original, but the different greens are represented, which is better than most decals of this nose art):


and my kit plus extras:

vanize
_VISITCOMMUNITY
Texas, United States
Joined: January 30, 2006
KitMaker: 1,954 posts
AeroScale: 1,163 posts
Posted: Tuesday, May 21, 2013 - 08:43 AM UTC
and my progress from about 6 weeks ago:

I left the stabilators in the neatral position, which is common enough on F-15s to not make posing them otherwise on this kit worthwhile. I did drop the flaperons tho, as these are almost always droopy on parked F-15s


I wasn't a huge fan of the wheel wells, but the openings are so small when the wheels are all the way down i gave myself permission not to worry about it:


Getting the ducts acceptable looking is relatively easy on this kit, which is a nice change from most jet model kits:


more this evening (hopefully) showing my recent progress, mostly on the nose section.
vanize
_VISITCOMMUNITY
Texas, United States
Joined: January 30, 2006
KitMaker: 1,954 posts
AeroScale: 1,163 posts
Posted: Wednesday, May 22, 2013 - 02:11 AM UTC
Here is my progress on Dragon Betty II as of last night - finally starting to look like an F-15:


lining up the nose to the main fuselage was the toughest part of the build. I had to leave the rear part of the nose not glued together so I could flex it out to match the main body without having too much of a step. I optimized for the top seam to be the best since it will be most visible. Note that my kitten (well, she's a year old now) used the intake ramp as a chew toy at some point recently. There was not much i could do about fixing the damage she did without wiping out tons of detail on the otherside of the ramp, so i left it be. at least the damage will be mostly hidden once the model is complete.


Detail of what was definitely the worst seam of the kit - the underside nose/fuselage join. I had to insert plastic shims to get this to work at all. I could have made this better if I let the seam on the topside be worse, but i opted for this trade-off. Most of this will be hidden by the intakes once they are on anyway. Keep in mind that in general, the fit on the parts on this kit is quite good.


and the obligatory cockpit detail shot, taken before i attached the nose to the main body. frankly I was VERY disappointed in the Avionics resin cockpit. It was obviously just a copy of the original kit part with a only a few small details added. the aftermarket instrument panels were merely inferior copies the original kit parts (I used the kit parts). I wound up using the Avionics tub and will use their ejection seats, but in retrospect i should have just bought some resin ejection seats for 1/4 the price and had 95% as good a result with a significantly easier cockpit build. I am not inclined to buy more Avionics cockpit sets after this experience.

SGTJKJ
#041
_VISITCOMMUNITY
Kobenhavn, Denmark
Joined: July 20, 2006
KitMaker: 10,069 posts
AeroScale: 3,788 posts
Posted: Wednesday, May 22, 2013 - 08:03 AM UTC
Lee, I used a rattle can of Testors dull coat. It needs to harden overnight, but goes on nice and easy. Just be careful not to put on a heavy layer.

Vance, nice build so far. I have this kit in my stash, so it is cool to see it goes together (mostly) well.
Looking forward to see more.
Hawkeye65
_VISITCOMMUNITY
Western Australia, Australia
Joined: February 11, 2012
KitMaker: 56 posts
AeroScale: 50 posts
Posted: Wednesday, May 22, 2013 - 06:17 PM UTC
I'll put in my vote for Testors matt as well. The rattle-can is nice because it is a quick cleanup and the results are nice and matt. The down side is a bit less control of the spray volume, but it has been working well for me.
Torchy
#047
_VISITCOMMUNITY
England - East Anglia, United Kingdom
Joined: September 13, 2005
KitMaker: 2,016 posts
AeroScale: 475 posts
Posted: Thursday, May 23, 2013 - 01:13 AM UTC
Greetings toons
Nearly time for beer and medals
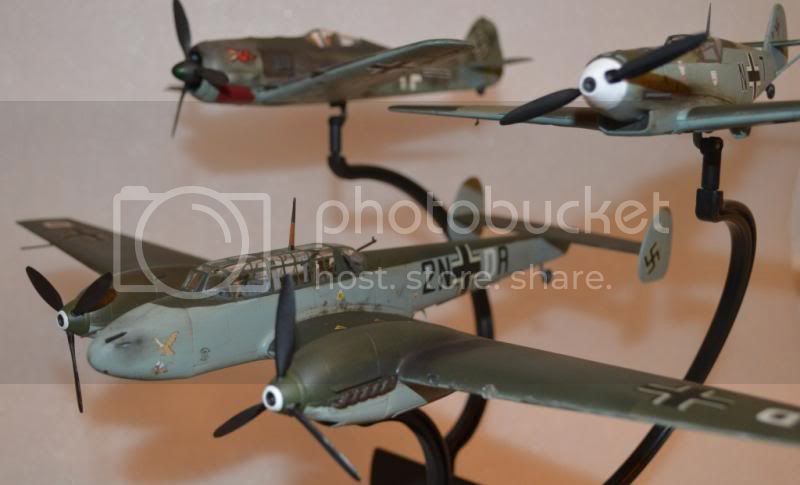
Vance...super Eagle,super Dragon, mad cat!!!
Lee... You must really mix that humrol matt cote up well
I prefer the following using Tamiya flat base and Klear
1 part flat to 3 parts Klear =very flat
1 part flat to 10 parts Klear = flat
1 part flat to 15 parts Klear =satin
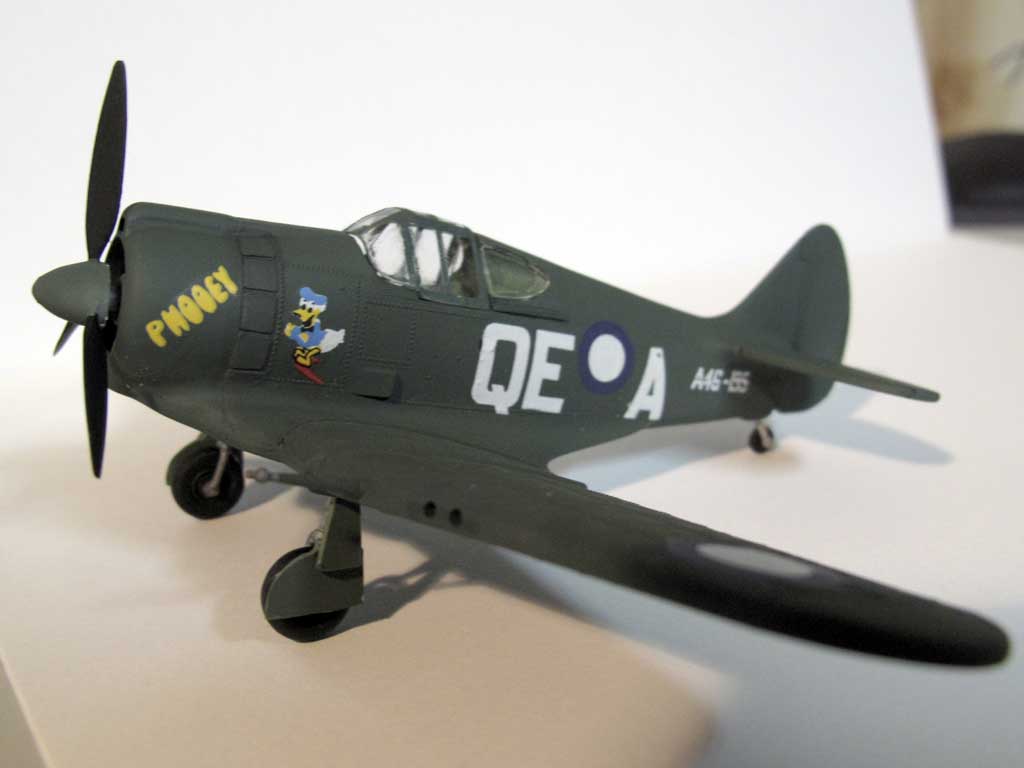
Harry... welcome aboard mate,superb Boomerang, smashing markings.
Jesper... brilliant fly past buddy ,great job
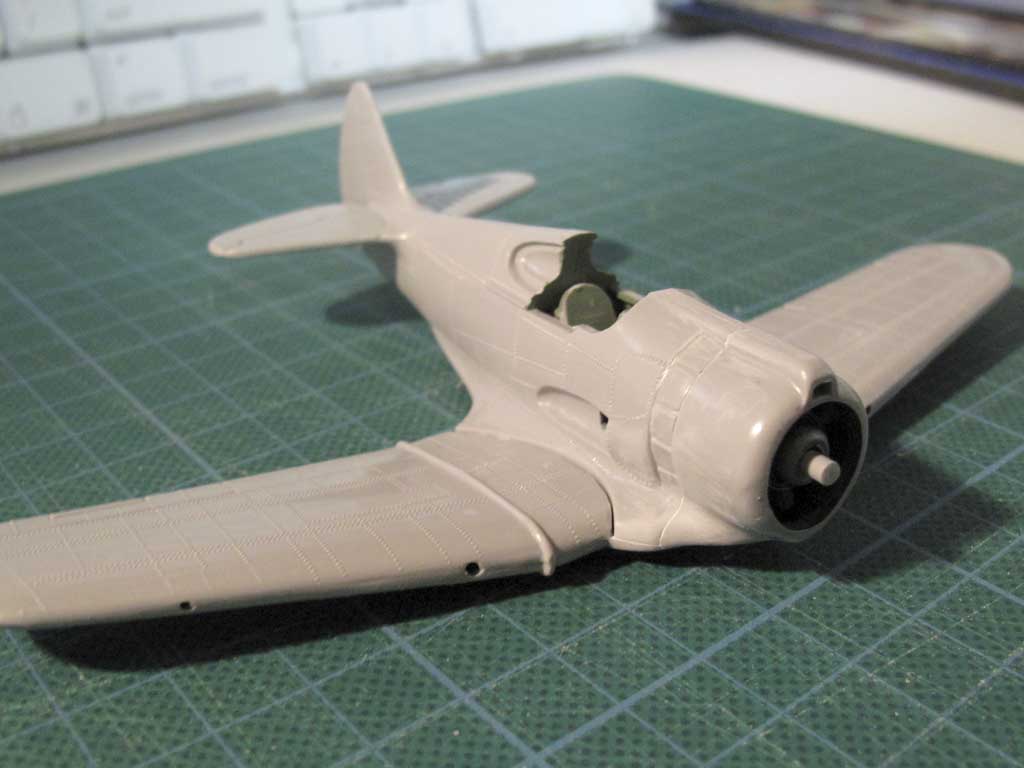
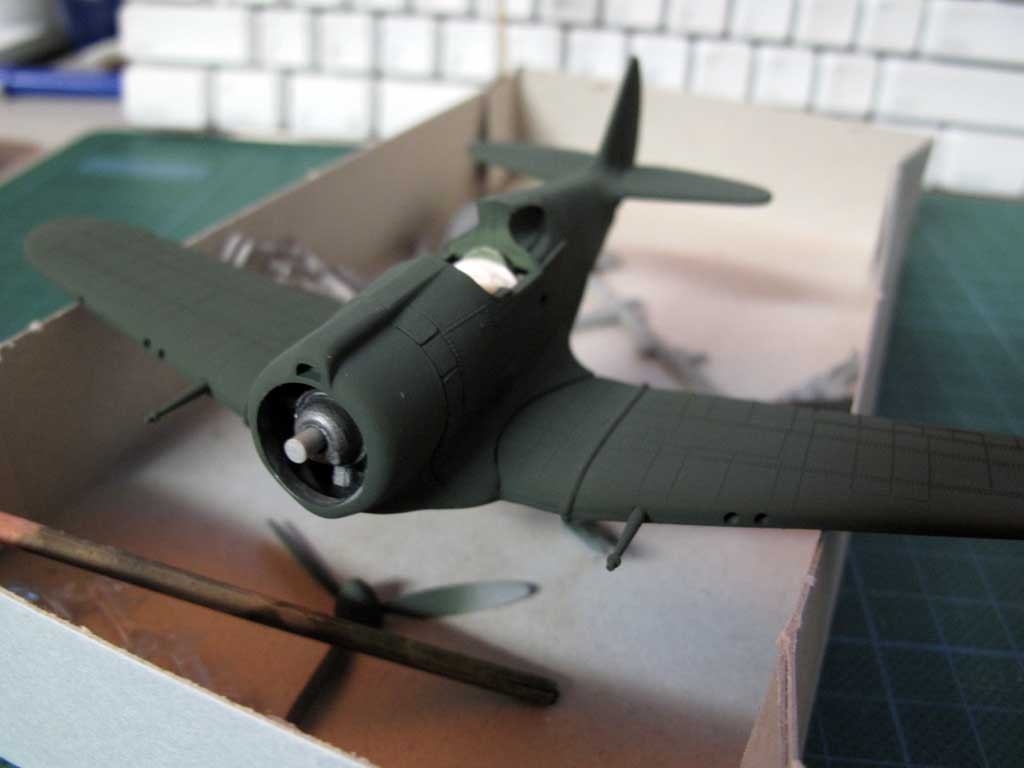
Ian...fantastic looking Rhino,can't wait to see that baby done.
Keep the pics coming fellas
Andy

emroglan
_VISITCOMMUNITY
Istanbul, Turkey / Türkçe
Joined: December 16, 2004
KitMaker: 1,163 posts
AeroScale: 255 posts
Posted: Friday, May 24, 2013 - 07:48 PM UTC
Hello everyone,

My progress is ever slow, but since my bike is being serviced this week it created an opportunity to stay home and get some modeling done. My Bf 109F-4 was first sprayed with a gloss coat. After it was dry, I started decalling which took more than two days. Cutting Edge provided black and white decals for the swastikas and unit markings, you need to apply the white background first and when dry, place the black decal over it. While tedious and slow, it gives good results.

After the decals, everything was covered with another layer of gloss to protect my work. It's now time to apply pinwashes and some filters.


I seriously hope that this toon is looney enough for this campaign

V2Phantom
_VISITCOMMUNITY
United States
Joined: December 26, 2008
KitMaker: 288 posts
AeroScale: 195 posts
Posted: Saturday, May 25, 2013 - 03:12 AM UTC
I finished this campaign in time! My track record for group builds is not quite perfect to say the least so I am always happy to finish my build before the deadline. Here is my completed Woody Woodpecker ANA B767-300 build for this campaign.


If you have been following this thread from the beginning, you might remember when I cut out the solid plastic and substituted clear plastic for the wing lights. Here is how they look on the finished model:


Thanks for following my build, this was a really fun Campaign!

For those who might remember the original cartoon....

That's All FFFFFolks!


Have fun modeling!
Mike
SaxonTheShiba
_VISITCOMMUNITY
United States
Joined: February 01, 2009
KitMaker: 1,233 posts
AeroScale: 663 posts
Posted: Saturday, May 25, 2013 - 06:13 AM UTC
Jesper-----Great display of your Luftwaffe trio.

Harry---The Boomerang looks realy good and what a great subject matter.

Lee----Like the Tornado. Good replication of the Desert Pink.

Vance----Looking forward to the Mudhen. The Revell-Monogram is a great kit. I liked it better than the Hasegawa offering.

Emre---Beautiful -109 thus far. Really good looking desert scheme.

Mike---Great looking scheme on the liner. Very well done.


I worked some more on "Bandwagon 100". All the panel lines and rivets have been drawn and I just added the Future/Black Paint wash to the wheel bays. The sub-assemblies are done so after the struts are added it will be ready for decals after the gloss application. Also drilled out the ECS pipes with a Dremel.


Regards, Ian


Hawkeye65
_VISITCOMMUNITY
Western Australia, Australia
Joined: February 11, 2012
KitMaker: 56 posts
AeroScale: 50 posts
Posted: Sunday, May 26, 2013 - 03:03 AM UTC
Some more progress on "Phooey". I truly hate canopies - particularly WWII "birdcage" canopies, and the fiddly mask-a-bit, paint-a-bit, mask some more method I use doesn't help. I have bought some Maskol but I haven't had the courage to try it yet. The stench is incredible!

Anyway, not far now - just a few minor tweaks.


Lovely progress on everyone's builds. There are some real colourful schemes here to enjoy!
SGTJKJ
#041
_VISITCOMMUNITY
Kobenhavn, Denmark
Joined: July 20, 2006
KitMaker: 10,069 posts
AeroScale: 3,788 posts
Posted: Sunday, May 26, 2013 - 09:20 AM UTC
Thanks for the comment, Ian

Herry, quick building and painting. looking forward to see it finished.
SaxonTheShiba
_VISITCOMMUNITY
United States
Joined: February 01, 2009
KitMaker: 1,233 posts
AeroScale: 663 posts
Posted: Monday, May 27, 2013 - 05:04 AM UTC
Well "Bandwagon One Zero Zero" is rockin' her Afterburner Decals now.....and fine decals they are. First -18 in my collection to bear the new USS George H.W. Bush motif. Should be ready to flat coat and wrap this up in the next few days.


GO FELIX!!!!!!!!!!!!!!!!!!!!!!!!!!!!!!!!!!!


North4003
_VISITCOMMUNITY
England - West Midlands, United Kingdom
Joined: August 01, 2012
KitMaker: 960 posts
AeroScale: 391 posts
Posted: Monday, May 27, 2013 - 06:16 AM UTC
I haven't posted to this Campaign in a while. Here is the progress on my Brewster Buffalo by Revell.


I have a set of F2A Buffalo decals from Starfighter Decals to replace the dried out set. I'll letter this F2A-1 for VF-3, the USS Saratoga in 1940, flown by Lt. Jimmy Thatch.

bdanie6
_VISITCOMMUNITY
New Hampshire, United States
Joined: November 09, 2008
KitMaker: 615 posts
AeroScale: 459 posts
Posted: Monday, May 27, 2013 - 10:36 AM UTC
OMG! Brent/Ian? you two get together for these posts?

Later
SaxonTheShiba
_VISITCOMMUNITY
United States
Joined: February 01, 2009
KitMaker: 1,233 posts
AeroScale: 663 posts
Posted: Monday, May 27, 2013 - 10:43 AM UTC

A Buffalo and a Rhino.....Felix Forever Baby!!!!!!!!!!


Quoted Text

OMG! Brent/Ian? you two get together for these posts?

Later

V2Phantom
_VISITCOMMUNITY
United States
Joined: December 26, 2008
KitMaker: 288 posts
AeroScale: 195 posts
Posted: Wednesday, May 29, 2013 - 02:12 AM UTC
Ian
Outstanding!!!!! Your Hornet rocks! I love the Felix on the tail. While I tend to build my VF-31 (favorite Navy squadron) aircraft in 1/72, your build is soooo nice I am tempted to upgrade in size!
Have fun modeling
Mike
SaxonTheShiba
_VISITCOMMUNITY
United States
Joined: February 01, 2009
KitMaker: 1,233 posts
AeroScale: 663 posts
Posted: Wednesday, May 29, 2013 - 12:24 PM UTC
Hey Mike.....thanks for the kind words. I love VF-31/VFA-31 too.....they have always had great CAG/DCAG schemes. Their black radome F-14D is still my fave of all time, though. I am going to wrap this one up tonight and get her posted tomorrow or Friday.


Regards, Ian