

Chuck,
I've been using the same method of added end plates of sheet stock to fix all my short cut pieces that results from the use of a micro saw and a knife. Believe me I'm an expert at it.
I'm really impressed with your simple, yet very effective use of a cut in block of styrene to repair the wing fillet. And those Flaps really look fantastic with those exposed hinges when viewed from the bottom.
Joel
World War II
Discuss WWII and the era directly before and after the war from 1935-1949.
Discuss WWII and the era directly before and after the war from 1935-1949.
Hosted by Rowan Baylis
IAR 81C- the Icaerodesign 1/48 kit
Joel_W

Joined: December 04, 2010
KitMaker: 11,666 posts
AeroScale: 7,410 posts
Posted: Thursday, October 30, 2014 - 10:27 AM UTC


SpeedyJ

Joined: September 17, 2013
KitMaker: 1,617 posts
AeroScale: 212 posts
Posted: Thursday, October 30, 2014 - 01:27 PM UTC
Absolutely fabulous. Like story so far.
Those girls seem to have a major impact.
If you want some recipe for dishes with garlic just give me a call
As ever great stuff you show us Chuck.
Greetings from Thailand where have some nice garlic.
Those girls seem to have a major impact.
If you want some recipe for dishes with garlic just give me a call
As ever great stuff you show us Chuck.
Greetings from Thailand where have some nice garlic.

wampablo

Joined: January 20, 2012
KitMaker: 31 posts
AeroScale: 22 posts
Posted: Monday, November 03, 2014 - 11:58 AM UTC
chuk i have to take my hat off to you your work is fantastic. i love watching your builds come to life.
chukw1
Joined: November 28, 2007
KitMaker: 817 posts
AeroScale: 729 posts
Posted: Sunday, November 16, 2014 - 08:32 AM UTC
Thank you all very kindly!
Joel, if you look very carefully, you will see a pic showing where I did the same type of repair to a ding in the starboard wingtip- cheers! And about those flap hinges, well, just read on...
I, too, love my garlic, Jan- and Thai food is some of the best food on this lovely planet- cheers!
Paul- you are too knid, my friend!
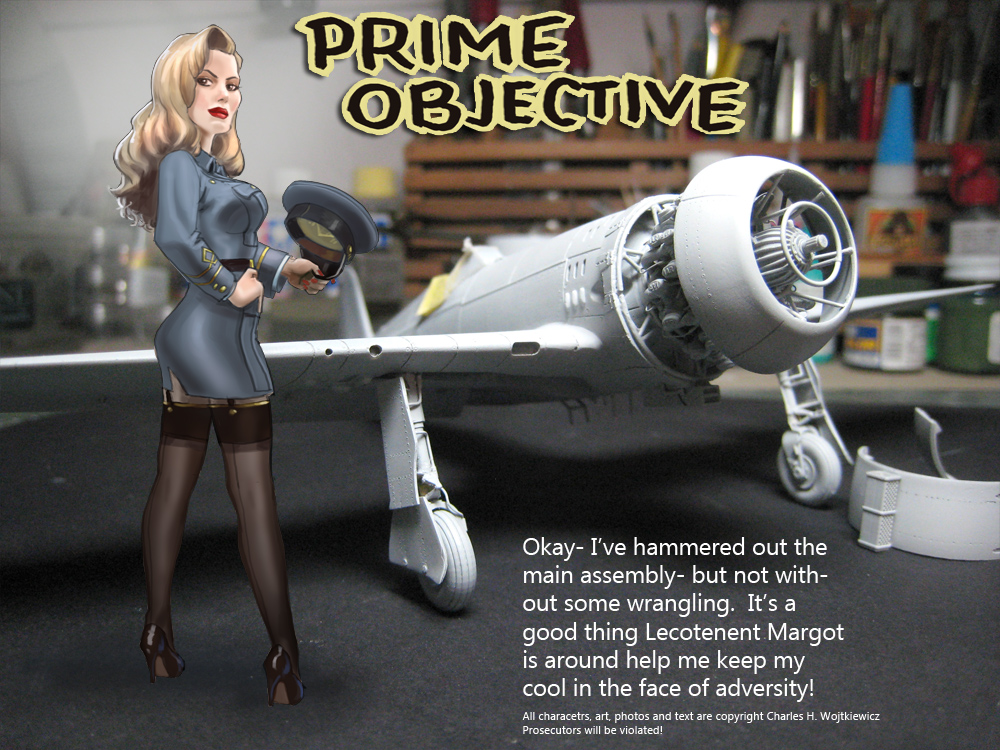
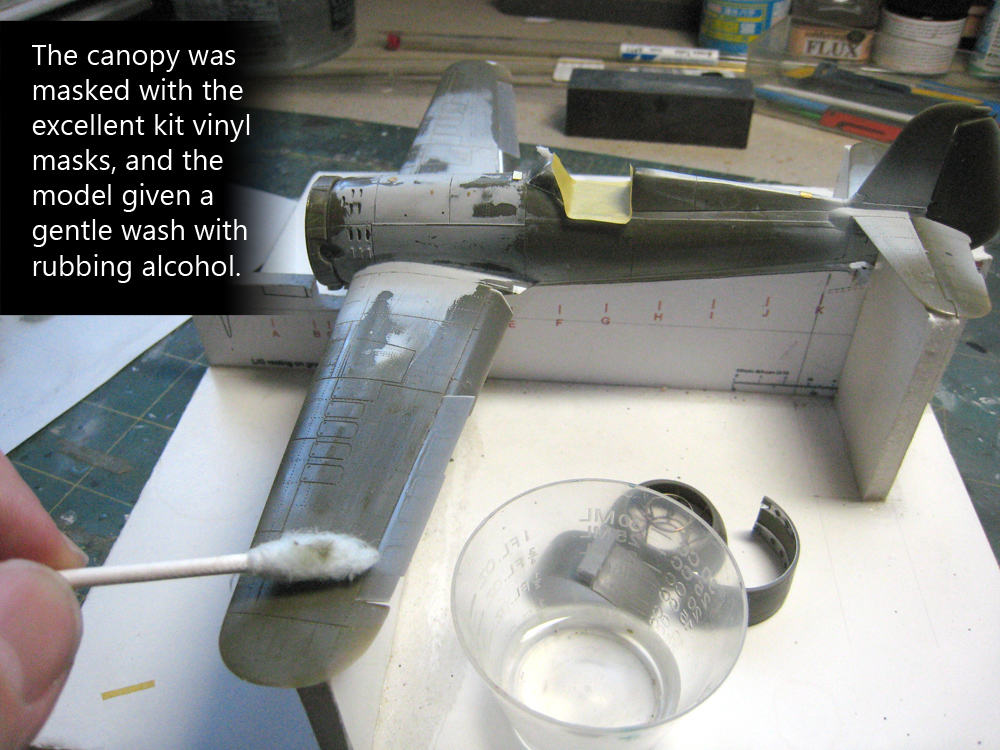
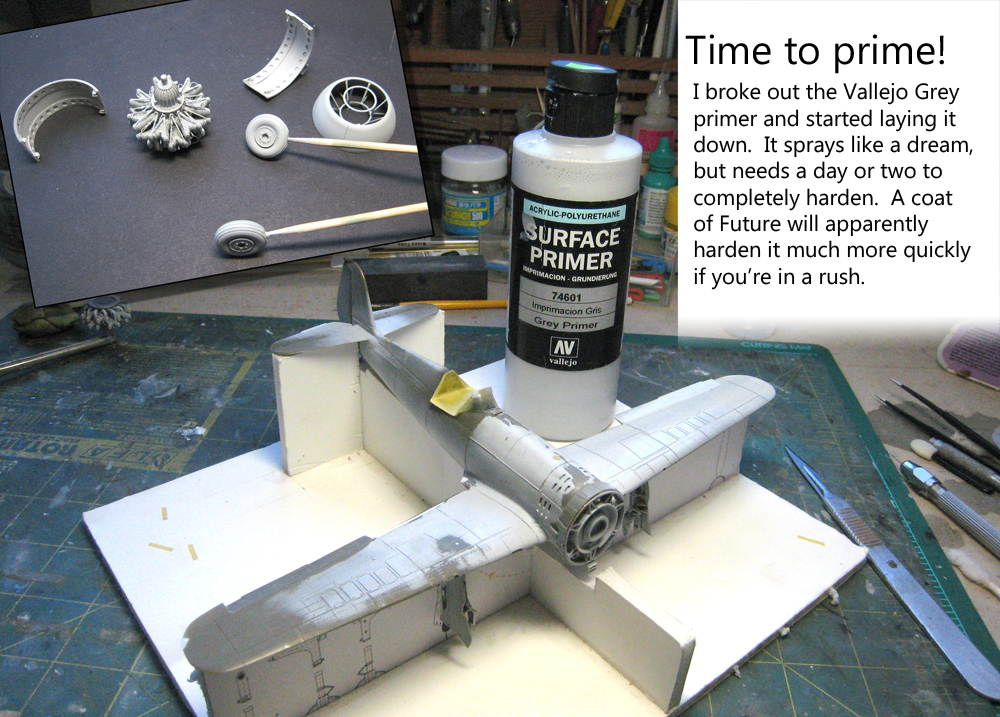
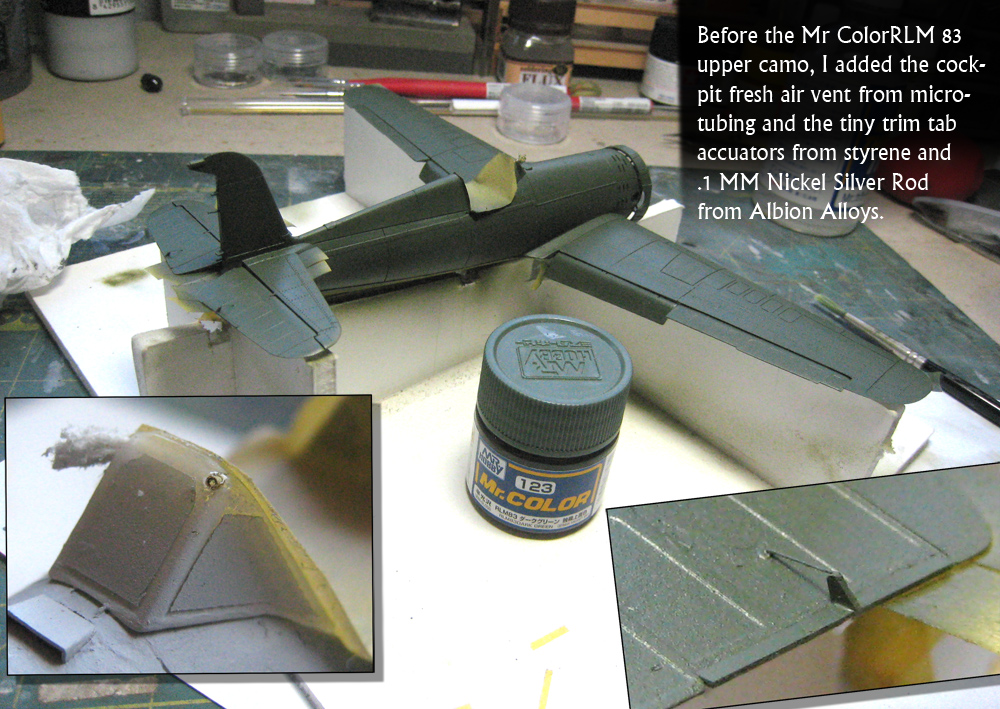
While unemployment sucks, it has given me more time for fussing with this tiny little fighter. I've gotten out my Big Hammer and nailed down some nasty loose ends- and shot some paint at last!
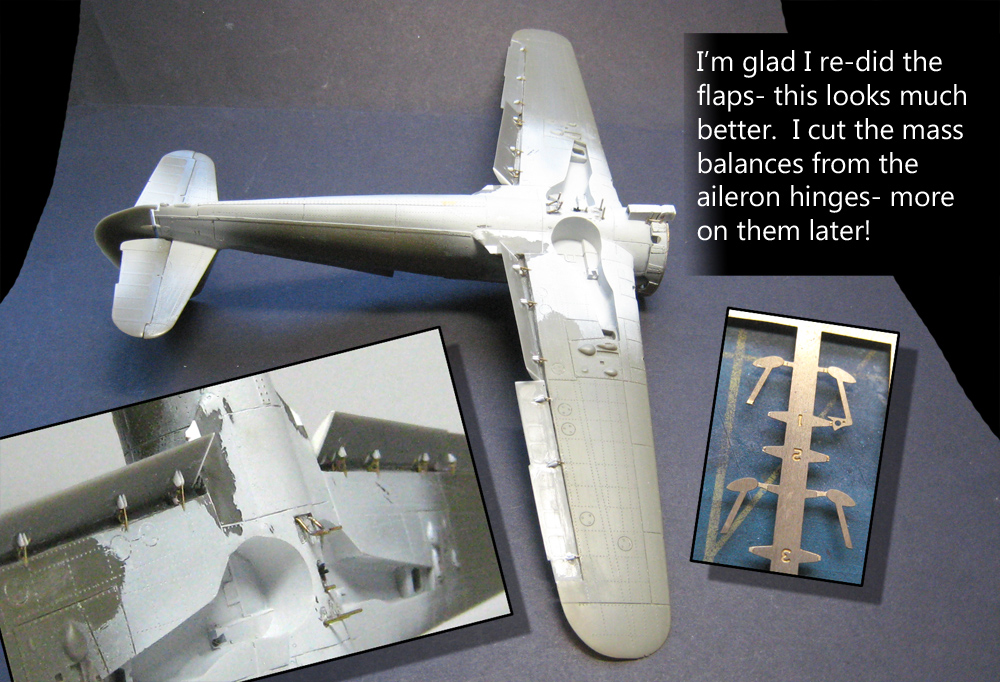

Joel, if you look very carefully, you will see a pic showing where I did the same type of repair to a ding in the starboard wingtip- cheers! And about those flap hinges, well, just read on...
I, too, love my garlic, Jan- and Thai food is some of the best food on this lovely planet- cheers!
Paul- you are too knid, my friend!
While unemployment sucks, it has given me more time for fussing with this tiny little fighter. I've gotten out my Big Hammer and nailed down some nasty loose ends- and shot some paint at last!


Mcleod

Joined: April 07, 2010
KitMaker: 1,028 posts
AeroScale: 939 posts
Posted: Sunday, November 16, 2014 - 10:03 AM UTC
I like clicking on your posts, Chuck. It's a great learning experience. Your efforts are top shelf. 

Redhand

#522
Joined: January 20, 2013
KitMaker: 1,460 posts
AeroScale: 1,443 posts
Posted: Sunday, November 16, 2014 - 11:36 PM UTC
Chuck:
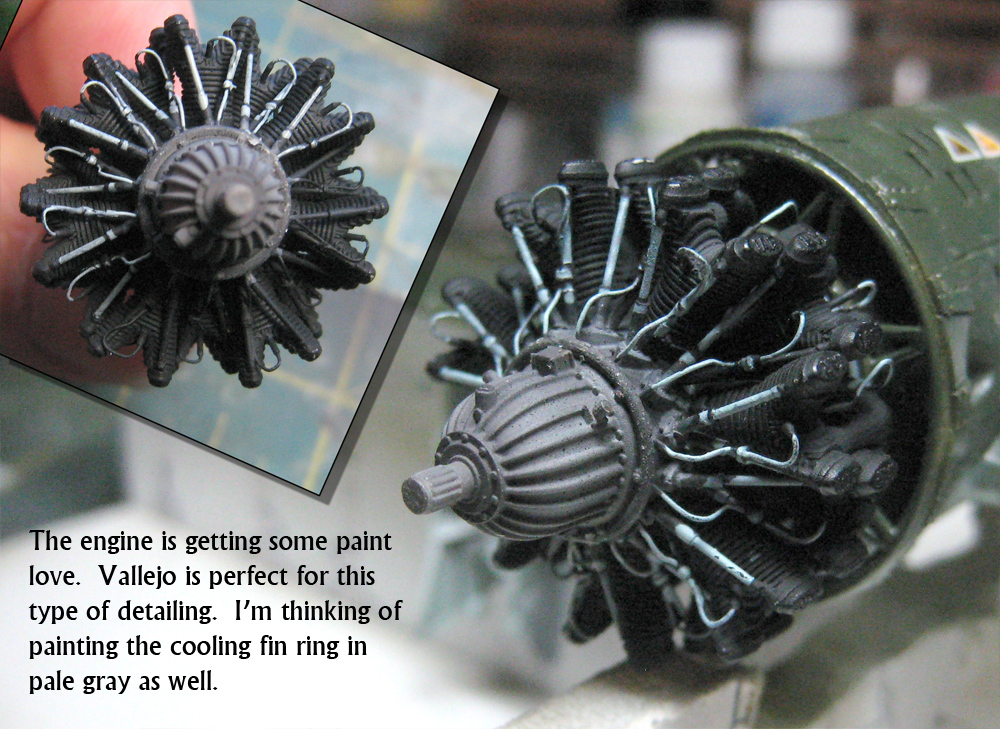
Prime the whole engine after it's assembled? Never seen that before. The mind boggles. Can't wait to see what your technique here is.
Prime the whole engine after it's assembled?
Never seen that before. The mind boggles. Can't wait to see what your technique here is.
Joel_W
Joined: December 04, 2010
KitMaker: 11,666 posts
AeroScale: 7,410 posts
Posted: Monday, November 17, 2014 - 01:11 AM UTC
Chuck,
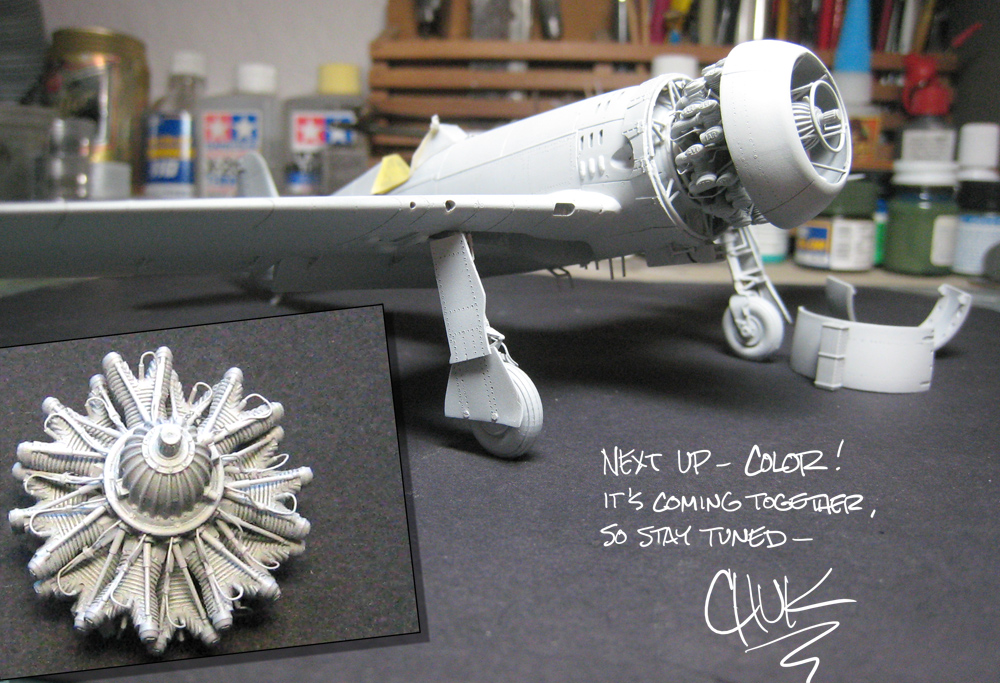
Those hinges are amazing,and they do look 100% better. Well done.
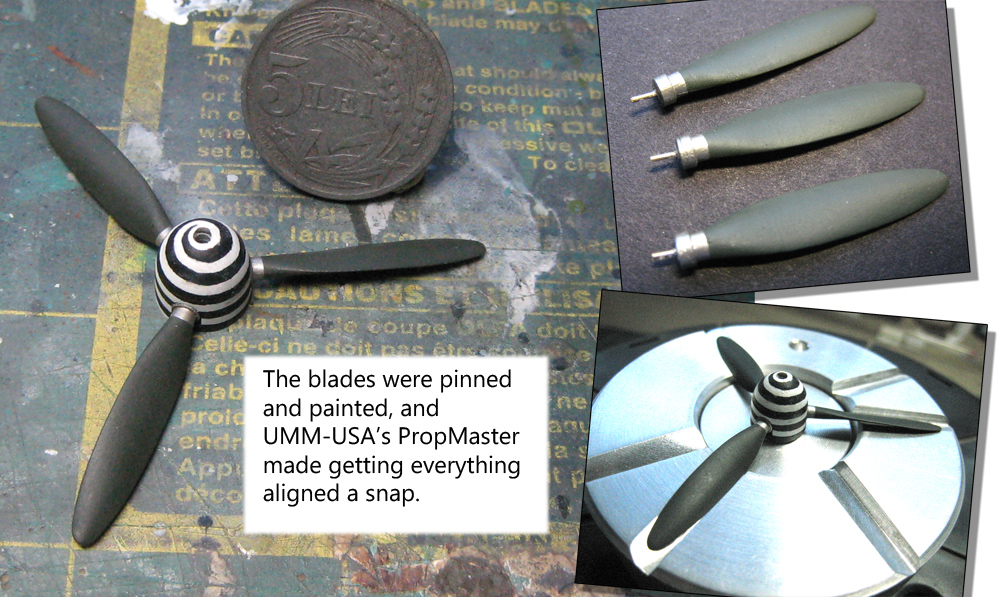
The prop really turned out quite well. I must confess that the P-38 has two props with separate blades. I haven't given it a 2nd thought yet on how I'm building them. Maybe I should. I'll be checking out the UMM-USA site for that alignment tool. Sure hope it isn't very expensive. Maybe I'll get lucky and the kit has something, but I'm not holding my breath. Just took a fast look. The blades all have a mounting pin that goes into a whole in the back spinner plate. Seems like it just might work.
Brian, I paint my detailed engines like Chuck does. Build and detail 1st, prime and paint afterwards. Never gave it a 2nd thought to do it the other way.
Chuck, my only concern is the spinner. For this incrediable build, not sure if good enough, is really good enough.
Joel
Those hinges are amazing,and they do look 100% better. Well done.
The prop really turned out quite well. I must confess that the P-38 has two props with separate blades. I haven't given it a 2nd thought yet on how I'm building them. Maybe I should. I'll be checking out the UMM-USA site for that alignment tool. Sure hope it isn't very expensive. Maybe I'll get lucky and the kit has something, but I'm not holding my breath. Just took a fast look. The blades all have a mounting pin that goes into a whole in the back spinner plate. Seems like it just might work.
Brian, I paint my detailed engines like Chuck does. Build and detail 1st, prime and paint afterwards. Never gave it a 2nd thought to do it the other way.
Chuck, my only concern is the spinner. For this incrediable build, not sure if good enough, is really good enough.
Joel
Redhand
#522
Joined: January 20, 2013
KitMaker: 1,460 posts
AeroScale: 1,443 posts
Posted: Monday, November 17, 2014 - 01:34 AM UTC
Quoted Text
Chuck,
Brian, I paint my detailed engines like Chuck does. Build and detail 1st, prime and paint afterwards. Never gave it a 2nd thought to do it the other way.
Chuck, my only concern is the spinner. For this incrediable build, not sure if good enough, is really good enough.
Joel
Joel:
Re the engines, that's remarkable. NEVER done it that way myself. Always painted piece parts separately, glued together and touched up with a brush then weathering. Will have to re-evaluate my approach.
Chuck:
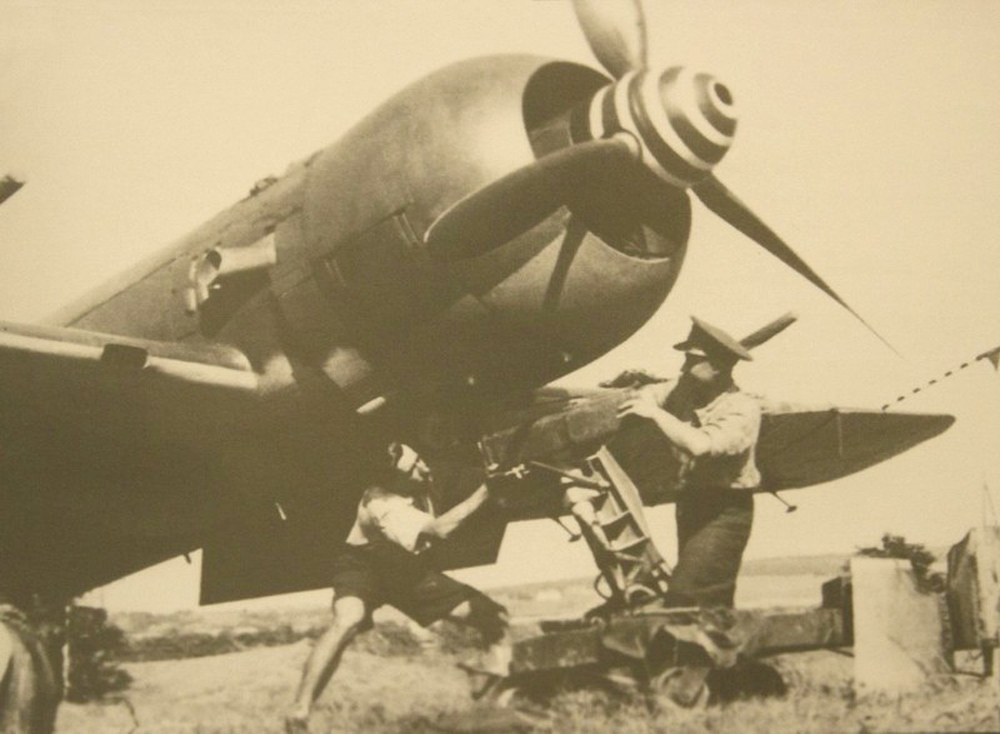
Can you show us a pic of the real aircraft you are modeling? I would be interested in seeing how crude the spiral is there. I am a little surprised that the kit does not come with a decal for this.
Joel_W
Joined: December 04, 2010
KitMaker: 11,666 posts
AeroScale: 7,410 posts
Posted: Monday, November 17, 2014 - 02:07 AM UTC
Brian,
Never thought that there would be decal for the spinner. Just can't see how it would actually settle down in the correct spiral. I have had enough issues with decals over compound curves. Like the Shark mouth on my F-4B.
Joel
Never thought that there would be decal for the spinner. Just can't see how it would actually settle down in the correct spiral. I have had enough issues with decals over compound curves. Like the Shark mouth on my F-4B.
Joel
Redhand
#522
Joined: January 20, 2013
KitMaker: 1,460 posts
AeroScale: 1,443 posts
Posted: Monday, November 17, 2014 - 07:12 AM UTC
Quoted Text
Brian,
Never thought that there would be decal for the spinner. Just can't see how it would actually settle down in the correct spiral. I have had enough issues with decals over compound curves. Like the Shark mouth on my F-4B.
Joel
While admittedly not as complex, I have seen decals for the spiral spinners on WWII German fighter kits. I know Trimaster did them way back when, and I think Hasegawa still does. This link at britmodeller has some interesting comments both on decals and painting. http://www.britmodeller.com/forums/index.php?/topic/62078-luftwaffe-spinner-spirals/
Joel_W
Joined: December 04, 2010
KitMaker: 11,666 posts
AeroScale: 7,410 posts
Posted: Monday, November 17, 2014 - 06:56 PM UTC
Quoted Text
Quoted TextBrian,
Never thought that there would be decal for the spinner. Just can't see how it would actually settle down in the correct spiral. I have had enough issues with decals over compound curves. Like the Shark mouth on my F-4B.
Joel
While admittedly not as complex, I have seen decals for the spiral spinners on WWII German fighter kits. I know Trimaster did them way back when, and I think Hasegawa still does. This link at britmodeller has some interesting comments both on decals and painting. http://www.britmodeller.com/forums/index.php?/topic/62078-luftwaffe-spinner-spirals/
Brian,
Thanks for that link. I read through it, and it seams that figuring out a curved spiral mask is the way to go. Honestly, I'm thrilled that I've never run into this situation with USA aircraft, as I already have more then enough issues with each build.
Joel
chukw1
Joined: November 28, 2007
KitMaker: 817 posts
AeroScale: 729 posts
Posted: Tuesday, November 18, 2014 - 10:26 PM UTC
Thanks, ben!
Brian, that's the way our armor-building brethren do it- and in this case I'm going to spray the engine black and then pick out the details. Might airbrush the crankcase.
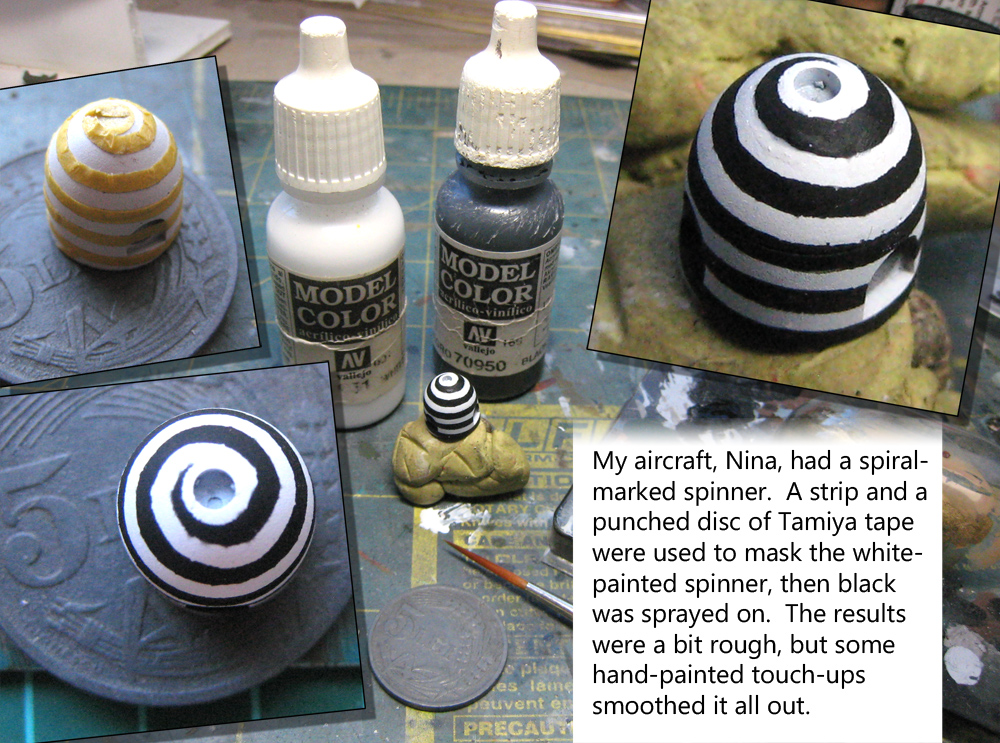
Joel- ouch! I hate you for being right! ! I may focus on a few other bits before going to color. You've made me search for more pics of "Nina." I was surprised to find several, and my paint job seems a bit crude- plus, the color is wrong. It should be white over schwartzgrun. The spiral in the new photos is somewhat uneven in the thick-and-thin nature of the lines, but the demarcation is fairly smooth. The spiral is in no way as perfect as some printed decals look! Needless to say, I'll have to fix the blotchy nature of my effort.
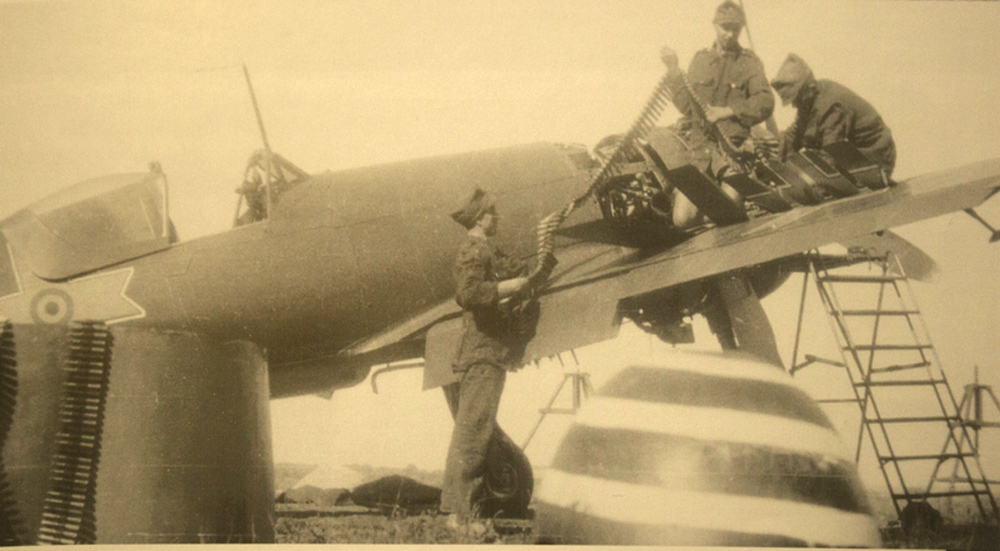
I've also been pondering the sway braces for the wing racks- I'm willing to bet Nina had 'em. I also believe the name was only painted on the port side, so that's easy. I have pics of wheel chocks, plus the use of a nice Luftwaffe-style ladder in use. I'll copy that from the Eduard etched release in their Bf110 sets but from brass wire- soldering time! There is also a light-colored area on the turtledeck behind the headrest. At least one Romanian modeler has painted this as underside blue. It would be covered by the canopy frame when all buttoned up. I got most of this info from a 1/72 build thread at Forum Machete.
All this new info has me puzzling, but I'll work it out- cheers!
Brian, that's the way our armor-building brethren do it- and in this case I'm going to spray the engine black and then pick out the details. Might airbrush the crankcase.
Joel- ouch! I hate you for being right!
! I may focus on a few other bits before going to color. You've made me search for more pics of "Nina." I was surprised to find several, and my paint job seems a bit crude- plus, the color is wrong. It should be white over schwartzgrun. The spiral in the new photos is somewhat uneven in the thick-and-thin nature of the lines, but the demarcation is fairly smooth. The spiral is in no way as perfect as some printed decals look! Needless to say, I'll have to fix the blotchy nature of my effort.I've also been pondering the sway braces for the wing racks- I'm willing to bet Nina had 'em. I also believe the name was only painted on the port side, so that's easy. I have pics of wheel chocks, plus the use of a nice Luftwaffe-style ladder in use. I'll copy that from the Eduard etched release in their Bf110 sets but from brass wire- soldering time! There is also a light-colored area on the turtledeck behind the headrest. At least one Romanian modeler has painted this as underside blue. It would be covered by the canopy frame when all buttoned up. I got most of this info from a 1/72 build thread at Forum Machete.
All this new info has me puzzling, but I'll work it out- cheers!
Joel_W
Joined: December 04, 2010
KitMaker: 11,666 posts
AeroScale: 7,410 posts
Posted: Tuesday, November 18, 2014 - 11:29 PM UTC
Chuck,
Glad that you saw my comment as positive, because it is. For the total effort that you've consistently maintained to reach this level of modeling craftsmanship, and your ability to solve the most complex problems, I have no doubt that coming up with a better way to paint the spiral on the spinner is just a thought away. Perhaps some of the WW11 German modelers can suggest how they do it. Those pictures are incrediable. Uneven spacing and lack of consistent thickness, but as you pointed out, the demarcation line is crisp and clean. As for taking what one 1/72 modeler has done, should be not based on scale, but his knowledge and references. This certainly isn't a subject that info just pops up everywhere. So far you've done a masterful job of sorting through the issues.
Joel
chukw1
Joined: November 28, 2007
KitMaker: 817 posts
AeroScale: 729 posts
Posted: Monday, December 01, 2014 - 01:05 AM UTC
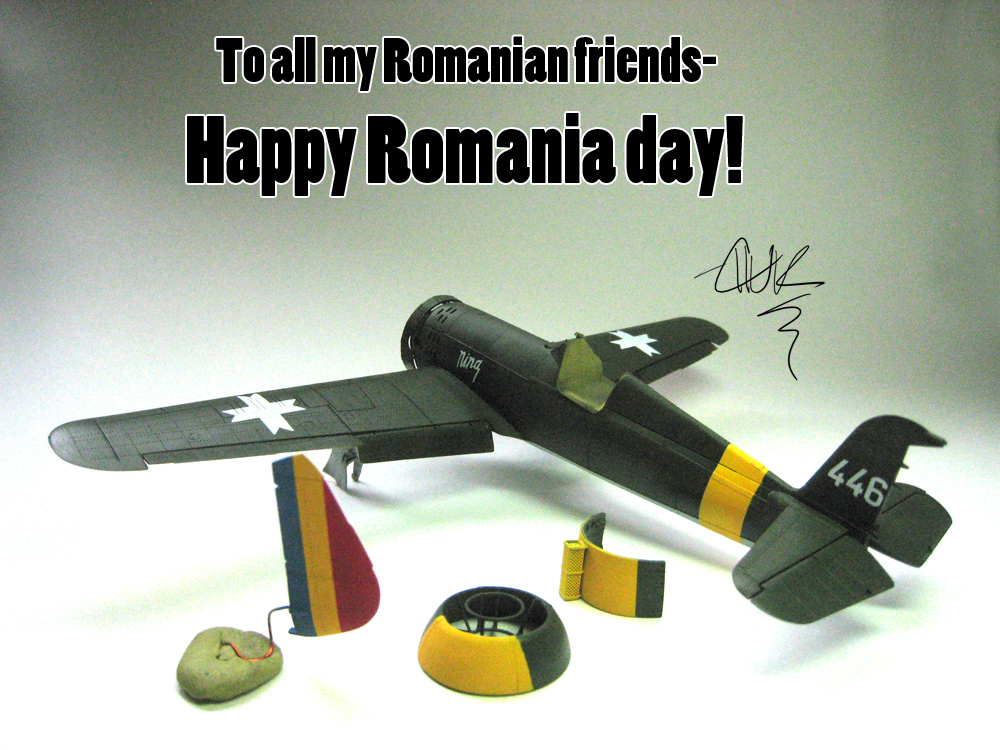
Just a teaser!

magnusf

Joined: May 02, 2006
KitMaker: 1,953 posts
AeroScale: 1,902 posts
Posted: Monday, December 01, 2014 - 01:15 AM UTC
I'm lurking in your thread Chuck!
One of the most stylish WWII fighters ever built and you're really working your magic on it!

Magnus
One of the most stylish WWII fighters ever built and you're really working your magic on it!
Magnus
Joel_W
Joined: December 04, 2010
KitMaker: 11,666 posts
AeroScale: 7,410 posts
Posted: Monday, December 01, 2014 - 01:51 AM UTC
Chuck,
I'm biting at the bit. Looks fantastic.
Joel
I'm biting at the bit. Looks fantastic.
Joel
Holdfast

#056

Joined: September 30, 2002
KitMaker: 8,581 posts
AeroScale: 4,913 posts

Posted: Monday, December 01, 2014 - 11:58 AM UTC
Thanks Chuck! Suitably teased  How long do we have to wait to see this in the works?
How long do we have to wait to see this in the works? 
jugjunkie

Joined: January 20, 2009
KitMaker: 140 posts
AeroScale: 84 posts
Posted: Monday, December 01, 2014 - 05:30 PM UTC
Hi Chuck, I love it when I come back to a site and find your threads that have been on the go for some months because it allows me to spend a relaxing, enthralling hour or two going through it without having to wait for the next update. As has been said already this is just another example of incredible modelling workmanship! I look forward to seeing the end result of all this magnificent effort mate.
chukw1
Joined: November 28, 2007
KitMaker: 817 posts
AeroScale: 729 posts
Posted: Tuesday, December 02, 2014 - 10:07 PM UTC
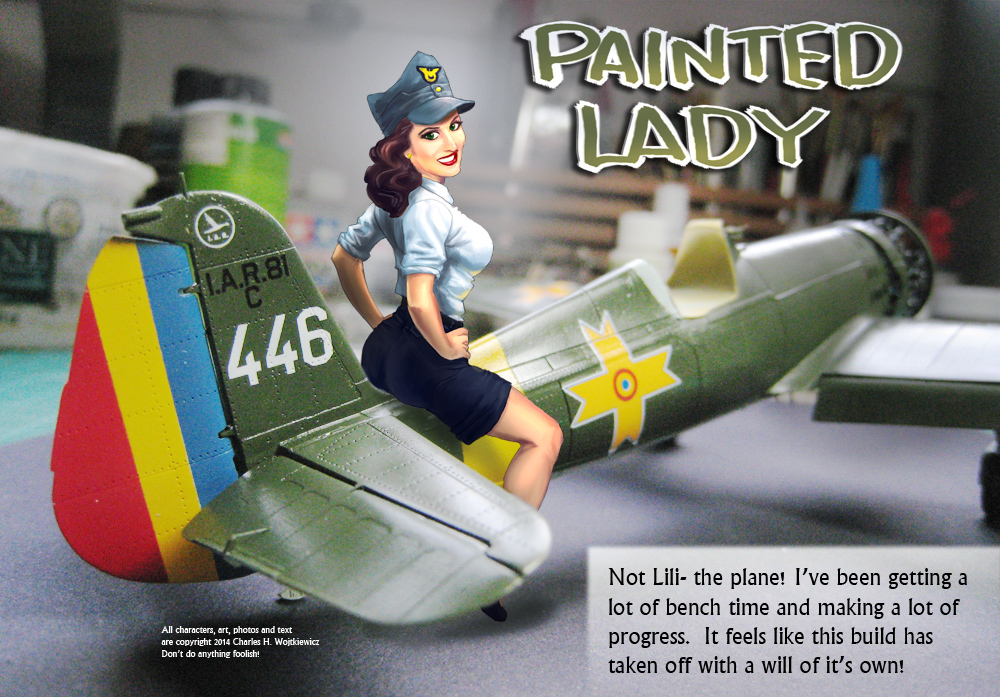
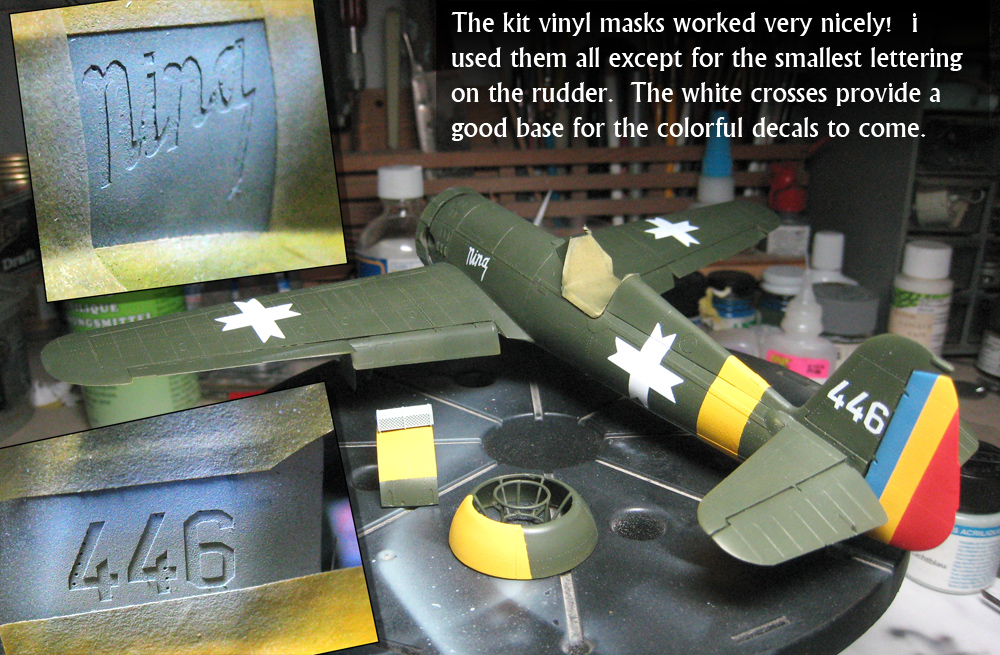
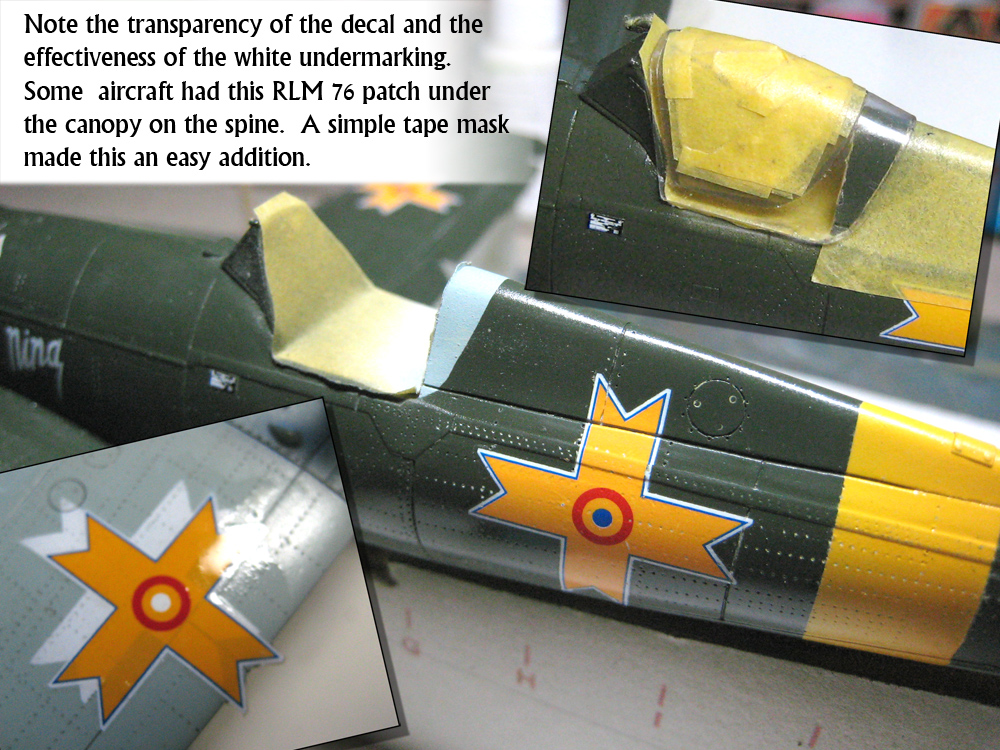
Thanks, guys! The markings you see are all painted with the kit-supplied vinyl masks. I did use Mal's carrier film to transfer them to the model- indispensable, that extra bit of film! The dust filter on the cowl bottom will be repainted in RLM 76. Sorry about the awful picture- we're having rain at last in Southern California. The last decent rain was a year ago! Mal, I'll do a full post soon- the only thing standing in the way is freelance work. Work- the curse of the modeling class! ;D

pimpdogbert
Joined: November 25, 2005
KitMaker: 131 posts
AeroScale: 5 posts

Posted: Wednesday, December 03, 2014 - 04:42 AM UTC
Amazing work I am always in awe by your skills! Hope everything is alright in your neck of the woods heard things are pretty hairy there. Best wishes for you and yours.
Cheers Alex
Cheers Alex
Holdfast
#056
Joined: September 30, 2002
KitMaker: 8,581 posts
AeroScale: 4,913 posts
Posted: Wednesday, December 03, 2014 - 12:31 PM UTC
Quoted Text
Thanks, guys! The markings you see are all painted with the kit-supplied vinyl masks. I did use Mal's carrier film to transfer them to the model- indispensable, that extra bit of film! The dust filter on the cowl bottom will be repainted in RLM 76. Sorry about the awful picture- we're having rain at last in Southern California. The last decent rain was a year ago! Mal, I'll do a full post soon- the only thing standing in the way is freelance work. Work- the curse of the modeling class! ;D
Its great to see a kit offering paint masks instead of decals
and I'm even more pleased that I was able to have an input, even though it was the tinniest bit  I'm really looking forward to your next post but I am aware that work, especially when your work is freelance but, yes, work is the curse of the modeling class!
 Joel_W
Joined: December 04, 2010
KitMaker: 11,666 posts
AeroScale: 7,410 posts
Posted: Wednesday, December 03, 2014 - 11:31 PM UTC
Quoted Text
Thanks, guys! The markings you see are all painted with the kit-supplied vinyl masks. I did use Mal's carrier film to transfer them to the model- indispensable, that extra bit of film! The dust filter on the cowl bottom will be repainted in RLM 76. Sorry about the awful picture- we're having rain at last in Southern California. The last decent rain was a year ago! Mal, I'll do a full post soon- the only thing standing in the way is freelance work. Work- the curse of the modeling class! ;D
Chuck,
Saw on the local news this morning that Northern California, namely San Fran is being flooded by one heavy rain storm after another. The pictures looked like a hurricane had just gone through. Hope you, your family, and your home is dry and out of Harms Way.
Joel
chukw1
Joined: November 28, 2007
KitMaker: 817 posts
AeroScale: 729 posts
Posted: Sunday, December 14, 2014 - 08:08 AM UTC
Thanks, gents! We've had some interesting weather to be sure, but we remain high and dry. Mal- it's very interesting hear you consulted on Icaerodesign's paint masks- they do work quite well!
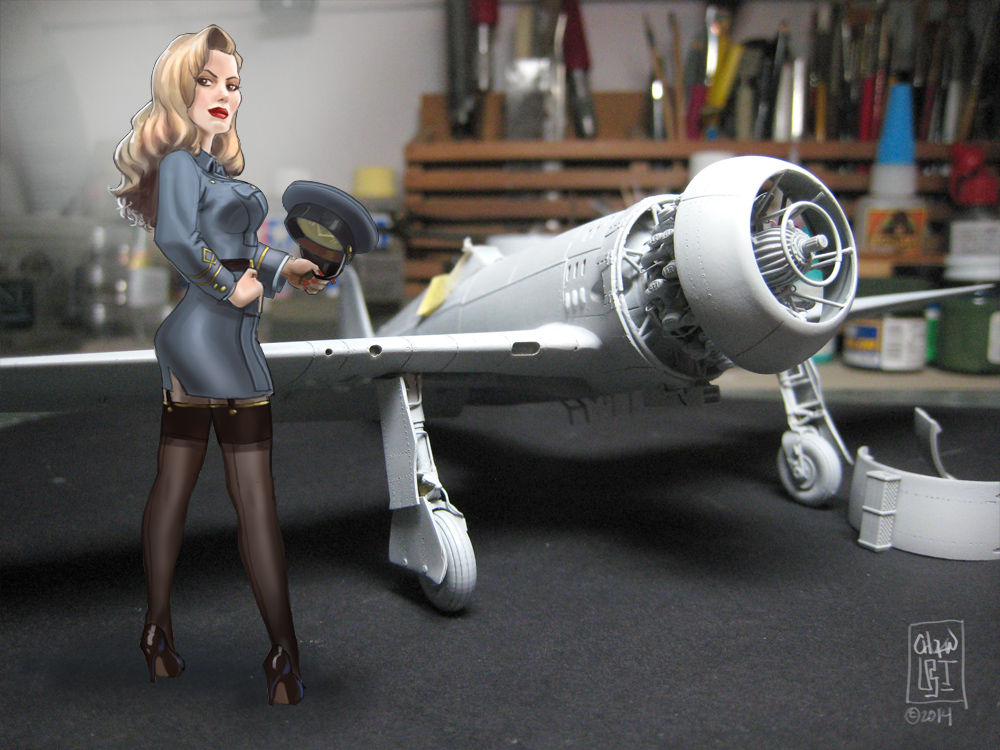
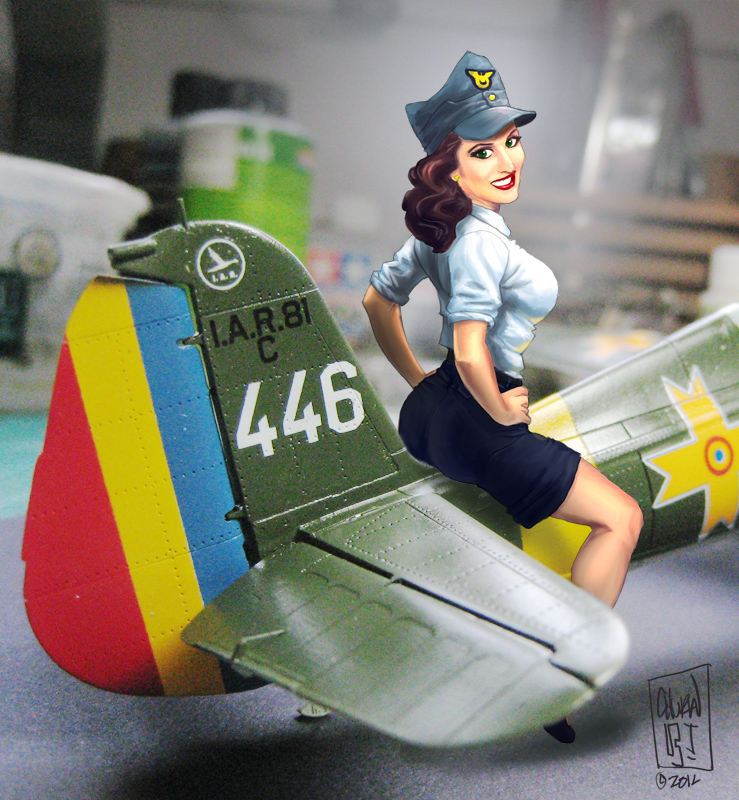
As a member of the Great Unemployed, I've had extra time to work on this project- carry on, Lili!

As a member of the Great Unemployed, I've had extra time to work on this project- carry on, Lili!
SpeedyJ
Joined: September 17, 2013
KitMaker: 1,617 posts
AeroScale: 212 posts
Posted: Sunday, December 14, 2014 - 10:57 AM UTC
Hi Chuck. The kit becomes a real bird. Very nice update!
Holdfast
#056
Joined: September 30, 2002
KitMaker: 8,581 posts
AeroScale: 4,913 posts
Posted: Sunday, December 14, 2014 - 01:01 PM UTC
Quoted Text
Mal- it's very interesting hear you consulted on Icaerodesign's paint masks- they do work quite well!
Errrr, no! Chuck, I was referring to this:
Quoted Text
I did use Mal's carrier film to transfer them to the model- indispensable, that extra bit of film!
When I said this:
Quoted Text
and I'm even more pleased that I was able to have an input, even though it was the tinniest bit
Those white painted bits do improve the decals and the painted rudder, and other bits, do look the dogs
The whole thing is looking really good; I just love the little extra details and Lili is just the icing on the cake  |

WEB HOSTING BY


Copyright ©2021 AeroScale and Kitmaker Network, a subsidiary of Silver Star Enterprises
All Rights Reserved. Please read our Conditions of Use and Privacy Policy.
All Rights Reserved. Please read our Conditions of Use and Privacy Policy.