

There's light at the end of that tunnel! you're so close!
This looks amazing.
World War II
Discuss WWII and the era directly before and after the war from 1935-1949.
Discuss WWII and the era directly before and after the war from 1935-1949.
Hosted by Rowan Baylis
IAR 81C- the Icaerodesign 1/48 kit

Scrodes

Joined: July 22, 2012
KitMaker: 771 posts
AeroScale: 763 posts
Posted: Sunday, December 14, 2014 - 04:57 PM UTC
Joel_W

Joined: December 04, 2010
KitMaker: 11,666 posts
AeroScale: 7,410 posts
Posted: Sunday, December 14, 2014 - 08:14 PM UTC
Chuck,
Just fantastic progress!!
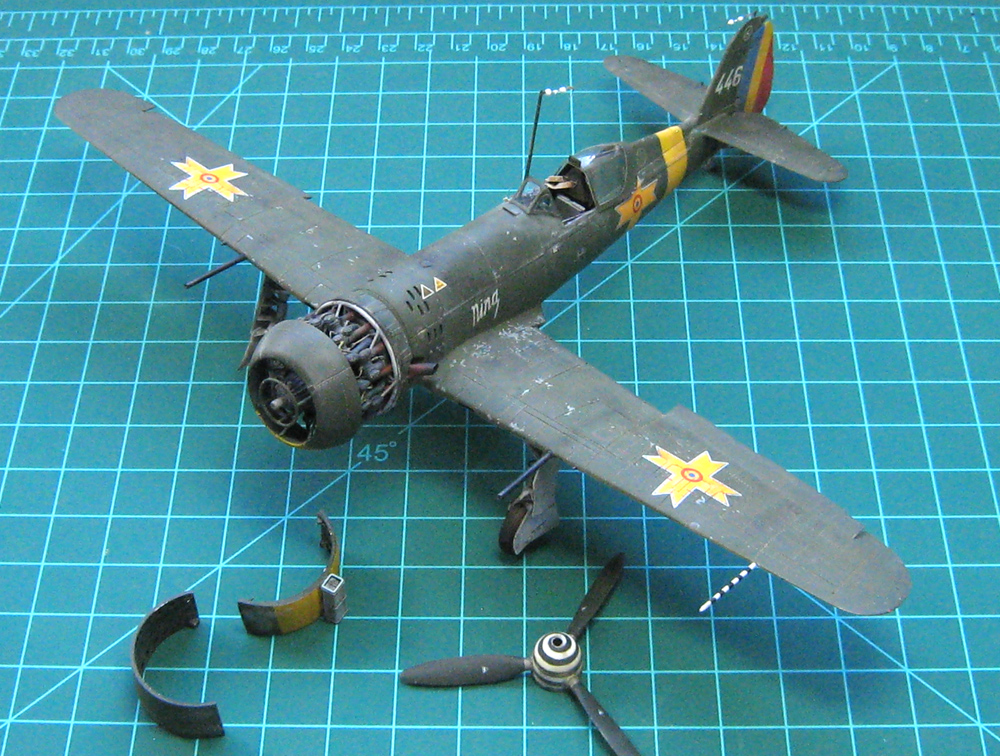
Paint is near on perfect, so is your masking for all the marking. Just simply outstanding. The engine detailing is getting better and better. I did notice the repaint on the spinner: you nailed it. WTG
Joel
Just fantastic progress!!
Paint is near on perfect, so is your masking for all the marking. Just simply outstanding. The engine detailing is getting better and better. I did notice the repaint on the spinner: you nailed it. WTG
Joel


Redhand

#522
Joined: January 20, 2013
KitMaker: 1,460 posts
AeroScale: 1,443 posts
Posted: Sunday, December 14, 2014 - 08:31 PM UTC
I agree with Joel on the spinner and the whole job. This is a true museum piece.

chukw1
Joined: November 28, 2007
KitMaker: 817 posts
AeroScale: 729 posts
Posted: Wednesday, December 17, 2014 - 09:23 PM UTC
Thanks, everyone!
Mal- oops, I misread your comment! My only argument with the Icaerodesign masks is that they not as thin as yours- it made the tiny black lettering on the rudder a bit too dicey for me to risk trying them. The decals were the "smart bet." Many thanks!
Thanks, Matt- I hope that light's not an onrushing train!
Joel, I'll post my home-brew spiral mask and the prodigious hand-brushing to make it presentable in the next installment. It was, indeed, worth a re-do. Cheers!
Brian, I much appreciate the kind words. You have me eying the bombers in my stash, you bad influence, you!
More to come- in time for Christmas!
Mal- oops, I misread your comment! My only argument with the Icaerodesign masks is that they not as thin as yours- it made the tiny black lettering on the rudder a bit too dicey for me to risk trying them. The decals were the "smart bet."
Many thanks! Thanks, Matt- I hope that light's not an onrushing train!
Joel, I'll post my home-brew spiral mask and the prodigious hand-brushing to make it presentable in the next installment. It was, indeed, worth a re-do. Cheers!
Brian, I much appreciate the kind words. You have me eying the bombers in my stash, you bad influence, you!
More to come- in time for Christmas!


DougN1
Joined: August 08, 2011
KitMaker: 410 posts
AeroScale: 409 posts

Posted: Wednesday, December 17, 2014 - 11:55 PM UTC
Looking good Chuk! I really need to update my build and get it wrapped up as well 
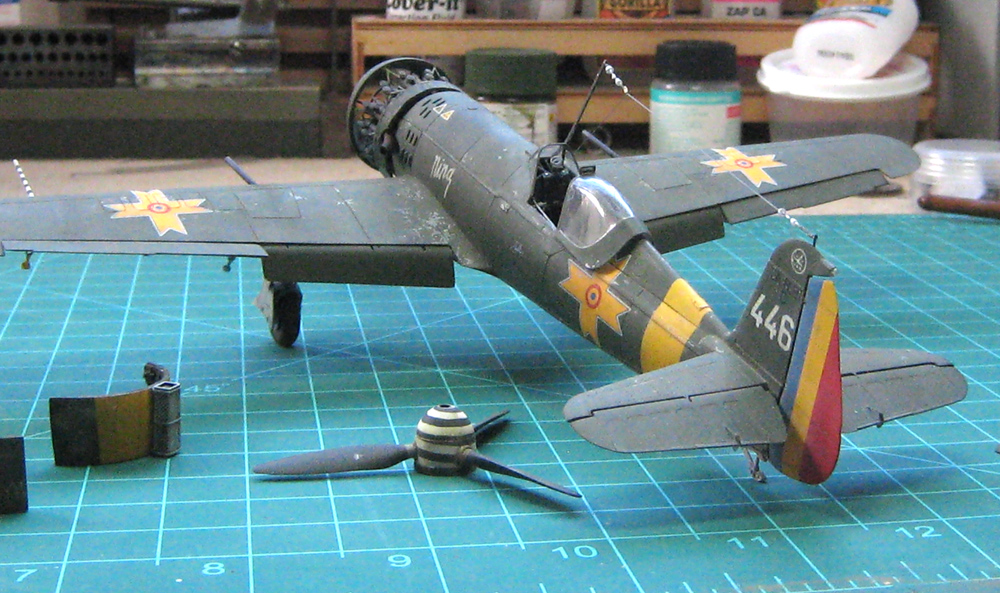
One note - on the RLM76 Light Blue colored area on the spine. I know a couple modelers on the Romanian forum painted that area 76, but looking at the below photo (and also the photo you posted of "Nina" being rearmed) you can see that the area on the spine is a darker color than the 76 on the internal canopy framing and cockpit sill area. In his new, second book on the IAR 80/81, Radu speculates it may have been a grey primer. I would also speculate it may have been 34079 green used earlier on some airframes before repainting in RLM83.

Looking forward to the next installment!
Doug
chukw1
Joined: November 28, 2007
KitMaker: 817 posts
AeroScale: 729 posts
Posted: Thursday, December 18, 2014 - 12:03 AM UTC
Thanks, Greg! At the moment I can't spring for Radu's new book  , but I think I will change the color- it's too light. Now to decide- green or gray?
, but I think I will change the color- it's too light. Now to decide- green or gray? Holdfast

#056

Joined: September 30, 2002
KitMaker: 8,581 posts
AeroScale: 4,913 posts

Posted: Thursday, December 18, 2014 - 12:00 PM UTC
Quoted Text
Mal- oops, I misread your comment! My only argument with the Icaerodesign masks is that they not as thin as yours- it made the tiny black lettering on the rudder a bit too dicey for me to risk trying them. The decals were the "smart bet." Many thanks!
I will be starting the Azur Frrom 1/32 I.A.R-81C in the new year and will be cutting masks for the insignia. Watching your build has brought it to the front, well almost, of the do now pile and I am really looking forward to making a start
Your build is quality and inspirational, but we don't expect anything less 
DougN1
Joined: August 08, 2011
KitMaker: 410 posts
AeroScale: 409 posts
Posted: Friday, December 19, 2014 - 09:20 AM UTC
Glad I was able to post the info before it was too late Chuck
If you go with the primer grey, Radu describes it as a "relatively dark bluish-grey". This primer color was found on surviving pieces of airframe, such as the interior of the cowling (under the RLM83 paint) and on the tailplane where the tailfin would have been mounted (which would have been covered when the airframe was painted in its camo color).
Doug
chukw1
Joined: November 28, 2007
KitMaker: 817 posts
AeroScale: 729 posts
Posted: Friday, December 19, 2014 - 10:26 PM UTC
Doug, I've gone with a lighter tone of green, and I think I'll keep that. Again, thanks for the heads-up!
chukw1
Joined: November 28, 2007
KitMaker: 817 posts
AeroScale: 729 posts
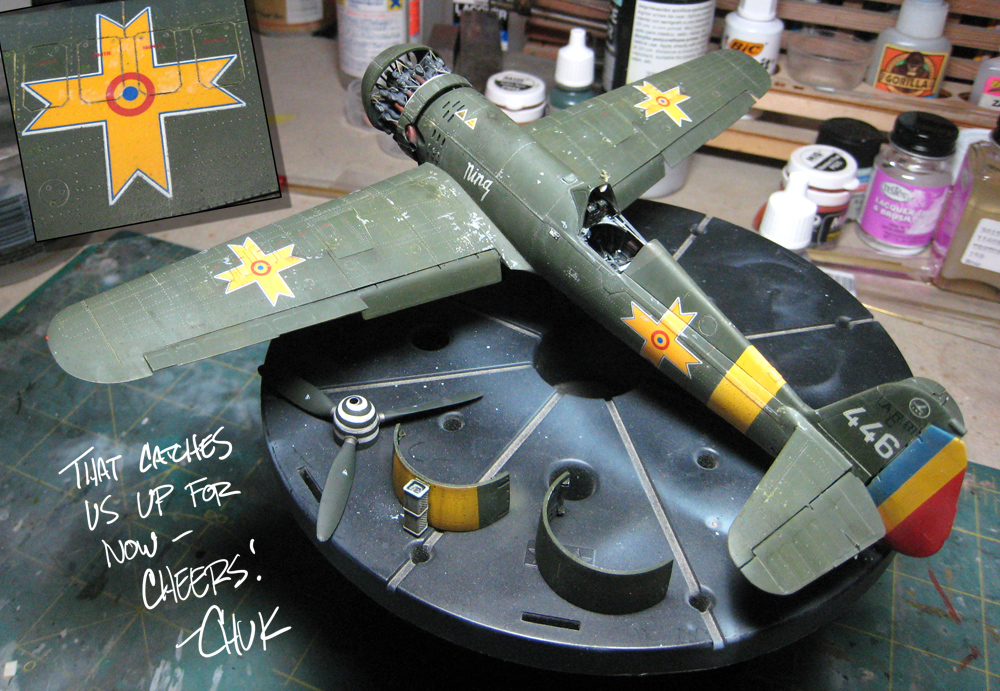
Posted: Monday, January 05, 2015 - 10:48 PM UTC
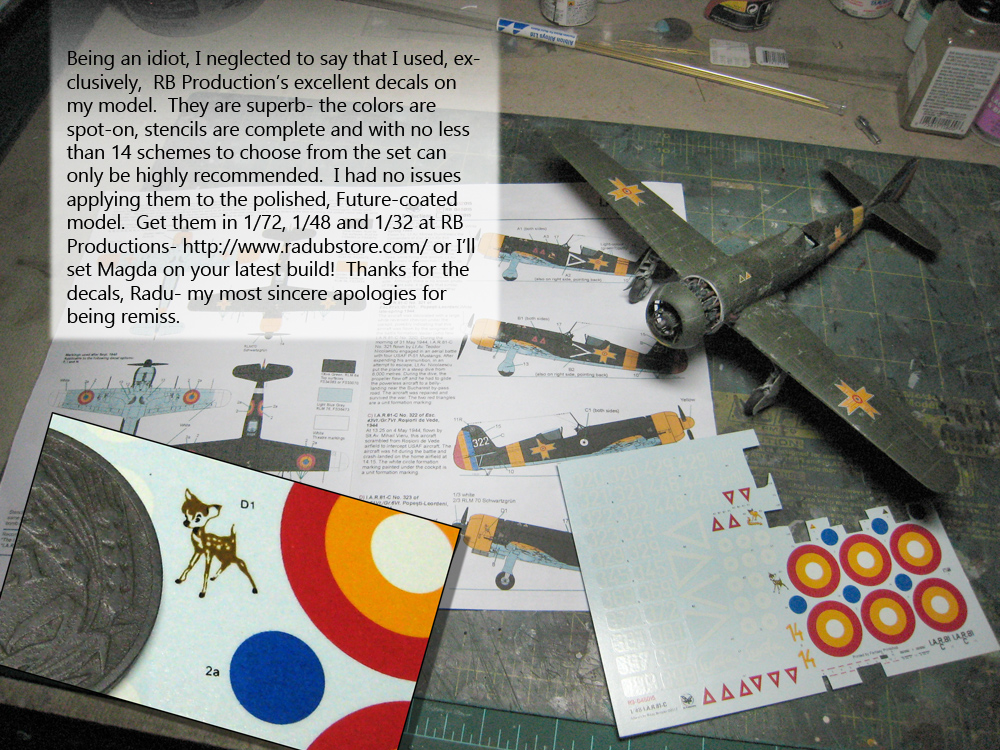
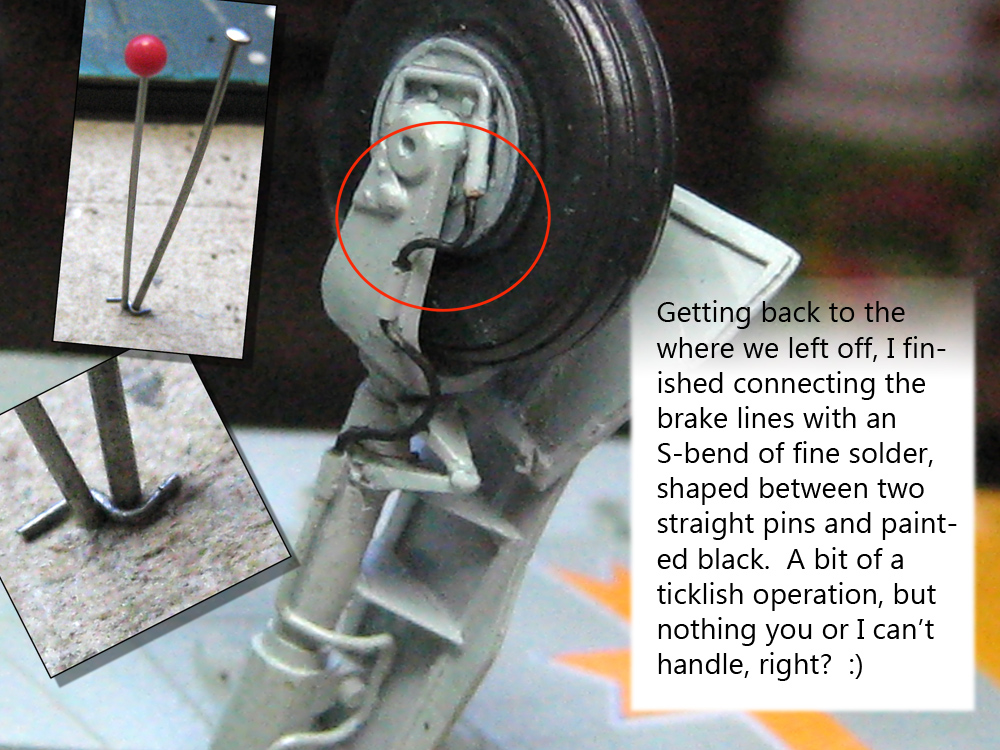
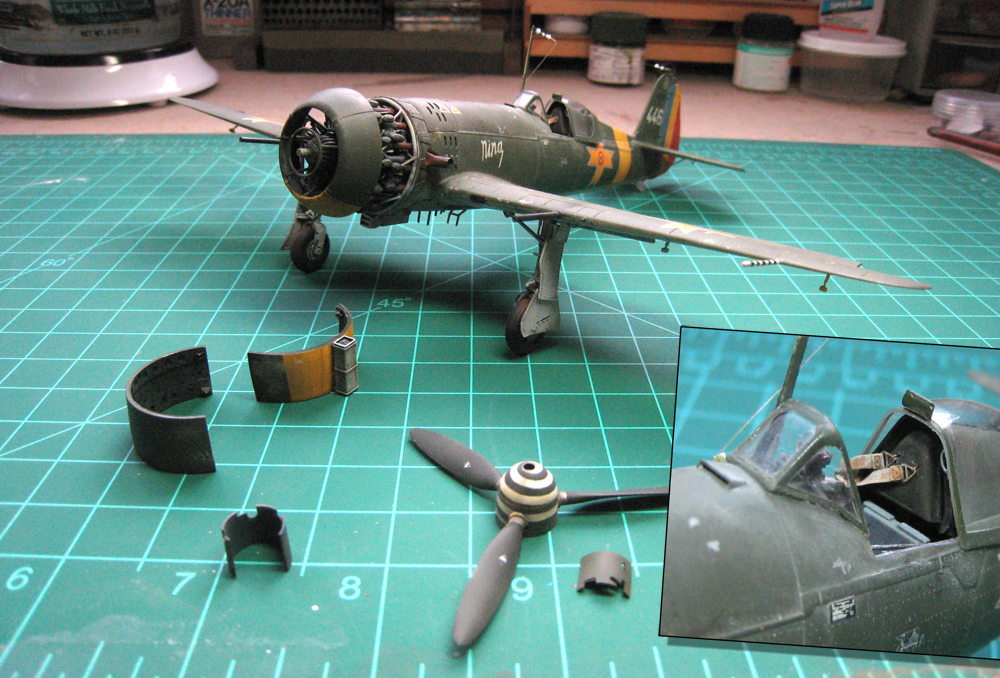
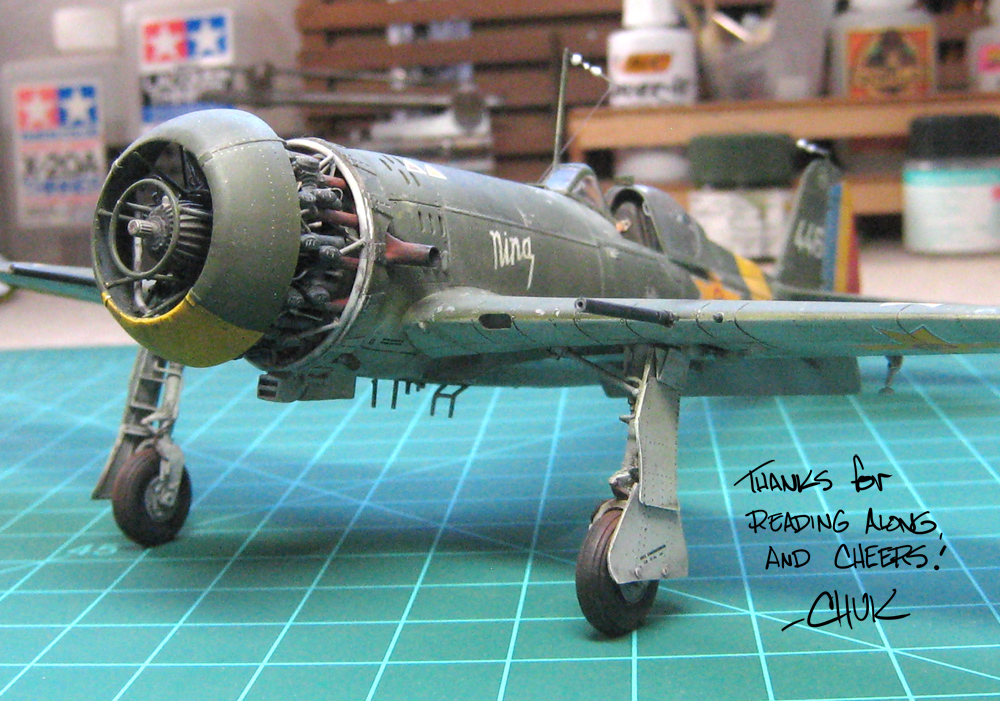
Well, I've had a lot of bench time, and Had some serious back and forth with this build! One thing I did realize was that I left poor Radu Brinzan out in the cold after he was nice enough to send me a set of his IAR 81C decals. What a dope I am! I did use them instead of the kit decals (which do look very nice, BTW) They were a treat to apply- judge for yourself.
I won't go into the issues with dullcoat blushing and bad material interactions, but it's all coming out in th wash. I had so many pics in my camera that i'm breaking it into two installments- here's Doging Bullets, Part 1-
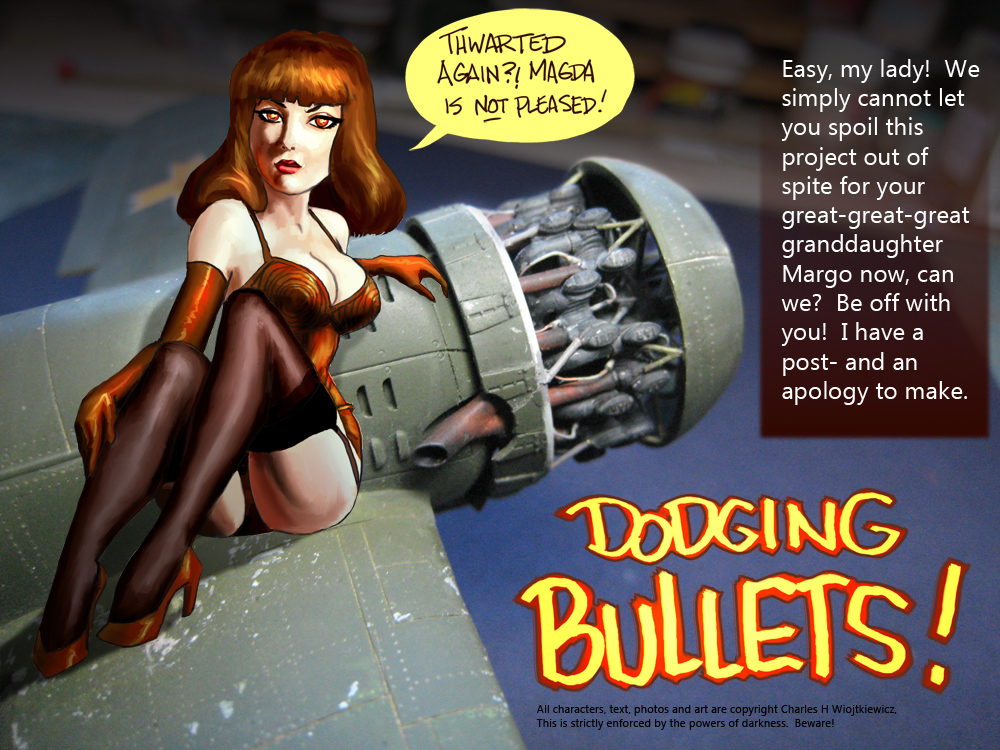

I won't go into the issues with dullcoat blushing and bad material interactions, but it's all coming out in th wash. I had so many pics in my camera that i'm breaking it into two installments- here's Doging Bullets, Part 1-
Redhand
#522
Joined: January 20, 2013
KitMaker: 1,460 posts
AeroScale: 1,443 posts
Posted: Tuesday, January 06, 2015 - 05:22 AM UTC
Looks fantastic. Ur an artist, man!
Joel_W
Joined: December 04, 2010
KitMaker: 11,666 posts
AeroScale: 7,410 posts
Posted: Wednesday, January 07, 2015 - 02:51 AM UTC
chuck,
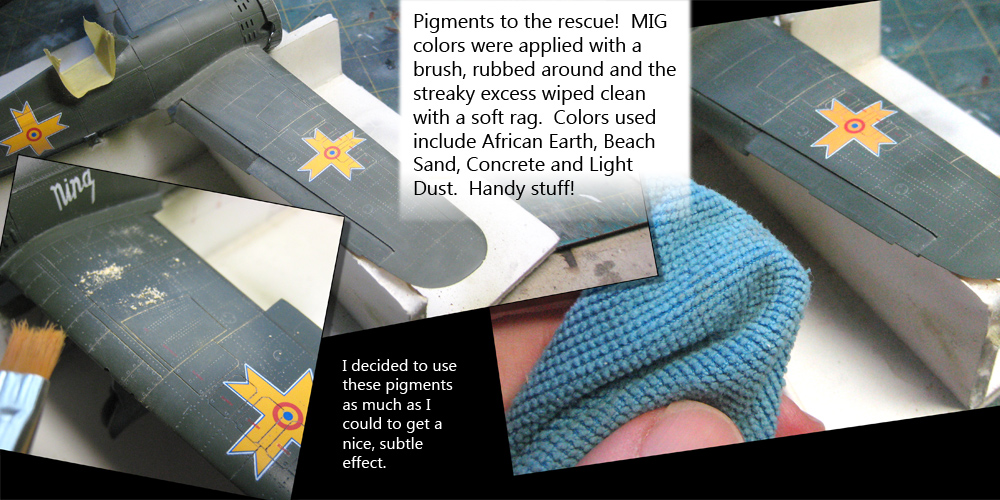
your weathering is just incredibly realistic, yet has that look of a well maintained operational aircraft with that "used but not abused" look to it. Your use of MIG Pigments really opened my eyes to just how effective yet not over powering that technique can be. Will be getting some for my next WW11 prop build. As for the decaling, I keep on looking at then, and they look just like they were painted on with masks. No flash, and the seat down into every nook and cranny. Decaling the way decaling should be done.
Well done my friend.
Joel
SGTJKJ
#041

Joined: July 20, 2006
KitMaker: 10,069 posts
AeroScale: 3,788 posts

Posted: Wednesday, January 07, 2015 - 06:05 PM UTC
Absolutely fantastic build. Simply fantastic!

raypalmer
Joined: March 29, 2010
KitMaker: 1,151 posts
AeroScale: 985 posts

Posted: Friday, January 09, 2015 - 06:29 AM UTC
Hey Chuck, in a different one of your builds you used micro fibre sheets and qtip type things got polishing. Where did you get those??

magnusf

Joined: May 02, 2006
KitMaker: 1,953 posts
AeroScale: 1,902 posts
Posted: Friday, January 09, 2015 - 01:20 PM UTC
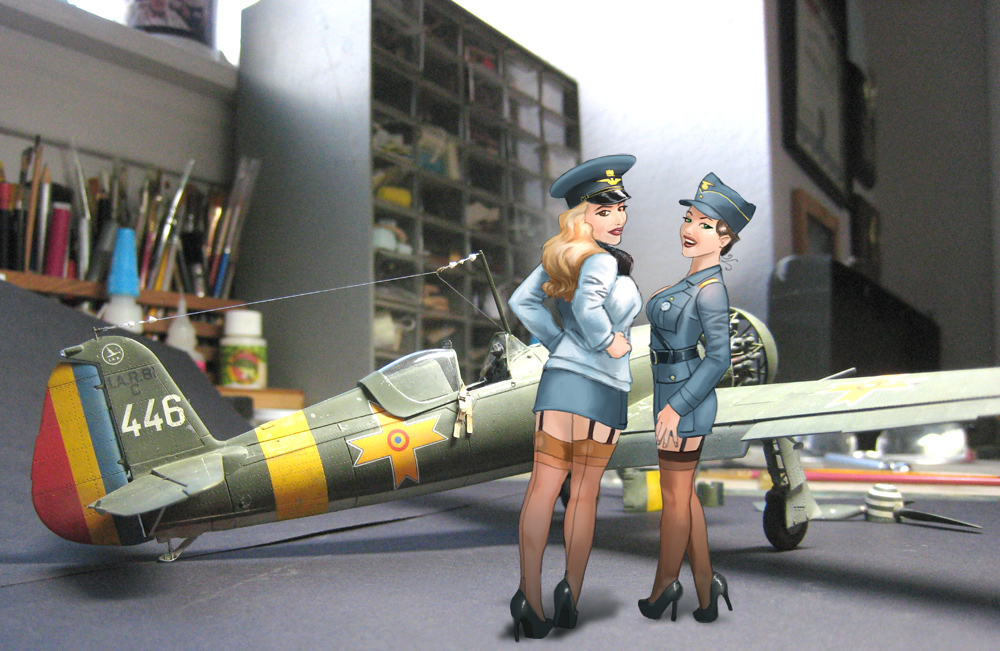
Chuck! This is obscene (and I am certainly NOT talking about Magda here )!

Magnus
)! Magnus
Redhand
#522
Joined: January 20, 2013
KitMaker: 1,460 posts
AeroScale: 1,443 posts
Posted: Friday, January 09, 2015 - 04:18 PM UTC
Quoted Text
Chuck! This is obscene (and I am certainly NOT talking about Magda here
Magnus
No kidding. Just lookit the color of the engine exhausts on that baby!
chukw1
Joined: November 28, 2007
KitMaker: 817 posts
AeroScale: 729 posts
Posted: Wednesday, January 14, 2015 - 12:12 AM UTC
Thanks, my friends! After this post I'll be down to the Fiddely Bits. The end is in sight!
Richard- I love my Micro-Mesh sanding cloths, pads and swabs. Look them up- they sold in plenty of places, you can choose your poison.
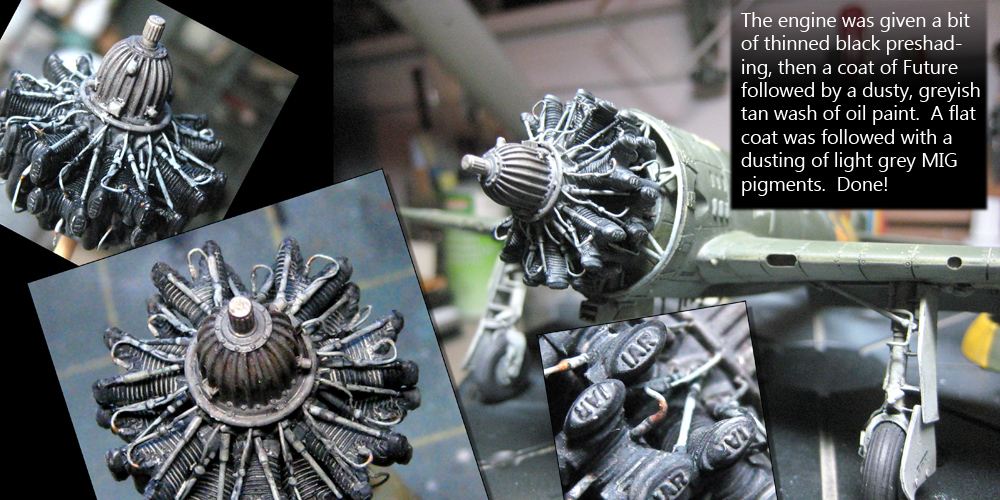
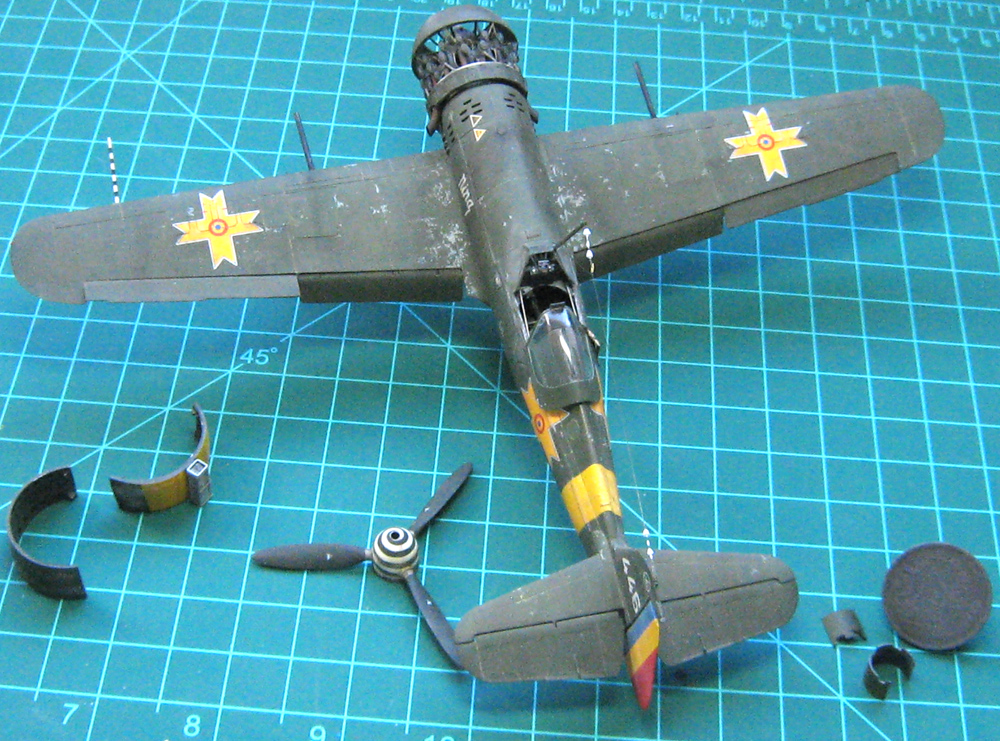
Here's Dodging Bullets Part 2- Marina is just tuckered out from all the engine work she's put in. Read on, Bold Modeler!


Richard- I love my Micro-Mesh sanding cloths, pads and swabs. Look them up- they sold in plenty of places, you can choose your poison.
Here's Dodging Bullets Part 2- Marina is just tuckered out from all the engine work she's put in. Read on, Bold Modeler!
Holdfast
#056
Joined: September 30, 2002
KitMaker: 8,581 posts
AeroScale: 4,913 posts
Posted: Wednesday, January 14, 2015 - 12:00 PM UTC
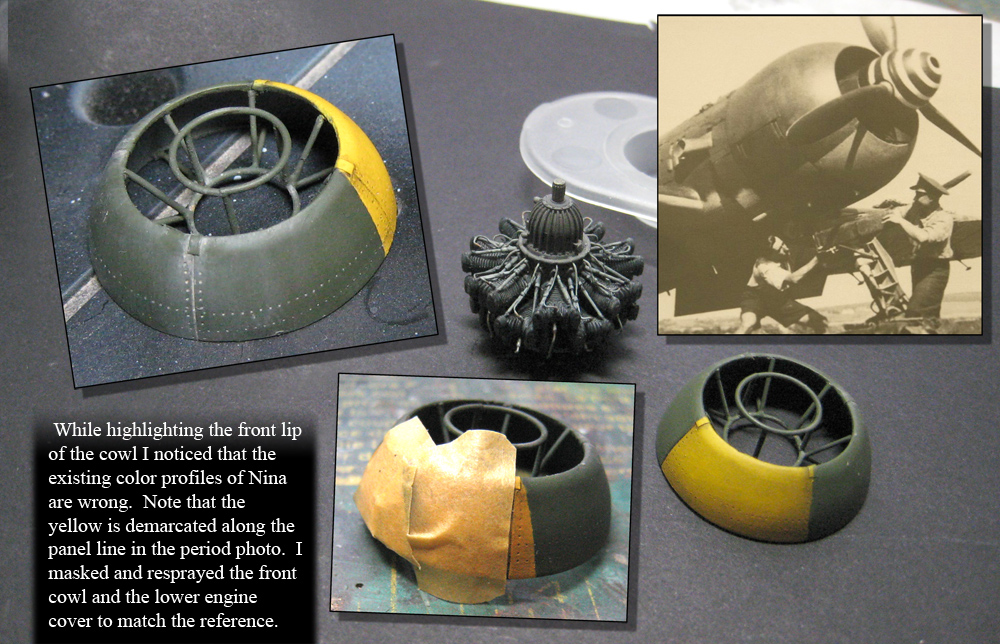
Simply stunning work Chuck The fact the you re-did the cowling from just shouts class. I like the painting it gives the model a very realistic look and the catch of the yellow on the cowling is another great sign of dedication.
I bet that I am not the only one that is very much looking forward to see what you tackle next?
The fact the you re-did the cowling from just shouts class. I like the painting it gives the model a very realistic look and the catch of the yellow on the cowling is another great sign of dedication.I bet that I am not the only one that is very much looking forward to see what you tackle next?
Redhand
#522
Joined: January 20, 2013
KitMaker: 1,460 posts
AeroScale: 1,443 posts
Posted: Wednesday, January 14, 2015 - 06:31 PM UTC
There is so much to learn from your exterior weathering techniques (among other things!) that it's hard to "take it all in." Much food for thought for later in my B-17 build. Stunning work; love the engine piping and detail.
magnusf
Joined: May 02, 2006
KitMaker: 1,953 posts
AeroScale: 1,902 posts
Posted: Wednesday, January 14, 2015 - 06:46 PM UTC
I'll second that: looking forward to next build, looking back on the old ones every now and then and extremely impressed by how you handled the offending engine framework.
Things like that framework would probably have left me crying and the model in the bin...
Magnus
Things like that framework would probably have left me crying and the model in the bin...
Magnus
Joel_W
Joined: December 04, 2010
KitMaker: 11,666 posts
AeroScale: 7,410 posts
Posted: Thursday, January 15, 2015 - 12:38 AM UTC
Chuck,
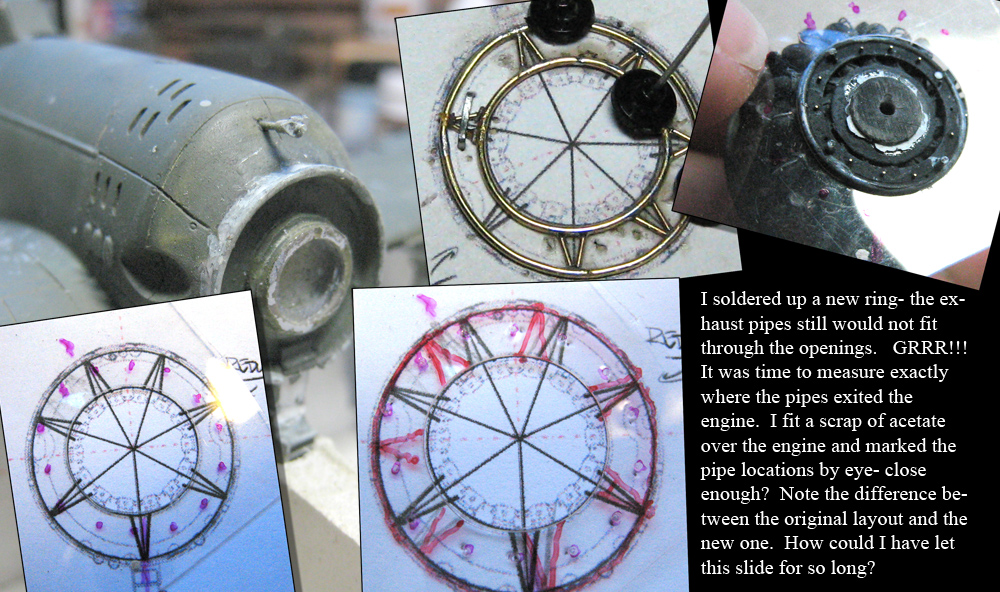
Certainly one needed step back then two steps forward to redo the engine mount. I've got to give you credit for doing it a 3nd time. From the overlay, one can easily see where the issues for the exhausts were. The end results speak for themselves. Same for the needed repaint on the engine cowling and cover.
As for your exhaust headers, they look better then the real deal.
Your weathering is at the same incrediable level as the rest of your truly outstanding build.
Joel
chukw1
Joined: November 28, 2007
KitMaker: 817 posts
AeroScale: 729 posts
Posted: Sunday, January 18, 2015 - 12:36 AM UTC
Many thanks, my friends! This has been a challenging build- but mostly due to my own "improvements!"
Mal, I was lucky enough to find those two pics of Nina I've posted- I'll wager they came out of Radu's latest book. He's likely fixed his profiles as well- he's the expert, after all. Next? I'll rescue my old Well Provisioned dio from the Shelf of Doom. No child left behind, as they say in halls of Congress...
Thanks, Brian- you're B-17 is an epic project and great fun to follow along with. You'll be surprised at how easy pigments are to work with- and should really liven up a canvas such as yours. Cheers1
Thank you, Magnus- I am cheating, after all- working in 1/48, that giant scale! ;D
Again my thanks to you, Joel! That ring- oy! It was him or me- and the outcome was shaky for a bit!
Ladies and gents, I am on the final lap, crossing items off the ever shortening list. One more update- stay tuned!
Mal, I was lucky enough to find those two pics of Nina I've posted- I'll wager they came out of Radu's latest book. He's likely fixed his profiles as well- he's the expert, after all.
Next? I'll rescue my old Well Provisioned dio from the Shelf of Doom. No child left behind, as they say in halls of Congress...Thanks, Brian- you're B-17 is an epic project and great fun to follow along with. You'll be surprised at how easy pigments are to work with- and should really liven up a canvas such as yours. Cheers1
Thank you, Magnus- I am cheating, after all- working in 1/48, that giant scale! ;D
Again my thanks to you, Joel! That ring- oy! It was him or me- and the outcome was shaky for a bit!
Ladies and gents, I am on the final lap, crossing items off the ever shortening list. One more update- stay tuned!
Joel_W
Joined: December 04, 2010
KitMaker: 11,666 posts
AeroScale: 7,410 posts
Posted: Sunday, January 18, 2015 - 07:52 PM UTC
Chuck,
Looking forward to your last and final update to a very special build. The flip side is that the journey is done, and we'll have to wait for your next project to see the "girls" again.
Joel
Looking forward to your last and final update to a very special build. The flip side is that the journey is done, and we'll have to wait for your next project to see the "girls" again.
Joel
raypalmer
Joined: March 29, 2010
KitMaker: 1,151 posts
AeroScale: 985 posts
Posted: Sunday, January 18, 2015 - 08:43 PM UTC
Chuck you should do a kickstarter to publish all these builds as a coffee table book. I can tell you people I've shown them to who have zero interest in modelling find them engaging.
chukw1
Joined: November 28, 2007
KitMaker: 817 posts
AeroScale: 729 posts
Posted: Tuesday, January 27, 2015 - 12:11 AM UTC
That will happen one fine day, Ray- cheers!
Well, this one's done at last. Like every build, this has been a real learning experience for me, and I hope I've been successful in sharing what I've picked up through the highs and lows. Thanks to all for reading along!
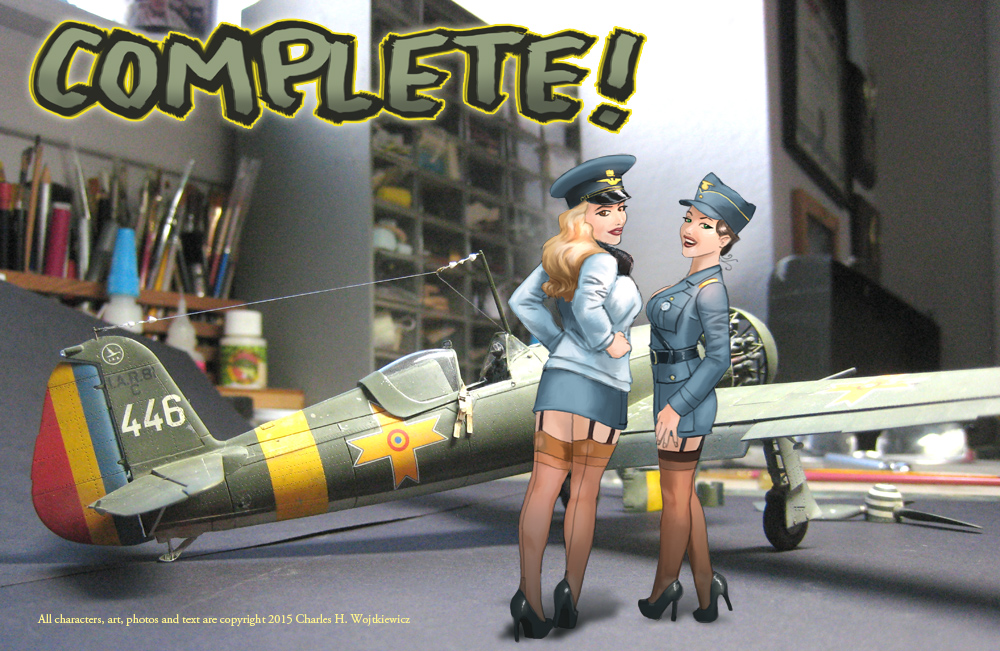


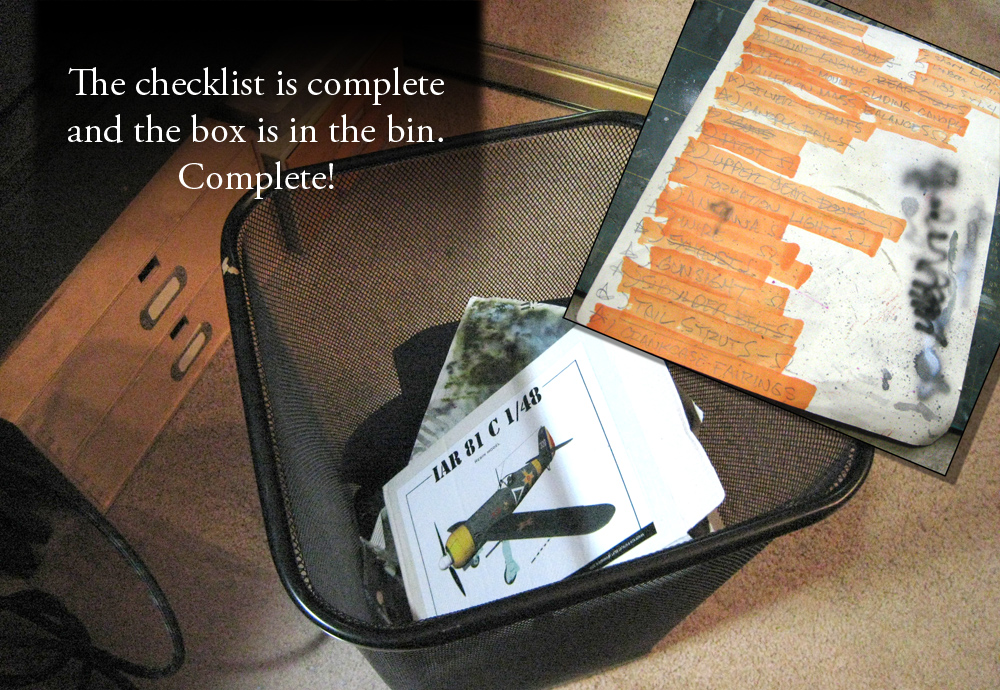
Well, this one's done at last. Like every build, this has been a real learning experience for me, and I hope I've been successful in sharing what I've picked up through the highs and lows. Thanks to all for reading along!
 |

WEB HOSTING BY


Copyright ©2021 AeroScale and Kitmaker Network, a subsidiary of Silver Star Enterprises
All Rights Reserved. Please read our Conditions of Use and Privacy Policy.
All Rights Reserved. Please read our Conditions of Use and Privacy Policy.