World War II
Discuss WWII and the era directly before and after the war from 1935-1949.
Hosted by Rowan Baylis
1/48 B-17F Build - 303rd BGs Luscious Lady
Redhand
#522
_VISITCOMMUNITY
New Jersey, United States
Joined: January 20, 2013
KitMaker: 1,460 posts
AeroScale: 1,443 posts
Posted: Monday, December 09, 2019 - 03:25 AM UTC
Where necessary, he is filling in my scribing using materials I will discuss and rescribing on his own. It is pretty remarkable. More pictures showing filled in scribing I did soon. Generally speaking, he's taking ownership of fuselage scribing. I think that is clear from his decision to take the fuselage down to bare plastic.

Needless to say I am thrilled by the boost this gives to the build. But considering his level of work on the wings, are any of us surprised?

I learned from my NC friend Art, who was also a former friend of the guy who abandoned the "Vicious Virgin" project on me, that the man passed away last Thursday. Despite our massive falling out, the news saddens me.
Redhand
#522
_VISITCOMMUNITY
New Jersey, United States
Joined: January 20, 2013
KitMaker: 1,460 posts
AeroScale: 1,443 posts
Posted: Sunday, December 15, 2019 - 06:26 AM UTC
THE BODY (CONTINUED, PT. 2)

H.G. has completed so much on the fuselage since the last post, and sent me so many photos, that I have to be selective. First, he stripped the old primer off the whole thing in sections, using a liquid I forget, which is probably a "trade secret" anyway.

Here are some examples of that process.


He is going to re-scribe the whole thing, and here are some of his tools and materials:


The black lines and the degraded plastic filler (below)


use a polystyrene concoction that is his own formula. Once it hardens, it will fill gaps and be sandable and scribable like plastic, more or less.


Here's his description of the re-scribing process.


Quoted Text

The old raised lines are used as a guide with the green tape. FBS is made of a thermo-stabilized polymer film with a rubber based adhesive that offers excellent conform-ability to irregular surfaces and tight curves. FBS tape provides excellent adhesion to a variety of substrates, a sharp paint line, and removes cleanly, leaving no residue. I find dymo tape too ridged and doesn't conform enough around complex curves, plus FBS being designed for the automotive industry naturally is more common hence far less expensive. I also use Tamiya flexible tape which is thinner but is even more flexible. The others used for your project is Japanese MT (Kabuki) and PACTRA "Trim Tape" and good ol' fashioned stretchy black electrical.

The lines stay until everything is ready to sand. They look deep but it's because the of the dark green plastic under the lighter primer and that there is a raised line next to them. In other places I leave the nice raised details that would be very tough to remake and appear to me should be raised anyway.


Next is scribing and riveting.


Quoted Text

For riveting I'll be following closely the wings, meaning the 0.75 mm next to the panel lines and a 0.65 mm double wheel in open areas. But before that can happen though a careful sanding with 1200, 800, 400 grits then all mistakes in the lines, current and previous, have to be filled with polystyrene filler (sprue goo). I use that type because it's easy to re-scribe and rivet. Once that hardens after a day or so I can go over the work again and make adjustments. Because of all the dust, oil and possible tape residue the lines and rivets have to be cleaned out in order to take a wash and have something for the oil weathering to cling to. MOST importantly is to absolutely preserve the mind numbing amount of interior detail.


I am flattered and humbled that my work on the interior has resulted in this level of effort.

There are other fuselage corrections that H.G. is making.

Look at the rear crew access door:


Here is a start on the replacement door coaming:


And last but not least, corrections to the fit of the cockpit glass.

Before:


After:


Much remains to be done on the join between the glass and the roof, but it will be, and there will be a surprise.

There will also be a surprise aft, but I won't give up any hints at this point.
Redhand
#522
_VISITCOMMUNITY
New Jersey, United States
Joined: January 20, 2013
KitMaker: 1,460 posts
AeroScale: 1,443 posts
Posted: Tuesday, December 17, 2019 - 12:37 PM UTC
TAIL DETAIL

H.G. has done some great work cleaning up the tail, horizontal stabilizers, and control surfaces.

But first, check out the rear crew access door coaming repair.


Next note the cleanup of the areas surrounding the rudder, top


and bottom


A beautiful fit! Note also the riveting on the vertical stab.


Now check out the riveting on the horizontal stabilizers, top


and bottom


I'll save the "surprise" in the rear fuselage for tomorrow.
Redhand
#522
_VISITCOMMUNITY
New Jersey, United States
Joined: January 20, 2013
KitMaker: 1,460 posts
AeroScale: 1,443 posts
Posted: Friday, January 03, 2020 - 01:47 PM UTC
THE "SURPRISE" IN THE REAR FUSELAGE

Happy New Year everyone.

I will start with a fearless prediction. 2020 is the year "Luscious Lady" finally gets finished. I'm not holding H.G. to any deadline but with the progress that he has made since taking the project over in June-July of last year, it is a fair bet.

I promised a surprise "tomorrow" in mid-December: an optimistic prediction to be sure. But I trust what you see when I unveil it will be worth the wait.

I will start with a teaser: the tail gunner's escape hatch under the starboard horizontal stabilizer. If you look again (below) at the last picture I posted in 2019 you can see the opening I cut out for it.


I was originally planning on using a knock-off copy of the old Paragon Designs door set for the B-17, but the quality was so-so, so I purchased some time back the more realistic door set from resin2detail. You can compare the doors below.


r2d in gray left, the Paragon door in white at bottom right.

H.G. chose the r2d door, for obvious reasons, but what surprised me was his need to shorten the door opening in the fuselage.


After checking some blueprints, we stayed with that.


It looked pretty good, but I did have a question about the hinges. How would H.G. position these open?

I need not have asked. Look at these metal hinges!


I'll save the "surprise" for the next post. Again, it will be worth the wait.
Joel_W
Staff MemberAssociate Editor
AUTOMODELER
_VISITCOMMUNITY
New York, United States
Joined: December 04, 2010
KitMaker: 11,666 posts
AeroScale: 7,410 posts
Posted: Saturday, January 04, 2020 - 04:14 AM UTC
As usual, HG's work is more then simply amazing, it's certainly the worse of a truly talented Alien.

And happy New York my friend.

Joel
Redhand
#522
_VISITCOMMUNITY
New Jersey, United States
Joined: January 20, 2013
KitMaker: 1,460 posts
AeroScale: 1,443 posts
Posted: Saturday, January 04, 2020 - 04:29 AM UTC

Quoted Text

As usual, HG's work is more then simply amazing, it's certainly the [work] of a truly talented Alien.

And happy New [Year] my friend.

Joel


Good to hear from you, Joel. I was about to check in with you by email.

I may as well do "The Big Reveal" now on what's next.


I kid you not. In a closed-up fuselage no less.

I'll be starting a post on this work tonight.

The build has taken on a life of its own.
KPHB17FE
_VISITCOMMUNITY
Illinois, United States
Joined: January 12, 2015
KitMaker: 292 posts
AeroScale: 292 posts
Posted: Saturday, January 04, 2020 - 04:53 AM UTC
Pretty amazing! What is this FBS tape and where do I find it? And how does he make his seam filling goo? Always looking for new ways to do things . Also, do you guys have the Centerline Diagram for the tail wheel? It is Drawing Number 15-7368.
Joel_W
Staff MemberAssociate Editor
AUTOMODELER
_VISITCOMMUNITY
New York, United States
Joined: December 04, 2010
KitMaker: 11,666 posts
AeroScale: 7,410 posts
Posted: Saturday, January 04, 2020 - 07:57 AM UTC
Brian,
HP is having retractable landing gear that works?

Karl, I'm just about to start to mix up my own goo once again. I use a half bottle of Extra Thin and start adding pcs of sprue. When it gets to the consistency you want, you're done. But you need to give the sprue pcs time to dissolve. As it thickens up over time, just add more Extra Thin. When using it, go easy and work in layers if need be. The stuff really shrinks as it dries out, which takes quite a long time.

Joel
KPHB17FE
_VISITCOMMUNITY
Illinois, United States
Joined: January 12, 2015
KitMaker: 292 posts
AeroScale: 292 posts
Posted: Saturday, January 04, 2020 - 08:21 AM UTC
Thanks Joel. Any brands of sprue react different from others? The Airfix plastic is certainly softer than Tamiya or Monogram.
Redhand
#522
_VISITCOMMUNITY
New Jersey, United States
Joined: January 20, 2013
KitMaker: 1,460 posts
AeroScale: 1,443 posts
Posted: Saturday, January 04, 2020 - 08:22 AM UTC

Quoted Text

Brian,

[HG] is having retractable landing gear that works?


Joel


No, it will be static, but basically complete. Quite a change from the kit parts!
Redhand
#522
_VISITCOMMUNITY
New Jersey, United States
Joined: January 20, 2013
KitMaker: 1,460 posts
AeroScale: 1,443 posts
Posted: Saturday, January 04, 2020 - 04:45 PM UTC
TAIL. WHEEL. WELL.

At the end of the last "build progress post," where I put up the tailwheel landing gear drawing I wrote:


Quoted Text

The build has taken on a life of its own.


There's a reason. Let's go back to November 7, 2016, and page 36 of this blog, to the post titled


Quoted Text

BOXED IN


where I wrote:


Quoted Text

I started the tail compartment. First thing to do is deal with the gaping maw that is the opening to the tail wheel.

I did not want to leave it as is, because that would allow one to look right up into where the tail joins above. It would be like looking into any other empty wheel well, only one that would go to the top of the fuselage.

I didn't want to try to replicate the actual tail wheel strut structure or the very complex internal structures around it. The kit tail wheel strut is not accurate where it joins the kit internal structures. But it would take literally weeks if not months of work to make it accurate. And the well where it receives the wheel would have been a nightmare too. At this point it just isn't worth my time given the relatively limited visibility. So I compromised by boxing in the aperture above the tail wheel opening. You can see that below.


So, this is what it looked like back then:


culminating in this as my best effort.


Whaddayagonnado? A man must acknowledge his limits. There was no way I could navigate the Symplegades "clashing rocks"

of this


and this


and emerge unscathed.


It would take a modeler of heroic stature to get there:


Of course it's not done, but in the next post I'll start documenting H.G.'s progress from the start.

Johnnych01
_VISITCOMMUNITY
England - South West, United Kingdom
Joined: June 29, 2019
KitMaker: 604 posts
AeroScale: 32 posts
Posted: Saturday, January 04, 2020 - 11:53 PM UTC
Brian, I've said it before and will say it again, its an epic build. I was interested though, in a percentage if possible, how much is left of the original base B17 and how much is scratch built ? Keep up the amazing work and attention to detail.
Joel_W
Staff MemberAssociate Editor
AUTOMODELER
_VISITCOMMUNITY
New York, United States
Joined: December 04, 2010
KitMaker: 11,666 posts
AeroScale: 7,410 posts
Posted: Sunday, January 05, 2020 - 03:40 AM UTC
Brian,
And you're going to tell me that HG isn't an Alien from a far off distant place Honestly, I've never, ever, seen such a detailed, scratch build work like this. And I've seen many National IPMS winners and Best of Shows. Nothing to my aging mind comes close.

Honestly, at this point, your model belongs in a museum with full details, pictures, etc. It's no longer just a super detailed model build in any stretch of the imagination.

Joel
Redhand
#522
_VISITCOMMUNITY
New Jersey, United States
Joined: January 20, 2013
KitMaker: 1,460 posts
AeroScale: 1,443 posts
Posted: Sunday, January 05, 2020 - 04:46 AM UTC

Quoted Text

Brian,
And you're going to tell me that HG isn't an Alien from a far off distant place Honestly, I've never, ever, seen such a detailed, scratch build work like this. And I've seen many National IPMS winners and Best of Shows. Nothing to my aging mind comes close.

Honestly, at this point, your model belongs in a museum with full details, pictures, etc. It's no longer just a super detailed model build in any stretch of the imagination.

Joel


What can I say, Joel? My own "aging mind" may indeed bequeath it to some museum, but the original idea was to have a display case for it (already have the materials) for my law office. A hardstand diorama enclosed in Plexiglas, with a top that can be opened. Hopefully, I will live long enough to enjoy it for a few years.
Redhand
#522
_VISITCOMMUNITY
New Jersey, United States
Joined: January 20, 2013
KitMaker: 1,460 posts
AeroScale: 1,443 posts
Posted: Sunday, January 05, 2020 - 04:54 AM UTC

Quoted Text

Pretty amazing! What is this FBS tape and where do I find it? And how does he make his seam filling goo? Always looking for new ways to do things . Also, do you guys have the Centerline Diagram for the tail wheel? It is Drawing Number 15-7368.


Karl:

We don't have that centerline drawing so if you could kindly send it.

This morning, unprompted, H.G. sent me his formula for the black goo. (No, not "the black goo" in "Prometheus," see https://www.youtube.com/watch?v=i-x78afiSZU, which is hilarious!)

Here it is per your request.


Quoted Text

Please pass this along to Karl or post in your blog.

I use Bandai plastic because it is extremely high quality, dries faster, hardens better yet is ductil enough to take a riveting wheel and scriber easily. It also sands smoother as opposed to one of the Czech or Polish, Russian or Ukraine kit makers. When a pot of tamiya extra thin is at 1/3 remaining begin to add pellets to cover the bottom and count out how many it took. These pellets should be length and height roughly the same (an average sprue tree is 3 mm so 3 by 3 mm). let this dissolve overnight. Mix thoroughly and add another layer and let it dissolve. Best way to test for a consistency that will have far less shrink, dry faster and eat into the existing plastic is when the tip of the cement brush drips VERY slowly or not at all. I use a dark color because it is easier to see when sanding.


I think you can just Google FSB tape. If not I'll get a source from H.G.
Redhand
#522
_VISITCOMMUNITY
New Jersey, United States
Joined: January 20, 2013
KitMaker: 1,460 posts
AeroScale: 1,443 posts
Posted: Sunday, January 05, 2020 - 05:40 AM UTC

Quoted Text

Brian, I've said it before and will say it again, its an epic build. I was interested though, in a percentage if possible, how much is left of the original base B17 and how much is scratch built ? Keep up the amazing work and attention to detail.


Thanks for your comment, John. The truly epic builds are those where the underlying model becomes just a skeleton for a universe of aftermarket parts and scratch building, and, yeah, this is turning out to be one of those.

The greatest one I ever saw before this was an FM 1/48 Halifax (a horror of a kit) that a Greek guy built and posted on the "Hellenic Modelers" website. (Sadly dark now). It was extra special because in addition to scratch-building virtually the entire interior, he converted it to a Halifax Mk. II with Merlin engines. It was really something to see.

The Revell B-17F kit we started with has a virtually empty interior, with only the most rudimentary parts in the nose and cockpit. Literally everything in this interior is either aftermarket, scratch-built, pirated from the Monogram B-17G model, or a kit-bashed combination of those elements. That includes the Monogram horizontal stabilizers, elevators and rudder. So at this point for the fuselage, figure the two halves, the cockpit roof and most of the clear parts (though H.G. has plans for those, I believe.)

For the wings, I can say the only kit parts are the tops and bottoms, and they have been so heavily modified with rescribing, the opening of apertures, and other details that they are all but unrecognizable from the out-of-the-box originals. The engines are Eduard, with even more detail added, the props are Ultracast and, the wheels are aftermarket, the superchargers are improved Verlinden, and the landing gear are vastly improved Verlinden parts that can also be considered scratch-built because they are so heavily modified. And of course the wheel wells are entirely scratch built.

I have to say again and again that I started this project as "an advanced journeyman" modeler who outdid himself on the interior, and who has received incredible and gracious help on the journey, beginning with my NC friend Art, Karl's encyclopedic knowledge and hard data concerning the B-17F airframe, and of course, H.G.'s literally incredible modeling skills and extraordinary drive to realize my dream for this model down to the last possible detail.

The best things that people make are due to joint efforts, and I feel very humbled and privileged to see how far we have come from some pretty modest but ambitious beginnings in 2014.

Who woulda thunk it?
Redhand
#522
_VISITCOMMUNITY
New Jersey, United States
Joined: January 20, 2013
KitMaker: 1,460 posts
AeroScale: 1,443 posts
Posted: Monday, January 06, 2020 - 05:57 PM UTC
TAIL. WHEEL. WELL. PLANNING SESSION, CONCEPTION and CONSTRUCTION.

I spoke with H.G. about the build sometime in mid-December when he asked what was going on in the tail wheel area.

I explained my reasoning and he said he would "take a look at the area" and asked for some references, which I supplied.

Then I got this email making clear he was going to "have a go"


so to speak.


Quoted Text

I'll sculpt a negative mold to form my aluminum around and try to find fabric ot roll some clay to replicate it. What I need is a wider angle photo of the well.

Bet you didn't think this was going to be attempted. We certainly didn't discuss it.


To which I responded:


Quoted Text

I knew I didn't have the skill set to replicate the actual configuration and there is the major point that it is a load-bearing component. And with the fuselage closed, I figured re-visiting this would be an exercise in futility.


There's that builder's adage: "Measure twice, cut once."

The picture of his calipers in the prior post was one thing, but I didn't bank on this remarkable discovery using the Mk. I eyeball.


Do you see the problem? The center is literally off-center relative to the fuselage opening.

I would never have seen this on my own.

H.G.'s solution?


Quoted Text

What would best for the model is [styrene] strips and not an even wider massive gaping hole which will make no sense what with the already overly wide clearance for the size of the tire and gear.


So that's what he started to do while simultaneously working on the tub.


Oh man, rough going!


Note the front bulkhead too.

Getting the dimensions right required measurements.


Kinda like surgery where the parts of the body not going under the scalpel are covered.


Getting better


but it needs the tub, so check out these shots as that comes together.


You can see how much work went into getting the new opening to match the sides of the tub.


And of course what's the point without the landing gear and supporting struts?


I'm told getting all this aligned and the V struts glued to the forward bulkhead at the correct angle and so that this tail sitter would look right was a nightmare.

But he found a way to do it.


More to come.
KPHB17FE
_VISITCOMMUNITY
Illinois, United States
Joined: January 12, 2015
KitMaker: 292 posts
AeroScale: 292 posts
Posted: Monday, January 06, 2020 - 11:54 PM UTC
That is amazing. Too late now for the centerline drawing, thought it might help align things. But he did just fine on his own. That entire tail wheel assembly might be a good project for a 3D printer.
amoz02t
#192
_VISITCOMMUNITY
Kentucky, United States
Joined: November 25, 2009
KitMaker: 1,383 posts
AeroScale: 65 posts
Posted: Tuesday, January 07, 2020 - 03:14 AM UTC

Quoted Text

That is amazing. Too late now for the centerline drawing, thought it might help align things. But he did just fine on his own. That entire tail wheel assembly might be a good project for a 3D printer.


Wow. Just wow! Thank you so much for sharing this effort. Following every day.
Redhand
#522
_VISITCOMMUNITY
New Jersey, United States
Joined: January 20, 2013
KitMaker: 1,460 posts
AeroScale: 1,443 posts
Posted: Tuesday, January 07, 2020 - 03:52 AM UTC

Quoted Text


Quoted Text

That is amazing. Too late now for the centerline drawing, thought it might help align things. But he did just fine on his own. That entire tail wheel assembly might be a good project for a 3D printer.


Wow. Just wow! Thank you so much for sharing this effort. Following every day.


Yes, it IS worth recording. And thank you.
Joel_W
Staff MemberAssociate Editor
AUTOMODELER
_VISITCOMMUNITY
New York, United States
Joined: December 04, 2010
KitMaker: 11,666 posts
AeroScale: 7,410 posts
Posted: Tuesday, January 07, 2020 - 10:07 AM UTC
That's just not humanly possible. More proof that HG is an Alien.

Joel
Redhand
#522
_VISITCOMMUNITY
New Jersey, United States
Joined: January 20, 2013
KitMaker: 1,460 posts
AeroScale: 1,443 posts
Posted: Saturday, January 11, 2020 - 04:40 PM UTC
TAIL WHEEL FINIS - FOR NOW

It's time to take this unexpected excursion into a whole new tail wheel strut assembly and wheel well into the home stretch, leaving what remains for "final assembly."

When H.G. embarked on doing the well and actual strut assembly, I expected something like this.


Yes, you can see some real cloth with stitching (yet to be trimmed and "finalized") to replicate the forward canvas in the well


BUT NOT the strut, and all that actuator stuff above it, with some kind of upsidedown sawhorse in the overhead and a motor at the crux. We don't have to bother with that because no one is going to see it behind the bulkhead at the end of the waist. No real visibility, ya know, not really.

We'll just go with something like this, with the shaft extending through that canvas into an unseeable void.


How does that period song go? "Who could ask for anything more?" Seriously?

But some pieces didn't add up.


That is until I saw this.


and realized H.G. was building a reasonable facsimile of the upper landing gear structure above the canvas


that could indeed be glimpsed from various openings in the fuselage such as the tail gunner's escape hatch and the main crew door forward.


It's clear this subassembly greatly exceeds expectations.


And it isn't even finished yet.

The next post will follow H.G.'s work cleaning up the waist windows and the forward crew hatch in the nose.
Redhand
#522
_VISITCOMMUNITY
New Jersey, United States
Joined: January 20, 2013
KitMaker: 1,460 posts
AeroScale: 1,443 posts
Posted: Sunday, January 12, 2020 - 04:50 AM UTC
DOORS AND WINDOWS


Yeah, the 3D printer interior ribbing created by Art, my NC friend, needed some waist window trimming after installation.


Not bad, eh, though I don't envy H.G.'s task reinstalling the interior sliding window shown at the bottom.

Here's a cleaner shot, and yes there are some paper stubs that still need to be addressed.


Nice!

And here's a look at the port side window.


Reflecting on my own interior work, I gotta say I love the effect of those radio wires and oxygen hoses hanging down! Thanks, H.G. for properly framing them!

Let's move now to the forward crew access door, which was originally cut for the Paragon Designs door knock-off we had but decided to discard in favor of the more elegant and accurate resin2detail door.

Here's the opening.


And, ah, some corrections are needed.


The work on this continues, and then I believe H.G. will be moving to the pilots' roof, windshield and other windows. corrections around the radio room roof.

I won't give a new surprise away [about the cockpit area] other than to say that his planed work there should be something to see!
Redhand
#522
_VISITCOMMUNITY
New Jersey, United States
Joined: January 20, 2013
KitMaker: 1,460 posts
AeroScale: 1,443 posts
Posted: Friday, January 17, 2020 - 03:10 PM UTC
DIAMOND IN THE ROUGH

A good definition to start this post (and all of H.G.'s work IMO) is Diamond in the rough.


Quoted Text

Someone (or something) that has hidden exceptional characteristics and/or future potential, but currently lacks the final touches that would make them (or it) truly stand out from the crowd.

The phrase is metaphorical and relates to the fact that naturally occurring diamonds are quite ordinary at first glance, and that their true beauty as jewels is only realized through the cutting and polishing process.


That's kind of how I see the collaboration between H.G. and me at this point. I look upon my work as the rough diamond that he is converting into a beautiful jewel.

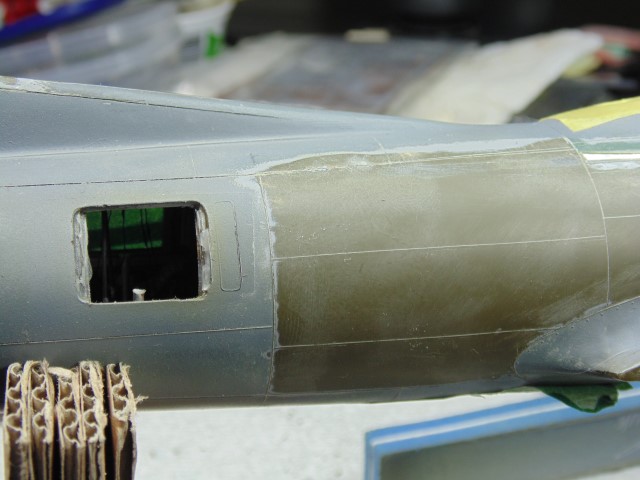
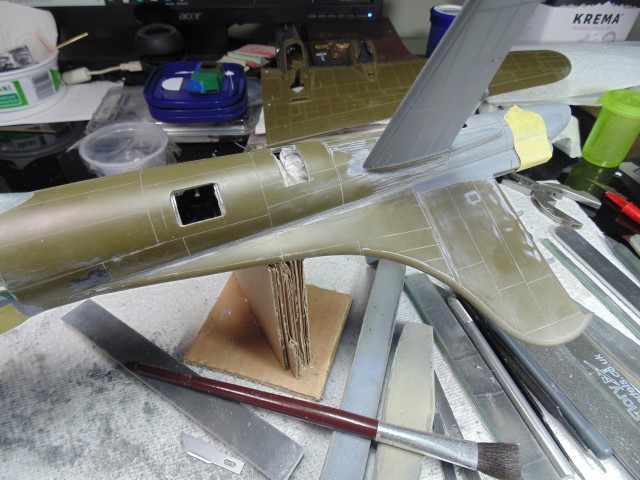
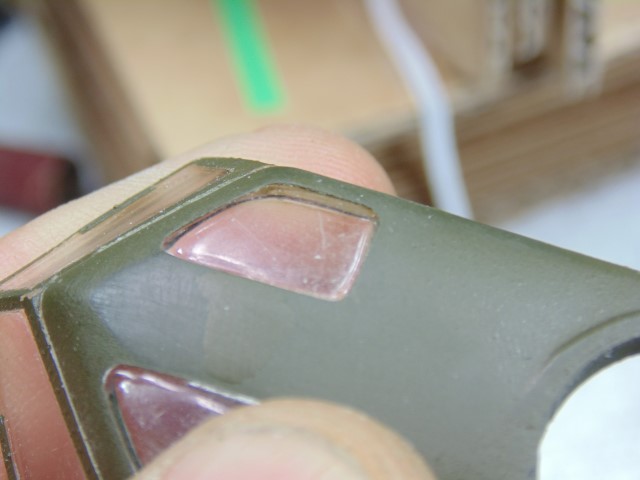
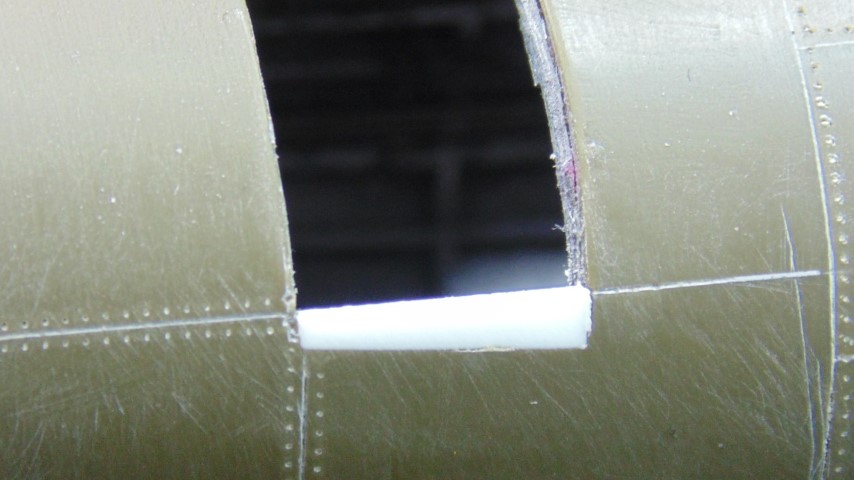
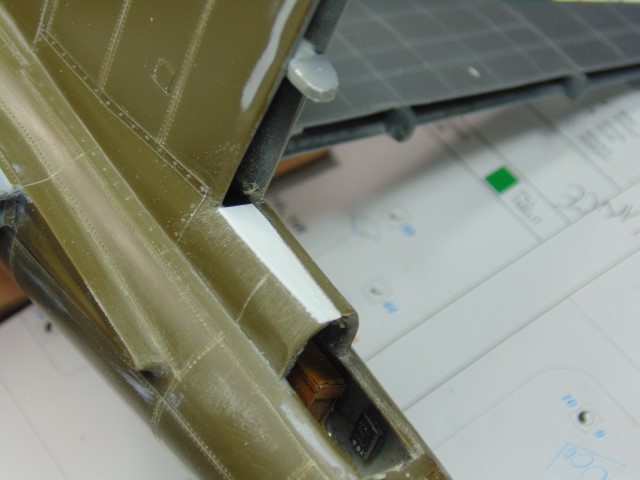
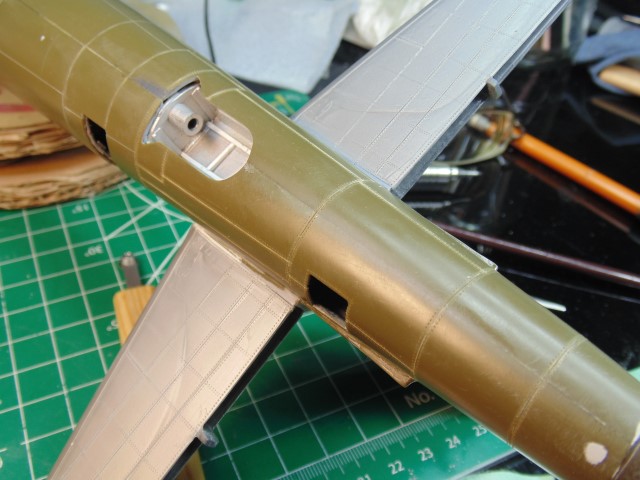
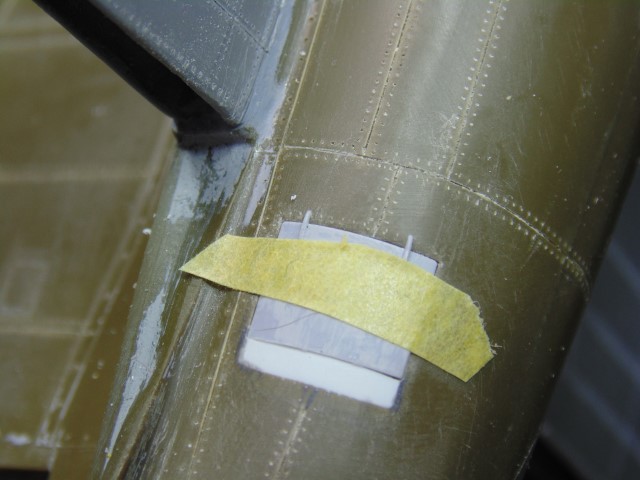
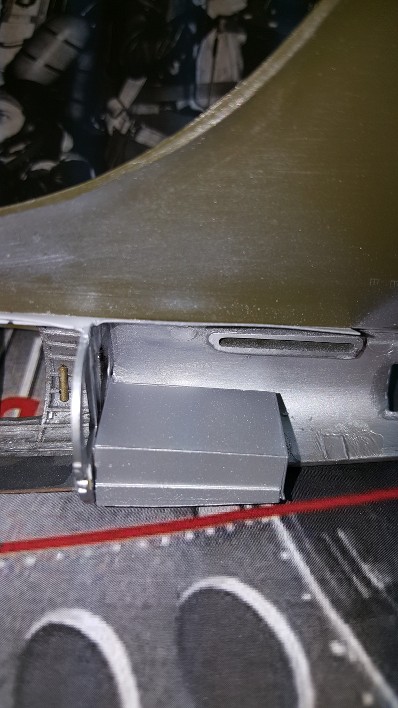
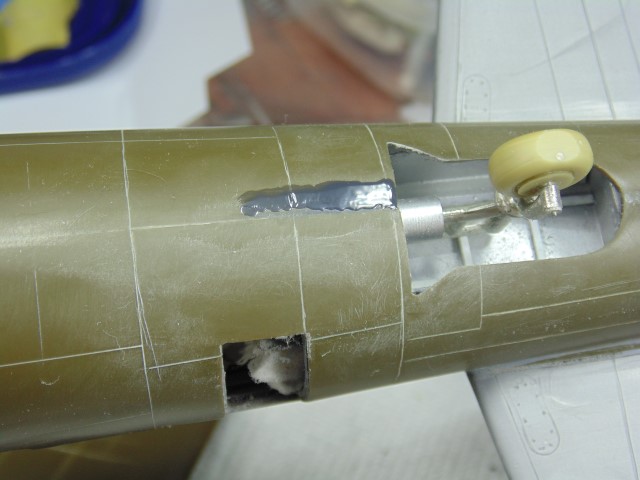
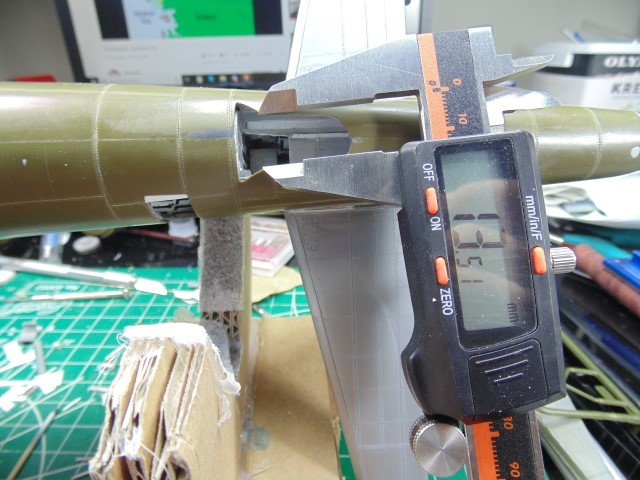
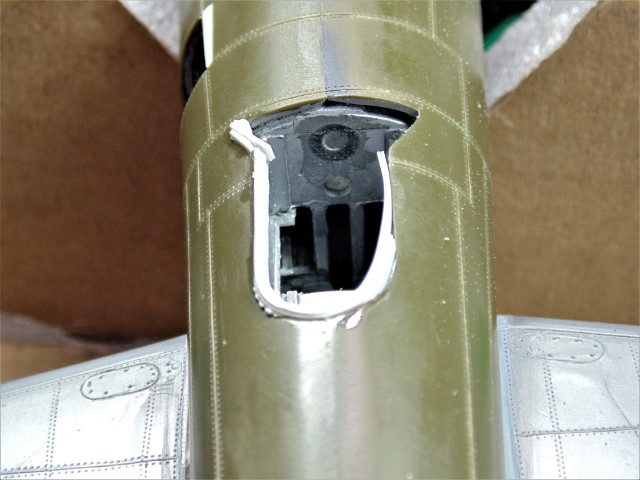
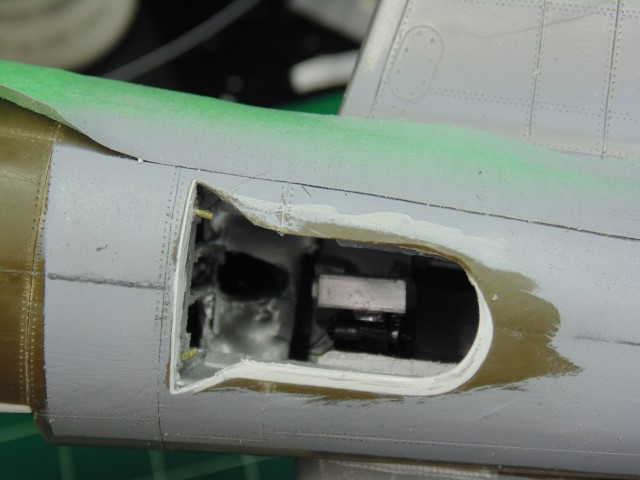
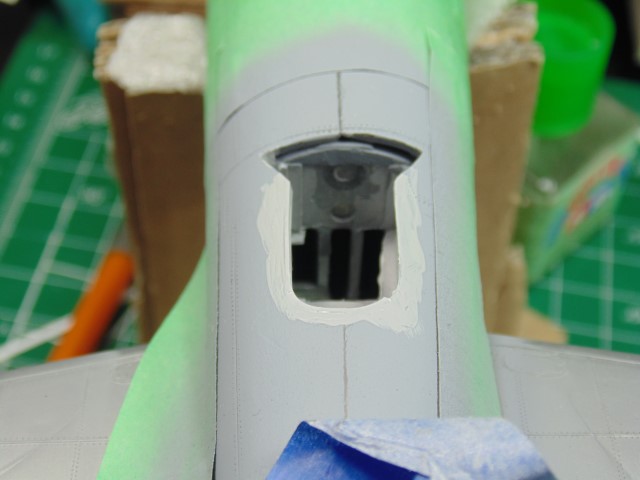
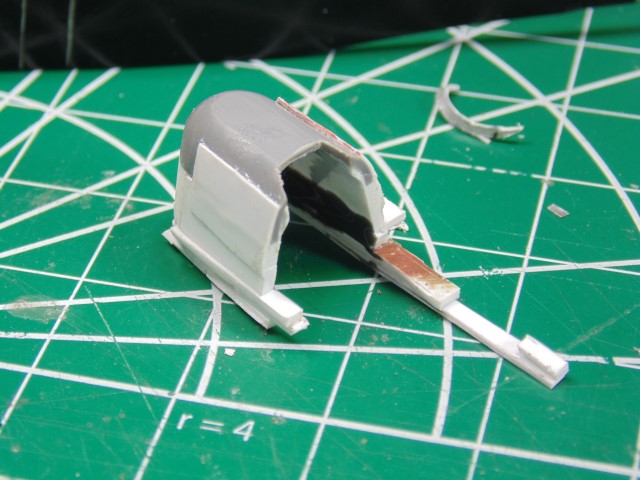
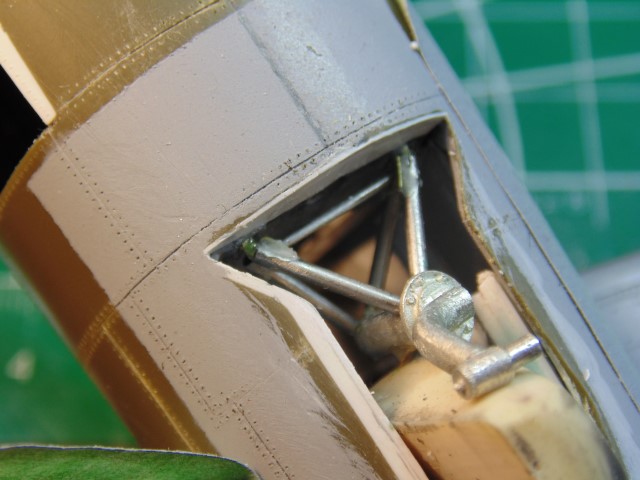
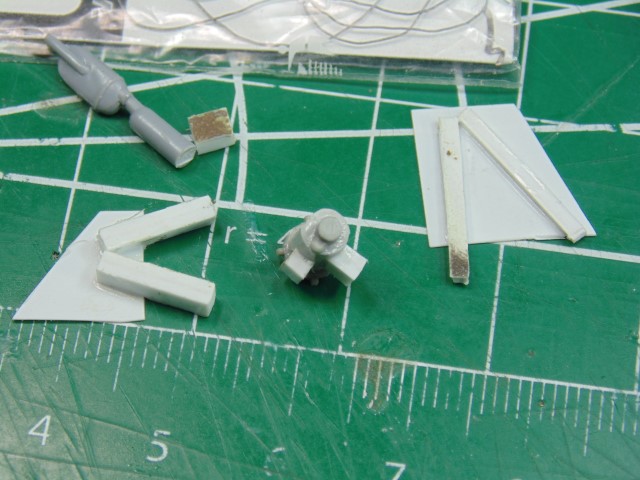
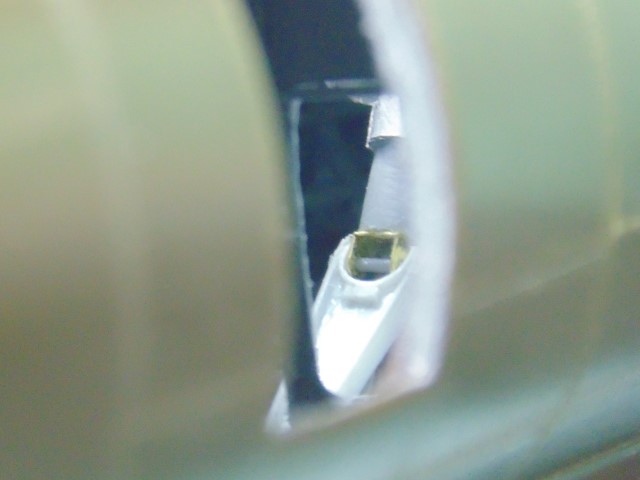
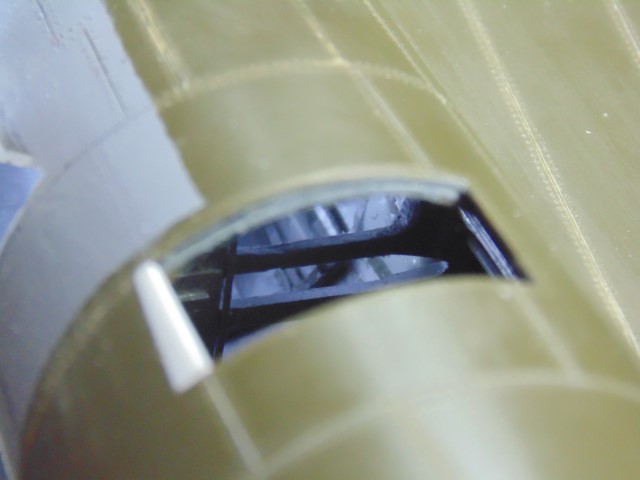
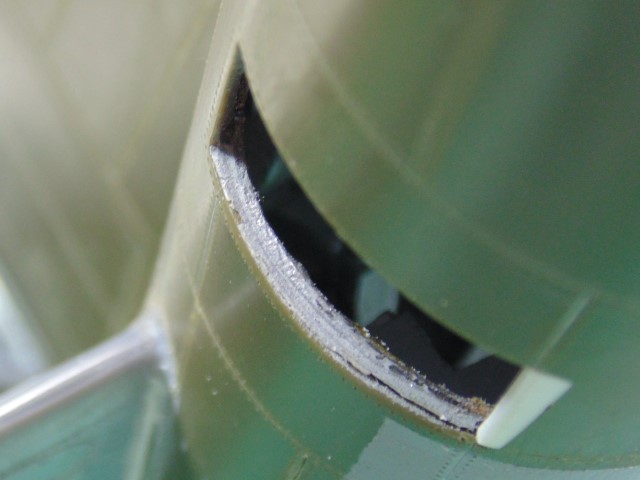
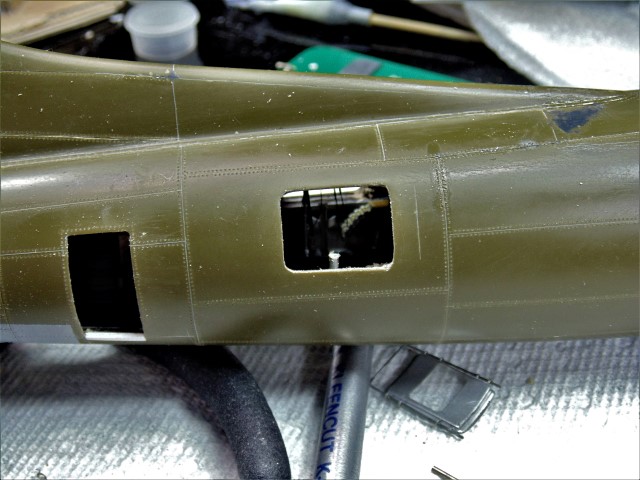
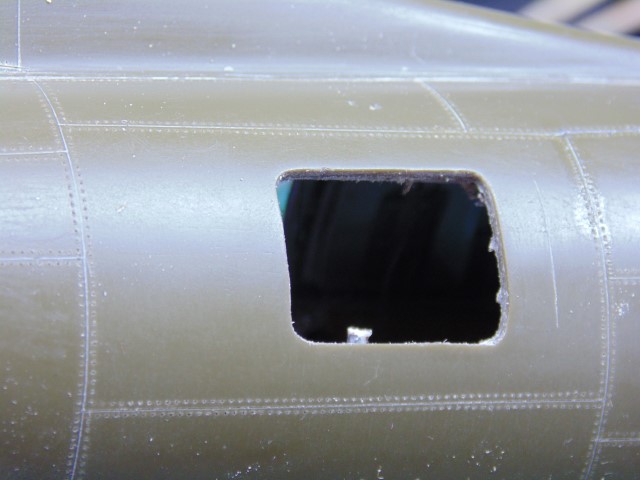
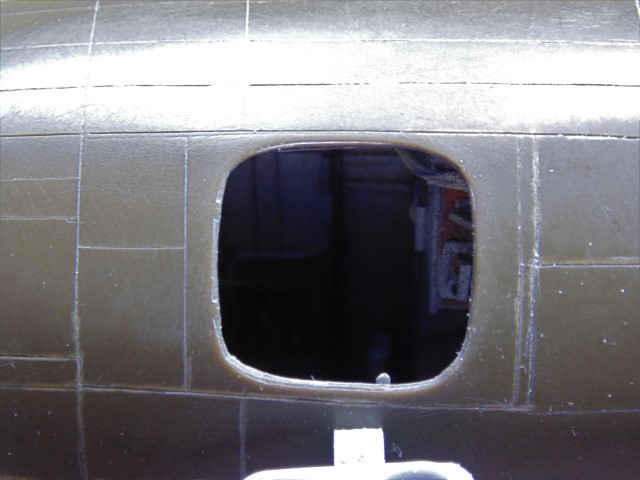
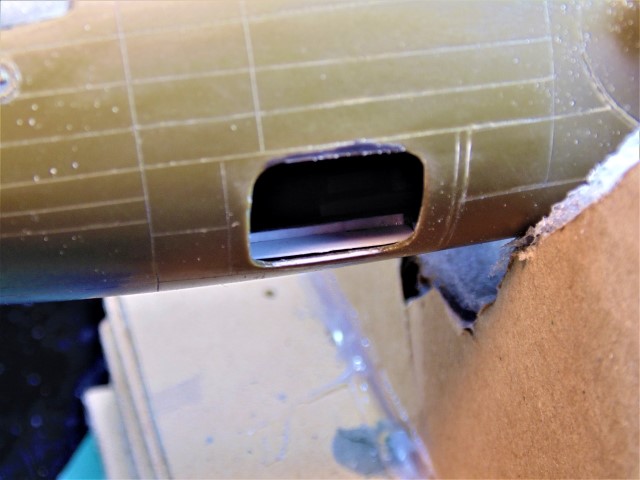
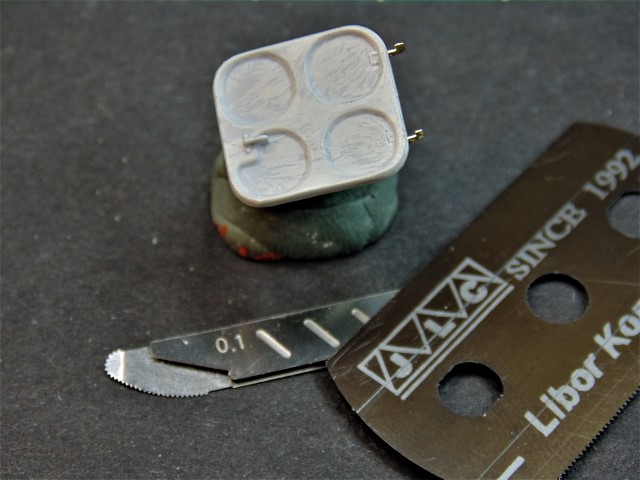
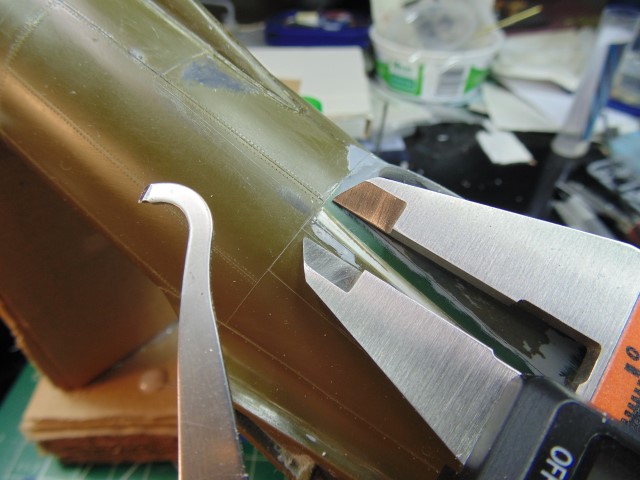
Let's consider the nose crew access/escape hatch for starters.

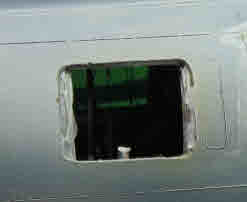
It's worth recalling that when I added the walk/crawlway to the floor leading to the navigator/bombardier compartment door, I added some perpendicular formers to address the gap visible in the open hatch between the walkway and the floor,


similar to those that were in the space behind the door opening. See below, right.


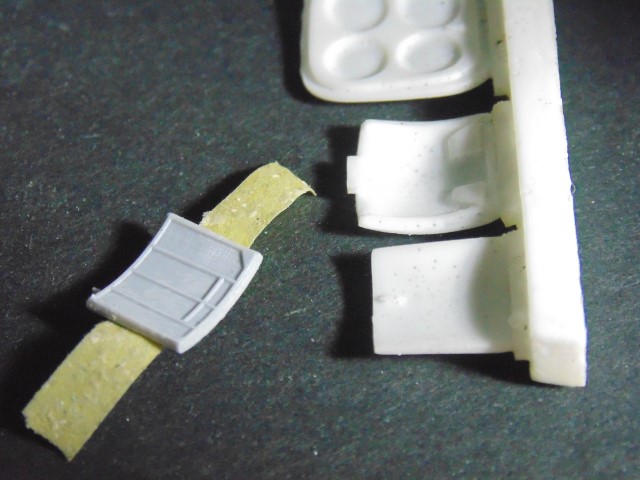
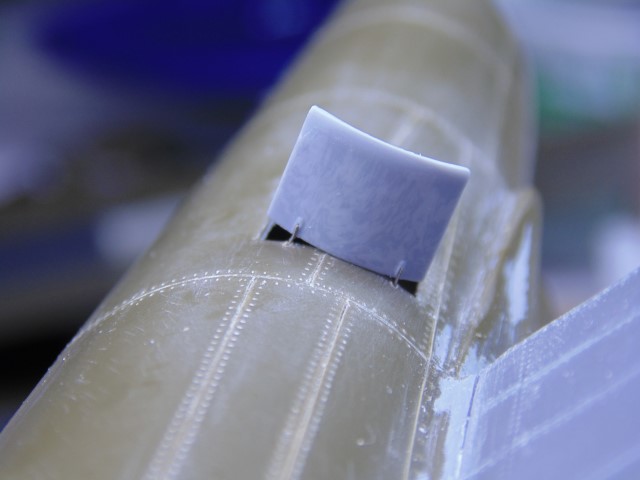
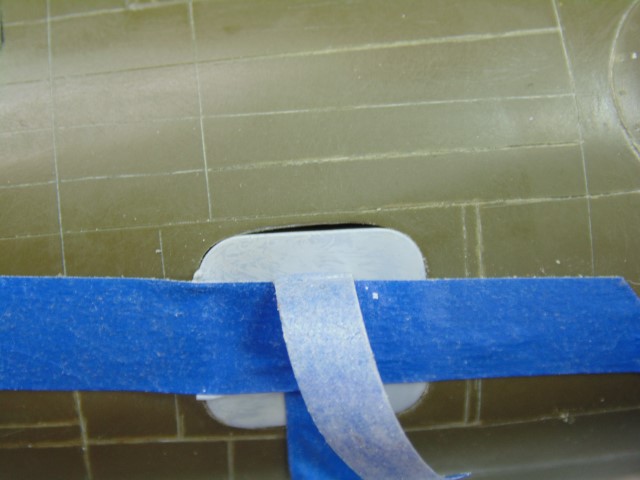
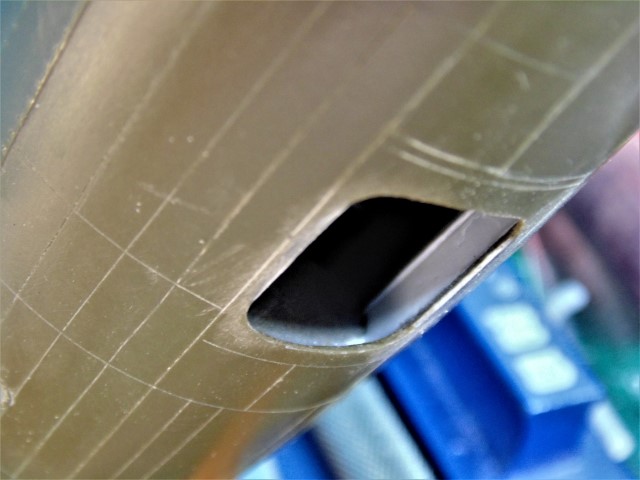
H.G. recognized the need to eliminate the formers and come up with a solution that looks closer to the real thing.
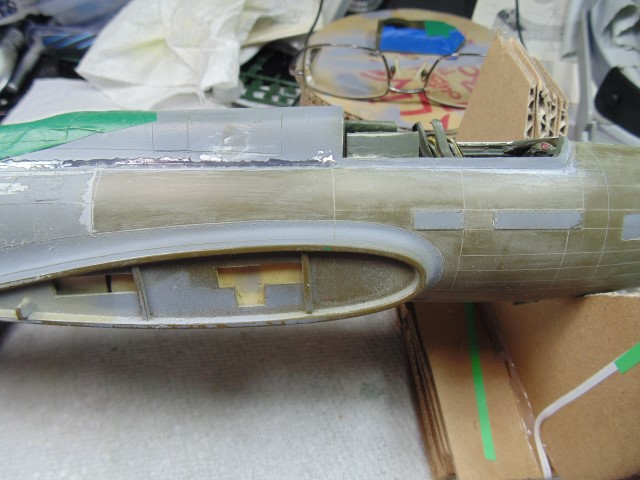
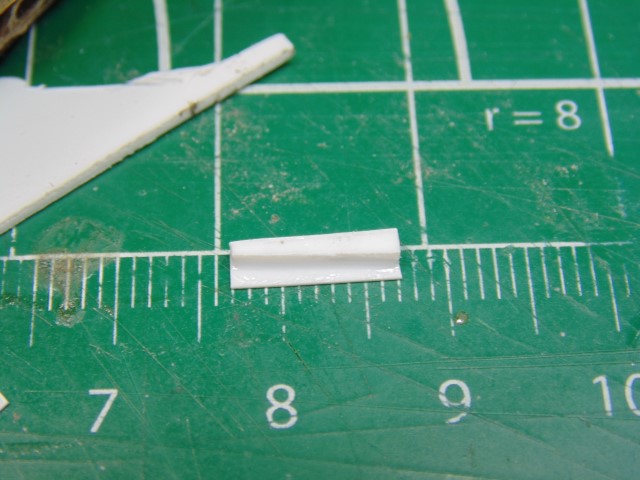
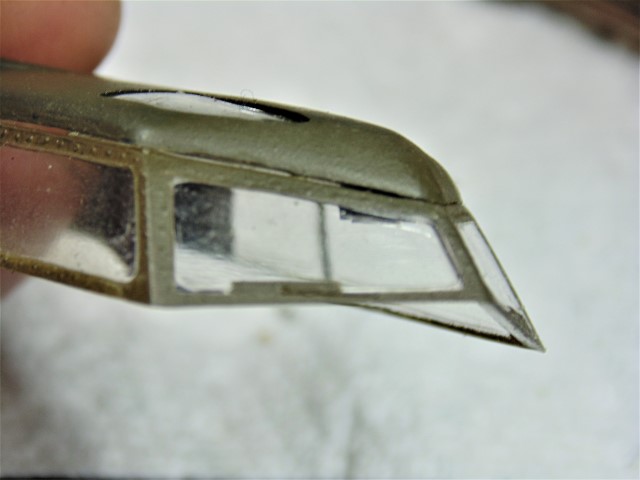
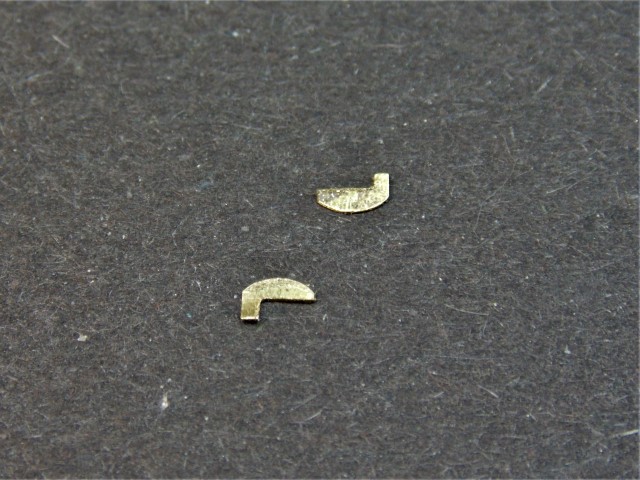
He filled the gap


fashioned a plate to reduce the sense of excessive height


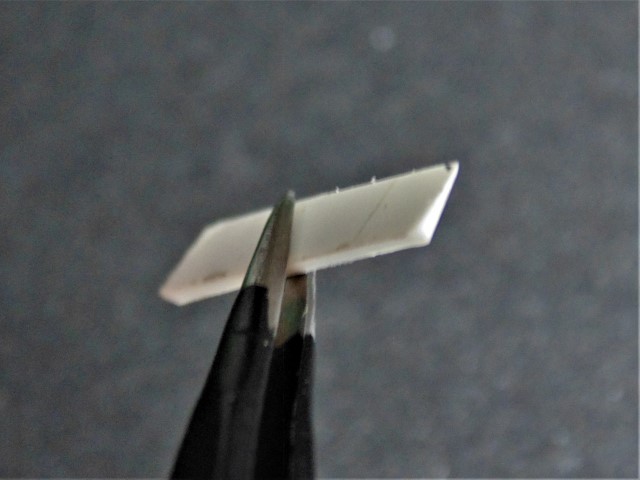
and then inserted it to create a flatter look.


(The small gap near the door opening will be eliminated later.)

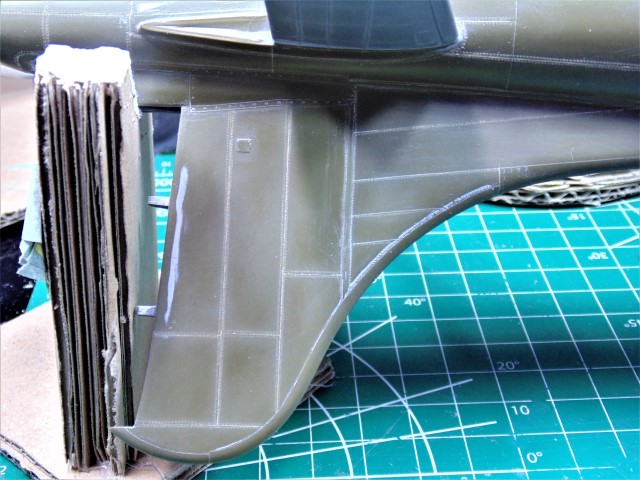
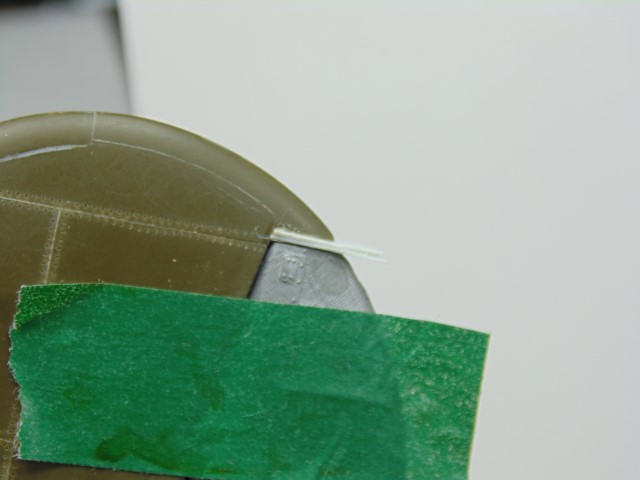
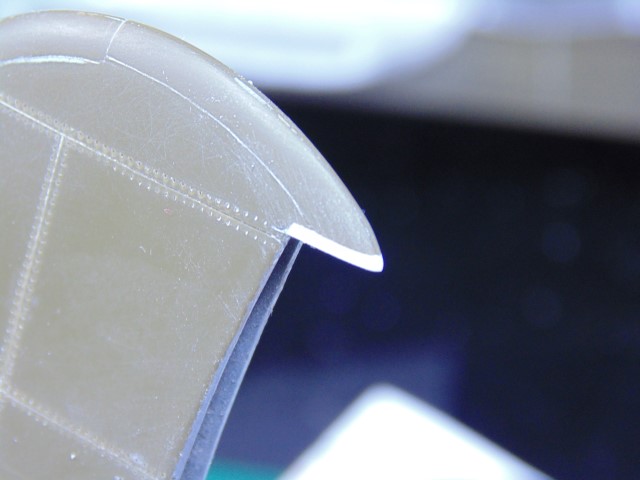
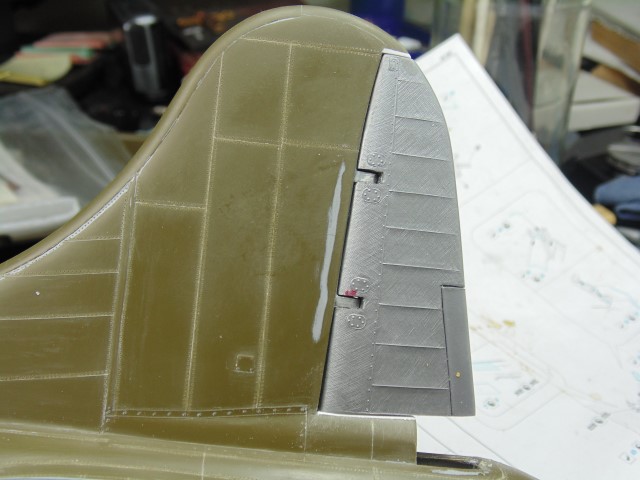
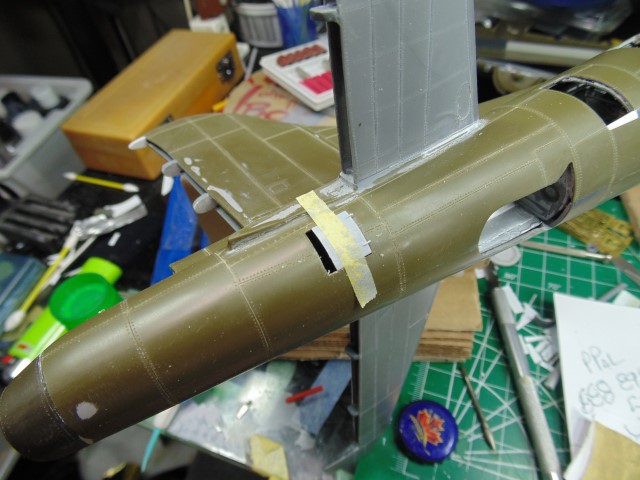
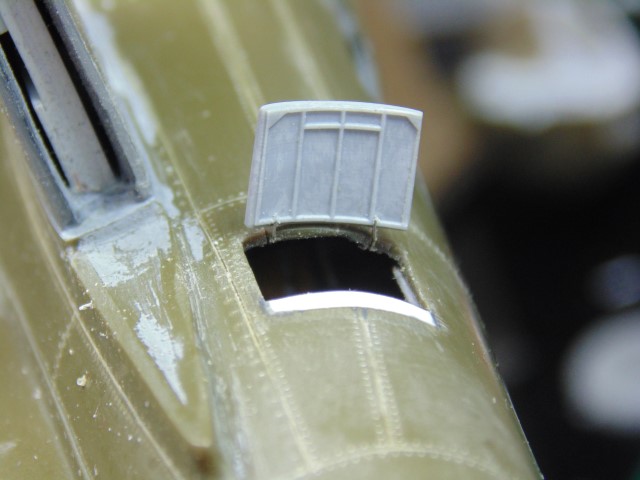
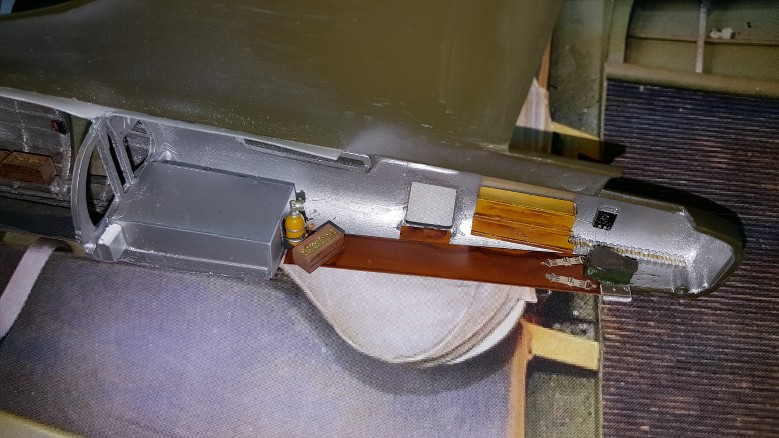
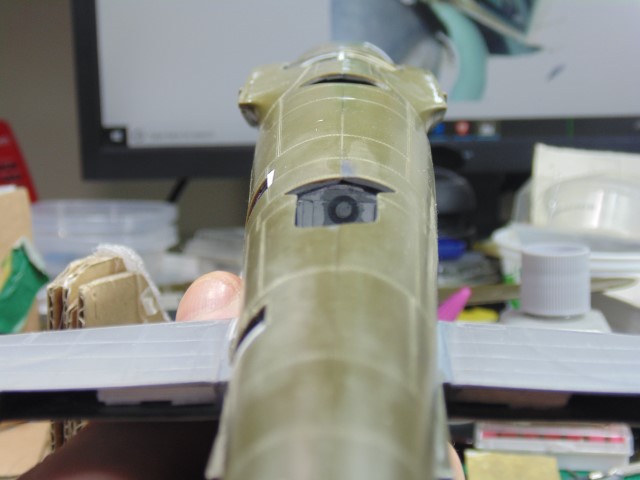
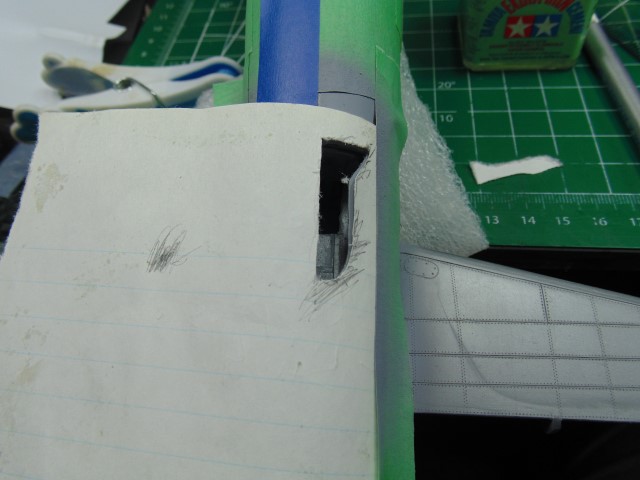
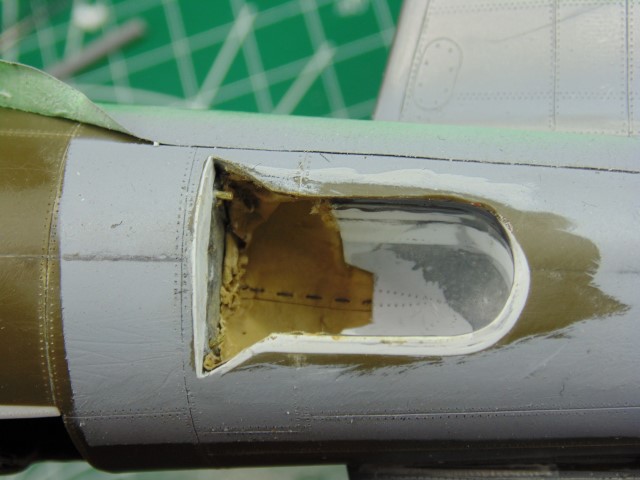
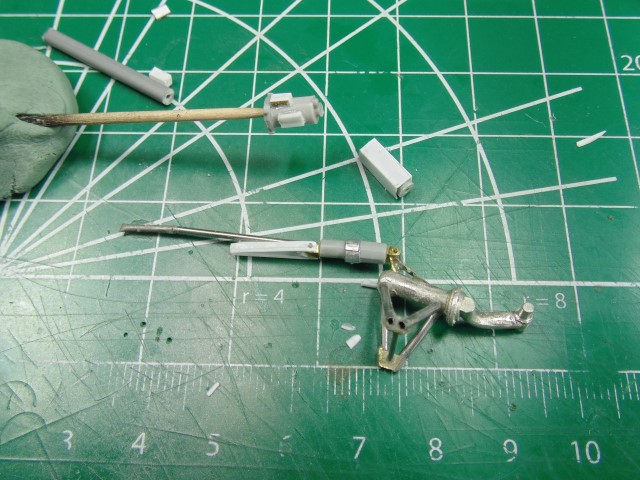
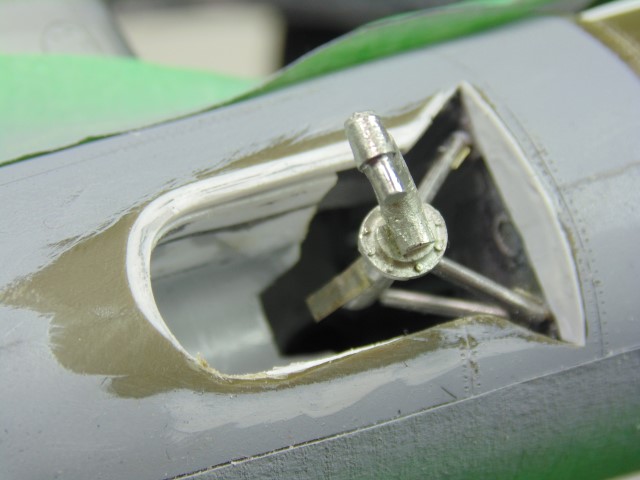
You can also see that the door opening


now matches the door dimensions MUCH better.


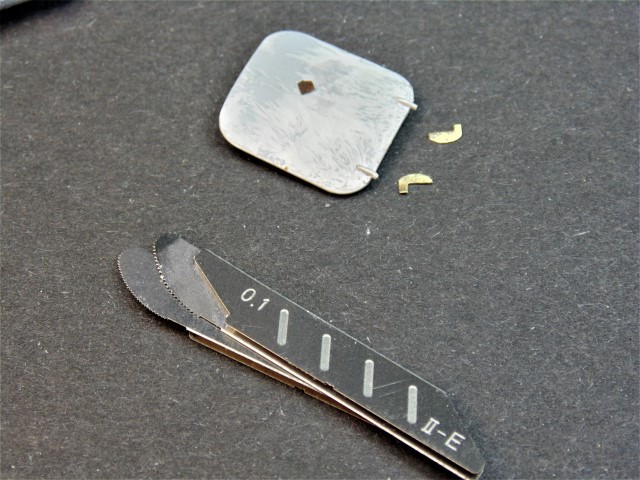
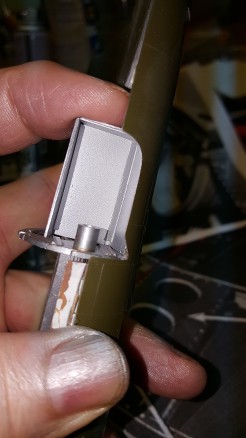
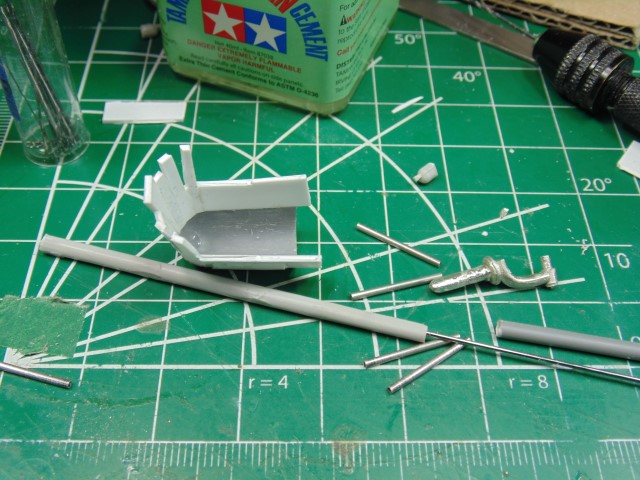
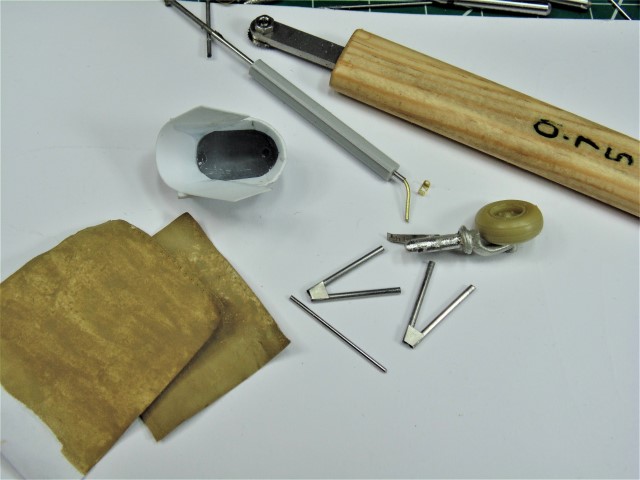
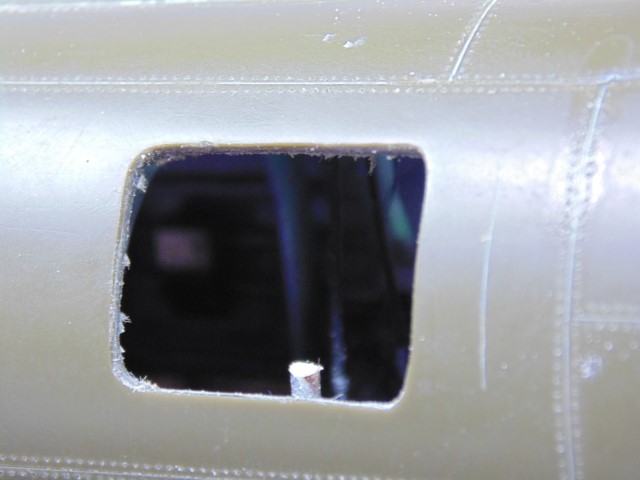
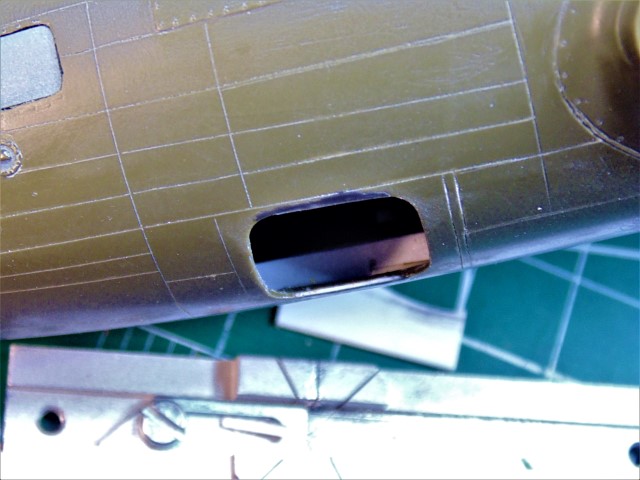
And yes, those are custom-made door hinges.


which will fit the door beautifully.


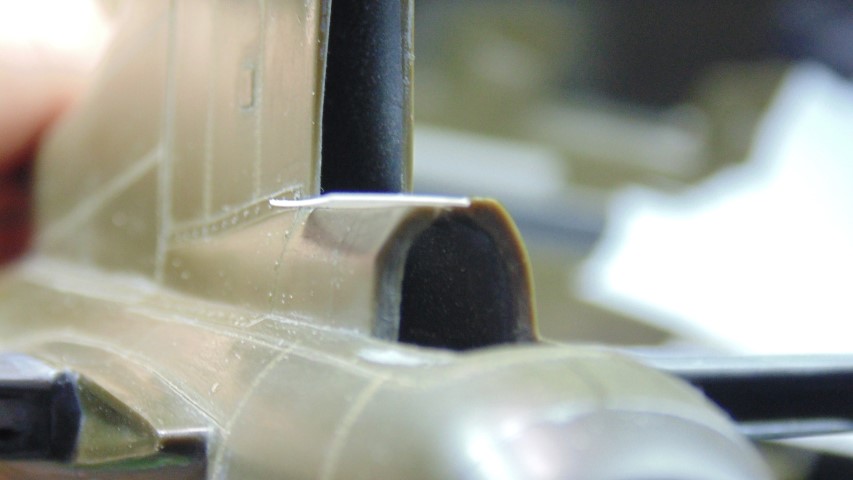
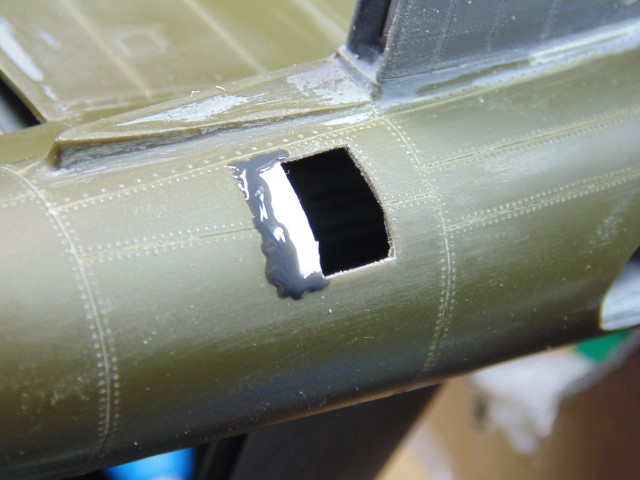
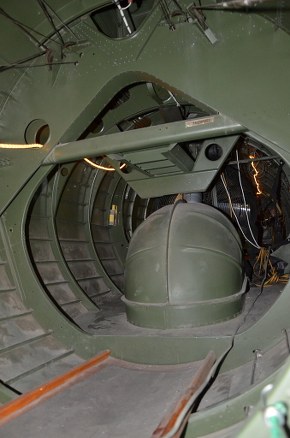
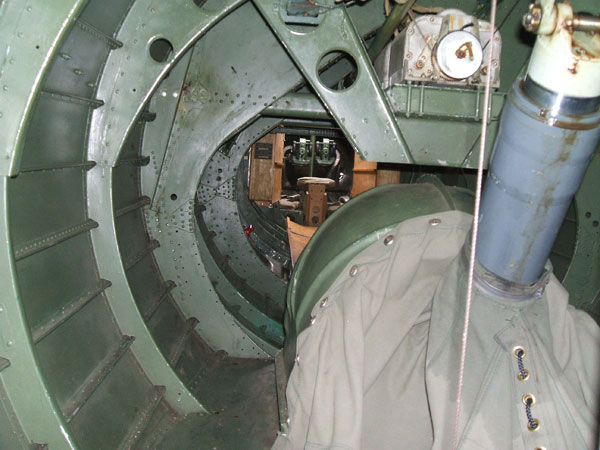
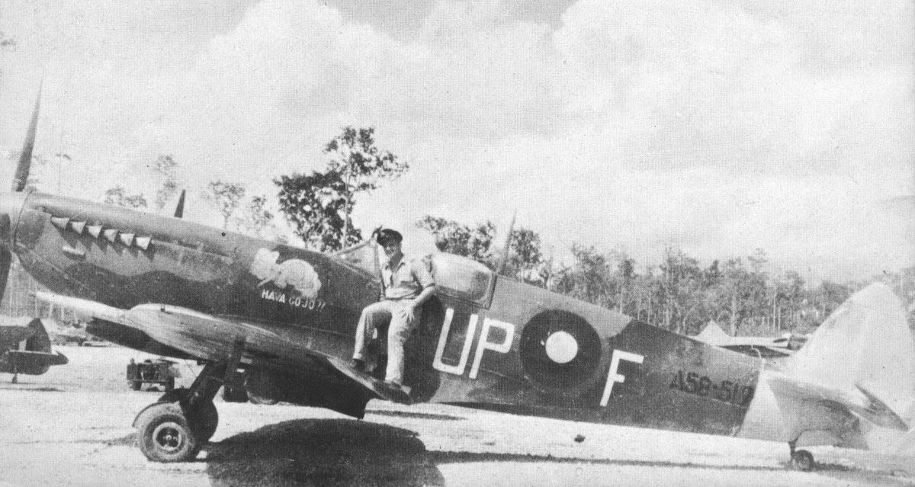
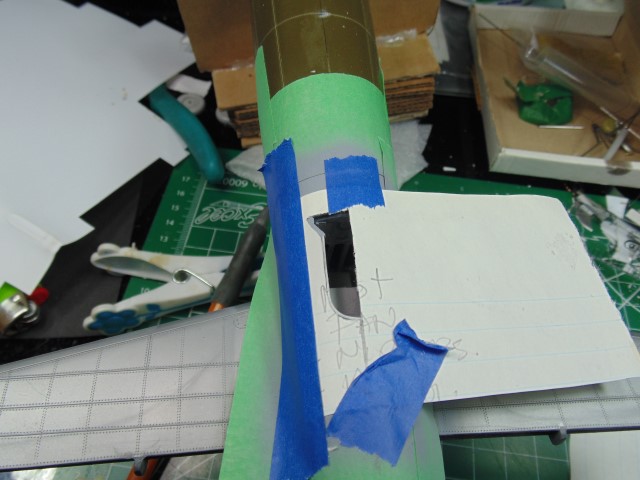
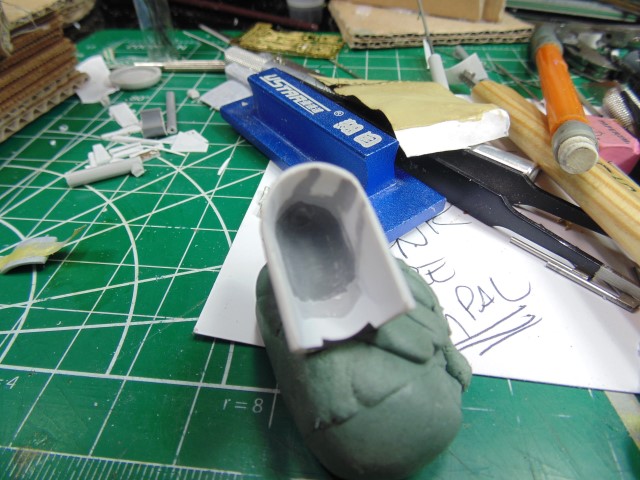
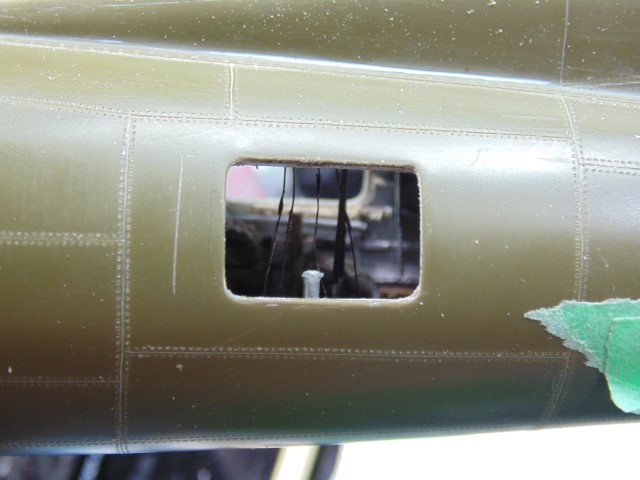
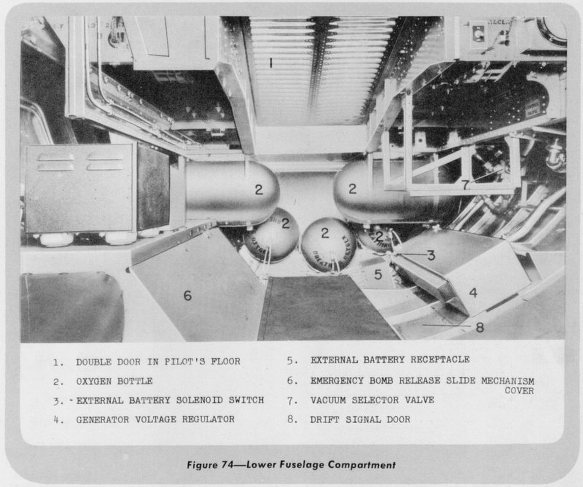
and what's not to like about the model door


vs. the real thing?


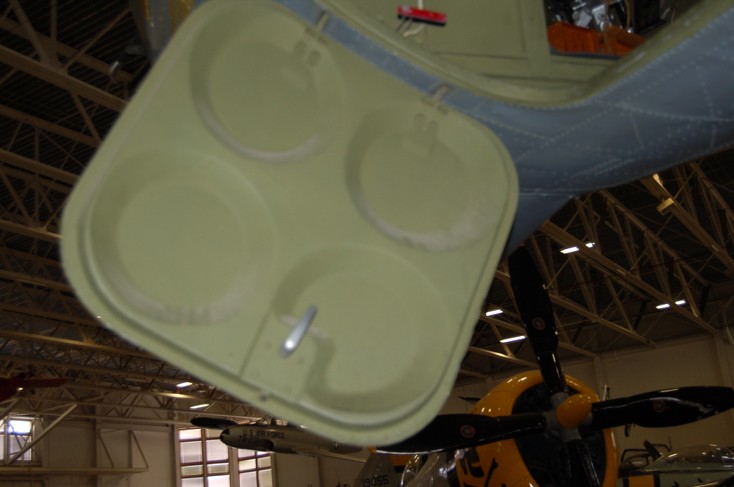
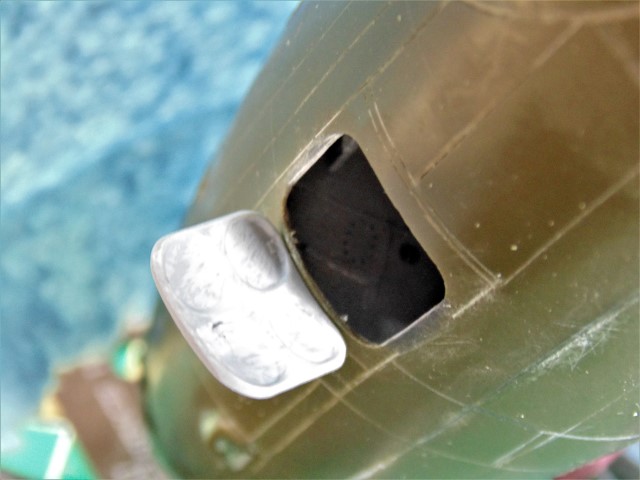
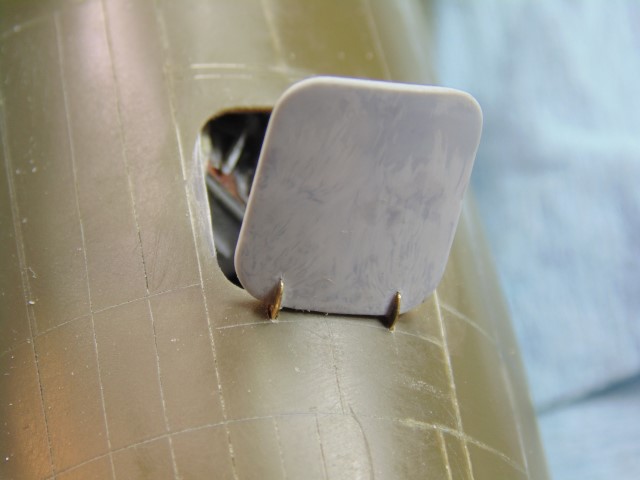
I call this the edge of a beautifully cut diamond!

_________________________________________________________________

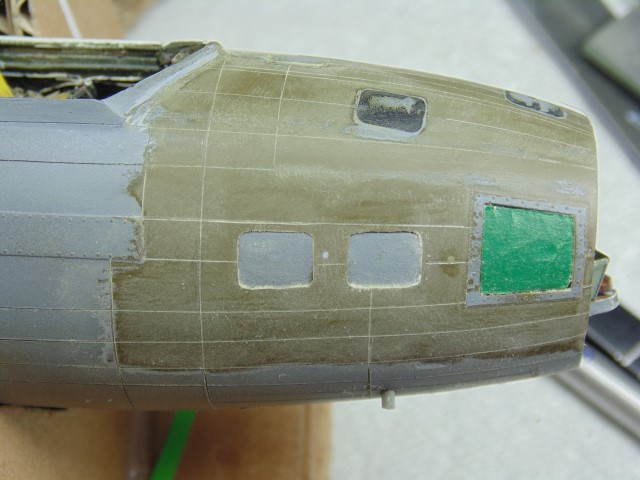
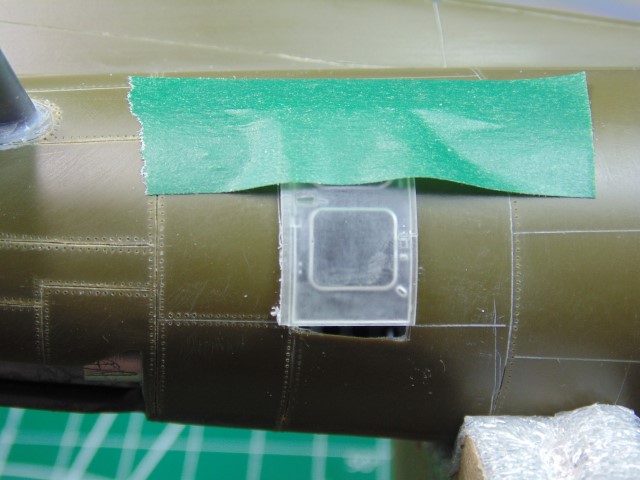
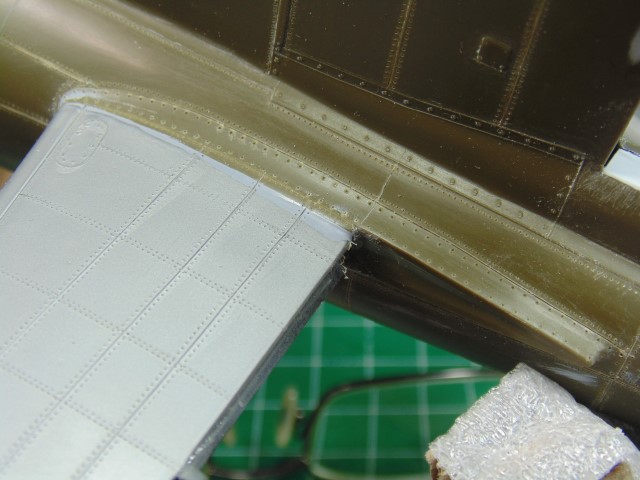
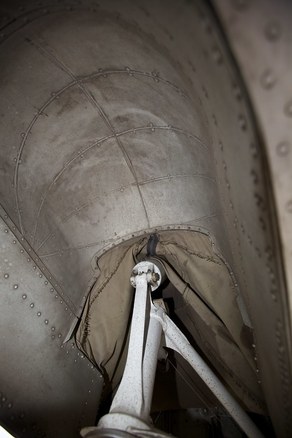
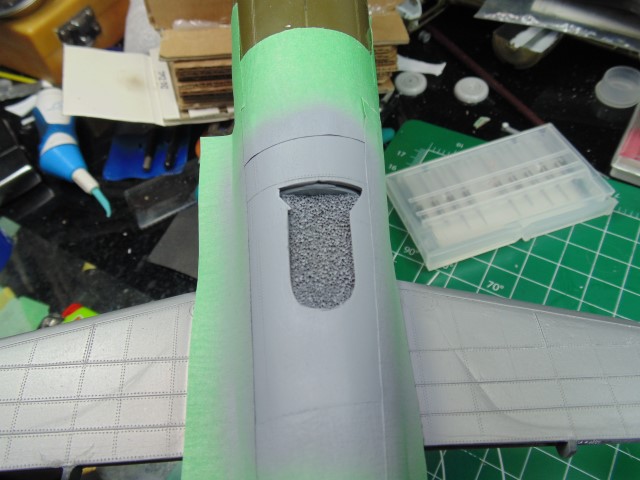
And here's the start to his re-do of the radio room roof. Before going to the pictures, here's his explanation of what you see:


Quoted Text

After taking some measurements and pouring over the drawings I set out to do panel lines. However, with the different colors from plastics, filled lines and old primer it was best to prep for re-prime and have a clean surface.


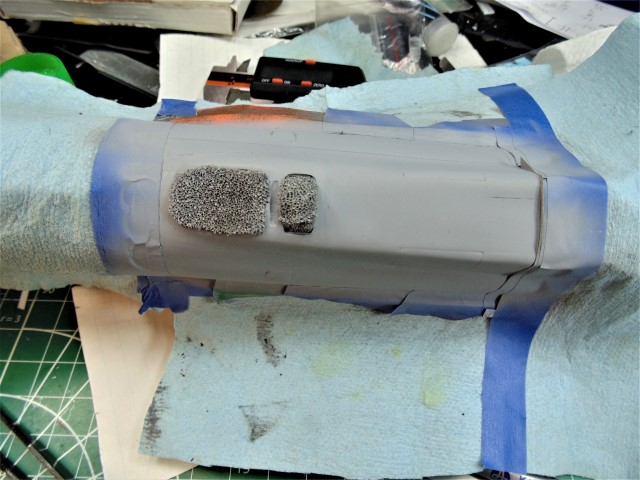
I'm happy with this. For me, the radio room roof was one of the most problematic areas of the whole build. Now I know it will have the right look.

More to follow, and I may even find time to make some small progress on one of my own projects this weekend.
Joel_W
Staff MemberAssociate Editor
AUTOMODELER
_VISITCOMMUNITY
New York, United States
Joined: December 04, 2010
KitMaker: 11,666 posts
AeroScale: 7,410 posts
Posted: Saturday, January 18, 2020 - 05:28 AM UTC
Brian,
Once again I'm just speechless.

I would love to attend a series of seminars by HG on how to accomplish just the basic detailing he does including absolutely perfect rescribing.

Joel