World War II
Discuss WWII and the era directly before and after the war from 1935-1949.
Hosted by Rowan Baylis
1/48 B-17F Build - 303rd BGs Luscious Lady
Redhand
#522
_VISITCOMMUNITY
New Jersey, United States
Joined: January 20, 2013
KitMaker: 1,460 posts
AeroScale: 1,443 posts
Posted: Saturday, August 08, 2020 - 01:55 AM UTC

Quoted Text

Brian,

As I said before, I'd really love to see your one of a kind master piece finished, and on display in some museum where it surely belongs before my time comes, or equally worse, but most likely my eyesight completely fails. (more eye surgery scheduled for Aug 24 in my one good eye as they couldn't find a lens script that I could actually benefit from, plus Cataract to be removed just for the fun of it).

Joel


Joel, your eyesight problems are not good news. It saddens me to hear of them. (Why is life so damn unfair!?) I also have been thinking of a proper place for this model when my time comes. If I had a choice, I'd pick the Air Force Museum in Dayton, where I and Luscious Lady's tail gunner once gave a dual presentation ---"Eighth Air Force History: Living It and Writing It." That was a fun time, but oh so long ago.
amoz02t
#192
_VISITCOMMUNITY
Kentucky, United States
Joined: November 25, 2009
KitMaker: 1,383 posts
AeroScale: 65 posts
Posted: Saturday, August 08, 2020 - 05:11 AM UTC

Quoted Text


Quoted Text

Brian,

As I said before, I'd really love to see your one of a kind master piece finished, and on display in some museum where it surely belongs before my time comes, or equally worse, but most likely my eyesight completely fails. (more eye surgery scheduled for Aug 24 in my one good eye as they couldn't find a lens script that I could actually benefit from, plus Cataract to be removed just for the fun of it).

Joel


Joel, your eyesight problems are not good news. It saddens me to hear of them. (Why is life so damn unfair!?) I also have been thinking of a proper place for this model when my time comes. If I had a choice, I'd pick the Air Force Museum in Dayton, where I and Luscious Lady's tail gunner once gave a dual presentation ---"Eighth Air Force History: Living It and Writing It." That was a fun time, but oh so long ago.


Yes! Voting for USAFM WPAFB Dayton please
Joel_W
Staff MemberAssociate Editor
AUTOMODELER
_VISITCOMMUNITY
New York, United States
Joined: December 04, 2010
KitMaker: 11,666 posts
AeroScale: 7,410 posts
Posted: Saturday, August 08, 2020 - 05:52 AM UTC
Brian,
The really ironic part is that I have a twin brother, and he's basically healthy and sound like a rock. He's right handed and I'm left handed, so life's been a struggle from day 1 as growing up everything was made for right handed people.

Like I said, I'm really looking forward to the day that Luscious Lady is finally finished and then put on display. A crowning achievement for you, HG, your friend from NC, and even Aeroscale as I'm pretty sure that no other build has had an honor like that before.

joel
Redhand
#522
_VISITCOMMUNITY
New Jersey, United States
Joined: January 20, 2013
KitMaker: 1,460 posts
AeroScale: 1,443 posts
Posted: Wednesday, August 12, 2020 - 01:08 PM UTC
BOMB BAY DOORS - A STUDY IN MODEL ENGINEERING

As model builders, most of us look for the best kits. What's better, the recent Tamiya 1/48 re-tool of the Mark I Spitfire or the new crop of offerings from Eduard? We are looking for the best-engineered kit in terms of detail, accuracy, and ease of construction.

Where a kit is good but lacks detail or requires accuracy corrections, if we're lucky, we will find an appropriate aftermarket set.

But sometimes, we have to do the "engineering" on our own.

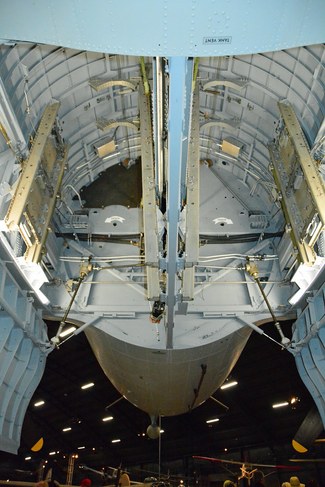
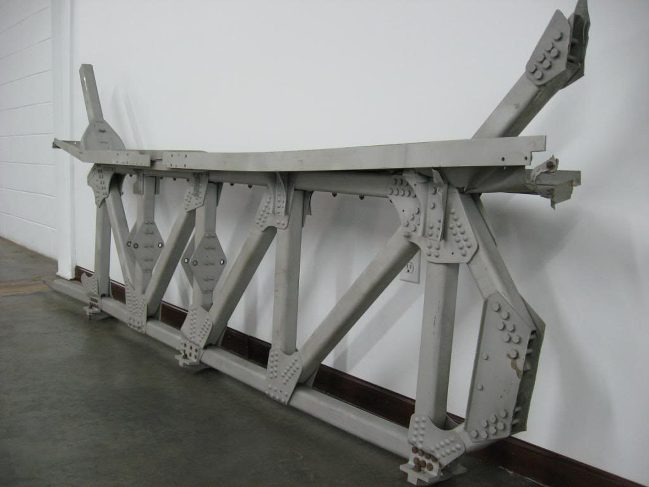
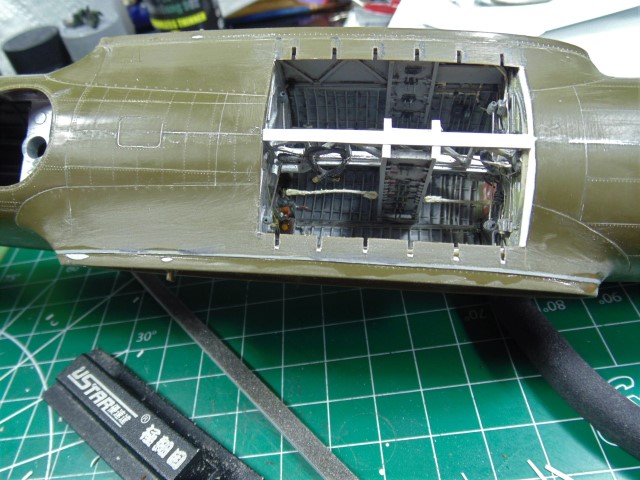
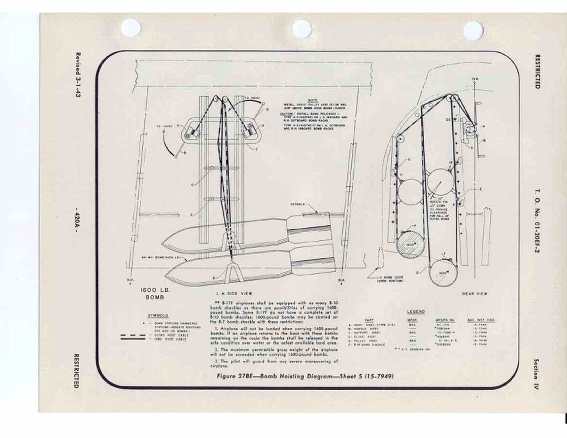
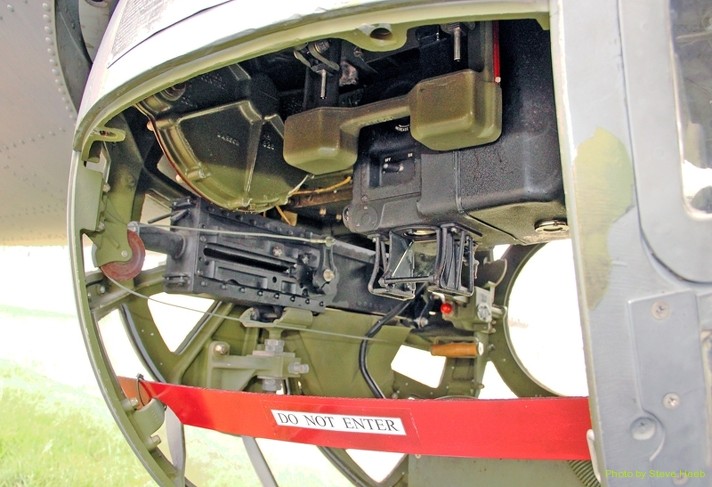
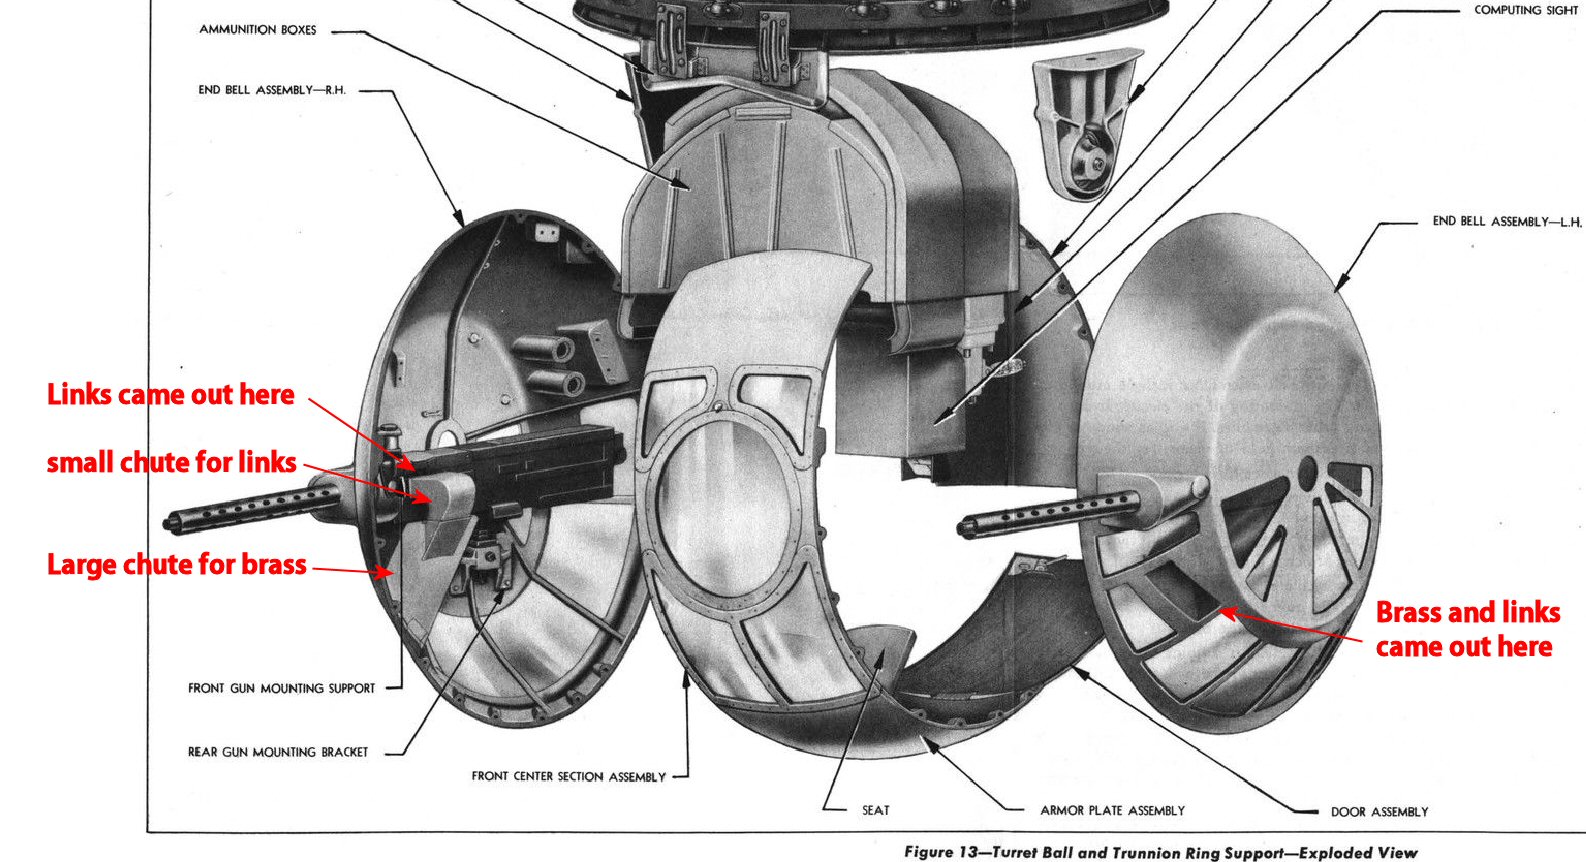
That's what I felt was before me when I decided to open up the Bomb Bay of Luscious Lady and use this obscure bomb bay resin detail set that I got from the Czech Republic.

I knew from the beginning that the doors would pose a problem. I think the supplier's intent was that one would simply drill holes for the legs along the port and starboard edges and basically be done with it. I wasn't sure how I would approach the problem, but I knew it was going to be a tough one.

What I didn't expect was how HG would approach the job. I can only describe his work here as another example of a near-perfect modeler's model engineering job.

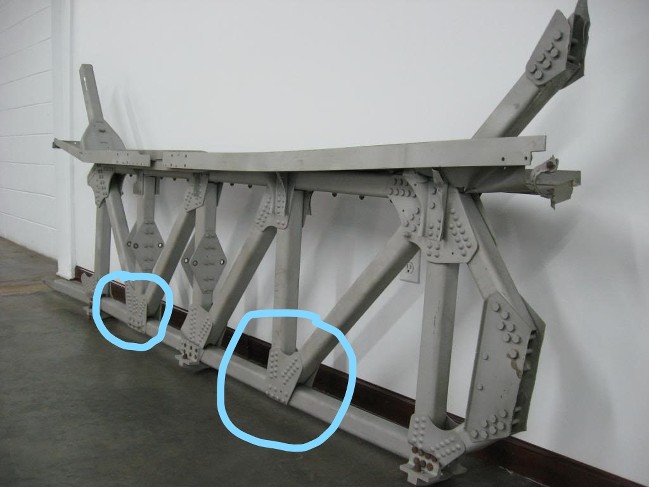
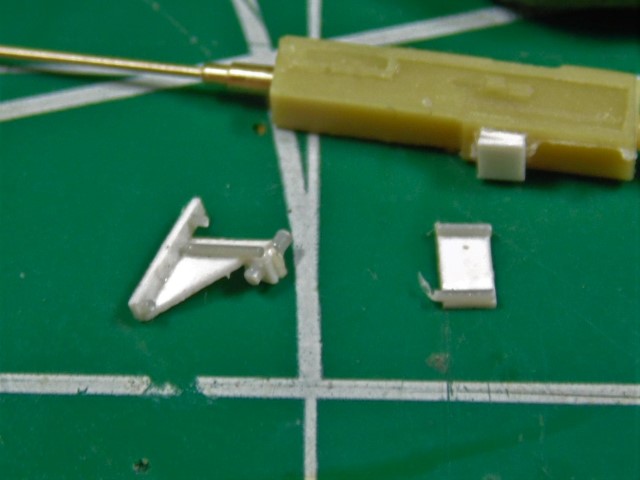
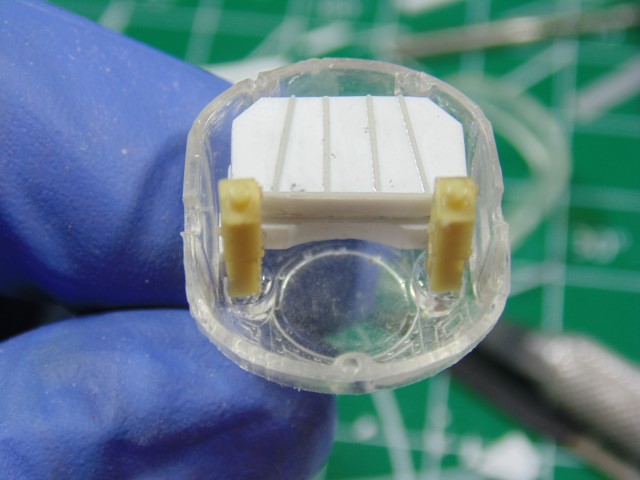
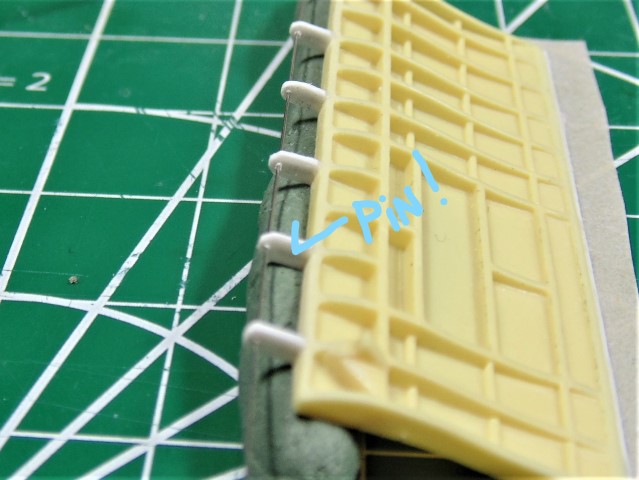
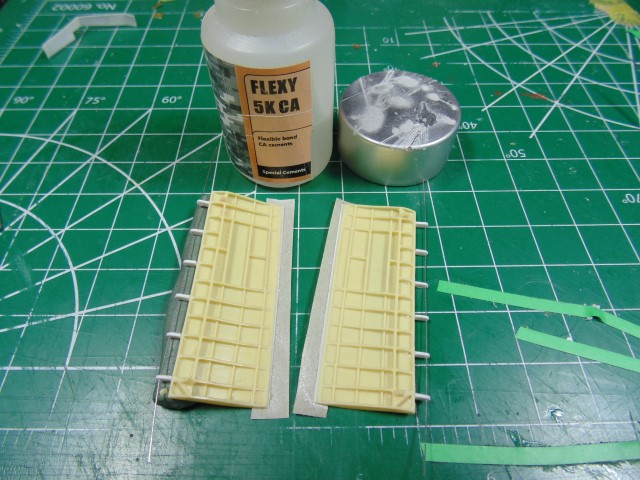
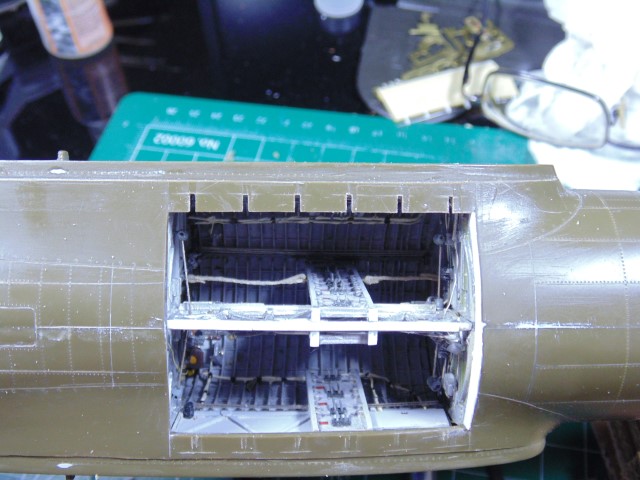
You know from the prior posts that he cut all the legs off the door that had two missing legs. He did that with the other door as well.


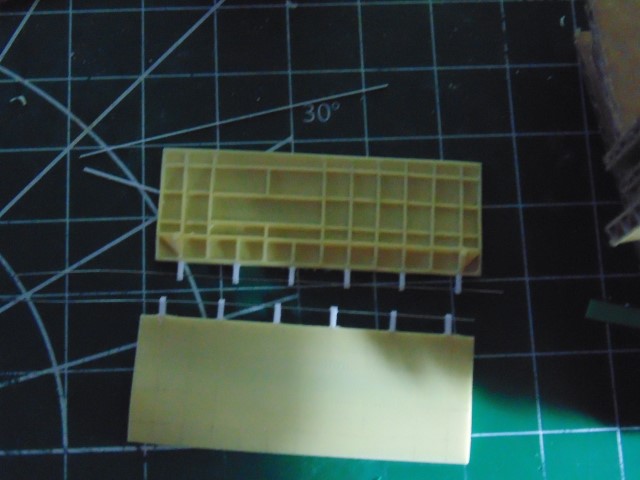
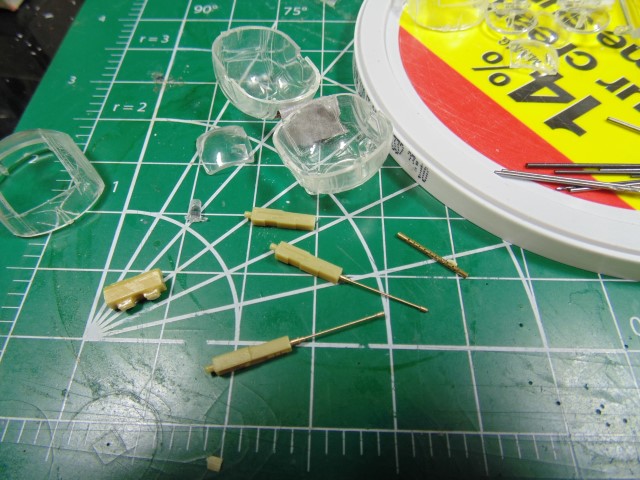
but unsatisfied with the appearance of the legs


he thinned them down. Compare the one on the far left with the rest below.


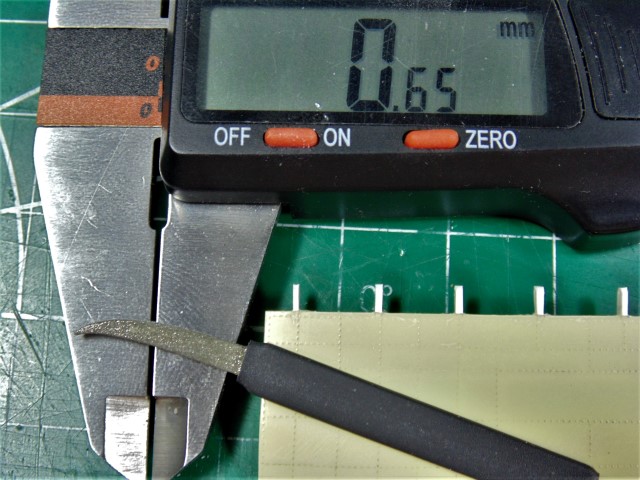
This required some pretty tight tolerances.


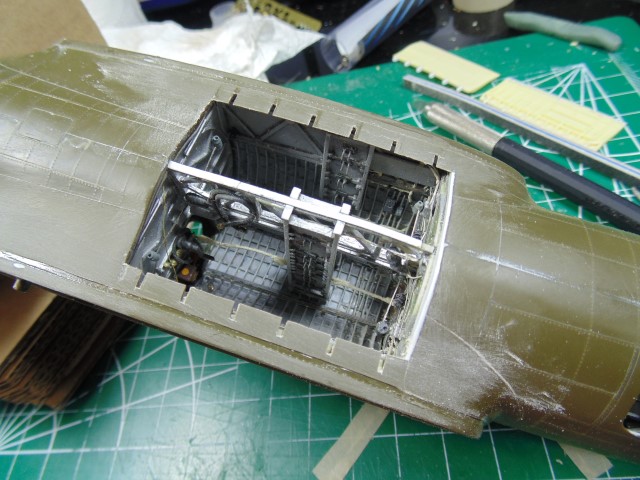
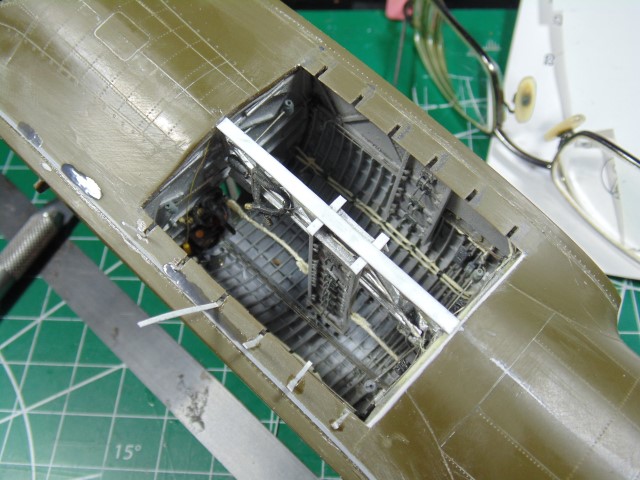
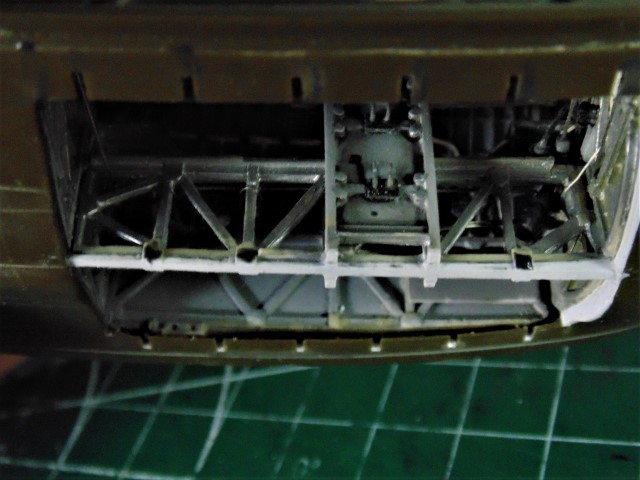
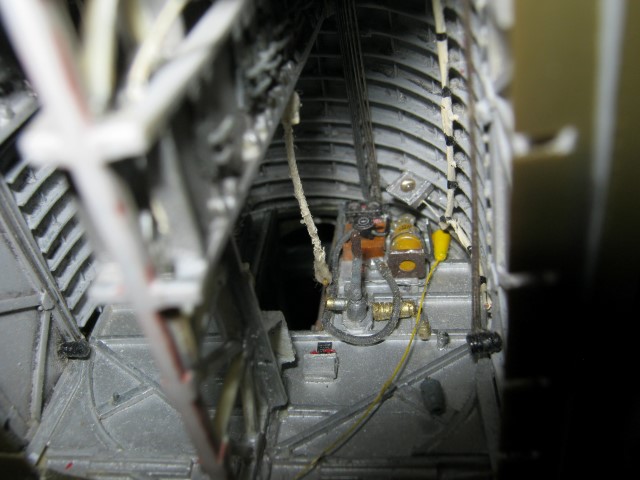
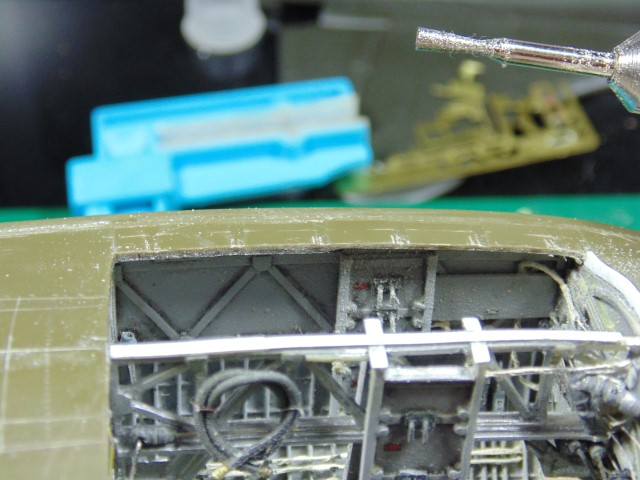
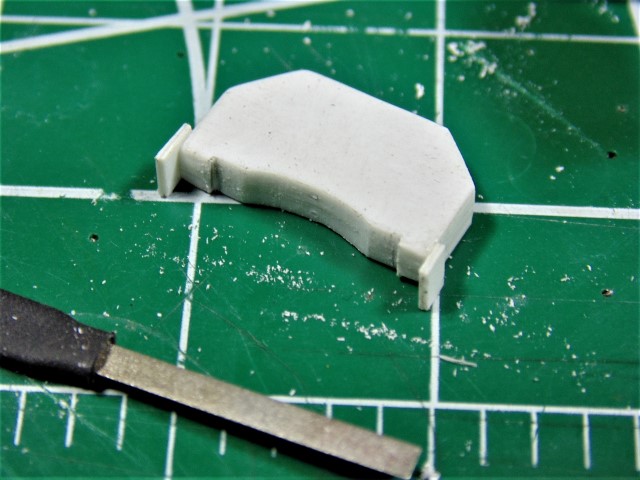
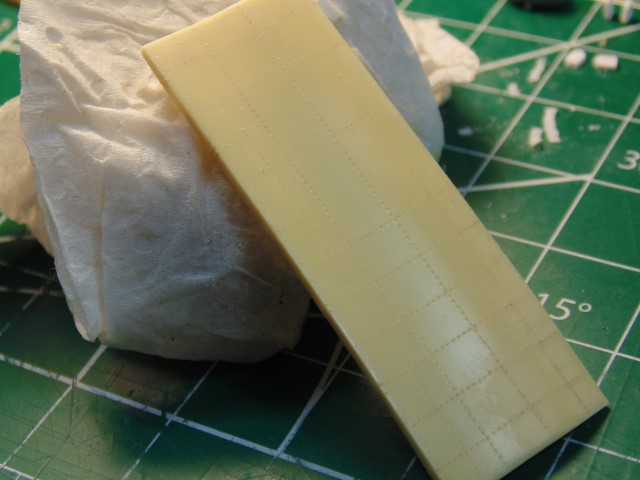
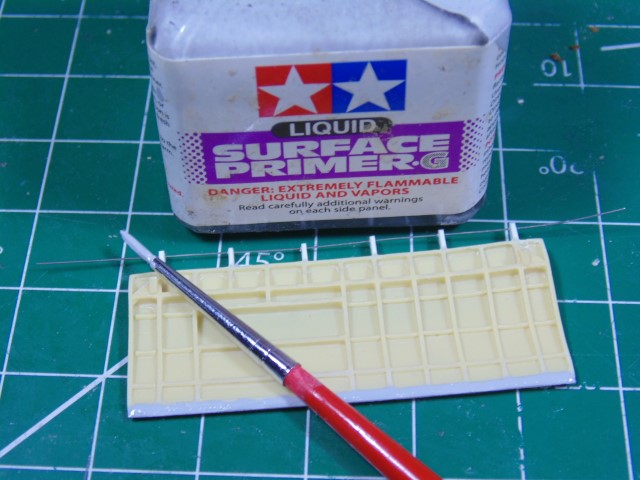
In addition to getting the door legs/hinges correct, he also worked on the doors themselves sanding them where appropriate so that they look more like the real thing. You can get a sense of that here,


But the impression is subtle and I'm not sure I can illustrate it fully.

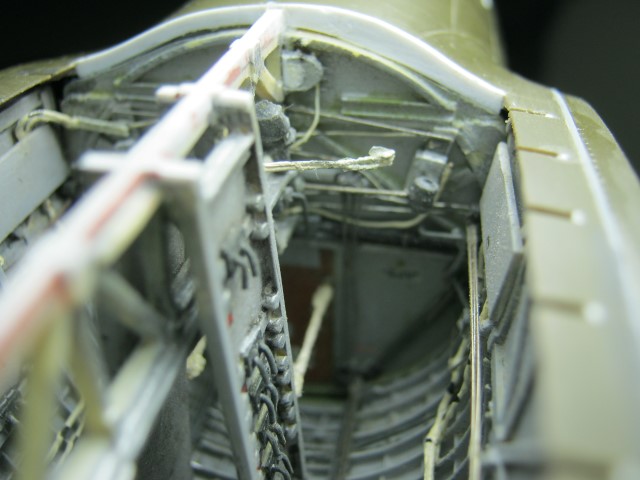
However, you can see other areas that he corrected that I confess I would've overlooked completely


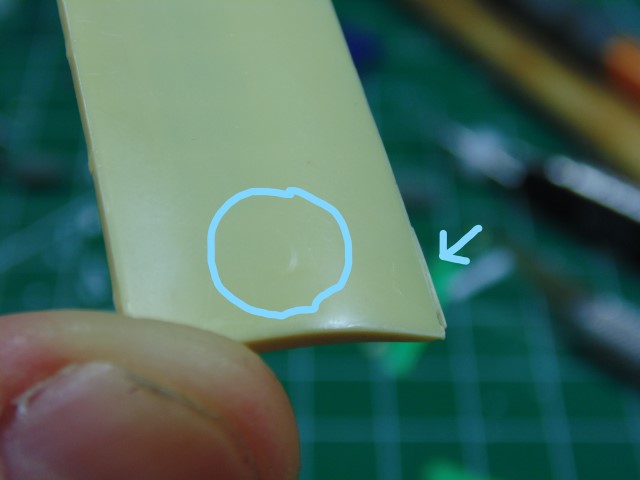
Maybe it's just me but I describe this as seeing things that I can't.

And of course, in making the doors ready he riveted panel lines.


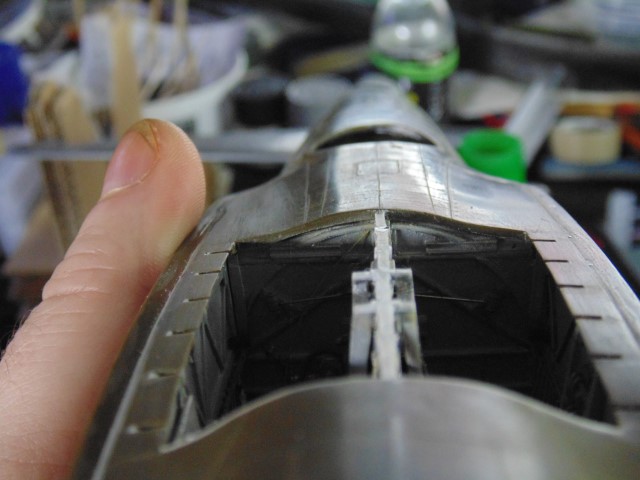
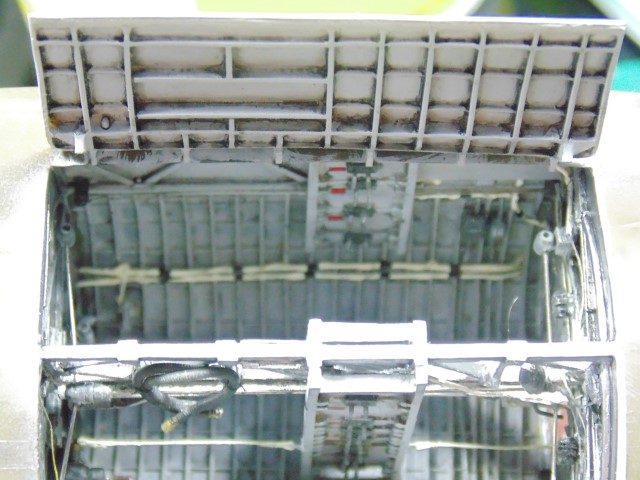
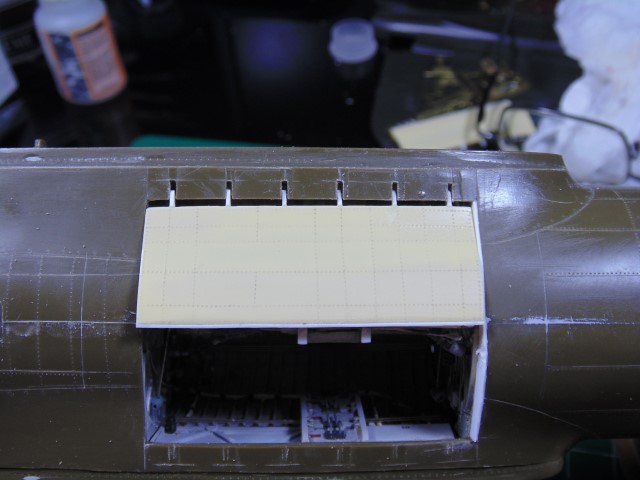
But the biggest surprise for me was what came next. Look, we all know that the doors are going to be positioned opened, so who really cares how they will look closed? "No one will ever be able to tell."

Well, I won't surprise you by saying that sometimes that is not good enough. HG's plan all along was to make sure the doors fit perfectly in the closed position as well as in their ultimate open position.

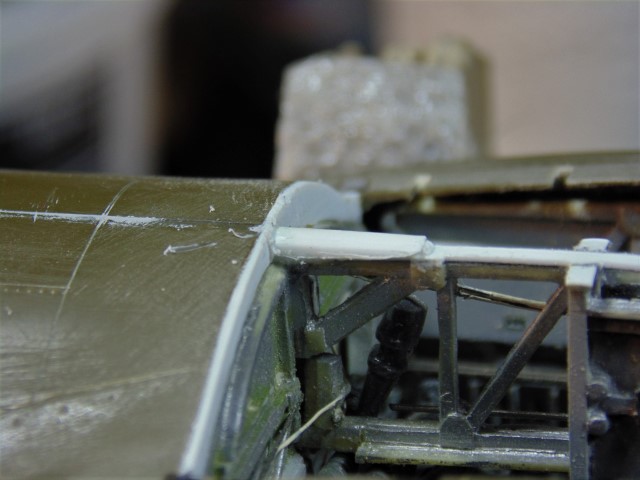
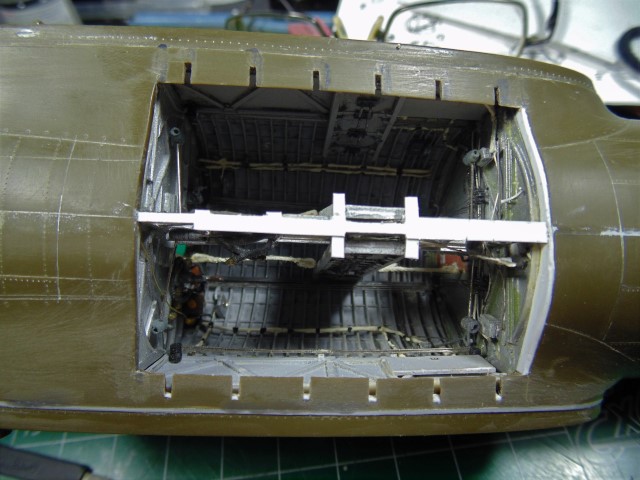
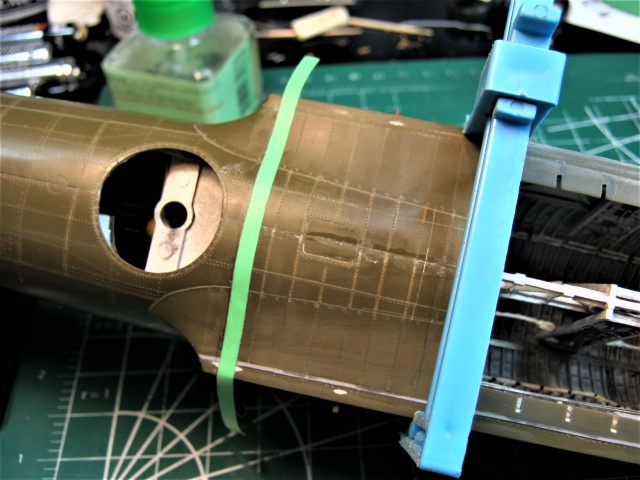
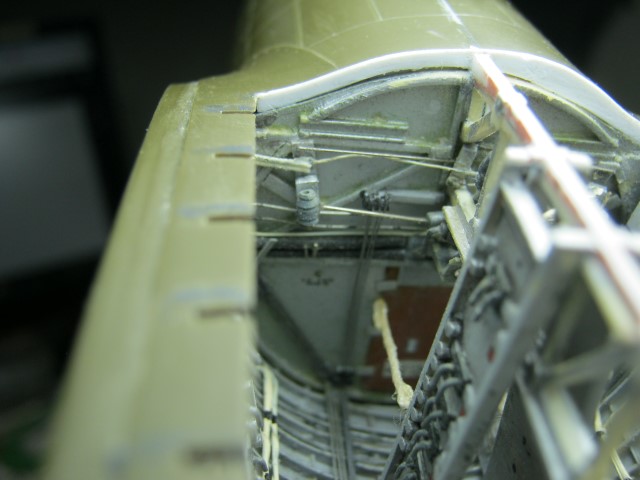
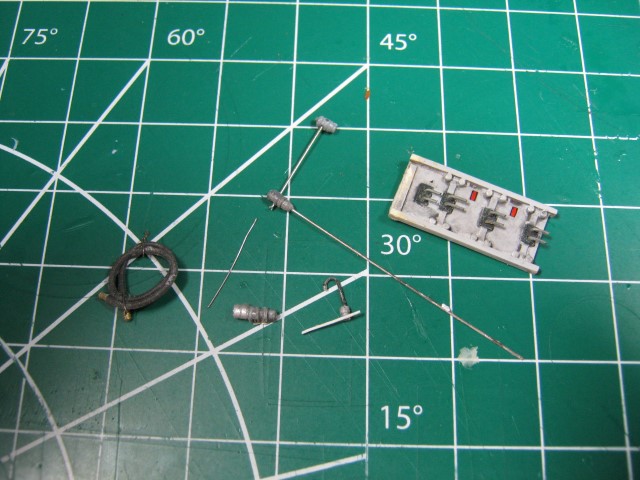
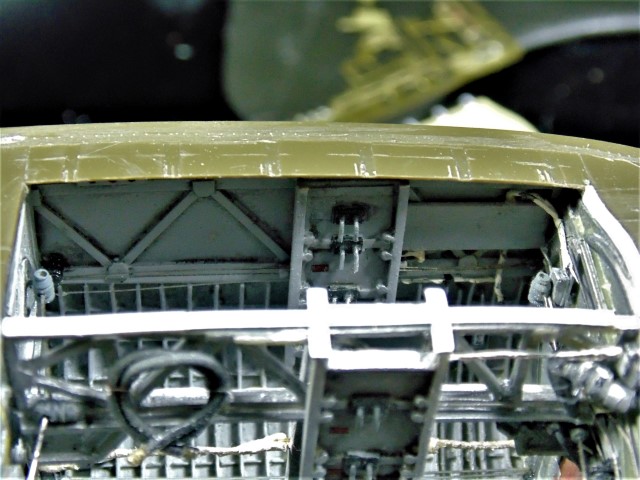
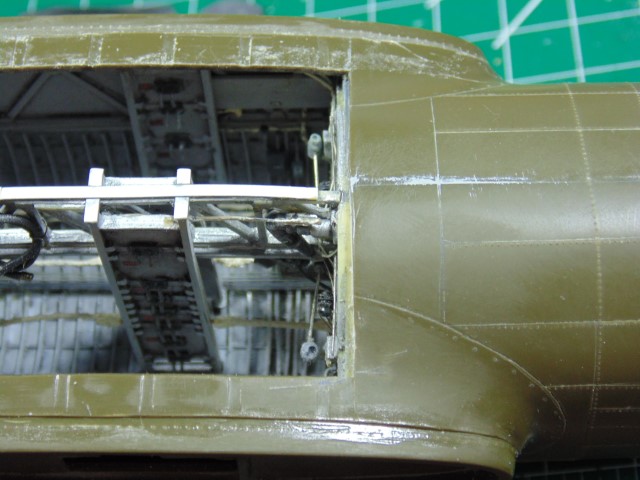
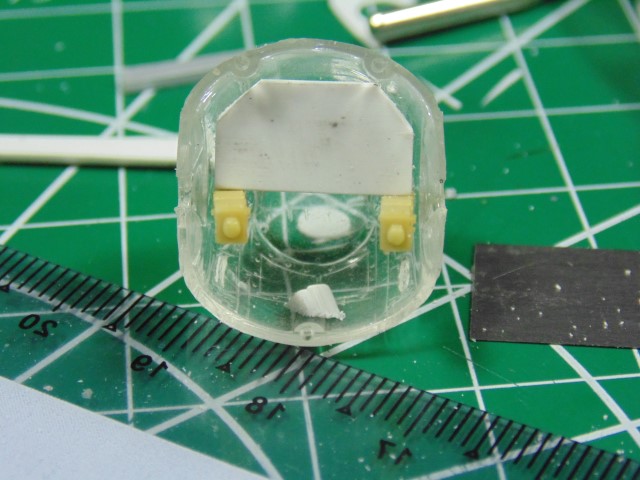
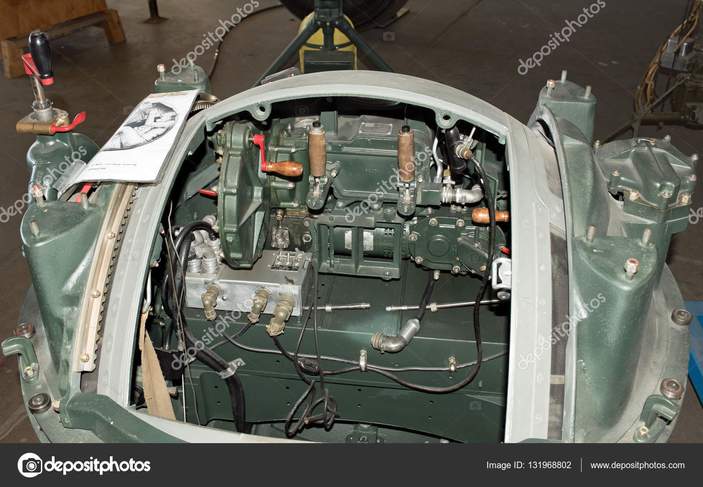
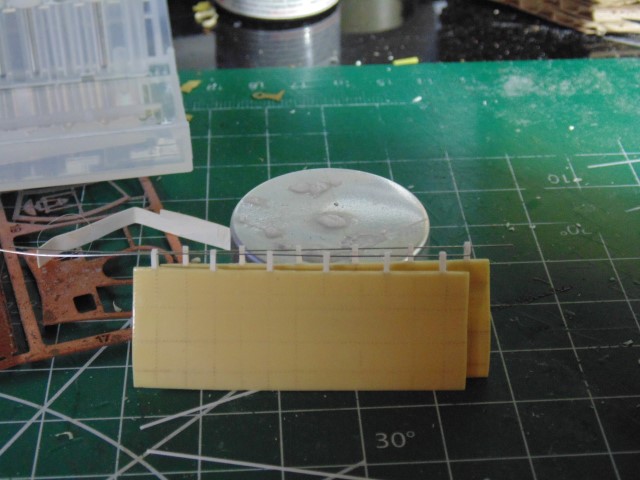
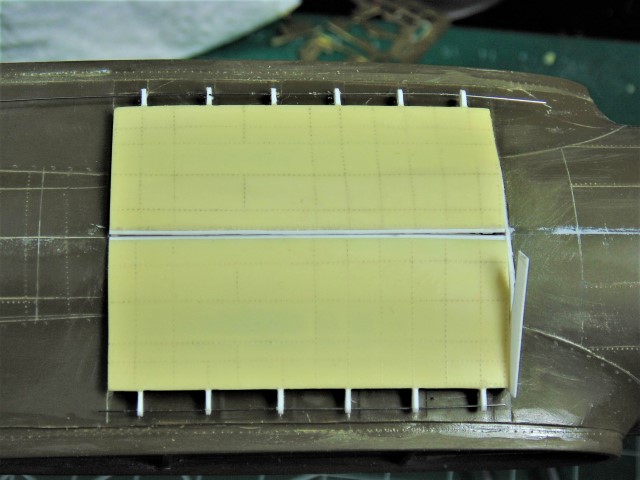
Here are some test fitting shots.


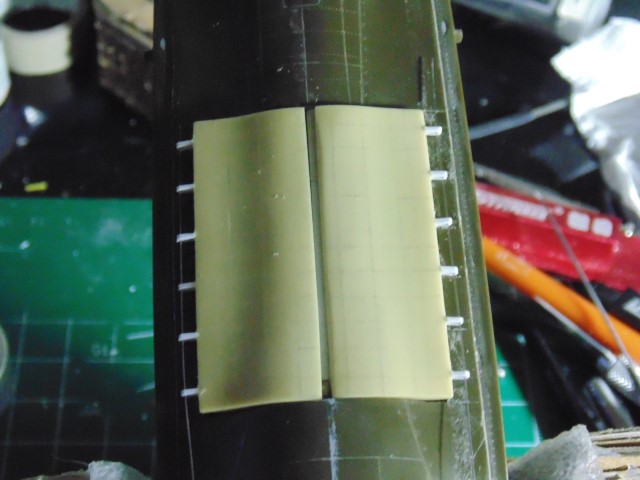
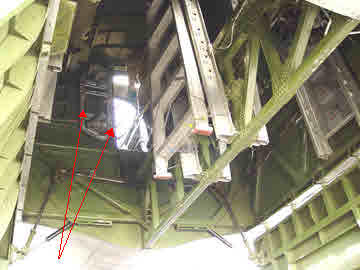
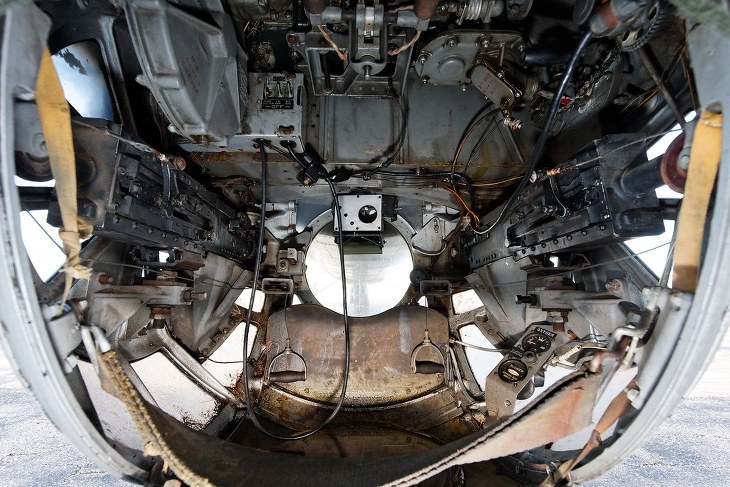
We can see from the above that there is a big gap between the door edges and the catwalk, as if the catwalk was the closure point for the inner door edges. But that isn't the case. The doors closed over the bottom of the Catwalk.

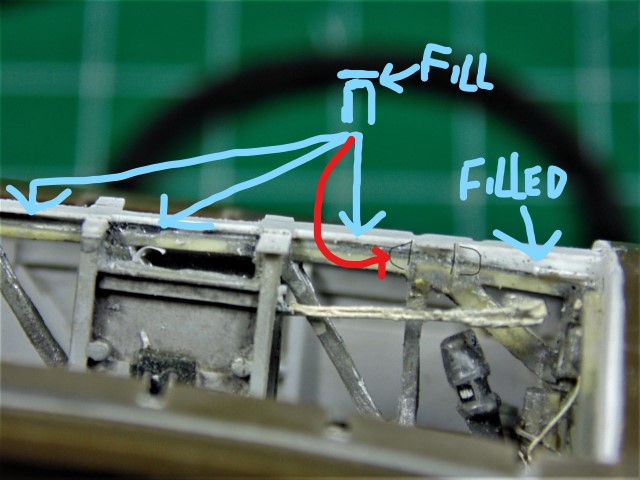
How to fix this? Well, extend the door edges.


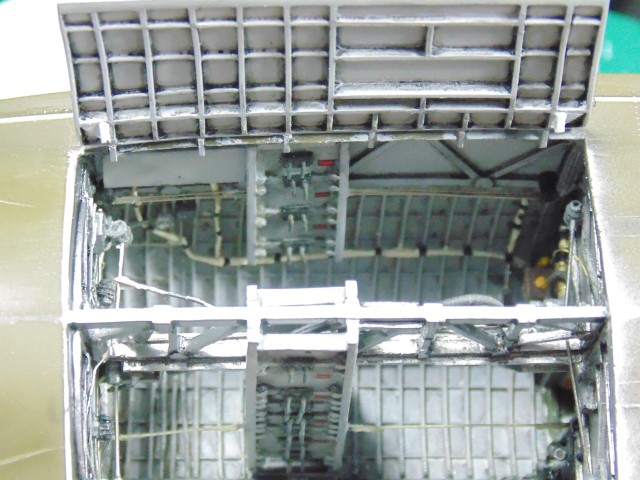
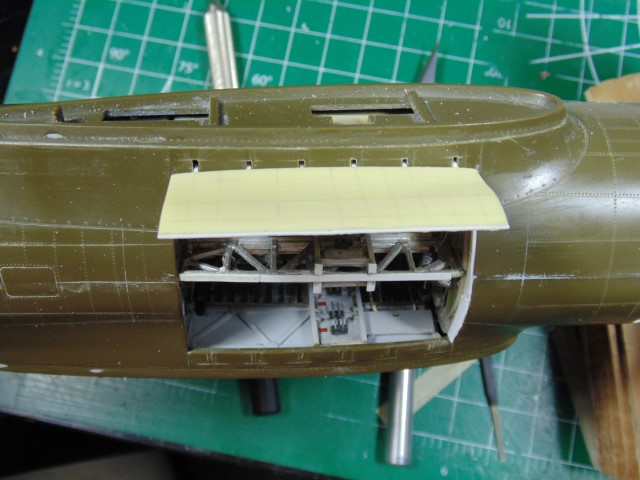
I still don't know how he managed to complete it but I'm not arguing with success.


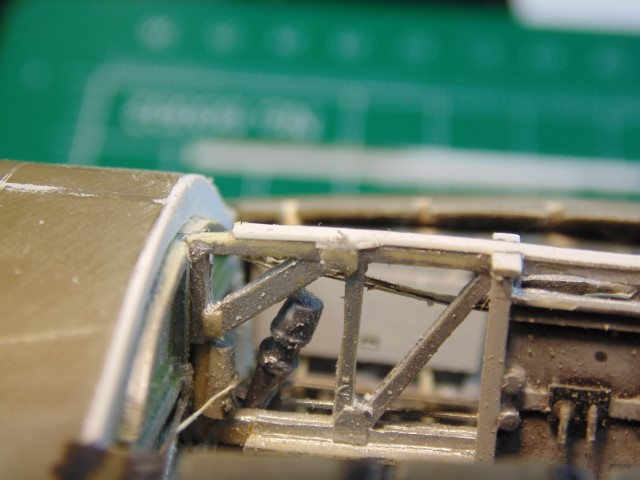
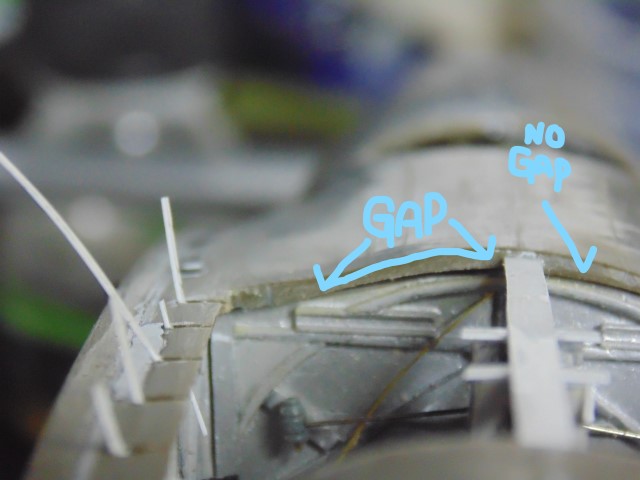
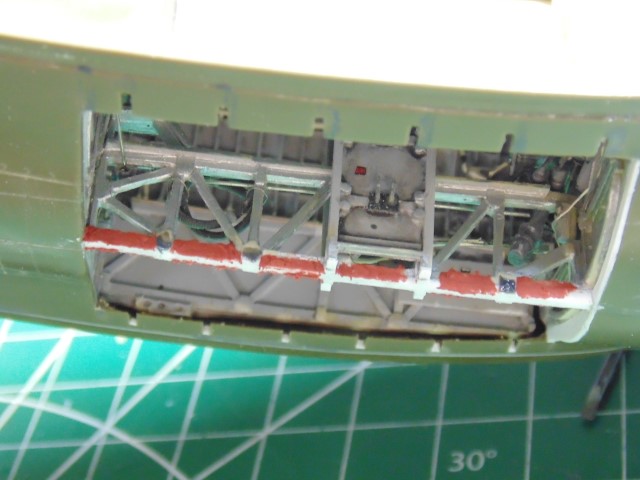
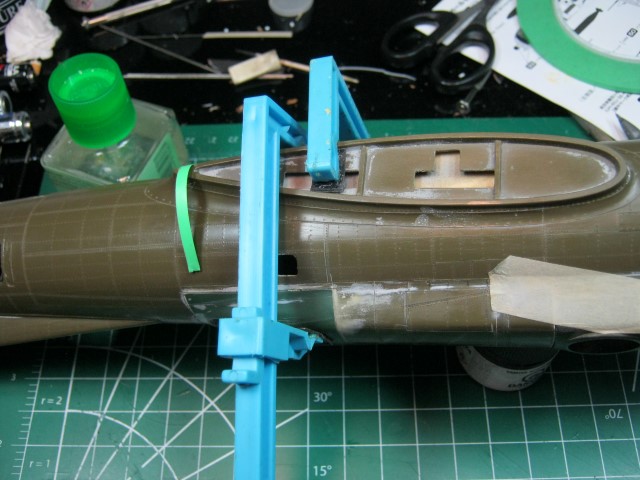
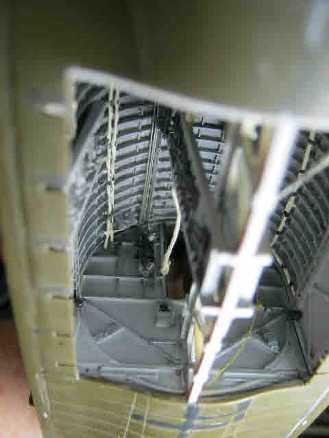
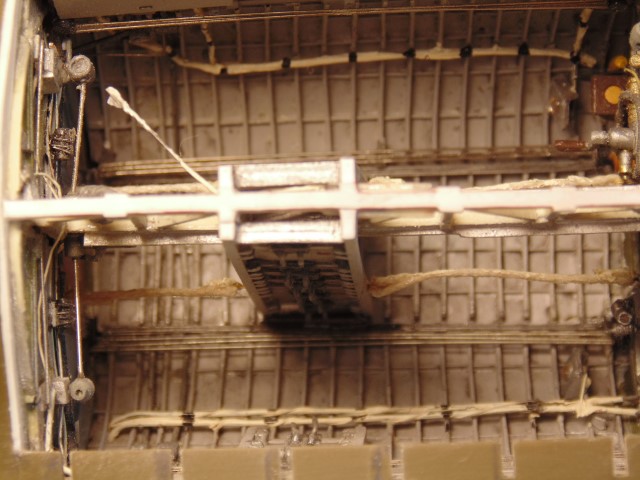
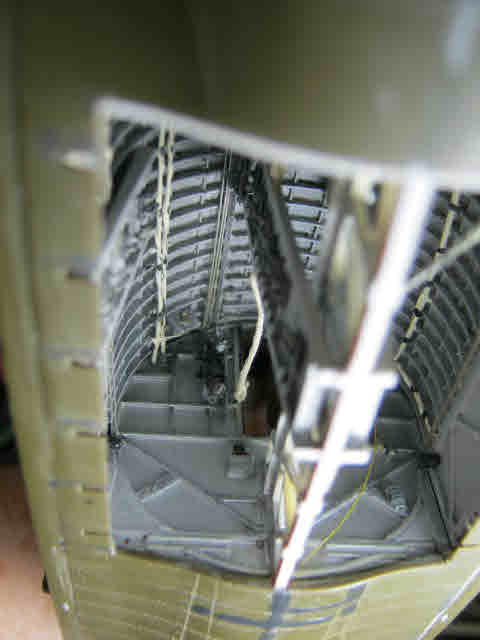
You see here that he is getting closer, but there are still edges to trim and straighten. Both on the doors themselves and on the fore and aft bulkheads into which they fit.


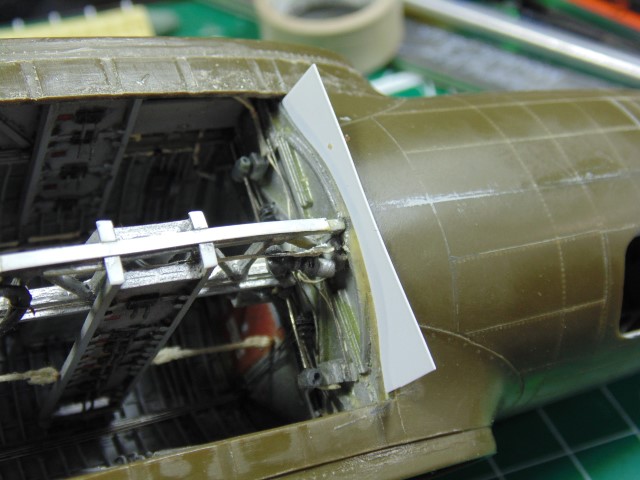
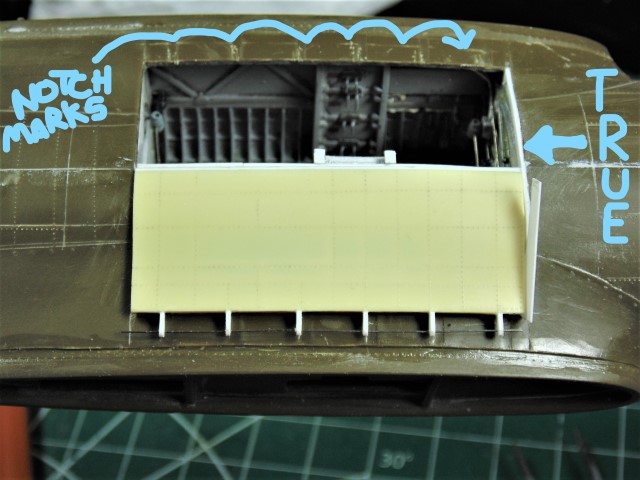
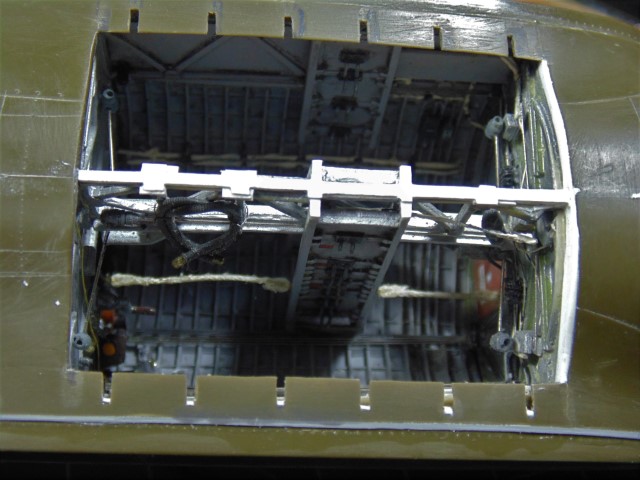
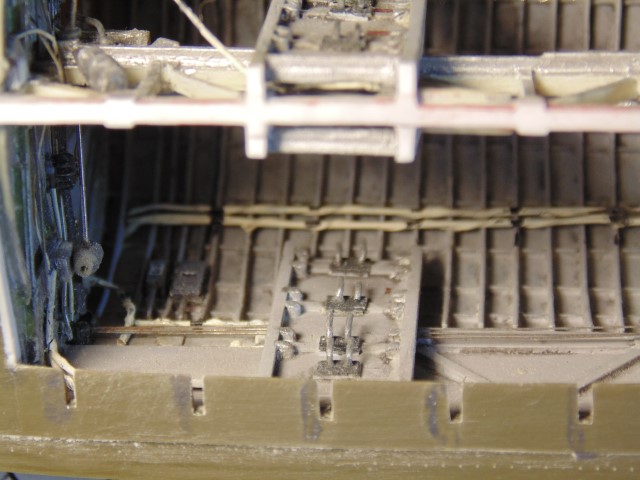
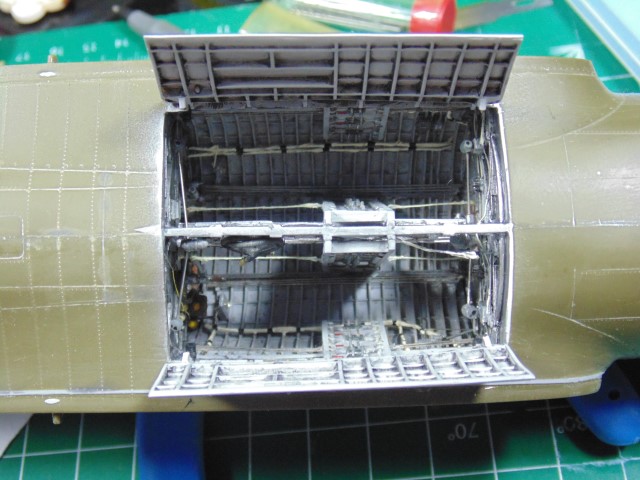
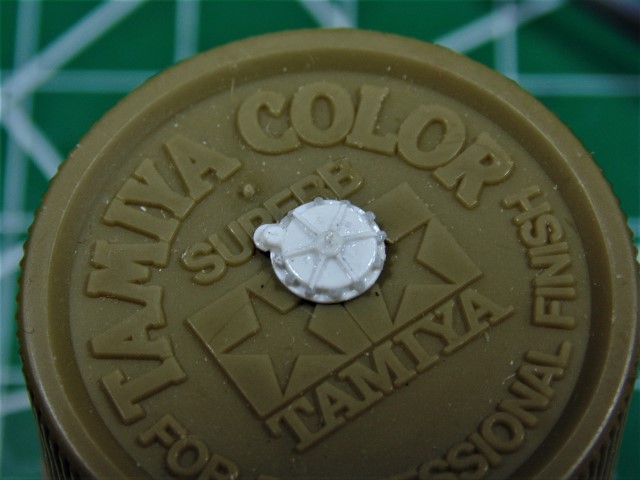
Finally, with the precise drilling of the notches into which the legs will fit


We get a glimpse of what his mind's eye saw from the beginning.

I don't call this plastic modeling. I think of it as art.
Joel_W
Staff MemberAssociate Editor
AUTOMODELER
_VISITCOMMUNITY
New York, United States
Joined: December 04, 2010
KitMaker: 11,666 posts
AeroScale: 7,410 posts
Posted: Thursday, August 13, 2020 - 02:06 AM UTC
Brian,
I'm truly speechless after seeing his work on the bomb bay doors.
Joel
Redhand
#522
_VISITCOMMUNITY
New Jersey, United States
Joined: January 20, 2013
KitMaker: 1,460 posts
AeroScale: 1,443 posts
Posted: Friday, August 14, 2020 - 02:28 PM UTC
BOMB BAY DOORS (CONTINUED)

For comparison's sake, here's a view of the Memphis Belle's Bomb Bay well into restoration.


And here's how the same space looks in Luscious Lady.


First time I've had a real look inside in a long, long time.

Note that the door hinge slots are open on both sides now. (HG tells me that there's some truing-up to do still.)

Also, another focus area is detailing the central structural component of the Bomb Bay.


Expect to see more rivets than you do here.


The deletions and additions to the "bottom on top" part is to create a surface that will allow full closure of the doors.


It's clear some repainting of subcomponents will be necessary too.

More to follow!
Joel_W
Staff MemberAssociate Editor
AUTOMODELER
_VISITCOMMUNITY
New York, United States
Joined: December 04, 2010
KitMaker: 11,666 posts
AeroScale: 7,410 posts
Posted: Saturday, August 15, 2020 - 02:14 AM UTC
Brian,
Can't wait to see how HG works his magic on the bomb bay. Should be world class modeling for sure.

joel
Redhand
#522
_VISITCOMMUNITY
New Jersey, United States
Joined: January 20, 2013
KitMaker: 1,460 posts
AeroScale: 1,443 posts
Posted: Wednesday, August 26, 2020 - 05:37 PM UTC
— and done a hundred things
You have not dreamed of –


The cognoscenti will recognize these lines from a classic WWII aviation poem, and for the rest of yuz there's the link. I had the advantage of growing up in a 1950s Air Force family, so the words are second nature to me.

Maybe that's why I thought of them to describe HG's ongoing refinement of Luscious Lady's bomb bay, taking it "to the next level," and then some:

Sunward I’ve climbed, and joined the tumbling mirth
of sun-split clouds


OK, I've used my quota of flowery descriptions for this post. It's time to head earthward to a work table in Edmonton to see what's new. I will just showcase the work, centered mainly on delicate improvements to that central spine that is the heart of the bomb bay structure.


I am told the oversized strip in the center is to allow (somehow) for detailing of "fishplates." And what are those?


A preview of other repairs.


Some systematic thinning of that central beam.


And now we get to the really detailed repairs/upgrades, or shall I say the prep work for them that I had not dreamed of.


Thinned down and getting there.


Looking down the straight and narrow.


Ya know, some things are best seen in the half-light.


Wait, how did that get there?

Long time readers will recognize the image, which has appeared in the blog before. Call her the model of this model, an alternate version of "Luscious Lady," courtesy of painter Fabian Perez.

Now back to the real image in half-light.


And we close with some jarring full-daylight red lipstick color filler covering the gaps that HG pointed out earlier.


I have no doubt the red will disappear into a seamless join between the styrene strip and resin spine.

Dragon164
#226
_VISITCOMMUNITY
British Columbia, Canada
Joined: February 20, 2012
KitMaker: 1,909 posts
AeroScale: 508 posts
Posted: Saturday, August 29, 2020 - 07:35 AM UTC
Hey Brian!
Looks to be coming along nicely!

Nice work HG!

Cheers Rob.
Redhand
#522
_VISITCOMMUNITY
New Jersey, United States
Joined: January 20, 2013
KitMaker: 1,460 posts
AeroScale: 1,443 posts
Posted: Saturday, August 29, 2020 - 11:19 AM UTC

Quoted Text

Hey Brian!
Looks to be coming along nicely!

Nice work HG!

Cheers Rob.


Yes, it is! Thanks for looking.

Brian
rdt1953
_VISITCOMMUNITY
New Jersey, United States
Joined: February 06, 2015
KitMaker: 1,098 posts
AeroScale: 900 posts
Posted: Saturday, August 29, 2020 - 12:24 PM UTC
And so it goes tauntingly- inching ever so close to the finish line leaving a captive audience holding their collective breaths .
You and a certain Mr Barnes are a pair of cruel directors leaving your followers hanging by their fingernails anxiously awaiting closure and yet not wanting it to end at the same time . LOL - Keep it up !
Cheers from a fan - Mr Redcircles
Redhand
#522
_VISITCOMMUNITY
New Jersey, United States
Joined: January 20, 2013
KitMaker: 1,460 posts
AeroScale: 1,443 posts
Posted: Saturday, August 29, 2020 - 03:50 PM UTC

Quoted Text

And so it goes tauntingly- inching ever so close to the finish line leaving a captive audience holding their collective breaths .
You and a certain Mr Barnes are a pair of cruel directors leaving your followers hanging by their fingernails anxiously awaiting closure and yet not wanting it to end at the same time . LOL - Keep it up !
Cheers from a fan - Mr Redcircles


Those are rare compliments, Richard, much appreciated. Looking at your work on the Zero and other projects – that miraculous conversion of a Japanese fuel tanker into a starter truck, to mate up with an Oscar – and the kind of research and technical construction skill and planning you bring to things like the Kaga flight deck for the Zero, this is high praise indeed.

As I've said before, and as I said X number of years ago when I started Luscious Lady, I still consider myself a little more than an advanced journeyman and I certainly don't expect to ever equal to kind of work that you and HG do. I write better than I build.

However, I do take real pleasure in the talent my enthusiasm has drawn to this cause. When HG took over the actual build he said he would be my hands, and he's been that and so much more. I am really amazed at the things that he has been able to accomplish, and I know that the collective effort will result in a "build for the ages."

It will be my dream until the actuarial factor dictates otherwise, but I do plan for it to have a good home in Dayton, in what I still stubbornly call "the Air Force Museum."

One of the really cool things about my participation in this is the communications that HG and I have had between ourselves and with Karl to get things right. The goal was always to make the most accurate B-17F possible, and I think we're on track to achieving that. It wouldn't happen without the three of us collaborating, and for that, I'm most grateful.

It is also fun doing the posts, and the little modeling that I can manage with my work schedule. However, I will be going back to the basement sometime Sunday to install a few more instrument dials in the first Guardian's instrument panel. One of the neat things about that, which almost no one will see or appreciate, is that the decal set I have can be matched to a technical photo showing what goes where, so the panel really is pretty similar to the real thing.

A damned ungainly beast but I'll stick with it, or them.

I hope to have another LL post up in the next couple of days. There will be more interior shots of the bomb bay, with various cleanup items by HG. It's strange looking at something I devoted so much time to five years ago, knowing that it is still "under construction" and is being enhanced still further.
Redhand
#522
_VISITCOMMUNITY
New Jersey, United States
Joined: January 20, 2013
KitMaker: 1,460 posts
AeroScale: 1,443 posts
Posted: Sunday, September 06, 2020 - 03:54 PM UTC
SPRING CLEANING IN THE FALL

I think we can say at this point the exterior of the lower fuselage around the bomb bay is basically done. Compare this


to this


"You get the picture."

H.G. accomplished this despite a setback: The center seam


Quoted Text

Snapped like a thunder crack and scared the living $%#& out [of] me!!! Some filling and sanding needs doing here on the camera door, back wing root flaps support and the misangled rivet line by the bay edge. * * * I'll have more later because this seam has to harden enough first.


So, the next step is spring cleaning and repair/upgrading of parts of the bomb bay interior.

My work way back when on the stbd after bulkhead..


And now.


The other corners now, starting with port and stbd forward.


On to the aft stbd bulkhead with the portable bomb hoist still in place, though barely visible in the light.


Here's what I'm talking about.


Yes, there were things taken out.


But they will be placed back in situ.


And H.G. will


Quoted Text

begin masking off and covering places to protect your paint, detail and decals. Then will paint and add decals. I assume more of the red rectangles are missing than on the short removed rack. Lots of work I didn't expect to do so things will slow down because it's such fine work, especially the decals going in an awkward spot(s).


Somehow, I feel his work here will exceed expectations (again). Let's wait and see.
Redhand
#522
_VISITCOMMUNITY
New Jersey, United States
Joined: January 20, 2013
KitMaker: 1,460 posts
AeroScale: 1,443 posts
Posted: Friday, October 02, 2020 - 03:19 PM UTC
BOMB BAY MAKEOVER COMPLETE (MORE OR LESS)

Here is the definition of the word:


And here is the result following a month's work.

Some BEFORE shots or H.G. work in preliminary stages.


Dirty and rough with many gaps, and a waaaaaaaaay overlarge set of catwalk ropes.


I'll leave aside the already thoroughly documented and meticulous cleanup of the fuselage areas adjacent to the bomb bay doors, and the delicate crafting and recutting of both the bomb bay door hinges and hinge openings. You can tell a master's work by the way when finished it looks so clean you'd think it was a Tamiya shake-n-bake and not the result of major "plastic surgery."

OT. I've had a helluva week in COVID isolation at my home office working to get immigration applications in to beat a massive filing fee increase that a federal district court declared unlawful at the last moment (whew!) so am still a bit frazzled. So let me go straight to the good stuff and let's see if you can see the difference.

AFTER:


Look at the straightened keel of the catwalk, and the delicate, new rope handrails that H.G. installed. How he got in there to do the replacement still mystifies me. I am told it took a full day in the life.

I love the clean fit of the door, which you can also see from the other side.


Note also the repainting of the overhead to eliminate excessive and improbable weathering executed by yours truly years ago. I like the new look.

Finally, here's a straight overhead shot, to put it all "in perspective."


Notice how beautifully blended in the fore and aft bulkheads are with the fuselage.

In a way, the best is yet to come. H.G. has on order delicate metal tubing to create the arms connecting the doors to the actuator motors and gearboxes on the fore and aft bulkheads.

My somewhat perverted old man mind thinks of the lyrics from Randy Newman's 1972 song,

You Can Leave Your Hat On

Raise your arms up into the air
Shake 'em
You give me a reason to live


To everything there is a season, I guess.

Stay tuned. After the bomb bay H.G. is moving to a true kit-within-a-kit: the ball turret.
Redhand
#522
_VISITCOMMUNITY
New Jersey, United States
Joined: January 20, 2013
KitMaker: 1,460 posts
AeroScale: 1,443 posts
Posted: Sunday, October 11, 2020 - 01:43 PM UTC
HAVE A BALL!

H.G. is starting work on the Ball Turret interior. As a preliminary matter, he asked what color I would like. There appear to be two choices:


This is from the B-17F "Boeing Bee" in Seattle.

So, "interior green?"

Here's the other choice from the photos available.


I decided to seek Karl's advice, and this was his response.


Quoted Text

According to the information I have, if it was built by Briggs the ball had a gray interior. But I have not heard an official definition if that means unpainted or actually painted gray. Turrets built by Emerson were Dull Dark green internally. So you can take your pick! I like DDG myself, but that is just aesthetics. Sperry designed it but didn't build any.


I also prefer the "Dull Dark Green," which will mean a color like that in the cockpit, i.e., this:


rather than what one usually sees in "restorations," i.e. that "interior green" we saw earlier.


And here's the start of H.G.'s work.


Yes, he has thinned the interior ball parts out. (At least that's how it looks to me.)

And I close with a scratch-built gun support.


More to follow, of course.
Removed by original poster on 10/23/20 - 04:00:43 (GMT).
Redhand
#522
_VISITCOMMUNITY
New Jersey, United States
Joined: January 20, 2013
KitMaker: 1,460 posts
AeroScale: 1,443 posts
Posted: Wednesday, October 28, 2020 - 04:30 PM UTC
ON THE BALL

It's been a couple of weeks since the last post, but H.G. is still on the ball. The plan really is a scratch build of the entire interior, something that to my knowledge hasn't been tried before, at least in 1/48.

This exploded drawing gives some perspective.


Take note of the ammunition bins in the middle. Here you see H.G. starting to build this component out of styrene bar stock.


Note also the spent shell bin under one of the guns and the beginning of scratch construction on the other.

And again, for reference, here's a picture of the real spent casing bin just above the "DO NOT ENTER" sign and below the gun housing on the bottom. (Sorry, I don't know the technical term for this part of the .50 cal.)


To keep things real, we should remember that everything didn't fall neatly into the spent casing cans, or that they were big enough to hold all spent ammo components. See "Shoving links out of the chute opening" below.


Can you believe it!? Man, oh man! I think the spent ammo cans were more chutes than containers, channeling the spent ammo components to forward part of the ball, though it looks like the spent brass casings holding the powder were ejected somewhere else?

Anyone know? Karl?


Now, back to the ammo cans.


We can see a double layer of the cans here. I know that this is still a bit rough and that H.G. plans more shaping of these components.


And perhaps my favorite so far, H.G.'s scratch build of the circular gear housing that rotates the ball from the horizontal to the vertical allowing gunner ingress during flight. You can see it to the left below, with the red rotating crank and wood handle.


And here it is in 1/48.


Simply amazing artisanship here.

I have no other words, except "More to follow."
rdt1953
_VISITCOMMUNITY
New Jersey, United States
Joined: February 06, 2015
KitMaker: 1,098 posts
AeroScale: 900 posts
Posted: Thursday, October 29, 2020 - 04:08 AM UTC
Wonderful as expected ! Keep it coming -
More ! More ! More !
amoz02t
#192
_VISITCOMMUNITY
Kentucky, United States
Joined: November 25, 2009
KitMaker: 1,383 posts
AeroScale: 65 posts
Posted: Thursday, October 29, 2020 - 04:33 AM UTC

Quoted Text

ON THE BALL

To keep things real, we should remember that everything didn't fall neatly into the spent casing cans, or that they were big enough to hold all spent ammo components. See "Shoving links out of the chute opening" below.

Can you believe it!? Man, oh man! I think the spent ammo cans were more chutes than containers, channeling the spent ammo components to forward part of the ball, though it looks like the spent brass casings holding the powder were ejected somewhere else?

Anyone know? Karl?


Amazing work! Most inspiring and wonderful to see. Thank you!

This Browning MG graphic from Alton Gaming really helped me understand how the brass falls out the bottom while the links get ejected out the side. Long video but hope this helps...

click here https://youtu.be/GFri-znNRYI

KPHB17FE
_VISITCOMMUNITY
Illinois, United States
Joined: January 12, 2015
KitMaker: 292 posts
AeroScale: 292 posts
Posted: Thursday, October 29, 2020 - 06:55 AM UTC
Sorry, missed out on the last few posts. Looks amazing! As for the brass and links, they were ejected overboard through chutes. Don't know why that guy had all those links in his turret, I suppose the chute came off for some reason and he was too busy to reinstall it. See if I can come up with some good illustrations for you on that subject.

KPHB17FE
_VISITCOMMUNITY
Illinois, United States
Joined: January 12, 2015
KitMaker: 292 posts
AeroScale: 292 posts
Posted: Thursday, October 29, 2020 - 07:09 AM UTC
I browsed through the photos I have of restored ball turrets and none of them have the chutes for the links. For those who don't know, the links go out the side of the gun, opposite of where the ammo belt feeds in. The empty brass then ejects out of the bottom of the gun. So this illustration shows how the links and brass were routed out the ball turret. The brass and links were not retained under normal circumstances.

Redhand
#522
_VISITCOMMUNITY
New Jersey, United States
Joined: January 20, 2013
KitMaker: 1,460 posts
AeroScale: 1,443 posts
Posted: Friday, October 30, 2020 - 12:57 AM UTC
Very helpful, Karl. Thank you!
Redhand
#522
_VISITCOMMUNITY
New Jersey, United States
Joined: January 20, 2013
KitMaker: 1,460 posts
AeroScale: 1,443 posts
Posted: Friday, October 30, 2020 - 04:39 AM UTC
A TIME TO REMEMBER A FRIEND

Long-time readers of this build blog will recall my frequent references to help I received on the build from a person identified as "my North Carolina friend" or simply "my NC friend," and more recently as "Art."

Art provided enormous help early in the build and was aware of the full back-story to it, recounted elsewhere in the blog. Art was responsible for a number of scratch-built parts, including the hand-held cheek-gun brackets, and the entire F-model bombardier floor (so different from that in the B-17G). Art also conceived, designed and laser cut the bulkhead framing in the entire rear fuselage from the aft radio room bulkhead all the way back to the tail gunner's position.

Most of all, however, I appreciated Art's steady friendship and shared modeling interest going back to the late 1970s and early 1980s, when we were both members of Delaware Valley Scale Modelers (DVSM), http://www.dvsm.org/, in the Philadelphia, PA area.

Sadly, Art's wife called me yesterday and informed me that he had finally succumbed to a long battle with stomach cancer, at the relatively young age (to me) of 64. So, at this point, it's appropriate for me to remember him and introduce him fully to you with this excerpt from his obituary.


I will miss his genuine friendship and kindness, and will always remember his contributions to this cherished project.
Redhand
#522
_VISITCOMMUNITY
New Jersey, United States
Joined: January 20, 2013
KitMaker: 1,460 posts
AeroScale: 1,443 posts
Posted: Saturday, November 07, 2020 - 04:29 PM UTC
WE'RE MOVING!

To the new forum site. Look for the title:

1/48 B-17F Build - 303rd BGs Luscious Lady (Continued)

Brian
KPHB17FE
_VISITCOMMUNITY
Illinois, United States
Joined: January 12, 2015
KitMaker: 292 posts
AeroScale: 292 posts
Posted: Wednesday, November 11, 2020 - 06:32 AM UTC
WHAT new forum?