Germany
Joined: September 07, 2005
KitMaker: 5,609 posts
AeroScale: 5,231 posts
Posted: Friday, May 02, 2014 - 06:25 AM UTC
Thanks Jean-Luc,
I just wrote Jan.
A propos speedy ... seems I am breaking the rules of physics and going faster than light
all the best
Steffen
DULCE ET DECORUM EST PRO HOBBY MORI
Moselle, France
Joined: May 15, 2005
KitMaker: 5,653 posts
AeroScale: 4,347 posts
Posted: Friday, May 02, 2014 - 06:27 AM UTC
Hi Steffen,
I suspect you are working all nights...

This is Warp Speed!
Jean-Luc

Better think one hour and build five minutes...
Than think five minutes and build an hour!
Merlin
 Senior Editor
#017
United Kingdom
Joined: June 11, 2003
KitMaker: 17,582 posts
AeroScale: 12,795 posts
Posted: Friday, May 02, 2014 - 07:31 AM UTC
Hi Steffen
Amazing progress - and looking REALLY good!

I'm still tinkering with the final etched parts in the cockpit. I'll be working for Oxfam through the weekend and Bank Holiday, but I hope to get a bit more done.

All the best
Rowan
BEWARE OF THE FEW...
As I grow older, I regret to say that a detestable habit of thinking seems to be getting a hold of me. - H. Rider Haggard
Merlin
Senior Editor #017
United Kingdom
Joined: June 11, 2003
KitMaker: 17,582 posts
AeroScale: 12,795 posts
Posted: Friday, May 02, 2014 - 07:38 AM UTC
Quoted Text
A comparison matching fuselage halves to Zvezda's parts would be most helpful.
One wishes Eduard had taken some inspiration from it...
Gaston
Hi Gaston
I would dig through the Stash, but you can probably tell, the priority in this thread is to build the beast. I've no doubt there'll be endless comparisons made with other kits for months to come.
All the best
Rowan
BEWARE OF THE FEW...
As I grow older, I regret to say that a detestable habit of thinking seems to be getting a hold of me. - H. Rider Haggard
Merlin
Senior Editor #017
United Kingdom
Joined: June 11, 2003
KitMaker: 17,582 posts
AeroScale: 12,795 posts
Posted: Friday, May 02, 2014 - 07:43 AM UTC
Quoted Text
Rowan,
the parcel is just in... could you please check your Brassin 648148 (the MG 151 pods). My set has two lhs covers (R7 with R8 missing). I want to find out if all are packed wrong or if I just got a "bad set"
all the best
Steffen
Hi Steffen
Make that all three of us.
All the best
Rowan
BEWARE OF THE FEW...
As I grow older, I regret to say that a detestable habit of thinking seems to be getting a hold of me. - H. Rider Haggard
British Columbia, Canada
Joined: September 03, 2009
KitMaker: 6,965 posts
AeroScale: 6,247 posts
Posted: Friday, May 02, 2014 - 04:26 PM UTC
Quoted Text
A comparison matching fuselage halves to Zvezda's parts would be most helpful.
One wishes Eduard had taken some inspiration from it...
Gaston
Then you should go out, get one of each and do it.
When once you have tasted flight you will walk the Earth with your eyes turned skyward.
For there you have been, and there you will always long to return.
-Leonardo Da Vinci
Alberta, Canada
Joined: January 19, 2008
KitMaker: 6,743 posts
AeroScale: 6,151 posts
Posted: Friday, May 02, 2014 - 11:09 PM UTC
Quoted Text
Thanks Jean-Luc,
I just wrote Jan.
A propos speedy ... seems I am breaking the rules of physics and going faster than light
all the best
Steffen
How was the mask for fitting on the canopy ?
Germany
Joined: September 07, 2005
KitMaker: 5,609 posts
AeroScale: 5,231 posts
Posted: Saturday, May 03, 2014 - 12:48 AM UTC
Hi Terri,
no problem at all. I only had problems once or twice with the kabuki tape masks and I use them a lot.
all the best
Steffen
P.S. the flu knocks me down at the moment so my progress will slow down considerably
DULCE ET DECORUM EST PRO HOBBY MORI
European Union
Joined: August 09, 2009
KitMaker: 1,732 posts
AeroScale: 1,336 posts
Posted: Saturday, May 03, 2014 - 06:47 AM UTC
I follow this "group build" closely as I have ordered also a kit from my LHS. Your builds look great so far (as always ...
)
Steffen, gute Besserung!
Torsten
My campaigns for 2020:
MiGs - Done !
The Big Three - Done !
65 years Bundeswehr - Done !
40 years Leopard 2 - Done !
Land Lease - Done !
Merlin
Senior Editor #017
United Kingdom
Joined: June 11, 2003
KitMaker: 17,582 posts
AeroScale: 12,795 posts
Posted: Saturday, May 03, 2014 - 07:34 AM UTC
Hi Steffen
I also hope you feel better soon! I think it'll be a day or two (or three!) before I even approach the stage you've reached already.
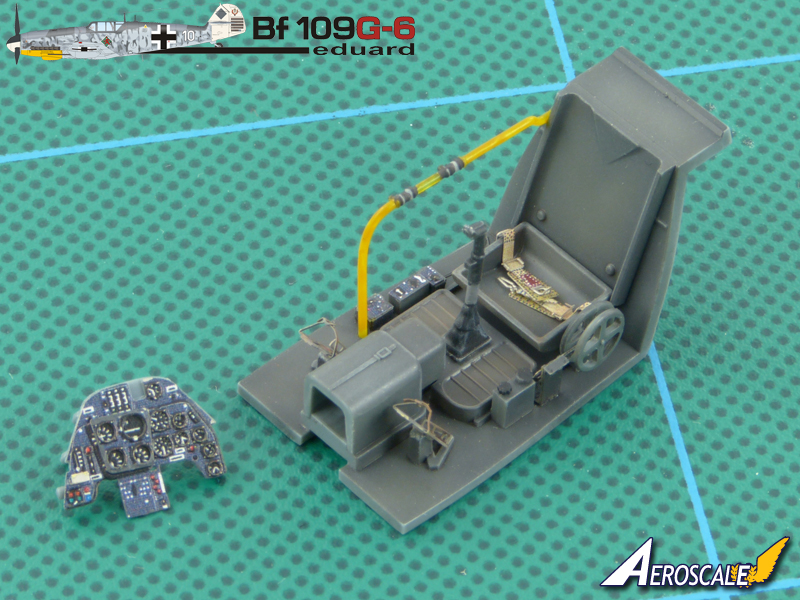
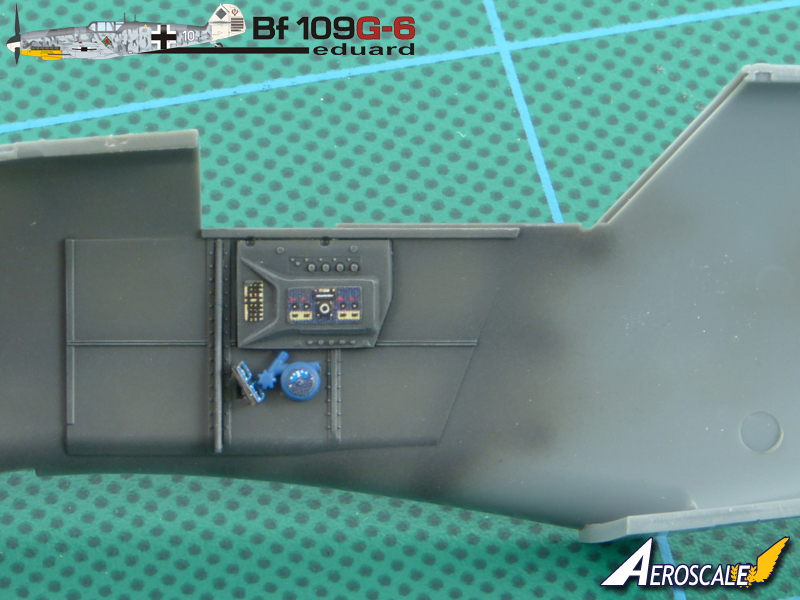
I've got nothing to add by way of an update. I put the remaining etched placards and fascias in place this morning before work, and sealed them with an overall tinted "slightly dirty wash" coat of Kleer this evening to pull everything together.
I'll give it a chance to dry overnight, with a matt coat first thing in the morning before I head off to work. Maybe some pastels when I get home. Hopefully a few photos tomorrow evening...
All the best
Rowan
BEWARE OF THE FEW...
As I grow older, I regret to say that a detestable habit of thinking seems to be getting a hold of me. - H. Rider Haggard
Moselle, France
Joined: May 15, 2005
KitMaker: 5,653 posts
AeroScale: 4,347 posts
Posted: Saturday, May 03, 2014 - 11:51 AM UTC
Hi all,
Steffen, that's too bad about the Flu...

my modeling friend Chris is ill as well. I wonder what you did both in Siegen last week-end...

Here is what I have achieved in the meantime...

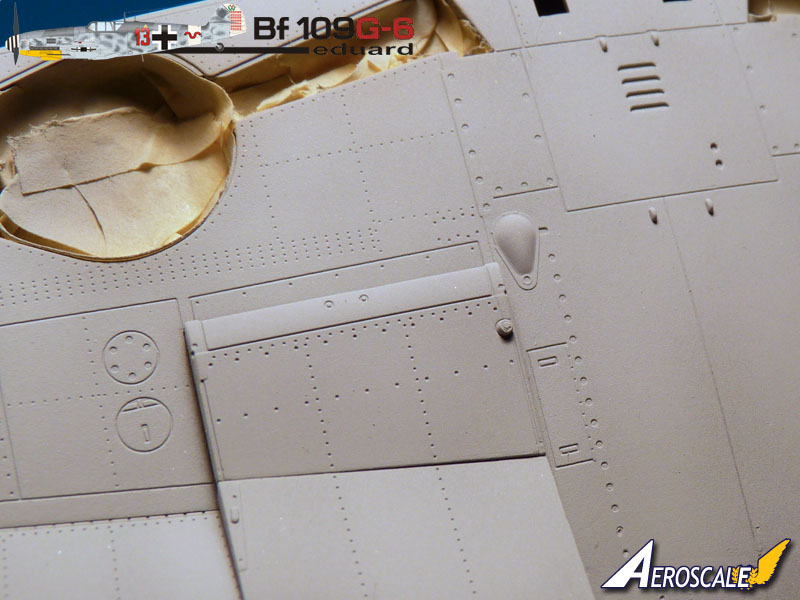
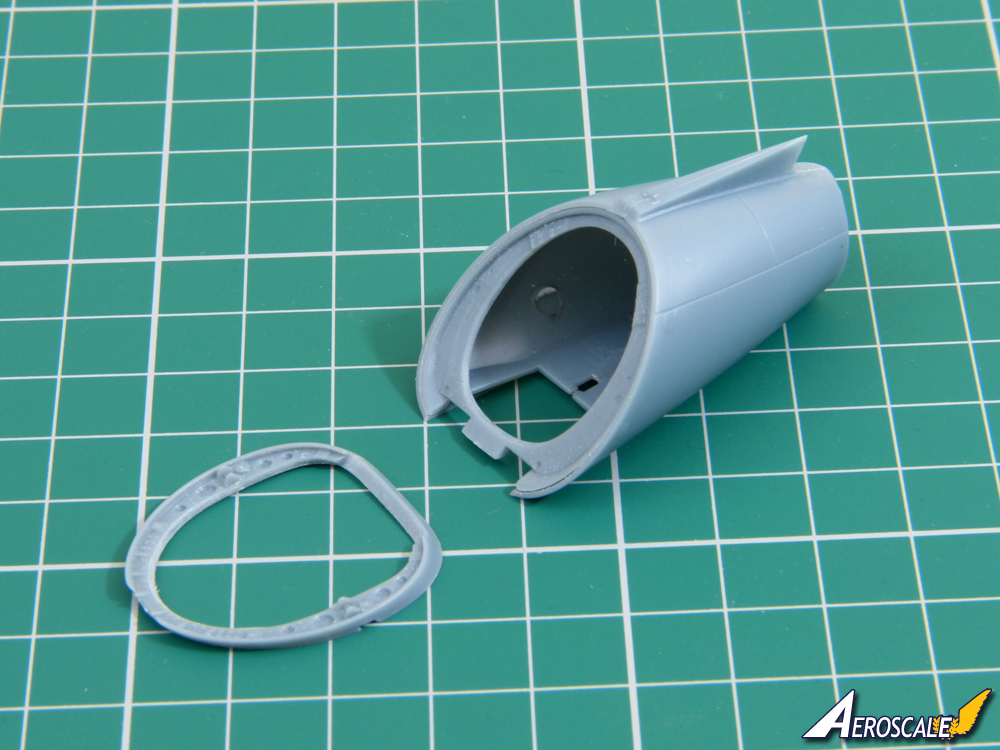
Overal fit is good though, like Steffen said, not as tight in the wing root area like the Spitfire and the Bf 109E. Maybe it will be better with the parts produced with the tuned up injection machine. However, filler will have to be used in some places because the joints of some parts don't represent existing panel lines...

This is a little annoying but one must go through this and it is exactly the same with the Hasegawa model. This is probably a compromise between the design of the original aircraft and the need to make a logical break down of the plastic parts. Note the red arrow showing a small plastic triangle to fill a hole which is visible if you glue the radiator flaps in the down position...

Now the models are awaiting preparation for the painting stage (masking and protection of canopy and wheel wells areas).
To be continued...
Jean-Luc
Better think one hour and build five minutes...
Than think five minutes and build an hour!
Germany
Joined: September 07, 2005
KitMaker: 5,609 posts
AeroScale: 5,231 posts
Posted: Saturday, May 03, 2014 - 05:59 PM UTC
Nice progress Jean-Luc
Hmm, Chris and me were together with you ...
Fuselage band is next.
cheers
Steffen
DULCE ET DECORUM EST PRO HOBBY MORI
Moselle, France
Joined: May 15, 2005
KitMaker: 5,653 posts
AeroScale: 4,347 posts
Posted: Saturday, May 03, 2014 - 11:57 PM UTC
Hi Steffen,
You are stronger than the Flu...

Very nice job indeed on the camouflage! It is obvious that you are in your element with the Bf 109G-6...

Jean-Luc
Better think one hour and build five minutes...
Than think five minutes and build an hour!
Ontario, Canada
Joined: March 29, 2010
KitMaker: 1,151 posts
AeroScale: 985 posts
Posted: Sunday, May 04, 2014 - 01:21 AM UTC
Every post in this thread pushes my ICM 109 nearer to the bin...
Germany
Joined: September 07, 2005
KitMaker: 5,609 posts
AeroScale: 5,231 posts
Posted: Sunday, May 04, 2014 - 03:03 AM UTC
Thanks Jean-Luc, Rowan and Torsten for your kind wishes. But still I am feeling pretty bad. Thus progress is slim.
BTW I do my build log on the IPMS Deutschland site and as soon as I use the pix there I have to touch up the Hakenkreuz so do not wonder when pix change sometimes...
Ray, well the ICM might be good for something ... we have an expert in the club who thinks the lower nose might be off (he is still checking) and could be exchanged for the ICM
all the best
Steffen
DULCE ET DECORUM EST PRO HOBBY MORI
Merlin
Senior Editor #017
United Kingdom
Joined: June 11, 2003
KitMaker: 17,582 posts
AeroScale: 12,795 posts
Posted: Sunday, May 04, 2014 - 08:51 AM UTC
Hi again
Great progress Steffen! I think your determination not to let the flu stop you is making you produce some of your best work!
I got a little bit more done today either side of work. I've got a couple of hours off tomorrow, so I'll try to get the cockpit finished and take a couple of pics.
All the best
Rowan
BEWARE OF THE FEW...
As I grow older, I regret to say that a detestable habit of thinking seems to be getting a hold of me. - H. Rider Haggard
Moselle, France
Joined: May 15, 2005
KitMaker: 5,653 posts
AeroScale: 4,347 posts
Posted: Sunday, May 04, 2014 - 10:15 AM UTC
Hi all,
This is the last update before a break of three days (birthday of my wife...)
Not much to report, I have just started to paint the model and have applied the underside color first...

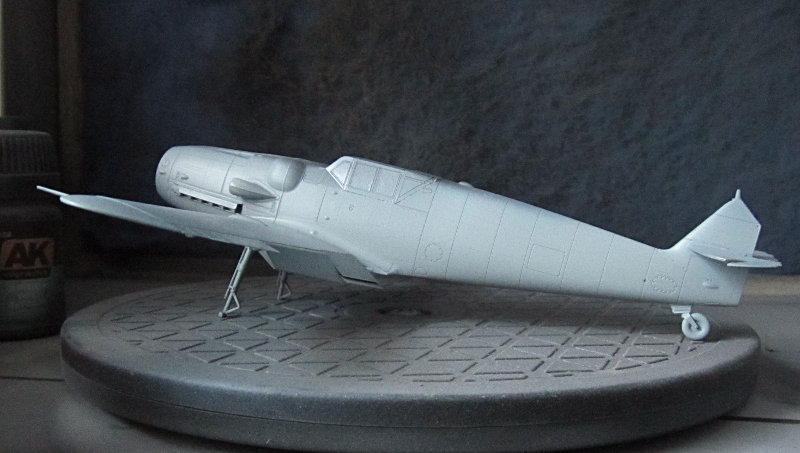
Nothing special yet, the harder work is ahead (camouflage). But I take advantage of the fact that the model is coated with mat paint to post two more pictures revealing the excellent surface detail of the model...

To be continued... on Thursday!
Jean-Luc
Better think one hour and build five minutes...
Than think five minutes and build an hour!
California, United States
Joined: November 28, 2007
KitMaker: 817 posts
AeroScale: 729 posts
Posted: Sunday, May 04, 2014 - 11:15 AM UTC
Great thread, gents! Sprue by sprue- what a way to get a kit!
[url]http://chukw.blogspot.com/[/url]
Alberta, Canada
Joined: January 19, 2008
KitMaker: 6,743 posts
AeroScale: 6,151 posts
Posted: Sunday, May 04, 2014 - 12:05 PM UTC
Go Guy's Go !
Merlin
Senior Editor #017
United Kingdom
Joined: June 11, 2003
KitMaker: 17,582 posts
AeroScale: 12,795 posts
Posted: Sunday, May 04, 2014 - 11:12 PM UTC
Hi Jean-Luc
Great work! And those photos really show off the quality of the exterior detailing.
I made a bit of progress this morning:


Eduard's version of RLM 66 is a bit more blue than Mr Color's - the photos actually accentuate the difference. In fact, once the canopy's on, I don't think it'll show so badly.
In answer to Steffen's point about the colour flaking off the etched parts, that did start to happen on one of the seatbelts - the coating began to peel back where I'd bent the belt to fit over the edge of the seat, so I quickly ran a little CA underneath to fix it.
My aim was to begin to have something looking aeroplane shaped before heading in to work this afternoon. I've jus about got there:
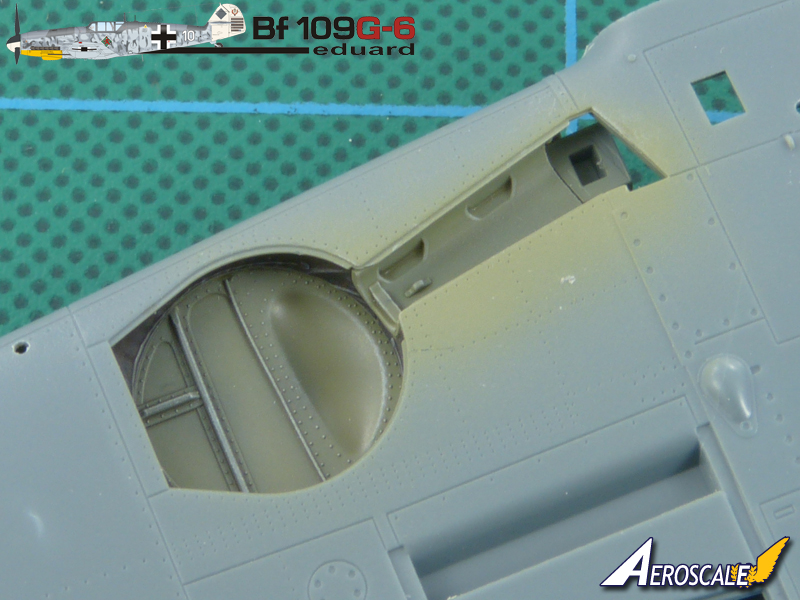
With that nice big hole in the nose, I thought I'd leave the exhausts off to add them after painting the camouflage - it's worth a try to see if it works.
I've done the wheel wells, so I should finish and add the wings this evening.
All the best
Rowan
BEWARE OF THE FEW...
As I grow older, I regret to say that a detestable habit of thinking seems to be getting a hold of me. - H. Rider Haggard
Germany
Joined: September 07, 2005
KitMaker: 5,609 posts
AeroScale: 5,231 posts
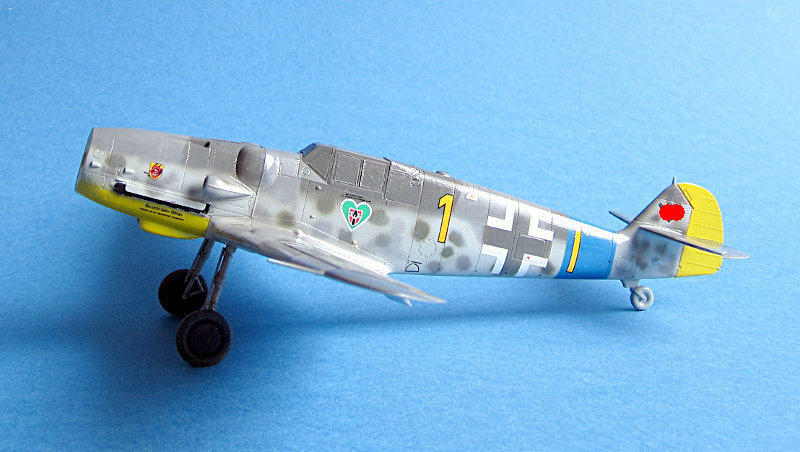
Posted: Sunday, May 04, 2014 - 11:46 PM UTC
Hi Rowan,
great progess! as for the exhausts: I would not wait as loong because putting it in the right spot is not as easy as one might think.
BTW do not remove the seam as J-L did .. there is a weld line on every pipe. I have no really good picture of it but you can see it here if you look closely:
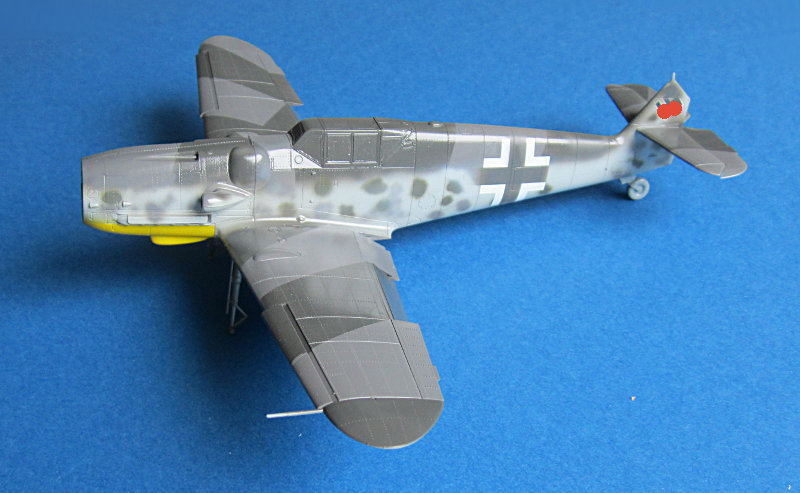
No progress on my kit as I am ill. last state was this yesterday:

(red dots being necessary due to german law)
I also put on the spinner spiral which worked out good with Klear
all the best
Steffen
DULCE ET DECORUM EST PRO HOBBY MORI
Merlin
Senior Editor #017
United Kingdom
Joined: June 11, 2003
KitMaker: 17,582 posts
AeroScale: 12,795 posts
Posted: Monday, May 05, 2014 - 04:59 AM UTC
Cheers Steffen
Your Gustav is looking great with its markings on!
I checked the fit of the exhausts through the nose and there should be no problem. Ironically, in doing so, I noticed how faint the mould seams are, so I'm very tempted to beef them up with stretched sprue to represent the welds better.
I made a bit more progress today:

The wings on my kit are an excellent fit. Like Jean-Luc, I'll add triangular fills at the trailing edge. I also found a little plastic card helps support the seam and so should mean less sanding and filler:

All the best
Rowan
BEWARE OF THE FEW...
As I grow older, I regret to say that a detestable habit of thinking seems to be getting a hold of me. - H. Rider Haggard
Merlin
Senior Editor #017
United Kingdom
Joined: June 11, 2003
KitMaker: 17,582 posts
AeroScale: 12,795 posts
Posted: Monday, May 05, 2014 - 07:37 AM UTC
Hi again
Well, no pics, but I sort of reached my target for the day (something of a miracle!) with the wings the wings ready to attach once the inserts for the rear of the roots have dried.
All the best
Rowan
BEWARE OF THE FEW...
As I grow older, I regret to say that a detestable habit of thinking seems to be getting a hold of me. - H. Rider Haggard
Germany
Joined: September 07, 2005
KitMaker: 5,609 posts
AeroScale: 5,231 posts
Posted: Tuesday, May 06, 2014 - 12:04 AM UTC
Not much to see, but there are already a bunch of stencils applied. Furthermore I worked on the prop (it has sinkholes in the preproduction shots) Spinner and wheels.
all the best
Steffen
DULCE ET DECORUM EST PRO HOBBY MORI
Merlin
Senior Editor #017
United Kingdom
Joined: June 11, 2003
KitMaker: 17,582 posts
AeroScale: 12,795 posts
Posted: Tuesday, May 06, 2014 - 06:13 AM UTC
Hi Steffen
Looking good!
I'm just home from work, so I'll try to do a little bit more tonight.
All the best
Rowan
BEWARE OF THE FEW...
As I grow older, I regret to say that a detestable habit of thinking seems to be getting a hold of me. - H. Rider Haggard


