Mal , you are right , carb air intake .
Terri


Hi Joel,
nice progress on your build, after priming the beautiful shapes become visible. And there are a lot of useful informations so far. Thanks for sharing all the pics.
kind regards ro


 ) and it is usually rather easy to fill a blemish and re-paint locally without seeing a trace of it afterwards!
I am not sure that Vallejo putty and Tamiya paint mixes very well, at least not so well so that you can avoid re-painting. On the other hand, I have done many such touch-ups (we did have the discussion on the subject of professionalism, didn't we
Magnus,
You're 100% correct. I guess I was looking for the quick and easy way out. Will fill with a few coats of Vallejo white putty, then try dry brushing 1st. If not then I'll just do quick masking and air brush it.
Joel
Magnus


Inspirational paint job there.


 However I think that there may be a major problem here
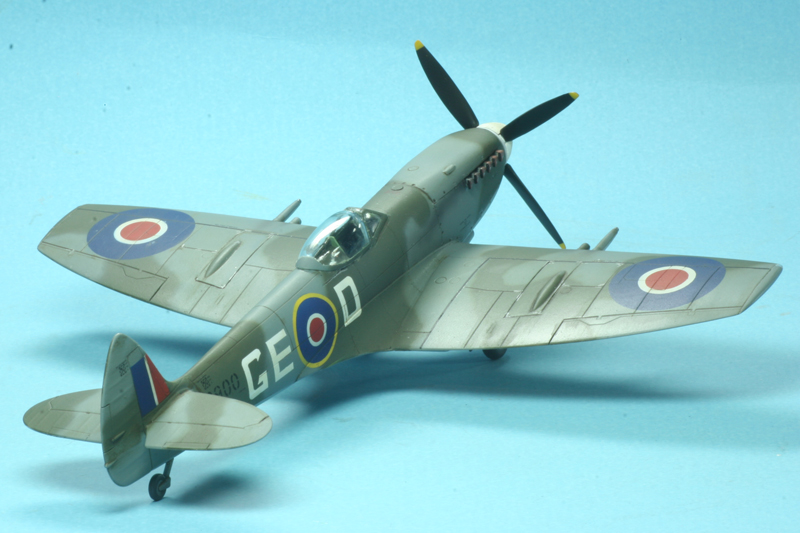
Well I googled the aircraft I was going to do, and sure enough there is a fuselage tail band that needs to be applied. Also the Squadron numbers were stenciled over it.
Inspirational paint job there.
Quoted TextInspirational paint job there.
I agree. It's a helluva nice job Joel, and I like your backdating research! Makes for a unique model.
Looking good Joel, nicely done
The camouflage pattern looks like the "B" type but the practice of having even serial numbered aircraft in the "A" scheme and odd serial numbered aircraft in the "B" scheme (a mirror image of the "A" scheme) was stopped before the MkIX (infact the MkV) entered service. Here is a photo of my 1/48 MKXVI that shows the scheme.
Just for interest there were actually 4 different schemes originally, Schemes "C" and "D" were the same as the "A" and "B" schemes but with the colours reversed
Quoted TextWell I googled the aircraft I was going to do, and sure enough there is a fuselage tail band that needs to be applied. Also the Squadron numbers were stenciled over it.
Just for clarification that is the serial number, the Squadron code consisted of 2 letters,FY in this case; the "B" is the individual aircraft


Joel, your build is great! No matter what colour on a vice versa camo-paint (who really cares?) since you do not a build for a magazin or museum. As long as you are satisfied leave like it is and count the rivets on your next Spitfire.
So for sure: CONTINUE!!!
Thomas


As I pointed out to Brian, I'm way too far into the paint scheme to even consider trying to strip it, and repaint. I'm sure that course would lead to some other disaster. So the choices are now continue as is or shelve it for now.
 Remember I have gone to great lengths to produce camouflage masks for the Spitfire so it just jumped out at me. Steffen is right though that if you haven't applied the decals then you could. I do know though that if you go down that road this could well end up on the shelf of doom! Many won't see the wrong pattern, they will just see a well made Spitfire Mk IX model
 BTW, that's one very nice looking MKXVI Spitfire.


Just a thought.
Joel,
Excellent build going here, I've been following the camo-conundrum and thought I'd throw in another idea. If you're anything like me, I hate to do a major repaint once I've gotten to your stage in the build. If it isn't to the point of no-return with the markings, and that particular aircraft doesn't have deep sentimental significance, I'd opt to do another aircraft in the same squadron. If the decal library is deep enough, all you should have to do is come up with another aircraft letter and some changes in the serial no. One would think at least one other ship in that unit would have the pattern you've gone with. I've gone that route a couple of times in the past due to one screw-up or another, and besides, what's the chance that Group Captain Farnsworth will show up at your house on an inspection tour? Just a thought.
 |