World War II
Discuss WWII and the era directly before and after the war from 1935-1949.
Hosted by Rowan Baylis
Eduard 1/48 Limited Edition Spitfire Mk.IX
Joel_W
Staff MemberAssociate Editor
AUTOMODELER
_VISITCOMMUNITY
New York, United States
Joined: December 04, 2010
KitMaker: 11,666 posts
AeroScale: 7,410 posts
Posted: Sunday, April 12, 2015 - 08:32 PM UTC
Ok, the old paint is gone, and the primer coat is on. I primed with Tamiya Gray Primer Sealer 2:3 Tamiya Lacquer Thinner. Went on smooth as silk. So I'm back on track. I just hope not to have another screw up.

Here's two pictures post stripped. By shear accident I tested out Denatured Alcohol after getting next to no where with Isopropyl Alcohol , and it removed the paint like it was still wet. Rub hard enough, and it eats into the primer. That's what those dark areas are, raw plastic.


And here's two right after the primer coat. It's the smoothest I've ever laid down a coat of primer. Really doesn't need to be rubbed out, it's that smooth.


And here's the paint scheme courtesy of Mal:


Joel

Antoni
_VISITCOMMUNITY
England - East Midlands, United Kingdom
Joined: June 03, 2006
KitMaker: 574 posts
AeroScale: 573 posts
Posted: Sunday, April 12, 2015 - 08:56 PM UTC
You will find a set of camouflage masks that can be printed on paper here:

http://www.yolo.net/~jeaton/mymodels/spitfire/templates/SpitTemp.html
Joel_W
Staff MemberAssociate Editor
AUTOMODELER
_VISITCOMMUNITY
New York, United States
Joined: December 04, 2010
KitMaker: 11,666 posts
AeroScale: 7,410 posts
Posted: Sunday, April 12, 2015 - 09:18 PM UTC

Quoted Text

You will find a set of camouflage masks that can be printed on paper here:

http://www.yolo.net/~jeaton/mymodels/spitfire/templates/SpitTemp.html


Antoni,
Thanks so much for the link. I'll be downloading just the A scheme in a little while.
Joel
Redhand
#522
_VISITCOMMUNITY
New Jersey, United States
Joined: January 20, 2013
KitMaker: 1,460 posts
AeroScale: 1,443 posts
Posted: Sunday, April 12, 2015 - 09:49 PM UTC
Glad to see you're back on track. Looks great.
Joel_W
Staff MemberAssociate Editor
AUTOMODELER
_VISITCOMMUNITY
New York, United States
Joined: December 04, 2010
KitMaker: 11,666 posts
AeroScale: 7,410 posts
Posted: Monday, April 13, 2015 - 12:17 AM UTC

Quoted Text

Glad to see you're back on track. Looks great.


Brian,
Thanks,
Joel
litespeed
Staff MemberNews Reporter
AEROSCALE
_VISITCOMMUNITY
England - North West, United Kingdom
Joined: October 15, 2009
KitMaker: 1,976 posts
AeroScale: 1,789 posts
Posted: Monday, April 13, 2015 - 02:37 AM UTC
Way to go Joel Well done.From the image the primer application looks excellent, it looks like the original plastic surface.
tim
Holdfast
Staff MemberPresident
IPMS-UK KITMAKER BRANCH
#056
_VISITCOMMUNITY
England - South West, United Kingdom
Joined: September 30, 2002
KitMaker: 8,581 posts
AeroScale: 4,913 posts
Posted: Monday, April 13, 2015 - 11:44 AM UTC
Nicely done Joel so does this mean that you don't need the masks?
Joel_W
Staff MemberAssociate Editor
AUTOMODELER
_VISITCOMMUNITY
New York, United States
Joined: December 04, 2010
KitMaker: 11,666 posts
AeroScale: 7,410 posts
Posted: Monday, April 13, 2015 - 05:18 PM UTC

Quoted Text

Nicely done Joel so does this mean that you don't need the masks?


Mal,
Since our last few pms, it seems that a feathered edge is the proper way to go, other then the hard demarcation line from top to bottom, and you've already posted the plans for the proper A camo scheme, so that's all that I need.

I'm more then appreciative for the offer of the masks, and the posting of the A camo scheme.

Joel
Joel_W
Staff MemberAssociate Editor
AUTOMODELER
_VISITCOMMUNITY
New York, United States
Joined: December 04, 2010
KitMaker: 11,666 posts
AeroScale: 7,410 posts
Posted: Monday, April 13, 2015 - 05:20 PM UTC

Quoted Text

Way to go Joel Well done.From the image the primer application looks excellent, it looks like the original plastic surface.
tim


Tim,
Thanks.

I've always had to lightly rub out the Tamiya Gray Surface Primer applied 1:1. This time I decided to thin it out even more as it's much thicker then Tamiya's Acrylic paints @ 2:3. You can see the results. I'm more then thrilled with the results.

Joel
alpha_tango
_VISITCOMMUNITY
Germany
Joined: September 07, 2005
KitMaker: 5,609 posts
AeroScale: 5,231 posts
Posted: Monday, April 13, 2015 - 09:51 PM UTC
Hi Joel,

glad to see you got some of your mojo back!! Good Luck.. this time it will work!

all the best

Steffen
Joel_W
Staff MemberAssociate Editor
AUTOMODELER
_VISITCOMMUNITY
New York, United States
Joined: December 04, 2010
KitMaker: 11,666 posts
AeroScale: 7,410 posts
Posted: Tuesday, April 14, 2015 - 06:02 PM UTC

Quoted Text

Hi Joel,

glad to see you got some of your mojo back!! Good Luck.. this time it will work!

all the best

Steffen


Steffen,
Sure seams that way.
Joel
Naseby
_VISITCOMMUNITY
Slovakia
Joined: October 15, 2010
KitMaker: 825 posts
AeroScale: 476 posts
Posted: Thursday, April 16, 2015 - 12:57 AM UTC
You made a bold decision with the stripping of the paint Joel, but I think it will be worth it in the end. Very nice so far.
Joel_W
Staff MemberAssociate Editor
AUTOMODELER
_VISITCOMMUNITY
New York, United States
Joined: December 04, 2010
KitMaker: 11,666 posts
AeroScale: 7,410 posts
Posted: Thursday, April 16, 2015 - 01:34 AM UTC

Quoted Text

You made a bold decision with the stripping of the paint Joel, but I think it will be worth it in the end. Very nice so far.


Naseby,
Not really. It was already wrong in respect to the paint scheme, and paint finish. I really didn't have much to loose.
Joel
Joel_W
Staff MemberAssociate Editor
AUTOMODELER
_VISITCOMMUNITY
New York, United States
Joined: December 04, 2010
KitMaker: 11,666 posts
AeroScale: 7,410 posts
Posted: Sunday, April 19, 2015 - 06:07 AM UTC
Well, I took a little detour from the build while I sorted out my air brush issues. The Iwata Eclipse has been sold, and I've bought the new Iwata Revolution M-1 internal Single Action airbrush with a .35mm needle to replace it. This is now my go to gun, while my trusty old Paasche H with the .77mm needle will be used for primer coats, and the 1.0mm needle for clear coats.

While waiting for Mal's Masks to arrive, I started to work on the landing gear. I added what I think is a oil line to the strut made from stretched sprue. The hydraulic brake line was made from copper wire that was bent to shape. I painted the lower curved section with thick flat Nato Black paint to represent rubber tubing, and the top portion painted with flat Aluminum paint to represent aluminum tubing. The strut was painted with the same Tamiya Flat Aluminum acrylic paint. the oleo was primed with Tamiya Gray primer, then buffed, followed by a coat of Alcad 11 Chrome. When dry I brushed on a coat of Alcad Gloss Clear to add a oily shine to it.

The Wheel and tires are separate pieces which made painting them so much easier.

Finally, the assembled strut/wheel assembly got an overall wash of Raw Sienna enamel paint except for the oleos.

I still have the tail wheel assembly to go. Hopefully, the masks will arrive this week so I can continue with the Type A camo paint scheme.

Joel


Joel_W
Staff MemberAssociate Editor
AUTOMODELER
_VISITCOMMUNITY
New York, United States
Joined: December 04, 2010
KitMaker: 11,666 posts
AeroScale: 7,410 posts
Posted: Tuesday, April 21, 2015 - 10:35 PM UTC
Well, it's time for another small but major step forward update.

Yesterday, I received both my new Iwata Revolution M-1 air brush, as well as not one but two sets of masks from our own Mal of Miracle Masks. I'd call that one great day.

So last night while watching the Yankee baseball game, I read the instructions on how apply the masks. Mal has done an excellent job to help us newbies over the fear of screwing up applying them. I figured it would take me a few days to get them right. I started with the Horizontal rear stabilizers, figuring that they were the easiest to do.

I started off at a snails pace, and had a little trouble with proper positioning caused by me, not the masks . But once I got use to working with them, and over the fear that I would damage them if I pulled, pushed, or lifted too hard. I found that the masks are very durable, bendable, and show no signs of stress or damage from my 1st few clumsy attempts. In short order I got reasonably comfortable applying them, and even the larger masks weren't a issue if you followed Mal's instructions. There are some cut outs to help the masks conform over bulges, and I did need to cover a few seams to play it safe, but the process didn't take nearly as long as I thought.

There is one large mask, #8 that goes both above and below the rear horizontal stabilizer. Mal supplies an extra one just in case you damage it. I had no such issues, but it's rare that anyone thinks of that and supplies a back up.

Mal, I can't thank you enough.

Tonight is the 1st of two overnight shifts I do each week at work, so after my coffee it was time to get up close and personal with the M-1. Oh my! This is without the best airbrush I've ever used. The precision and control of the spray pattern of an internal air brush, coupled with the smooth flow rate that I've come to expect from my Paasche H external air brush, made the learning curve like 5 min.

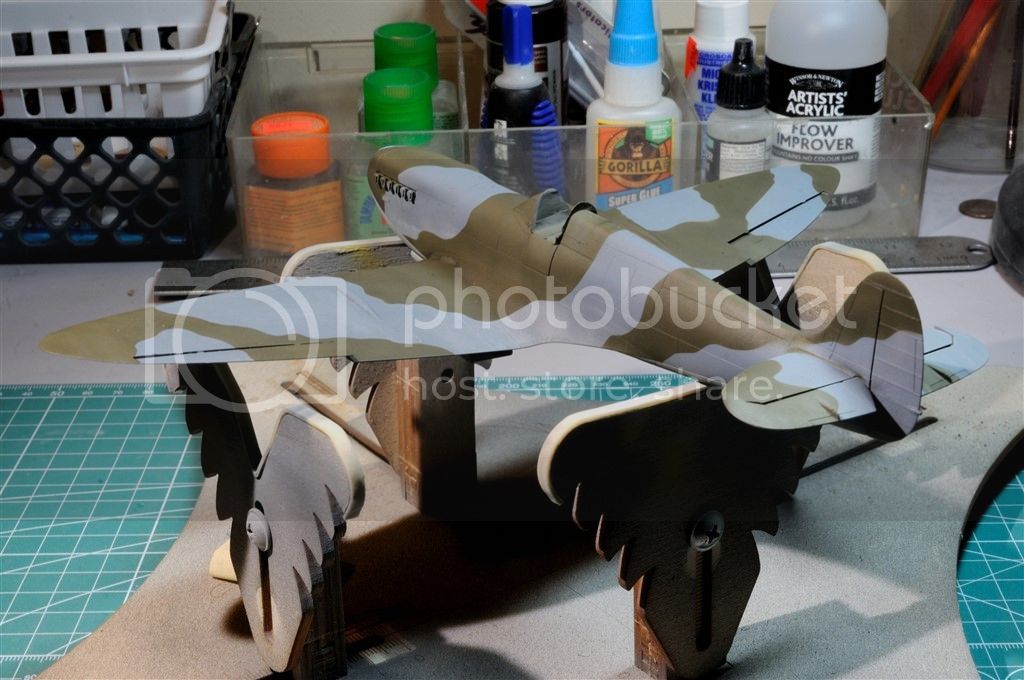
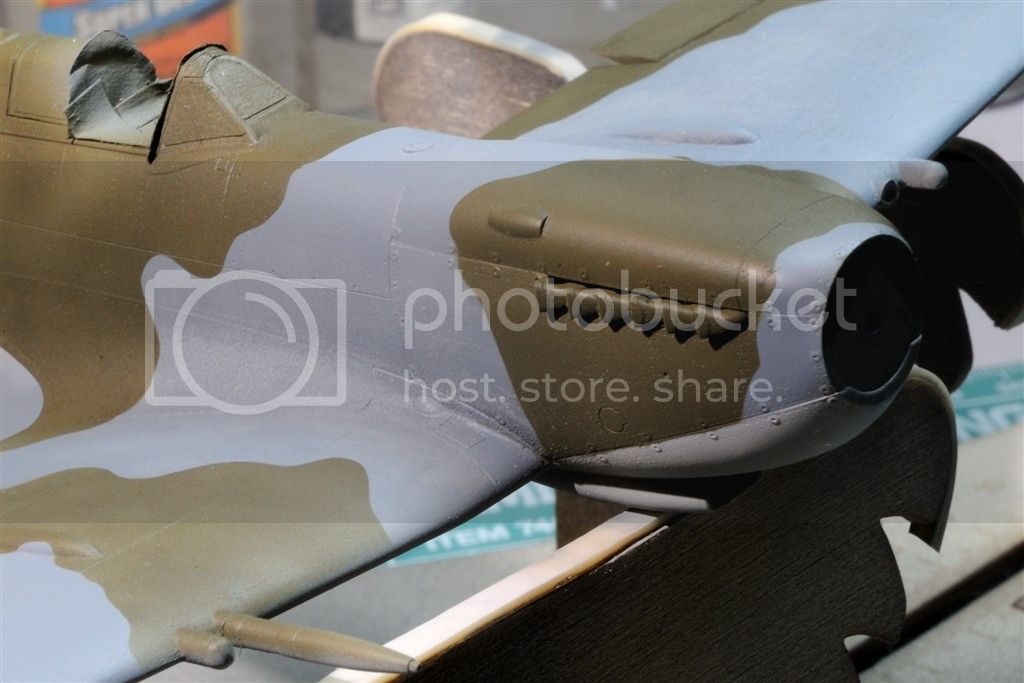
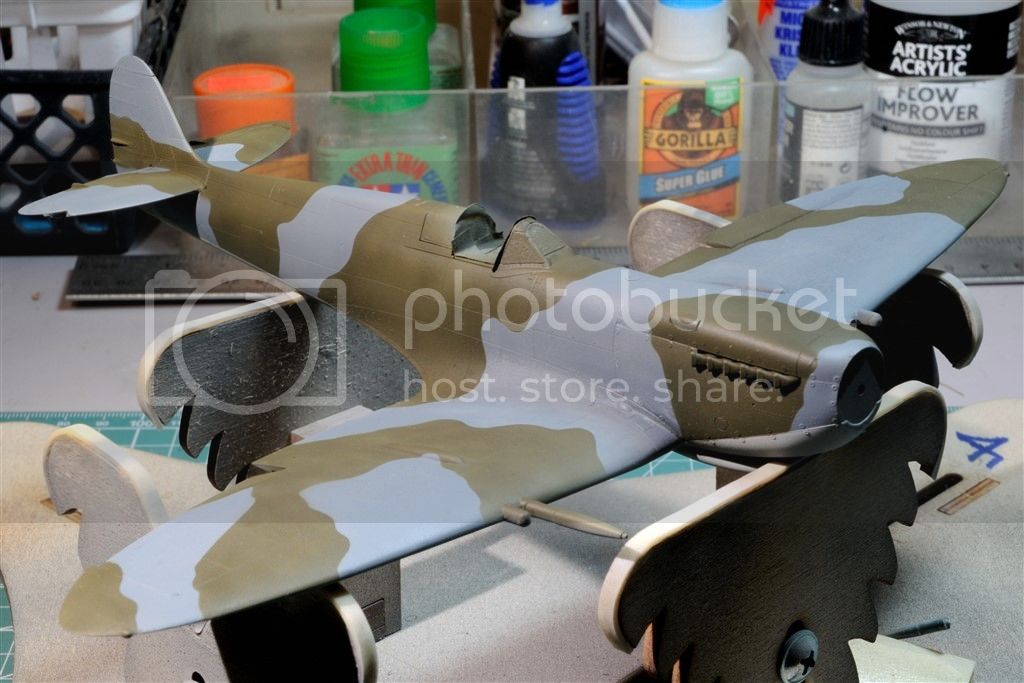
So it was time to air brush on the Tamiya Dark Green XF-81 thinned 1:1 with Tamiya's Lacquer Thinner. I decreased the flow rate from 18 psi that I use with the Paasche H to 16 psi and worked a little closer to the surface. The paint just flowed on as smooth as silk. Needless to say, I'm one happy camper.

Here's a few pictures of the camo paint scheme. It's as perfect as I can get it. Thanks to Mal's masks, there wasn't a drop of over spray or paint running under the masks.

Joel


Redhand
#522
_VISITCOMMUNITY
New Jersey, United States
Joined: January 20, 2013
KitMaker: 1,460 posts
AeroScale: 1,443 posts
Posted: Tuesday, April 21, 2015 - 10:53 PM UTC
VERY nice. I think the sharp demarcation lines from the masks are fantastic. This is going to turn out beautifully.

Glad you stuck with it.
magnusf
_VISITCOMMUNITY
Stockholm, Sweden
Joined: May 02, 2006
KitMaker: 1,953 posts
AeroScale: 1,902 posts
Posted: Tuesday, April 21, 2015 - 10:54 PM UTC
Joel! Can we agree upon that you actually managed to save it ? Beautiful detail work on the wheels as well by the way!


Magnus
alpha_tango
_VISITCOMMUNITY
Germany
Joined: September 07, 2005
KitMaker: 5,609 posts
AeroScale: 5,231 posts
Posted: Tuesday, April 21, 2015 - 11:16 PM UTC
Very nice rescue of your kit!

Mals masks are just wonderful and save a lot of time, at least these camomasks... no wonder there are already some copycats

all the best

Steffen
goodn8
_VISITCOMMUNITY
Berlin, Germany
Joined: October 12, 2008
KitMaker: 709 posts
AeroScale: 651 posts
Posted: Tuesday, April 21, 2015 - 11:24 PM UTC
Congrats and respect to your decision to move on and start again, Chapeau!
And again cograts to your new M-1, seems that you managed it very quickly.
Your Spit again comes out extremely nice, may I say better than before. The smoothness of the color is obvious. And Mal's masks must be very helpful.
Thomas
Merlin
Staff MemberSenior Editor
AEROSCALE
#017
_VISITCOMMUNITY
United Kingdom
Joined: June 11, 2003
KitMaker: 17,582 posts
AeroScale: 12,795 posts
Posted: Tuesday, April 21, 2015 - 11:34 PM UTC
Nice one Joel!

I'm so pleased you've got on well with your new Iwata M-1 . I also thought it was a lovely piece of kit when I reviewed it.

I've got to admit I like the TR-0 even more (partly on account of my wonky carpal tunnel hand these days), but the M-1 is right by my spray booth as a solid back-up.

All the best

Rowan
Joel_W
Staff MemberAssociate Editor
AUTOMODELER
_VISITCOMMUNITY
New York, United States
Joined: December 04, 2010
KitMaker: 11,666 posts
AeroScale: 7,410 posts
Posted: Tuesday, April 21, 2015 - 11:48 PM UTC

Quoted Text

VERY nice. I think the sharp demarcation lines from the masks are fantastic. This is going to turn out beautifully.

Glad you stuck with it.


Brian,
Me too. Without Mal's masks I couldn't have come close to the crispness of those demarcation lines, let along all those smooth flowing curves.

At this point, I feel that I'm over the hump, and back on track.

Joel
Joel_W
Staff MemberAssociate Editor
AUTOMODELER
_VISITCOMMUNITY
New York, United States
Joined: December 04, 2010
KitMaker: 11,666 posts
AeroScale: 7,410 posts
Posted: Tuesday, April 21, 2015 - 11:50 PM UTC

Quoted Text

Joel! Can we agree upon that you actually managed to save it ? Beautiful detail work on the wheels as well by the way!


Magnus


Magnus,
Agreed. See, there are really such things as Christmas Miracles, even though it's not anywhere near Xmas time.

Looking forward to my 1st but not last Spitfire in my model display .
Joel
Joel_W
Staff MemberAssociate Editor
AUTOMODELER
_VISITCOMMUNITY
New York, United States
Joined: December 04, 2010
KitMaker: 11,666 posts
AeroScale: 7,410 posts
Posted: Tuesday, April 21, 2015 - 11:52 PM UTC

Quoted Text

Very nice rescue of your kit!

Mals masks are just wonderful and save a lot of time, at least these camomasks... no wonder there are already some copycats

all the best

Steffen


Steffen,
I'm still in shock that I actually not only saved a kit, but brought it back better then before.

Mal's masks are in a class by themselves. They're that good.

Joel
Joel_W
Staff MemberAssociate Editor
AUTOMODELER
_VISITCOMMUNITY
New York, United States
Joined: December 04, 2010
KitMaker: 11,666 posts
AeroScale: 7,410 posts
Posted: Tuesday, April 21, 2015 - 11:54 PM UTC

Quoted Text

Congrats and respect to your decision to move on and start again, Chapeau!
And again cograts to your new M-1, seems that you managed it very quickly.
Your Spit again comes out extremely nice, may I say better than before. The smoothness of the color is obvious. And Mal's masks must be very helpful.
Thomas


Thomas,
Agreed that the new version is by far superior to the old one. I never would have thought that those lines could be that sharp and smooth.
Joel
Joel_W
Staff MemberAssociate Editor
AUTOMODELER
_VISITCOMMUNITY
New York, United States
Joined: December 04, 2010
KitMaker: 11,666 posts
AeroScale: 7,410 posts
Posted: Wednesday, April 22, 2015 - 12:08 AM UTC

Quoted Text

Nice one Joel!

I'm so pleased you've got on well with your new Iwata M-1 . I also thought it was a lovely piece of kit when I reviewed it.

I've got to admit I like the TR-0 even more (partly on account of my wonky carpal tunnel hand these days), but the M-1 is right by my spray booth as a solid back-up.

All the best

Rowan


Rowan,
Thanks. So far I'm more then thrilled, and will use my Paasche H for primer coats and clearcoats. The M-1 for everything else.
Joel