World War II
Discuss WWII and the era directly before and after the war from 1935-1949.
Hosted by Rowan Baylis
B-29 Superfortress Jumbo King of the Show
chukw1
California, United States
Joined: November 28, 2007
KitMaker: 817 posts
AeroScale: 729 posts
Joined: November 28, 2007
KitMaker: 817 posts
AeroScale: 729 posts
Posted: Tuesday, February 23, 2016 - 09:19 PM UTC
Joel_W
Associate Editor
New York, United States
Joined: December 04, 2010
KitMaker: 11,666 posts
AeroScale: 7,410 posts
Joined: December 04, 2010
KitMaker: 11,666 posts
AeroScale: 7,410 posts
Posted: Tuesday, February 23, 2016 - 11:22 PM UTC
Chuck,
boy did you come through in a big way. Those exhausts are incredible, as is the engine.
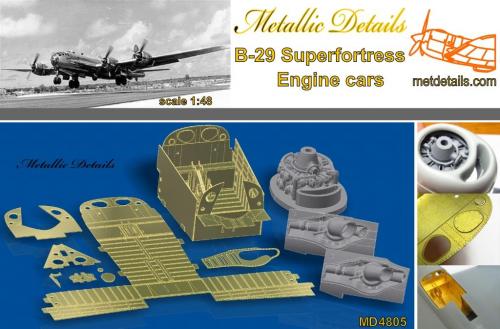
Gary would you be considering these AM ugrades? they would certainly make a huge difference.
Joel
boy did you come through in a big way. Those exhausts are incredible, as is the engine.
Gary would you be considering these AM ugrades? they would certainly make a huge difference.
Joel
Posted: Wednesday, February 24, 2016 - 02:45 PM UTC
Chuck,
Thank you for those tantalizing upgrades. Honestly, I'd love every thing you guys have shown. Guns are a must, and those exhausts look fantastic. But I do have to work within a budget, so we'll see. This weekend I'll conduct experiments with resin, foil, and vac-form canopies. Then I can either decide or ruminate further.
Gary
Bloody heat. It's been 90 degrees fahrenheit every afternoon this week. I have accomplished little except looking a pictures of big silver birds.
Kilo_Uniform
Gauteng, South Africa
Joined: July 03, 2015
KitMaker: 280 posts
AeroScale: 141 posts
Joined: July 03, 2015
KitMaker: 280 posts
AeroScale: 141 posts
Posted: Wednesday, February 24, 2016 - 09:26 PM UTC
Hi Gary
I feel your pain with the heat - we've been averaging between 30 - 35 degrees Celsius (86-95 degrees Fahrenheit) the past week or so here in Johannesburg - and we're supposed to be heading into Autumn! Even the evenings are not much cooler.
Looking forward to the next update.
Kobus
BTW Chuck - those are awesome exhaust & engine details
Posted: Friday, February 26, 2016 - 07:06 AM UTC
Hi Everyone,
Now that the weekend is here, I'm determined to sweat for my hobby. It's too hot to do much else other than seeking ways to stay cool.
Because I had to test foil on a couple other mediums (resin and vac-form) I decided to motivate myself by foiling a cowl.
Here's the story:
I always start with the most difficult part of the foiling. For the cowling, it's the ring around the opening, face, or whatever the proper term for it might be. This tiny area needed eight pieces.
Welcome to my light-box! The Sun shows my success as well as things that will need cleaning up.
This three view with more foil added shows even more clean-up is required. Have no fear. It's easy.
A few strokes of 1500 grit wet/dry. A tiny amount of aluminum polish, with a wipe of turpentine afterwards, and many of the blemishes are gone. It's an operational aircraft, so you don't want areas like the engine nacelles to be flawless... unless you're depicting it factory fresh, that is.
A bit of a zoom in. I don't like overly large images because it makes me grumpy waiting for pictures to upload. Now, say you think it's too shiny. All you do is add a coat of Future. Too shiny still...add a coat of Testor's Dullcoat. And if you're really going for 'well-used', add another coat of Future or Testor's Gloss Coat to reduce your shine even further before you pin-wash and weather.
Oh, I almost forgot. My testing of Foil and Resin and Vac-form.
The resin was a virtual failure, I'm sad to say. I really liked the look of those exhausts.
The vac-form was better, but not as good as adherence to plastic.
Thank you for looking.
Gary
BTW...Anyone got some good images of her control surfaces? The fabric and ribbing effects look way overdone. But trying to find useful close-ups of those areas have given little success. Thanks for thinking about it!
Posted: Friday, February 26, 2016 - 09:28 AM UTC
Holy Crow!
I literally don't know how you do it! What is the thickness of the aluminum foil you use? How do you adhere it to the plastic?
I'll be watching every step of the way. I don't know of anyone else who has tried to foil a 1/48 B-29. Just amazing to me.
FWIW it's cold, damp and miserable here in NJ USA. However, we are getting some clear crisp skies too.
greif8
Bayern, Germany
Joined: January 17, 2006
KitMaker: 673 posts
AeroScale: 492 posts
Joined: January 17, 2006
KitMaker: 673 posts
AeroScale: 492 posts
Posted: Friday, February 26, 2016 - 02:44 PM UTC
Wow, very, very sweet Gary! I'm not sure I have the patience to cover an entire model as large as a B-29 with foil, much respect for your skill and perseverance there Gary.
Posted: Friday, February 26, 2016 - 04:53 PM UTC
Hi Brian,
Glad to have you here. I've never tried to foil a B-29 before, either. I've done three blogs with foiled a/c here at Aeroscale. Here is one in which I put a small tutorial:
Ki-44 with Tutorial
The foil is very thin with no thickness given on the box. The cheapest and thinnest is always best. Made in China...truthfully.
But it's cheap. Like I said, I've covered three single-engined fighters with the same $5.00 bottle of glue and $2.00 worth of foil. ...and I haven't used a quarter of the glue, nor the whole 10+yards of foil.
I reckon I should be able to do this B-29 and a Tu-95 before I might have to consider spending another $7.00 on materials.
Gary
Posted: Friday, February 26, 2016 - 04:58 PM UTC
Hi Ernest,
Thank you very much. It's all relative, really. I don't have to paint, fade, weather, or chip. I don't have to wait for paint to dry. A pin wash, Exhaust stains, maybe a few smeared rivulets of oil. This plane didn't have a long operational life, so I don't even have to fade the insignia.
The only really odious task of this kit is having to scribe in new panel lines. Which for me means fixing mistakes, too.
Gary
Joel_W
Associate Editor
New York, United States
Joined: December 04, 2010
KitMaker: 11,666 posts
AeroScale: 7,410 posts
Joined: December 04, 2010
KitMaker: 11,666 posts
AeroScale: 7,410 posts
Posted: Friday, February 26, 2016 - 09:46 PM UTC
Gary,
The engine cowls look amazing. For that matter, so does the sanding, reshaping that I had such concerns about. Just one question, what or how are you going to deal with those radiator intakes in each cowling?
As for foiling resin, how about a few coats of Future or a clear coat of your choice? Would a lacquer primer make a difference?
Hey Brian, over here on LI we actually had a few days of 50 degree weather before Old Man Winter came back.
Joel
SteveAndrews
England - South East, United Kingdom
Joined: August 16, 2010
KitMaker: 693 posts
AeroScale: 551 posts
Joined: August 16, 2010
KitMaker: 693 posts
AeroScale: 551 posts
Posted: Saturday, February 27, 2016 - 12:53 AM UTC
Hi Gary
I just popped over to say good luck, and that I'll be watching. That really is a great effect you get with the foil. If you make it look too easy I might be tempted to go the same route with the Mirage. Then expect a barrage of please for help.
Have fun.
Steve

I just popped over to say good luck, and that I'll be watching. That really is a great effect you get with the foil. If you make it look too easy I might be tempted to go the same route with the Mirage. Then expect a barrage of please for help.
Have fun.
Steve
Posted: Saturday, February 27, 2016 - 02:04 AM UTC
Quoted Text
Gary,
The engine cowls look amazing. For that matter, so does the sanding, reshaping that I had such concerns about. Just one question, what or how are you going to deal with those radiator intakes in each cowling?
As for foiling resin, how about a few coats of Future or a clear coat of your choice? Would a lacquer primer make a difference?
Hey Brian, over here on LI we actually had a few days of 50 degree weather before Old Man Winter came back.
Joel
Hi Joel,
Thank you for your kind words. I may just paint the radiator intakes. I actually foiled one earlier but it really doesn't show. As for the louvres, I'll have to ruminate further.
I'm going to prime the resin with Alclad black primer, let it cure and then repeat the experiment. It's probably the strongest material I have.
Gary
Posted: Saturday, February 27, 2016 - 02:15 AM UTC
Quoted Text
Hi Gary
I just popped over to say good luck, and that I'll be watching. That really is a great effect you get with the foil. If you make it look too easy I might be tempted to go the same route with the Mirage. Then expect a barrage of please for help.
Have fun.
Steve
Hi Steve,
Glad you came by. Thank you, I'm glad you like the way the foil looks. If you do take the plunge, and have a question, I come to the forums every and would be glad to help.
Best wishes,
Gary
Posted: Saturday, March 05, 2016 - 05:14 AM UTC
Hi Everyone,
feels like a long time since my last update. In the interim, I've scribed both horizontal tail-planes and one entire wing. Very boring, very frustrating because minor mistakes made by clumsy hands, and not worth a photo.
For a break from scribing, I decided I would dig into the engine detail of the powerful Wright Cyclones. For me, radial engines now require extra plumbing to make them look right. If the engine is behind a big fan, like on the FW-190, I'd give it a miss. But on these US birds with their big open-faced cowlings, extra effort is required.
I started by drilling all of the holes required for the ignition wires, and by foiling the ignition ring.
Then, I airbrushed the main cylinder color in acrylics. Between coats, I dipped a q-tip into a mixture of glass cleaner and water and wiped the paint from the foiled ignition rings. Then I painted the engine detail with a hairy stick. And finally before putting the paintbrush down, a thin black wash to fill nooks and crannies adding depth.
Then I had the fun of installing all of the wires. About a six-hour process for one engine. Hopefully it'll go faster for the other three. For wire, I had raided the stereo system of about a foot of speaker wire. It's very fine.
The result, ensconced inside the one foiled cowling:
Not much of an update. Summer heat added to life's issues meant I spent fewer hours at the bench than hoped. Thankfully winter is approaching.
Best Wishes,
Gary
Posted: Saturday, March 05, 2016 - 07:39 AM UTC
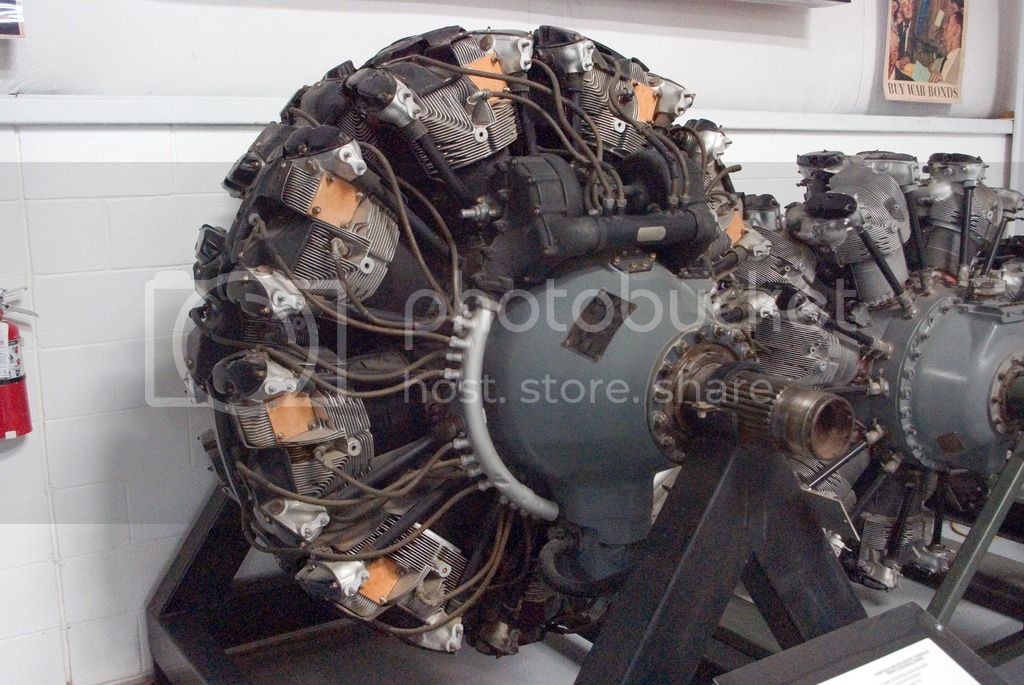
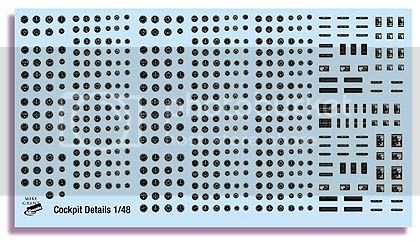
Very nice indeed. I didn't do much detailing on my engines, taking an "old-timey" paint the engraved wires approach, but I agree engines are one of the best places to detail a kit -- especially radials! One can always create nice additional details with data plates using Mike Grant's generic decals.
See below for placement.
Carry on!
See below for placement.
Carry on!
Posted: Saturday, March 05, 2016 - 09:30 AM UTC
Hey Brian,
Thanks for that! Great picture of the engine, too. Your picture was from a better angle than the best I could find. If a guy was of a mind to put this bird in an open-cowl situation, he'd have his hands full. I think I might stick a decal on each one of those bab boys, anyway.
Gary
Thanks for that! Great picture of the engine, too. Your picture was from a better angle than the best I could find. If a guy was of a mind to put this bird in an open-cowl situation, he'd have his hands full. I think I might stick a decal on each one of those bab boys, anyway.
Gary
Posted: Saturday, March 05, 2016 - 04:11 PM UTC
Quoted Text
Hey Brian,
Thanks for that! Great picture of the engine, too. Your picture was from a better angle than the best I could find. If a guy was of a mind to put this bird in an open-cowl situation, he'd have his hands full. I think I might stick a decal on each one of those ba[d] boys, anyway.
Gary
Yeah, it's a painless small addition. When I did my 29 I was crazy enough to use Grant's decal sheet to punch out dials for the engineer's console and the pilots' instrument panels. There are now aftermarket decal sheets for this, or Eduard brass, I believe.
Kilo_Uniform
Gauteng, South Africa
Joined: July 03, 2015
KitMaker: 280 posts
AeroScale: 141 posts
Joined: July 03, 2015
KitMaker: 280 posts
AeroScale: 141 posts
Posted: Saturday, March 05, 2016 - 05:42 PM UTC
Awesome work on the engines Gary - looking really good.
As always, looking forward to the next instalment.
Regards,
Kobus
As always, looking forward to the next instalment.
Regards,
Kobus
Posted: Sunday, March 06, 2016 - 11:00 AM UTC
@ Brian: I'm not an interior detail guy, so I can only imagine that kind of effort. I've tried serious cockpit work, but I'm not very good at detail painting. Working with soft metals works a little better for me.
@ Kobus: Thank you, sir!
Gary
@ Kobus: Thank you, sir!
Gary
greif8
Bayern, Germany
Joined: January 17, 2006
KitMaker: 673 posts
AeroScale: 492 posts
Joined: January 17, 2006
KitMaker: 673 posts
AeroScale: 492 posts
Posted: Sunday, March 06, 2016 - 12:37 PM UTC
Awesome work on the engine Gary, it looks great! Scribing or re-scribing panel lines is one of the very few modeling tasks I don't enjoy very much. It is always a tense time for me when I do it.
Posted: Sunday, March 06, 2016 - 01:41 PM UTC
Hi Ernest,
Thank you! To be honest, I deplore scribing. But the real reason I hate it is because I am never pleased with the results. I hope that some day I can do well enough to feel content with the results.
Finished the fourth engine today... Er, well I thought I was finished until I remembered that Brian showed me more details I can add. Small details, but each detail adds a liitle depth.
Tomorrow after work I will give the engines a coat of Future which will dull the sheen of metal a bit.
All the Best,
Gaz
KelticKnot
Scotland, United Kingdom
Joined: May 11, 2015
KitMaker: 768 posts
AeroScale: 656 posts
Joined: May 11, 2015
KitMaker: 768 posts
AeroScale: 656 posts
Posted: Sunday, March 06, 2016 - 08:43 PM UTC
Been following this from the start but realised i've yet to comment.
Nice work so far! I'm really interested in the foil technique - it seems like a massive amount of work but as you say, there's no painting to be done so comparatively it's not so bad. Maybe i'll try a SMALL bare metal a/c someday.
Posted: Sunday, March 06, 2016 - 11:22 PM UTC
Hi Paul,
Thank you! My first foil model took a lot of time, I'll admit. But each one has gotten easier, and now I can experiment with smaller parts like I did with the engines here.
Gary
Thank you! My first foil model took a lot of time, I'll admit. But each one has gotten easier, and now I can experiment with smaller parts like I did with the engines here.
Gary
Joel_W
Associate Editor
New York, United States
Joined: December 04, 2010
KitMaker: 11,666 posts
AeroScale: 7,410 posts
Joined: December 04, 2010
KitMaker: 11,666 posts
AeroScale: 7,410 posts
Posted: Monday, March 07, 2016 - 06:31 AM UTC
Gary,
Those big radials really look good with the wiring harness added. Your shaming me into doing the engines on the B-25B.
Joel
Those big radials really look good with the wiring harness added. Your shaming me into doing the engines on the B-25B.
Joel
Posted: Monday, March 07, 2016 - 10:58 AM UTC
Quoted Text
Gary,
Those big radials really look good with the wiring harness added. Your shaming me into doing the engines on the B-25B.
Joel
Joel,
Heh...I thought by now that doing the harness in your Mitchell was obligatory after showing us pictures of your P-61 engines. You kinda set the bar, buddy.
That being said, the kit engines are in need of some lovin'. And I would bet anyone 20 bucks that the pictures of those Wright Cyclones I can see on the net every day are better than the maker of the model had at his disposal when he was preparing the original moulds.
Best wishes,
Gary