Hello Friends,
It's time to start a build which has been on my mind for quite some time. When I started to research the B-29, I saw a video which contained factory as well as mission footage. One plane in particular caught my imagination.
These are the only images of the aircraft that I have been able to find.
Assigned to 871st Bombardment Squadon, 497th Group, 73rd Bomber Wing, her fin call numbers were A Square 50. Serial number 42-63418. The image below is only an example from another squadron.
The 73 Bomber Wing had failed to completely break the back of the Mushashino Engine Factory (target 357) despite repeated attempts with precision bombing. The 20th Air Force ordered a test mission against Nagoya, Japan. It was thought that torching the entire area would produce better results. The production of many components used by the Japanese war machine were subcontracted to small, family-run machine shops in residential areas, and hundreds of these small businesses produced parts for the main factories. If the factory couldn't be destroyed, perhaps all of the shops that kept the factory supplied, could.
On January 3 1945, Jumbo King of the Show, piloted by Captain Howard M. Clifford participated in Mission 17 against Nagoya Japan. Each aircraft carried 14 M-69 Incendiary cluster bombs which would release their bomblets at 8000 feet.
The Japanese fighters (Ki-61's from 55th and 56 Sentais, Zeroes from 210 Kokutai,Irving's and Judy night-fighters) flew 349 combat passes and 5 B-29's were lost. B-29 gunners claimed 14-14-20 Japanese aircraft. The Japanese documented two pilots lost on this raid.
Within 75 miles of her base at Saipan the aircraft had been flying on three engines and had run out of fuel. Because it was dark, it was decided to ditch the plane in the sea. Captain Clifford and four other crew members were rescued by the destroyer USS Grayson. Six of the crew remained missing lost at sea.
The research will continue along with the build. Any helpful comments, hints, or knowledge will be appreciated.
Thanks for looking,
Gary
World War II
Discuss WWII and the era directly before and after the war from 1935-1949.
Hosted by Rowan Baylis
B-29 Superfortress Jumbo King of the Show
Posted: Saturday, February 20, 2016 - 09:13 AM UTC
Kilo_Uniform
Gauteng, South Africa
Joined: July 03, 2015
KitMaker: 280 posts
AeroScale: 141 posts
Joined: July 03, 2015
KitMaker: 280 posts
AeroScale: 141 posts
Posted: Saturday, February 20, 2016 - 11:07 AM UTC
Looks real interesting Gary. Let me guess - you're going to foil her?
Regards,
Kobus
Regards,
Kobus
Posted: Saturday, February 20, 2016 - 11:20 AM UTC
Quoted Text
Hello Friends,
It's time to start a build which has been on my mind for quite some time. When I started to research the B-29, I saw a video which contained factory as well as mission footage. One plane in particular caught my imagination.
These are the only images of the aircraft that I have been able to find.
Gary
What scale? 1/48? I built one of these a few years ago and will have a lot of tips. Plus, I know quite a few nifty, but obscure aftermarket parts.
Will follow with great interest.
Brian
Posted: Saturday, February 20, 2016 - 03:02 PM UTC
Hey Kobus,
Glad to see you! Yes, she must be foiled. For me, Aluminum paint is only for places where foil won't go, or on canvas covered control surfaces that were painted in aluminum dope.
Hey Brian,
I'll be glad for any tips you can throw my way. Aftermarket gun barrels are a must.... But some things are a long way away. Removing raised panel lines and scribing new ones is the first thing I have to do.
Best wishes,
Gary
BlackWidow
European Union
Joined: August 09, 2009
KitMaker: 1,732 posts
AeroScale: 1,336 posts
Joined: August 09, 2009
KitMaker: 1,732 posts
AeroScale: 1,336 posts
Posted: Saturday, February 20, 2016 - 03:11 PM UTC
Gary, I'll follow also your build. It surely won't fit in your new coffee table, though ....
Torsten
Torsten
Posted: Saturday, February 20, 2016 - 03:38 PM UTC
Torsten,
I'll be glad to have you along. This bird is going to hang on a wall, in a frame. To do this I will have to build a skeleton of brass to bear the weight. The kit gear will have to be replaced by combination bolts-and-landing-gear.
The coffee table top has been declared off-limits.
Gary
I'll be glad to have you along. This bird is going to hang on a wall, in a frame. To do this I will have to build a skeleton of brass to bear the weight. The kit gear will have to be replaced by combination bolts-and-landing-gear.
The coffee table top has been declared off-limits.
Gary
Posted: Saturday, February 20, 2016 - 09:12 PM UTC
Quoted Text
Hey Brian,
I'll be glad for any tips you can throw my way. Aftermarket gun barrels are a must.... But some things are a long way away. Removing raised panel lines and scribing new ones is the first thing I have to do.
Best wishes,
Gary
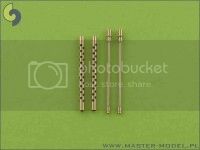
I used these Karaya barrels on the B-29 (and will on the 17 too)
but apparently Karaya has abandoned their home-grown product in favor of these from Master
Given the large number on a 29, I would still look for the cheaper Karaya product first. They look great.
Posted: Sunday, February 21, 2016 - 01:38 AM UTC
Brian,
I found those same Master barrels yesterday for AU 9.00 a pair in Australia. They do look pretty fantastic.
Here's a question for you:
I've seen photos and film where the muzzle ends of the jacketed barrels were covered in a lighter colored material... Probably to keep stuff out. Was this carried into combat, or peeled off before take-off?
Gary
Scrodes
Ontario, Canada
Joined: July 22, 2012
KitMaker: 771 posts
AeroScale: 763 posts
Joined: July 22, 2012
KitMaker: 771 posts
AeroScale: 763 posts
Posted: Sunday, February 21, 2016 - 04:10 AM UTC
Quoted Text
I found those same Master barrels yesterdayThey do look pretty fantastic.
I've used a few sets of them and absolutely love them. I can't imagine building a model that they're available for and not purchasing them.
They're typically designed to replace kit parts directly (moreso in 32nd scale because there are fewer kits)
Joel_W
Associate Editor
New York, United States
Joined: December 04, 2010
KitMaker: 11,666 posts
AeroScale: 7,410 posts
Joined: December 04, 2010
KitMaker: 11,666 posts
AeroScale: 7,410 posts
Posted: Sunday, February 21, 2016 - 04:44 AM UTC
Gary,
I'm officially signing up for the ride. A foil covered B-29 with all the Goodies. Sure sounds like fun.
Joel
I'm officially signing up for the ride. A foil covered B-29 with all the Goodies. Sure sounds like fun.
Joel
Posted: Sunday, February 21, 2016 - 05:53 AM UTC
Quoted Text
Brian,
I found those same Master barrels yesterday for AU 9.00 a pair in Australia. They do look pretty fantastic.
Here's a question for you:
I've seen photos and film where the muzzle ends of the jacketed barrels were covered in a lighter colored material... Probably to keep stuff out. Was this carried into combat, or peeled off before take-off?
Gary
I'm not sure really. Do you have a still pic to post?
Posted: Sunday, February 21, 2016 - 09:05 AM UTC
Hi Everyone,
Brian, thanks for thinking on it. I did more searching and it seems it was just on a training film, so nothing to think more about.
I've scribed the stabilizers, and started working on the cowlings since they came off the same sprue. Here is where the model shows it's age:
To give the appearance of panels on the cowling, the person making the mold put steps into the cowlings. There is a step behind the first cowling ring, and then another step for the cooling louvers. These steps will have to be removed after I have scribed lines in for the panels that the cowling has.
This will change the angle of the cooling louvers, but hopefully not the shape.
And just as I had considered thinning the louvers from the back, I realize that there are no kind of alignment points or marks for where to attach them to the nacelles. This puts me in fear of discovering after the glue has dried that I might have them cockeyed. I hate when you look at your work and discover it has a lazy eye.
Best Wishes,
Gary
Posted: Sunday, February 21, 2016 - 10:26 AM UTC
I just blew past the cowlings "steps" on my build. IIRR there are no firm attachment points for the cowlings. Butt Joins!
I wound up gluing styrene tabs on the forward part of the nacelles that the cowlings would fit over. That worked reasonably well.
in a sense: on to the canopy. I do recommend the Squadron vacuform canopy over the kit one, at least on top. The kit one is flush and curved, which is totally wrong. See below:
A friend attached it for me (difficult!!) but I hand masked the top with all those subtle indents for the rubber. Tedious but worth it.
Posted: Sunday, February 21, 2016 - 11:22 AM UTC
Brian,
thanks for the link and illustrations. It's good that there are so many decent color pictures of the type around.
I've been working working on a couple of the cowlings. I've had to find engine close-ups and add panel lines to make foiling the front openings possible.
Have you ever tried to replicate the ripple effect that some panels get?
Gary
Kilo_Uniform
Gauteng, South Africa
Joined: July 03, 2015
KitMaker: 280 posts
AeroScale: 141 posts
Joined: July 03, 2015
KitMaker: 280 posts
AeroScale: 141 posts
Posted: Sunday, February 21, 2016 - 07:02 PM UTC
Hi Gary
Can't wait to see the 1st foil - will be following along for sure.
Regards,
Kobus
Can't wait to see the 1st foil - will be following along for sure.
Regards,
Kobus
Joel_W
Associate Editor
New York, United States
Joined: December 04, 2010
KitMaker: 11,666 posts
AeroScale: 7,410 posts
Joined: December 04, 2010
KitMaker: 11,666 posts
AeroScale: 7,410 posts
Posted: Sunday, February 21, 2016 - 08:13 PM UTC
Gary,
I've dealt with issues nothing to that level with several cowlings, and in every instance where a aftermarket part was available, I went that route, and never regretted it. While it's certainly possible to reshape and rescribe all 4 cowls, but the time you get back to the cowl flaps, keeping the same geometry will be a difficult task, and I do have concerns of just how thin those cowl flaps will be. That is an issue when the basic mounting surface is the back of the cowls. Going with Brian's suggestion of mounting tabs is the best bet.
I took the liberty and did a few Google searches and came up with these resin cowlings, and they sure do look good.
I have no idea if they're still made, but I'm sure a few sets are still around via ebay.
Joel
Posted: Sunday, February 21, 2016 - 11:10 PM UTC
Hi Kobus,
I'm looking forward to the first foiling, too. Because the project is so big, I'm going to bounce from one task to the other to keep my mojo going. I don't want to get bogged down in one task and lose sight of the goal.
Joel,
Thank you for letting me know about those. I'll do some looking around to see what I can find.
Best wishes,
Gary
Joel_W
Associate Editor
New York, United States
Joined: December 04, 2010
KitMaker: 11,666 posts
AeroScale: 7,410 posts
Joined: December 04, 2010
KitMaker: 11,666 posts
AeroScale: 7,410 posts
Posted: Monday, February 22, 2016 - 12:00 AM UTC
Quoted Text
Thank you for letting me know about those. I'll do some looking around to see what I can find.
Best wishes,
Gary
Gary,
Sure hope that someone still has a set. Grinding away a two tier step 4 times is a challenge I personally wouldn't want to be facing. But if need be, I'm sure that you'll be able to pull it off without any issues.
Joel
Posted: Monday, February 22, 2016 - 12:07 PM UTC
Hey Joel,
The steps go down pretty quickly with a file. Then wetted sandpaper to smooth. I use small files that curve toward the tip. This enables me to work in small, localized strokes. I just about had two done yesterday.
I had another learning epiphany yesterday. When you have a plane that is still around and well photographed, you can zoom in if there are places where you think it will be difficult to foil with methods you've used previously. This allows you in some circumstances to see every panel used by the real builders. Sure enough, there are always more than we think there are.
This means more scribing for me, sure. But it will also give me less trouble in the confines of the engine intakes.
Speaking of scribing, have you tried the UMM scriber? It's the best 5 bucks a modeller will ever spend. It does the work of three tools in one stroke, saving tons of time and effort. About the only thing I can't make better with it is curves by freehand.
Best Wishes,
Gary
Joel_W
Associate Editor
New York, United States
Joined: December 04, 2010
KitMaker: 11,666 posts
AeroScale: 7,410 posts
Joined: December 04, 2010
KitMaker: 11,666 posts
AeroScale: 7,410 posts
Posted: Monday, February 22, 2016 - 07:41 PM UTC
Quoted Text
Hey Joel,
The steps go down pretty quickly with a file. Then wetted sandpaper to smooth. I use small files that curve toward the tip. This enables me to work in small, localized strokes. I just about had two done yesterday.
I had another learning epiphany yesterday. When you have a plane that is still around and well photographed, you can zoom in if there are places where you think it will be difficult to foil with methods you've used previously. This allows you in some circumstances to see every panel used by the real builders. Sure enough, there are always more than we think there are.
This means more scribing for me, sure. But it will also give me less trouble in the confines of the engine intakes.
Speaking of scribing, have you tried the UMM scriber? It's the best 5 bucks a modeller will ever spend. It does the work of three tools in one stroke, saving tons of time and effort. About the only thing I can't make better with it is curves by freehand.
Best Wishes,
Gary
Gary,
Glad that you're making progress with the engine cowls. I opted on the PV-1 to go with the aftermarket ones, rather then spend the time to try and correct the shape issues. Guess that's just me as I'm basically lazy, and will always look for the easy way to accomplish a task.
As for the UMM scriber, they make two. I've had the UMM USA SCR01 for a few years, and it's my favorite and most versatile scriber by far. The straight cutter surface is like a multi tool as it does so many different things, and is very easy to control. I have the Tamiya scriber that I use for deepening and widening the demarcation lines of flying surfaces, and cutting various surfaces out.
I'm looking forward to your 1st update with the before and after of the cowls.
Joel
KelticKnot
Scotland, United Kingdom
Joined: May 11, 2015
KitMaker: 768 posts
AeroScale: 656 posts
Joined: May 11, 2015
KitMaker: 768 posts
AeroScale: 656 posts
Posted: Monday, February 22, 2016 - 08:02 PM UTC
Another giant bomber to drool over? Count me in !
Posted: Monday, February 22, 2016 - 11:08 PM UTC
Hey Joel,
I haven't ruled out the resin cowls yet, but I haven't found them, either. I'm no less lazy. Another question that comes into mind recently is how the foil glue will react to resin. I can experiment with that this weekend when I have time to pour some resin from a molding kit that's been laying around. Matter of fact, I have to do the same test on some vac form canopies to see if I can consider buying the canopy that Brian recommended. Unfortunately, it's the nastiest part of Queensland summer. So hot and muggy that after work the only thing you wanna do is sit in the pool with a cold drink.
Paul, welcome aboard! Do you know that there is a 1/48 scale Tu-95 Bear Bomber out there? It's on my list once I do some serious stash reduction.
Best Wishes,
Gary
Joel_W
Associate Editor
New York, United States
Joined: December 04, 2010
KitMaker: 11,666 posts
AeroScale: 7,410 posts
Joined: December 04, 2010
KitMaker: 11,666 posts
AeroScale: 7,410 posts
Posted: Monday, February 22, 2016 - 11:16 PM UTC
Gary,
Right about now I'd kill for that weather. We had a mild Jan and I thought that we were going to have a mild winter. Then Feb got here. Now this is Long Island New York. We've had literally 0 degrees days and -6 nights!
I'm lucky, and I know just how lucky I am. I have central temp control throughout the house which includes air conditioning. My wife never even knows what it's like outside if she doesn't go out. Between the lighting and computers in the model room, it's usually in the mid 70s, and in the summer I have the AC vents fully open and it stays in the high 60s. Humidity is never an issue year around for me.
Joel
litespeed
News Reporter
England - North West, United Kingdom
Joined: October 15, 2009
KitMaker: 1,976 posts
AeroScale: 1,789 posts
Joined: October 15, 2009
KitMaker: 1,976 posts
AeroScale: 1,789 posts
Posted: Tuesday, February 23, 2016 - 01:29 AM UTC
Looking forward to seeing progress with your latest project Gary. What a monster.
Me too Gary I have not been into my workshop much this winter as it's too cold to do anything. I could heat it but there are far too many draughts to have any effect. I'm not allowed into the house as I'm not the tidiest modeller in the world. She that lives indoors also hates the smell of glue and plastic. So I'm patiently waiting for some milder weather.
tim
Quoted Text
Gary,
Right about now I'd kill for that weather.
Joel
Me too Gary I have not been into my workshop much this winter as it's too cold to do anything. I could heat it but there are far too many draughts to have any effect. I'm not allowed into the house as I'm not the tidiest modeller in the world. She that lives indoors also hates the smell of glue and plastic. So I'm patiently waiting for some milder weather.
tim
greif8
Bayern, Germany
Joined: January 17, 2006
KitMaker: 673 posts
AeroScale: 492 posts
Joined: January 17, 2006
KitMaker: 673 posts
AeroScale: 492 posts
Posted: Tuesday, February 23, 2016 - 12:33 PM UTC
I'm along for the ride Gary. That's going to be one big beast when finished!