

Hi Gary
Awesome detail work on the barbettes - like the guys (Joel, Paul, Brian and others) have mentioned the scribing, clean-up, and thinning of the fairings were all time consuming jobs - however, I do believe that the result will make the effort worthwhile.
Keep up the epic work mate!
Regards,
Kobus
World War II
Discuss WWII and the era directly before and after the war from 1935-1949.
Discuss WWII and the era directly before and after the war from 1935-1949.
Hosted by Rowan Baylis
B-29 Superfortress Jumbo King of the Show

Kilo_Uniform

Joined: July 03, 2015
KitMaker: 280 posts
AeroScale: 141 posts
Posted: Saturday, March 19, 2016 - 01:18 PM UTC

GazzaS

#424

Joined: April 23, 2015
KitMaker: 4,648 posts
AeroScale: 1,938 posts

Posted: Saturday, March 19, 2016 - 02:30 PM UTC
Ernest and Kobus,
Thank you! I spent much of today getting all of the fairings close to the shape I wanted. Then I sat down to learn more about the construction of the turret domes.
I didn't find the information I was seeking, but I did learn that at one point in time, a four-piece kit was offered which replaced all of the fairings on the fuselage. Anyway, my budget is a bit constricted enough that it's better I've done it myself.
Next up I will paint everything in black acrylic to find errors.
Best Wishes,
Gary
Joel_W

Joined: December 04, 2010
KitMaker: 11,666 posts
AeroScale: 7,410 posts
Posted: Saturday, March 19, 2016 - 10:25 PM UTC
Gary,
Took a double take at your Avatar. That's one from the past for sure.
Joel
Took a double take at your Avatar. That's one from the past for sure.
Joel

GazzaS
#424
Joined: April 23, 2015
KitMaker: 4,648 posts
AeroScale: 1,938 posts
Posted: Saturday, March 19, 2016 - 10:55 PM UTC
Hey Joel,
Working on this bird has sorta inspired the old cold warrior in me. It was either Slim Pickens riding the bomb,or the Doctor, but I couldn't find a picture of Slim on the Bomb that would look good reduced to the required 75X75 pixel format.
Gaz
Working on this bird has sorta inspired the old cold warrior in me. It was either Slim Pickens riding the bomb,or the Doctor, but I couldn't find a picture of Slim on the Bomb that would look good reduced to the required 75X75 pixel format.
Gaz

goodn8

Joined: October 12, 2008
KitMaker: 709 posts
AeroScale: 651 posts
Posted: Saturday, March 19, 2016 - 11:18 PM UTC
Quoted Text
It was either Slim Pickens riding the bomb,or the Doctor...
Peter Sellers, one of my favourite actors and ever famous in his characters always riding the bomb when acting...

Great work on your kit, will follow...
Thomas


Redhand

#522
Joined: January 20, 2013
KitMaker: 1,460 posts
AeroScale: 1,443 posts
Posted: Sunday, March 20, 2016 - 06:18 AM UTC
Quoted Text
It was either Slim Pickens riding the bomb,or the Doctor...
Nu-clear combat wit the Rusk-ies.

And to think I have two of 'em in my home even as I write this! Wife and her daughter * * * Times change.

GazzaS
#424
Joined: April 23, 2015
KitMaker: 4,648 posts
AeroScale: 1,938 posts
Posted: Sunday, March 20, 2016 - 11:31 AM UTC
Thomas,
Thank you. Glad to have you along!
Brian,
I learned to stop worrying and love the bomb. Craziest movie sub-title ever!
Gaz
Thank you. Glad to have you along!
Brian,
I learned to stop worrying and love the bomb. Craziest movie sub-title ever!
Gaz
GazzaS
#424
Joined: April 23, 2015
KitMaker: 4,648 posts
AeroScale: 1,938 posts
Posted: Sunday, March 20, 2016 - 02:18 PM UTC
Hi everyone,
As I follow in the footsteps of every madman who has decided to rescribe a large model, I thought I would share in my discoveries, triumphs, and tragedies.
I found that I had made the lower aft barbette very thin when light started to show through it.

At this point panic set in as I realized I still had to scribe lines in it!
Generally there are a few kinds of putties on offer:
a. Putties that will eat your plastic and take too long to dry. Squadron Green putty for example.
b. Benign putties that take too long to dry and might just flake off completely when you touch it. Milliput is great for some things, but not for being worked with a sharp instrument.
c. Granular putties that don't react well to scribing. Mr. Surfacer 1000 is one that I've used time and again only to discover I need to apply another coat.
d. This bed is too hard (sorry Goldilocks!) I've tried CA as a filler, and never been really happy with it.
So, Because I had to shore up the walls of the ventral barbette, I thought I would try Bondic. I put some in place, spread it with a toothpick, then 5 seconds under UV light provided with Bondic, and (Shazam!)the barbette is shored up from the inside.

That shiny stuff between the red lines is Bondic. It's harder than styrene but not as hard as CA. Hopefully I won't pierce the little bit of styrene that remains around the barbette. But, if I do, I'm certain the Bondic won't let my clumsy fingers turn the whole thing into a calamity.
Now I must render a respectful salute to any person who has painted this model. One because it's so big, and two because it must have cost a fortune in model paint. BTW...if anyone offers the B-36 in 1/48 scale...Don't tell me!!
I've painted her black to find any flaw I've made in her skin.

And there are a lot of them! First are any of the smaller access panels. They all look disappointing! Ugly corners are my worst problem. I've yet to find an answer to making decent small curves with a scribe. There aren't many of them, but I'm pretty sure I'm going to fill them in so that they disappear.
Drift lines are another problem. You start a line, then realize that your scribing tool has drifted of course an infinitesimal amount but you can still see it!
I stuck my 1/48 scale Ki-44 Tojo in there for size comparison. The Tojo was one of the few early Japanese planes that could climb high enough to reach the B-29's. Amazingly, they then attacked with only four .50 cal Machine guns.
Thank you for looking.
Gaz
As I follow in the footsteps of every madman who has decided to rescribe a large model, I thought I would share in my discoveries, triumphs, and tragedies.
I found that I had made the lower aft barbette very thin when light started to show through it.
At this point panic set in as I realized I still had to scribe lines in it!
Generally there are a few kinds of putties on offer:
a. Putties that will eat your plastic and take too long to dry. Squadron Green putty for example.
b. Benign putties that take too long to dry and might just flake off completely when you touch it. Milliput is great for some things, but not for being worked with a sharp instrument.
c. Granular putties that don't react well to scribing. Mr. Surfacer 1000 is one that I've used time and again only to discover I need to apply another coat.
d. This bed is too hard (sorry Goldilocks!) I've tried CA as a filler, and never been really happy with it.
So, Because I had to shore up the walls of the ventral barbette, I thought I would try Bondic. I put some in place, spread it with a toothpick, then 5 seconds under UV light provided with Bondic, and (Shazam!)the barbette is shored up from the inside.
That shiny stuff between the red lines is Bondic. It's harder than styrene but not as hard as CA. Hopefully I won't pierce the little bit of styrene that remains around the barbette. But, if I do, I'm certain the Bondic won't let my clumsy fingers turn the whole thing into a calamity.
Now I must render a respectful salute to any person who has painted this model. One because it's so big, and two because it must have cost a fortune in model paint. BTW...if anyone offers the B-36 in 1/48 scale...Don't tell me!!
I've painted her black to find any flaw I've made in her skin.
And there are a lot of them! First are any of the smaller access panels. They all look disappointing! Ugly corners are my worst problem. I've yet to find an answer to making decent small curves with a scribe. There aren't many of them, but I'm pretty sure I'm going to fill them in so that they disappear.
Drift lines are another problem. You start a line, then realize that your scribing tool has drifted of course an infinitesimal amount but you can still see it!
I stuck my 1/48 scale Ki-44 Tojo in there for size comparison. The Tojo was one of the few early Japanese planes that could climb high enough to reach the B-29's. Amazingly, they then attacked with only four .50 cal Machine guns.
Thank you for looking.
Gaz
Kilo_Uniform
Joined: July 03, 2015
KitMaker: 280 posts
AeroScale: 141 posts
Posted: Sunday, March 20, 2016 - 03:05 PM UTC
WOW Gary!!
I never realised just how big the B-29 is going to be. Seeing her laid out like that - with the Ki-44 Tojo for scale - wow!
Hats off to you sir! Foiling her is going to be an epic task. I am convinced that all the effort and preparation will be worth it.
Good luck mate!
Regards,
Kobus
I never realised just how big the B-29 is going to be. Seeing her laid out like that - with the Ki-44 Tojo for scale - wow!
Hats off to you sir! Foiling her is going to be an epic task. I am convinced that all the effort and preparation will be worth it.
Good luck mate!
Regards,
Kobus

KelticKnot

Joined: May 11, 2015
KitMaker: 768 posts
AeroScale: 656 posts
Posted: Sunday, March 20, 2016 - 04:03 PM UTC
Quoted Text
Hey Gentlemen,
Thank you very much for your kind words! One of the 'joys' of working with a kit like this is how much you turn up when researching some other factor.
Indeed Gary, best not to dwell on how much hands-on time is lost to all that research which takes detours when you come across something "fascinating" (to yourself at least !
)

BlackWidow

Joined: August 09, 2009
KitMaker: 1,732 posts
AeroScale: 1,336 posts
Posted: Sunday, March 20, 2016 - 04:23 PM UTC
Gary, great progress on your Super Fortress!
The Shoki (Tojo) usually had an armament of 2 x 7,7 mm guns in the fuselage and 1 x 12,7 mm gun in each wing. Later during home defense some Shokis were equipped with 40 mm guns in the wings.
Torsten
The Shoki (Tojo) usually had an armament of 2 x 7,7 mm guns in the fuselage and 1 x 12,7 mm gun in each wing. Later during home defense some Shokis were equipped with 40 mm guns in the wings.
Torsten


AussieReg

#007
Joined: June 09, 2009
KitMaker: 8,156 posts
AeroScale: 3,756 posts
Posted: Sunday, March 20, 2016 - 05:17 PM UTC
Quoted Text
BTW...if anyone offers the B-36 in 1/48 scale...Don't tell me!
Hmmm, rumour has it that there was a resin 1/48 B-36 made by HpH a few years back, but you didn't hear that from me.
Awesome update Gaz, thanks once again for sharing so much detail on your techniques. Do you scribe along the raised panel lines before you sand them off? I am planning a no-holds-barred full-out resin/PE/scratch/rescribe job on a 1/48 Monogram P-61 so I am taking lots of notes.
Cheers, D

Joel_W
Joined: December 04, 2010
KitMaker: 11,666 posts
AeroScale: 7,410 posts
Posted: Sunday, March 20, 2016 - 06:36 PM UTC
Gary,
I'm not familiar with Bondic. Is it like a resin expoxy? But they dry rock hard.
I would think that the Monogram 1/72 scale B-36 would be more then most modelers could handle space wise. I can't even envision just how big it would be in 1/48 scale. It would certainly be the build of a life time, if for no other reason then that's how long it would most likely take me to do a enhanced build.
I'm horrific a scribing, but for rounded corners I I've made my own patterns using my Hole punch set into the thinnest plastic sheet I have.
Joel
GazzaS
#424
Joined: April 23, 2015
KitMaker: 4,648 posts
AeroScale: 1,938 posts
Posted: Monday, March 21, 2016 - 01:44 AM UTC
Hi guys,
Thank you for your replies and kind words.
@Kobus: I agree that the foiling will be time consuming. But I think getting the exterior details to look right will be the longer part of the process. I honestly see the foiling as the easier part. Mainly because if it looks wrong, you know straightaway.
@Paul: Fascinating is correct! It's really best when you find anecdotes from those who flew them. One man wrote that they would decompress the plane before entering the combat zone so that battle damage wouldn't cause explosive decompression.
@Torsten: Thank you for the correction! It's even more amazing that they expected to shoot down anything with such puny armament!
@ Damian: On the first plane I considered scribing, I sanded off the detail first. In some places, it was clear where I needed to put the new lines. In other places, especially where there was more detail to reproduce, it was easier to lose lines completely. In the end, on that plane I chose another non-scribing technique to try to reproduce those details. The result was less successful than hoped.
So, on this plane, I used my scribing tool angled into the base of the raised detail. Saved some time that way, too, I reckon.
@ Joel: Bondic is actually a commercialized dental product. Dentists use it for temporary repairs while they're waiting for stuff like porcelain crowns to be made. In it's wet state it looks like thickened CA.
It is pretty hard, but responds well to files and sanding.
There is a Youtube video on it, just search for Bondic. Since I bought it, it's becoming more available from other sources. Heh... Global Shop Direct is currently offering a two-for-the-price-of-one deal on another brand name.
You can even build up detail with it by working in layers.
I have a circle template but it's that thick clear plastic made for classroom use. I might try making something like you're describing. I think the main problem is my lack of steadiness and manual dexterity.
Cheers,
Gaz

greif8
Joined: January 17, 2006
KitMaker: 673 posts
AeroScale: 492 posts

Posted: Monday, March 21, 2016 - 01:00 PM UTC
Great progress Gary, you are a better man then I re-scribing the whole thing. Thank you for the tip on Bondic, I will see if I can find some and give it a try.
Ernest
Ernest
GazzaS
#424
Joined: April 23, 2015
KitMaker: 4,648 posts
AeroScale: 1,938 posts
Posted: Monday, March 21, 2016 - 01:15 PM UTC
Thank you Ernest. Bondic shouln't be hard to find. It is:
Hergestellt in Deustchland
Gaz
Hergestellt in Deustchland
Gaz
GazzaS
#424
Joined: April 23, 2015
KitMaker: 4,648 posts
AeroScale: 1,938 posts
Posted: Friday, April 01, 2016 - 10:13 AM UTC
Hi Everyone,
It seems like an eternity since I posted here last. I hope you all have kept well in the meantime.
I got caught up in the humdrum of scribing for a while. Once the scribing was completed, it was time to search for errors. Eventually I had to repair over 100 scribing errors. Some detail was obliterated because I could not get it to look the way I wanted. Here's a chunk of B-29 after fixing the errors and polishing the styrene with some newsprint.

I wanted to get something foiled and completed. Unfortunately to start foiling the propeller spinners, I needed to reshape them, and reshape the propeller blades. The blades were simple. Originally, the forward and trailing edges of the blades had the same rounded shape. They made me think of whale flippers... By scraping and sanding, I was able to bring the trailing edges of the blades into something closer to a knife's edge. The tips of the blades required some slight refinement, too.
With every new model comes a new foil challenge. The challenge is learning how to foil a new shape. I think I spent over six hours to get the first propeller spinner foiled. It was a process of finding what I could get from the foil, and what way of placing and working the foil would lead to the best result.
And although the first one took six hours of trying, swearing, and retrying, each subsequent one took less than half an hour. It's just the way foil works, I guess. Here's the process:


And finally all four propellers in muted light with no flash.

You may remember that I had a pebbly finish on the blades earlier. They've now been coated with a thick layer of Future and will cure for a while. I'll then sand them smooth and apply the necessary decals.
Thanks for looking!
Gary
It seems like an eternity since I posted here last. I hope you all have kept well in the meantime.
I got caught up in the humdrum of scribing for a while. Once the scribing was completed, it was time to search for errors. Eventually I had to repair over 100 scribing errors. Some detail was obliterated because I could not get it to look the way I wanted. Here's a chunk of B-29 after fixing the errors and polishing the styrene with some newsprint.
I wanted to get something foiled and completed. Unfortunately to start foiling the propeller spinners, I needed to reshape them, and reshape the propeller blades. The blades were simple. Originally, the forward and trailing edges of the blades had the same rounded shape. They made me think of whale flippers... By scraping and sanding, I was able to bring the trailing edges of the blades into something closer to a knife's edge. The tips of the blades required some slight refinement, too.
With every new model comes a new foil challenge. The challenge is learning how to foil a new shape. I think I spent over six hours to get the first propeller spinner foiled. It was a process of finding what I could get from the foil, and what way of placing and working the foil would lead to the best result.
And although the first one took six hours of trying, swearing, and retrying, each subsequent one took less than half an hour. It's just the way foil works, I guess. Here's the process:
And finally all four propellers in muted light with no flash.
You may remember that I had a pebbly finish on the blades earlier. They've now been coated with a thick layer of Future and will cure for a while. I'll then sand them smooth and apply the necessary decals.
Thanks for looking!
Gary
KelticKnot
Joined: May 11, 2015
KitMaker: 768 posts
AeroScale: 656 posts
Posted: Friday, April 01, 2016 - 02:36 PM UTC
Wow. The spinners look incredible, thanks for taking the time to detail your process. I can start to imagine how shiny the finished aircraft will be.

Antilles
Joined: March 22, 2015
KitMaker: 671 posts
AeroScale: 614 posts
Posted: Friday, April 01, 2016 - 04:19 PM UTC
Amazing. I am out of words
Oliver
Oliver
Joel_W
Joined: December 04, 2010
KitMaker: 11,666 posts
AeroScale: 7,410 posts
Posted: Friday, April 01, 2016 - 06:17 PM UTC
Gary,
I'm certainly a big fan of your foiling techniques, and constantly marvel at the results you attain. The finished prop spinners viewed in scale look perfect, and one gets a real sense of the differences of the polished hub to the painted aluminum spinners themselves.
But I do wonder that in this case, other then mastering a new technique/shape, if using one of the Alcad IIs polished metalizers wouldn't have been an option to consider, especially time wise.
I've stared at that one fuselage shell, and your finished scribing looks perfect.
Joel
Redhand
#522
Joined: January 20, 2013
KitMaker: 1,460 posts
AeroScale: 1,443 posts
Posted: Saturday, April 02, 2016 - 01:02 AM UTC
What Antilles said!
GazzaS
#424
Joined: April 23, 2015
KitMaker: 4,648 posts
AeroScale: 1,938 posts
Posted: Saturday, April 02, 2016 - 02:58 AM UTC
Hi Gentlemen,
Thank you for your kind thoughts and words.
Joel, On the actual aircraft, those propeller spinners are polished to an almost mirror finish. Because of their size, the sheen attainable isn't the same in model form. Still, that final picture was taken in very low light. Eventually they'll be presented in brighter light.
I've only recently seen those polishable paints. They might prove useful in some situations, but are beyond my budget at the moment.
Just arrived in the mail are EZ masks, a sheet of Bare Metal Foil, and some BMF Decal paper which I hope will be of better quality than the other decal paper I purchased last year. On-order are six pairs of Master Model .50 caliber barrels with separate jackets and a new bottle of Alcad II Polished Aluminum for the fabric covered control surfaces.
Best wishes,
Gaz
GazzaS
#424
Joined: April 23, 2015
KitMaker: 4,648 posts
AeroScale: 1,938 posts
Posted: Saturday, April 02, 2016 - 10:55 AM UTC
Hi Everyone,
Lets talk about the interior. I am not an interior guy. before this plane, most of my aircraft models had a single color cockpit with a wash, and maybe a few knobs or buttons painted. As I see the rash of colors inside the Superfortress, I've decided to go a little further than the usual. (This does not necessarily mean that that I will do it well.)
Not only are there a lot of controls and displays and wires to see, there is a lot of different shades of Dull Dark Green.
I am thinking that parts that were sub-contracted out arrived painted from the supplier in whatever shade of DDG (or whatever they had that they thought was DDG) they had. And that the structural pieces assembled at the aircraft factory would be in a different shade.
Images included for discussion.
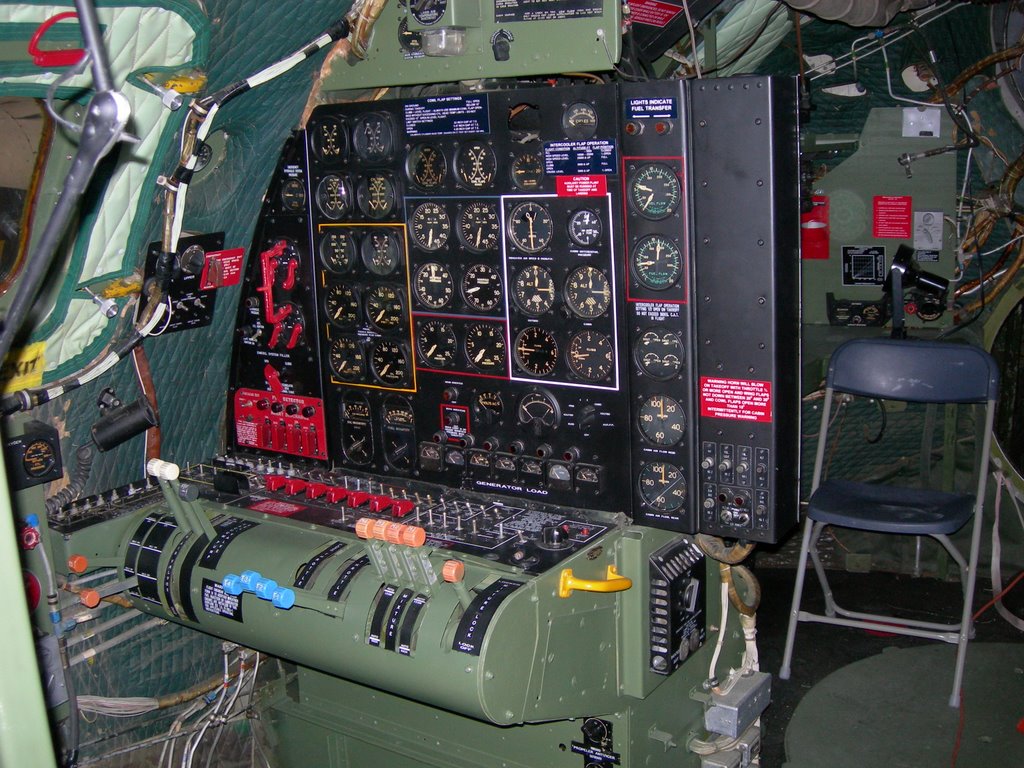


Anyway, that being said, I've finally got my base color painted on most of the interior parts. I'll let it cure for a day before I give it a wash and start detailing and building sub assemblies.
If anyone has any thoughts to add, please feel free to interject.
Best Wishes,
Gaz
Lets talk about the interior. I am not an interior guy. before this plane, most of my aircraft models had a single color cockpit with a wash, and maybe a few knobs or buttons painted. As I see the rash of colors inside the Superfortress, I've decided to go a little further than the usual. (This does not necessarily mean that that I will do it well.)
Not only are there a lot of controls and displays and wires to see, there is a lot of different shades of Dull Dark Green.
I am thinking that parts that were sub-contracted out arrived painted from the supplier in whatever shade of DDG (or whatever they had that they thought was DDG) they had. And that the structural pieces assembled at the aircraft factory would be in a different shade.
Images included for discussion.
Anyway, that being said, I've finally got my base color painted on most of the interior parts. I'll let it cure for a day before I give it a wash and start detailing and building sub assemblies.
If anyone has any thoughts to add, please feel free to interject.
Best Wishes,
Gaz
AussieReg
#007
Joined: June 09, 2009
KitMaker: 8,156 posts
AeroScale: 3,756 posts
Posted: Saturday, April 02, 2016 - 11:04 AM UTC
That interior looks amazing Gaz, you would almost think you were sitting inside the real thing!
Thanks for the step-by-step on the spinners, it is a real eye-opener to see the amount of work that goes into such a small but complex shaped part. This build is true modelling, and artistry, way beyond the simple assembly and painting that most of my builds consist of.
Cheers, D
Thanks for the step-by-step on the spinners, it is a real eye-opener to see the amount of work that goes into such a small but complex shaped part. This build is true modelling, and artistry, way beyond the simple assembly and painting that most of my builds consist of.
Cheers, D
GazzaS
#424
Joined: April 23, 2015
KitMaker: 4,648 posts
AeroScale: 1,938 posts
Posted: Saturday, April 02, 2016 - 12:39 PM UTC
Hi Damian,
Thanks! I'm glad you enjoyed my little mini-tutorial. If it weren't for gun barrels and aluminium paint used in history, I'd like to think that I could free myself of metallic paint.
Btw...those aren't pictures of my work. Those are pictures I borrowed from other sites of the real thing. Sorry if my post was misleading. It wasn't intentional. They will provide a lot of reference for me in the coming days.
Cheers,
Gaz
 |

WEB HOSTING BY


Copyright ©2021 AeroScale and Kitmaker Network, a subsidiary of Silver Star Enterprises
All Rights Reserved. Please read our Conditions of Use and Privacy Policy.
All Rights Reserved. Please read our Conditions of Use and Privacy Policy.