OFFICIAL: The Sign of the Four Campaign

#305
Christchurch, New Zealand
Joined: February 01, 2006
KitMaker: 1,673 posts
AeroScale: 1,517 posts
Posted: Saturday, October 08, 2016 - 02:35 AM UTC

#424
Queensland, Australia
Joined: April 23, 2015
KitMaker: 4,648 posts
AeroScale: 1,938 posts
Posted: Saturday, October 08, 2016 - 05:58 AM UTC
Truly Chris,
I don't think I could tell your kit from a Dragon or Tamiya offering at this point. Still, the worst part of the PzIV lays ahead... Painting all of those roadwheels always tests my patience.
Gaz
"Artillery adds dignity, to what would otherwise be an ugly brawl."
Frederick The Great

#305
Christchurch, New Zealand
Joined: February 01, 2006
KitMaker: 1,673 posts
AeroScale: 1,517 posts
Posted: Saturday, October 08, 2016 - 10:03 AM UTC
Hey thanks for the compliments guys! It does look quite good now after all the extra's have been added. I've got a tow rope coming as the scratch built hooks at the back are too far apart to use the kit part.
Painting wheels of any sort is trying Gaz! I've got an idea to cut masks from masking tape so I can paint the wheels black when I'm doing my pre-shade and the cover the tyres and leave just the hub and paint that then mask the tyres and spray the rest of the kit. The challenge will of course be what camo do I pick and do I replicate it behind the schurzen or not?
Alvsborgs, Sweden
Joined: October 05, 2016
KitMaker: 19 posts
AeroScale: 10 posts
Posted: Saturday, October 08, 2016 - 07:08 PM UTC
One issue that has popped up is that I can't seem to find anything in the instructions where Dragon tells us which optional part goes along with which of the different vehicles in the painting instructions, and back there they are all identical as far as my eyes can tell.
This would seem to call for references. Does anyone have any idea where I might be able to find a photo or so of the vehicle they describe as "Unidentified Unit, Eastern Front 1943" with number 421 (black, outlined in white) on the turret?
Berlin, Germany
Joined: October 12, 2008
KitMaker: 709 posts
AeroScale: 651 posts
Posted: Sunday, October 09, 2016 - 08:08 PM UTC
WOW! Fantastic work here everybody

Chris: great efforts on that Panzer IV-kit, you really turned it into a very nice one so far. As my last armour build was decades back I'm very impressed.
(Note to myself: build a Tank or AMV soon...)
But for now I'm going to divide the "Tank-Section" and show further proress on a flying thingy. Did the office on the 1/72 F-4F II (no milestone, but can live with)


Thomas

Sometimes you need to distance yourself to see things clearly - Lao Tzu -
... in scale and in real life -T.

#305
Christchurch, New Zealand
Joined: February 01, 2006
KitMaker: 1,673 posts
AeroScale: 1,517 posts
Posted: Sunday, October 09, 2016 - 11:51 PM UTC
Thomas outstanding work on that cockpit! You've made the detail pop and it looks suitably busy for a front office, even more so because of the fact it's 1/72nd scale. looking forward to see what you do with the rest of the kit.
To be fair Thomas this is probably my first armor kit in the last couple of years and I'm doing things that I've never done before in regards to aftermarket parts and painting so it's quite the journey. Totally next level, actually several levels above what I usually do or have done with armor previously. But my use of aftermarket parts in my aircraft kits has opened my eyes to the possibilities with my armor kits and I want to experiment and see where it takes me.
Alvsborgs, Sweden
Joined: October 05, 2016
KitMaker: 19 posts
AeroScale: 10 posts
Posted: Monday, October 10, 2016 - 08:17 PM UTC
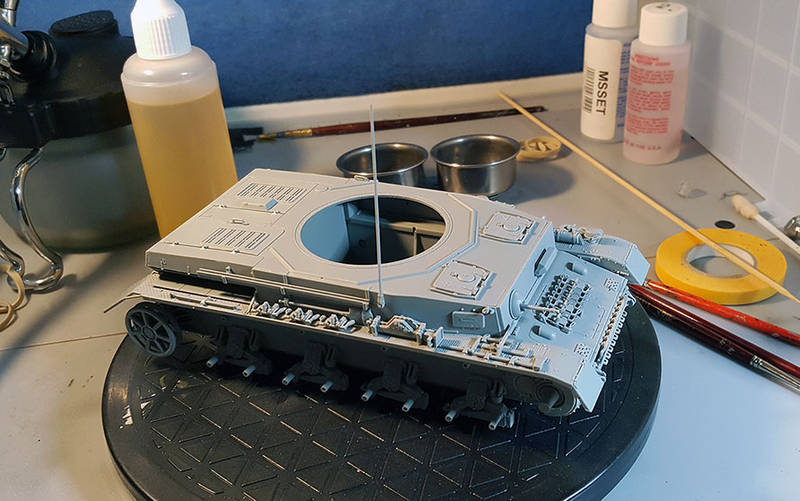
Hull done. The instructions do have a worrying tendency of not telling you things every now and then. Plastics generally good at least, most things fit very well, and most bits are more or less flash/mould line free (obviously not the road wheels and return rollers, Muprhy wouldn't let that fly now would he).

#424
Queensland, Australia
Joined: April 23, 2015
KitMaker: 4,648 posts
AeroScale: 1,938 posts
Posted: Tuesday, October 11, 2016 - 10:30 AM UTC
Ach, more road wheels!
Thomas,
Nice looking pit!
Gaz
"Artillery adds dignity, to what would otherwise be an ugly brawl."
Frederick The Great

#523
Idaho, United States
Joined: February 28, 2014
KitMaker: 342 posts
AeroScale: 250 posts
Posted: Tuesday, October 11, 2016 - 10:53 PM UTC
Chris,
I really like the way the Zimmerit came out.
The Pzkpfw IV looks really good nice job so far......

#372
United Kingdom
Joined: March 10, 2010
KitMaker: 2,568 posts
AeroScale: 1,619 posts
Posted: Tuesday, October 11, 2016 - 11:34 PM UTC
Fantastic builds. The panzers are coming along nicely.
Really need to get back to work on my build. Doubt I will make the deadline but I'll to do as much as I can.
On the bench: 1/72 Mosquito, Lightning F.6, DH.2,
AMT Vulcan Shuttle Surak.
Cyber-Hobby 1:35 Sherman Firefly IC - still stalled.
Alvsborgs, Sweden
Joined: October 05, 2016
KitMaker: 19 posts
AeroScale: 10 posts
Posted: Friday, October 14, 2016 - 08:23 PM UTC
Primed up and ready to go.
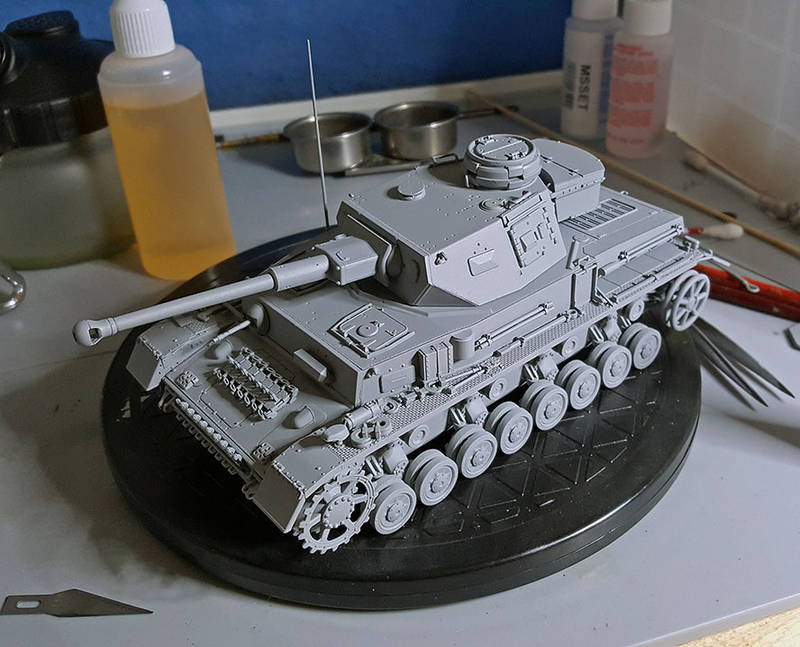
The painting guide has three different paints suggested for the base grey, all of which appear to be wildly different hues, and then names this as "feldgrau".
On a tank.
Oh dear.
So the instructions have most definitely not been all that kind to me. Slightly more of a bother with mold lines than the Tasca/Asuka Sherman I made a while back, but I'd say slightly better guides/slots for some of the small stuff.


Berlin, Germany
Joined: October 12, 2008
KitMaker: 709 posts
AeroScale: 651 posts
Posted: Friday, October 14, 2016 - 10:13 PM UTC
Erik: very nice progress, already looking cool. It shows up a lot of details.
My Phantom is getting slowly together and turns into a plane shape. Added some styrene strips at the fuselage before installing the office (before it looked too thin to me) and pre-painted the nozzles with Gunze-Metalizer.

Thomas

Sometimes you need to distance yourself to see things clearly - Lao Tzu -
... in scale and in real life -T.

#424
Queensland, Australia
Joined: April 23, 2015
KitMaker: 4,648 posts
AeroScale: 1,938 posts
Posted: Saturday, October 15, 2016 - 02:57 AM UTC
Erik,
Your Pz looks great! I love the unique look of the Pz IVf2.
Thomas,
Glad to see your F4 is coming to shape.
Gaz
"Artillery adds dignity, to what would otherwise be an ugly brawl."
Frederick The Great
New South Wales, Australia
Joined: September 22, 2016
KitMaker: 26 posts
AeroScale: 3 posts
Posted: Sunday, October 16, 2016 - 03:36 AM UTC
Plenty of good work here guys, I haven't even opened my box yet, I have been under the pump at work Will hopefully get underway soon. Looking forward to seeing more progress.
Lets see how many Campaigns I can finish,
Watch this space ------------->>>>>

#372
United Kingdom
Joined: March 10, 2010
KitMaker: 2,568 posts
AeroScale: 1,619 posts
Posted: Tuesday, October 18, 2016 - 01:32 AM UTC
Thomas, the Phantom is coming along nicely. I'm guessing it's Revell's 1/72 F-4F?
The Rumpler's cockpit is coming together slowly. No fault of the kits, just my current build rate. House and other things keep throwing surprises at me. But I'll keep working at it.
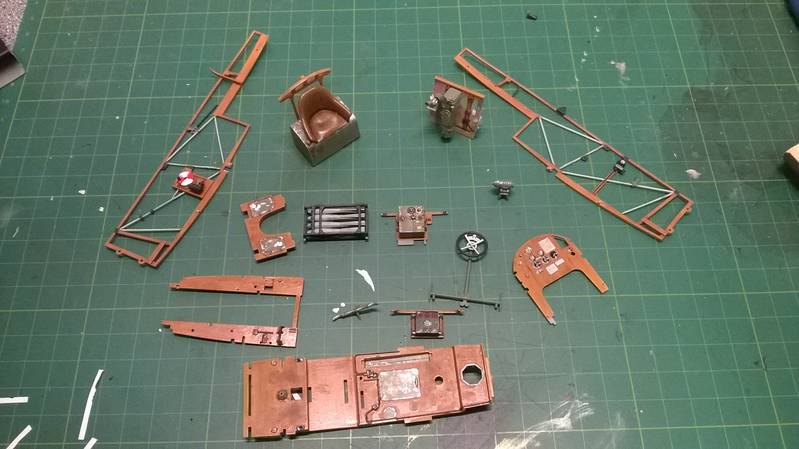
Just a few more things to do and then it will be ready to fit together and install inside the fuselage. At some point.

On the bench: 1/72 Mosquito, Lightning F.6, DH.2,
AMT Vulcan Shuttle Surak.
Cyber-Hobby 1:35 Sherman Firefly IC - still stalled.

#305
Christchurch, New Zealand
Joined: February 01, 2006
KitMaker: 1,673 posts
AeroScale: 1,517 posts
Posted: Friday, October 21, 2016 - 01:22 AM UTC
New York, United States
Joined: March 08, 2010
KitMaker: 3,662 posts
AeroScale: 174 posts
Posted: Friday, October 21, 2016 - 07:41 PM UTC
Hi guys

Originally I planned to go with a PzIV being that I have 3 in the stash but because Im running a little late to the party


Ill go with this Wingy Thingy that I originally picked up for the Academy Campaign

Started it the other night put dont have any progress photos yet


Active Campaigns on the bench:
Operation Fall Gelb - Pz.Kpfw. IV Ausf. C
Engineering the Future - M-26 Recovery Vehicle
115 Campaigns completed
United States
Joined: February 01, 2009
KitMaker: 1,233 posts
AeroScale: 663 posts
Posted: Friday, October 21, 2016 - 08:39 PM UTC
Thomas-----Great work on the F-4.
Chris----The Panzer IV is really turning out nicely. Can't wait to see it in all it's camo glory.
Sal---Hey, welcome to the campaign. I have not run across you in awhile. Hope you are well.
Best wishes,
Ian
It is a fact that under equal conditions, large-scale battles and whole wars are won by troops which have a strong will for victory, clear goals before them, high moral standards, and devotion to the banner under which they go into battle.
-Georgy Zhukov
United States
Joined: February 01, 2009
KitMaker: 1,233 posts
AeroScale: 663 posts
Posted: Friday, October 21, 2016 - 08:41 PM UTC
Stephen---That Rumpler interior is really nicely done.
Regards,
Ian
It is a fact that under equal conditions, large-scale battles and whole wars are won by troops which have a strong will for victory, clear goals before them, high moral standards, and devotion to the banner under which they go into battle.
-Georgy Zhukov

#372
United Kingdom
Joined: March 10, 2010
KitMaker: 2,568 posts
AeroScale: 1,619 posts
Posted: Friday, October 21, 2016 - 10:46 PM UTC
Thanks Ian.
There are a lot of little jobs that are very time consuming in the cockpit.
I've to work out how to fit in the seatbelts and control wires!
On the bench: 1/72 Mosquito, Lightning F.6, DH.2,
AMT Vulcan Shuttle Surak.
Cyber-Hobby 1:35 Sherman Firefly IC - still stalled.
Sør-Trøndelag, Norway
Joined: October 23, 2012
KitMaker: 189 posts
AeroScale: 142 posts
Posted: Saturday, October 22, 2016 - 05:01 AM UTC
First weekend in a while with no commitments, and I decided to get some more work done. Built the turret today, and plan to finish with the suspension tomorrow, and then start with the fiddly bits and a base coat. Might try a black basecoat on this one for a change!
Building the world, one piece at the time.
Alvsborgs, Sweden
Joined: October 05, 2016
KitMaker: 19 posts
AeroScale: 10 posts
Posted: Saturday, October 22, 2016 - 08:13 PM UTC
Things happening.
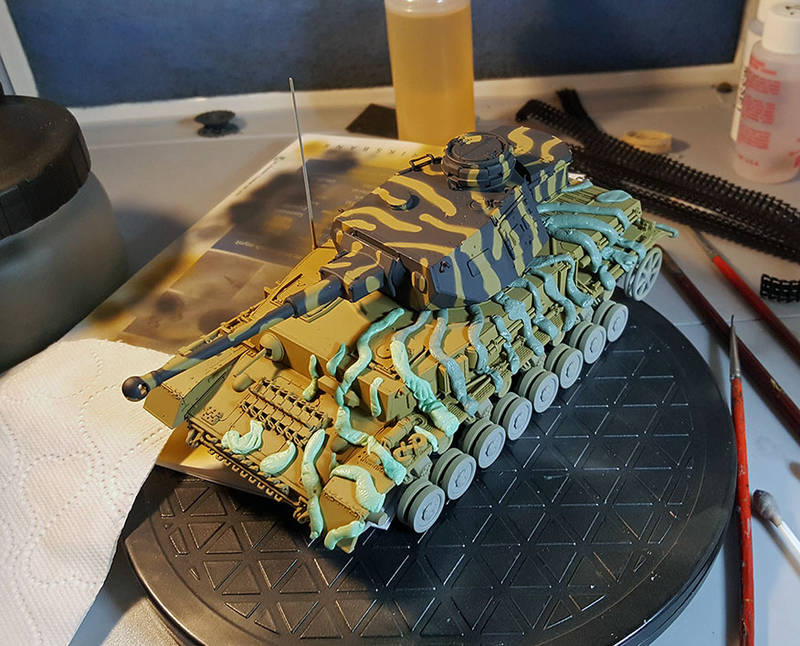
Going for the hand painted wheels approach instead of masking, with an every so slightly different shade of dark grey. That may have been quite a bit more effort than effect.
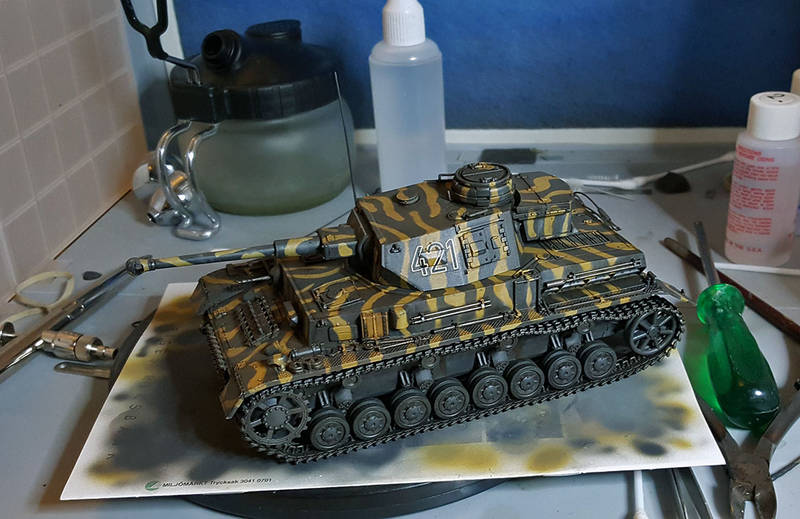
On the plus side the big transfers behaved quite well (once sufficiently drowned in MicroSol) despite being placed right over the view ports.
Berlin, Germany
Joined: October 12, 2008
KitMaker: 709 posts
AeroScale: 651 posts
Posted: Saturday, October 22, 2016 - 09:10 PM UTC
Looking cooler every time you show more - great work on that paint, Erik!
Sometimes you need to distance yourself to see things clearly - Lao Tzu -
... in scale and in real life -T.
United States
Joined: February 01, 2009
KitMaker: 1,233 posts
AeroScale: 663 posts
Posted: Saturday, October 22, 2016 - 09:45 PM UTC
Erik----Wow!!! What a beautiful scheme. Fantastic job, sir.
Best wishes,
Ian
It is a fact that under equal conditions, large-scale battles and whole wars are won by troops which have a strong will for victory, clear goals before them, high moral standards, and devotion to the banner under which they go into battle.
-Georgy Zhukov
Berlin, Germany
Joined: October 12, 2008
KitMaker: 709 posts
AeroScale: 651 posts
Posted: Sunday, October 23, 2016 - 12:28 AM UTC
Some different colour...
Got the first layer on the underside/fuselage. Revell enamel.

Thomas

Sometimes you need to distance yourself to see things clearly - Lao Tzu -
... in scale and in real life -T.


