

Air Campaigns
Want to start or join a group build? This is where to start.
Want to start or join a group build? This is where to start.
Hosted by Frederick Boucher, Michael Satin
OFFICIAL: The Sign of the Four Campaign

Bigrip74

Joined: February 22, 2008
KitMaker: 5,026 posts
AeroScale: 2,811 posts

Posted: Friday, June 10, 2016 - 08:01 PM UTC
D, nice assortment of sanding material. I need to make a run to the local beauty supply for some replacements. Mine are about 7 years old and a little ratty.

AussieReg

#007

Joined: June 09, 2009
KitMaker: 8,156 posts
AeroScale: 3,756 posts
Posted: Friday, June 10, 2016 - 08:09 PM UTC
Bob, I'm a regular at the local $2 shop where they sell a range of sanding sticks for manicuring, but I still find that I need to get some specialist sticks in various grits from time to time.
I just realised I might have broken the rules getting a 6-pack of "5Seeds" apple cider, but there are only 4 of them left now so I might be safe!
Cheers, D
I just realised I might have broken the rules getting a 6-pack of "5Seeds" apple cider, but there are only 4 of them left now so I might be safe!
Cheers, D

MichaelSatin

Joined: January 19, 2008
KitMaker: 3,909 posts
AeroScale: 2,904 posts
Posted: Friday, June 10, 2016 - 08:51 PM UTC
Quoted Text
I just realised I might have broken the rules getting a 6-pack of "5Seeds" apple cider, but there are only 4 of them left now so I might be safe!
Cheers, D
I dunno D, seems like you're 4ging pretty close to the edge there! You might have to 4feit.
Very interesting builds going on here. Mine will have to wait until I clear out some others, but I won't 4get!
Michael


AmTrac1833

#431
Joined: February 20, 2014
KitMaker: 376 posts
AeroScale: 39 posts

Posted: Saturday, June 11, 2016 - 06:10 AM UTC
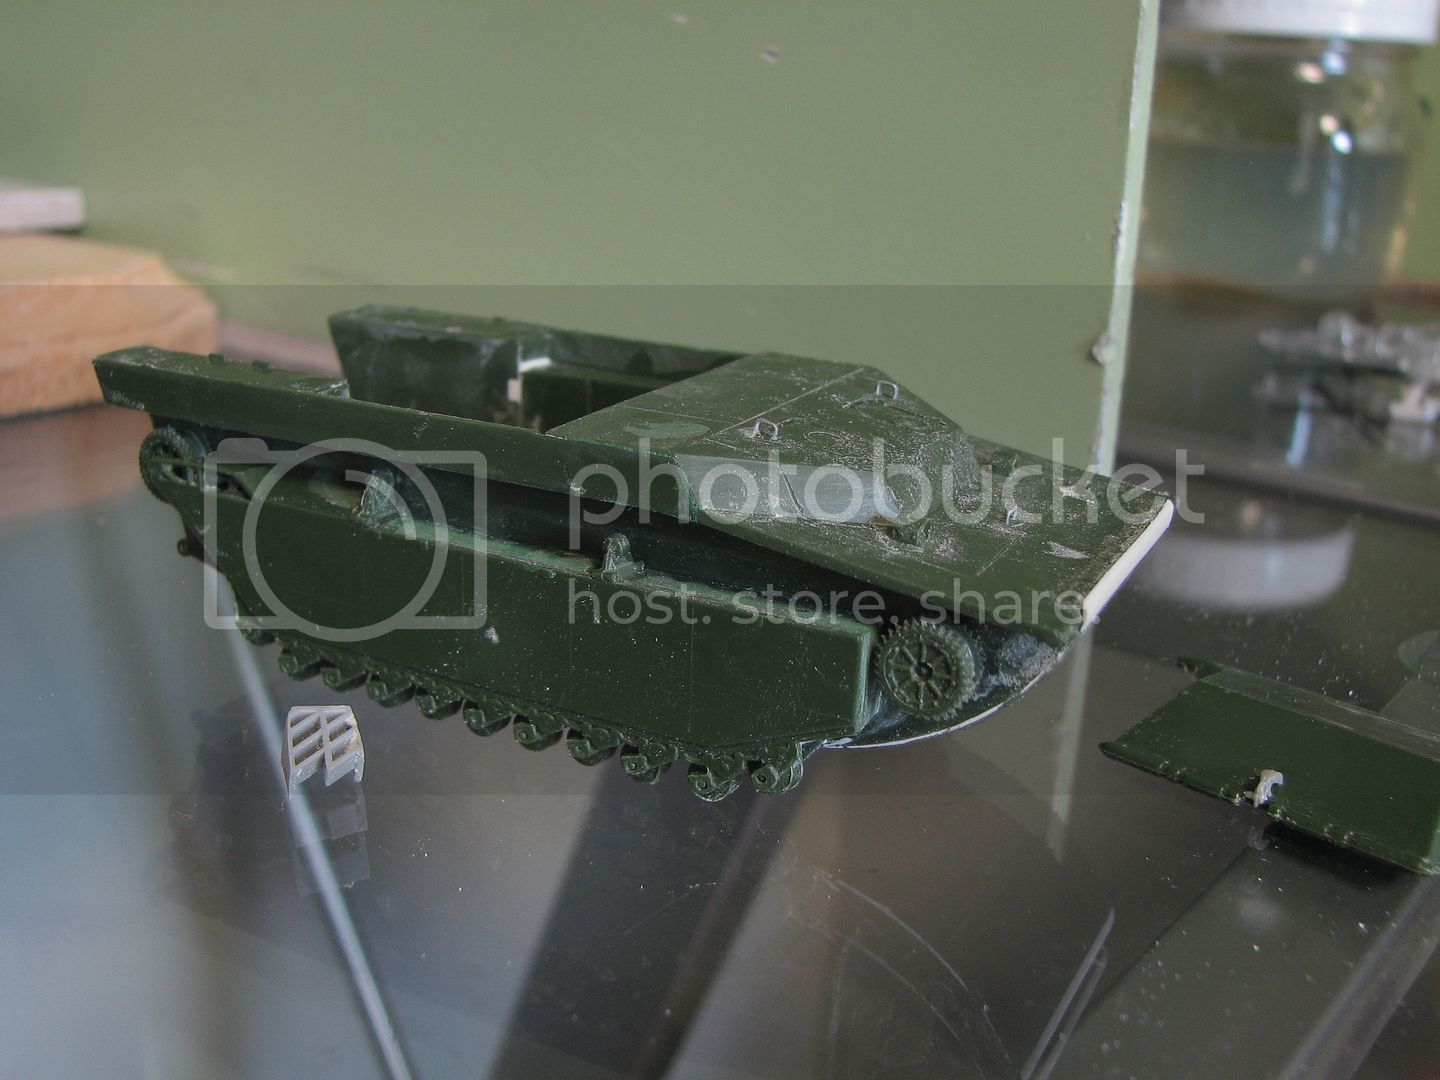
Couple other projects crept into todays schedule but managed to get a bit of work in on the LVT4. I sanded away the nubs that passed as grab handles when the kit was originally molded and replaced them with wire. I kept away from the cramped confines of the cargo hold, the detail on the cab is going to have to sale this project. I also added a bit of plastic to the bow to help better blend the armor plate in instead of attempting to sand the step down. The kit was missing the ramps tow pintle so I rummaged through the spares and had one from a Dragon 1/72 LVT. Also from those spares are couple of water troughs. They are much larger than I thought, doubt the sanding will get them thin enough but this will have to work.

One of todays other projects. I came across this surplus AFV interior storage shelf on eBay and thought it would appropriate on my hobby desk. A little wiggling and drilling and there it is. It fits the whole hobby area and I Love Me Wall quite well. Im still moving stuff around to find the best set up.

One of todays other projects. I came across this surplus AFV interior storage shelf on eBay and thought it would appropriate on my hobby desk. A little wiggling and drilling and there it is. It fits the whole hobby area and I Love Me Wall quite well. Im still moving stuff around to find the best set up.
AussieReg
#007
Joined: June 09, 2009
KitMaker: 8,156 posts
AeroScale: 3,756 posts
Posted: Saturday, June 11, 2016 - 07:38 PM UTC
Quoted Text
I dunno D, seems like you're 4ging pretty close to the edge there! You might have to 4feit.
Michael, if I must then I will beg your 4giveness 4 my 4mer transgression, I certainly don't want to 4go my place in this Group Build.
More sub assembly work and sanding tonight. The parts that seem to have troubled people most in the reviews I have seen are the fuselage panel inserts at the rear, but once I spent a little time trimming and test fitting, mine seemed to go together quite well. After a bit of sanding there will only be a small amount of putty required on the rear vertical seam on the starboard fuselage half, and none at all on the port side half.


What I have done is allow the sanding dust to build up in the fine seams during the sanding process, then brush some Tamiya Extra Thin cement over the seams. This dissolves and bonds the dust into the seams and creates a filler. There is still a little bit more sanding to be done tomorrow once the cement cures.
Cheers, D
AmTrac1833
#431
Joined: February 20, 2014
KitMaker: 376 posts
AeroScale: 39 posts
Posted: Saturday, June 11, 2016 - 11:08 PM UTC
All right folks, dont know bout you but Im seeing too much primer and not enough color. Time to get to spraying. Gonna do a little pre-shading and throw a coat of OD on the LVT4. Then itll get set aside to cure before adding the brown camouflage.

AmTrac1833
#431
Joined: February 20, 2014
KitMaker: 376 posts
AeroScale: 39 posts
Posted: Sunday, June 12, 2016 - 01:13 AM UTC
First color down, followed quickly with a heavily thinned green filter. Now for it to cure for day or more before applying the brown camouflage.

BoiseBlade

#523
Joined: February 28, 2014
KitMaker: 342 posts
AeroScale: 250 posts

Posted: Monday, June 13, 2016 - 08:43 AM UTC
Ok Michael,
I may be stretching it but I am going a complete opposite direction to add variety.
Here is my entry
Lamborghini Countach 5000 Quattrovalvole
4 Valves, Faster, stronger, better!
I will do a European version with Hump back and no US crap on it.


I may be stretching it but I am going a complete opposite direction to add variety.
Here is my entry
Lamborghini Countach 5000 Quattrovalvole
4 Valves, Faster, stronger, better!
I will do a European version with Hump back and no US crap on it.
AussieReg
#007
Joined: June 09, 2009
KitMaker: 8,156 posts
AeroScale: 3,756 posts
Posted: Monday, June 13, 2016 - 07:22 PM UTC
After a total of about 2 hours of trimming, test fitting, glueing and sanding I got to a point where I was happy to apply some filler. In this case I used my home-made concoction of black Sprue dissolved in Tamiya Extra Thin cement so you can see how little was actually required to get a good finish. I much prefer to spend the time doing this than to throw I'll-fitting parts together and patch it up with buckets of putty. A little further forward on the underside of the fuselage halves you can also see where I applied some filler to a couple of sink marks which were beneath the locator pin positions.

Ready to hit the paint shop now and get the interior dressed up for assembly. I'm going with Gunze H58 interior green for the fuselage and cockpit with black and grey panels and beige seats to break it up.
This is going to be a basic OOB build so no aftermarket or scratch building shenanigans will be entered into.
Cheers, D
BoiseBlade
#523
Joined: February 28, 2014
KitMaker: 342 posts
AeroScale: 250 posts
Posted: Tuesday, June 14, 2016 - 12:31 AM UTC
FYI, I will not begin my build for 1-2 weeks, completing other builds.
But for your amusement here is what the US and Euro cars look like.

Now The true lines of the Euro car.
(Note: huge rear wing could still be ordered but it is completely useless. The Countach does not suffer from aerodynamic lift at high speeds, so the rear wing only adds drag)
Still not sure if I will add it or not?

From http://www.lambocars.com
"The Countach Quattrovalvole built before 1987, those without the sills and cars without the massive rear wing, are believed to be the best looking Countach ever. It is also the most powerful one, and it is said that this is how the Countach should have been from the beginning."
But for your amusement here is what the US and Euro cars look like.
Now The true lines of the Euro car.
(Note: huge rear wing could still be ordered but it is completely useless. The Countach does not suffer from aerodynamic lift at high speeds, so the rear wing only adds drag)
Still not sure if I will add it or not?
From http://www.lambocars.com
"The Countach Quattrovalvole built before 1987, those without the sills and cars without the massive rear wing, are believed to be the best looking Countach ever. It is also the most powerful one, and it is said that this is how the Countach should have been from the beginning."

phantom_phanatic309
#372

Joined: March 10, 2010
KitMaker: 2,568 posts
AeroScale: 1,619 posts

Posted: Tuesday, June 14, 2016 - 03:17 AM UTC
Damian, great work getting those fuselage panels to fit. I'll certainly remember to trim and constantly test fit when I build mine.
Daniel, the Amtrac is looking great. Hard to believe that it's the Airfix kit after your hard work. It's one of only a few of the Airfix 1/76 vehicles I never built. Most of them are fairly awful!
I'm hoping to make a start on the Rumpler in the next few days. Still in the process of getting the Whitley ready for some paint and gathering some references for the Rumpler. In particular the engine as I would like to wire it up.

AussieReg
#007
Joined: June 09, 2009
KitMaker: 8,156 posts
AeroScale: 3,756 posts
Posted: Tuesday, June 14, 2016 - 04:45 PM UTC
Paint shop time . . . .
Gunze H58 Interior Green

And Tamiya X-18 Semi Gloss Black with a drop of XF-83 Medium Sea Grey (because it was handy) to scale it back a bit

Daniel, great progress, very fast and neat work.
Jeff, looking forward to the Quattro coming together. The spoiler just needs to go, and the side vents are wannabe Ferrari, without those couple of add-ons it is pure classic. Great choice.
Stephen, thanks for checking in, appreciate the feedback. I'm looking forward to watching your Rumpler coming together here, hopefully it doesn't give you as much grief as the Whitley.
Cheers, D
BoiseBlade
#523
Joined: February 28, 2014
KitMaker: 342 posts
AeroScale: 250 posts
Posted: Tuesday, June 14, 2016 - 07:34 PM UTC
Damian,
Amen mate!
No Wing no Skirts. Thanks for the feedback that cinched it for me now.
Your build is coming along great. I have been following your Thunderbolt build as well and can not wait to see the finished Dio you do some amazing work.
And I have jumped into ships as well Built one sailing so far and now working on 1/350 CV-14 Tico
Cheers
phantom_phanatic309
#372
Joined: March 10, 2010
KitMaker: 2,568 posts
AeroScale: 1,619 posts
Posted: Wednesday, June 15, 2016 - 01:46 AM UTC
Some shots of what I will be tackling. And what a kit it is!
The box is heaving with parts.

The box is heaving with parts.
phantom_phanatic309
#372
Joined: March 10, 2010
KitMaker: 2,568 posts
AeroScale: 1,619 posts
Posted: Wednesday, June 15, 2016 - 01:59 AM UTC
Second time lucky.


[imghttp://gallery3.kitmaker.net/data/30441/STP80790.JPG][/img]


My chief reference so far is Aeronaut Books Rumpler Aircraft of WW1. An interesting book filled with lots of technical information, photo's and plans.

Still undecided as to which I will be building. I like option B with the red, white and black stripes but I am being drawn towards the lozenge covered version.
I think this will be a fun build though.
[imghttp://gallery3.kitmaker.net/data/30441/STP80790.JPG][/img]
My chief reference so far is Aeronaut Books Rumpler Aircraft of WW1. An interesting book filled with lots of technical information, photo's and plans.
Still undecided as to which I will be building. I like option B with the red, white and black stripes but I am being drawn towards the lozenge covered version.
I think this will be a fun build though.
duckdawgs
Joined: August 01, 2010
KitMaker: 143 posts
AeroScale: 55 posts

Posted: Wednesday, June 15, 2016 - 07:12 AM UTC
Working on the tailwheel gear and control surfaces linkage, also was able to get some Eduard photo etch installed. I will start marking the locations for the internal ribbing.  I need to work on this area and get rid of inaccurate detail.
 Here is the Zoukei-Mura carrier deck base. I thought the quality would at least match their SWS series of airplane kits, but sorry to say, it is crap.
  Base is warped, tie downs are not in a straight line, a ton of leftover material in between the wood planks, incorrect number of planks between tie downs. The planking looks like a decrepit boardwalk, and finally the factory paint job is hideous. Since the deck is an integral part of my diorama, I'm trying to get it as accurate as possible. I will be building one of my own now, using photo etch tie downs, and basswood.
 happy modeling everybody
I need to work on this area and get rid of inaccurate detail. Here is the Zoukei-Mura carrier deck base. I thought the quality would at least match their SWS series of airplane kits, but sorry to say, it is crap. Base is warped, tie downs are not in a straight line, a ton of leftover material in between the wood planks, incorrect number of planks between tie downs. The planking looks like a decrepit boardwalk, and finally the factory paint job is hideous. Since the deck is an integral part of my diorama, I'm trying to get it as accurate as possible. I will be building one of my own now, using photo etch tie downs, and basswood. happy modeling everybody duckdawgs
Joined: August 01, 2010
KitMaker: 143 posts
AeroScale: 55 posts
Posted: Friday, June 17, 2016 - 10:06 AM UTC
Mocking up some figures now. Even though the Zoukei-Mura base wasn't up to par, their line of figures are outstanding, though they will be modified to represent USN personnel. This is the rough scene.
 This figure will be holding a pole to untangle the arresting cable from the hook
 this one will be hooking up a chain to the tail wheel to right it
 and this one will be detaching a control rod that is digging into the deck
This is the rough scene. This figure will be holding a pole to untangle the arresting cable from the hook this one will be hooking up a chain to the tail wheel to right it and this one will be detaching a control rod that is digging into the deck 
spaarndammer

Joined: January 28, 2007
KitMaker: 1,945 posts
AeroScale: 388 posts
Posted: Friday, June 17, 2016 - 01:26 PM UTC
This will be a great scene Roland! The layout of the scene starts to become really nice.
How much will be visible from the inside of the tail? Or will you paint it black to obscure any lack of detail?
I will follow this and the other interesting builds from this campaign with great interest.
:-H
Jelger
How much will be visible from the inside of the tail? Or will you paint it black to obscure any lack of detail?
I will follow this and the other interesting builds from this campaign with great interest.
:-H
Jelger
duckdawgs
Joined: August 01, 2010
KitMaker: 143 posts
AeroScale: 55 posts
Posted: Friday, June 17, 2016 - 02:09 PM UTC
Thanks Jelger. I have the F4U Corsair Airframe & Powerplant factory manual for reference and I will be super detailing the inside, keeping it as accurate as possible.  I will add all the missing ribbing, cabling, wiring, control rods and some battle damage. The insides of Corsairs were painted zinc chromate so no it will not be painted black. The ZC should be light enough to highlight everything. Hopefully I can pull it off as I will be trying some new techniques for the first time
I will add all the missing ribbing, cabling, wiring, control rods and some battle damage. The insides of Corsairs were painted zinc chromate so no it will not be painted black. The ZC should be light enough to highlight everything. Hopefully I can pull it off as I will be trying some new techniques for the first time AussieReg
#007
Joined: June 09, 2009
KitMaker: 8,156 posts
AeroScale: 3,756 posts
Posted: Friday, June 17, 2016 - 08:15 PM UTC
A little more paint shop tonight

Detail painting and assembly next.
Cheers, D

Detail painting and assembly next.
Cheers, D

Namabiiru
#399
Joined: March 05, 2014
KitMaker: 2,888 posts
AeroScale: 307 posts

Posted: Friday, June 17, 2016 - 09:58 PM UTC
Been pre-occupied with some other builds, but able to re-focus on this one now. Construction and priming of my Flak 43 complete:

Time to jump over to Unfinished Business for awhile to allow the primer to thoroughly cure before moving on.

Time to jump over to Unfinished Business for awhile to allow the primer to thoroughly cure before moving on.
BoiseBlade
#523
Joined: February 28, 2014
KitMaker: 342 posts
AeroScale: 250 posts
Posted: Sunday, June 19, 2016 - 09:51 PM UTC
Roland,
That is going to be one nice looking Diorama!
Very cool idea and your figures are well executed.
That is going to be one nice looking Diorama!
Very cool idea and your figures are well executed.
duckdawgs
Joined: August 01, 2010
KitMaker: 143 posts
AeroScale: 55 posts
Posted: Monday, June 20, 2016 - 08:29 AM UTC
Thanks Jeff. Yes, the figures sure round out the scene. The ZM figures are awesome, the arms and feet aren't even glued on yet, almost a snap fit. The modifications will include 1/32 Hornet heads (bare) so I can sculpt sailors caps, or the color coded headgear that the deck gangs used. Alter the hand direction on one guy, sand off torso clothing on all and than re sculpt sweaters or t-shirts, and turn the pants into navy dungarees. Finally I will adjust the height on one of the upright figures. Because if my math is correct, all three figures scale out to 6ft tall, just want to throw in a little variation. For example the 'pushers' will be blue, the arresting gear figure will be green. I might have the seated driver of the tractor wearing supervisor yellow. Also if any members out there has a line on some good references on carrier deck activity, I would be grateful
BoiseBlade
#523
Joined: February 28, 2014
KitMaker: 342 posts
AeroScale: 250 posts
Posted: Wednesday, June 22, 2016 - 01:11 AM UTC
Hi Roland,
Altering the figures for deck crew will be a fun task. I not 100% on this but I would suggest you stick with plane handlers (Blues) and if you want maybe a salvage/crash (RED) shirts with the Yellow shirt Officer/Chief Aircraft handling officer who will be directing the deck crew. The arresting gear figure green, I would not think would be there even though they are Catapult and Arresting Gear Crews. My understanding was during WWII they dealt mostly with the Hook and Wire maintenance and lockup and recovery. I know it changed over time. I was on USS Iwo Jima LPH-2 (Gator freighter) in early 80s and Green shirts were mostly Cargo/Maint and landing personnel depending on helmet color. The ship only had Helicopters at that time though. Also I was not a deck hand so what do I know.
I will see if I can find any pictures from my wifes grandfather he was a handler in WWII on CV-14 Big T.
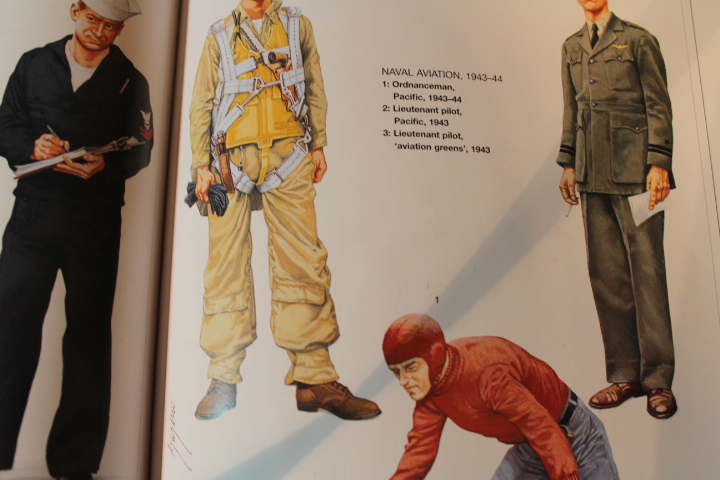
I am adding some images I found for reference if you want. Notice all Blues/Yellow running to wrench. If the director is an Officer/Chief Yellow would either be in Khaki or Green pants depending. Also you can see in the Deck meeting pic that some of the crew wore T-shirts over their regular dungaree shirt. Depending on the unit of the handlers responding they may have also had the Unit number on the front and the back of shirt "See Chock guy".
Not sure how often they were worn but you can see in the B/W photo that the plane director and one of the handling crew has on an inflatable life belt around their waist.

Altering the figures for deck crew will be a fun task.
I not 100% on this but I would suggest you stick with plane handlers (Blues) and if you want maybe a salvage/crash (RED) shirts with the Yellow shirt Officer/Chief Aircraft handling officer who will be directing the deck crew. The arresting gear figure green, I would not think would be there even though they are Catapult and Arresting Gear Crews. My understanding was during WWII they dealt mostly with the Hook and Wire maintenance and lockup and recovery. I know it changed over time. I was on USS Iwo Jima LPH-2 (Gator freighter) in early 80s and Green shirts were mostly Cargo/Maint and landing personnel depending on helmet color. The ship only had Helicopters at that time though. Also I was not a deck hand so what do I know.I will see if I can find any pictures from my wifes grandfather he was a handler in WWII on CV-14 Big T.
I am adding some images I found for reference if you want. Notice all Blues/Yellow running to wrench. If the director is an Officer/Chief Yellow would either be in Khaki or Green pants depending. Also you can see in the Deck meeting pic that some of the crew wore T-shirts over their regular dungaree shirt. Depending on the unit of the handlers responding they may have also had the Unit number on the front and the back of shirt "See Chock guy".
Not sure how often they were worn but you can see in the B/W photo that the plane director and one of the handling crew has on an inflatable life belt around their waist.
duckdawgs
Joined: August 01, 2010
KitMaker: 143 posts
AeroScale: 55 posts
Posted: Wednesday, June 22, 2016 - 06:51 AM UTC
Thanks Jeff, great pictures, never seen those before. The deck meeting is my favorite. One chief amongst all those indians. That life belt is cool, I might have to add that detail on one of those figures. Gonna have to google some up close pics though. Yes the figures will be "fun" to alter, but for me, that is my favorite part of this hobby. Scratch building and altering figures to suit. The internet and this book are what I'm using for references so far. According to an old timer I know, he says color coding remained generally the same from WW2 to early part of Korea, but color coding started to change once the US Navy started their transition to jets.
 The story with the green arresting gear guy, is that the arresting gear crew would have the long pike to get the cable untangled before they can reel the cable back in place. I found a picture on google where green guys are using this pike to hook up a strap to the tailwheel so as to lower a nosed over aircraft by a deck crane. No red guys because during Korea they were ordnance men. For sure a yellow supervisor wearing the life belt, and maybe a life belt on one of the pushers, because if there were no salvageable parts the next step would have been to push it over the side... Happy modeling everybody
The story with the green arresting gear guy, is that the arresting gear crew would have the long pike to get the cable untangled before they can reel the cable back in place. I found a picture on google where green guys are using this pike to hook up a strap to the tailwheel so as to lower a nosed over aircraft by a deck crane. No red guys because during Korea they were ordnance men. For sure a yellow supervisor wearing the life belt, and maybe a life belt on one of the pushers, because if there were no salvageable parts the next step would have been to push it over the side... Happy modeling everybody  |

WEB HOSTING BY


Copyright ©2021 AeroScale and Kitmaker Network, a subsidiary of Silver Star Enterprises
All Rights Reserved. Please read our Conditions of Use and Privacy Policy.
All Rights Reserved. Please read our Conditions of Use and Privacy Policy.