

Joel, looking forward to this one. It's really a good kit so you can have fun and concentrate on the finish without getting bogged down with problems. Your interior is looking righteous so far!!!
Best wishes,
Ian
World War II
Discuss WWII and the era directly before and after the war from 1935-1949.
Discuss WWII and the era directly before and after the war from 1935-1949.
Hosted by Rowan Baylis
1/48 scale Tamiya Mosquito Mk VI

SaxonTheShiba

Joined: February 01, 2009
KitMaker: 1,233 posts
AeroScale: 663 posts

Posted: Wednesday, July 20, 2016 - 05:52 AM UTC
Joel_W
Joined: December 04, 2010
KitMaker: 11,666 posts
AeroScale: 7,410 posts
Posted: Wednesday, July 20, 2016 - 08:22 PM UTC
Quoted Text
I'm following this closely, as I've got the kit in my stash. I was thinking about starting it early given this thread but as I've got a dual build of two Eduard Bf 109 e(4 and 7) on the bench, I've resisted that temptation. I've got similar AM as you but not the cockpit, but sounds like that might be fortunate for me in the future?
regards.
Spud,
Welcome to the party.
I usually don't' use much AM parts in a build if any, but I've gone in the complete opposite direction with the Mossy build. With the decals on the way from Aviaeology, there are 7 packages of AM parts. A all time record for me.
As for the Aires cockpit, lets just say that it's been rather interesting trying to get everything to fit.
Joel

Joel_W
Joined: December 04, 2010
KitMaker: 11,666 posts
AeroScale: 7,410 posts
Posted: Wednesday, July 20, 2016 - 08:26 PM UTC
Quoted Text
Joel, looking forward to this one. It's really a good kit so you can have fun and concentrate on the finish without getting bogged down with problems. Your interior is looking righteous so far!!!
Best wishes,
Ian
Ian,
Glad to have you along once again.
I'm more then impressed with the fit and detail of the rather old 1990's Tamiya Mossy kit. No wonder they're a leader in our hobby.
Since this is going to be my 1st contest entry in more then 40 years, I'm going to be tweaking the build to catch the eye of the judges.
As for the interior, I've changed direction 180 degrees, which is what my next post is all about.
Joel
Joel_W
Joined: December 04, 2010
KitMaker: 11,666 posts
AeroScale: 7,410 posts
Posted: Friday, July 22, 2016 - 09:15 PM UTC
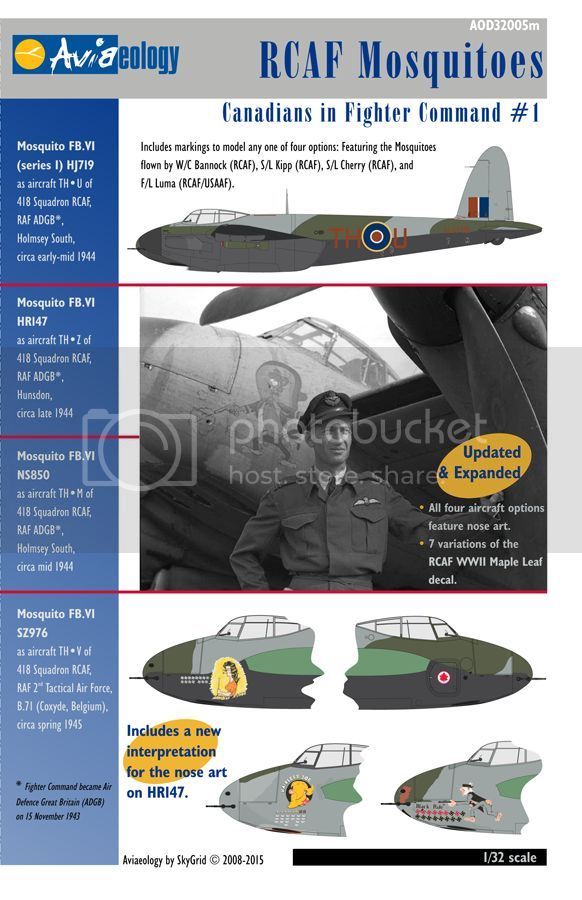
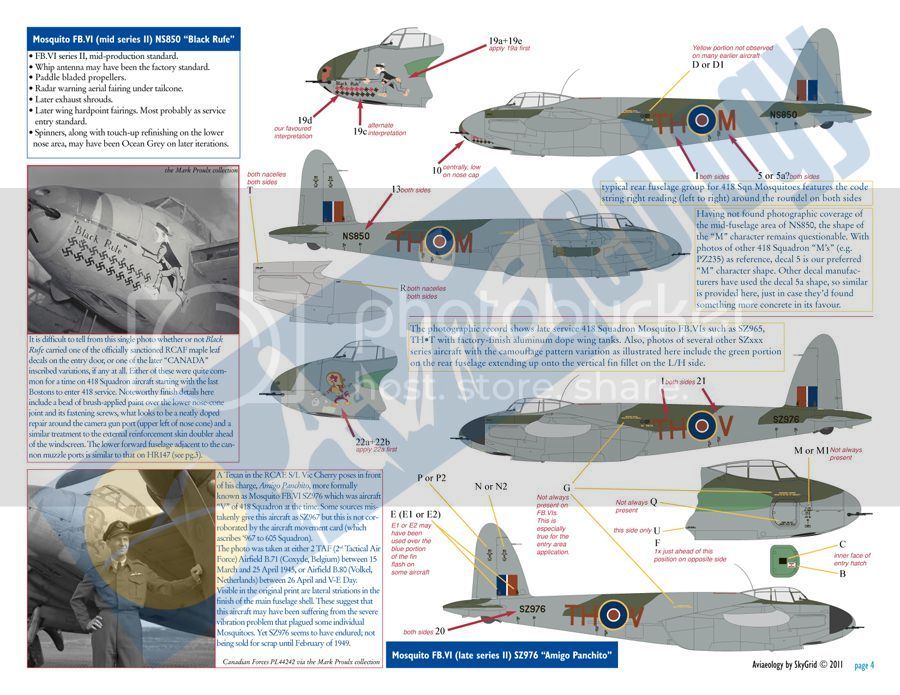
Almost ready for another update, which is kind of like a step backwards. Anyhow, just wanted to share that my Aviaeology decals arrived the other day. And as usual, they look fantastic. The instructions are literally loaded with detail pictures. All the decals are in perfect register, and the colors look dead on. Just enough stencils to look the part, but not so many as to make it a real chore. I still have nightmares from the stenciling on the 1/48 scale F-4B.
I downloaded the 1/32 scale sheets from ebay, but I did get the 1/48 scale sheet for the build.

Joel
I downloaded the 1/32 scale sheets from ebay, but I did get the 1/48 scale sheet for the build.


Joel
Joel_W
Joined: December 04, 2010
KitMaker: 11,666 posts
AeroScale: 7,410 posts
Posted: Friday, July 22, 2016 - 10:07 PM UTC
As I posted, the game plan was to use the complete Aires cockpit. Well, as most things in my life it didn't go as planned. The mocked up cockpit didn't fit very well, so I glued the sidewall panels to each fuselage half separately, But that's old news. Here's one pic just as a reminder:

No matter how much I filed, sanded, squeezed,cursed, I couldn't get the main floor section to fit correctly, so that the fuselage halves closed up without excess force. The goal is full closure with almost no to no force at all. I got it close, but I wasn't really happy with the fit. Then I tried it with the IP bulkhead, and I was back to square one. The fit was absolutely horrendous. What's more the machine gun compartment would be another major issue even closed up as the IP bulkhead was way to thick, and to wide.
So, I decided to go with Plan B.
Plan B was to use the Tamiya cockpit floor, and a combination of Tamiya parts, Aires parts, and a fair amount of scratch building.
1st off I had to finish up the Tamiya IP and IP bulkhead. The only real issue there was I had sanded off the instrument section of the IP thinking that I was going to use the Aires PE one and accompanying decals. But then I went with the Aires IP instead. So I was going to have to buy another Interior set, which I really didn't want to do, or find a way to salvage it which I had CCA glued to the Aires IP.
I figured I'd screw it up and ruin it, but I slowly worked a #10 blade behind the sheet plastic backing I used for the instrument decals. To my amazement I got the whole panel off without damaging it. I then glued it on the Tamiya IP I'd previously painted and weathered.

And yes it looks a little too beat up and rough, but this is like 3 times the real size. In scale and in the cockpit it looks just fine.

Nest up I test fitted the Tamiya floor to the fuselage halves for fit with the Aires sidewalls. And it's a marriage made in heaven. Well almost.

Unlike the Aires back section shelf section which has it's on side fuselage walls, the Tamiya one doesn't. So I've started to add small electrical boxes and lead wires to busy up those two areas.


Once I add the two radios to the rear deck, I'll detail the deck with an assortment of wires and cables.
Here's 2 pictures of the interior looking through the access hatch. The Tamiya floor fits perfectly, and there's an excellent start to the detail needed for that area.


The bomb bay needs to be basically finished prior to the fuselage halves being glued up. Here's how one side looks after the injector pin marks were taken care of.

That's my small update for now.
Joel

Peterpools
Joined: June 08, 2013
KitMaker: 197 posts
AeroScale: 193 posts
Posted: Saturday, July 23, 2016 - 01:09 AM UTC
JA
Nice progress and a good save for sure. Since we're basically at the same stage in out builds I'm pretty sure I know where you are going what what needs to be added.
Have to admit combining both the Tamiya and Aires Front offices wasn't an easy trick and it worked out really good.
Don't forget to bring the Front office to the diner tomorrow.
Keep 'em coming
Bro


GazzaS

#424

Joined: April 23, 2015
KitMaker: 4,648 posts
AeroScale: 1,938 posts

Posted: Saturday, July 23, 2016 - 01:28 AM UTC
Joel,
It's truly frustrating when the "extra" you've purchased is worse than the original you wanted to replace. Good thing you were able to keep going despite the trouble.
I'm closing up the office on my B-29 and watching the details disappear.
Gaz
It's truly frustrating when the "extra" you've purchased is worse than the original you wanted to replace. Good thing you were able to keep going despite the trouble.
I'm closing up the office on my B-29 and watching the details disappear.
Gaz
Joel_W
Joined: December 04, 2010
KitMaker: 11,666 posts
AeroScale: 7,410 posts
Posted: Saturday, July 23, 2016 - 05:25 AM UTC
Quoted Text
JA
Nice progress and a good save for sure. Since we're basically at the same stage in out builds I'm pretty sure I know where you are going what what needs to be added.
Have to admit combining both the Tamiya and Aires Front offices wasn't an easy trick and it worked out really good.
Don't forget to bring the Front office to the diner tomorrow.
Keep 'em coming
Bro
Pete,
Thanks for your more then fair assessment.
One thing I wanted to mention but forget (Old age once again strikes
 ), is that the Instruments in the original Aires IP were half covered with white glue. Here, I've done my best to clean off the glue, and you can see every one of them. Only one side of one Instrument, still needs a little more work to sharpen the Bezel.
 yeah, for once, one of my hair brain ideas actually worked. Go figure.

Joel
the Older Bro
Joel_W
Joined: December 04, 2010
KitMaker: 11,666 posts
AeroScale: 7,410 posts
Posted: Saturday, July 23, 2016 - 05:28 AM UTC
Quoted Text
Joel,
It's truly frustrating when the "extra" you've purchased is worse than the original you wanted to replace. Good thing you were able to keep going despite the trouble.
I'm closing up the office on my B-29 and watching the details disappear.
Gaz
Gary,
Ain't that the truth.
I'm giving it my best effort as this is going to be my 1st contest model since the 70's. My main concentration will be all exterior, as once the fuselage is closed up and the Green house glass glued in place not much of the cockpit will be that visible, except the rear deck, and I'm going to be detailing that quite a bit.
Joel

alpha_tango

Joined: September 07, 2005
KitMaker: 5,609 posts
AeroScale: 5,231 posts
Posted: Saturday, July 23, 2016 - 11:21 AM UTC
Nice build, Joel! Somehow this went under my radar...
As for Aires: Man you should have read one (any) build report using Aires stuff.. the sets are not designed to fit the kit but to be close to the original. This means you have to thin down the plastic til you can see through it and the same for the resin. It's also often mentiond in the instructions.
It can be discussed over and over if this is a good approach (e.g. 1mm plastic wall thickness on the model is 48mm in real life...).
Some newer sets do fit better, so a dryfit is mandatory on any Aires set.
Anyway, good luck with this project!
all the best
Steffen
P.S. How do you like the decals? ... I have the same set and the grafics are very (VERY) pixilated

SaxonTheShiba
Joined: February 01, 2009
KitMaker: 1,233 posts
AeroScale: 663 posts
Posted: Saturday, July 23, 2016 - 08:18 PM UTC
Joel, great work on the interior. Sorry you are experiencing the fit problems with the resin but that is an all too common problem. I still have nightmares from trying to get an Avionix F-14D tub in the Hasegawa kit. Kept asking myself if I had it in the right airplane! Nonetheless, you will make it work and it will look great. If you are building a contest bird concentrate on the basic construction and alignment and finish it off with a killer finish. Looking forward to more. Good news is once you deal with the cockpit the rest of the kit falls together.
Best wishes,
Ian
Best wishes,
Ian
Joel_W
Joined: December 04, 2010
KitMaker: 11,666 posts
AeroScale: 7,410 posts
Posted: Sunday, July 24, 2016 - 03:24 AM UTC
Quoted Text
Nice build, Joel! Somehow this went under my radar...
As for Aires: Man you should have read one (any) build report using Aires stuff.. the sets are not designed to fit the kit but to be close to the original. This means you have to thin down the plastic til you can see through it and the same for the resin. It's also often mentiond in the instructions.
It can be discussed over and over if this is a good approach (e.g. 1mm plastic wall thickness on the model is 48mm in real life...).
Some newer sets do fit better, so a dryfit is mandatory on any Aires set.
Anyway, good luck with this project!
all the best
Steffen
P.S. How do you like the decals? ... I have the same set and the grafics are very (VERY) pixilated
Steffen,
I've read more then a few reviews on Aires cockpits, and for the most part have used either CMK or just detailed the kit one with a resin seat and IP. I just wasn't prepared for the effort needed to get both the floor in, and the IP bulkhead. Tamiya's floor came to the rescue, and I'll be doing my usual detailing to it.
Whose decals are you referring to, Tamiya's or Aviaeology? The Tamiya decals actually look rather nice. Better then any I've tried to use over the years. The Aviaeology decals after a quick inspection look fine to me. What exactly do you mean by pixilated? I'm a little confused by that terminology.
Joel
Joel_W
Joined: December 04, 2010
KitMaker: 11,666 posts
AeroScale: 7,410 posts
Posted: Sunday, July 24, 2016 - 03:35 AM UTC
Quoted Text
Joel, great work on the interior. Sorry you are experiencing the fit problems with the resin but that is an all too common problem. I still have nightmares from trying to get an Avionix F-14D tub in the Hasegawa kit. Kept asking myself if I had it in the right airplane! Nonetheless, you will make it work and it will look great. If you are building a contest bird concentrate on the basic construction and alignment and finish it off with a killer finish. Looking forward to more. Good news is once you deal with the cockpit the rest of the kit falls together.
Best wishes,
Ian
Ian,
Thanks for the consoling words, but for once I've over come and taken a better path. At least that what it looks like for now.
I'm going to spend some time detailing those areas of the cockpit that are mostly by Tamiya, and that can easily be seen from outside looking in through the cockpit green house glass. The rest of my time will be devoted to the best effort I can muster on the exterior.
I'm not planning on opening up either the machine gun bay nor the canon bay at this point. Just detailing the bomb bay, and repositioning the Elevators and rudder. I'm also toying with the idea of opening up one panel to the oil coolers in the top of the wing. But the odds are I won't. I've got a lot of resin to replace incorrectly molded parts just as the exhaust suppressors, or kicking it up a notch or two such as the tires, MGs and canons, rear wheel strut and wheel/tire, and Eduard's canopy masks.
From years past of contest going, it's basics, basics, and more basics that gets one through all the cuts to the final round. Then it's the little details added, and how well they're done. So that's going to be my sole concentration.
Joel
alpha_tango
Joined: September 07, 2005
KitMaker: 5,609 posts
AeroScale: 5,231 posts
Posted: Sunday, July 24, 2016 - 01:01 PM UTC
Hi Joel,
Aires: I especially mean thinning down the side walls! You neither thinned the resin part nor the plastic so it is foreseeable that the floor and IP won't fit.... but luckily you found a way to cope with the problem.
Decals: I meant aviaeology see sample below ... this is not useable. Sadly.

all the best
Steffen
Aires: I especially mean thinning down the side walls! You neither thinned the resin part nor the plastic so it is foreseeable that the floor and IP won't fit.... but luckily you found a way to cope with the problem.
Decals: I meant aviaeology see sample below ... this is not useable. Sadly.
all the best
Steffen

Kilo_Uniform

Joined: July 03, 2015
KitMaker: 280 posts
AeroScale: 141 posts
Posted: Sunday, July 24, 2016 - 01:53 PM UTC
Hi Joel,
Awesome work in the cockpit - pity about the AM not fitting to your satisfaction. Glad to see, however, that you have found a solution and made it work so well.
Looking forward to the next update - the 'Wooden Wonder' is a favourite aircraft and the Tamiya one is on the 'must have list' 1/48 and 1/32 - one day when I'm big
Regards,
Kobus

Twentecable

Joined: September 13, 2003
KitMaker: 339 posts
AeroScale: 244 posts
Posted: Sunday, July 24, 2016 - 03:10 PM UTC
Joel looking good. Stay on it!
gr TC
gr TC
Joel_W
Joined: December 04, 2010
KitMaker: 11,666 posts
AeroScale: 7,410 posts
Posted: Sunday, July 24, 2016 - 08:42 PM UTC
Quoted Text
Joel looking good. Stay on it!
gr TC
Lars,
Thanks so much for those most kind and positive words.
Joel
Joel_W
Joined: December 04, 2010
KitMaker: 11,666 posts
AeroScale: 7,410 posts
Posted: Sunday, July 24, 2016 - 08:52 PM UTC
Quoted Text
Hi Joel,
Aires: I especially mean thinning down the side walls! You neither thinned the resin part nor the plastic so it is foreseeable that the floor and IP won't fit.... but luckily you found a way to cope with the problem.
Decals: I meant aviaeology see sample below ... this is not useable. Sadly.
all the best
Steffen
Steffen,
As for the Aviaeology decals, thanks for the heads up. I just pulled out my sheet and the little two supplement sheets with the aircraft nose art, and mine are perfect. They must have had an isolated issue that they've since corrected. I hope that they replaced those decals for you.
As for the Resin issues, you are 100% correct that I didn't thin out either set of walls, but rather just file and sanded the floor and IP bulkhead. The main reason I didn't file the side walls was that the fit was perfect especially at the tip fuselage sills. In this case I do think that I really lucked out as I'm getting the best of both worlds, and hopefully will pick up a few detail points during the judging.
Joel
Joel_W
Joined: December 04, 2010
KitMaker: 11,666 posts
AeroScale: 7,410 posts
Posted: Sunday, July 24, 2016 - 08:55 PM UTC
Quoted Text
Hi Joel,
Awesome work in the cockpit - pity about the AM not fitting to your satisfaction. Glad to see, however, that you have found a solution and made it work so well.
Looking forward to the next update - the 'Wooden Wonder' is a favourite aircraft and the Tamiya one is on the 'must have list' 1/48 and 1/32 - one day when I'm big
Regards,
Kobus
Kobus,
All things in good time my friend.
Hopefully the Pit will be much more detailed when I'm done with it, and be worth the time and effort I'm going to put into it.
Joel
Joel_W
Joined: December 04, 2010
KitMaker: 11,666 posts
AeroScale: 7,410 posts
Posted: Thursday, July 28, 2016 - 01:38 AM UTC
Work as progressed at my usual 2 steps forward and then 1 step backwards pace.
Now that I've gotten the Tamiya cockpit floor to snug up to the Aires cockpit side walls, the next step was to start to detail the cockpit prior to priming. I've got a rather large collection of photographs from the net, as well as being able to use Pics of Peter's 1/32 scale Tamiya Mossie build, and the actual kit as a reference guide. Not a bad deal if you ask me.
The 1st thing that I noticed was that the Navigators seat back didn't have the hinged armor plate backing, and the port hole. So I modified the kit part, then made one from .020 sheet. I slightly beveled the joint seam so that it looks like it's been somewhat worn from use. The port hole was a real challenge. I really needed some Evergreen tubing, but I didn't have a dia. that was close to fitting. I lucked out finding a piece of white sprue tree, and sanding it down using my Dremel as a lathe so it just fit. Then I drilled a pilot hole, then a largest hole that I had a drill bit for. It still was way to small, so using a triangle X-Acto file as a reamer, I slowly opened up the ID to where it looked about right. I sanded both sides to more rounded shape. I made a grab handle out of steel wire, and two hinges on the back side.

Next up was the issues that the old Tamiya kit had the main radio in about the right place on the rear deck, but the other radio was just stuck to the front of the deck, and the Oscilloscope was missing all together. So I just used the other radio as a starting point, and modified it to look like a Oscilloscope. Then I used some scale 1x3's to make a basic stand. Since the stand really can't be seen once the fuselage halves are joined, I didn't spend a whole lot of time on it.

Next up was modifying the Aeries radio to fit hanging over the rear deck, facing the Navigator's seat. Which you can see in the above picture as well.
I drilled out enough holes for electric cabling both in the 3 electrical units, and where they would go on the rear deck and it's face plate. I just haven't gotten to running those lead wire lines as yet.
As I said from the start, one of my goals was to have the cockpit as well as all detailed interior assemblies still allow the fuselage halves to mate up without any pressure. So I test fitted everything, and once I got the floor aligned, the dry fit was dead on perfect.


Then I test fitted the green house glass not only to see if there were any issues, of which thankfully there wasn't, but to see just what one can and couldn't see.


Looking at those two pictures, you can see that the cockpit is starting to take on that cramped operational look of the real deal, and that
Thanks to all that have taken the time to read through this update.
Joel
Peterpools
Joined: June 08, 2013
KitMaker: 197 posts
AeroScale: 193 posts
Posted: Thursday, July 28, 2016 - 02:09 AM UTC
JA
NIce progress on your Mossie and the front offcie is looking just the part busy and cramped. One thing I have noticed is a lot of the molded on details are going to be a bear to paint as and would recommend starting to prime and work on the details before much more is done. A lot of the interior will be visible through the greenhouse glass and the forward entrance hatch.
I've been painting as I go, so I don't forget the mistakes I've made on past builds.
Looking good
Keep 'em coming
Bro
Willard79

Joined: June 01, 2014
KitMaker: 189 posts
AeroScale: 179 posts
Posted: Thursday, July 28, 2016 - 02:25 AM UTC
Hi, Looking good. Was the Oscilloscope fitted to both the FB and night fighter versions. I'm planning an FB version.
cheers.
cheers.
GazzaS
#424
Joined: April 23, 2015
KitMaker: 4,648 posts
AeroScale: 1,938 posts
Posted: Thursday, July 28, 2016 - 11:15 AM UTC
Joel,
Nice update! Your scratch biult stuff looks great!
Gaz
Nice update! Your scratch biult stuff looks great!
Gaz
Kilo_Uniform
Joined: July 03, 2015
KitMaker: 280 posts
AeroScale: 141 posts
Posted: Thursday, July 28, 2016 - 12:09 PM UTC
Hi Joel,
Awesome detail in the cockpit!! Looking forward to the next update.
Regards,
Kobus
Awesome detail in the cockpit!! Looking forward to the next update.
Regards,
Kobus
Joel_W
Joined: December 04, 2010
KitMaker: 11,666 posts
AeroScale: 7,410 posts
Posted: Friday, July 29, 2016 - 03:10 AM UTC
Quoted Text
JA
NIce progress on your Mossie and the front offcie is looking just the part busy and cramped. One thing I have noticed is a lot of the molded on details are going to be a bear to paint as and would recommend starting to prime and work on the details before much more is done. A lot of the interior will be visible through the greenhouse glass and the forward entrance hatch.
I've been painting as I go, so I don't forget the mistakes I've made on past builds.
Looking good
Keep 'em coming
Bro
Pete,
I just emailed you with my adventures since I got up from working overnight.
I primed the various cockpit parts with MIG AMMO Acrylic Gray primer, then 2 hours later, I applied Model Master enamel RAF Interior Green. I'll be detail painting starting tomorrow.
Joel
 |

WEB HOSTING BY


Copyright ©2021 AeroScale and Kitmaker Network, a subsidiary of Silver Star Enterprises
All Rights Reserved. Please read our Conditions of Use and Privacy Policy.
All Rights Reserved. Please read our Conditions of Use and Privacy Policy.