World War II
Discuss WWII and the era directly before and after the war from 1935-1949.
Hosted by Rowan Baylis
1/48 scale Tamiya Mosquito Mk VI
Joel_W
Staff MemberAssociate Editor
AUTOMODELER
_VISITCOMMUNITY
New York, United States
Joined: December 04, 2010
KitMaker: 11,666 posts
AeroScale: 7,410 posts
Posted: Friday, August 12, 2016 - 08:39 PM UTC

Quoted Text

Joel,
Always glad to see another update. You always manage to do small things that add depth and quality to your builds. It also provides useful pointers for the rest of us.

Those fuel cells and surrounds look nice. Stuff like that makes a guy consider getting some mirrored shelving. I've learned the perils of allowing interested relatives to handle my models.

Gaz


Gary,
Thanks my friend. It really makes my day when members see some value in how I model and how it can relate to their builds. That's something really special.

As for the gas tanks in the bomb bay, or for that matter the bomb bay itself, I've always tried to leave open the doors even if it's just a display model because anyone can see them looking directly at the model, and it just adds some character to the build. In this case the model is going to be entered into the Mosquitocom and maybe the Replicon next year, so I need all the "Brownie" points I can get from the Judges. Not that I think I stand any kind of chance of placing, but that's not why I'm now contest focused.

I've had a long standing policy of no one touches a model why viewing it. I will put on my cotton gloves and turn over the model for them.

Joel
Joel_W
Staff MemberAssociate Editor
AUTOMODELER
_VISITCOMMUNITY
New York, United States
Joined: December 04, 2010
KitMaker: 11,666 posts
AeroScale: 7,410 posts
Posted: Friday, August 12, 2016 - 08:41 PM UTC

Quoted Text

Joel, the bomb bay looks awesome! Hopefully it will be easier than the bomb bay assembly we dealt with on our Venturas!!!

Best wishes,

Ian


Ian,
Thanks my friend. OMG!! I totally forgot about the PV-1, and those bomb bay door hinges. Talk about fiddly This is Tamiya we're talking about, and even way back in 1996 Papa Tamiya had a better plan.

Joel
SaxonTheShiba
_VISITCOMMUNITY
United States
Joined: February 01, 2009
KitMaker: 1,233 posts
AeroScale: 663 posts
Posted: Friday, August 12, 2016 - 10:59 PM UTC

Quoted Text


Quoted Text

Joel, the bomb bay looks awesome! Hopefully it will be easier than the bomb bay assembly we dealt with on our Venturas!!!

Best wishes,

Ian


Ian,
Thanks my friend. OMG!! I totally forgot about the PV-1, and those bomb bay door hinges. Talk about fiddly This is Tamiya we're talking about, and even way back in 1996 Papa Tamiya had a better plan.

Joel


Yeah, the Tamiya Mossie is a gem of a kit. Of course the 1/1 scale version is a gem of an airplane.

Best wishes,

Ian
Joel_W
Staff MemberAssociate Editor
AUTOMODELER
_VISITCOMMUNITY
New York, United States
Joined: December 04, 2010
KitMaker: 11,666 posts
AeroScale: 7,410 posts
Posted: Saturday, August 13, 2016 - 08:58 PM UTC
HELP NEEDED:
I've run into a problem that I really could use some help with.
Both main gear landing struts have what seems to be a oil tank that creates the hydraulic pressure for the raising and lowering of the gear. The instructions call for a British Crimson color, which would indicate that the tanks were made from Bakerlite. The instructions for the 1/32 scale kit now call for an Aluminum color, which would indicate that the tanks are indeed aluminum, which makes more sense.

I have photographs from three restorations, and there lies the problem. the tanks are painted British Crimson, RAF Interior Green, and one has them as unpainted Aluminum.

Every model build that I have read, has both tanks painted British Crimson. At this point I'm inclined to go with Natural Metal, and use Alcad2 Flat Aluminum#101.

Does anyone have a definitive answer?

Thanks for any and all help,

Joel
SaxonTheShiba
_VISITCOMMUNITY
United States
Joined: February 01, 2009
KitMaker: 1,233 posts
AeroScale: 663 posts
Posted: Saturday, August 13, 2016 - 10:55 PM UTC


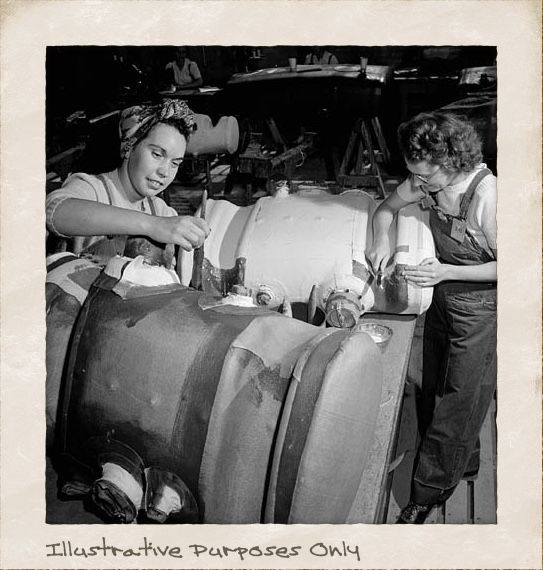
Joel, check out this picture. It's from an article on Heritage Toronto about DeHavilland assembly lines. I think these are your gear tanks and that front one looks colored. (Red Brown?)

Hope this helps,

Best wishes,

Ian
Joel_W
Staff MemberAssociate Editor
AUTOMODELER
_VISITCOMMUNITY
New York, United States
Joined: December 04, 2010
KitMaker: 11,666 posts
AeroScale: 7,410 posts
Posted: Saturday, August 13, 2016 - 11:33 PM UTC

Quoted Text


Joel, check out this picture. It's from an article on Heritage Toronto about DeHavilland assembly lines. I think these are your gear tanks and that front one looks colored. (Red Brown?)

Hope this helps,

Best wishes,

Ian


Ian,
Thanks for the picture and info. I been just looking at those tanks, and you can clearly see the wielded seam on the back tank. So I'm going to conclude that they're Aluminum, then coated with the same British Crimson coating that the Bomb bay tanks have.
Joel
SaxonTheShiba
_VISITCOMMUNITY
United States
Joined: February 01, 2009
KitMaker: 1,233 posts
AeroScale: 663 posts
Posted: Sunday, August 14, 2016 - 12:08 AM UTC
Glad to help Joel!

Best wishes,

Ian
magnusf
_VISITCOMMUNITY
Stockholm, Sweden
Joined: May 02, 2006
KitMaker: 1,953 posts
AeroScale: 1,902 posts
Posted: Thursday, August 18, 2016 - 01:31 AM UTC
Hi Joel and all!

I've just read up on your Mossie-thread, just realising how long I have been inactive on Aeroscale. I've simply haven't taken the time needed to do any modelling but hopefully I'm in for a re-start now, I cleaned the workbench yesterday (literally cleaned, things get a bit dusty when just left on the table for three months or so ) making room for finishing the Avias finally.

Earlier on there was a question about the bomb bay fuel tanks, I don't think it was answered. I can manage a guess: I am almost sure that these tanks are self sealing rubber "bags". Here is a Wikipedia article describing how it works!


Magnus
Joel_W
Staff MemberAssociate Editor
AUTOMODELER
_VISITCOMMUNITY
New York, United States
Joined: December 04, 2010
KitMaker: 11,666 posts
AeroScale: 7,410 posts
Posted: Thursday, August 18, 2016 - 01:48 AM UTC

Quoted Text

Hi Joel and all!

I've just read up on your Mossie-thread, just realising how long I have been inactive on Aeroscale. I've simply haven't taken the time needed to do any modelling but hopefully I'm in for a re-start now, I cleaned the workbench yesterday (literally cleaned, things get a bit dusty when just left on the table for three months or so ) making room for finishing the Avias finally.

Earlier on there was a question about the bomb bay fuel tanks, I don't think it was answered. I can manage a guess: I am almost sure that these tanks are self sealing rubber "bags". Here is a Wikipedia article describing how it works!


Magnus


Magnus,
Welcome home my friend. I thought that all this time you were building Armor models. And thanks for the info on self sealing fuel tanks. .
Joel


Joel_W
Staff MemberAssociate Editor
AUTOMODELER
_VISITCOMMUNITY
New York, United States
Joined: December 04, 2010
KitMaker: 11,666 posts
AeroScale: 7,410 posts
Posted: Thursday, August 18, 2016 - 11:02 PM UTC
Well another week has passed, and it's time for my weekly update.

I was getting to the point of finally being ready to glue up both fuselage halves, but I was still having some concerns about how the part Aeries, part Tamiya, part semi detailed cockpit would actually fit once glue was applied. There were still a few details that needed attending to, such as installing the rear fuselage wheel well mud guard.

I had previously painted and weathered it, then I thought I put it in one of the boxes I use to store sub assemblies and parts as they're worked on, but I couldn't find it! Could have the Carpet Monster paid me another visit, or did my cat named Evil (that's his real name, and it fits him perfectly), somehow managed to steal yet another part? I searched for over an hour but I couldn't find it. So now I was faced with having to make one. The part actually looks like a car's inner wheel well lining. So the challenge was how to duplicate it. I tried all sorts of shapes, but nothing really came close. Then as I was just looking though my spare parts box again hoping for a lazy man's miracle, I noticed that a tire had the approximate shape I needed. I cut out a section, and I thought I only needed a few hours of work to jury rig it. Well how wrong I was. To actually get the part to the correct shape, size, and depth took 2 days.


Then I had to shape the inside as that's what one will see. Nothing is as much fun as sanding Bondo in a complex concave shape.


Final sanding and polishing, then primed, and finally painted with model Master RAF Interior Green. Sealed, glossed, a dirty wash, and flat coated.


Yeah, I know it sure doesn't look like 2 days worth of work, but it really took that long. I then test fitted the Ultra Cast resin rear strut, wheel & tire. Looks pretty good if you ask me.


I'm jumping a little ahead of the time line, but it's easier to follow my work progress this way.

Next up was gluing up the two fuselage halves. One of my goals was to actually have the fit good enough so that almost no pressure was needed to close up any gaps. Dry fitting always looked good, but there just practice runs. To say that I was actually quite surprised that I achieved that benchmark is an under statement.


Another goal was to have the combination cockpit just detailed enough to give the illusion of a really busy and tight cockpit. To that end I think I succeeded. Wow!! Two accomplished goals in one week, that almost never happens during any of my builds.


Turning the Mossie over, you'll see how the combination bomb bay, Hispano canon bay turned out. I also decided at this time to insall the two 500 lb bombs. They were assemblied, primed with MIG AMMO acrylic Gray primer, then airbrushed with Life Color FS 34068 #1503 Weathered Olive Drab. Glossed, then I cut some yellow decals to make the yellow Stripes.


I'll be the 1st one to admit the Hispano canon bay looks pretty so so at bes., Ok, pretty poor when you're looking right at those very basic shaped canons. But it has quite a different look to it once the canon bay doors are on. Keep it in mind that the whole purpose of those canon extensions was to give the nosy judge who shines his pen flashlight through the access holes something to see. To that effect the illusion does indeed work.


Up next is the wings including the wheel wells, but not the land gear sub assembles.

Joel
KelticKnot
_VISITCOMMUNITY
Scotland, United Kingdom
Joined: May 11, 2015
KitMaker: 768 posts
AeroScale: 656 posts
Posted: Friday, August 19, 2016 - 12:27 AM UTC
Congrats Joel, everything is coming together beautifully.
It's a slight pity all that great stuff in the bomb bay is underneath but it'll sure give the judges something extra to look at when they turn it over !
Joel_W
Staff MemberAssociate Editor
AUTOMODELER
_VISITCOMMUNITY
New York, United States
Joined: December 04, 2010
KitMaker: 11,666 posts
AeroScale: 7,410 posts
Posted: Friday, August 19, 2016 - 01:46 AM UTC

Quoted Text

Congrats Joel, everything is coming together beautifully.
It's a slight pity all that great stuff in the bomb bay is underneath but it'll sure give the judges something extra to look at when they turn it over !


Paul,
Thanks for stopping by, and appreciating my efforts. I'm just hoping that the judges like what they see when they do over the Mossie.
Joel
Peterpools
_VISITCOMMUNITY
New York, United States
Joined: June 08, 2013
KitMaker: 197 posts
AeroScale: 193 posts
Posted: Friday, August 19, 2016 - 02:04 AM UTC
JA
Way to go. Super work on the tail wheel mud guard and bomb bay - looks awesome.Your goal of keeping everything busy and full was easily achieved and of course, you better start hoping none of the judges are here on Aeroscale and following your build.
Keep 'em coming
Bro
GazzaS
#424
_VISITCOMMUNITY
Queensland, Australia
Joined: April 23, 2015
KitMaker: 4,648 posts
AeroScale: 1,938 posts
Posted: Friday, August 19, 2016 - 02:08 AM UTC
Joel,
The bomb bay looks excellent! Nice save on the mudguard, too. The butts of your hand made Brownings add some nice fill, loking just right.

Our cat has been known to make many things disappear. Including a 109 canopy and two paint brushes. I found the canopy by stepping on it. Two paint brushes have ended up, who-knows-where. I didn't believe it until I saw it happen that she would fish parts from the box! I have even found her snoozing inside the B-29's box! She had worked her way under the lid. Only the snickering of my wife alerted me to this danger! Evil, they all are!

Keep up the good work!

Gaz
Joel_W
Staff MemberAssociate Editor
AUTOMODELER
_VISITCOMMUNITY
New York, United States
Joined: December 04, 2010
KitMaker: 11,666 posts
AeroScale: 7,410 posts
Posted: Friday, August 19, 2016 - 03:25 AM UTC

Quoted Text

JA
Way to go. Super work on the tail wheel mud guard and bomb bay - looks awesome.Your goal of keeping everything busy and full was easily achieved and of course, you better start hoping none of the judges are here on Aeroscale and following your build.
Keep 'em coming
Bro


Pete,
Thanks. With my luck, they're all at least lurking on as need to be basis.
Joel
Joel_W
Staff MemberAssociate Editor
AUTOMODELER
_VISITCOMMUNITY
New York, United States
Joined: December 04, 2010
KitMaker: 11,666 posts
AeroScale: 7,410 posts
Posted: Friday, August 19, 2016 - 03:28 AM UTC

Quoted Text

Joel,
The bomb bay looks excellent! Nice save on the mudguard, too. The butts of your hand made Brownings add some nice fill, loking just right.

Our cat has been known to make many things disappear. Including a 109 canopy and two paint brushes. I found the canopy by stepping on it. Two paint brushes have ended up, who-knows-where. I didn't believe it until I saw it happen that she would fish parts from the box! I have even found her snoozing inside the B-29's box! She had worked her way under the lid. Only the snickering of my wife alerted me to this danger! Evil, they all are!

Keep up the good work!

Gaz


Gary,
Thanks so much for stopping by.

Evil was just in the modeling room, and loves nothing better then trying to steal anything he can grab. I've even found steel wire in the hallway, old missing parts that I eventually step on, and the list just keeps on going on.

Joel
SaxonTheShiba
_VISITCOMMUNITY
United States
Joined: February 01, 2009
KitMaker: 1,233 posts
AeroScale: 663 posts
Posted: Friday, August 19, 2016 - 06:36 PM UTC
Looking fine Joel! Yeah, I bet that is an easier time than the Ventura bomb bay. I am still pissed I put all that time into the bombs and couldn't use 'em.

Regards,


Ian

Joel_W
Staff MemberAssociate Editor
AUTOMODELER
_VISITCOMMUNITY
New York, United States
Joined: December 04, 2010
KitMaker: 11,666 posts
AeroScale: 7,410 posts
Posted: Friday, August 19, 2016 - 07:00 PM UTC

Quoted Text

Looking fine Joel! Yeah, I bet that is an easier time than the Ventura bomb bay. I am still pissed I put all that time into the bombs and couldn't use 'em.

Regards,


Ian


Ian,
Thanks for stopping by my friend, it's much appreciated.

Tough to compare anything to a well thought out and designed Tamiya kit.

Joel
Joel_W
Staff MemberAssociate Editor
AUTOMODELER
_VISITCOMMUNITY
New York, United States
Joined: December 04, 2010
KitMaker: 11,666 posts
AeroScale: 7,410 posts
Posted: Thursday, September 01, 2016 - 12:38 AM UTC
Finally, time for another update. It's not that I haven't been putting time in at the bench, but rather that the time has been spent on getting glued up fuselage parts sanded flush, and the 1st polishing done. Unfortunately, that relates to not much to show for nearly 2 weeks of work.

It was time to address the nose section of the Mossie. 1st, the 4 20mm Hispano canons. After dry fitting the canons to the bay cover there just isn't enough of the muzzles showing to warrant the Master Brass replacements. Instead I decided to just drill out the muzzles, then sand to shape. When the canon assembly was fitted to the fuselage, the fit was close, but not perfect. So I started to sand till I got it close enough to what I thought the fit would most likely look like on the real aircraft.


Next up was the entire .303mm Browning machine housing. Since I made the decision to also close up this section as I felt that it just ruined the beautiful lines of the Mk VI, and that the Tamiya parts didn't even include ammon chuts. The alternative would have been to purchase the Aeries AM parts. I've already broken the $100 AM mark, and preferred not to continue buying every piece of AM available. I started by cutting off the 4 barrels, and drilling out the MG housings to accept the incredible Brass barrels by Master. This is the 1st time that I've used them, but it surely won't be the last. Once I was sastified that they fit and would align up correctly, I glued the nose section to the fuselage. Close, but not perfect. So I sanded and shaped the joints till they were flush. Some putty work will have to be done, and hopefully some successful scribing. Then came the one piece access hatch doors. It was clear that Tamiya never intended for these doors to be installed in the closed position. They're a little narrow in the width on the bottom, and a tad short at the top. So once the glue had dried, the sanding commenced till each side was flush. As you can see in the pictures below, putty work and scribing still needs to be addressed. I also installed the Master Brass .303 Brownnings.


With both the MG and Canon sections closed up, the Mossie is finally starting to look like one, well at least the fuselage is.


There is a bottom look down window approximately halfway down the bottom of the fuselage. The clear part fit is another "almost" quality fit by today's standards, but as I have to keep on reminding myself, Tamiya produced the Mossie way back in 1996. So after the Extra Thin had dried for a full day, I started the all to familar routine of sanding till the glass was flush with the surface. At this point I've gotten through the 1st phase of polishing. As you can see there is a long way to go. But you get the idea.


I also started the wing assemblies by drilling out the mounting holes I need for the installation of the wing tanks, and the rocket launchers. By 1944 the RCAF has taken to installing two sets of rockets on the outer two hard points, and mounting the wing tank between them and the fuselage. I also installed the taxi lights on the bottom of each wing, but have yet to do any further work on them.


The wing tips are separate two piece assemblies as the NF II version can also be built from this kit. The difference is that the The Mk VI version only has one wing tip light per wing, while the NF II version has two per wing. Once again the fit is very good, but not perfect. So more sanding and putty work. After the glue had cured, I sanded till I had a smooth, flush fit, then an application of Bondo, sanding, and the 1 round of polishing.


Masking for painting will be just inside of the glue joint line. Well, that's the plan, and hopefully they'll look just fine.

And that's it for nearly 2 weeks worth of time at the bench.

Joel
KelticKnot
_VISITCOMMUNITY
Scotland, United Kingdom
Joined: May 11, 2015
KitMaker: 768 posts
AeroScale: 656 posts
Posted: Thursday, September 01, 2016 - 02:54 AM UTC
Again, another fine update with plenty to show for your time !

Those Brownings look excellent. Better, I think, even than the Quickboost ones I am using on the Lanc.

I'm interested to see what methods you'll use to polish out the sanding marks on that window. There's a small part of me that's still horrified to see that scratched clear part but I guess that's just a hang-up from my first phase of modelling two decades ago !
wing_nut
_VISITCOMMUNITY
New Jersey, United States
Joined: June 02, 2006
KitMaker: 1,212 posts
AeroScale: 468 posts
Posted: Thursday, September 01, 2016 - 03:43 AM UTC
Did some catching up on this one. Looks nice. Those brass barrels really puts the sting in the nose.
GazzaS
#424
_VISITCOMMUNITY
Queensland, Australia
Joined: April 23, 2015
KitMaker: 4,648 posts
AeroScale: 1,938 posts
Posted: Thursday, September 01, 2016 - 04:19 AM UTC
Hey Joel,
Excellent update! Like the others, I'm very impressed by those .303's. Unfortunately they're making me consider building at that larger scale. The rest looks great, the clean lines of the Mossie showing through.

I too used to cringe about damaged clear parts. Now I just whip out the Meguires.

Gaz
Joel_W
Staff MemberAssociate Editor
AUTOMODELER
_VISITCOMMUNITY
New York, United States
Joined: December 04, 2010
KitMaker: 11,666 posts
AeroScale: 7,410 posts
Posted: Thursday, September 01, 2016 - 09:55 PM UTC

Quoted Text

Again, another fine update with plenty to show for your time !

Those Brownings look excellent. Better, I think, even than the Quickboost ones I am using on the Lanc.

I'm interested to see what methods you'll use to polish out the sanding marks on that window. There's a small part of me that's still horrified to see that scratched clear part but I guess that's just a hang-up from my first phase of modelling two decades ago !


Paul,
Thanks for stopping by and appreciating my most modest of efforts.

I used the Quickboost MGs on a recent build (just can't remember which one), and if IIRC they're resin not brass or even white metal. Honestly, if I had to decide between them and the Tamiya kit MGs, I'd go with the Tamiya ones.

I'm with you when it comes to sanding clear parts, but there seems to be an unwritten law that little wing tip lights and the such will never fit as well as the major kit components, hence, one has to learn to bite the bullet and sand/polish them. To be honest about it, in real 1:1 life size, the polished glass looks pretty good as is. What my next steps are is Meguiar's Polishing compound, followed by Meguiars Scatch X2.0. If it works on the Coupe's clear lenses for the lights, hopefully it will do the final trick here.

Joel
Joel_W
Staff MemberAssociate Editor
AUTOMODELER
_VISITCOMMUNITY
New York, United States
Joined: December 04, 2010
KitMaker: 11,666 posts
AeroScale: 7,410 posts
Posted: Thursday, September 01, 2016 - 10:02 PM UTC

Quoted Text

Did some catching up on this one. Looks nice. Those brass barrels really puts the sting in the nose.


Marc,
Thanks for stopping by. Those Master MGs are the best I've ever seen.
Joel
Joel_W
Staff MemberAssociate Editor
AUTOMODELER
_VISITCOMMUNITY
New York, United States
Joined: December 04, 2010
KitMaker: 11,666 posts
AeroScale: 7,410 posts
Posted: Thursday, September 01, 2016 - 10:08 PM UTC

Quoted Text

Hey Joel,
Excellent update! Like the others, I'm very impressed by those .303's. Unfortunately they're making me consider building at that larger scale. The rest looks great, the clean lines of the Mossie showing through.

I too used to cringe about damaged clear parts. Now I just whip out the Meguires.

Gaz


Gary,
Same scale as you build: 1/48. Even when I make the move to 1/32nd, it's only for single engine props and 1st generation jets. Everything else will still be 1/48 scale.
Joel