Hey Joel
I just dropped by and had a look. Its a fine job you're doing and the Yahu panel looks great.
I'm waiting for a new desk to arrive before I can get on, and marvelling at just how much modelling equipment and kits I have. There are boxes of the stuff waiting to be unpacked. Time to downsize a bit I think.
Happy modelling
Steve
Cold War (1950-1974)
Discuss the aircraft modeling subjects during the Cold War period.
Discuss the aircraft modeling subjects during the Cold War period.
Hosted by Tim Hatton
Best Starfighter Ever?
SteveAndrews

Joined: August 16, 2010
KitMaker: 693 posts
AeroScale: 551 posts

Posted: Wednesday, February 28, 2018 - 03:19 AM UTC
Joel_W

Joined: December 04, 2010
KitMaker: 11,666 posts
AeroScale: 7,410 posts

Posted: Thursday, March 01, 2018 - 02:07 AM UTC
Steve,
The level of detail is simply amazing. I guess that the harness and belts are removable at this point. Looking forward to seeing the cockpit painted and finally finished.
Joel
The level of detail is simply amazing. I guess that the harness and belts are removable at this point. Looking forward to seeing the cockpit painted and finally finished.
Joel

SteveAndrews

Joined: August 16, 2010
KitMaker: 693 posts
AeroScale: 551 posts

Posted: Sunday, March 11, 2018 - 03:05 AM UTC
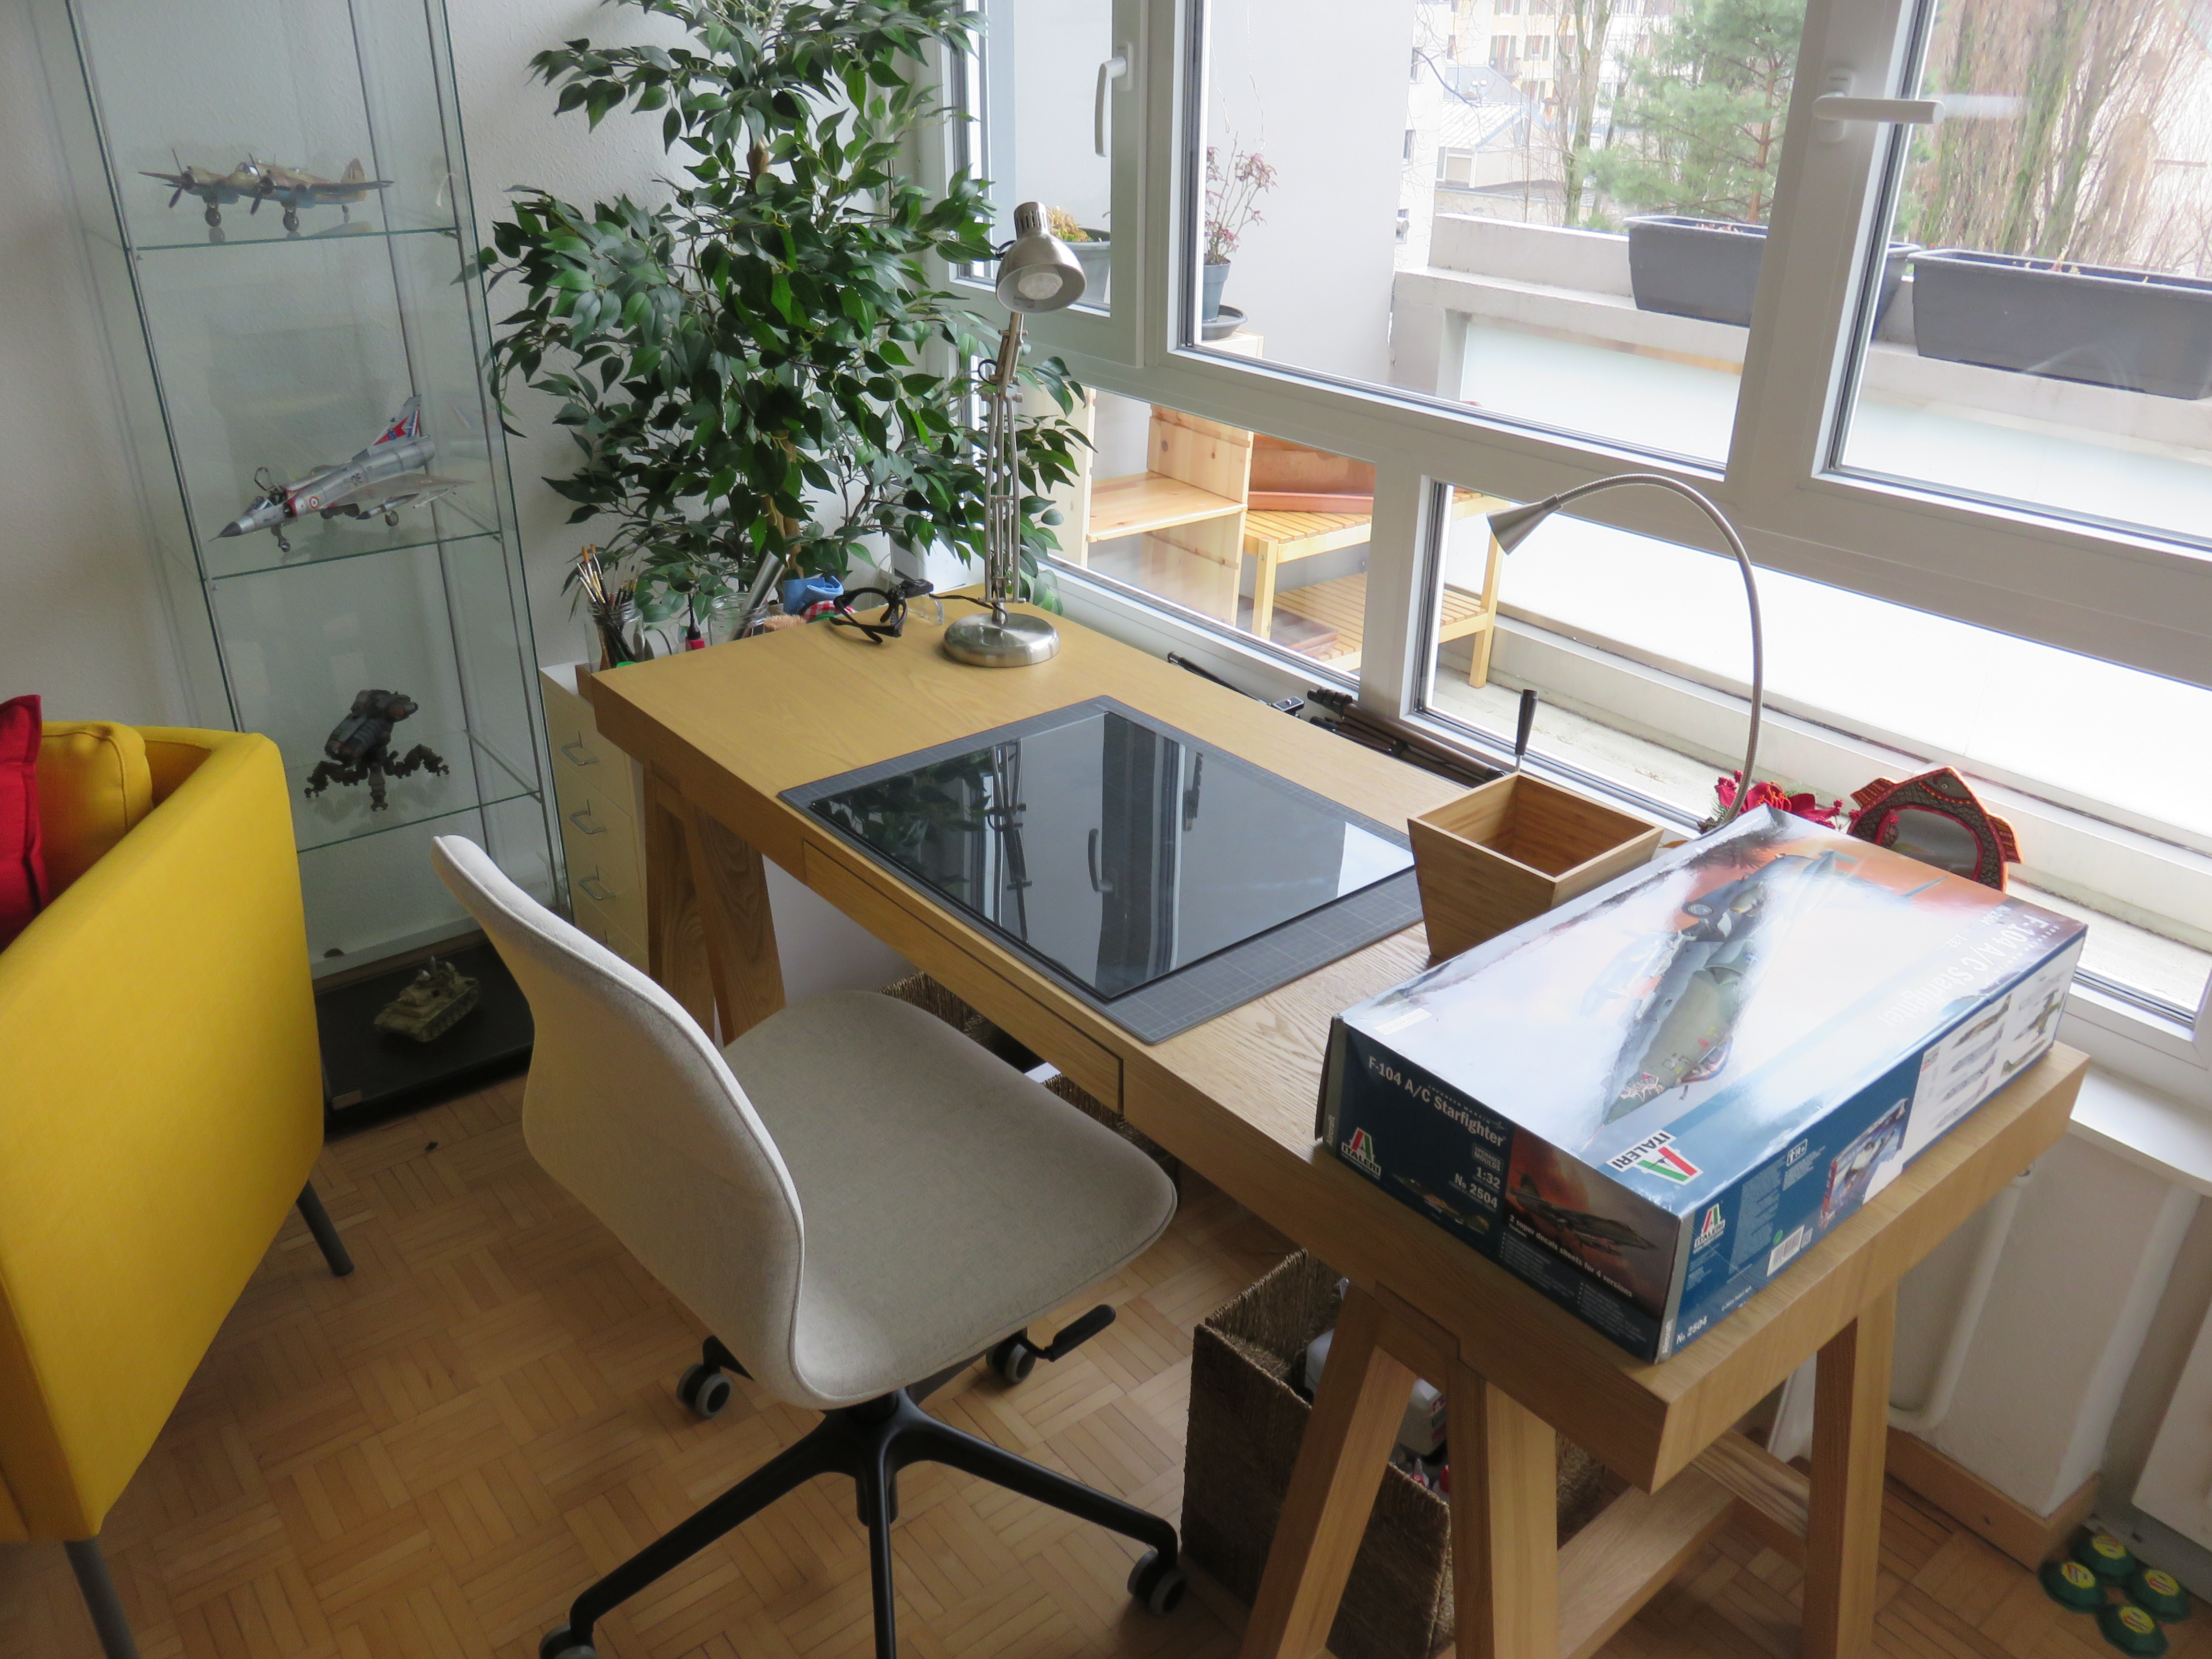
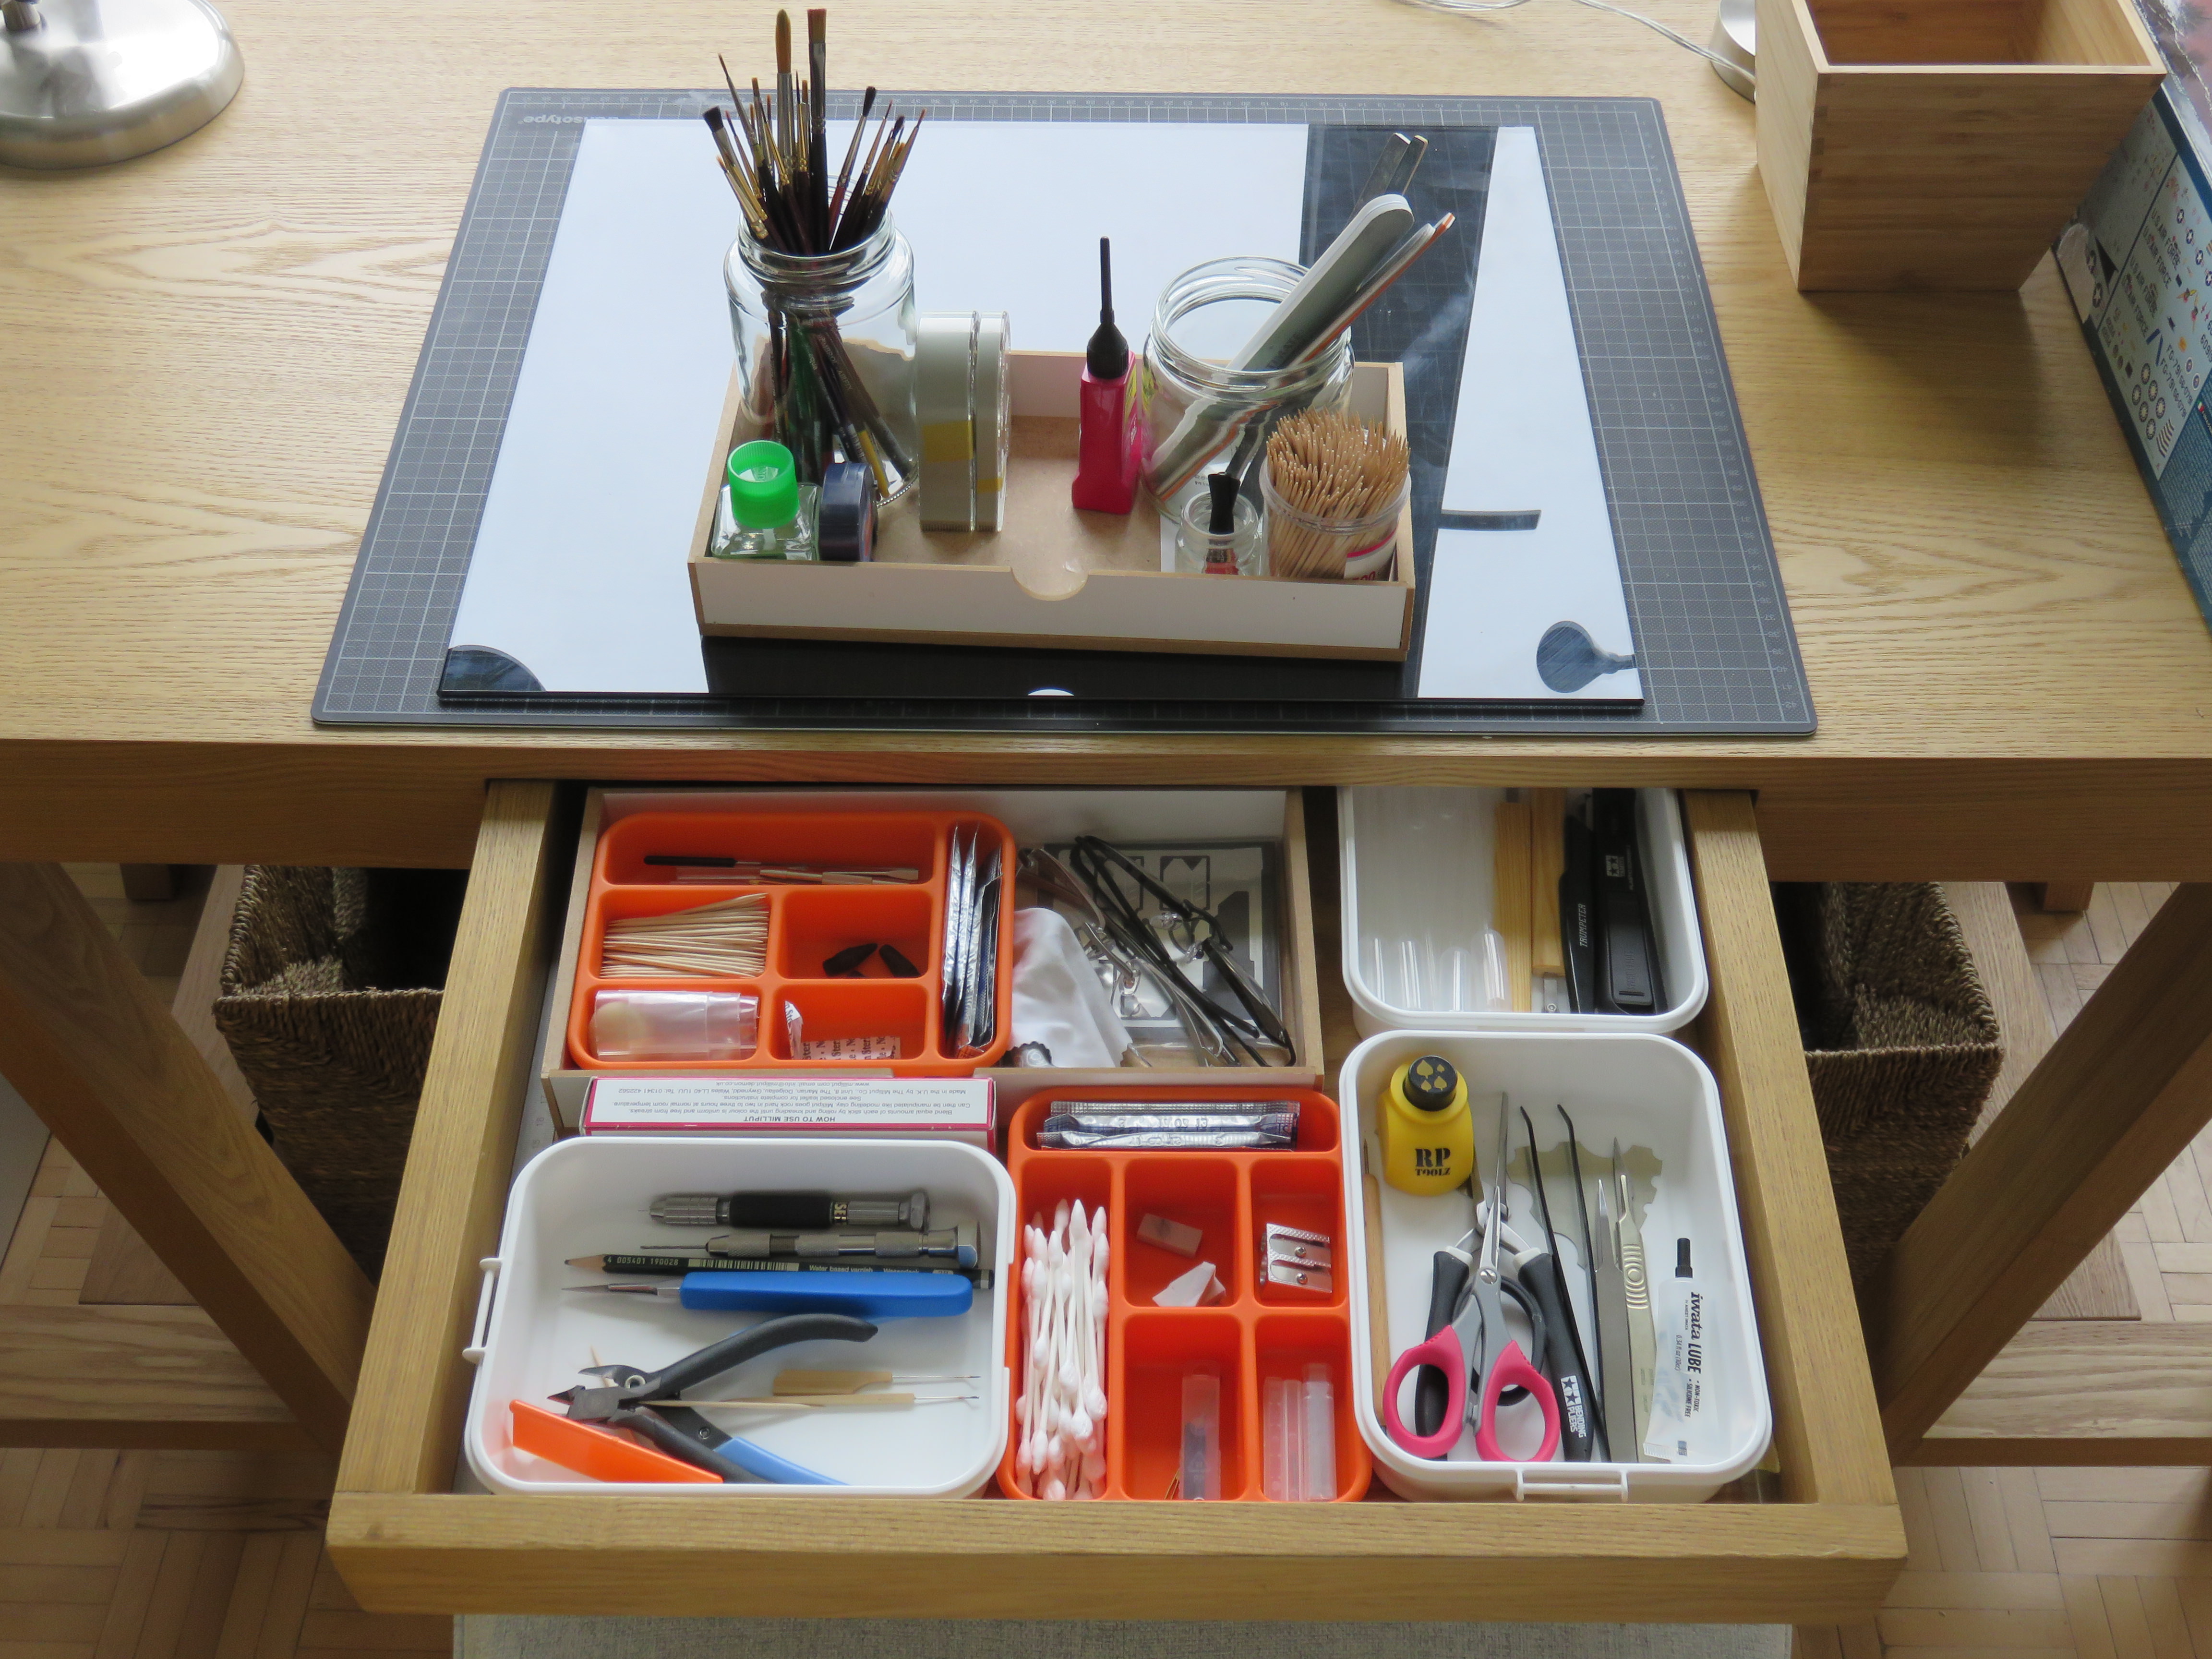
Finally! After what seems like a lifetime in and out of cardboard boxes, Iím settled in to the new apartment. In the course of moving I realised that probably about half of what I own is related to model making. Itís been a bit of a shock unpacking box after box of kits, equipment, tools, books, paints, etc. Armed with new resolve and a few aches from shifting stuff, I decided that downsizing is the right move. I vowed that before I put knife or glue to the Starfighter I would only have one knife and one type of glue. In the end I wasnít quite that ruthless but I treated myself to a new desk and a little set of shelves. Now the rule is if it doesnít fit it doesnít stayÖ well with a few exceptions like my compressor which now lives under the desk. It actually feels pretty good to get closer to the basics. I wonder if Iíll still be saying that in a few weeks? Iíll let you know. Hereís the new set-up ready for work to begin (and yes I am a Virgo - I work so much better without clutter).


Joel_W

Joined: December 04, 2010
KitMaker: 11,666 posts
AeroScale: 7,410 posts

Posted: Monday, March 12, 2018 - 07:16 PM UTC
Steve,
And I thought I was neat! I'm still going to take the bet that slowly but surely your collection of tools, glues, paints, brushes, and general modeling supplies will go back to your status quo, better known as your comfort zone.
Just in glues I have 6 types: Tamiya Extra Thin, Model Master regular, CCA thin, CCA Gel, Krystal Kleer/White glue, 5 min epoxy, & 15 min epoxy. CCA excelorator, & Debonder. And then there are the reserve bottles I have of each or any. My golden rule is if I have to order it, I have a reserve bottle. Extra thin is two reserve bottles. Paints, well, lets not even go there as paints are ordered and or backed up during the kit buying stage.
Looking forward to your next update.
Joel

SteveAndrews

Joined: August 16, 2010
KitMaker: 693 posts
AeroScale: 551 posts

Posted: Saturday, March 17, 2018 - 01:47 AM UTC
Hey Joel,
Your reply made me smile because there are already a few little extras creeping in. I'm fighting the good fight but sometimes you just need exactly the right tool in the right place, eh?
Anyhow, work has restarted. Woo-hoo!
Your reply made me smile because there are already a few little extras creeping in. I'm fighting the good fight but sometimes you just need exactly the right tool in the right place, eh?
Anyhow, work has restarted. Woo-hoo!

SteveAndrews

Joined: August 16, 2010
KitMaker: 693 posts
AeroScale: 551 posts

Posted: Saturday, March 17, 2018 - 01:52 AM UTC
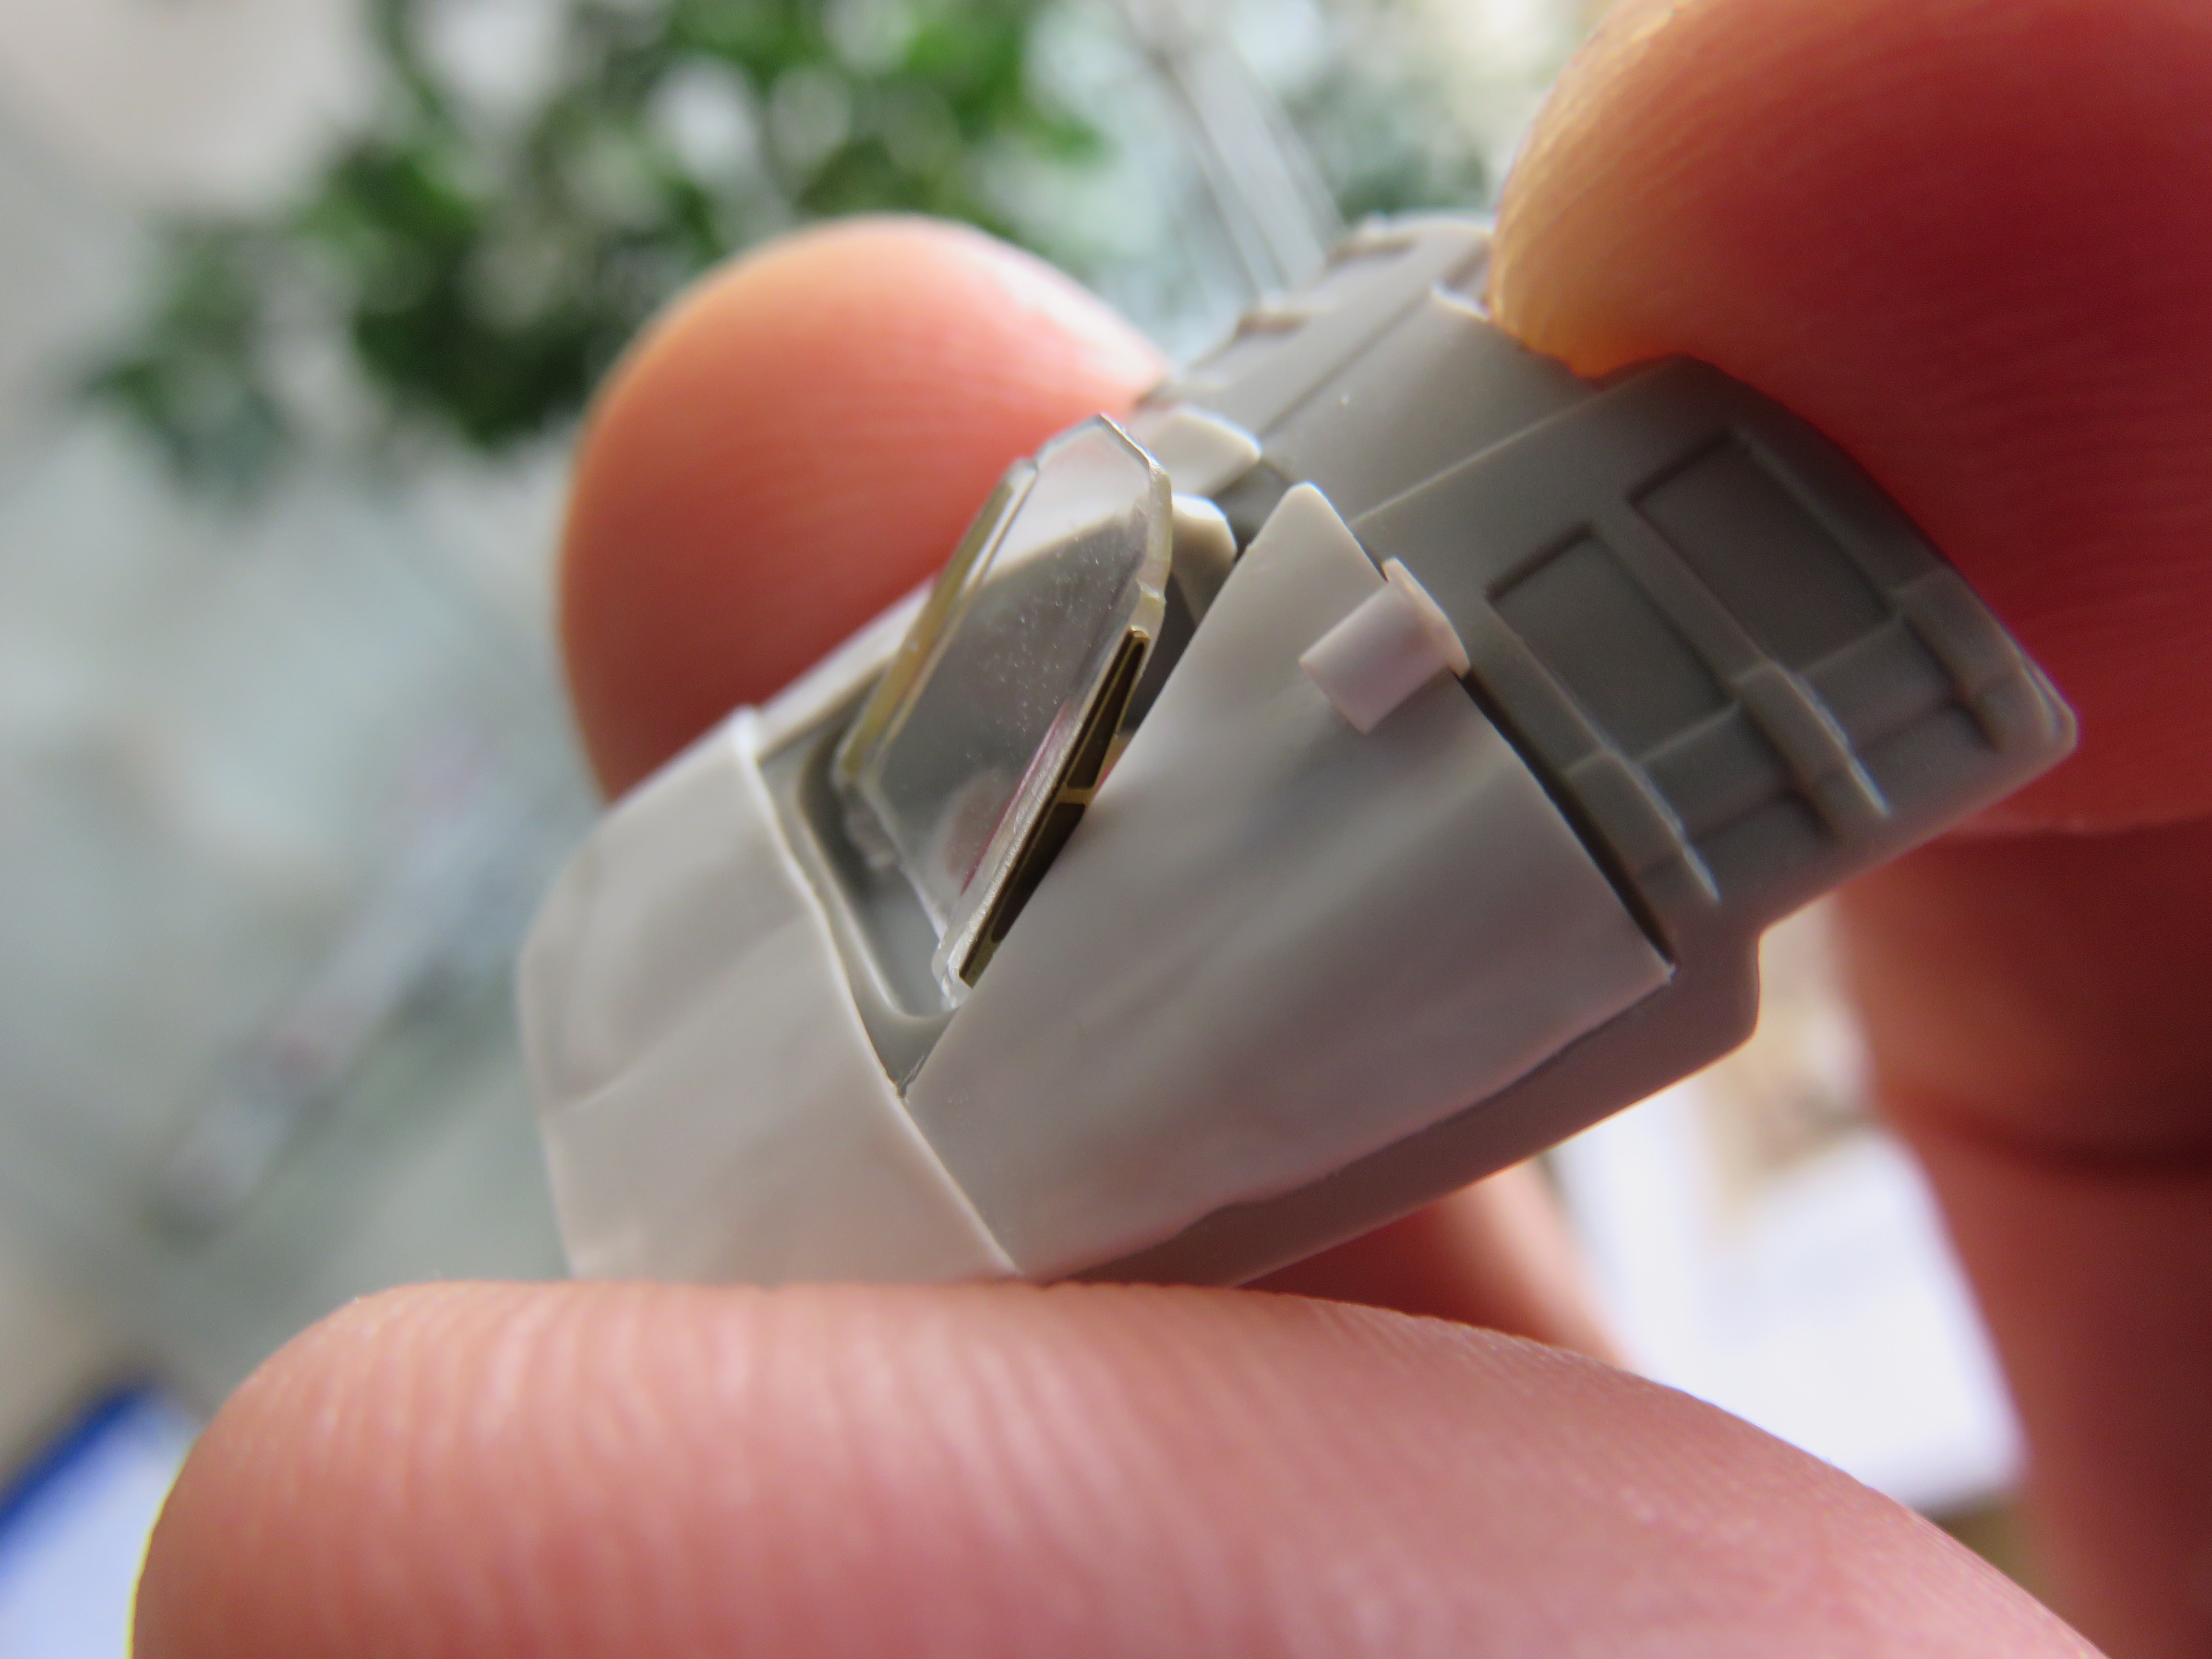
After nearly six weeks away from a hobby that is usually a daily experience for me, getting back to the Starfighter felt... odd. A new desk, a new set up and a new view all conspired to make the return a dislocating one. Happily after a few minutes reminding myself where I got to and checking next steps the good feeling came back. What was not so good though was the plan to replace the head-up projector with a photo etch item. Eduard provide some neat little spars and a sheet of clear plastic to make it, but it is so fiddly and the contact area for glue so thin that I decided on an alternative plan and simply enhanced the one piece kit part with the photo etch. It didnít take long, but it felt great to be building again. Here we have the fruits of the labour - the front cockpit area finished in a combination of kit parts, PE and simple scratch building.
Happy modelling guys.

Happy modelling guys.
Joel_W

Joined: December 04, 2010
KitMaker: 11,666 posts
AeroScale: 7,410 posts

Posted: Saturday, March 17, 2018 - 02:22 AM UTC
Steve,
Welcome back.
the modified heads up display really does look good.
Joel
Welcome back.
the modified heads up display really does look good.
Joel

SteveAndrews

Joined: August 16, 2010
KitMaker: 693 posts
AeroScale: 551 posts

Posted: Tuesday, March 20, 2018 - 01:49 AM UTC
Hey Joel
It's a pleasure - feels a bit like coming home. Thanks very much for the welcome. Normal service is restored.
Have a great day,
Steve
It's a pleasure - feels a bit like coming home. Thanks very much for the welcome. Normal service is restored.
Have a great day,
Steve

SteveAndrews

Joined: August 16, 2010
KitMaker: 693 posts
AeroScale: 551 posts

Posted: Tuesday, March 20, 2018 - 01:55 AM UTC
Before closing up the two sides of the fuselage thereís one last job to do. Thatís assembling the electronics bay behind the cockpit. Italeri offer us a fairly good representation moulded as a single item. With some care when painting and a bit of scratch building this could be made to look pretty cool. Itís only when you take a look at the extras Eduard offer that you see how much potential detail there is to add. Eduard give us a mixed bag of the pre-painted PE that Iíve already fallen out of love with and some much nicer traditional PE items. I might be in danger of going on too much about the printed PE, but really in the case of the electronics bay it amounts to little more than a thick decal with mediocre printing. On the other hand the unpainted items seem to glow with helpful detail. Check out the shots below and see what you think.
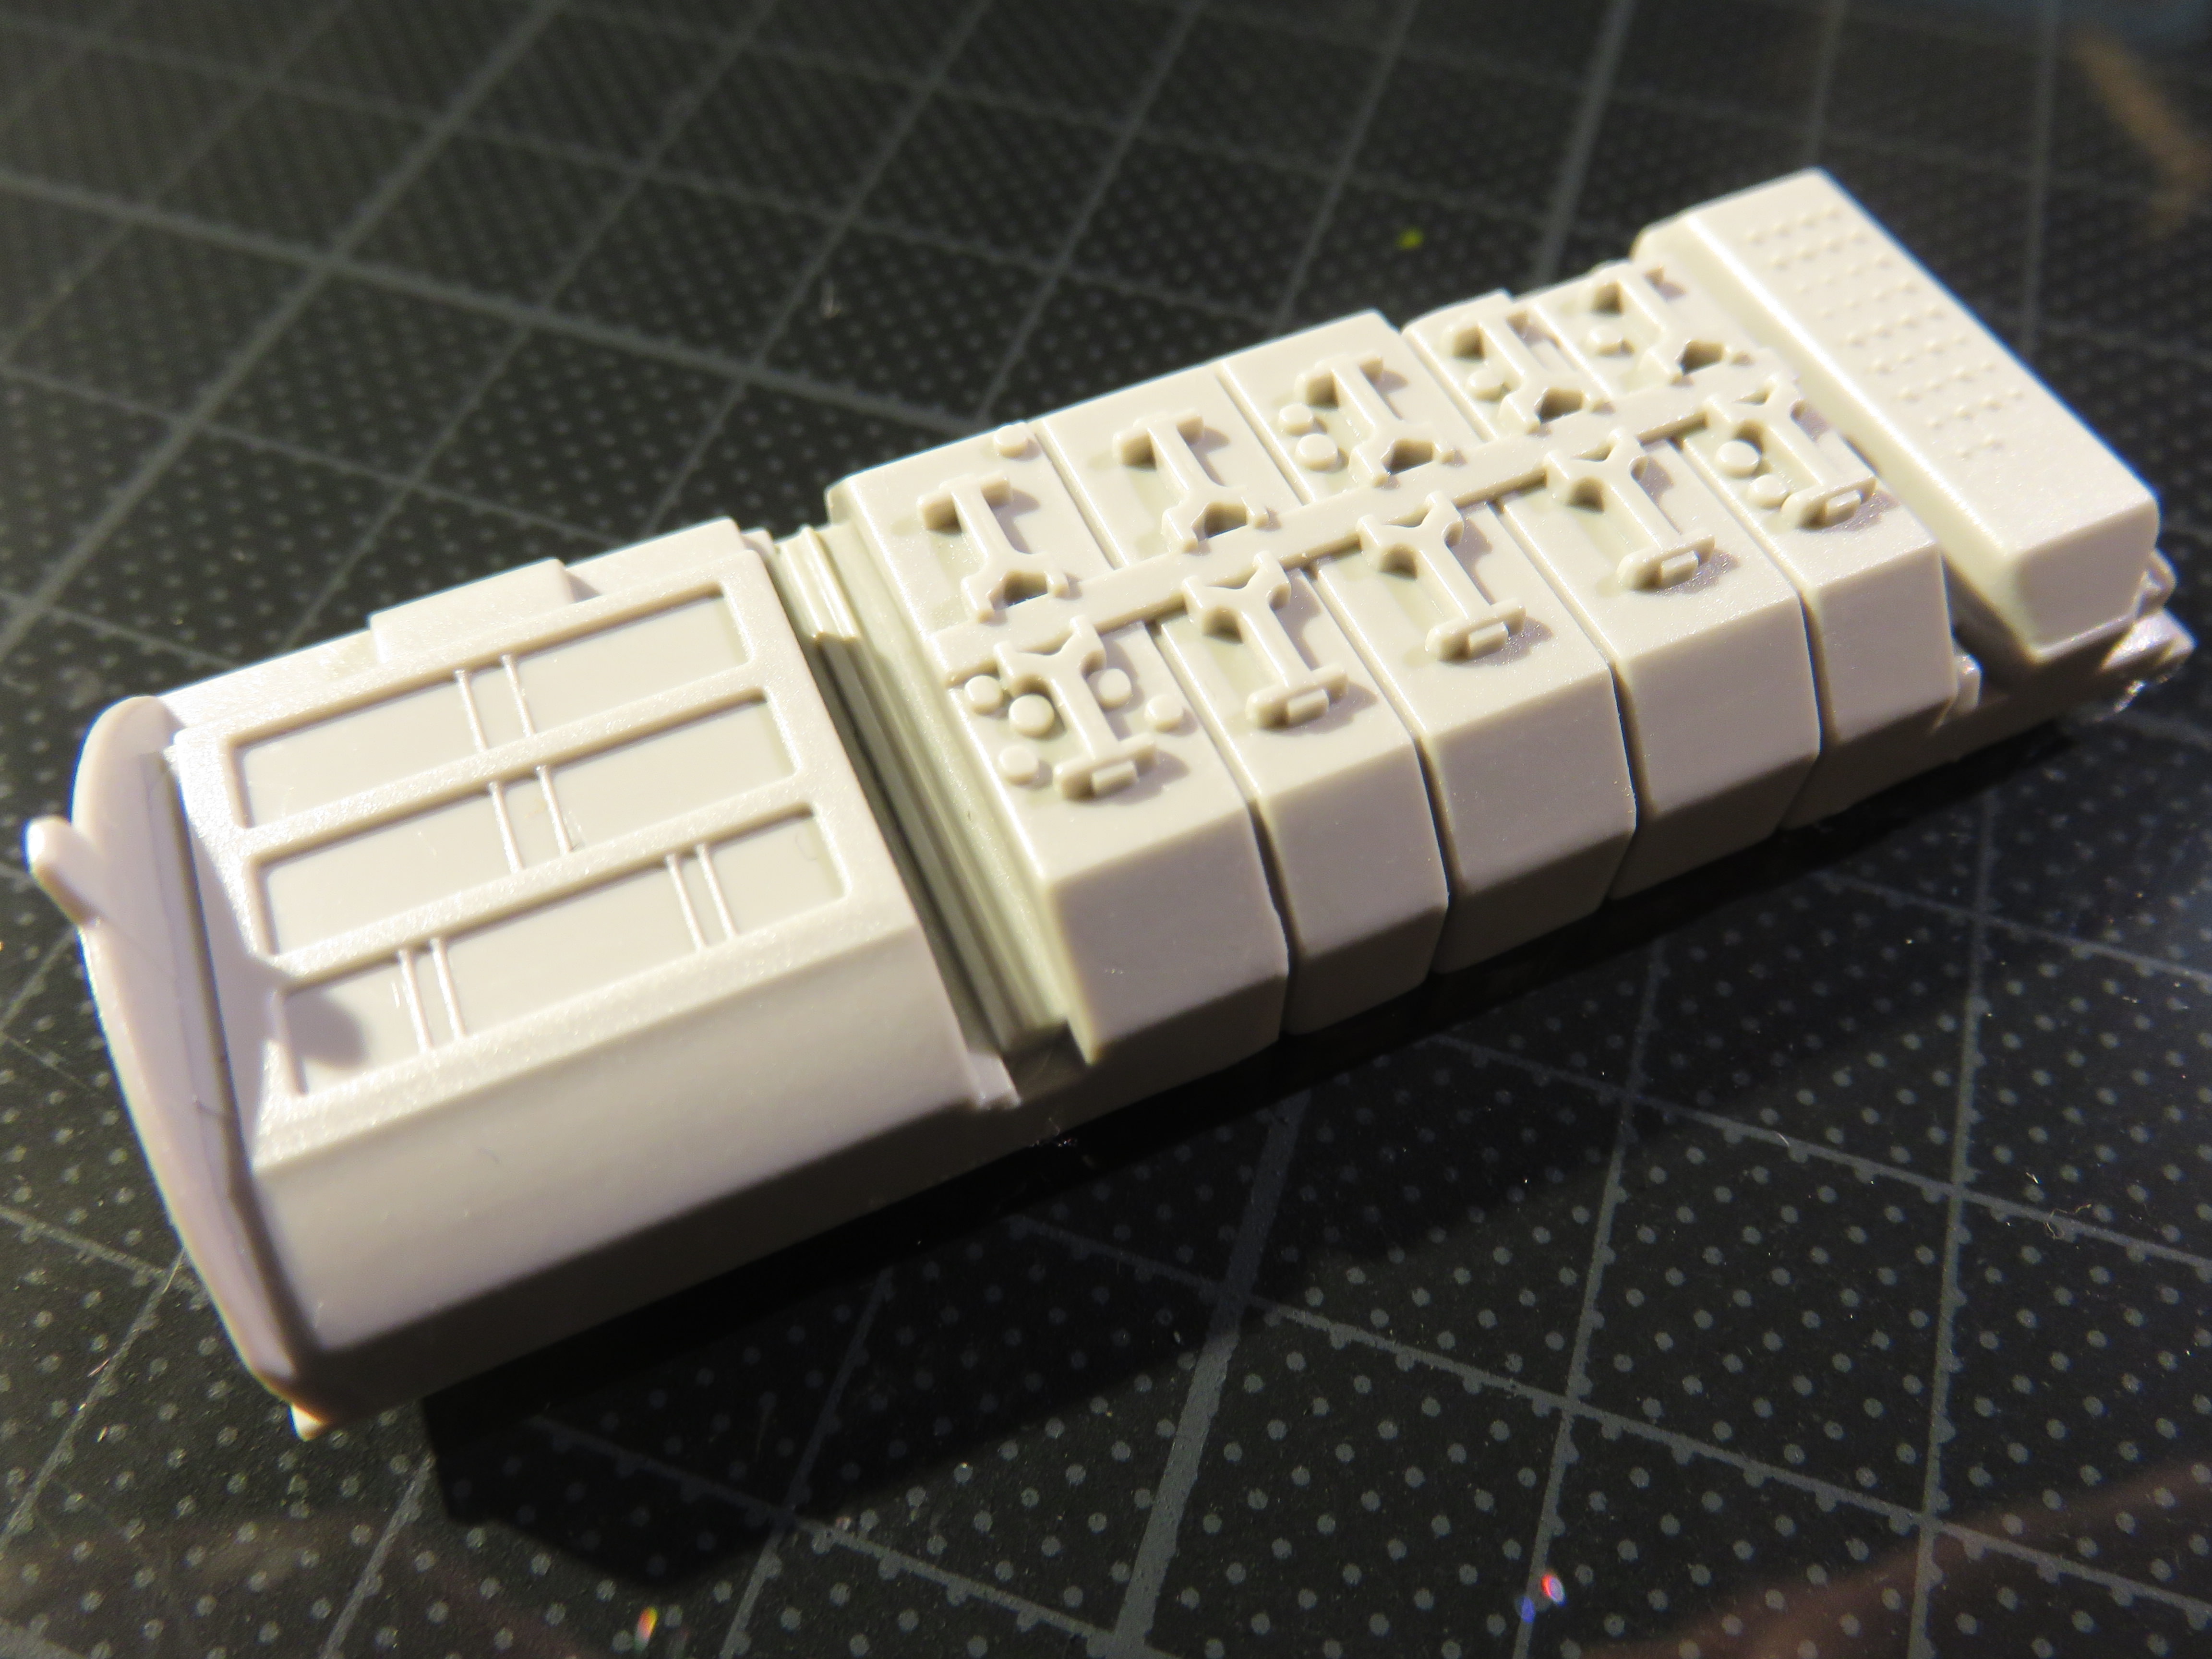
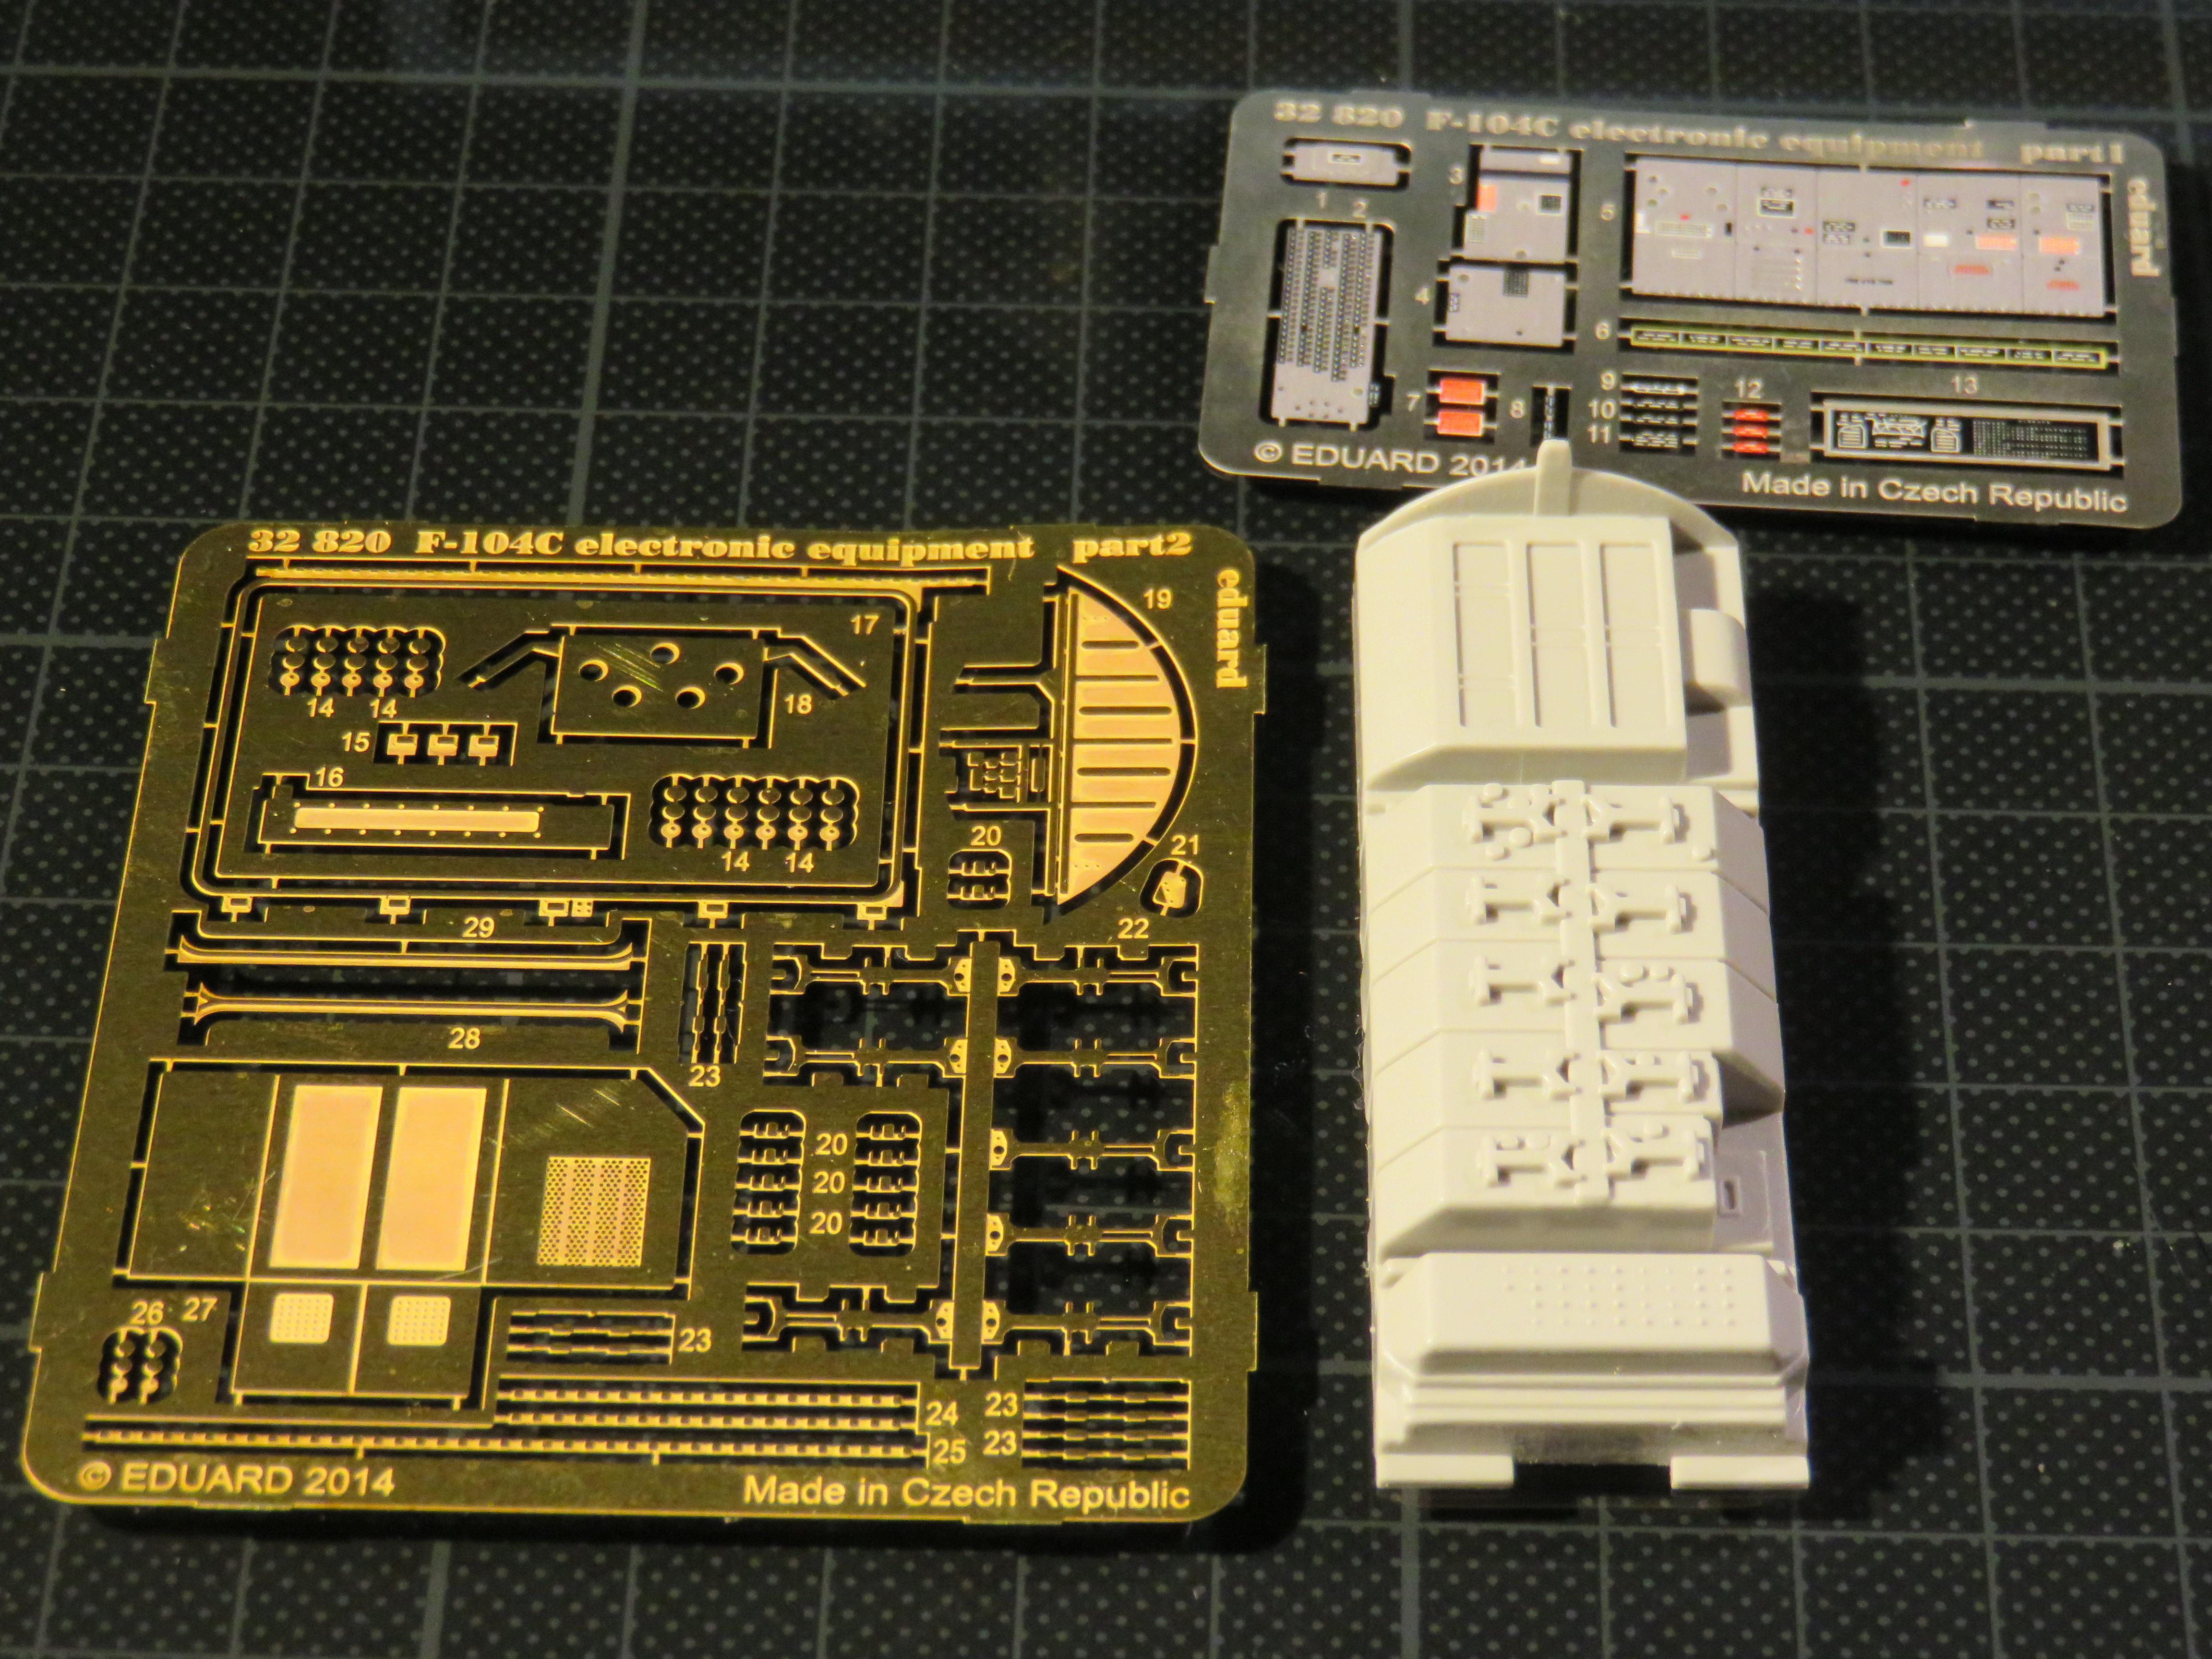
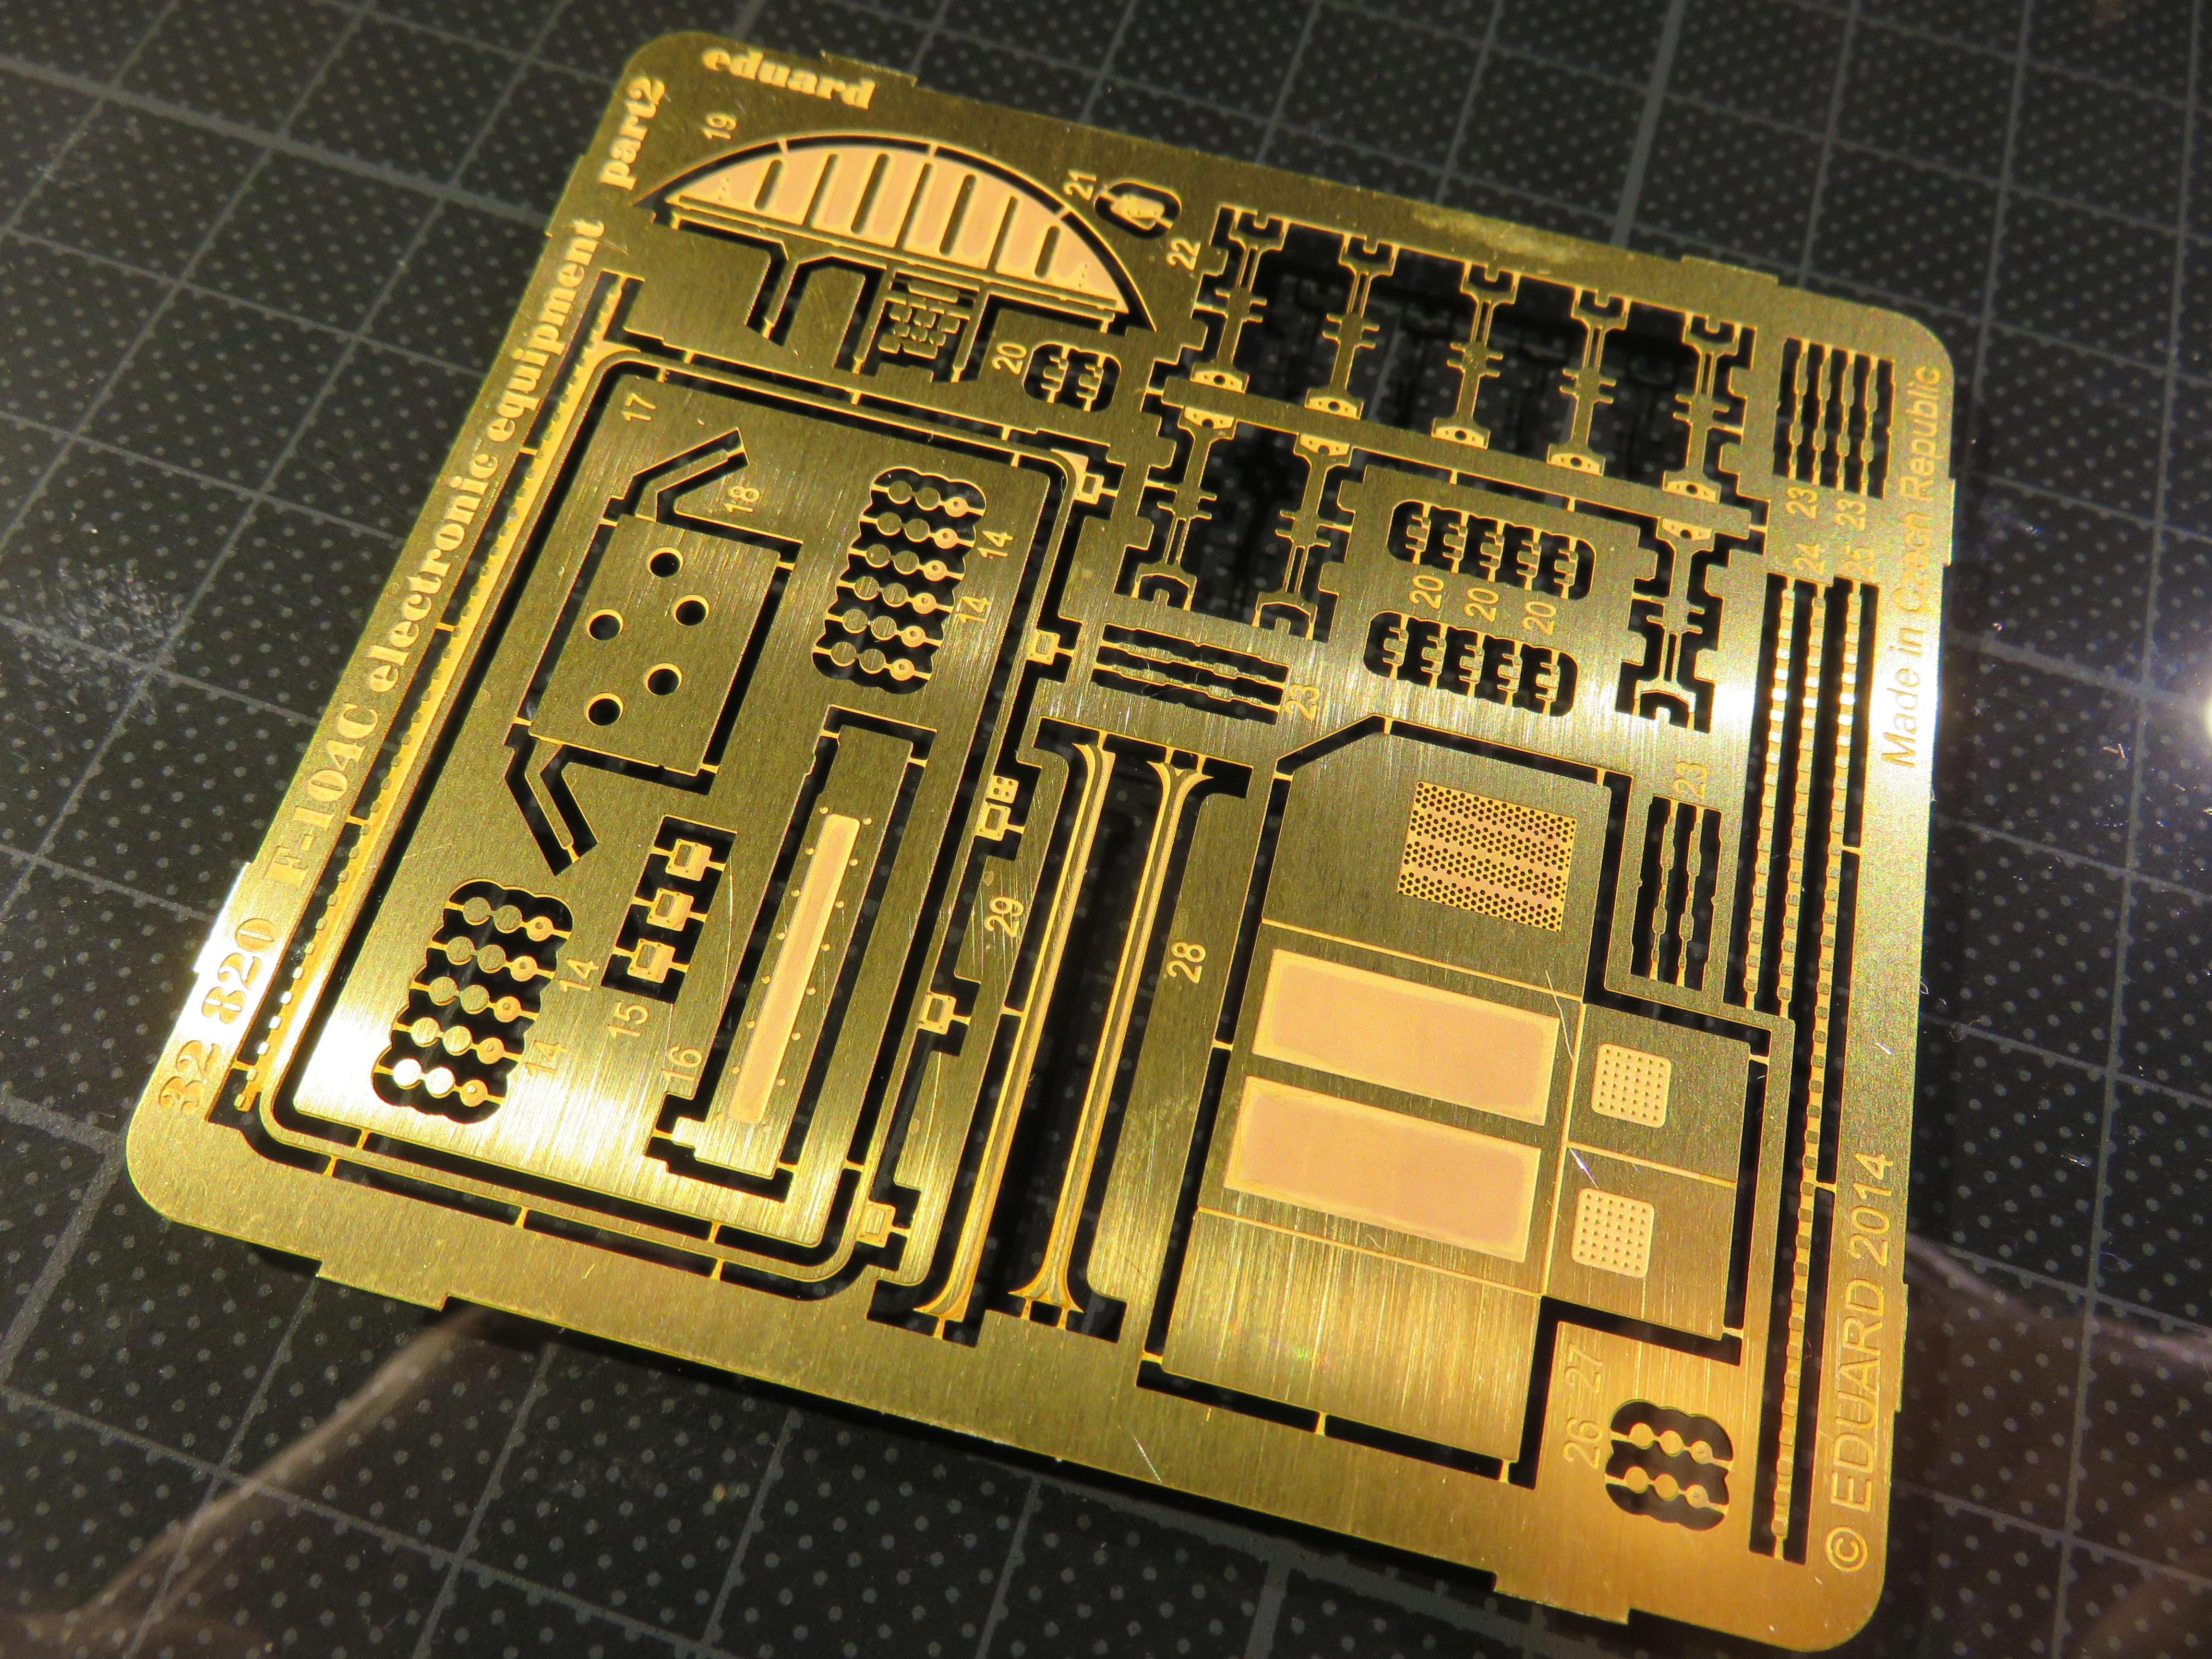
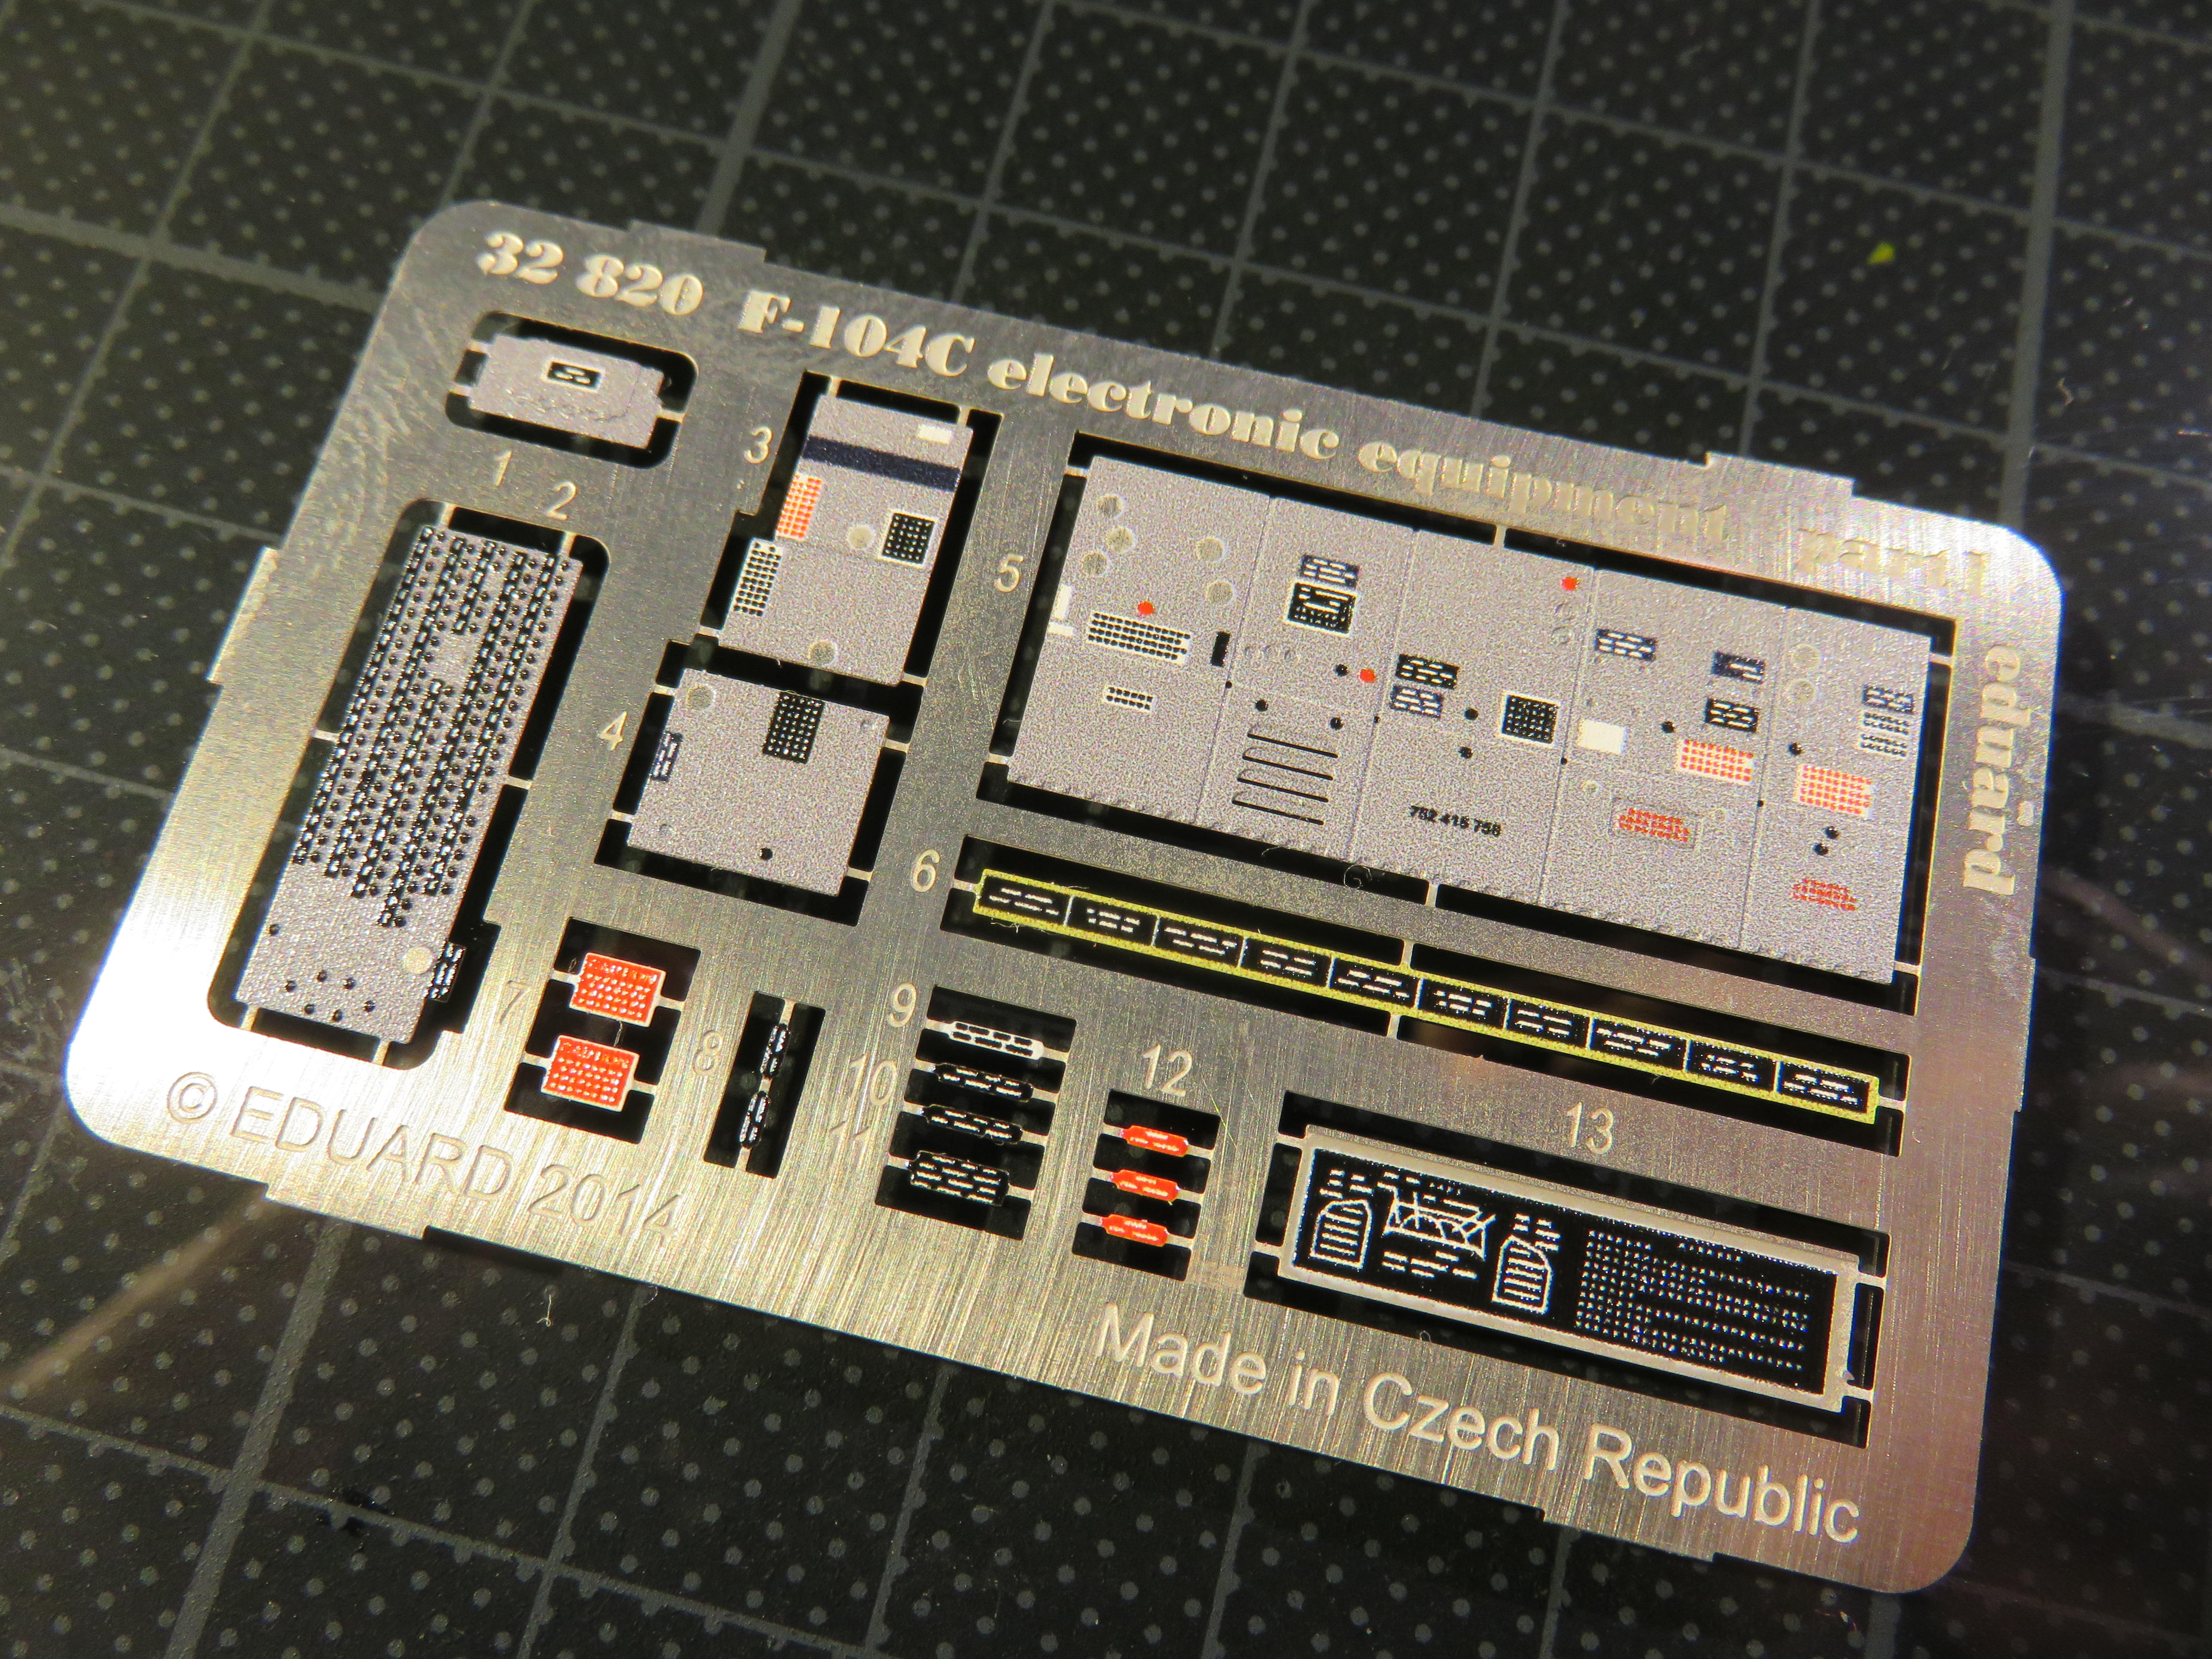
The first step in uniting the PE and kit part is to remove detail from the kit part. Iím going to try and vlog how I do this and in fact take us through the whole process of building this little part, so watch this space for a link.
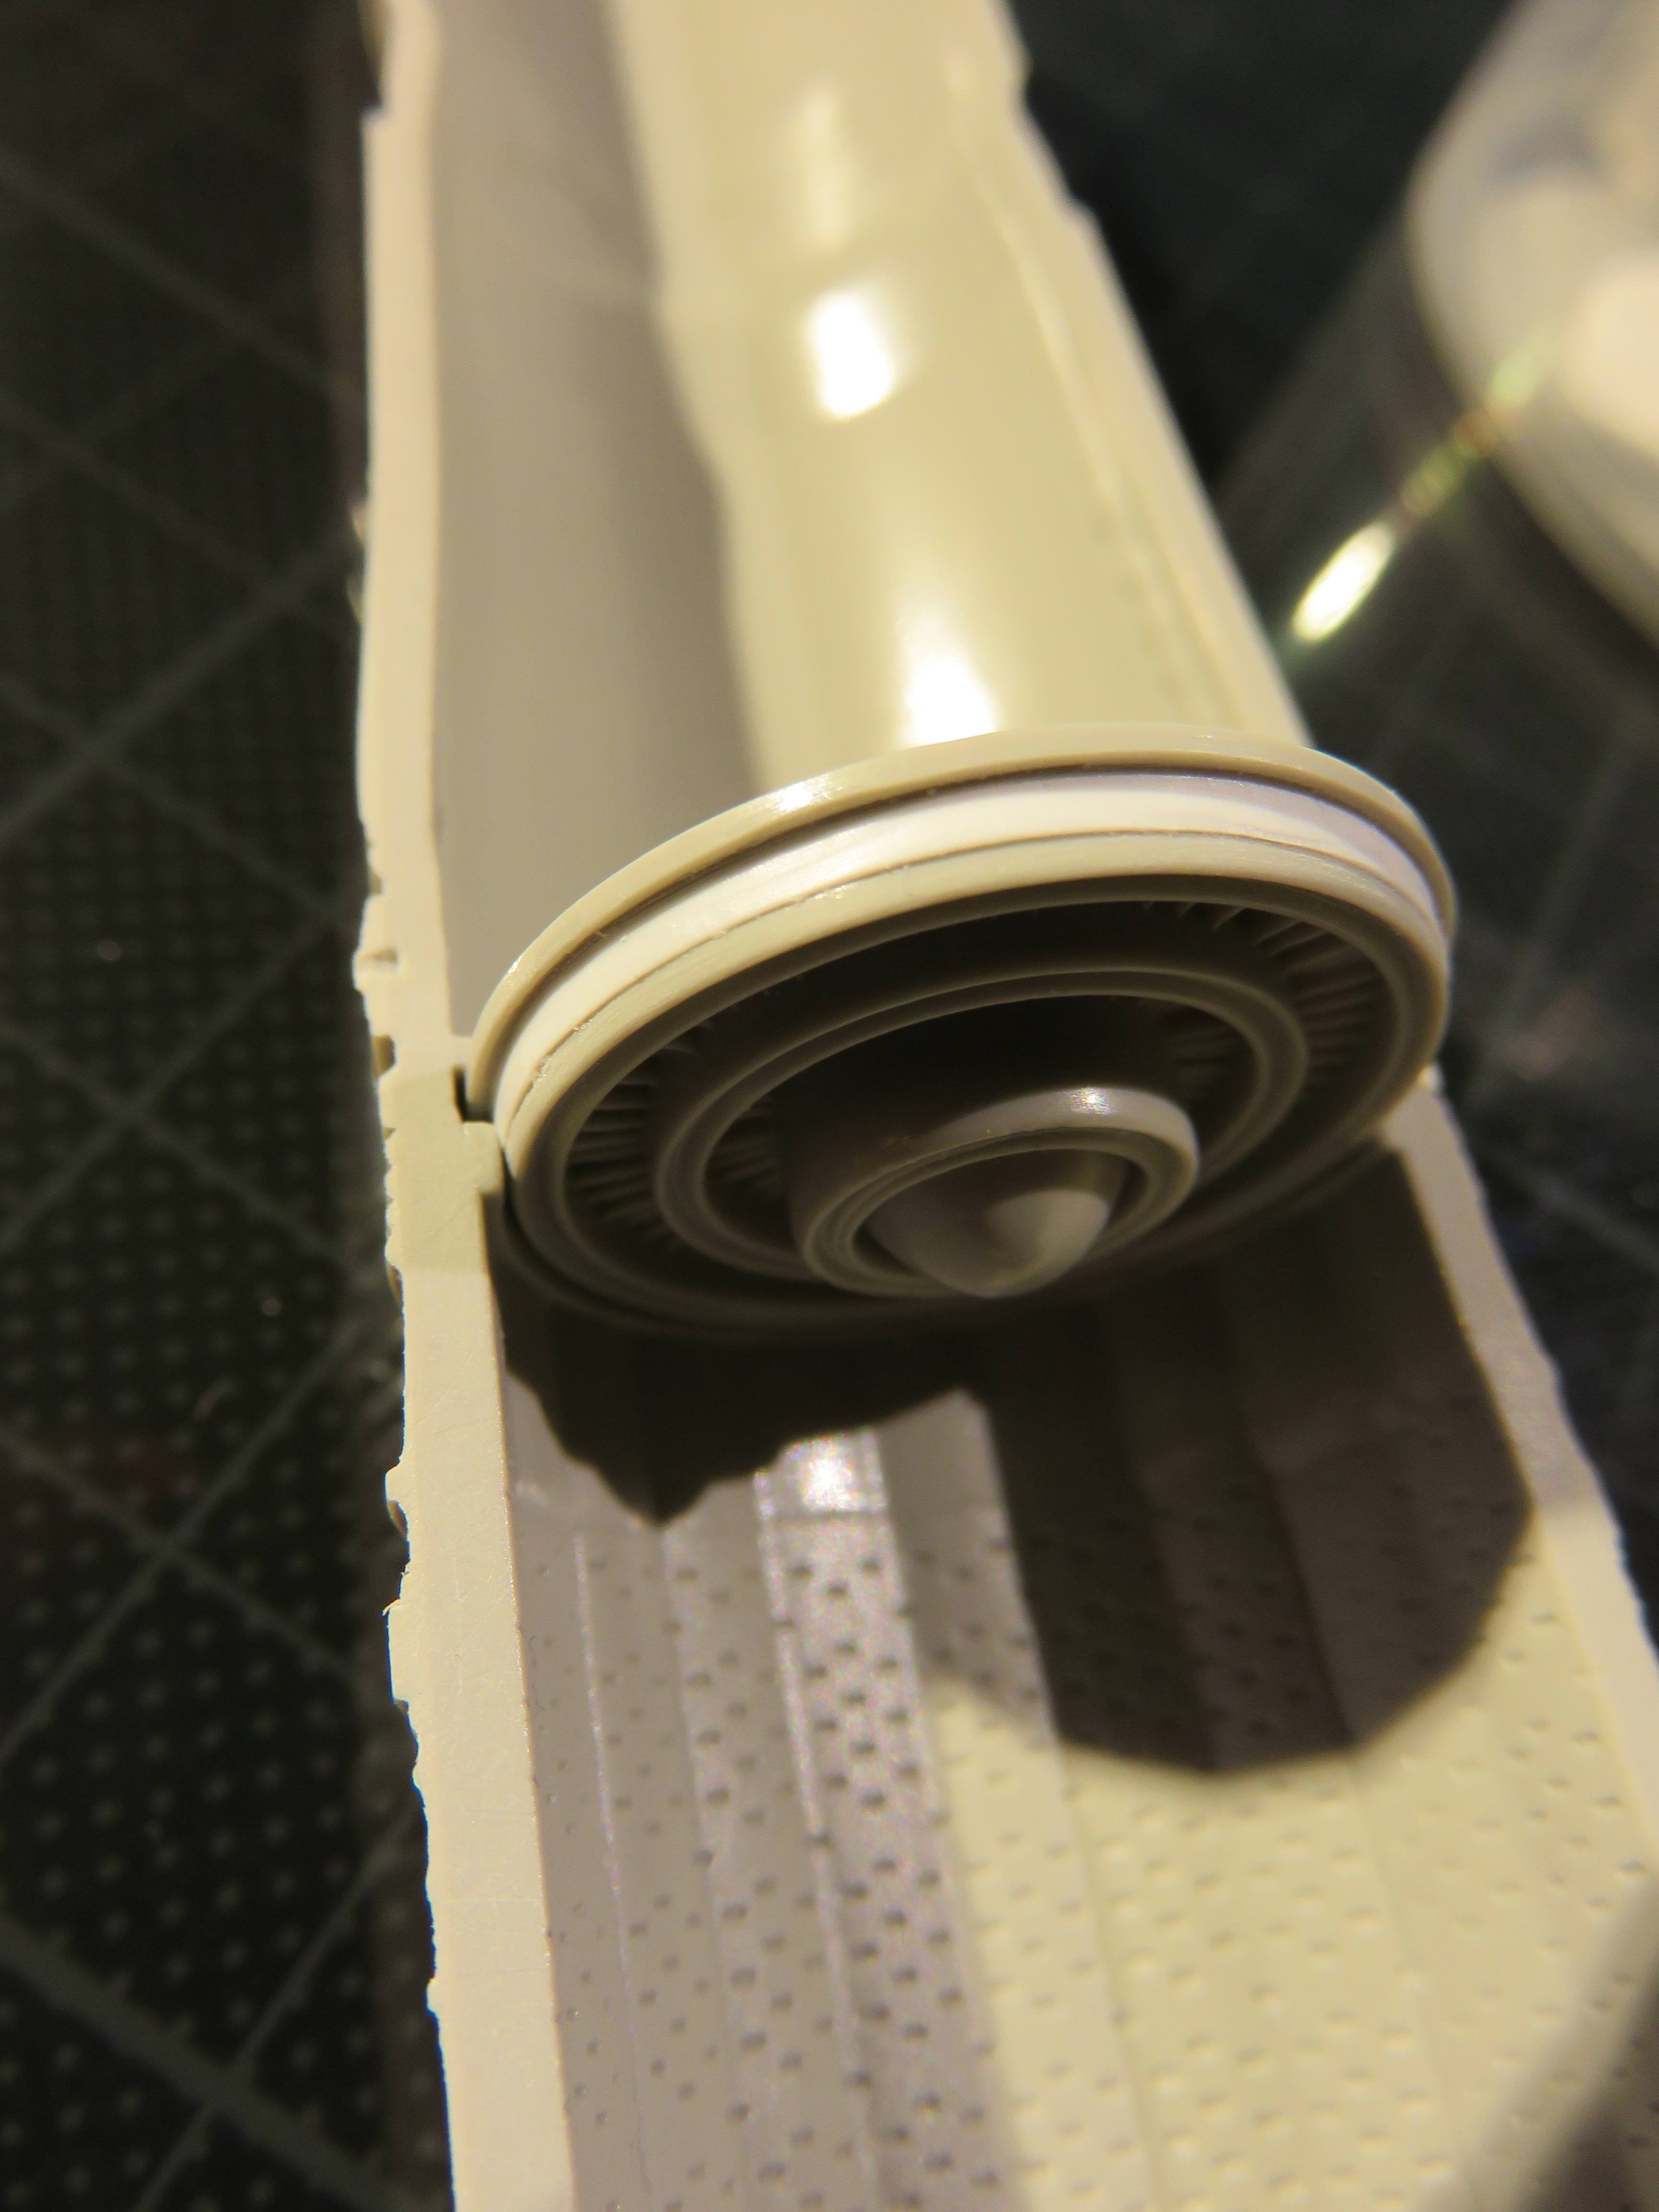
In the meantime I made a small correction to the interior of the engine. The piece representing the compressor blades and after-burner ring doesnít sit in the middle of the engine as it's supposed to; it seems just a bit too small and it flops around. After some head scratching I decided the best way to correct this was to add a ring of thin plastic card where the part mates with the larger piece. I chose the thinnest card I have (sorry I have no idea of the exact thickness, but think printer paper) and cut a thin strip, then glued it in place. That proved to be too thick and prevented the engine halves from mating, so I sanded it down with Tamiya sanding sponge until the fit was good.
Thatís all for now but keep watching for the vlog.
Happy modelling guys


The first step in uniting the PE and kit part is to remove detail from the kit part. Iím going to try and vlog how I do this and in fact take us through the whole process of building this little part, so watch this space for a link.
In the meantime I made a small correction to the interior of the engine. The piece representing the compressor blades and after-burner ring doesnít sit in the middle of the engine as it's supposed to; it seems just a bit too small and it flops around. After some head scratching I decided the best way to correct this was to add a ring of thin plastic card where the part mates with the larger piece. I chose the thinnest card I have (sorry I have no idea of the exact thickness, but think printer paper) and cut a thin strip, then glued it in place. That proved to be too thick and prevented the engine halves from mating, so I sanded it down with Tamiya sanding sponge until the fit was good.

Thatís all for now but keep watching for the vlog.
Happy modelling guys
Joel_W

Joined: December 04, 2010
KitMaker: 11,666 posts
AeroScale: 7,410 posts

Posted: Tuesday, March 20, 2018 - 03:01 AM UTC
Steve,
Looking forward to your Vlog on how you go about super detailing the electronics bay.
Joel
Looking forward to your Vlog on how you go about super detailing the electronics bay.
Joel

SteveAndrews

Joined: August 16, 2010
KitMaker: 693 posts
AeroScale: 551 posts

Posted: Thursday, March 22, 2018 - 01:22 AM UTC
Hi Joel
I'm hoping to start this weekend, all being well. It will be a bit experimental so I hope it works out.
Have a great day,
Steve
I'm hoping to start this weekend, all being well. It will be a bit experimental so I hope it works out.
Have a great day,
Steve

SteveAndrews

Joined: August 16, 2010
KitMaker: 693 posts
AeroScale: 551 posts

Posted: Sunday, March 25, 2018 - 01:11 AM UTC
Hi guys
Right, full service is resumed and the latest instalment is here:
https://www.youtube.com/watch?v=xRlkfzbyoIc
I'm having trouble with my webcam still, so I'm sorry for the poor focus and resolution especially at the beginning. I hope you get something from it despite the not so great quality in places. I'm learning.
Happy modelling,
Steve
Joel_W

Joined: December 04, 2010
KitMaker: 11,666 posts
AeroScale: 7,410 posts

Posted: Sunday, March 25, 2018 - 05:57 AM UTC
Steve,
Just watched your latest video. I had to laugh when you put on your magnifying glasses due to old age. Been there a long, long time wearing Optivors. 1st 3x, now 5x, and 7x before to long.
As far as the removing all that plastic, for the big chunks, I usually drill a pilot whole so I can get the tip of my Exacto saw in and start cutting the back 1st. Then I do the cuts from the side in. I find that usually the hardest cut done 1st, makes the whole process go that much faster and smoother. But that's just me.
Joel
Posted: Sunday, March 25, 2018 - 11:43 AM UTC
Nice video Steve.
I guess the approach I would have taken was to have used a saw along side the "boxes" as you did but then used a cutting disc on a Dremel 2 or 3 mm back from your required cut across since you didn't need to keep any piece of the removed plastic and then used a blade to tidy it up.
Looking forward to part two.
cheers
Michael

SteveAndrews

Joined: August 16, 2010
KitMaker: 693 posts
AeroScale: 551 posts

Posted: Sunday, March 25, 2018 - 11:45 AM UTC
Hey Joel
Yup, another good technique for sure. And those magnifying glasses are now essential kit for me. They even help to locate the extra long eyebrow hairs I seem to sprout these days :-) Thanks for watching the video, despite the mixed quality.
Has a great day,
Steve
Yup, another good technique for sure. And those magnifying glasses are now essential kit for me. They even help to locate the extra long eyebrow hairs I seem to sprout these days :-) Thanks for watching the video, despite the mixed quality.
Has a great day,
Steve

SteveAndrews

Joined: August 16, 2010
KitMaker: 693 posts
AeroScale: 551 posts

Posted: Sunday, March 25, 2018 - 08:52 PM UTC
Iíve tried everything short of using the Force to persuade my camera to take video close-ups but it is just not cooperating. After some frustrating attempts to film, Iíve returned to the old school method and posted some shots here.
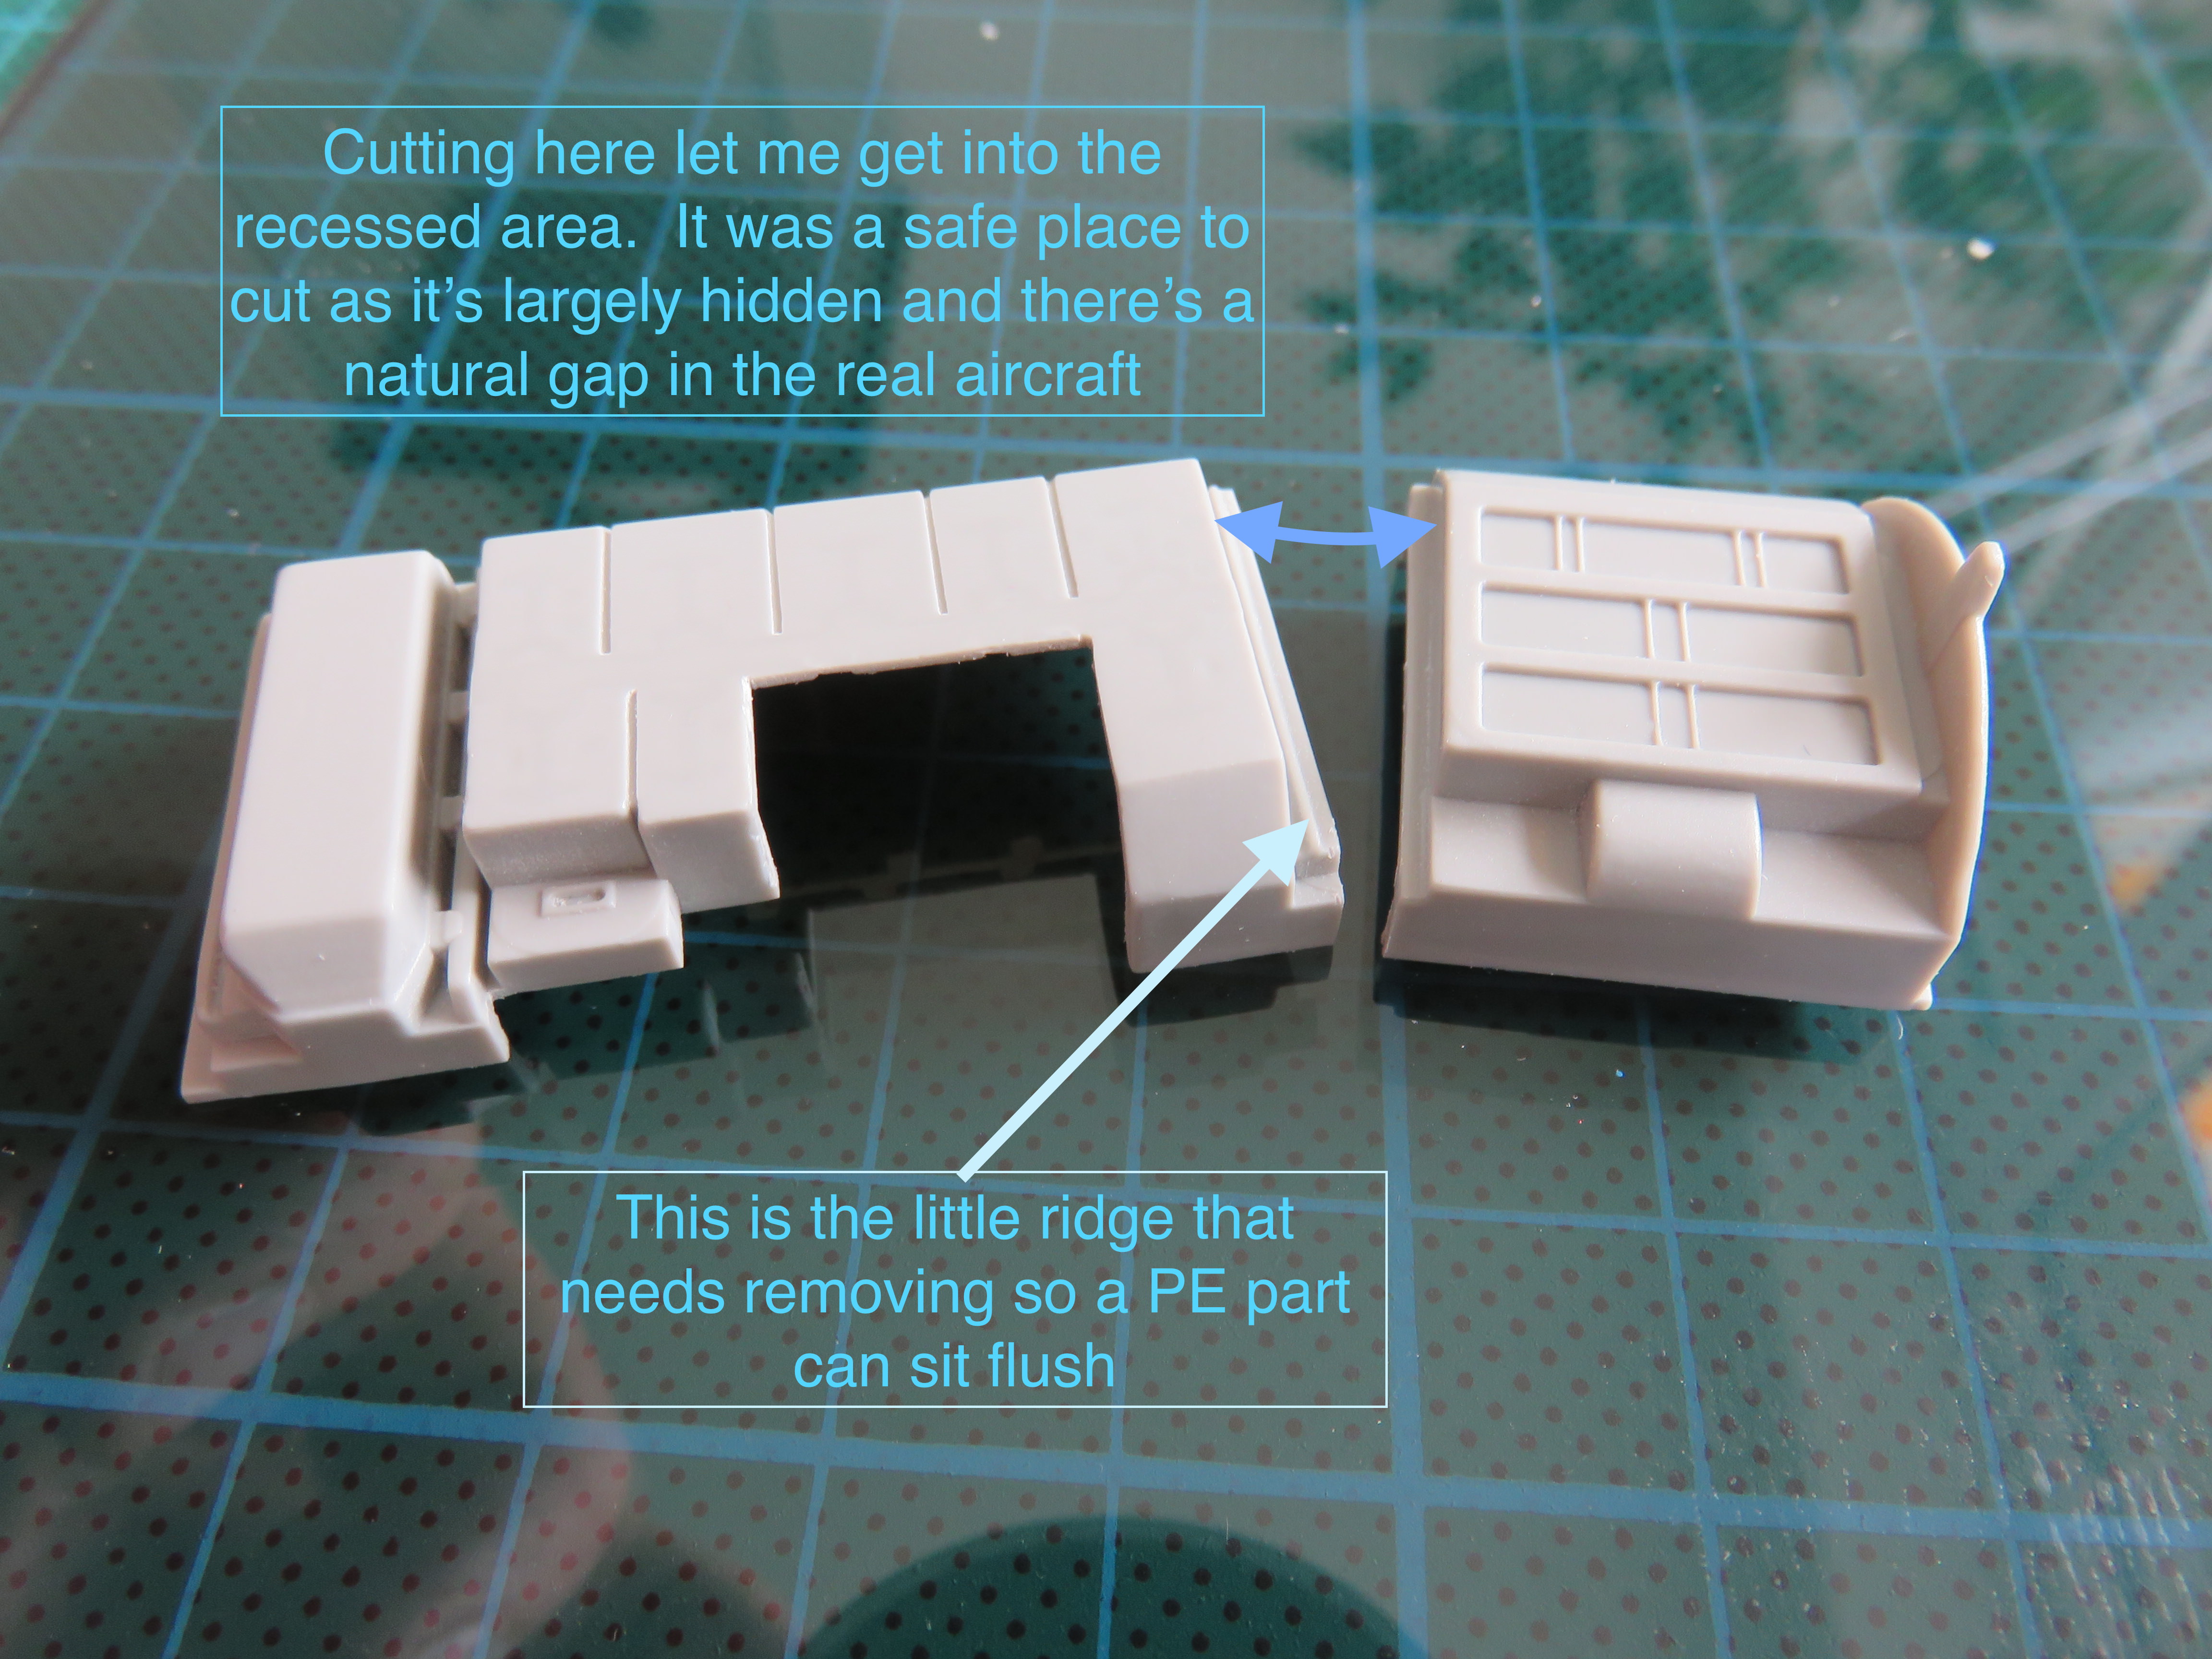
Eduard offers some really nice PE to enhance the rim of the avionics bay, and a bit of surgery is needed to make sure it will fit later. This presents a problem in one area, as the part that needs removing is hidden deep. I decided the best way to get at it was to split the single avionics bay in two. Some careful work with a razor saw did the job, and I could reach it. The thin blade made clean cut and it will be an easy repair.
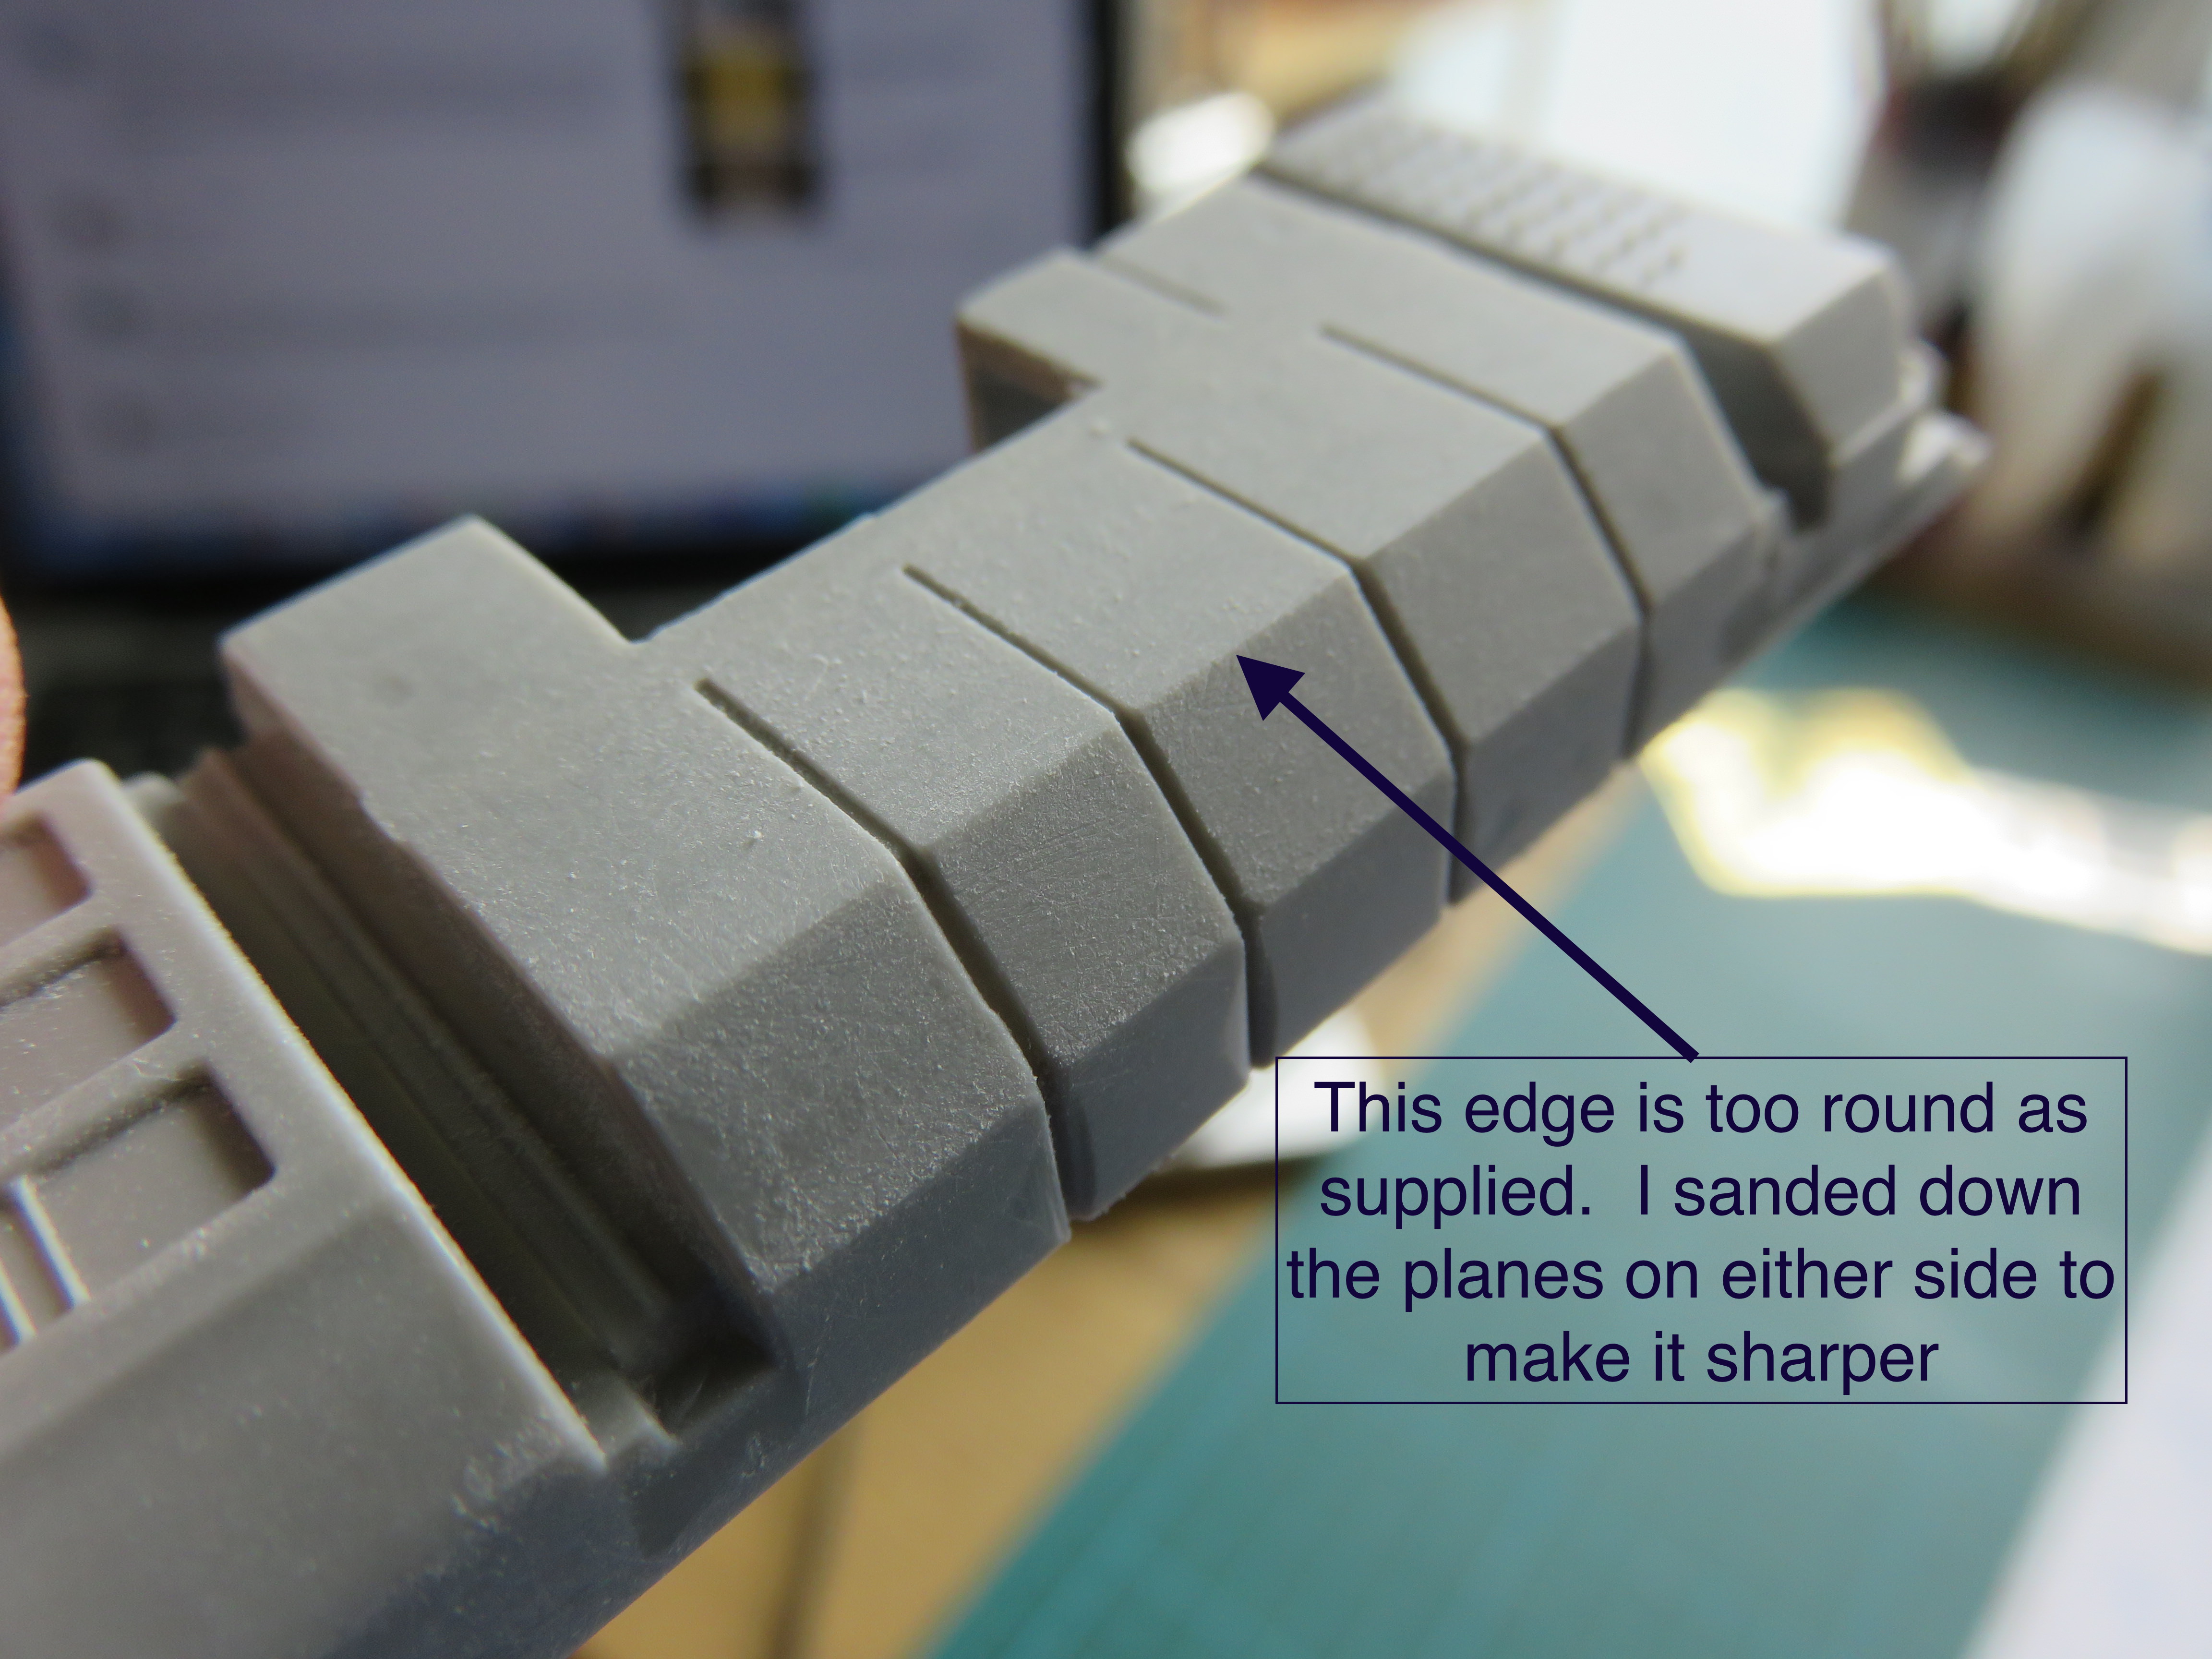
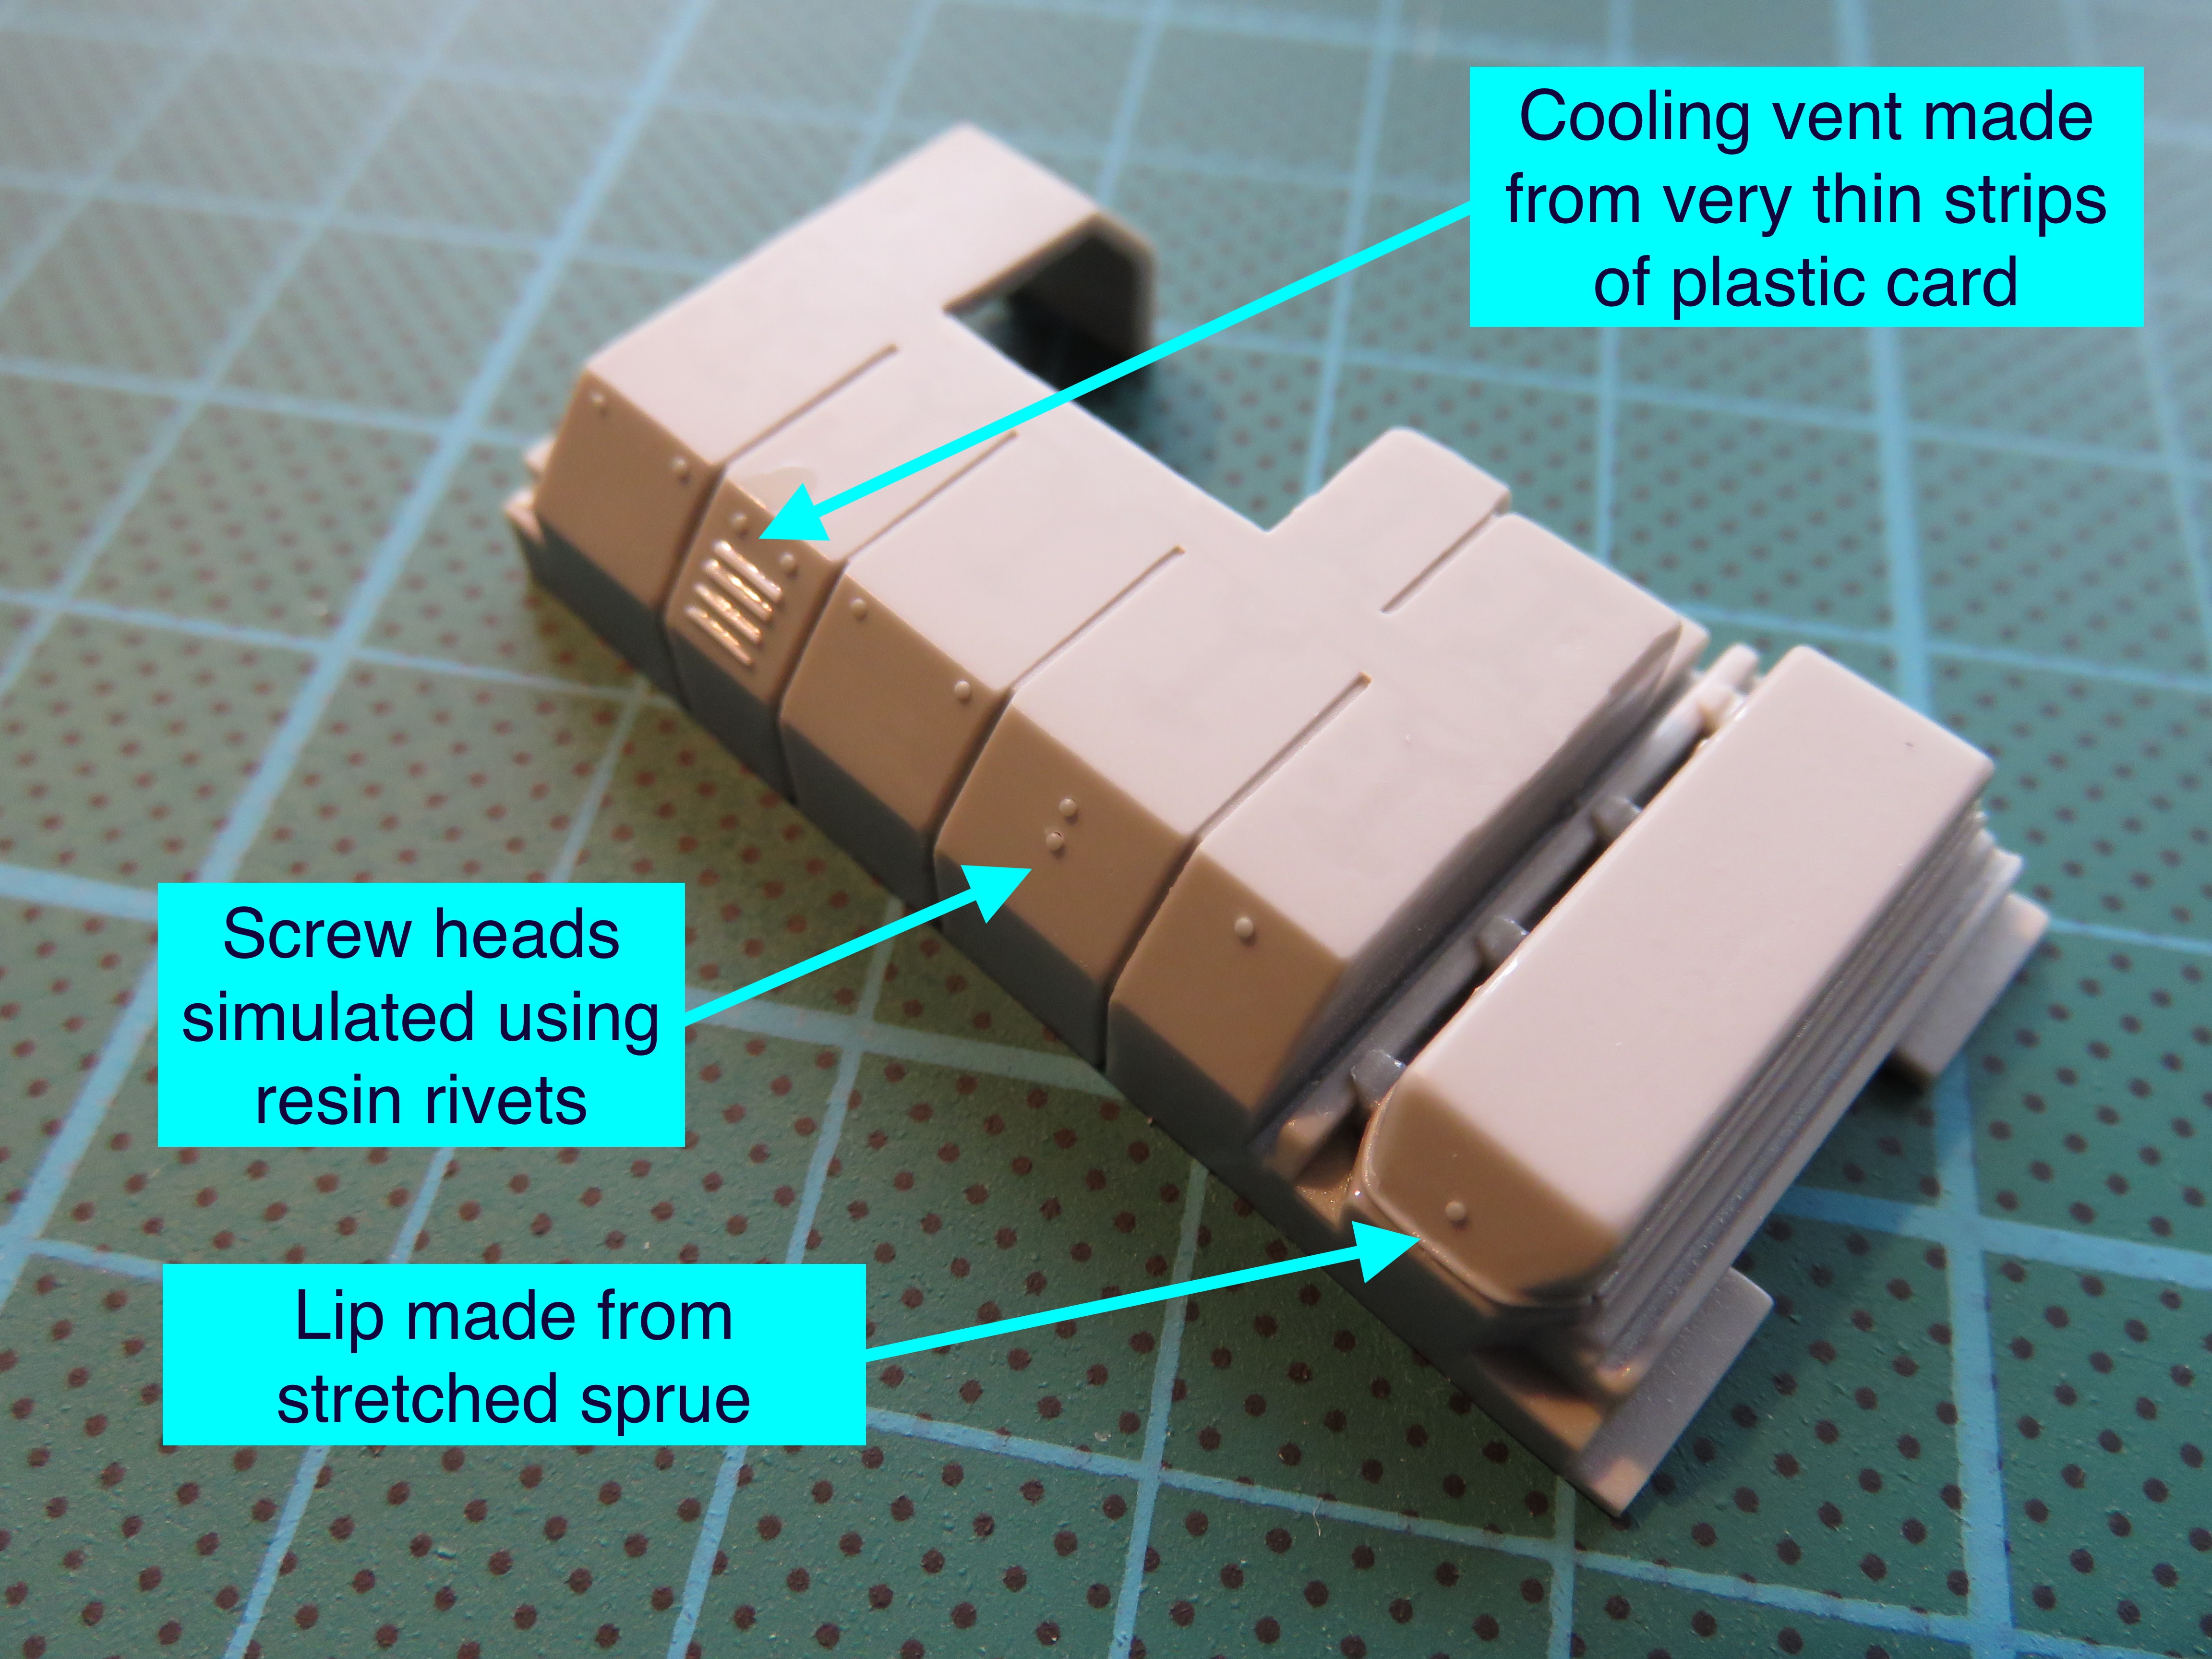
My reference photos show a lot of potential to add detail. Eduardís PE will help but it wonít do the whole job. I stared scratch building the screws on the side of the electronics and added a rim around the forward area from stretched sprue. I also added some thin strips of plastic card to simulate the lips over the cooling vents. Hereís what a few happy hours got me.
Happy modelling guys,
Steve
Eduard offers some really nice PE to enhance the rim of the avionics bay, and a bit of surgery is needed to make sure it will fit later. This presents a problem in one area, as the part that needs removing is hidden deep. I decided the best way to get at it was to split the single avionics bay in two. Some careful work with a razor saw did the job, and I could reach it. The thin blade made clean cut and it will be an easy repair.
My reference photos show a lot of potential to add detail. Eduardís PE will help but it wonít do the whole job. I stared scratch building the screws on the side of the electronics and added a rim around the forward area from stretched sprue. I also added some thin strips of plastic card to simulate the lips over the cooling vents. Hereís what a few happy hours got me.


Happy modelling guys,
Steve

SteveAndrews

Joined: August 16, 2010
KitMaker: 693 posts
AeroScale: 551 posts

Posted: Tuesday, March 27, 2018 - 12:53 AM UTC
A little work with some delicate photo etch, and bit more scratch building and the part is starting to look like the real thing. There's more to do but you get an impression of where it's headed. And just for good measure the reference shot is here too.
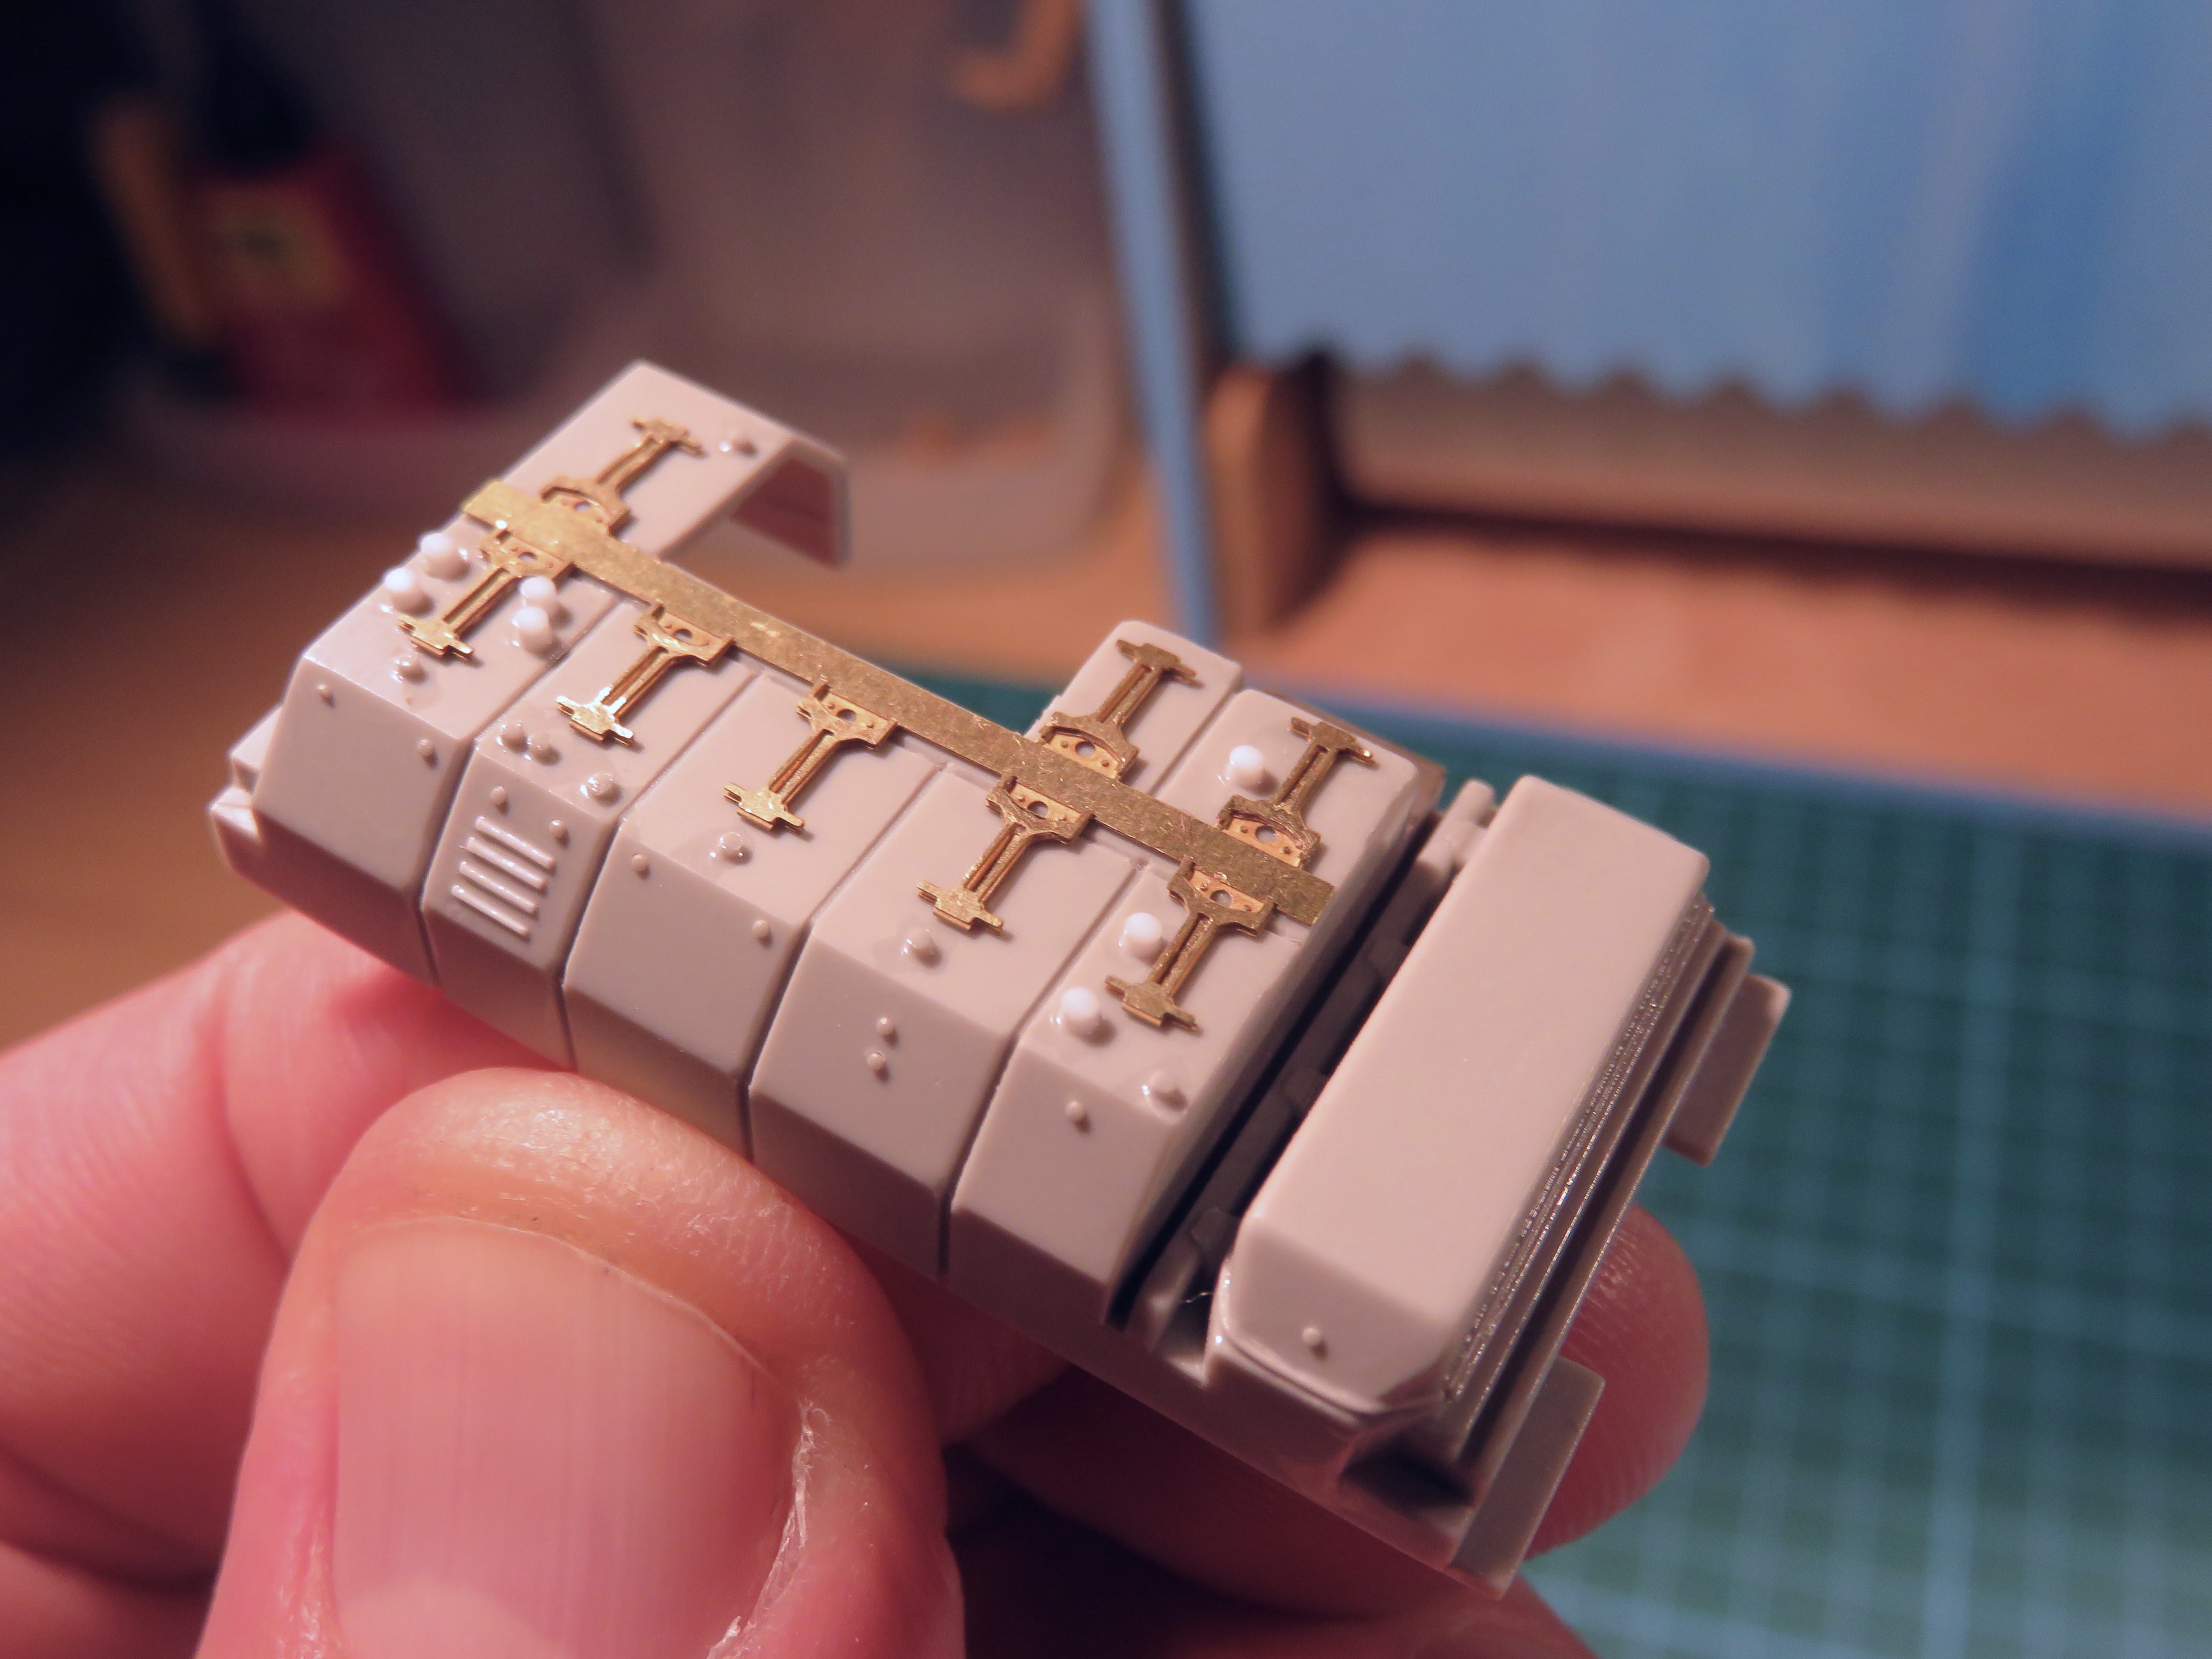
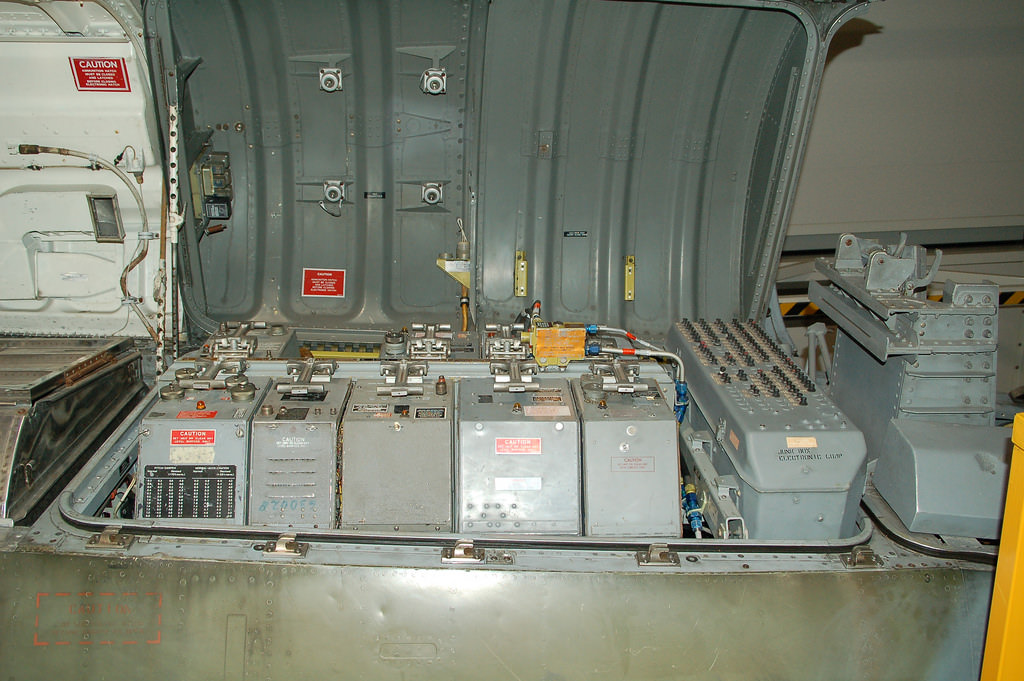
Happy modelling guys,
Steve.


Happy modelling guys,
Steve.
Joel_W

Joined: December 04, 2010
KitMaker: 11,666 posts
AeroScale: 7,410 posts

Posted: Tuesday, March 27, 2018 - 08:53 PM UTC
Steve,
The detailing is really starting to make a huge difference. What goes into the huge opening on the other side of the boxes?
Joel
The detailing is really starting to make a huge difference. What goes into the huge opening on the other side of the boxes?
Joel

SteveAndrews

Joined: August 16, 2010
KitMaker: 693 posts
AeroScale: 551 posts

Posted: Wednesday, March 28, 2018 - 12:47 AM UTC
Hey Joel
Thanks very much. There's a photo etch part that forms an open box of sorts. I've no idea what it actually represents, but maybe someone else does?
Have a great evening,
Steve
Thanks very much. There's a photo etch part that forms an open box of sorts. I've no idea what it actually represents, but maybe someone else does?
Have a great evening,
Steve

SteveAndrews

Joined: August 16, 2010
KitMaker: 693 posts
AeroScale: 551 posts

Posted: Tuesday, April 10, 2018 - 02:34 AM UTC
Youíve hear the expression ĎThe devil is in the detailí. Well, there have been moments recently when Iím sure that is literally true. As a piece of stretched sprue springs out of my tweezers and flies off into oblivion for the third or fourth time, I feel the torment. However, patience and perseverance pay off in the end. The avionics bay is now starting to look more like an impression of the real thing. Have a look at the real thing here (or at least a version of it. These shots are taken from an F-104G):
http://www.rolfferch.de/F104G/html/avionik.html
And here is where the scratch building has got me so far. This component isnít finished yet but itís reached the stage where I start to feel like something with proper detail is emerging. Compare theses shots to the ones of the kit supplied part a few posts back and you'll see the difference.
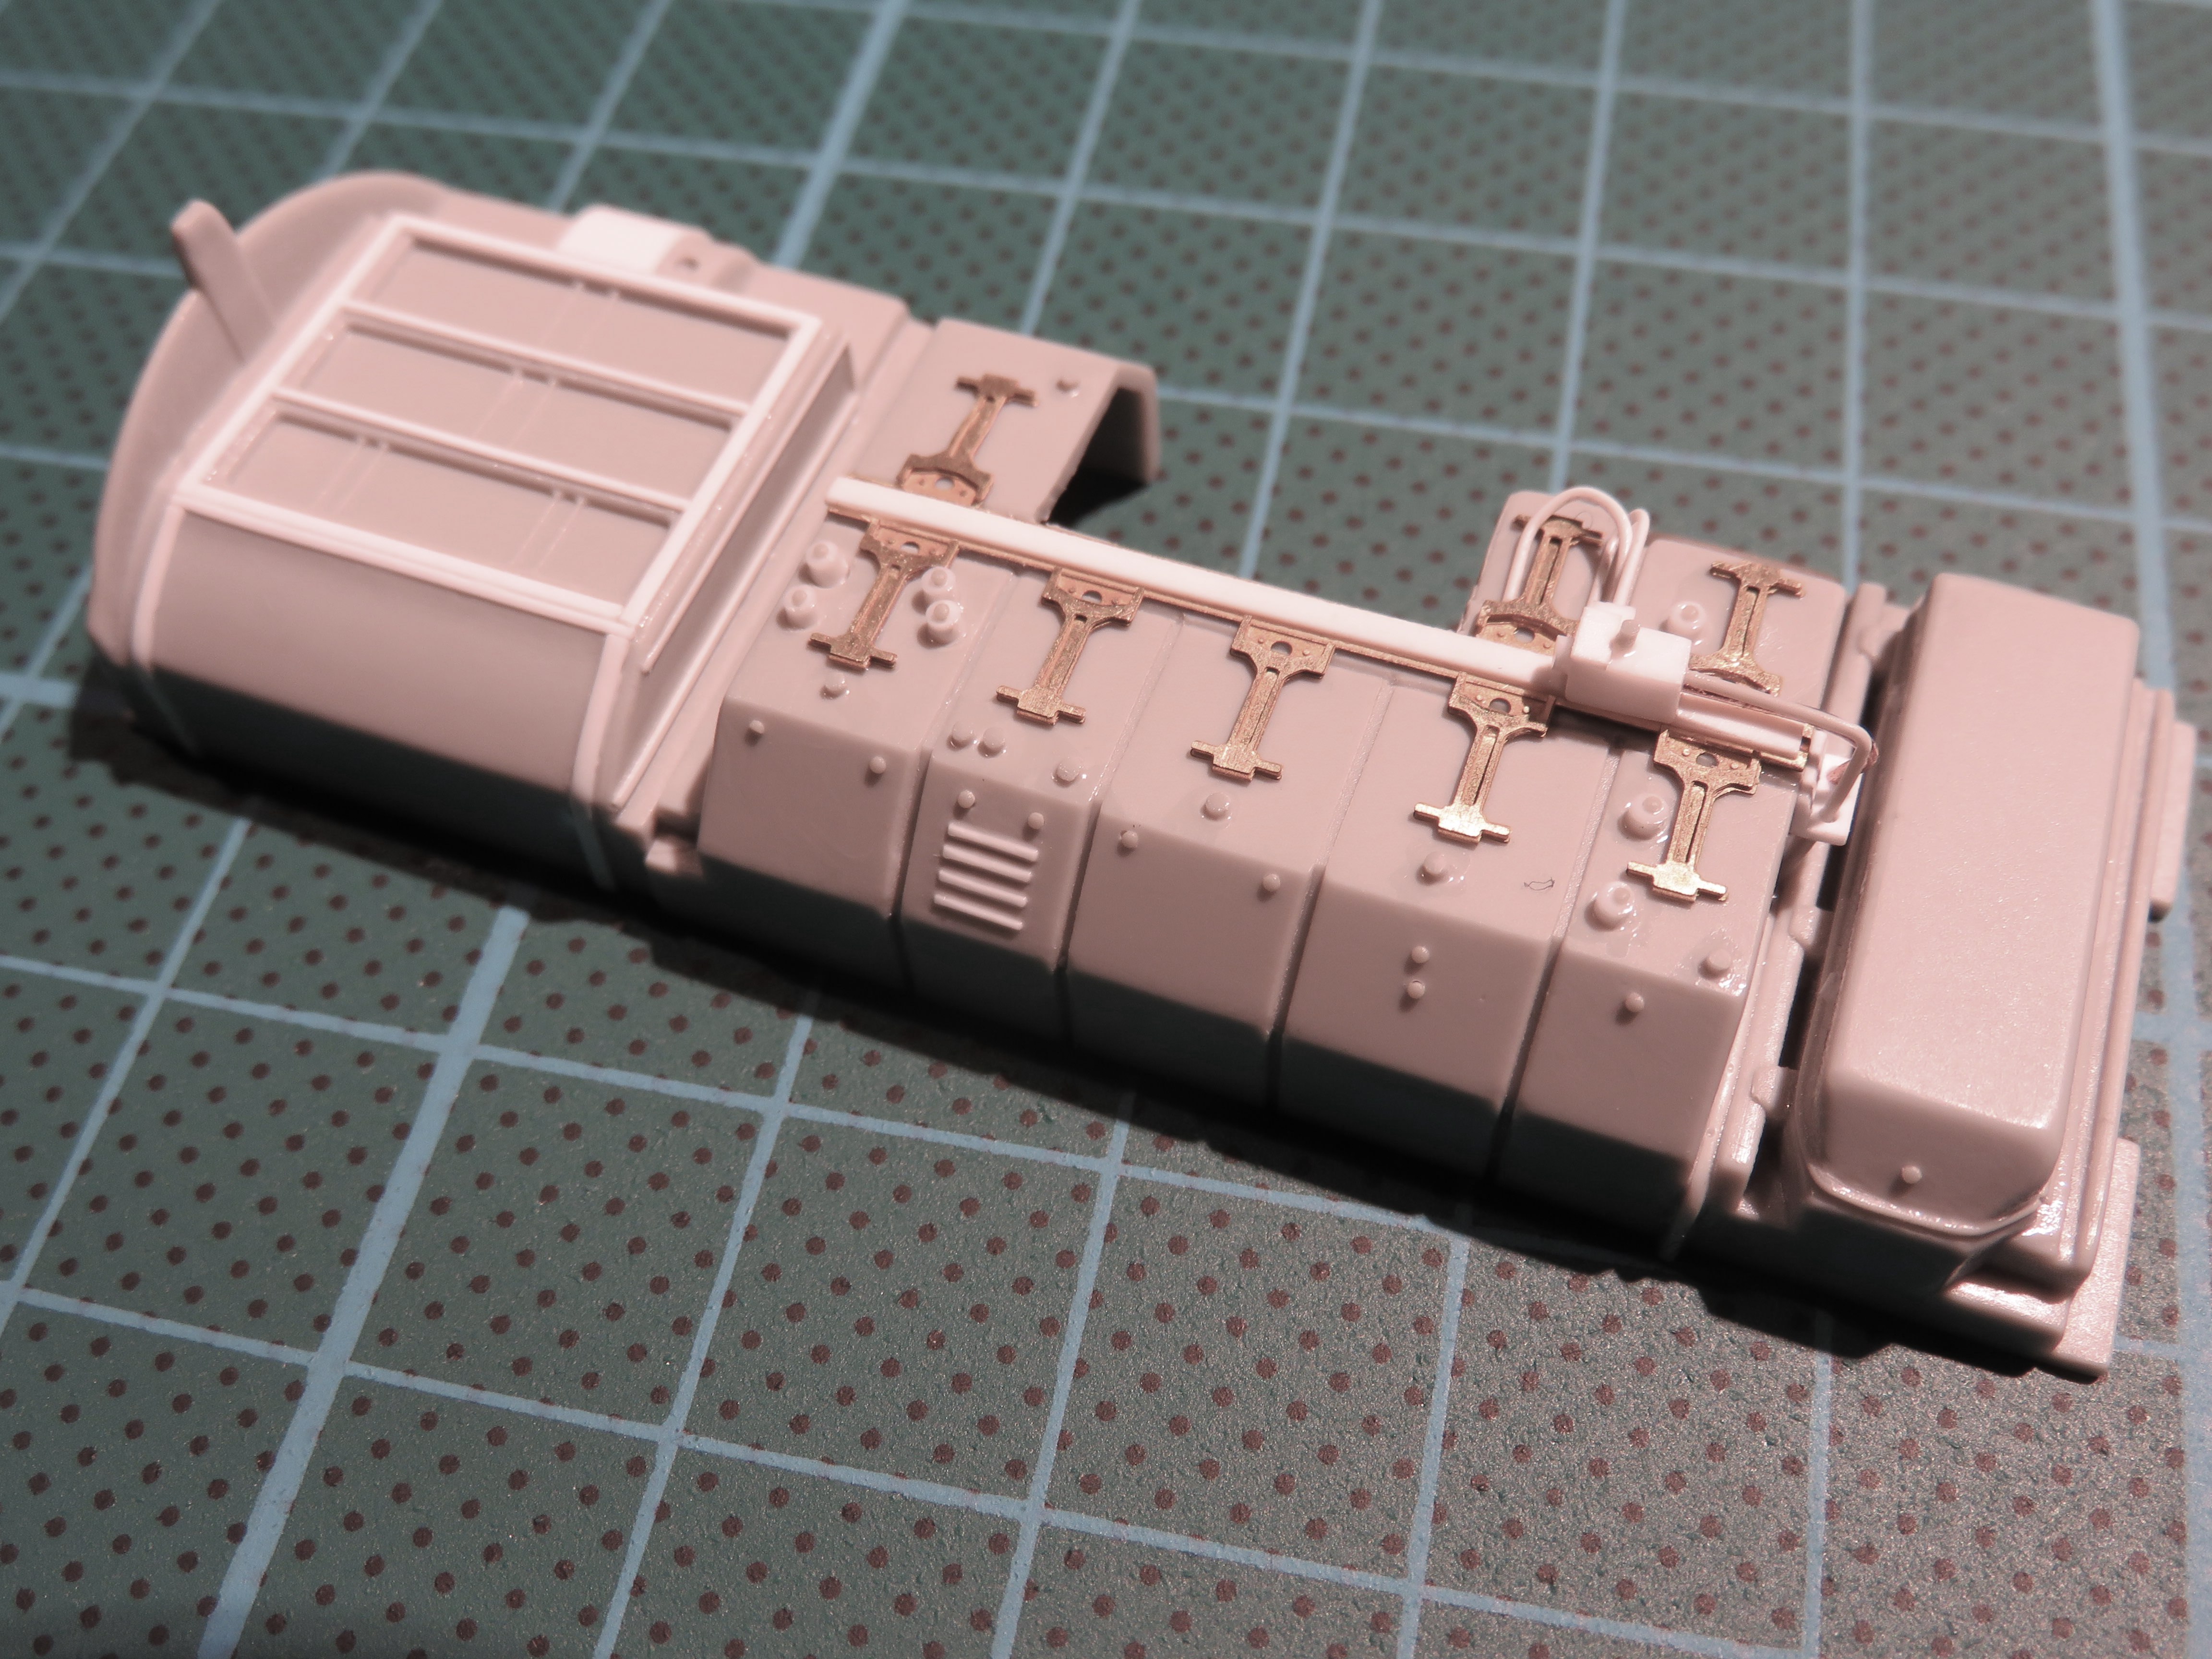
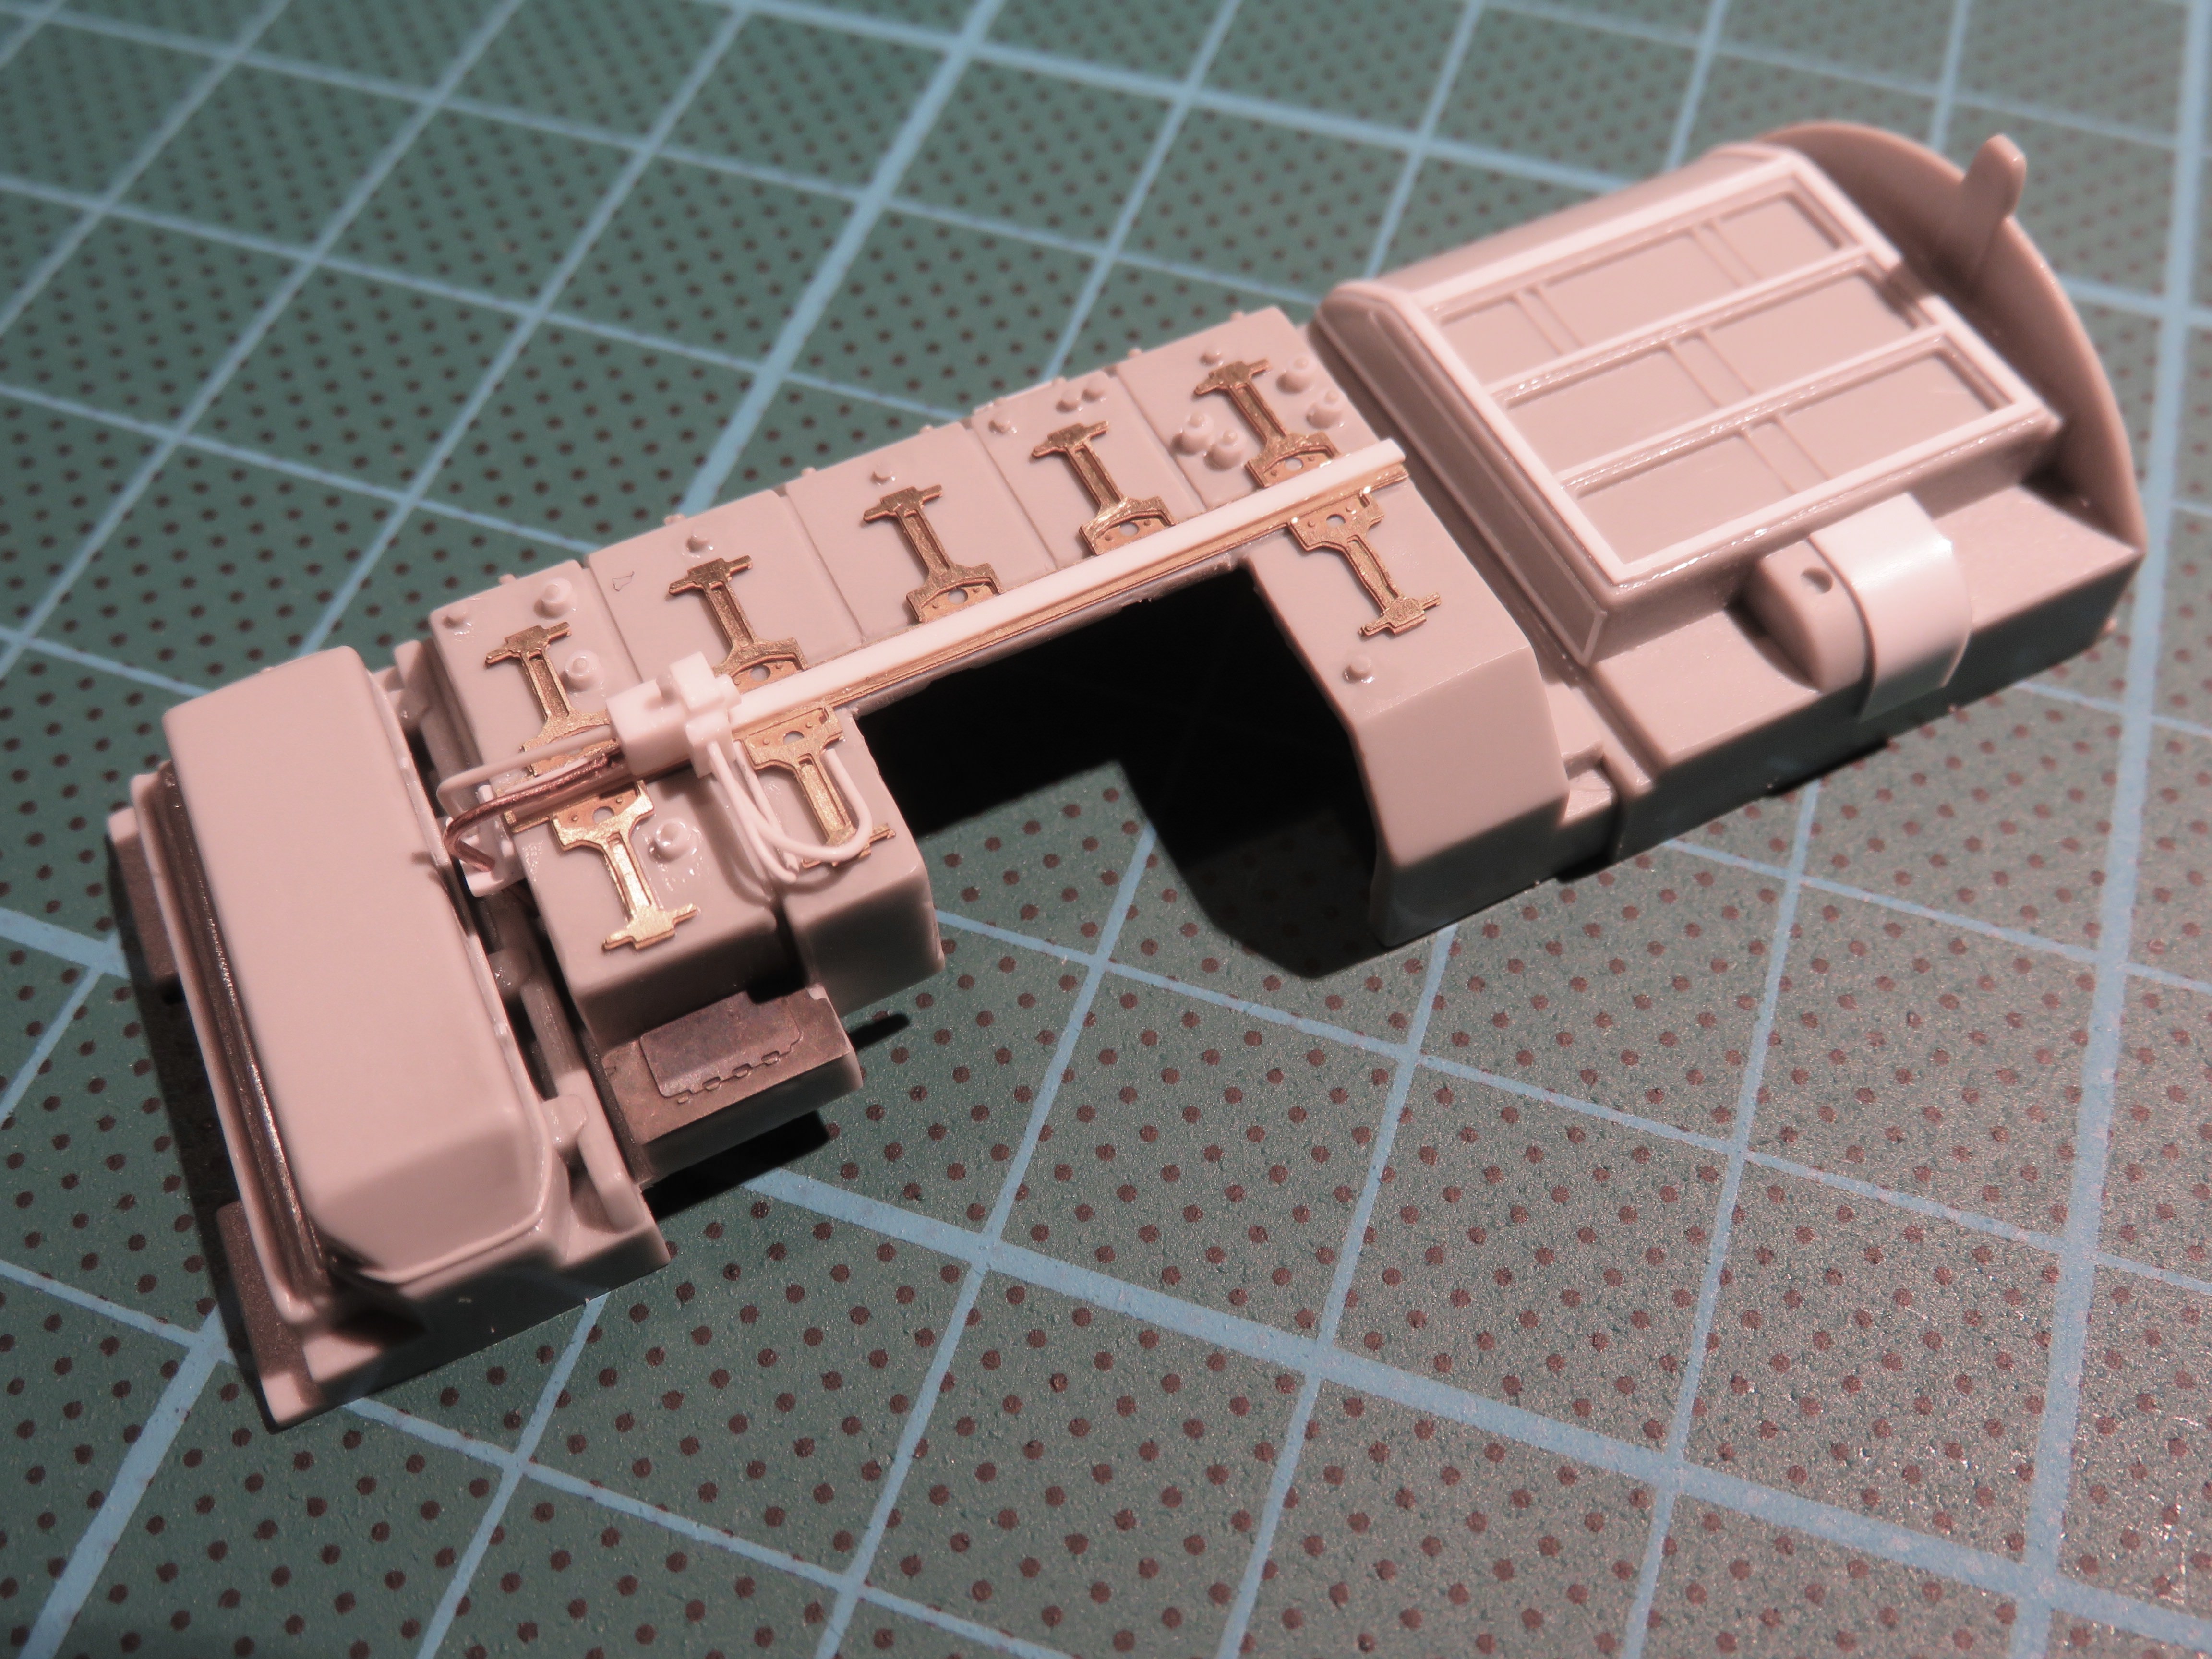
And thereís a challenge - all those little buttons at the back are going to be a real pain to reproduce one at a time. Eduard supplies a PE part but its more like a decal. Thereís no depth. Iíd love to avoid hours of work with dozens of microscopic bits of plastic. I can feel my sanity slipping already. Any ideas?
Oh, and talking of the F-104G, take a look this cool film with some lovely detailed close ups:
https://www.youtube.com/watch?v=aKv9lsdln7E
In the meantime have fun with your plastic guys.
http://www.rolfferch.de/F104G/html/avionik.html
And here is where the scratch building has got me so far. This component isnít finished yet but itís reached the stage where I start to feel like something with proper detail is emerging. Compare theses shots to the ones of the kit supplied part a few posts back and you'll see the difference.


And thereís a challenge - all those little buttons at the back are going to be a real pain to reproduce one at a time. Eduard supplies a PE part but its more like a decal. Thereís no depth. Iíd love to avoid hours of work with dozens of microscopic bits of plastic. I can feel my sanity slipping already. Any ideas?
Oh, and talking of the F-104G, take a look this cool film with some lovely detailed close ups:
https://www.youtube.com/watch?v=aKv9lsdln7E
In the meantime have fun with your plastic guys.

rdt1953

Joined: February 06, 2015
KitMaker: 1,098 posts
AeroScale: 900 posts

Posted: Tuesday, April 10, 2018 - 06:08 AM UTC
Quoted Text
And thereís a challenge - all those little buttons at the back are going to be a real pain to reproduce one at a time. Eduard supplies a PE part but its more like a decal. Thereís no depth. Iíd love to avoid hours of work with dozens of microscopic bits of plastic. I can feel my sanity slipping already. Any ideas?
Hi Steve - beautiful work you're doing here ! Have you considered Archer Resin rivets for the buttons in question ? If you are not familiar with them they are 3 d but printed on decal film and come in a variety of diameters , spacing and patterns and all can be cut apart down to a single rivet ( or button in your case ) if needed.
Keep up the great work - Richard
Addendum - Oops ! I just read in one of your previous posts showing you used resin rivets for screw heads so obviously you're aware of them - sorry for cluttering up your blog !

SteveAndrews

Joined: August 16, 2010
KitMaker: 693 posts
AeroScale: 551 posts

Posted: Tuesday, April 10, 2018 - 11:28 AM UTC
Hey Richard
No problem at all. I'm pleased to get the reminder. In fact it is using all those little rivets that I'm trying to avoid in this case. Your post reminded me about the Archer products and I'm going to check them out again, so thanks for posting.
Have a great day,
Steve.
No problem at all. I'm pleased to get the reminder. In fact it is using all those little rivets that I'm trying to avoid in this case. Your post reminded me about the Archer products and I'm going to check them out again, so thanks for posting.
Have a great day,
Steve.
Joel_W

Joined: December 04, 2010
KitMaker: 11,666 posts
AeroScale: 7,410 posts

Posted: Tuesday, April 10, 2018 - 10:28 PM UTC
Quoted Text
Youíve hear the expression ĎThe devil is in the detailí. Well, there have been moments recently when Iím sure that is literally true. As a piece of stretched sprue springs out of my tweezers and flies off into oblivion for the third or fourth time, I feel the torment. However, patience and perseverance pay off in the end. The avionics bay is now starting to look more like an impression of the real thing. Have a look at the real thing here (or at least a version of it. These shots are taken from an F-104G):
http://www.rolfferch.de/F104G/html/avionik.html
And here is where the scratch building has got me so far. This component isnít finished yet but itís reached the stage where I start to feel like something with proper detail is emerging. Compare theses shots to the ones of the kit supplied part a few posts back and you'll see the difference.
And thereís a challenge - all those little buttons at the back are going to be a real pain to reproduce one at a time. Eduard supplies a PE part but its more like a decal. Thereís no depth. Iíd love to avoid hours of work with dozens of microscopic bits of plastic. I can feel my sanity slipping already. Any ideas?
Oh, and talking of the F-104G, take a look this cool film with some lovely detailed close ups:
https://www.youtube.com/watch?v=aKv9lsdln7E
In the meantime have fun with your plastic guys.
Steve,
The Electronics bay is really starting to come alive with all that detail. As for those toggle switches if I wanted to make my own, I'd use stretched sprue, then once installed a coating of white glue to give them a more realistic shape.
I watched about half of the vid so far. The close-ups are really amazing.
Joel

SteveAndrews

Joined: August 16, 2010
KitMaker: 693 posts
AeroScale: 551 posts

Posted: Wednesday, April 11, 2018 - 01:33 AM UTC
Hi Joel
Thanks very much. That's a great idea to use white glue to soften a shape. I really like it and I've made a mental note to give it a try. Yup it's a cool video of the F-104G, and talking of video I'm experimenting a bit with my own and hope to have some more soon.
Have a great evening.
Thanks very much. That's a great idea to use white glue to soften a shape. I really like it and I've made a mental note to give it a try. Yup it's a cool video of the F-104G, and talking of video I'm experimenting a bit with my own and hope to have some more soon.
Have a great evening.

SteveAndrews

Joined: August 16, 2010
KitMaker: 693 posts
AeroScale: 551 posts

Posted: Monday, April 16, 2018 - 02:30 AM UTC
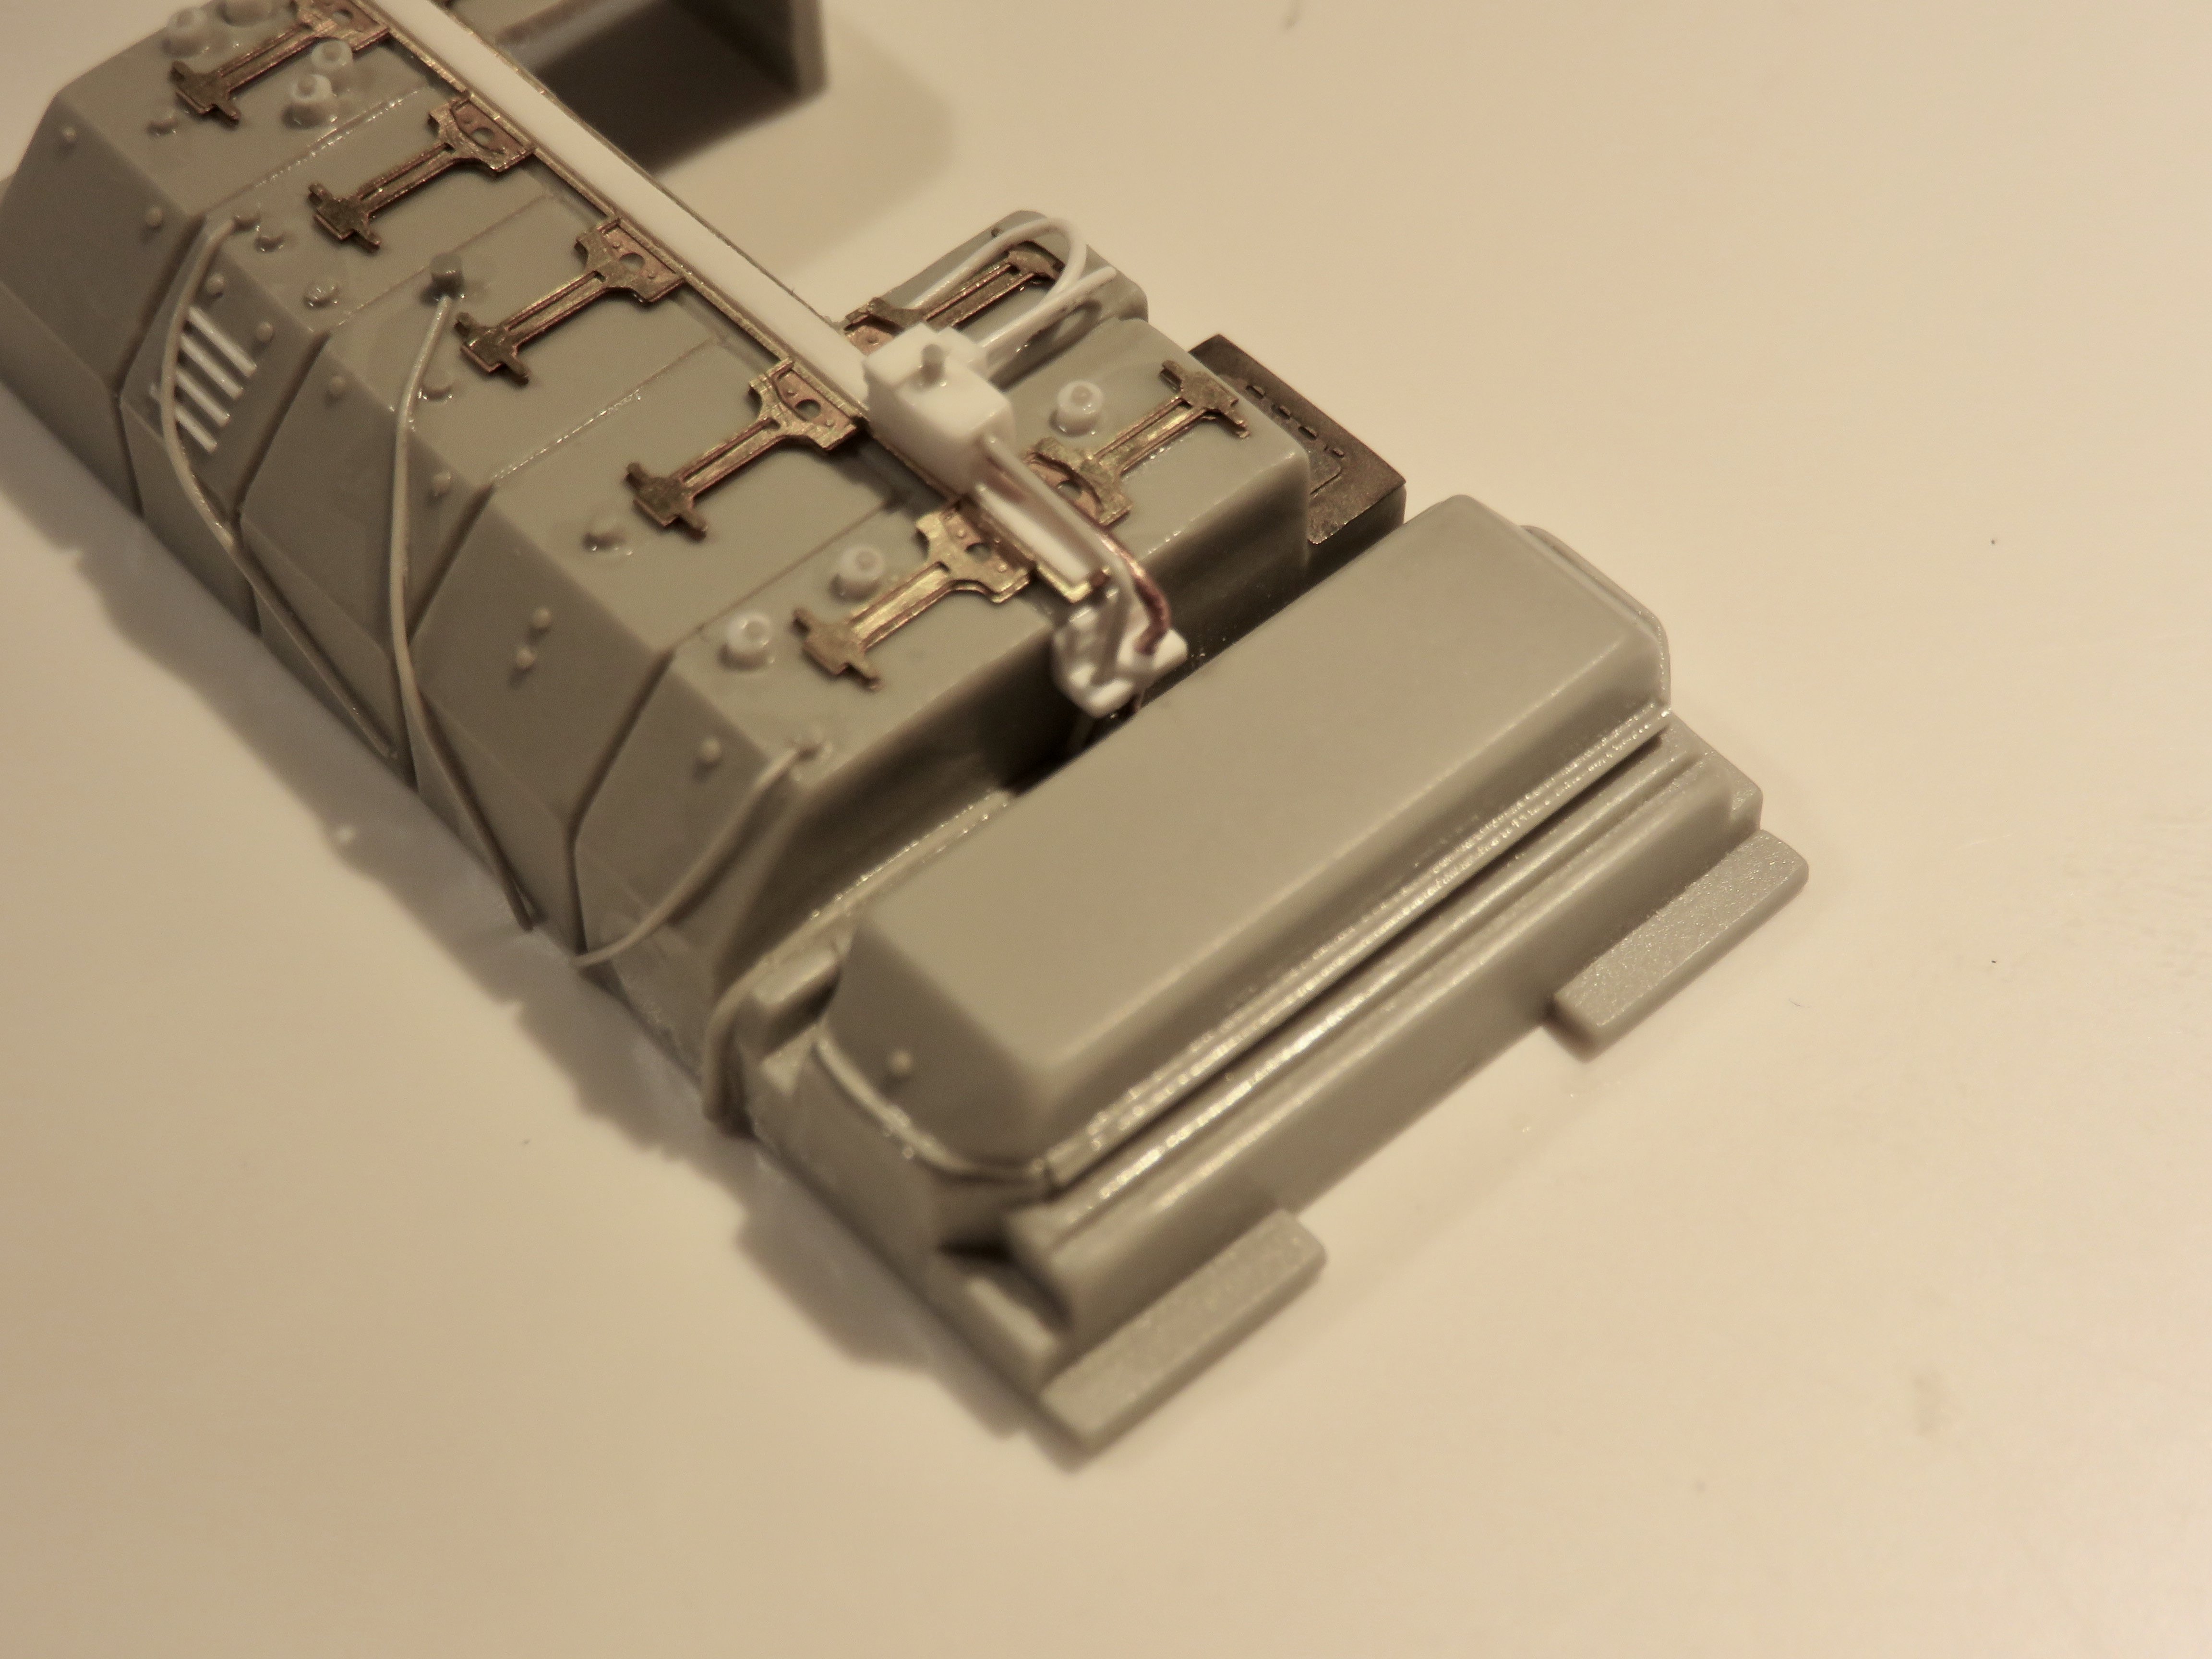
The last week has been spent wondering how to authentically reproduce the rows and rows of buttons at the front of the avionics pack. I thought long and hard about using Archer or HGW rivets but in the end decided they wouldnít give me enough depth. I looked again at the Eduard PE part and drew the same conclusion (again). That took me back to scratch building. After some unsuccessful experiments on a thick sheet of plastic card I decided that I really had to put the work in. Iím going to reproduce every little knob, well actually just enough to give a good impression of the original, and hereís how itís getting doneÖ
Starting with this plain surface.
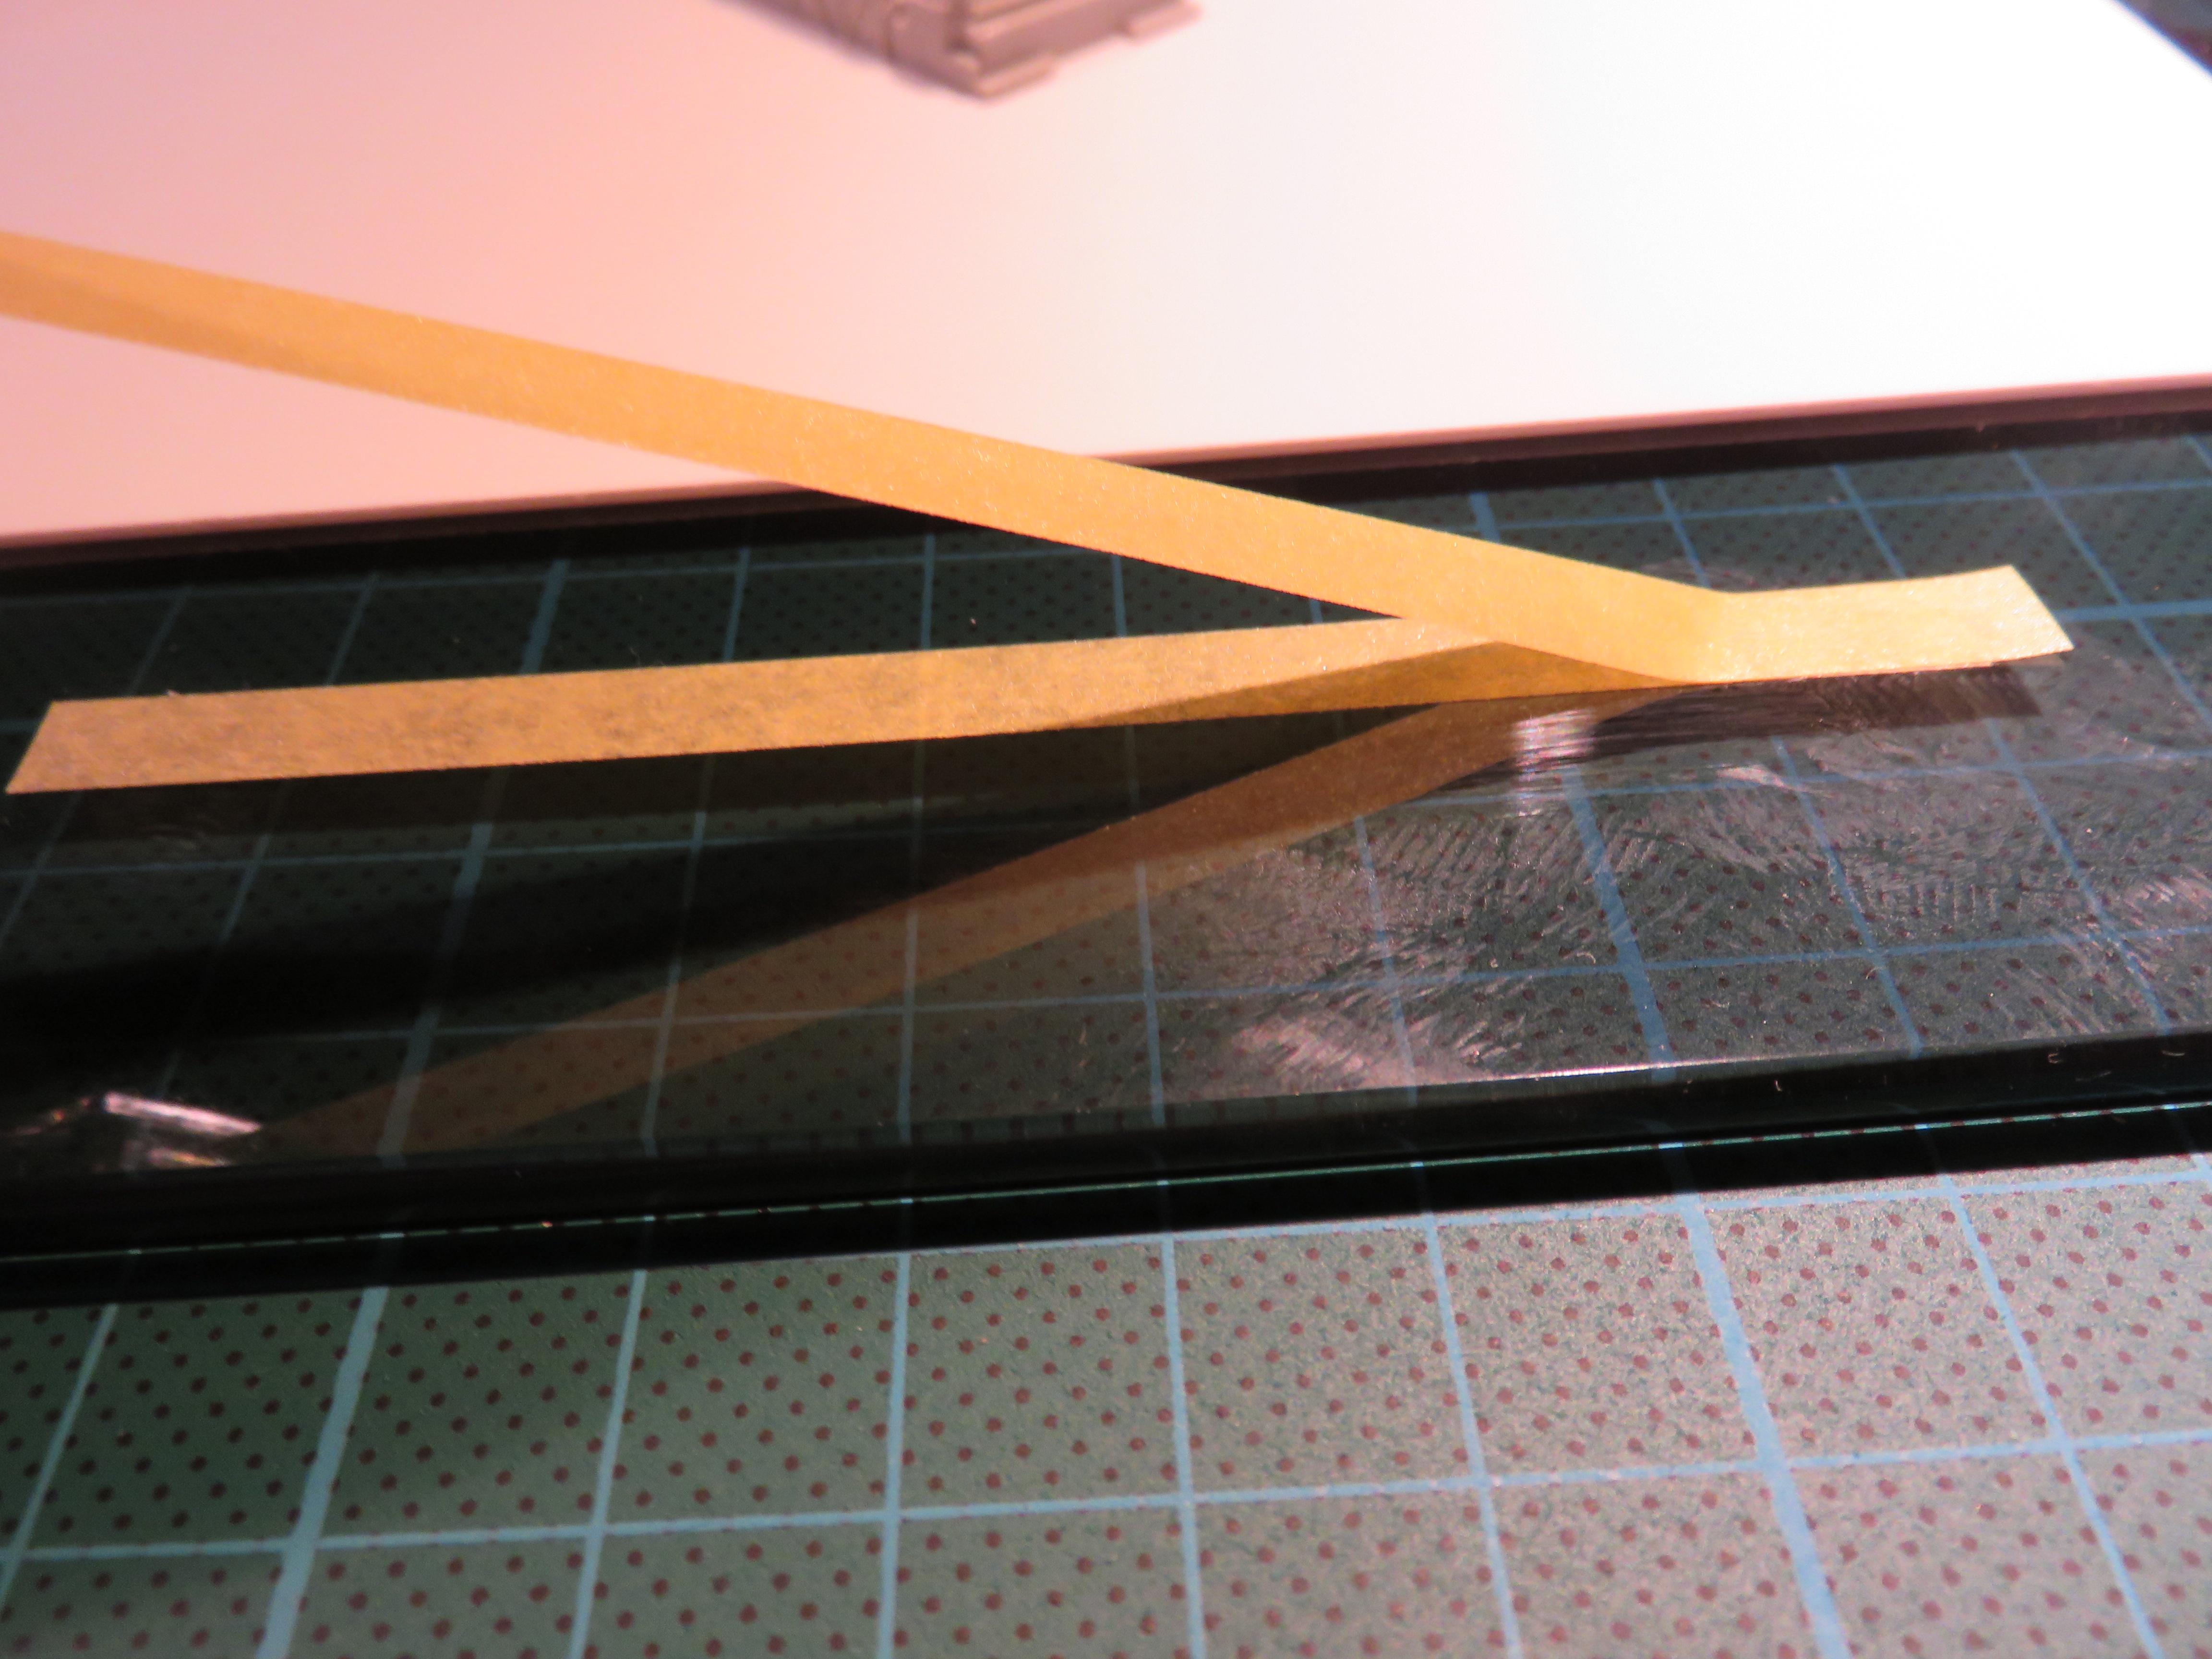
I used double thickness Tamiya masking tape - made by simply sticking one strip on top of another - to mark out the rows. The tape sticks of course so it can be positioned on the part and the double thickness stops it from wandering when I push a pencil against it.
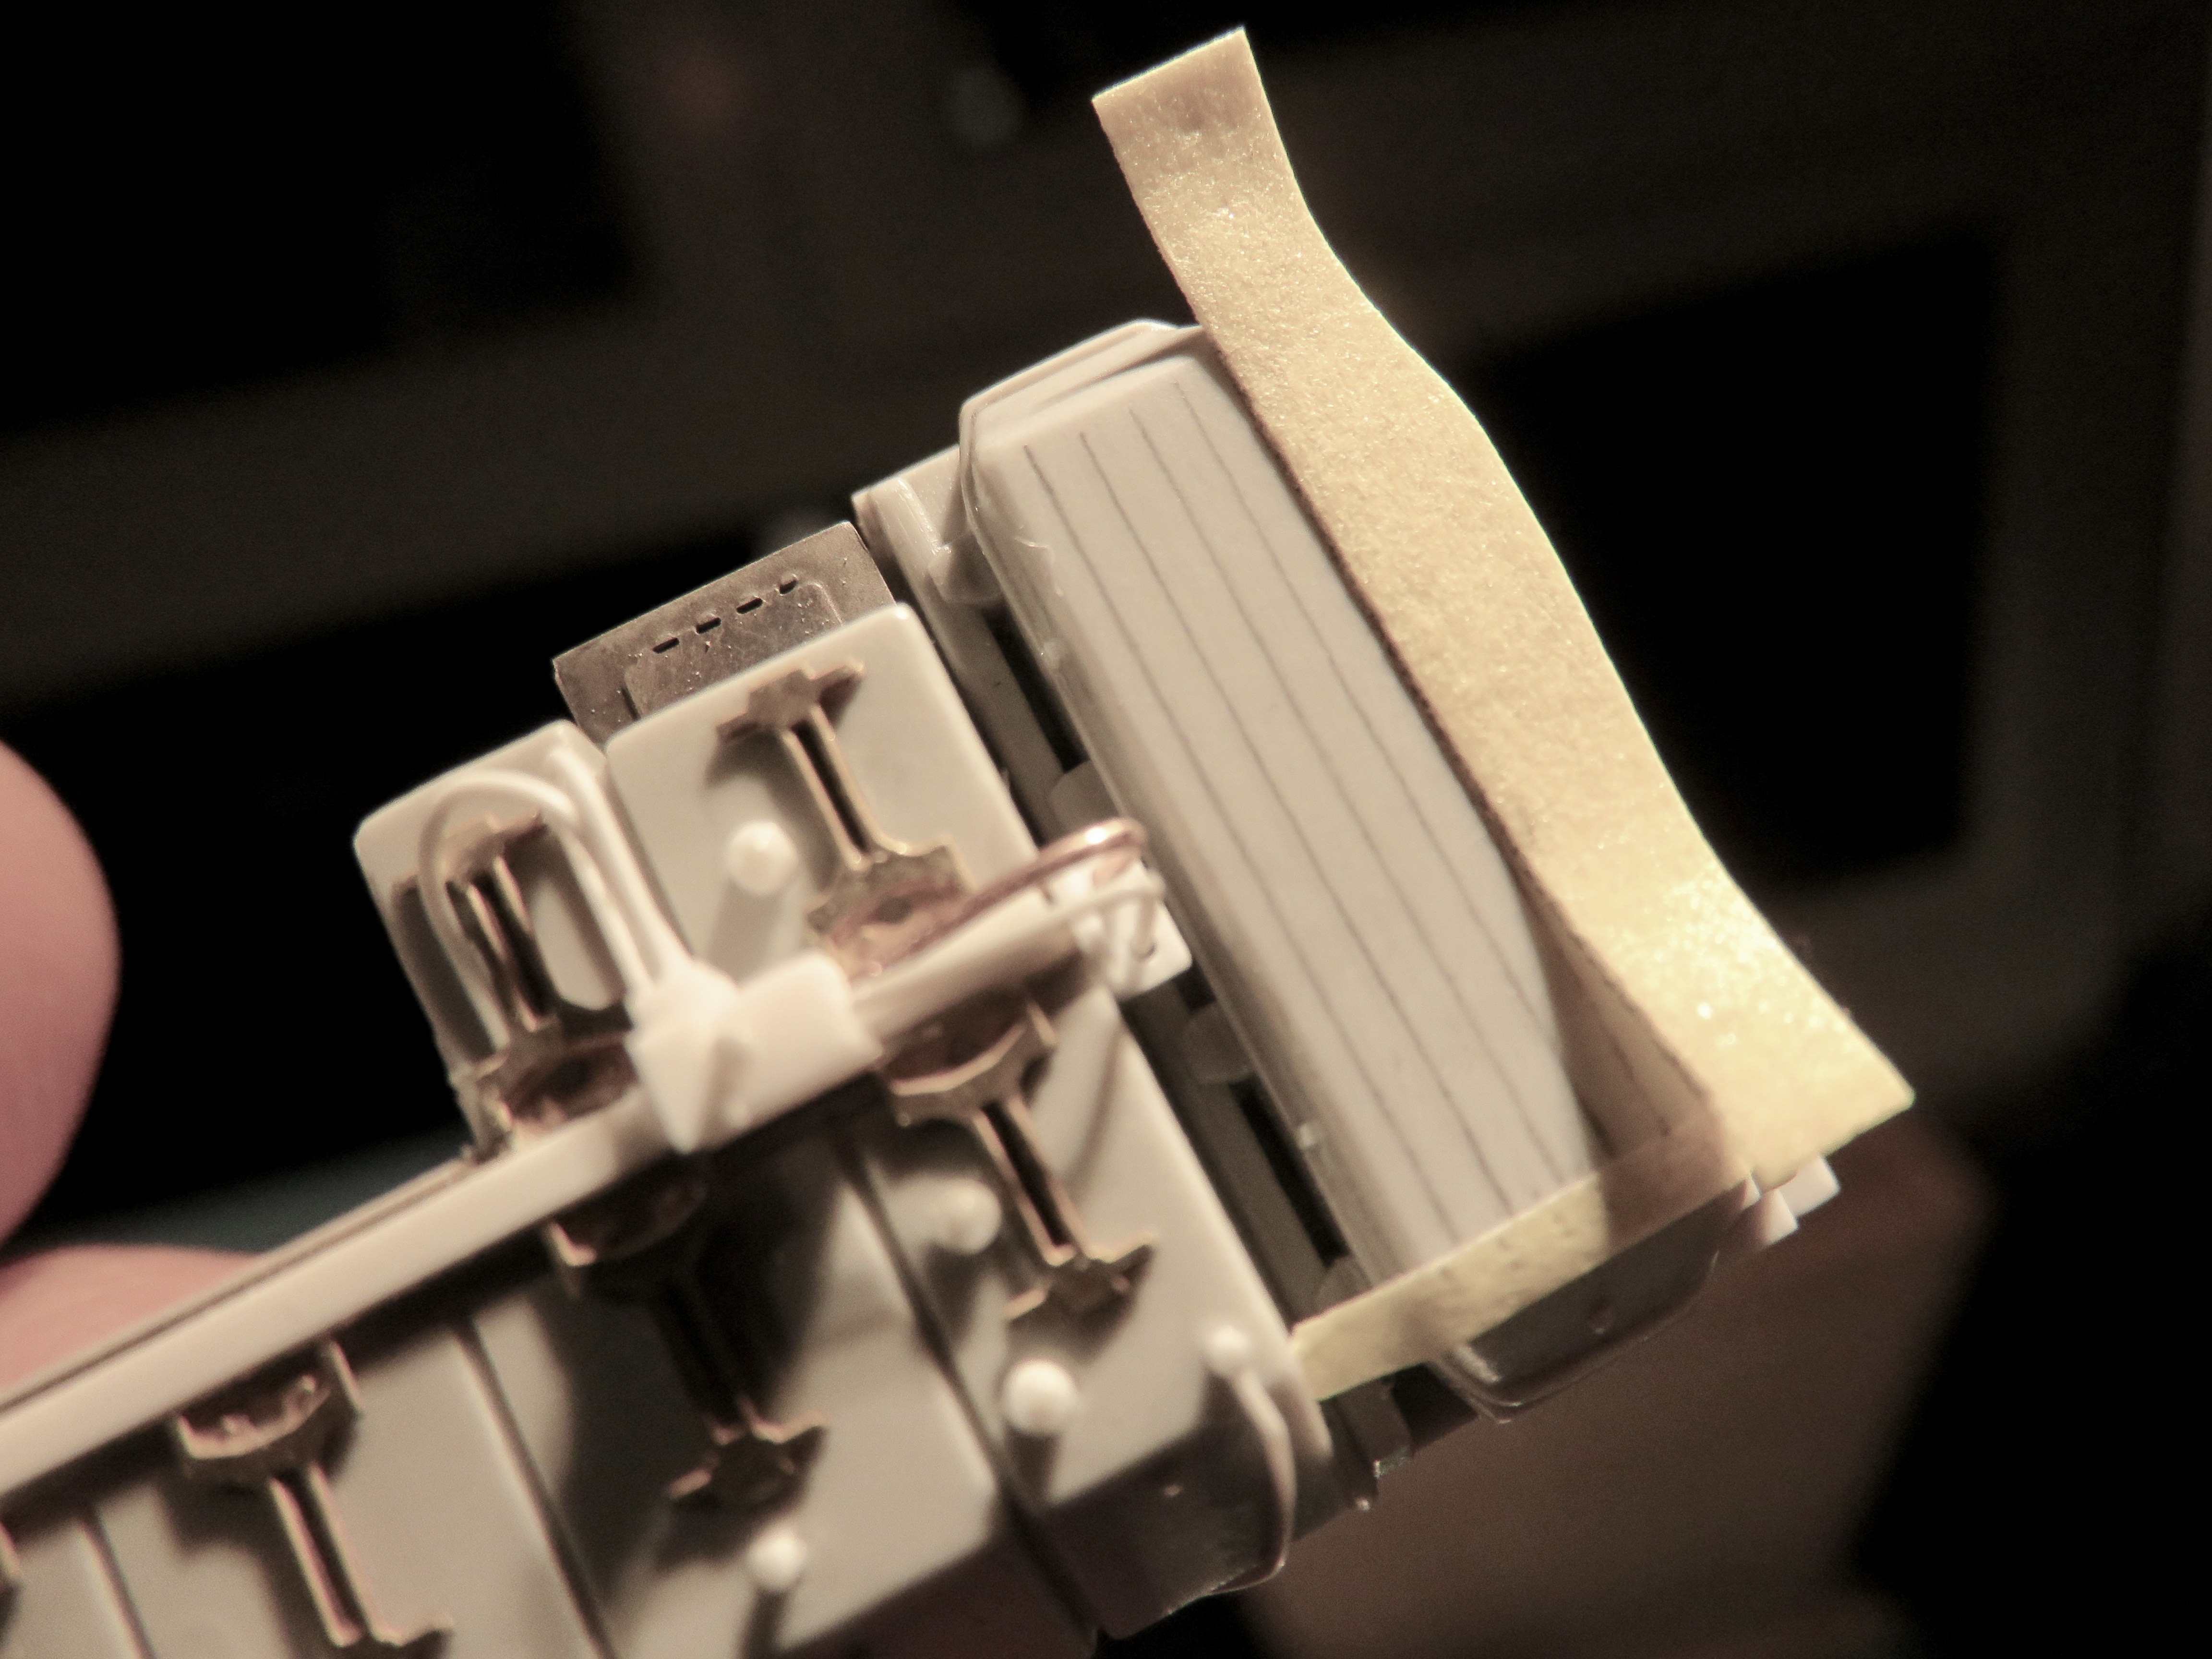
After a few failed attempts with wonky lines or uneven spacing I got a good guide.
Next up I ran Rosie the Riveter 1/32 scale, along the pencil lines. That give me a row of evenly space depressions which I opened up further with a small point and then drilled right through.
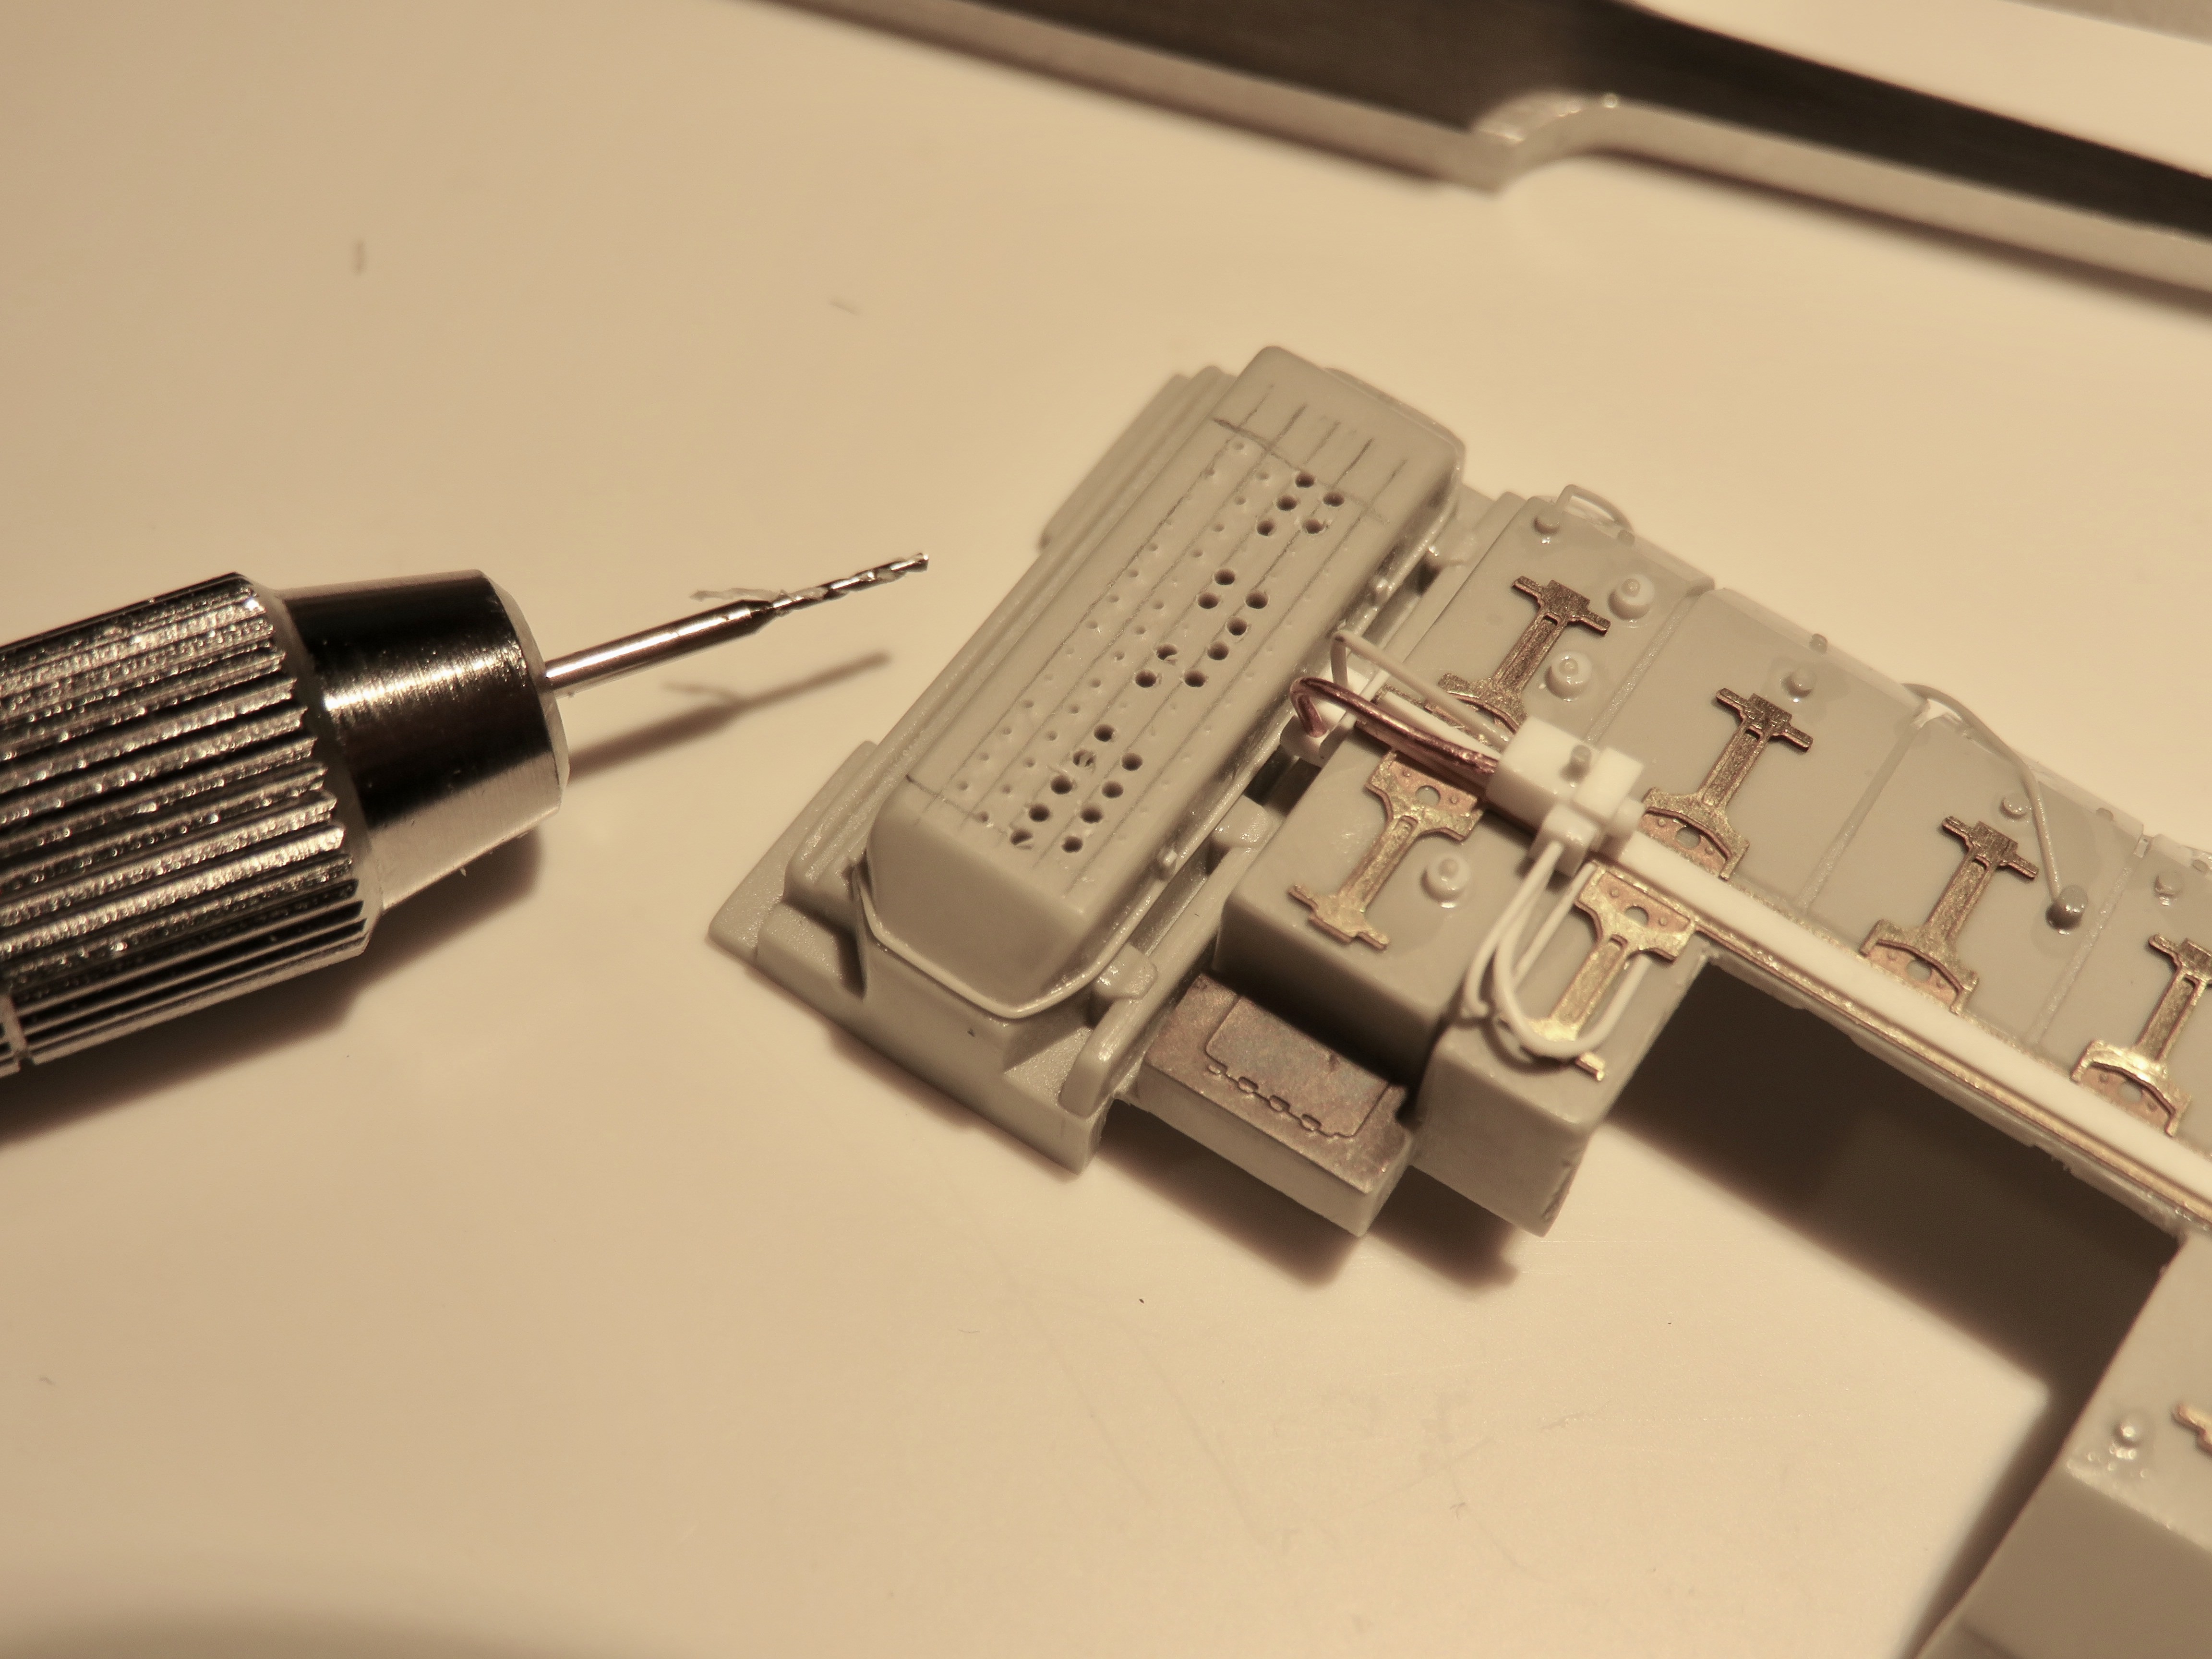
After some sanding to clean up the mess I was left with this.
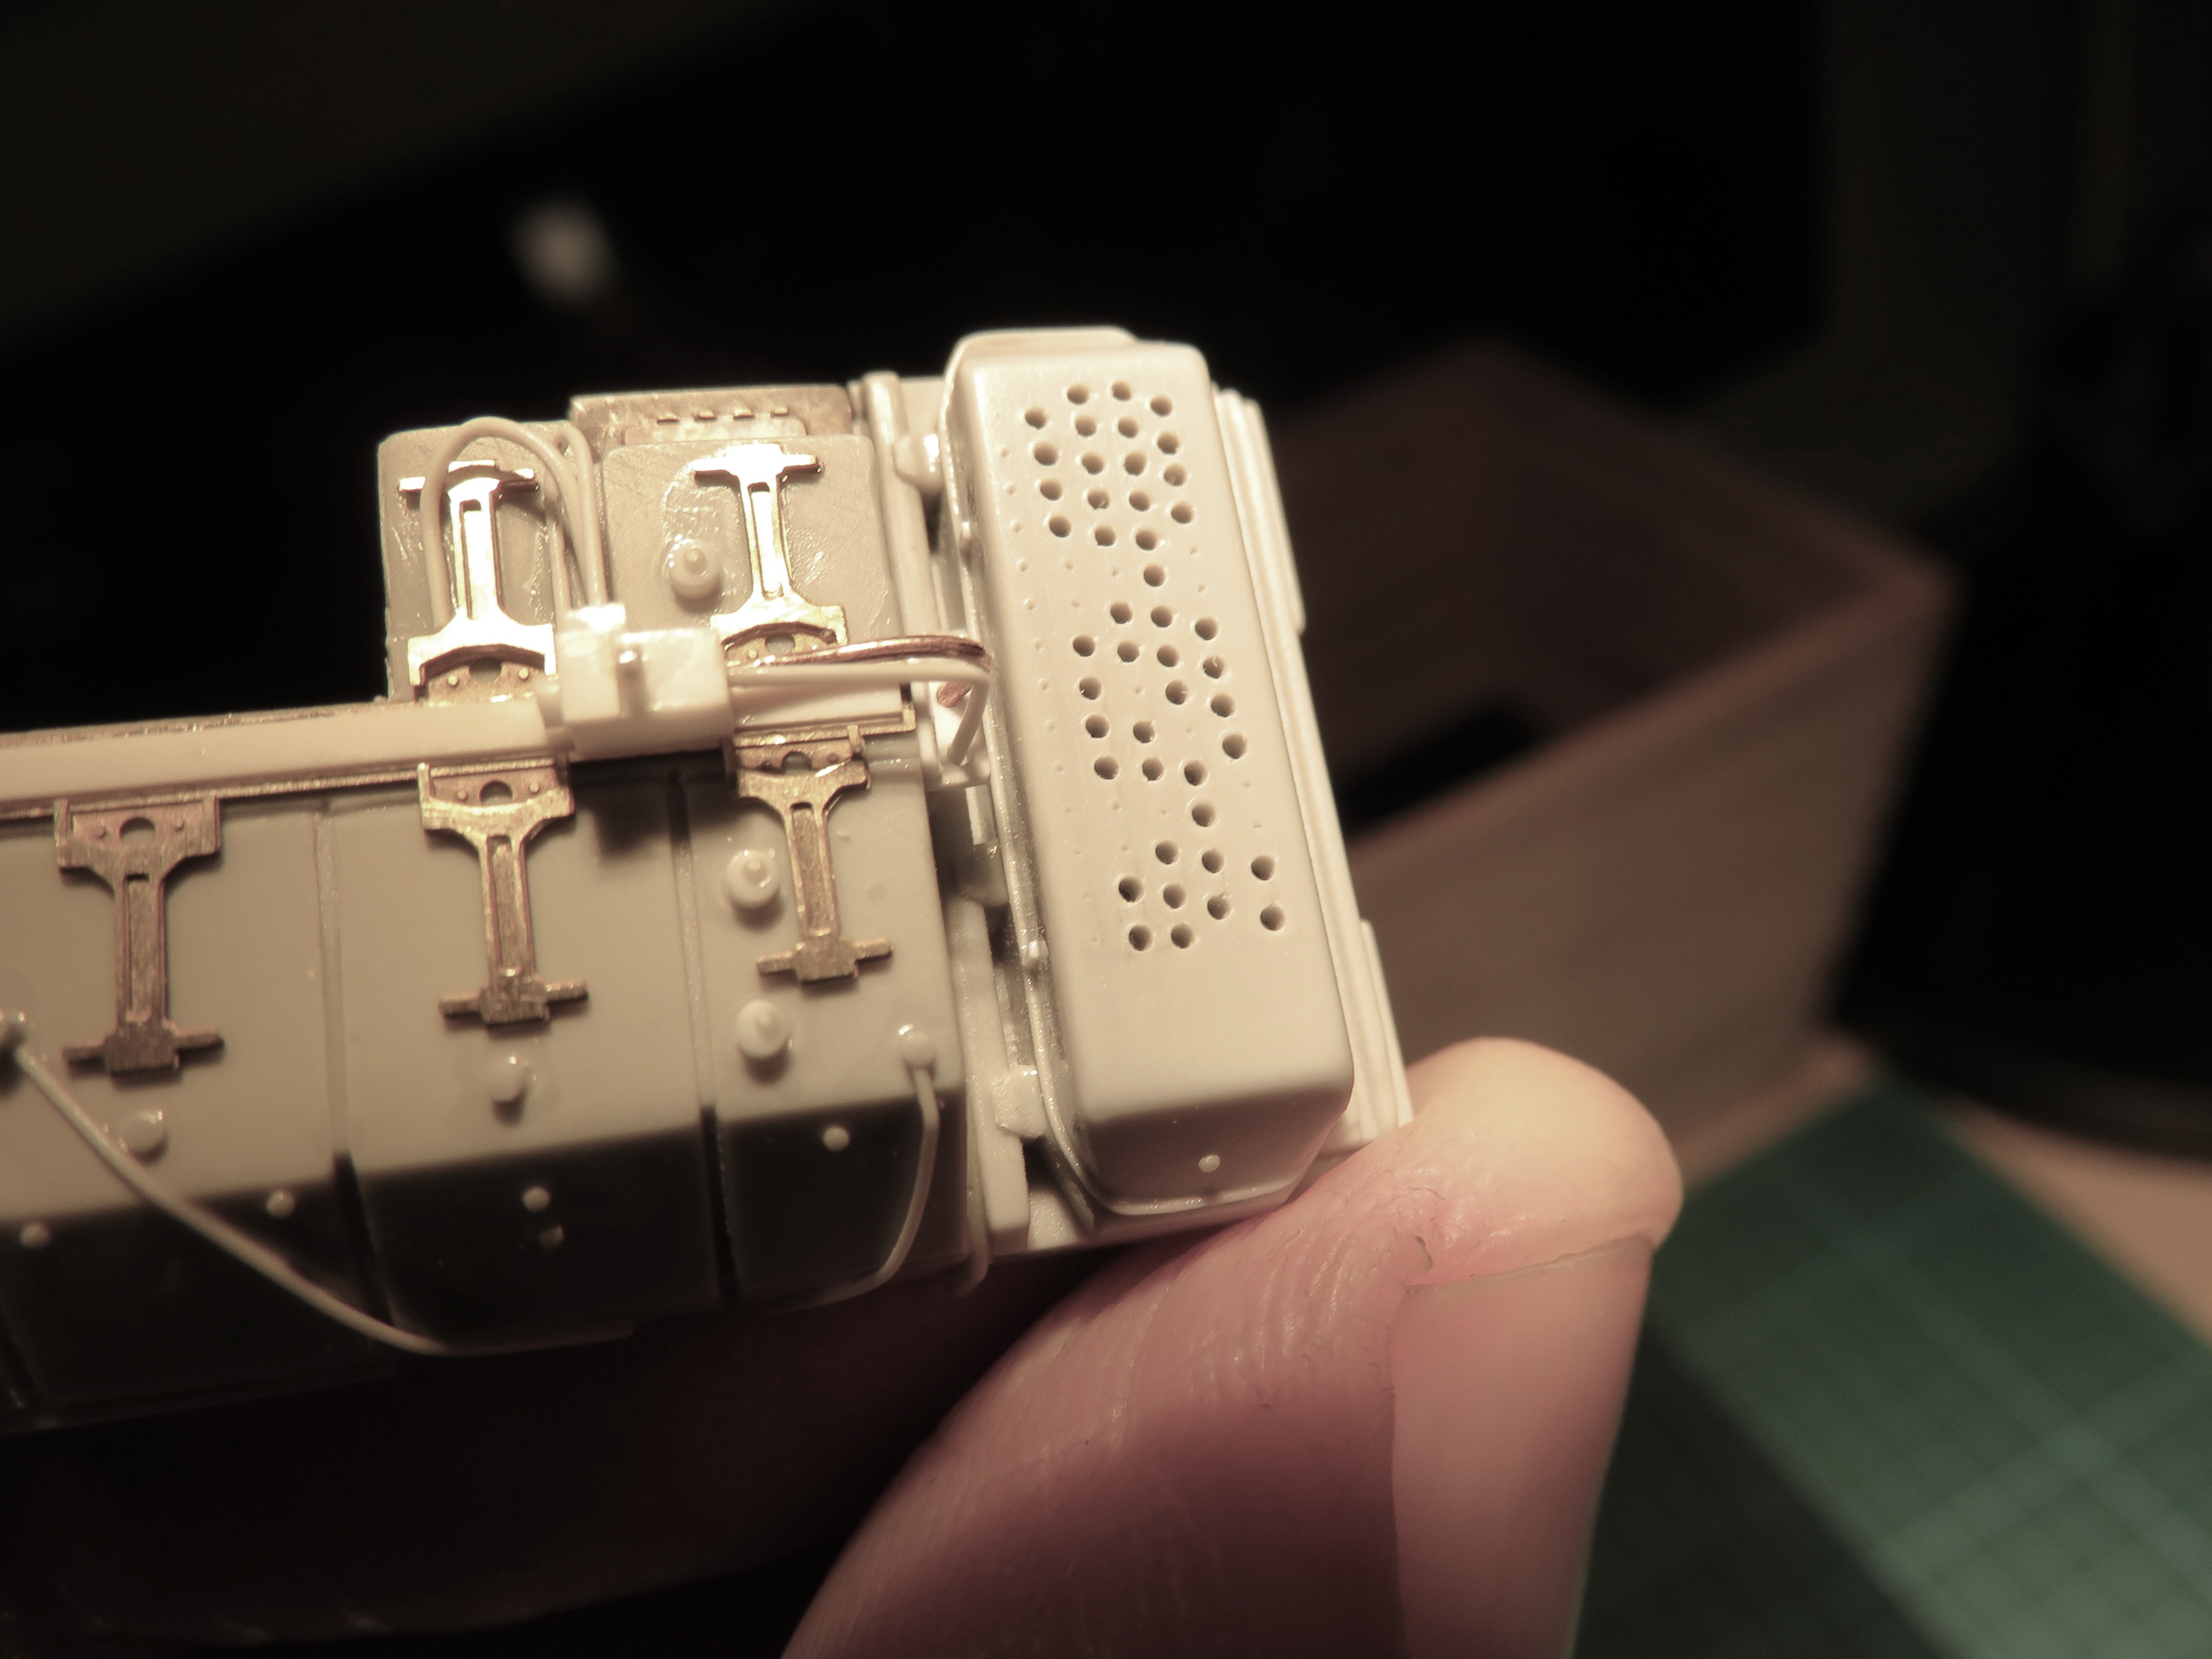
It actually took less time than I thought, and looking at it now Iím wondering if I will simply leave it like this. Even though I have holes rather then raised buttons I could get away with it - the visual effect is similar because the buttons are black. But then it wouldnít be the best I could do. So now I have two ideas to make the buttons, which areÖ
Ögoing to be revealed in the next instalment. Hmmm, maybe Iíve been spending too much time watching Netflix. S1E7 coming soon.
P.S. This gem has helped me to keep my sanity while I figured all this out, at least thatís what I tell myself.
https://www.youtube.com/watch?v=CvFH_6DNRCY
Starting with this plain surface.

I used double thickness Tamiya masking tape - made by simply sticking one strip on top of another - to mark out the rows. The tape sticks of course so it can be positioned on the part and the double thickness stops it from wandering when I push a pencil against it.

After a few failed attempts with wonky lines or uneven spacing I got a good guide.

Next up I ran Rosie the Riveter 1/32 scale, along the pencil lines. That give me a row of evenly space depressions which I opened up further with a small point and then drilled right through.

After some sanding to clean up the mess I was left with this.

It actually took less time than I thought, and looking at it now Iím wondering if I will simply leave it like this. Even though I have holes rather then raised buttons I could get away with it - the visual effect is similar because the buttons are black. But then it wouldnít be the best I could do. So now I have two ideas to make the buttons, which areÖ
Ögoing to be revealed in the next instalment. Hmmm, maybe Iíve been spending too much time watching Netflix. S1E7 coming soon.
P.S. This gem has helped me to keep my sanity while I figured all this out, at least thatís what I tell myself.
https://www.youtube.com/watch?v=CvFH_6DNRCY
 |


