The best Starfighter ever? OK, so I don't mean the absolute best. I mean my best. I’m going to build Italeri’s 1/32 scale F-104C and throw everything at it - aftermarket, scratch building, and as much time, patience and money as I can muster. The objective is to build my best model ever and take as long doing it as the kit and my ideas demand.
I must admit to a love/hate relationship with Italeri’s 1/32 scale aircraft kits. I love the subject matter, especially the cold war jets, but I hate some of the sloppy moulding and poor engineering. Anyone who followed my Mirage IIIc build will know it was a real trial. And yet when I look at all the kits in my display case it’s the Mirage I enjoy the most. Perhaps because it tested my skills and patience, I feel a glow of satisfaction whenever I see it. If you want to know why it tested me, then check out the blog here on Aeroscale. By the way, I’m sorry about the missing photos. They are a victim of Photobucket’s now infamous third party hosting policy. I’ve switched to imgur.
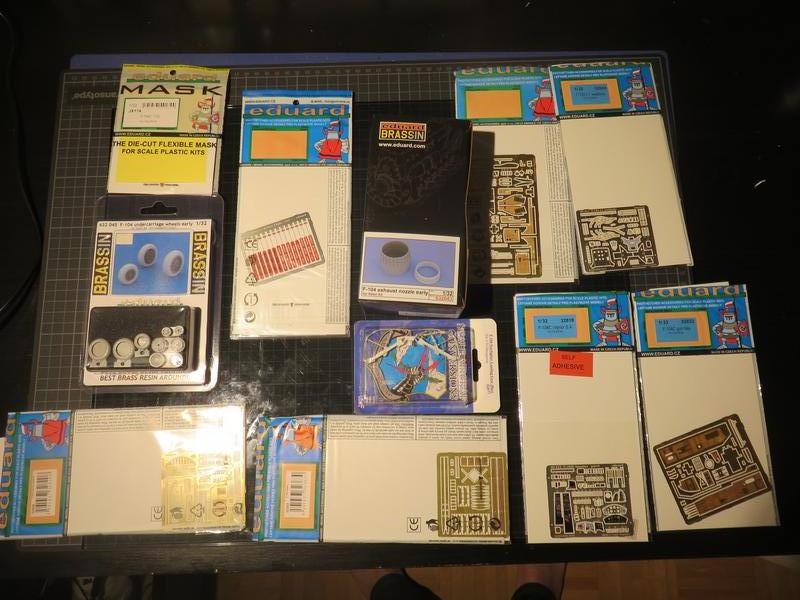
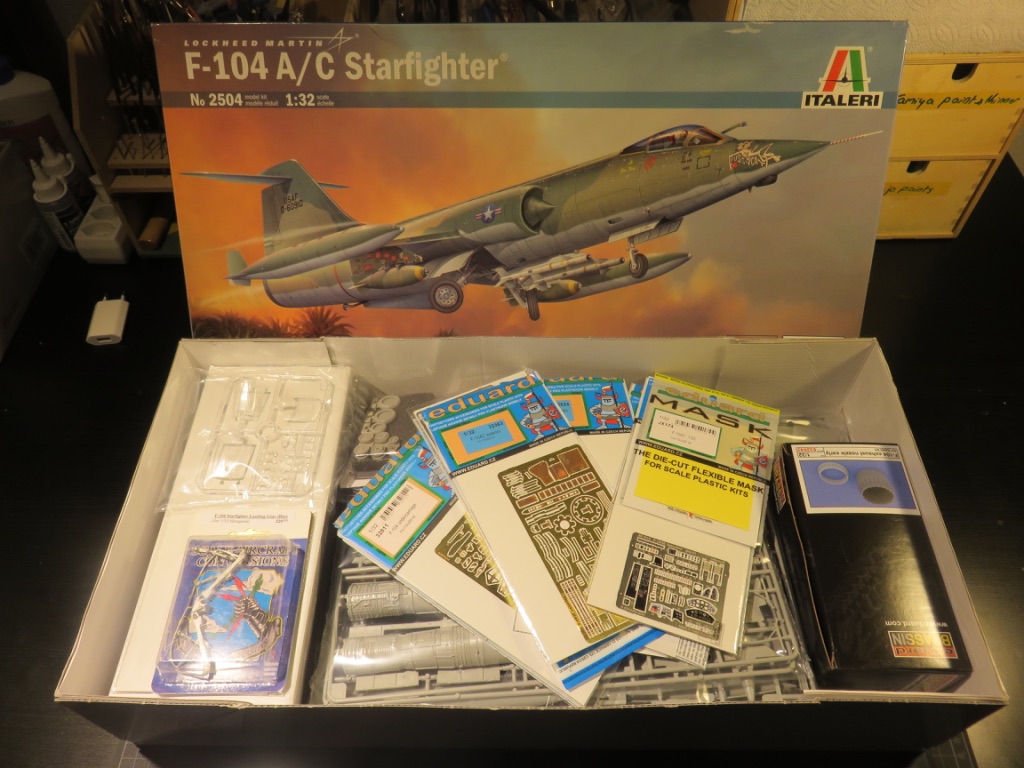
Now its on to the F-104C, which seems to be one of Italeri’s better 1/32 scale kits based on the evidence of other modellers and a quick look at the kit parts. Not flawless by any means, but not unbuildable either. My plan is to make an early Vietnam war version in natural metal. To help it along I invested in some Eduard goodies including interior and exterior photo etch, resin exhaust nozzles and resin wheels. I have metal landing gear too. I also bought a resin ejector seat but I got the wrong one (damn). I’ll be using photo etch and scratch building to enhance the kit seat instead.
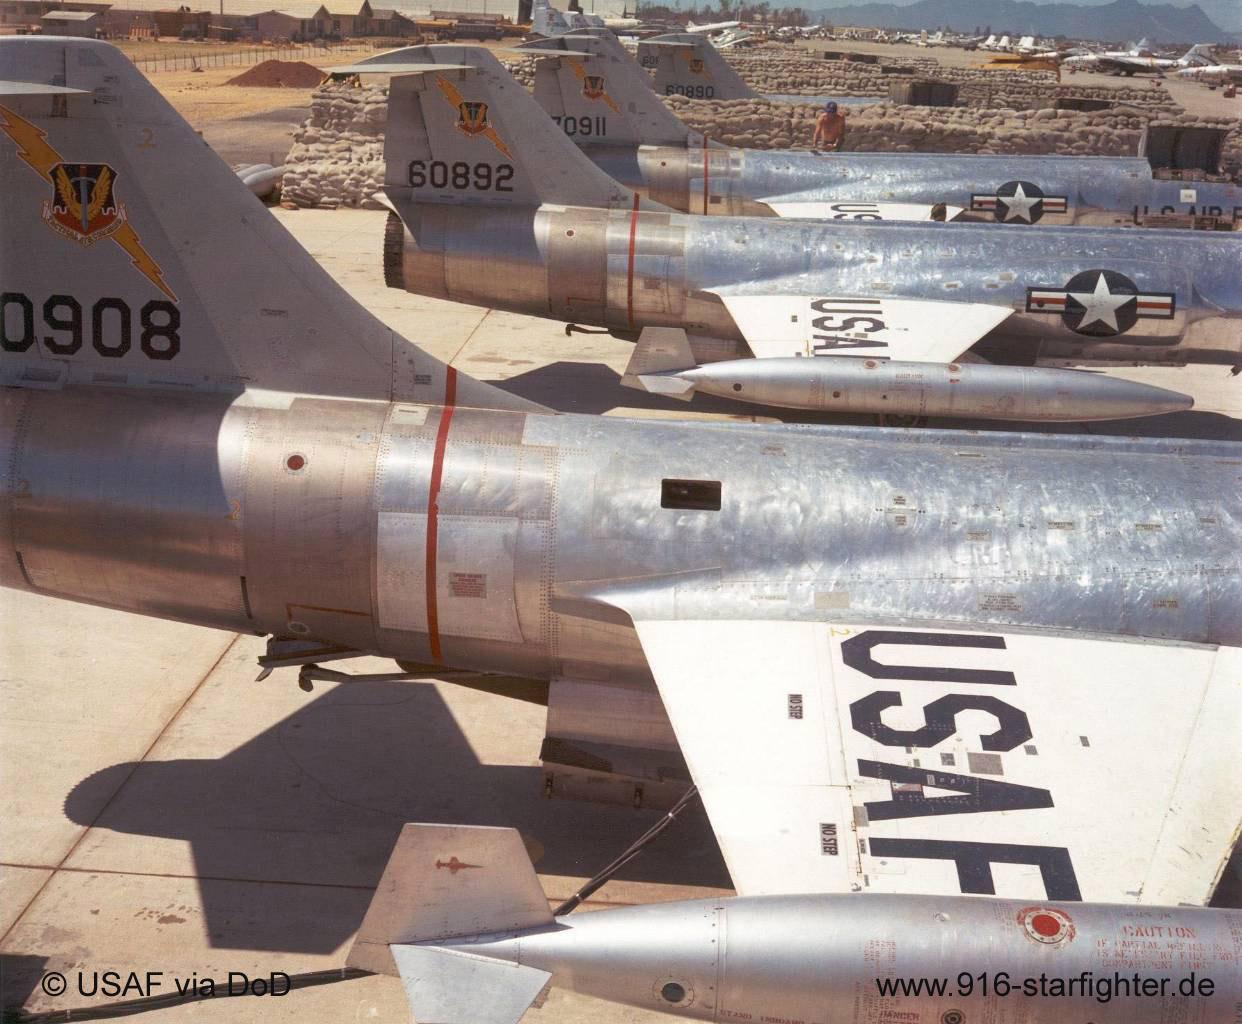
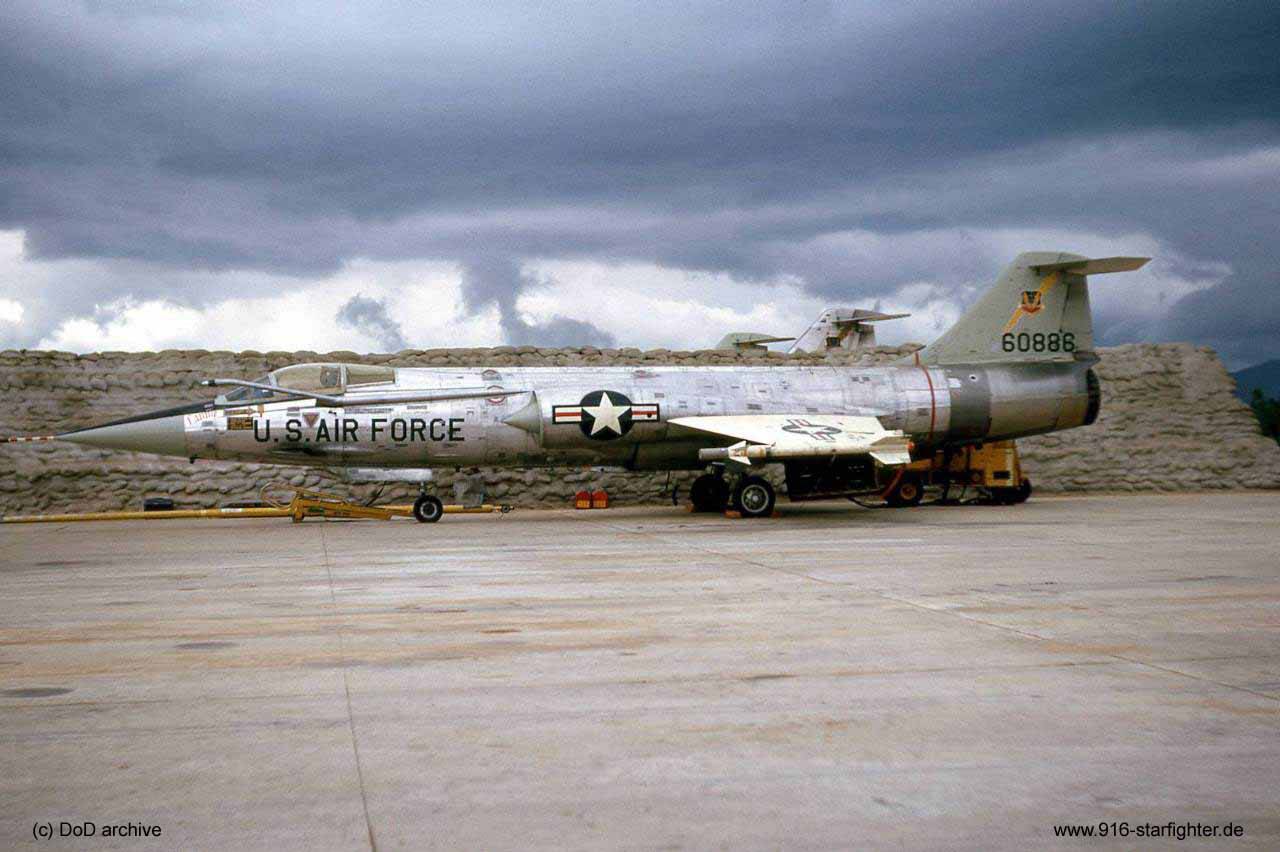
Thats the plan. Here are some photos of my subject, an F104C of 435th TFS, Da-Nang 1965, and some of the goodies that will contribute to the finished model. If you want to help me out with references, memories or any other suggestions then please feel free to join in the fun. And of course follow along and comment if you want to, but don't feel obliged.
Oh, and here’s some mood music to, well, get you in the mood. I hope its not prophetic
https://www.youtube.com/watch?v=byn7ZUjz5DY
Happy modelling folks.
Cold War (1950-1974)
Discuss the aircraft modeling subjects during the Cold War period.
Hosted by Tim Hatton
Best Starfighter Ever?
SteveAndrews
England - South East, United Kingdom
Joined: August 16, 2010
KitMaker: 693 posts
AeroScale: 551 posts
Joined: August 16, 2010
KitMaker: 693 posts
AeroScale: 551 posts
Posted: Thursday, October 19, 2017 - 02:22 AM UTC
SteveAndrews
England - South East, United Kingdom
Joined: August 16, 2010
KitMaker: 693 posts
AeroScale: 551 posts
Joined: August 16, 2010
KitMaker: 693 posts
AeroScale: 551 posts
Posted: Sunday, October 22, 2017 - 06:17 PM UTC
Cockpits. We nearly always start with cockpits. This kit isn’t any different. My first step before assembling anything was to gather reference material. It’s not easy finding complete 360 degree views of the interior, especially the area behind the ejector seat, so I ended up gleaning as much as I could from various photos on the internet. If you’re reading this and can add anything, please drop me a pm or feel free to post some images here.
These are the best I could come up with.
http://www.arcair.com/awa01/101-200/awa101-CF104/00.shtm
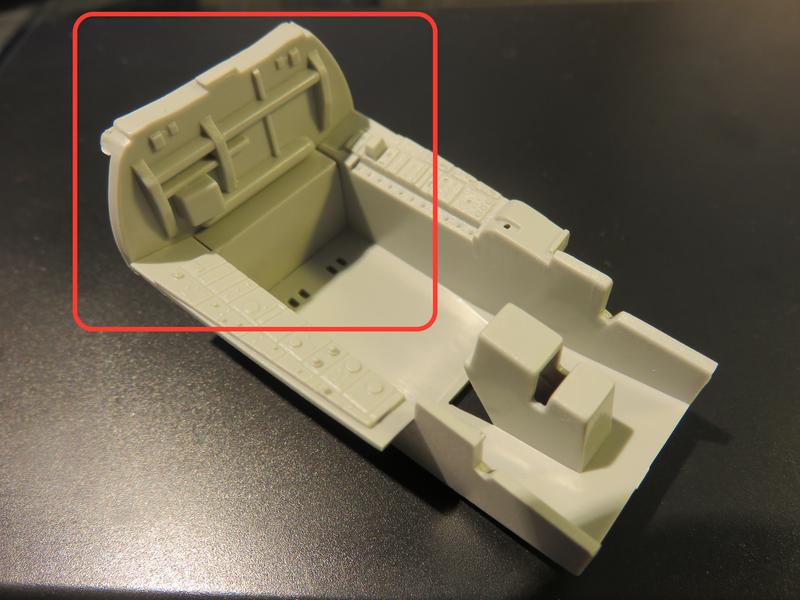
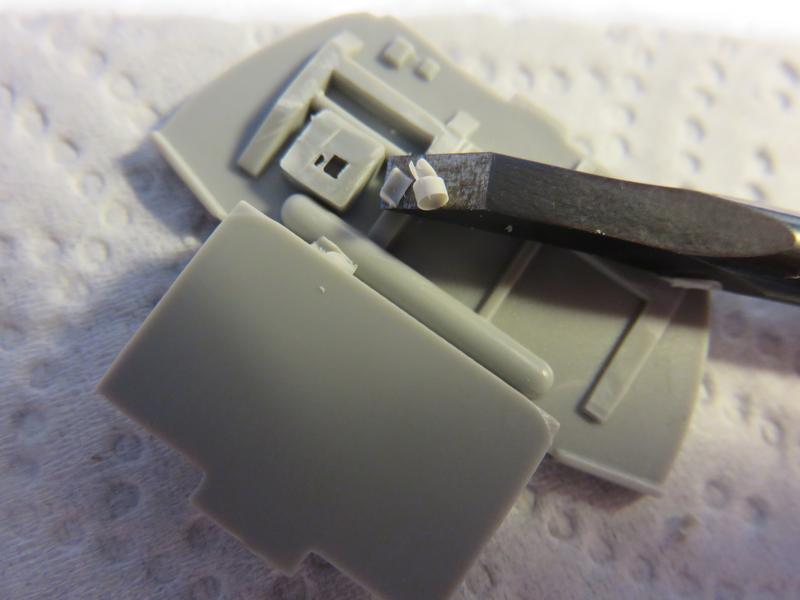
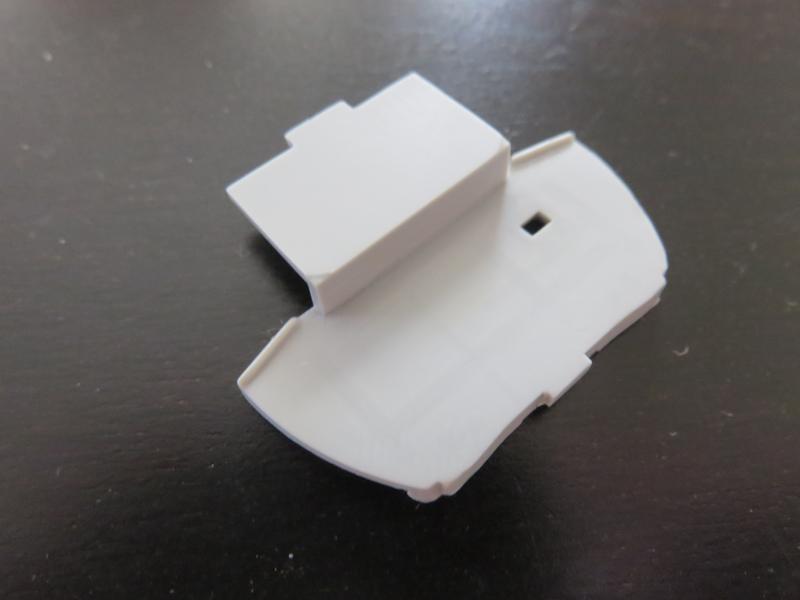
In the process of researching it became clear that even with the Eduard upgrades there was a lot of detail either missing, simplified or just plain wrong. The area that needs the most attention is actually the bulkhead behind the ejector seat. The kit provides a few basic lumps and bumps that don’t look like anything very much, and Eduard provides nothing. I want to bring this area to life so I removed all the details and created a plain canvas to do some scratch building. An hour or so of meditative cutting and sanding took it from this...
to this.
Right after that I removed and cleaned the Italeri ejector seat parts. I can see a lot of test fitting in my future as both the Italeri and Eduard instructions can be just a bit vague and some attachment points look flimsy. This work is going to need the modellers best tools - patience, care and experience. It feels good to be making a start.
Happy modelling guys.
Joel_W
Associate Editor
New York, United States
Joined: December 04, 2010
KitMaker: 11,666 posts
AeroScale: 7,410 posts
Joined: December 04, 2010
KitMaker: 11,666 posts
AeroScale: 7,410 posts
Posted: Sunday, October 29, 2017 - 01:56 AM UTC
Steve,
Looking forward to seeing you work your "magic" with the Italeri F-104C.
Nothing like starting with that clean canvas. Looking forward to seeing your progress in your next update.
Joel
Looking forward to seeing you work your "magic" with the Italeri F-104C.
Nothing like starting with that clean canvas. Looking forward to seeing your progress in your next update.
Joel
redcap
England - East Midlands, United Kingdom
Joined: November 06, 2005
KitMaker: 753 posts
AeroScale: 311 posts
Joined: November 06, 2005
KitMaker: 753 posts
AeroScale: 311 posts
Posted: Monday, October 30, 2017 - 12:21 AM UTC
Welcome back Steve after the 1/32 Mirage III saga!
Look forward to seeing you work your magic on this one.
Gary
Look forward to seeing you work your magic on this one.
Gary
KelticKnot
Scotland, United Kingdom
Joined: May 11, 2015
KitMaker: 768 posts
AeroScale: 656 posts
Joined: May 11, 2015
KitMaker: 768 posts
AeroScale: 656 posts
Posted: Monday, October 30, 2017 - 01:48 AM UTC
I seem to have missed you starting your new project Steve but I'll be along for the rest and I look forward to seeing the trials and triumphs
SteveAndrews
England - South East, United Kingdom
Joined: August 16, 2010
KitMaker: 693 posts
AeroScale: 551 posts
Joined: August 16, 2010
KitMaker: 693 posts
AeroScale: 551 posts
Posted: Monday, October 30, 2017 - 02:34 AM UTC
Hello friends (I hope I can call you that now)
Its great to have you along. I'm hoping there will be fewer trials with this kit, but let's see. Whatever happens your advice, encouragement, expertise and constructive criticism has become part of what I look forward when I start a new kit, so thanks for looking in.
Here's some progress...
Its great to have you along. I'm hoping there will be fewer trials with this kit, but let's see. Whatever happens your advice, encouragement, expertise and constructive criticism has become part of what I look forward when I start a new kit, so thanks for looking in.
Here's some progress...
SteveAndrews
England - South East, United Kingdom
Joined: August 16, 2010
KitMaker: 693 posts
AeroScale: 551 posts
Joined: August 16, 2010
KitMaker: 693 posts
AeroScale: 551 posts
Posted: Monday, October 30, 2017 - 02:40 AM UTC
Making models - like life in general - is full of decisions. One of the decisions we take when building a kit, especially when adding after market parts, is the extent to which we follow the manufacturers instructions. Now, you might be asking yourself why on earth a rational person would deviate from the carefully thought through steps provided in a kit. So, let me give you a little insight into how my brain thought about things. It started with…
I want to add more refined detail to the cockpit rear bulkhead…
…now, the detail will touch the cockpit sidewalls…
…so I’d better add the aftermarket photo etch to the sidewalls first to avoid fit problems with anything I scratch build…
…to do that I need to remove some of the original details…
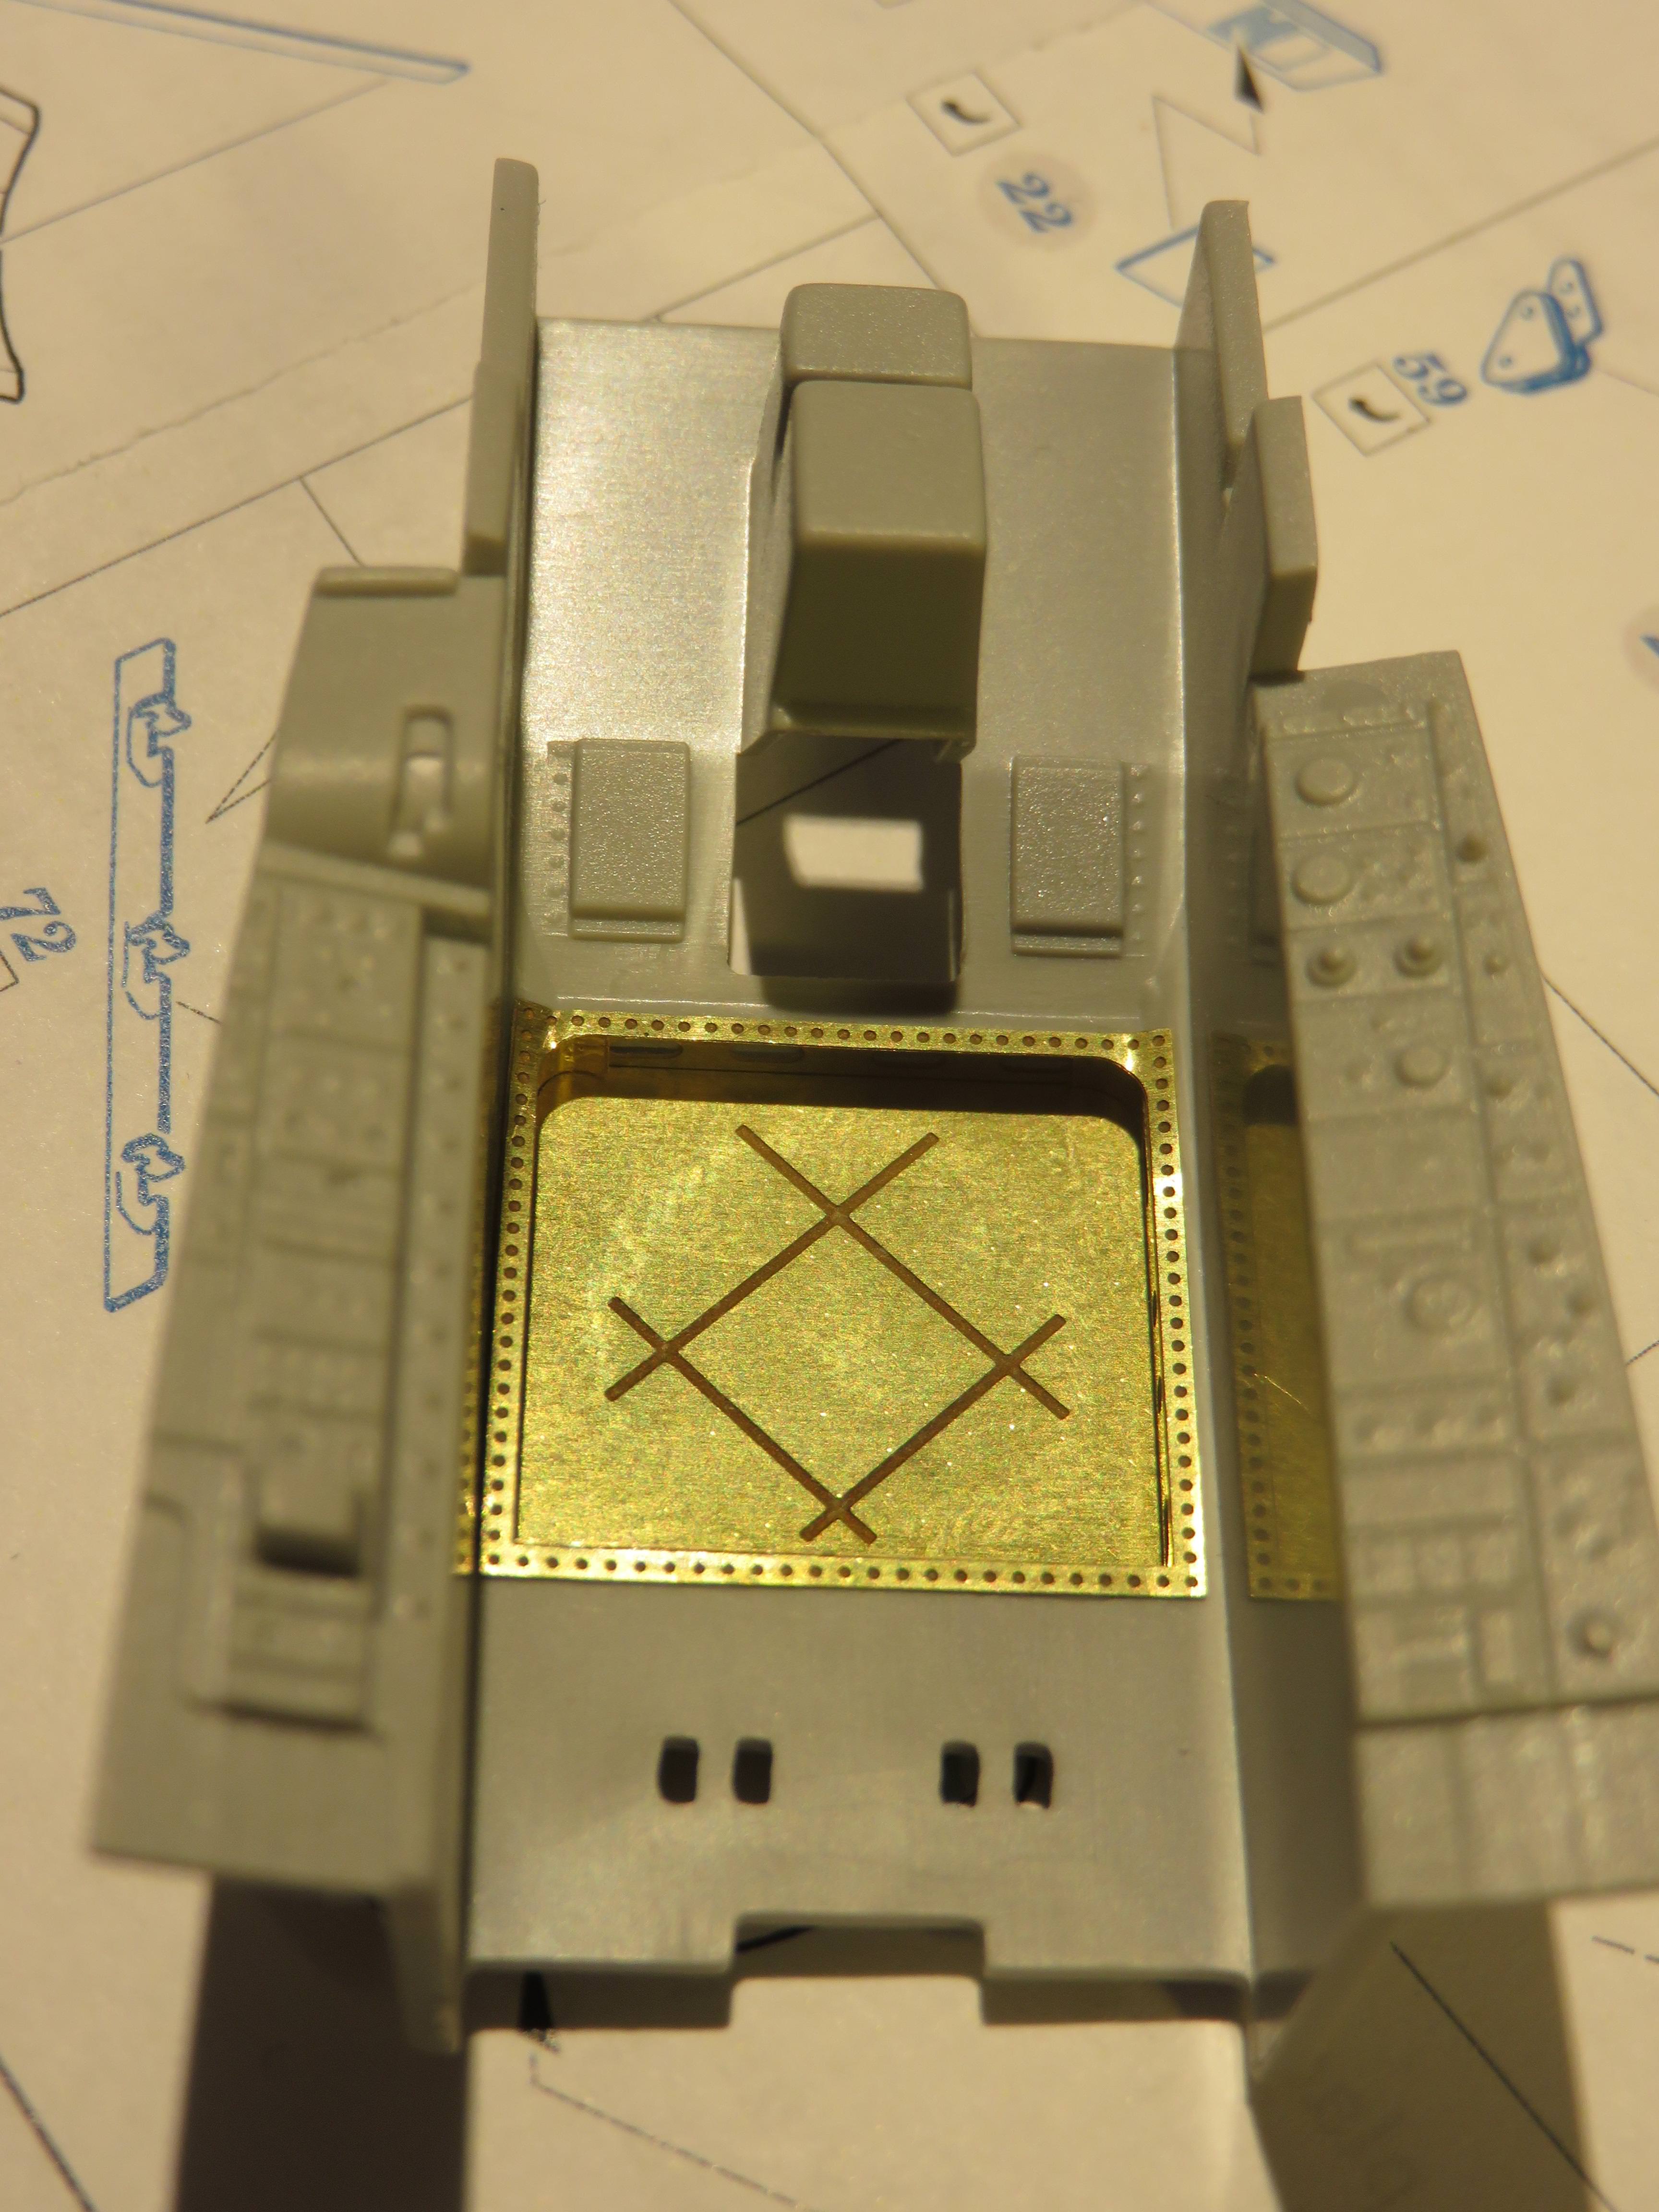
…and there’s a big cutting job to do on the cockpit floor…
…which risks damaging any photo etch I add, so I’ll do that cutting job first…
…and I’d better add the PE parts to the cockpit floor so I can see if they have any impact on the other parts.
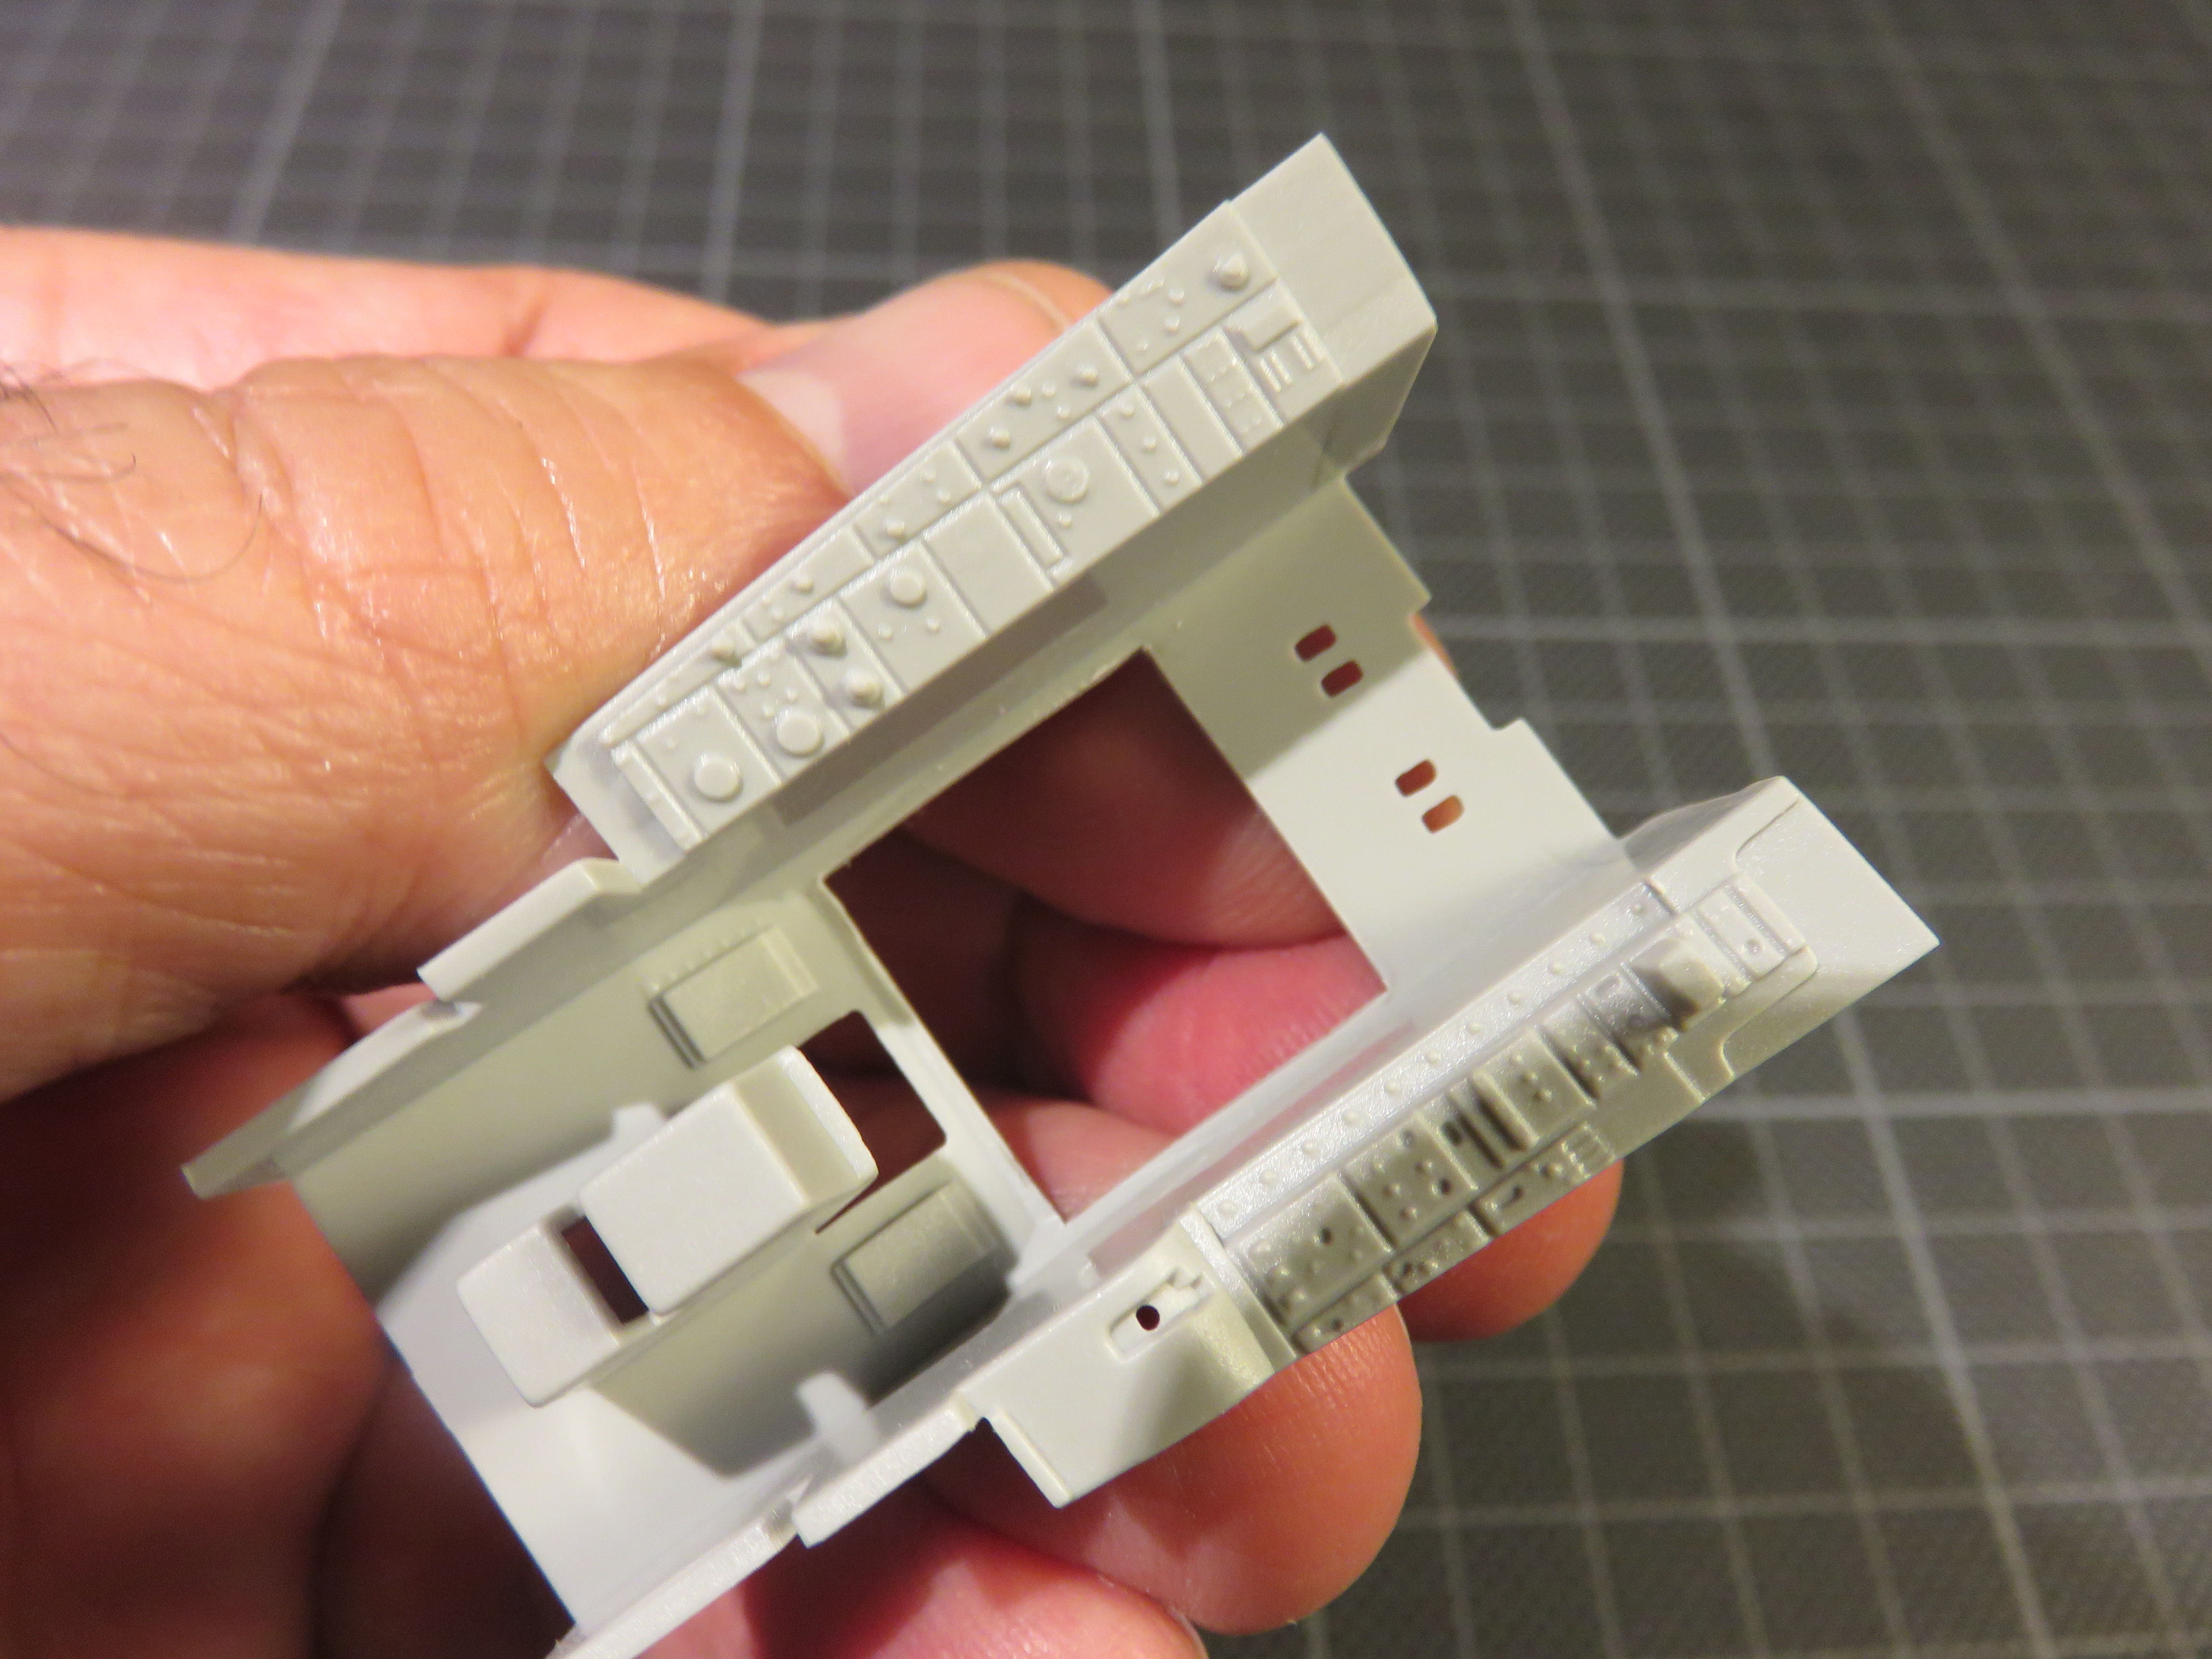
That fellow modellers is how I ended up making a big hole in the cockpit floor and adding the photo etch as a route to scratch building some detail on the rear bulkhead. Rational? You decide. This is what the hole looked like.
And how it looks now.
https://www.youtube.com/watch?v=P-JVnlB7Onk
Scrodes
Ontario, Canada
Joined: July 22, 2012
KitMaker: 771 posts
AeroScale: 763 posts
Joined: July 22, 2012
KitMaker: 771 posts
AeroScale: 763 posts
Posted: Monday, October 30, 2017 - 04:45 AM UTC
Oh wow, this is going to be spectacular. I'm along for the ride.
Posted: Monday, October 30, 2017 - 07:04 AM UTC
Hello Steve,
Nice to see you building again. I'm foiling this very same kit over at Large Scale Planes. I won't pirate your thread with any photos, but I think you'll be pleased with the fit of most parts, and the engineering is OK.
The only bugbear I found was some of the trench like details on the dorsal and side areas.
I'll be sure to check for your updates.
Enjoy,
Gaz
Posted: Monday, October 30, 2017 - 11:47 AM UTC
Definitely going to follow this. I am keen to try one these Italeri 104s so I will ignore the excesses and see what I can glean for a straightforward build.
cheers
Michael
cheers
Michael
SteveAndrews
England - South East, United Kingdom
Joined: August 16, 2010
KitMaker: 693 posts
AeroScale: 551 posts
Joined: August 16, 2010
KitMaker: 693 posts
AeroScale: 551 posts
Posted: Monday, October 30, 2017 - 05:12 PM UTC
Hello Gary, Matt and Michael
Its great to have you looking in. I hope to keep us all entertained.
Gary, please feel free to post some pics if you want to. I'm going to have a look at your build on LSP anyway. I know your foil technique will be spectacular.
Matt, thanks very much and welcome aboard.
Michael, yes looking at the kit I think you're right - it will build into a good looking model out of the box. I may have gone overboard a bit, but modelling is my only vice (at least that is what I say in public).
More soon, and have fun with your models. Oh, and Harvey, if you are reading this, I don't mean in that kind of way or that kind of model, even we are focusing on the 1960s here. It was never an excuse.
KelticKnot
Scotland, United Kingdom
Joined: May 11, 2015
KitMaker: 768 posts
AeroScale: 656 posts
Joined: May 11, 2015
KitMaker: 768 posts
AeroScale: 656 posts
Posted: Monday, October 30, 2017 - 05:55 PM UTC
Quoted Text
Rational? You decide.
It seems to me to be the most fun part when you put down the instructions and are surfing on the edge of what the kit's maker intended ! And then you need to untangle a mess of steps required so you don't shoot yourself in the foot later.
Creativity at its best form in this hobby
SteveAndrews
England - South East, United Kingdom
Joined: August 16, 2010
KitMaker: 693 posts
AeroScale: 551 posts
Joined: August 16, 2010
KitMaker: 693 posts
AeroScale: 551 posts
Posted: Tuesday, October 31, 2017 - 05:15 PM UTC
Hi Paul
Yes, I reckon you're right, especially about the creativity part. A fun build and a satisfying model at the end are why I play this game. I hope you and the other guys (and maybe girls?)looking in are having fun too.
SteveAndrews
England - South East, United Kingdom
Joined: August 16, 2010
KitMaker: 693 posts
AeroScale: 551 posts
Joined: August 16, 2010
KitMaker: 693 posts
AeroScale: 551 posts
Posted: Tuesday, October 31, 2017 - 05:25 PM UTC
By the way, Gary, the foil work on your F-104 is beautiful. If anyone else wants to take a look, go here:
http://forum.largescaleplanes.com/index.php?showtopic=68424&hl=starfighter
You keep tempting me you know, but I just bought some new NMF paints. Now, if you did a video tutorial... :-)
http://forum.largescaleplanes.com/index.php?showtopic=68424&hl=starfighter
You keep tempting me you know, but I just bought some new NMF paints. Now, if you did a video tutorial... :-)
Joel_W
Associate Editor
New York, United States
Joined: December 04, 2010
KitMaker: 11,666 posts
AeroScale: 7,410 posts
Joined: December 04, 2010
KitMaker: 11,666 posts
AeroScale: 7,410 posts
Posted: Wednesday, November 01, 2017 - 02:02 AM UTC
Steve,
Please forgive me for high jacking your build thread, but I followed your link to Gary's build on LSP, and read through his blog to date. My God, Gary has certainly become a master metal foiler. Simply outstanding.
But like you, all of my NMF work has been done to date with Alcad2s, and I'm really comfortable with the process. But comparing it to real Aluminum metal, side by side the Aluminum looks more like what it really is.
Joel
SteveAndrews
England - South East, United Kingdom
Joined: August 16, 2010
KitMaker: 693 posts
AeroScale: 551 posts
Joined: August 16, 2010
KitMaker: 693 posts
AeroScale: 551 posts
Posted: Wednesday, November 01, 2017 - 04:54 PM UTC
Hi Joel
No problem at all. Gary's work is just lovely and everyone should take a look. I was messing about with some kitchen grade aluminium foil last night, and it made me realize how much skill there is in Gary's work.
Have a great day.
Steve
No problem at all. Gary's work is just lovely and everyone should take a look. I was messing about with some kitchen grade aluminium foil last night, and it made me realize how much skill there is in Gary's work.
Have a great day.
Steve
Joel_W
Associate Editor
New York, United States
Joined: December 04, 2010
KitMaker: 11,666 posts
AeroScale: 7,410 posts
Joined: December 04, 2010
KitMaker: 11,666 posts
AeroScale: 7,410 posts
Posted: Wednesday, November 01, 2017 - 09:25 PM UTC
Quoted Text
Hi Joel
No problem at all. Gary's work is just lovely and everyone should take a look. I was messing about with some kitchen grade aluminium foil last night, and it made me realize how much skill there is in Gary's work.
Have a great day.
Steve
Steve,
That's the truth for sure. Foiling is an art/skill unto itself. One that I've never been able to get past a few flat surfaces. The concave and convex surfaces are much harder to do without wrinkles spoiling the look. Gary's put in a lot of time over the last few years learning and refining his foiling skills and techniques. If he didn't live in Australia, I'd sub contract my needed to work to him
Joel
SteveAndrews
England - South East, United Kingdom
Joined: August 16, 2010
KitMaker: 693 posts
AeroScale: 551 posts
Joined: August 16, 2010
KitMaker: 693 posts
AeroScale: 551 posts
Posted: Sunday, November 05, 2017 - 12:00 AM UTC
Hey Joel
Yup, I reckon he has a small business venture there from the envious and awestruck like me.
In the meantime I've been playing with plastic...
Yup, I reckon he has a small business venture there from the envious and awestruck like me.
In the meantime I've been playing with plastic...
SteveAndrews
England - South East, United Kingdom
Joined: August 16, 2010
KitMaker: 693 posts
AeroScale: 551 posts
Joined: August 16, 2010
KitMaker: 693 posts
AeroScale: 551 posts
Posted: Sunday, November 05, 2017 - 12:03 AM UTC
With the big hole in the cockpit floor dealt with, it was time to sand off the kit details from the instrument panels and prepare them for the photo etch replacement parts. That’s a straightforward job that I tackle with three sanding sticks - 320 grit, 600 grit and then finally 2000 grit, taking care to preserve the basic angles through lots of stopping and checking. The 2000 grit gets rid of the big scratches. You can go further of course but I wanted to keep some scoring so the self-adhesive photo etch has something to bite on later.
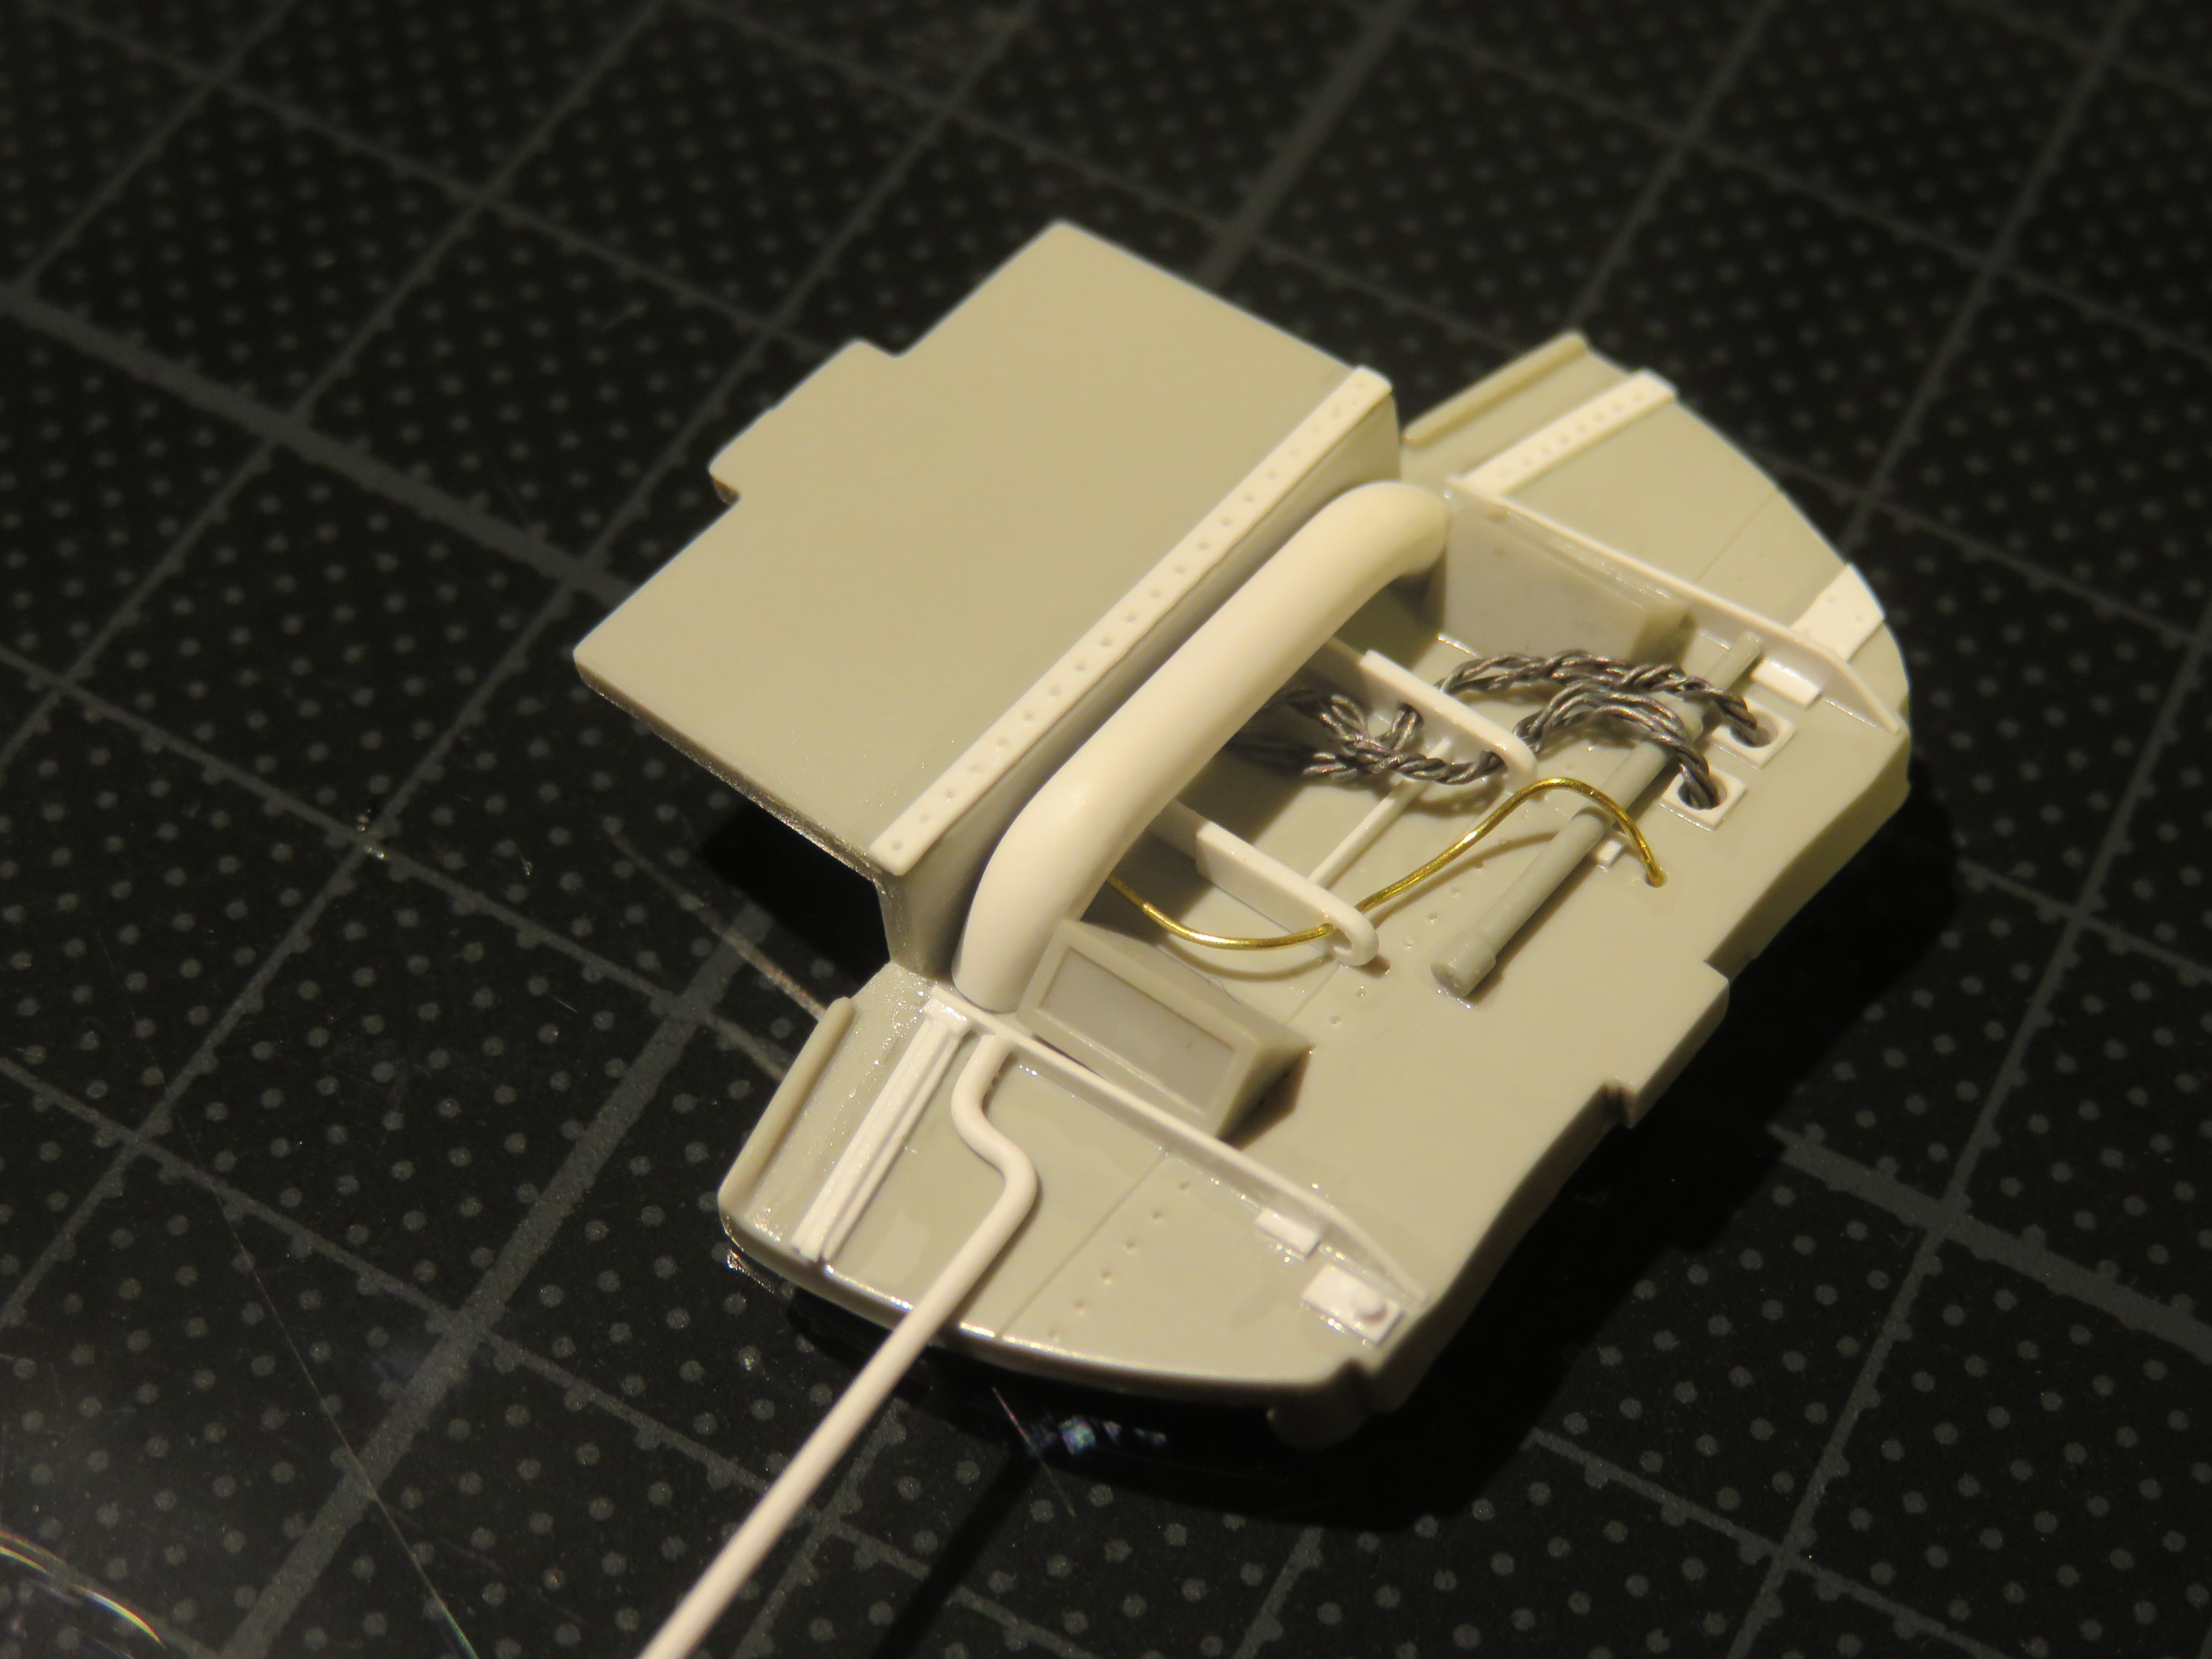
Finally with all the prep steps done I turned my attention to the rear bulkhead. Some time spent with plastic card, led and copper wire, Evergreen strip and a rummage through the spares box resulted in this:
I have to admit this isn’t an exact replica of the real aircraft. I couldn’t get really good references so I made the best impression based on the photos I got my hands on. This area won’t be a focal point of the kit once its done, so I settled for the best I could. My aim was to introduce some more convincing detail than the kit parts offered.
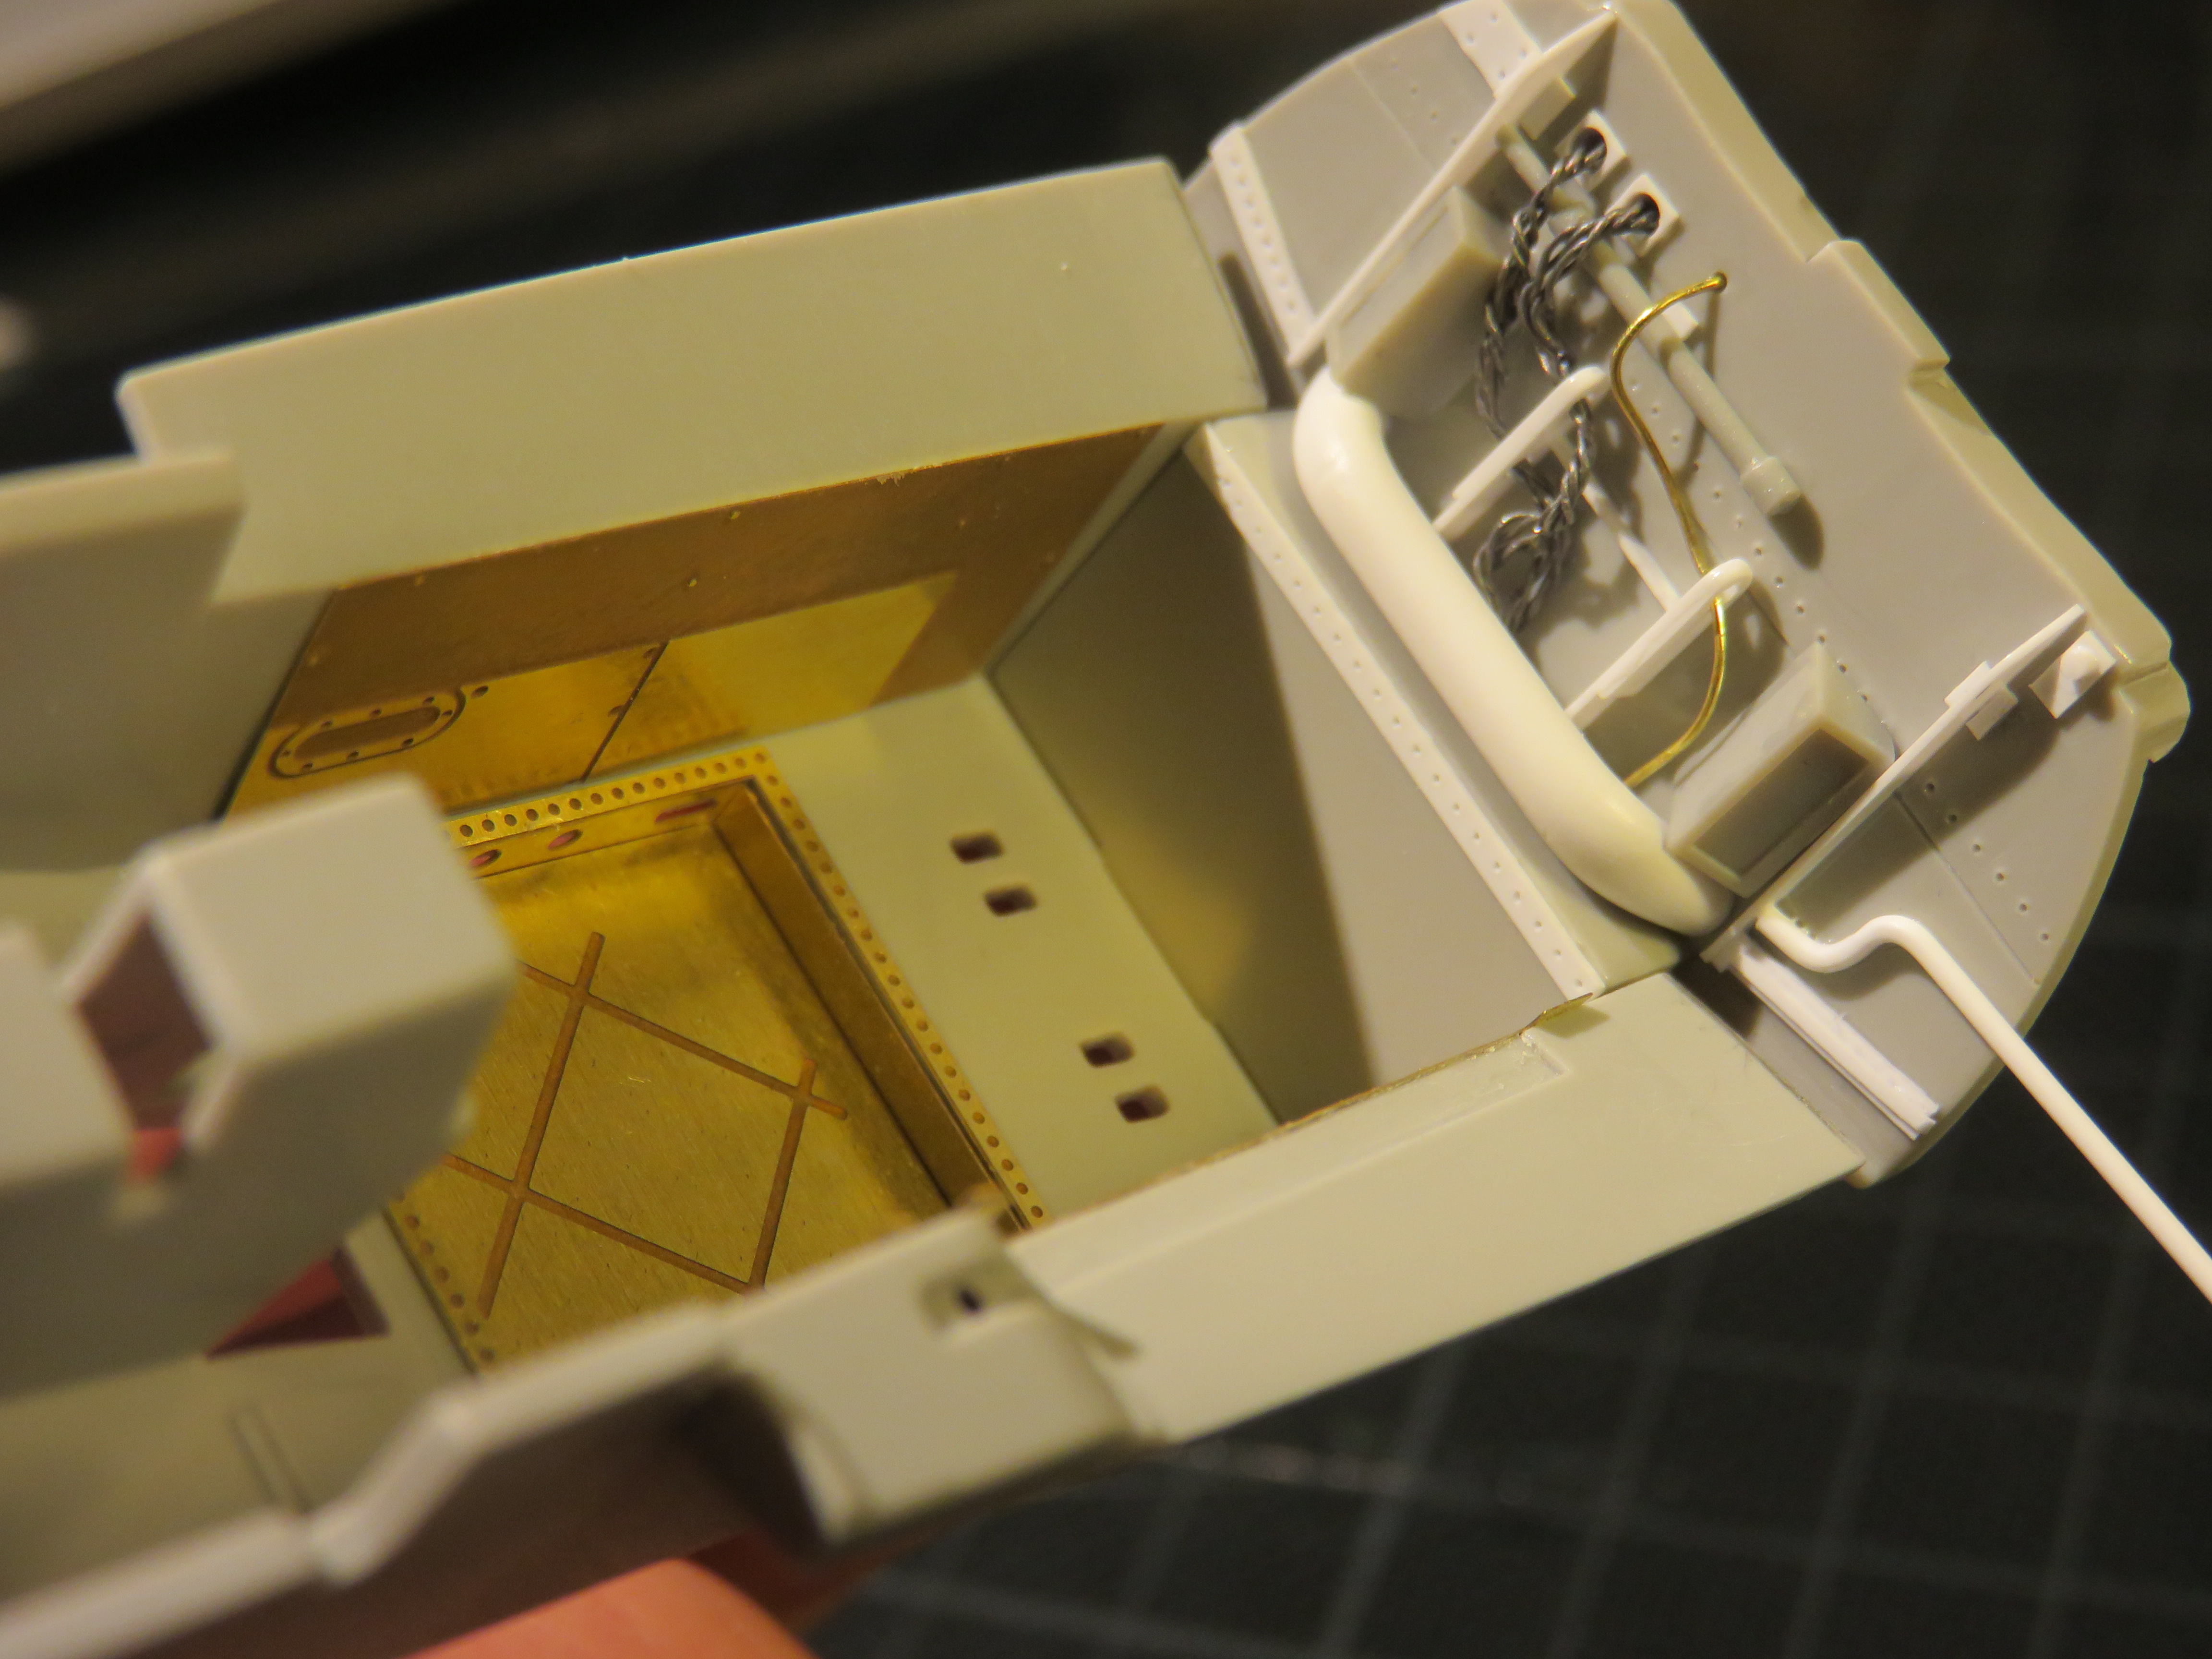
Here’s how it looks roughly held in place against the cockpit tub.
There's a bit more I can do, but you get the idea.
Have fun with your kits guys.
Steve.
Posted: Sunday, November 05, 2017 - 04:53 AM UTC
Steve,
That's some impressive added detail. Except for the pilot, I stayed OOB in order to maintain my sanity.
I've started applying the decals and imagine they will take quite some time. There are two large sheets, and one entire sheet is for the common insignia and stencils. I'm doing all kid them before I attach wings and vertical stabilizer for ease of access.
Keep up the good work, I really dig how well you do interior details.
Gaz
Joel_W
Associate Editor
New York, United States
Joined: December 04, 2010
KitMaker: 11,666 posts
AeroScale: 7,410 posts
Joined: December 04, 2010
KitMaker: 11,666 posts
AeroScale: 7,410 posts
Posted: Sunday, November 05, 2017 - 05:39 AM UTC
Steve,
The PE floor insert came out perfect. The box sure does look perfectly square. And the rear bulkhead detailing is more then busy enough to fool's one eye.
Joel
The PE floor insert came out perfect. The box sure does look perfectly square. And the rear bulkhead detailing is more then busy enough to fool's one eye.
Joel
KelticKnot
Scotland, United Kingdom
Joined: May 11, 2015
KitMaker: 768 posts
AeroScale: 656 posts
Joined: May 11, 2015
KitMaker: 768 posts
AeroScale: 656 posts
Posted: Sunday, November 05, 2017 - 01:25 PM UTC
The bulkhead looks great Steve and will look even better and busier with paint i'm sure. It all looks incredibly neat !
On a separate note, Welcome back Joel... you have been missed
Posted: Sunday, November 05, 2017 - 09:35 PM UTC
Hi Steve
Fantastic work already as usual! This is going to be an inspiring build to follow.
I shot a Walkaround of a Starfighter in Athens many years ago. I'm afraid it wasn't possible to access the cockpit, but I managed to get some detail shots of the landing gear and wheel-wells etc. that might hopefully be of some use to you when you get to that stage.
All the best
Rowan
SteveAndrews
England - South East, United Kingdom
Joined: August 16, 2010
KitMaker: 693 posts
AeroScale: 551 posts
Joined: August 16, 2010
KitMaker: 693 posts
AeroScale: 551 posts
Posted: Monday, November 06, 2017 - 03:02 AM UTC
Evening guys
Gaz, I think everyone is going to be too busy admiring their reflection in your amazing foil work to look elsewhere. The decalling seems a long way off to me right now.
Joel, thanks very much. This is where my Virgo side runs free and wild, well OK he gets his magnifying glasses and set square out :-)
Paul, thanks also. Ive been away a bit too so I didn't notice Joel's absence. Joel I hope everything is good in your world.
Rowan, that walk around is really great. Thanks a million for sharing it, and for looking in
More progress tomorrow I hope.
Bye for now.
SteveAndrews
England - South East, United Kingdom
Joined: August 16, 2010
KitMaker: 693 posts
AeroScale: 551 posts
Joined: August 16, 2010
KitMaker: 693 posts
AeroScale: 551 posts
Posted: Tuesday, November 21, 2017 - 01:04 AM UTC
Hi guys
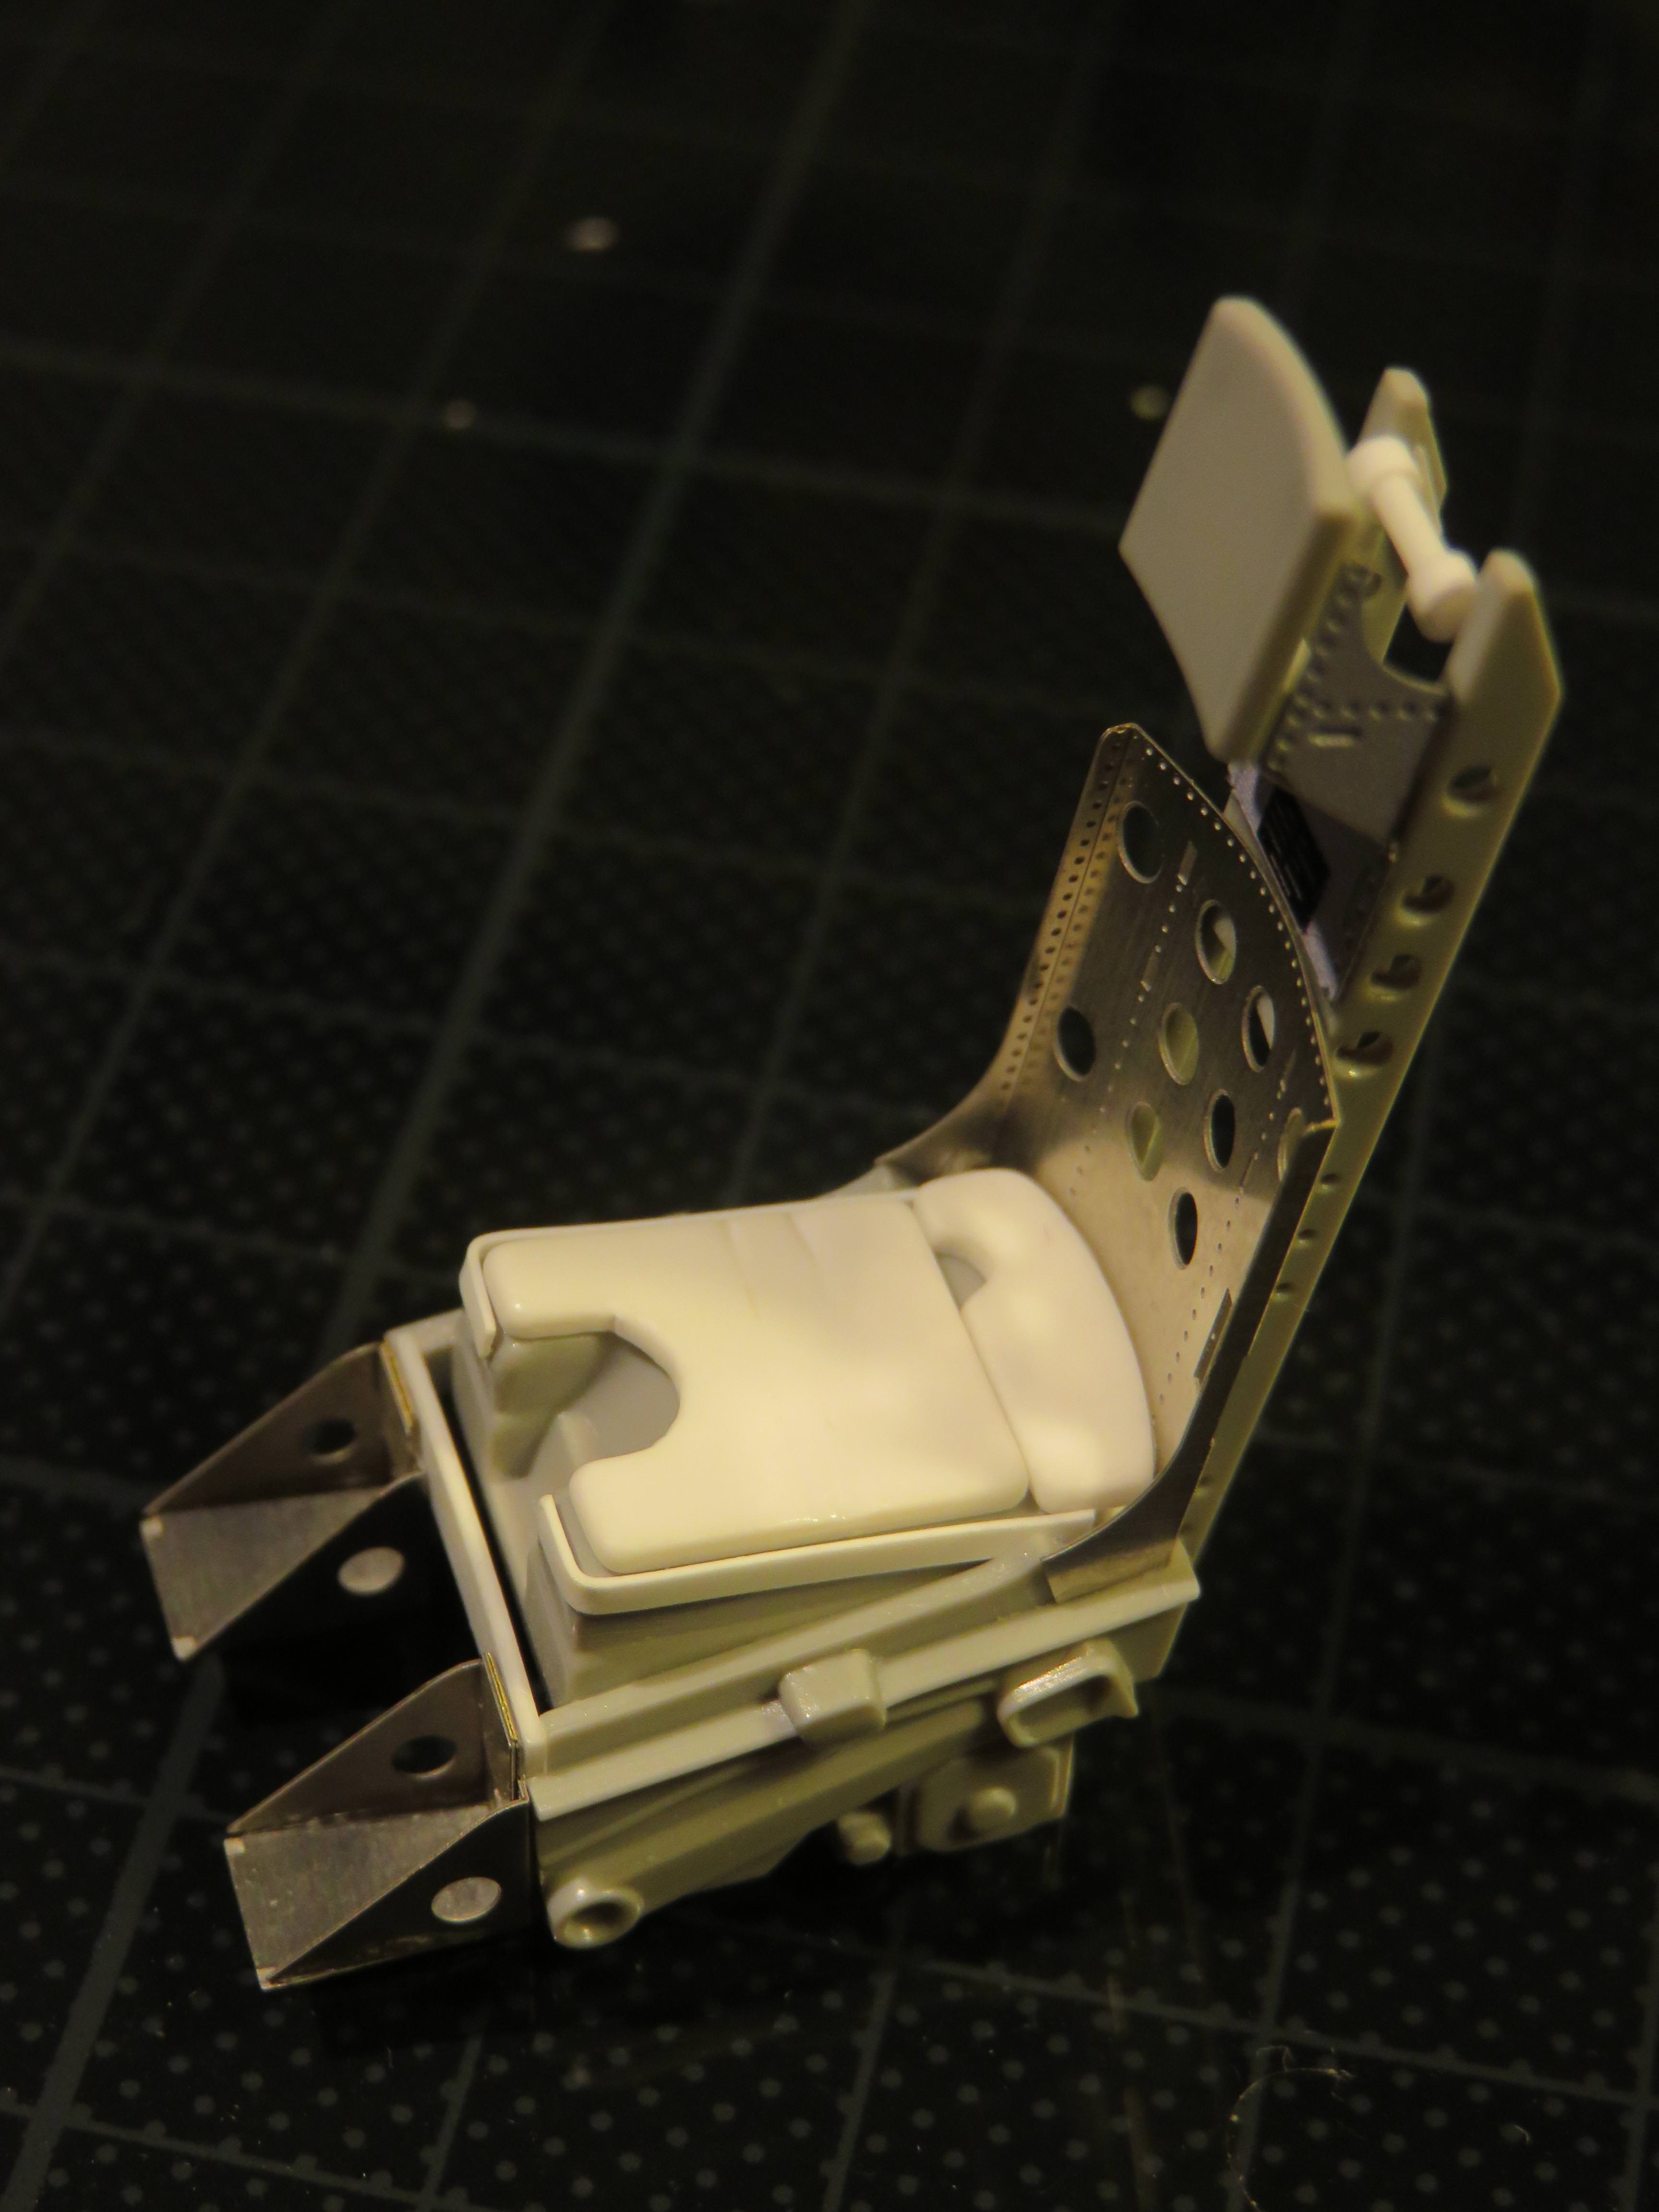
Fresh back from a few days in London I got stuck in to the ejector seat. A combination of the kit parts, Eduard photo etch and some scratch building got me here. Some of the PE is already coloured but I’m going to paint everything anyway, so this was all about assembly.
And here’s the ejector seat and cockpit tub side by side.
I still have lots to do in the tub but the seat is largely finished apart from the webbing and seat belts. It starts to feel like there's a busy cockpit emerging.
Happy modelling.
Steve