

Very nice Steve. I haven't heard of Ultimate Primer. Who makes that because it certainly has a smooth finish.
cheers
Michael
Cold War (1950-1974)
Discuss the aircraft modeling subjects during the Cold War period.
Discuss the aircraft modeling subjects during the Cold War period.
Hosted by Tim Hatton
Best Starfighter Ever?
Cosimodo

#335

Joined: September 03, 2013
KitMaker: 1,808 posts
AeroScale: 195 posts

Posted: Sunday, June 03, 2018 - 07:45 PM UTC

SteveAndrews

Joined: August 16, 2010
KitMaker: 693 posts
AeroScale: 551 posts
Posted: Sunday, June 03, 2018 - 10:52 PM UTC
Hi Michael
Thanks very much. Ultimate Primer is from these guys:
https://www.umpretail.com/
It's actually Stynylrez primer from Badger repackaged, which might be more familiar and/or available in the US?
Whichever one you go for, they are definitely worth a try. Just don't be put off by how thick it is out of the bottle - follow the instructions and it will reward you every time.
Have a great day,
S
SteveAndrews
Joined: August 16, 2010
KitMaker: 693 posts
AeroScale: 551 posts
Posted: Sunday, June 17, 2018 - 07:42 AM UTC
When it comes to painting cockpits, I tend to use techniques that are more commonly found in armour modelling; techniques like colour modulation, filters and chipping. To start the interior of the F-104C I mixed up a mid-grey with a slight blue tint using Tamiya paints and levelling thinner. I sprayed it on lightly in areas in shadow such as the floor and the lower sidewalls, to let the primer show. I added some white to the mix and gave heavier coat to surfaces that face up towards the light or are exposed, for example to top third of the ejector seat. In short I used a pretty standard modulation technique. The results are more obvious to the naked eye than they are in the photos below, but you might get a hint of the tint.
The grey coat has revealed a few imperfections, but none are bad enough to go back a step. However the grey also showed up one very irritating omission; I forgot to add the row of buttons in the recessed part of the left side instrument panel. Luckily, Eduard supplies a coloured photo-etch part. After all my moaning the coloured PE is coming to my rescue. I guess that's karma.
Next up Ill be reaching for the paint brushes.
Happy modelling guys.
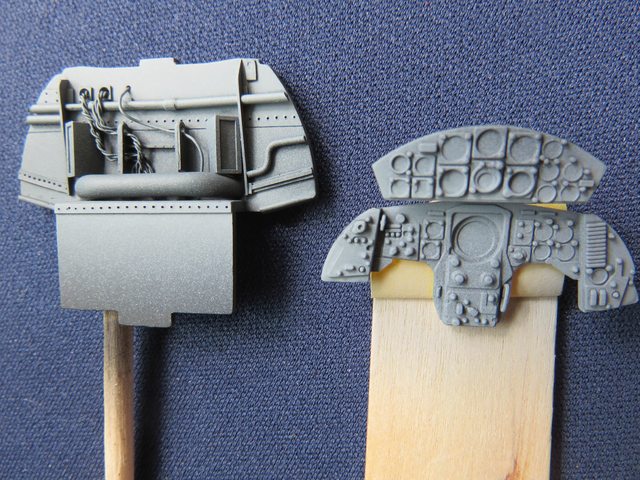
Joel_W

Joined: December 04, 2010
KitMaker: 11,666 posts
AeroScale: 7,410 posts
Posted: Wednesday, June 20, 2018 - 08:08 AM UTC
Steve,
The gray color coat really makes that seat pop. Looking forward to seeing more of your cockpit painting.
Joel
The gray color coat really makes that seat pop. Looking forward to seeing more of your cockpit painting.
Joel

SteveAndrews
Joined: August 16, 2010
KitMaker: 693 posts
AeroScale: 551 posts
Posted: Thursday, June 21, 2018 - 06:29 PM UTC
Hey Joel,
Thanks very much. The brushes are out and Im blocking in some basic colours. Photos soon.
Have a great day,
Steve
Thanks very much. The brushes are out and Im blocking in some basic colours. Photos soon.
Have a great day,
Steve
SteveAndrews
Joined: August 16, 2010
KitMaker: 693 posts
AeroScale: 551 posts
Posted: Monday, June 25, 2018 - 08:02 AM UTC
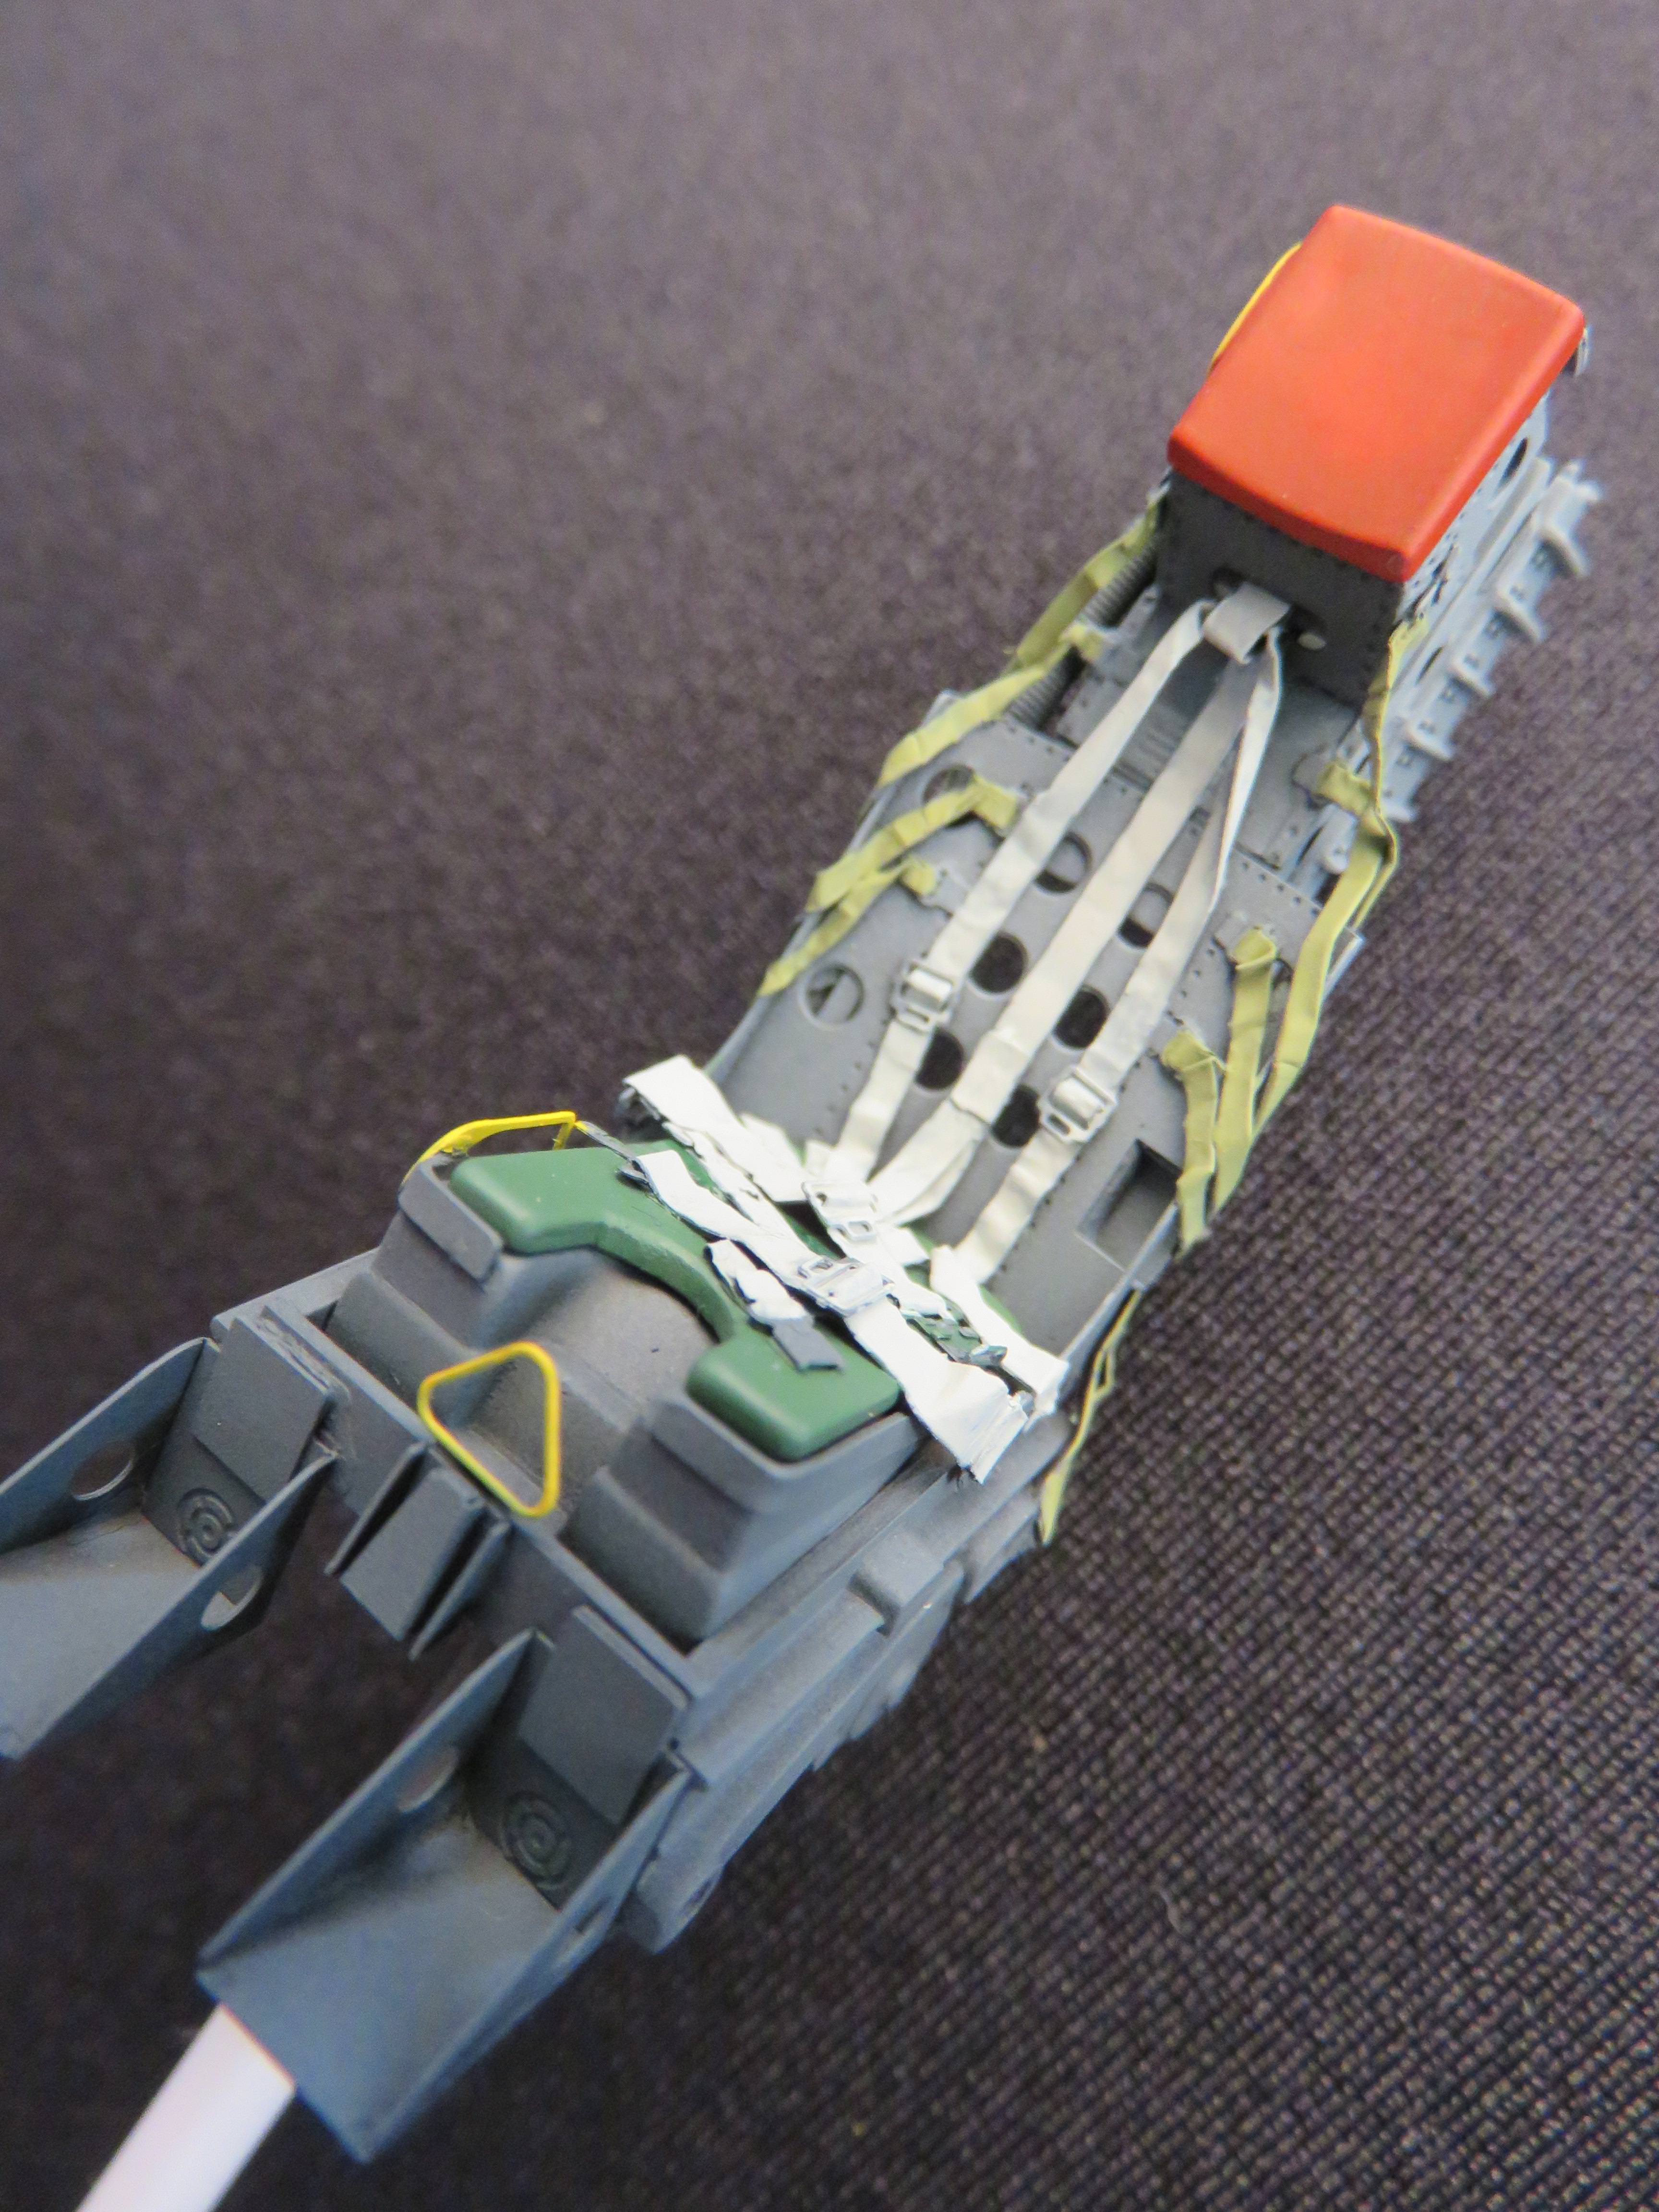
I reached for the paintbrushes. Heres the ejector seat with the main colours blocked in. I used a combination of Vallejo model colour and Mission Model Paints, applying two or three thin layers to preserve as much detail as I could and keep the finish as smooth as a polished, er
smooth thing. Mission Model Paints are great for brush painting. They thin well, dont dry out too quickly and have a good self-levelling quality. There are a few more details to do, and once theses basic colours have dried Ill enhance the shadows and highlights and do bit of weathering.
Happy modelling guys
P.S. RIP Military Modelling.
P.P.S. England 6:1 Panama!
Happy modelling guys
P.S. RIP Military Modelling.
P.P.S. England 6:1 Panama!
Cosimodo
#335
Joined: September 03, 2013
KitMaker: 1,808 posts
AeroScale: 195 posts
Posted: Monday, June 25, 2018 - 09:49 PM UTC
Great detail painting Steve. The seat looks superb.
cheers
Michael
cheers
Michael
SteveAndrews
Joined: August 16, 2010
KitMaker: 693 posts
AeroScale: 551 posts
Posted: Tuesday, June 26, 2018 - 09:16 AM UTC
Hi Michael
Thanks very much. I hope to show some more soon. I do have to give another plug for Mission Model Paints which seem to load onto the brush beautifully and cover well too.
Have a great day,
Steve
Thanks very much. I hope to show some more soon. I do have to give another plug for Mission Model Paints which seem to load onto the brush beautifully and cover well too.
Have a great day,
Steve
SteveAndrews
Joined: August 16, 2010
KitMaker: 693 posts
AeroScale: 551 posts
Posted: Monday, July 09, 2018 - 08:50 AM UTC
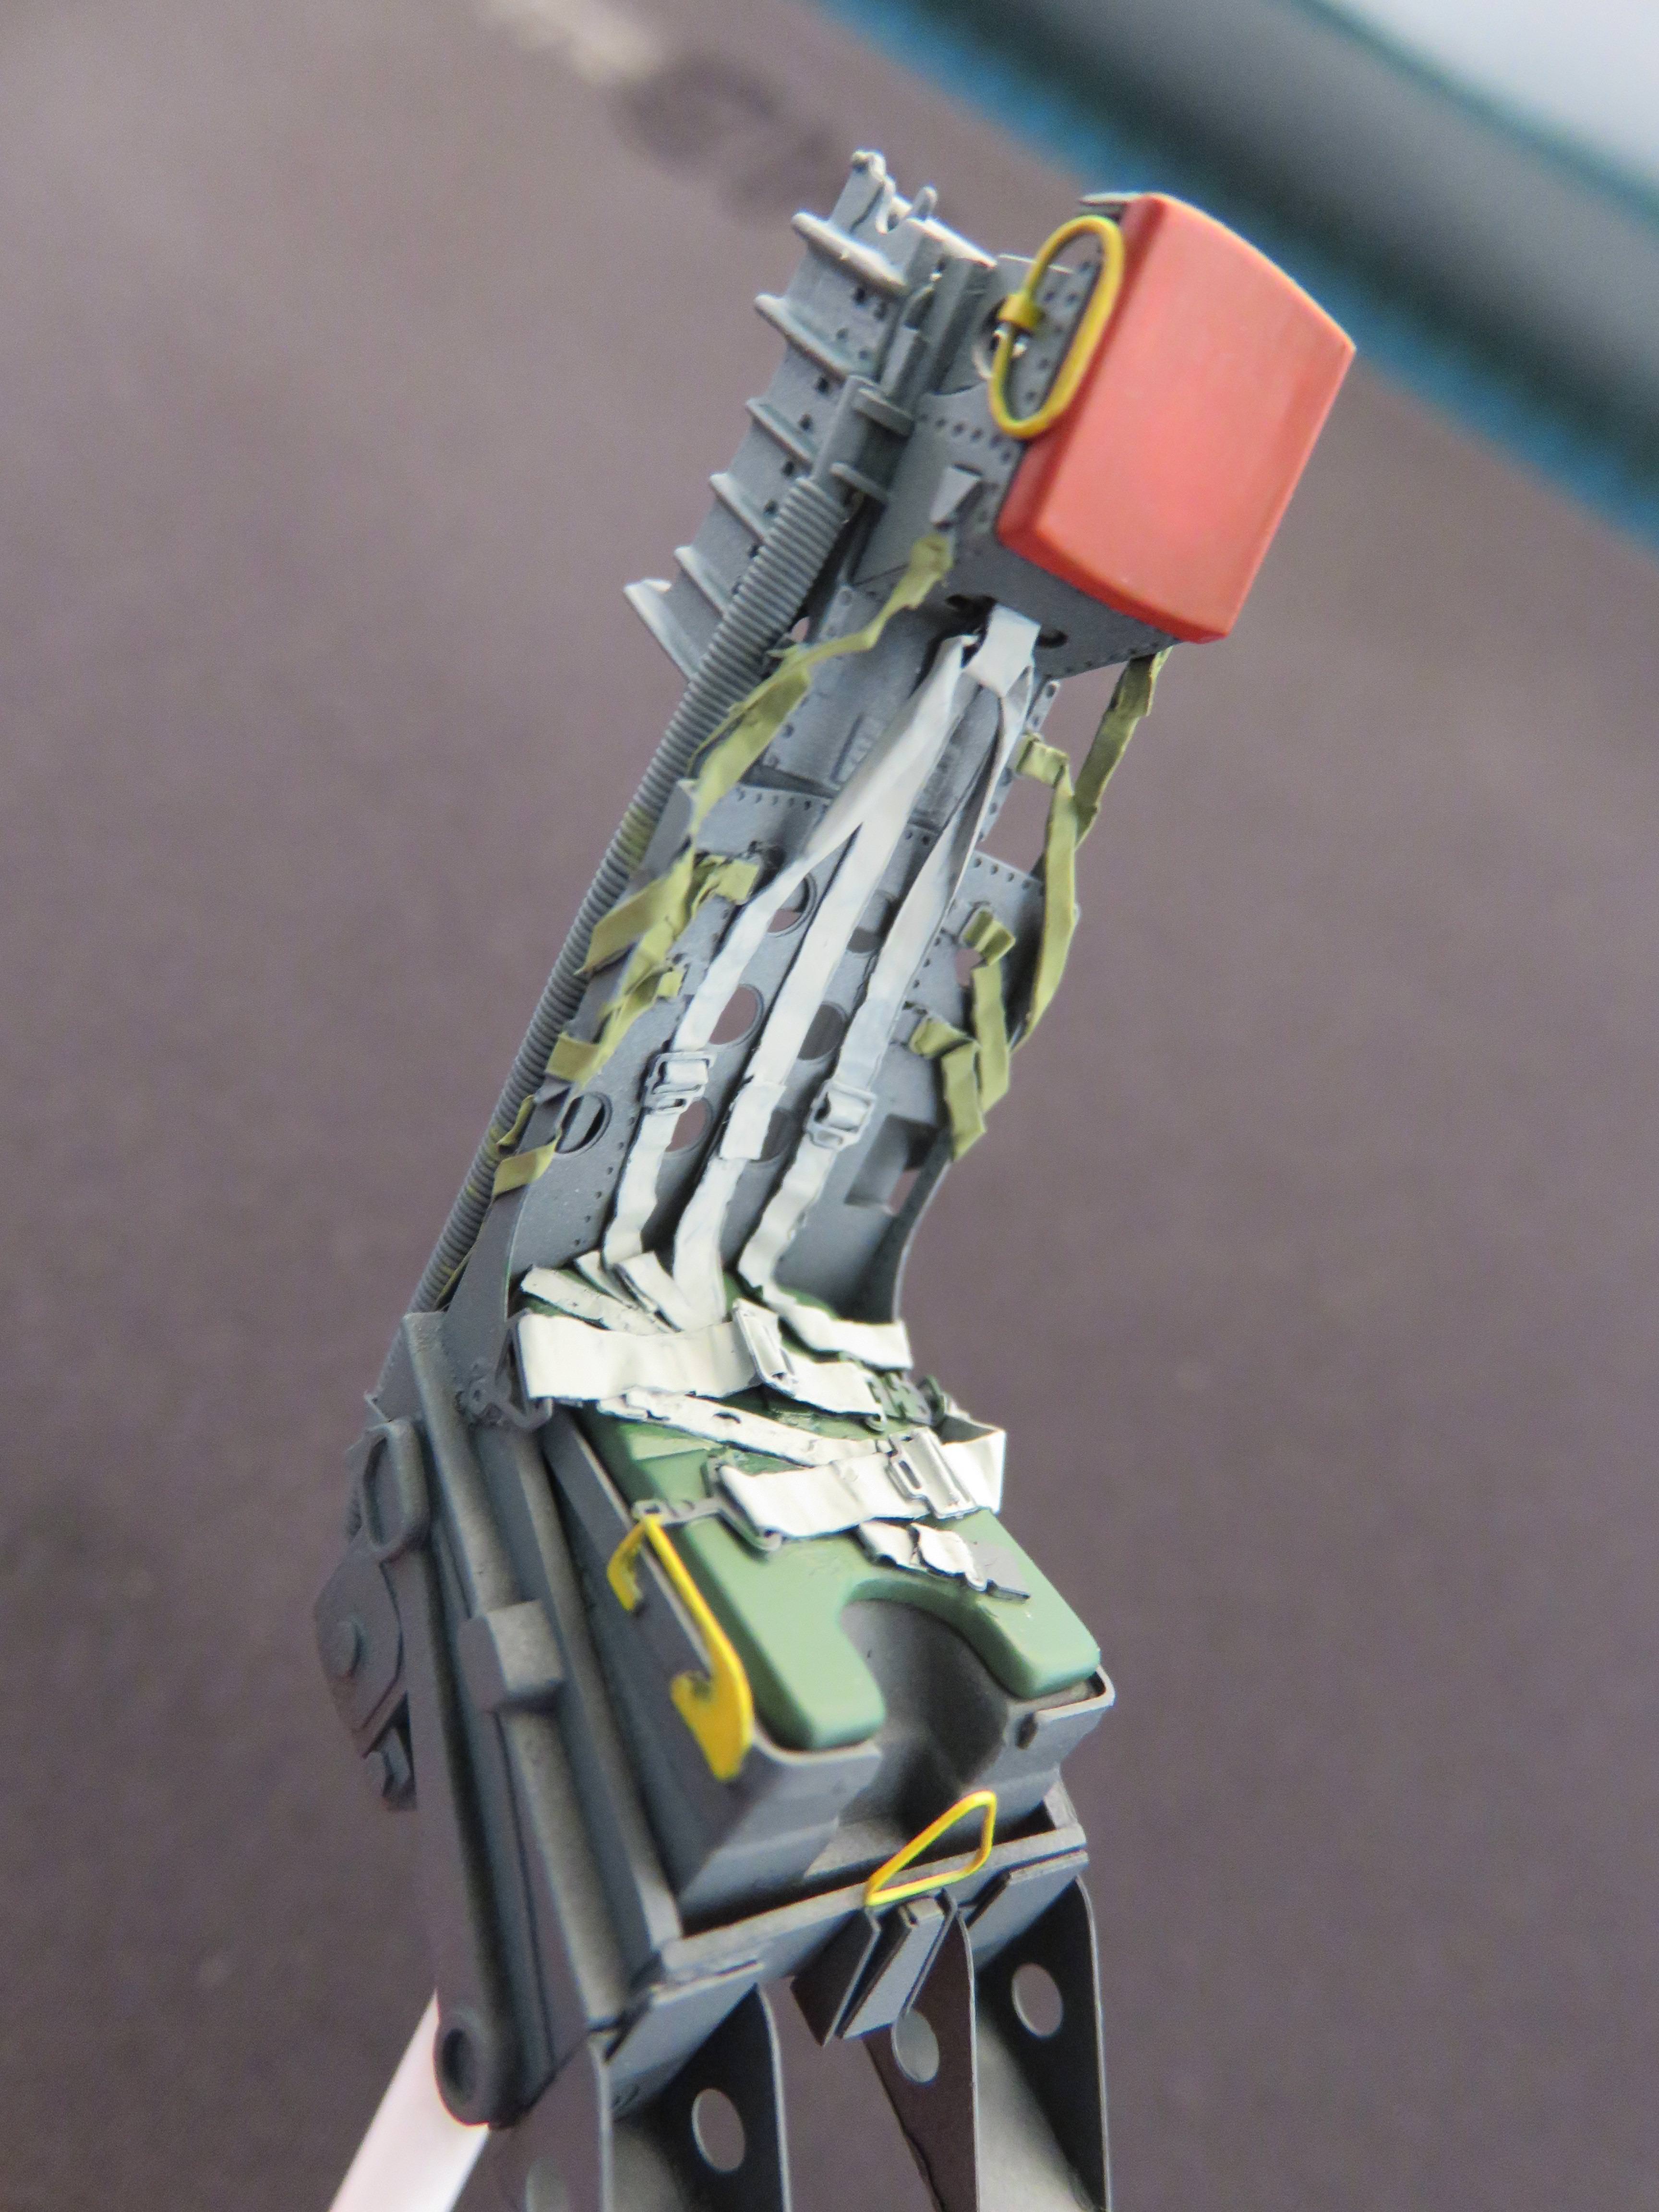
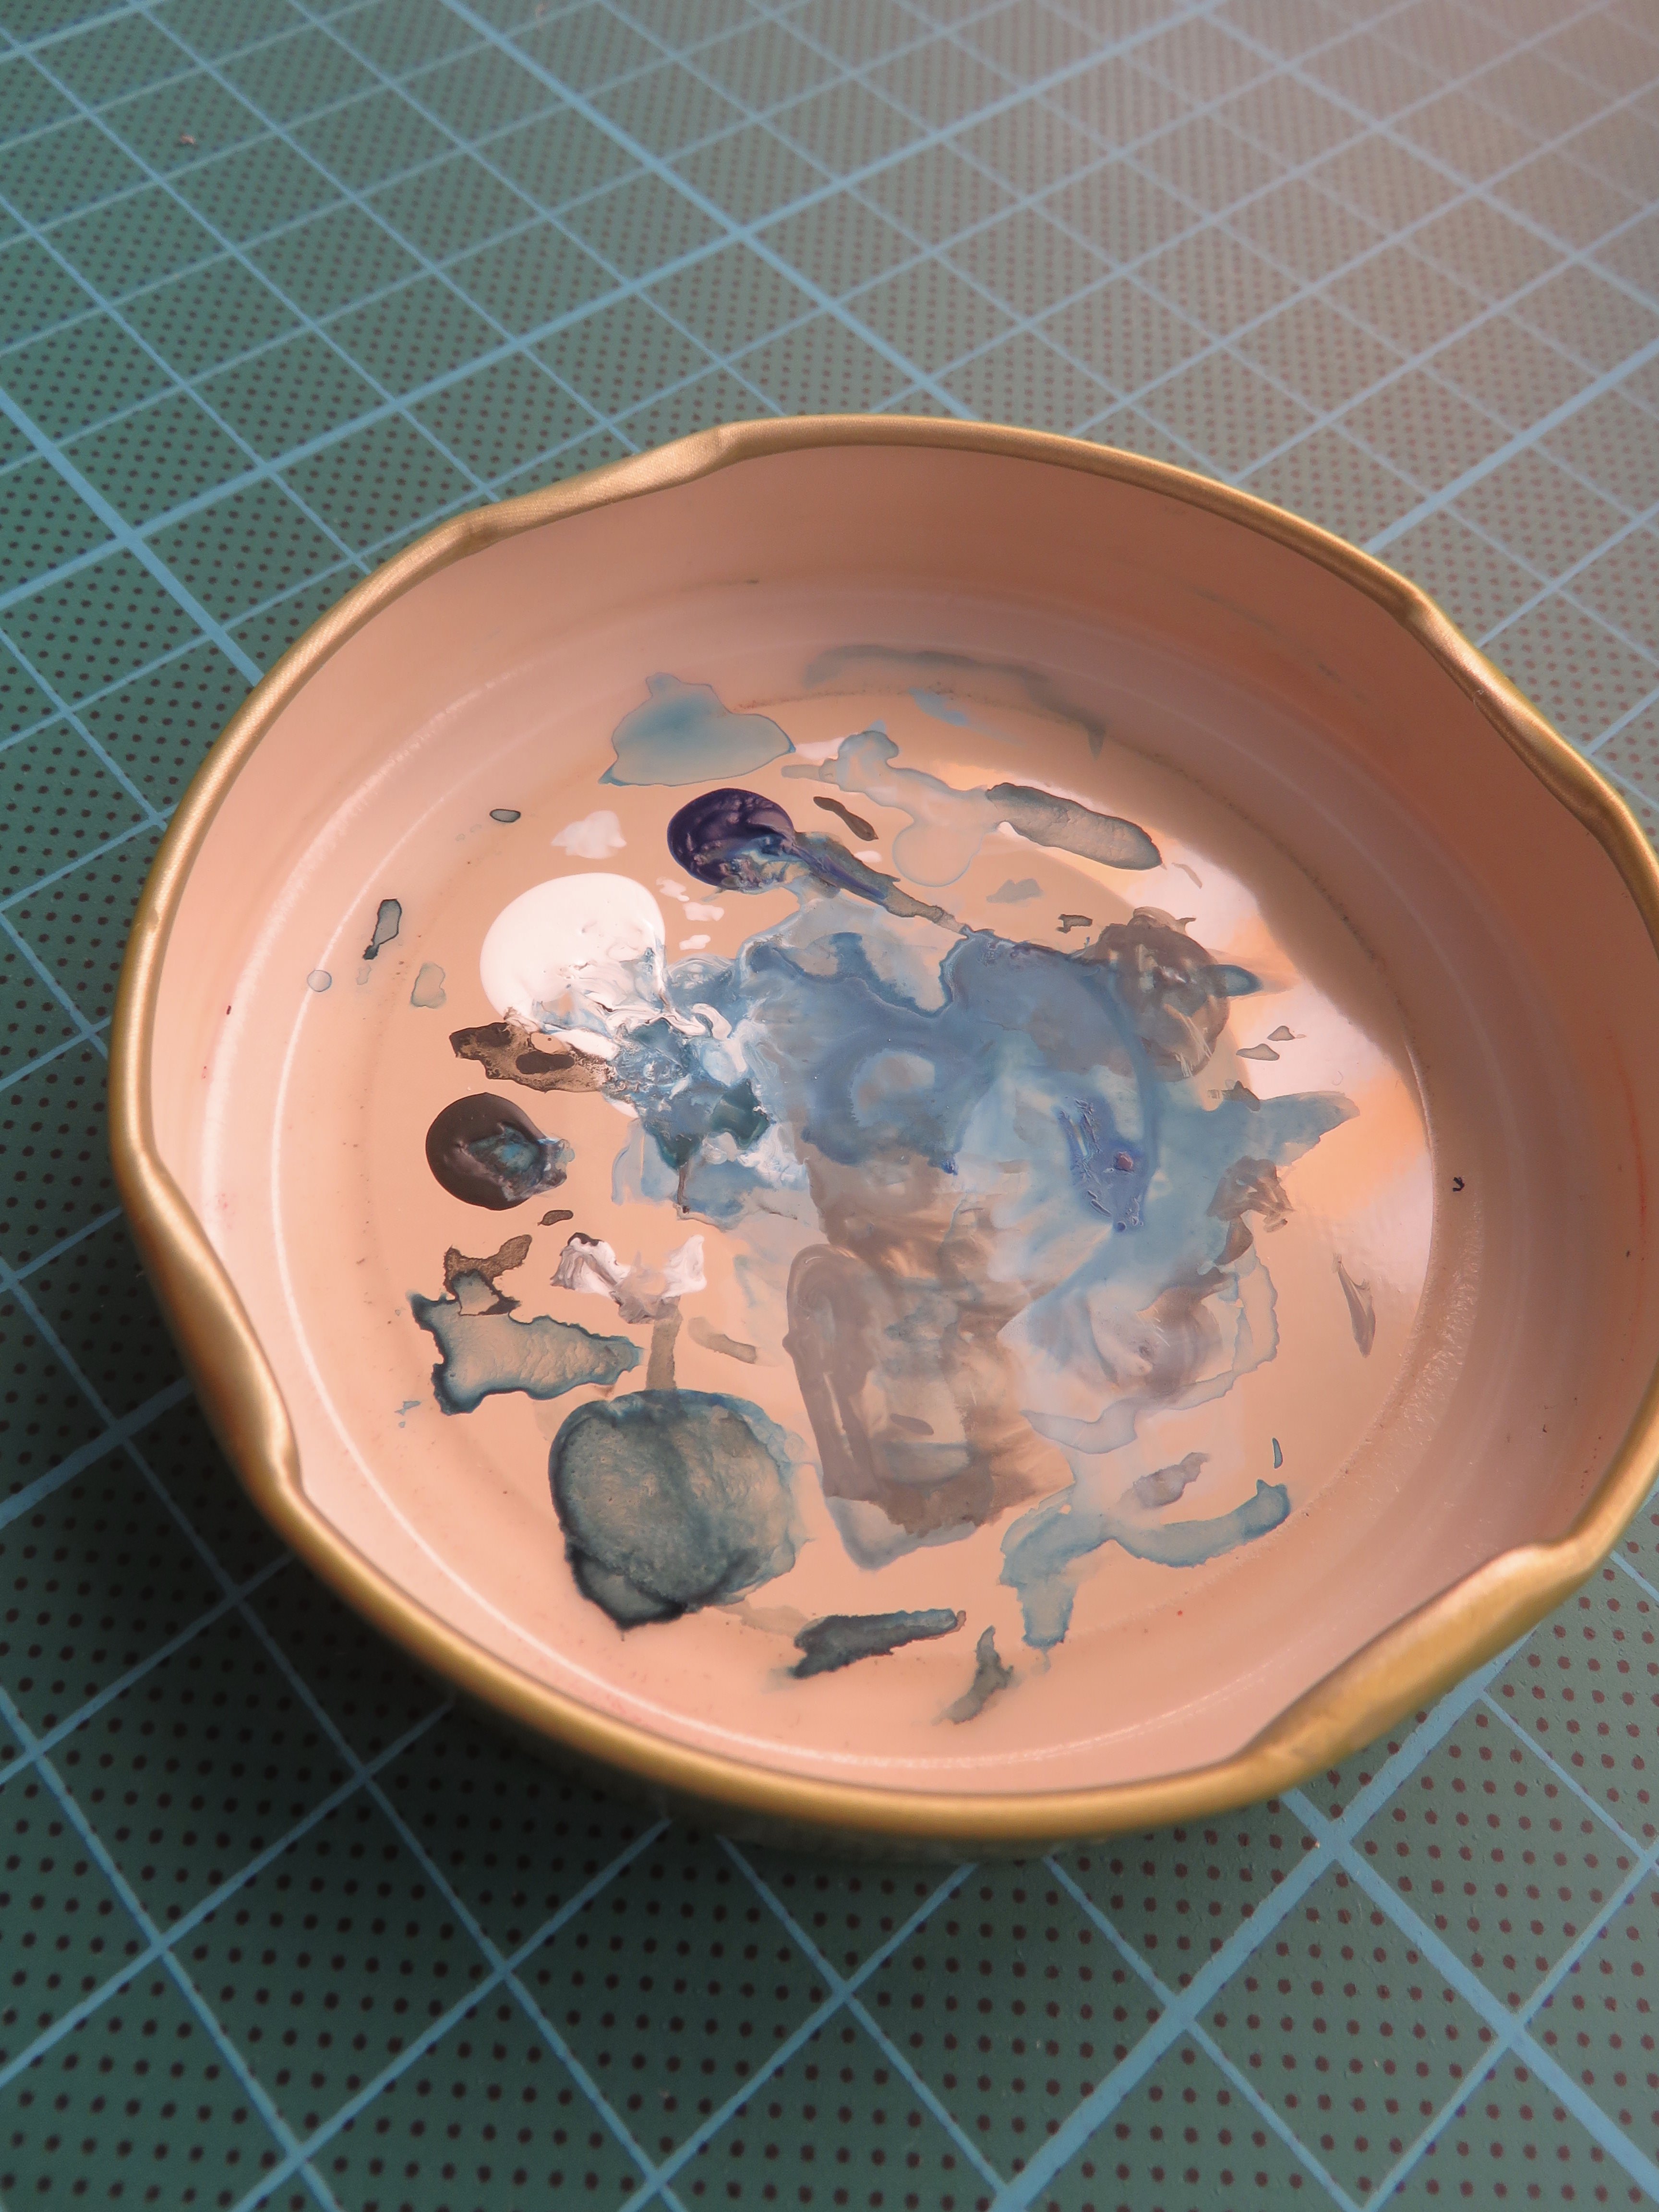
With the main colours blocked in, the next step is to enhance light and dark areas. The traditional way to do this is using washes and dry brushing. Ive used the same techniques many times but recently Ive become dissatisfied. The reason is that a wash tints all the shadows the same colour, when in reality they are not, and dry brushing catches edges rather than the planes that reflect most of the light. After getting inspiration from some artists work on Youtube I tried a different approach. This time I created shadows using a colour wheel to decide on the right tones, and I used yellow or white to highlight planes that will catch the light. Colour was applied in several light filters. Heres a comparison of the seat, before and after. Ive also included a shot of the palette (a.k.a. a jar lid) so you can see the variety of whites, blues and greys that I used on the grey areas of the seat.
Before
and after.
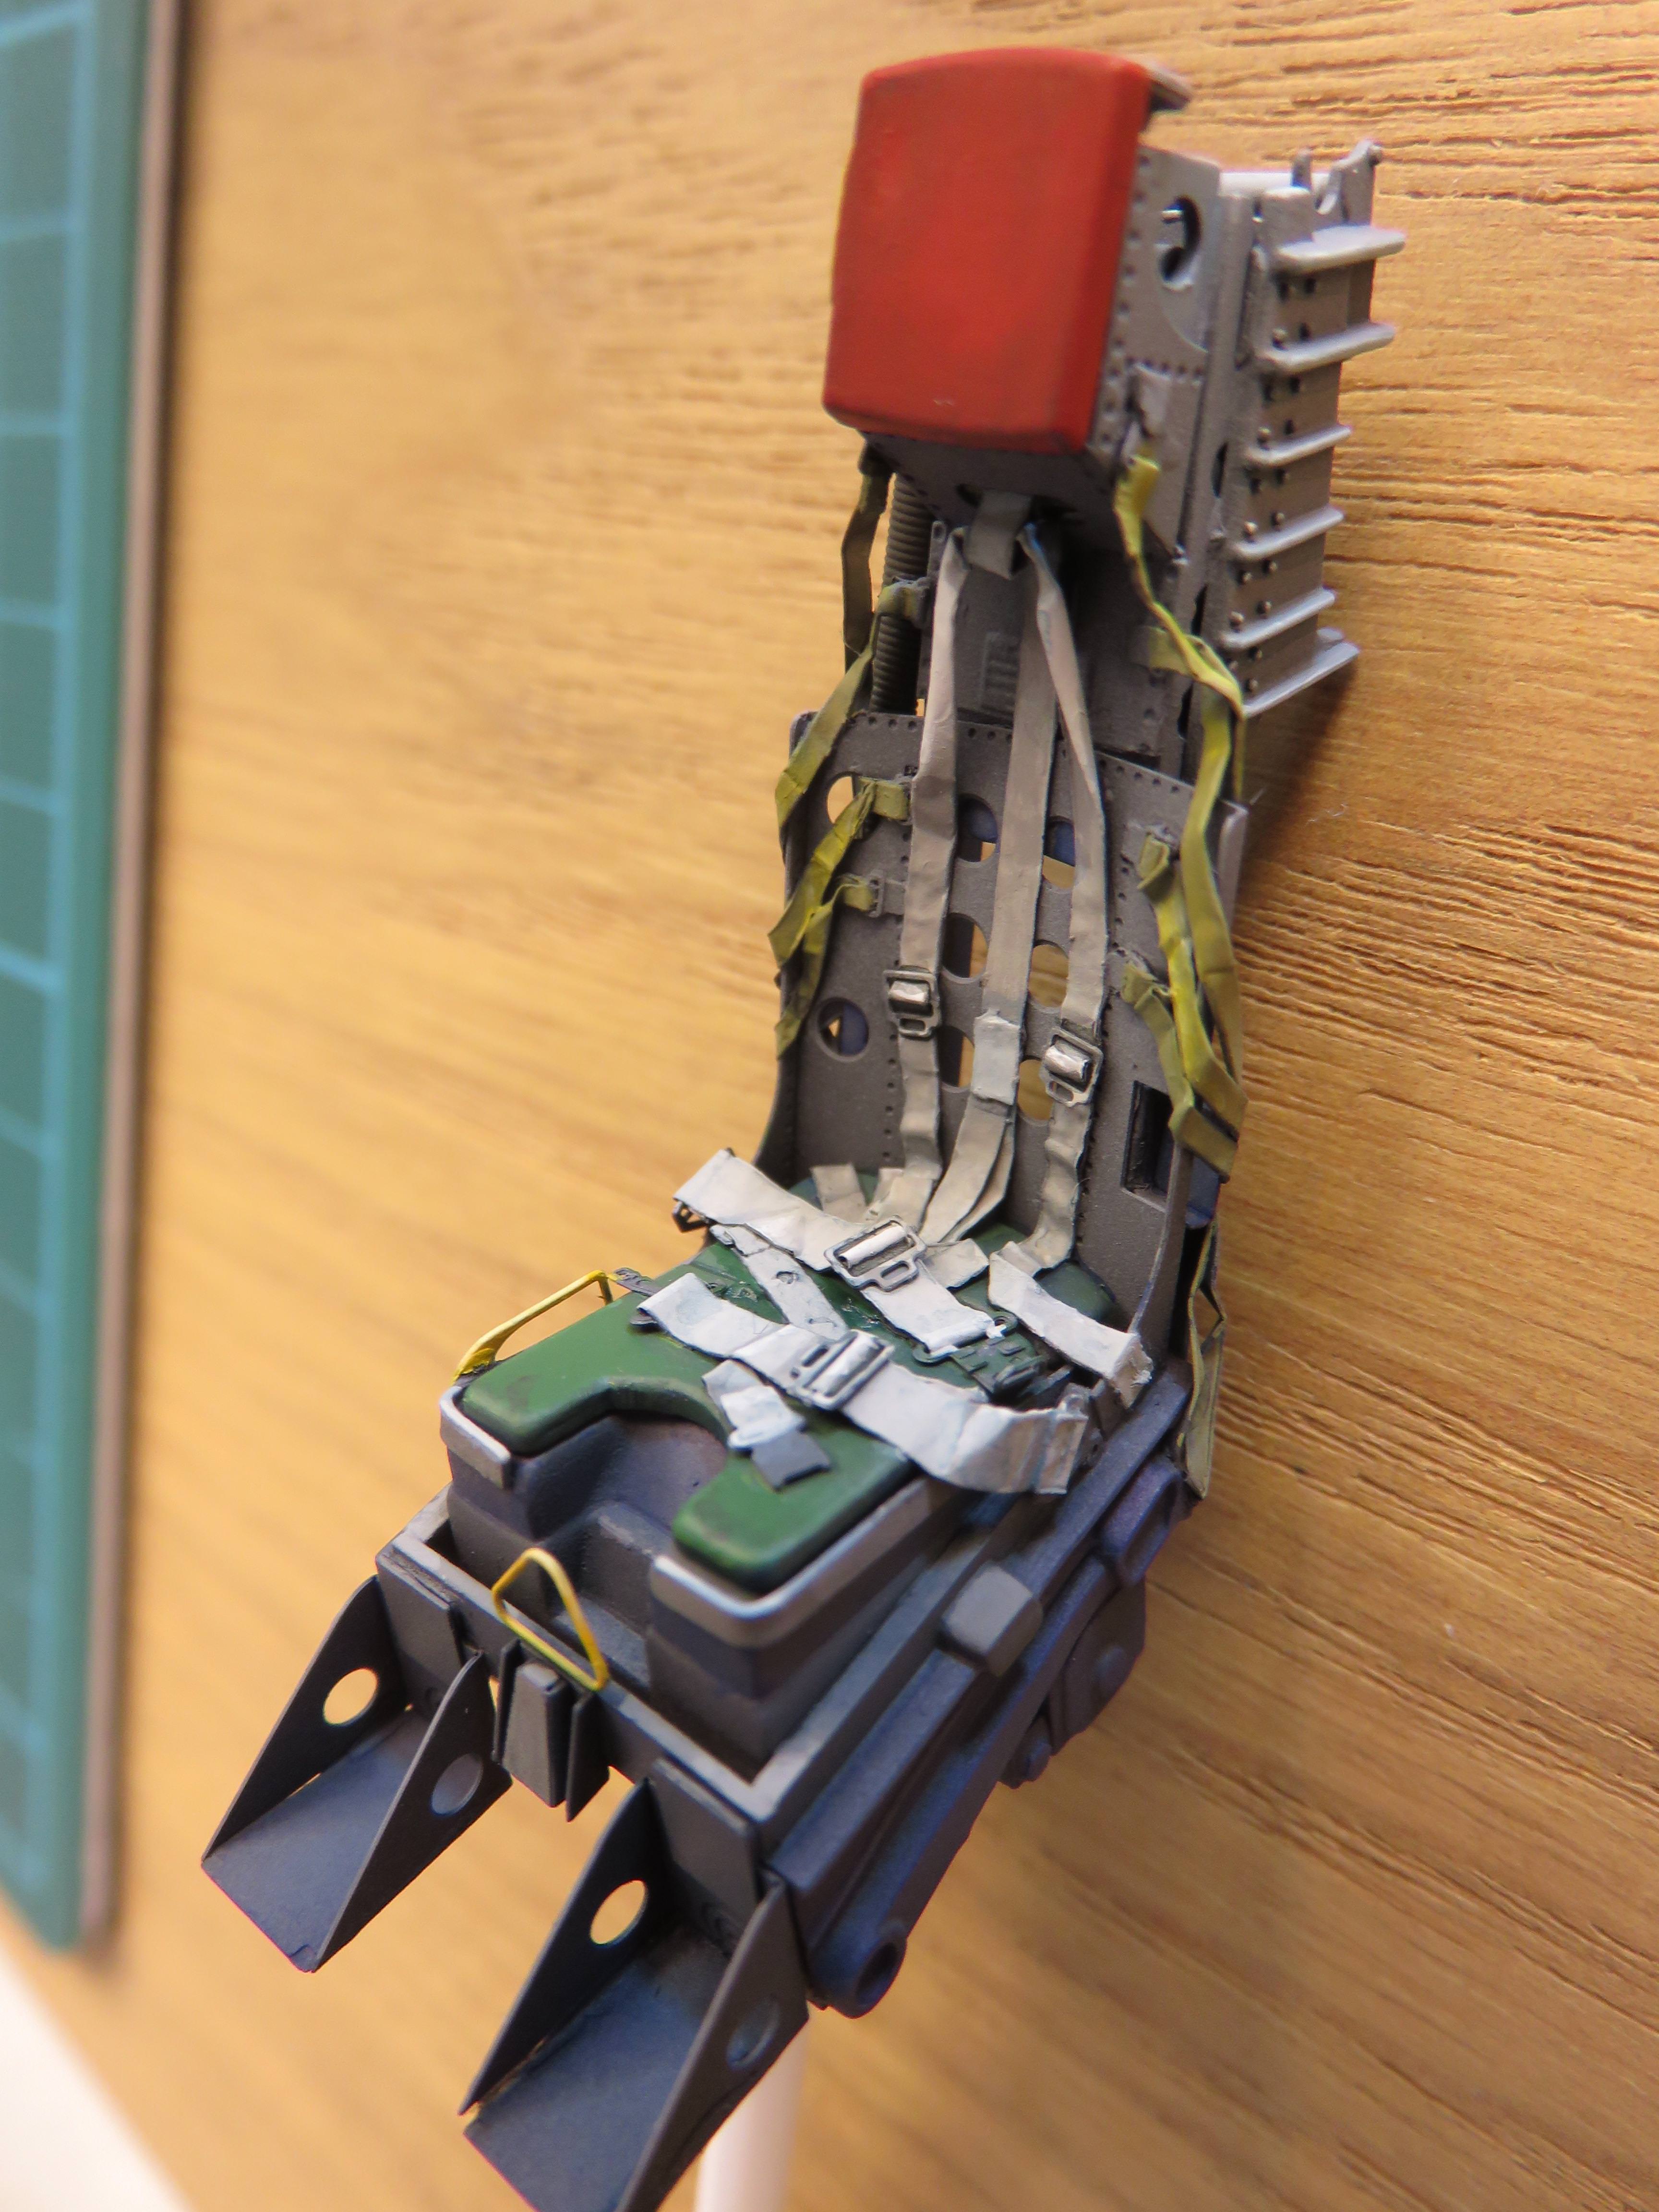
Hopefully you can see that the colour is more rich in the second shot and overall there appears to be more depth and interest.
As promised heres the, er palette.
Before
and after.
Hopefully you can see that the colour is more rich in the second shot and overall there appears to be more depth and interest.
As promised heres the, er palette.

Scrodes

Joined: July 22, 2012
KitMaker: 771 posts
AeroScale: 763 posts
Posted: Monday, July 09, 2018 - 10:18 AM UTC
Quoted Text
After getting inspiration from some artists work on Youtube I tried a different approach.
Before
Looks fantastic!
Care to share?
SteveAndrews
Joined: August 16, 2010
KitMaker: 693 posts
AeroScale: 551 posts
Posted: Tuesday, July 10, 2018 - 08:54 AM UTC
Hi Matt
Thanks very much. I've been leaning on the work by an artist called Mark Carder. He's posted a lot of great stuff aimed at artists working in oils, but I find it a good source for us modellers too. Have a look at this for starters:
https://www.youtube.com/watch?v=xQYcG4Km1-k
I hope it helps.
Happy modelling,
Steve.
Joel_W
Joined: December 04, 2010
KitMaker: 11,666 posts
AeroScale: 7,410 posts
Posted: Wednesday, July 11, 2018 - 06:18 AM UTC
Steve,
I'm just amazed at the difference in appearance of the seat using your new technique. it really does look real.
I just checked out that link, and I'll be spending quite a bit of time there just trying to learn the basics as I truly suck at mixing colors other then just adding this or that and hoping for the best.
joel
SteveAndrews
Joined: August 16, 2010
KitMaker: 693 posts
AeroScale: 551 posts
Posted: Sunday, July 22, 2018 - 10:33 PM UTC
Hey Joel
Sorry for the long delay in replying. I was on holiday without wi-fi which was both a joy and a torture.
Yes, I reckon we can learn lots from artists. We are all in the same game I guess - recreating a version of reality that pleases the eye. Mind you, I won't be rushing to do a Picasso style scratch build.
I hope life is good with you.
Steve
SteveAndrews
Joined: August 16, 2010
KitMaker: 693 posts
AeroScale: 551 posts
Posted: Friday, July 27, 2018 - 11:03 PM UTC
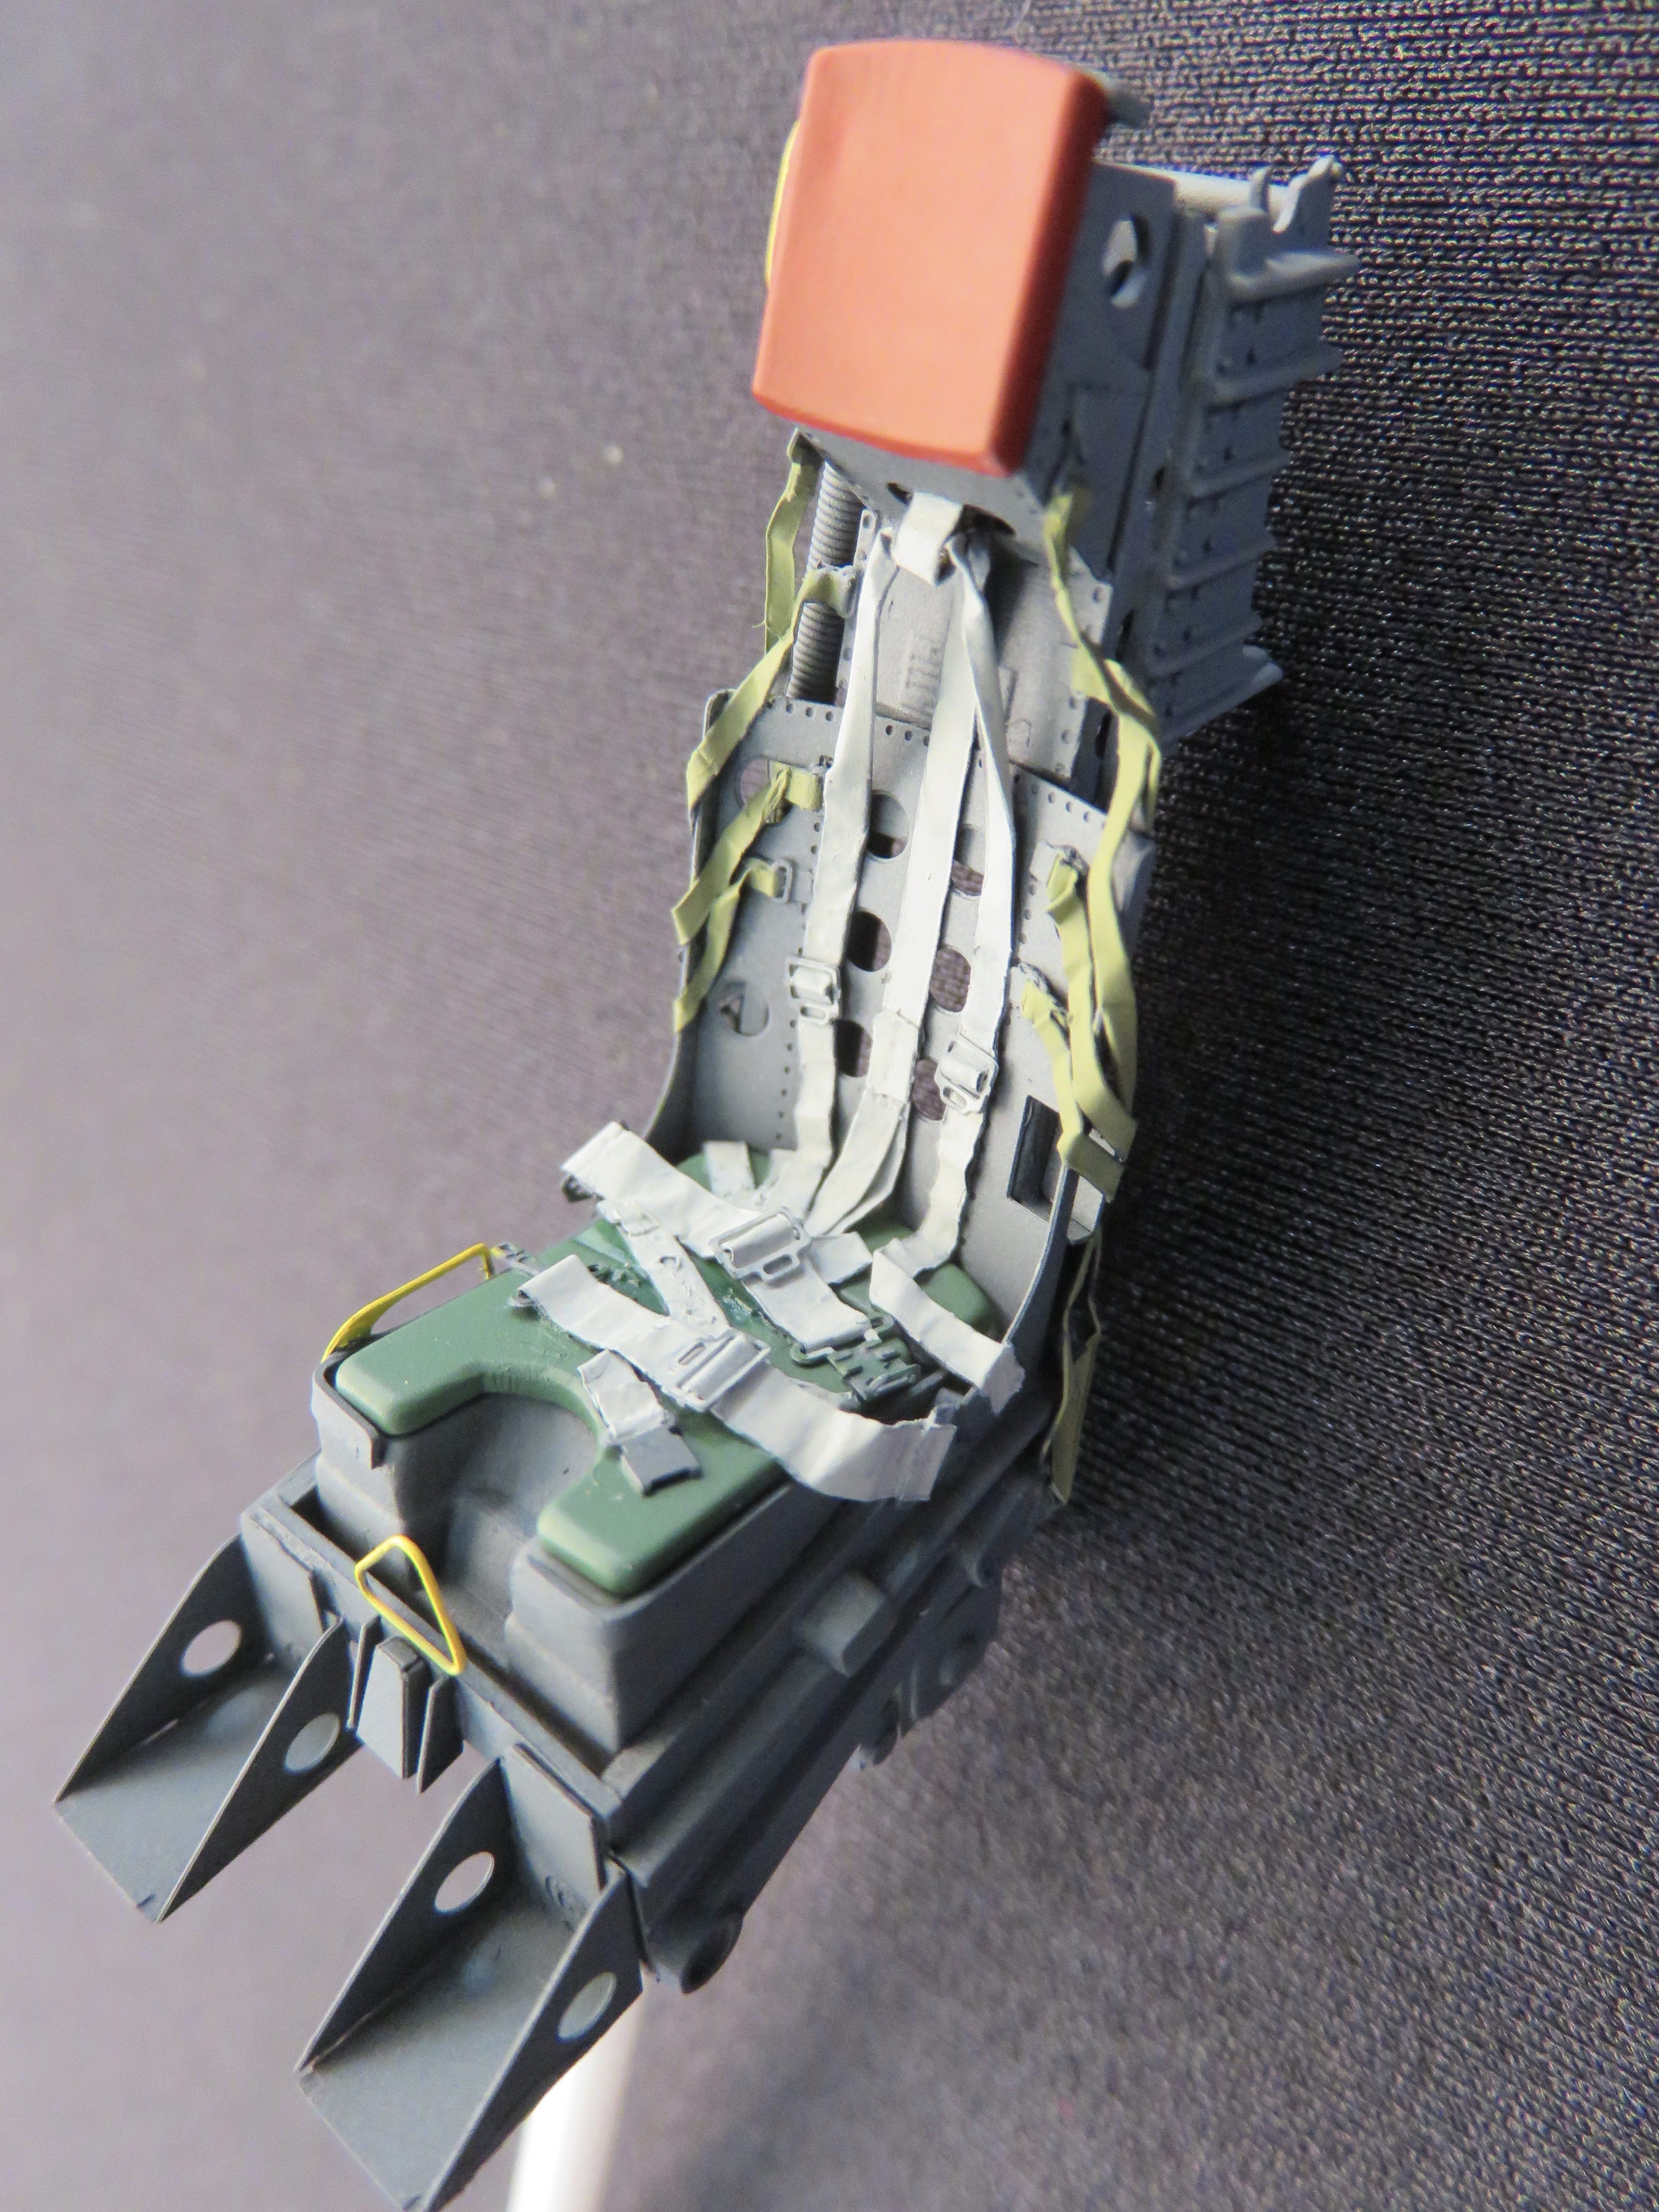
Ive been fighting a wave of lethargy brought on by the near tropical temperatures and humidity here in Europe. Its almost as if the Starfighter wants a South East Asian climate to add to the realism. Today at least some rain has swept in and so my motivation levels have returned to normal. Im continuing to use colour modulation techniques on the cockpit interior. Here you can see the second step - picking out details in lighter shades than the base colour. You might notice that I don't use one shade - I darken the highlights as the background darkens. Theres no crafty blending going on, just lower values as we get towards the cockpit floor.
This technique is more work than washes and dry brushing, but for me it produces a more interesting look with more depth, especially when viewed from the arms length distance that most models are seen at. Have a look and decide for yourself.

Happy modelling,
Steve.
This technique is more work than washes and dry brushing, but for me it produces a more interesting look with more depth, especially when viewed from the arms length distance that most models are seen at. Have a look and decide for yourself.
Happy modelling,
Steve.
Joel_W
Joined: December 04, 2010
KitMaker: 11,666 posts
AeroScale: 7,410 posts
Posted: Saturday, July 28, 2018 - 02:06 AM UTC
Steve,
I feel you pain with the extreme heat and nearly unbearable humidity we've also had here on the Island as of late. Then it's monsoon type rains most days just to make it a little more interesting. At least for me I can't complain. We decided many years ago that Central Air was a necessity for us, so the summer weather once we get in doors really isn't an issue.
I really like your modulation technique, as I usually confine mine to dark washes and Tamiya Black recess panel washes, followed by dry brushing with just a light shade of gray regardless of the color coat. Your method certainly results in what to me looks a lot more natural, so I'm going to adapt it for all my modeling moving forward.
Joel
SteveAndrews
Joined: August 16, 2010
KitMaker: 693 posts
AeroScale: 551 posts
Posted: Sunday, July 29, 2018 - 08:45 AM UTC
Hey Joel
I envy your aircon. I'm relying on fans and frequent trips to the local pool.
As for the modulation work. I'm hoping when it all comes together that I'll have a busy and interesting cockpit. Watch this space for more.
Have a great day,
Steve.
I envy your aircon. I'm relying on fans and frequent trips to the local pool.
As for the modulation work. I'm hoping when it all comes together that I'll have a busy and interesting cockpit. Watch this space for more.
Have a great day,
Steve.
Joel_W
Joined: December 04, 2010
KitMaker: 11,666 posts
AeroScale: 7,410 posts
Posted: Monday, July 30, 2018 - 10:34 AM UTC
Steve,
We bought our home 39 years ago, and just had a single A/C in the bedroom. We actually ended up during the hot summer months cooking in the kitchen or BBQing, eating and watching tv in the bedroom, and using that bathroom. We never used the rest of the house. We came to the realization that there has to be a better way. Believe me, we're very conservative in it's use by keeping the house at 72 but the humidity is like 60% all year long, which makes a great difference.
I use subscriptions so that I never miss any updates to threads that I'm following. And I certainly don't want to miss any of yours.
Joel
SteveAndrews
Joined: August 16, 2010
KitMaker: 693 posts
AeroScale: 551 posts
Posted: Friday, August 03, 2018 - 10:27 PM UTC
Hey Joel and fellow modellers,
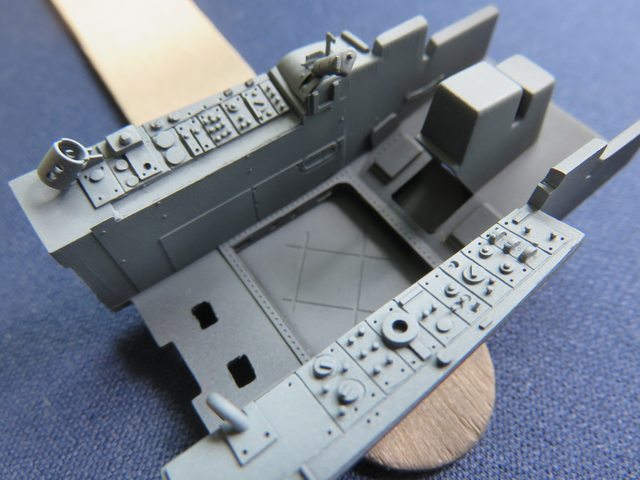
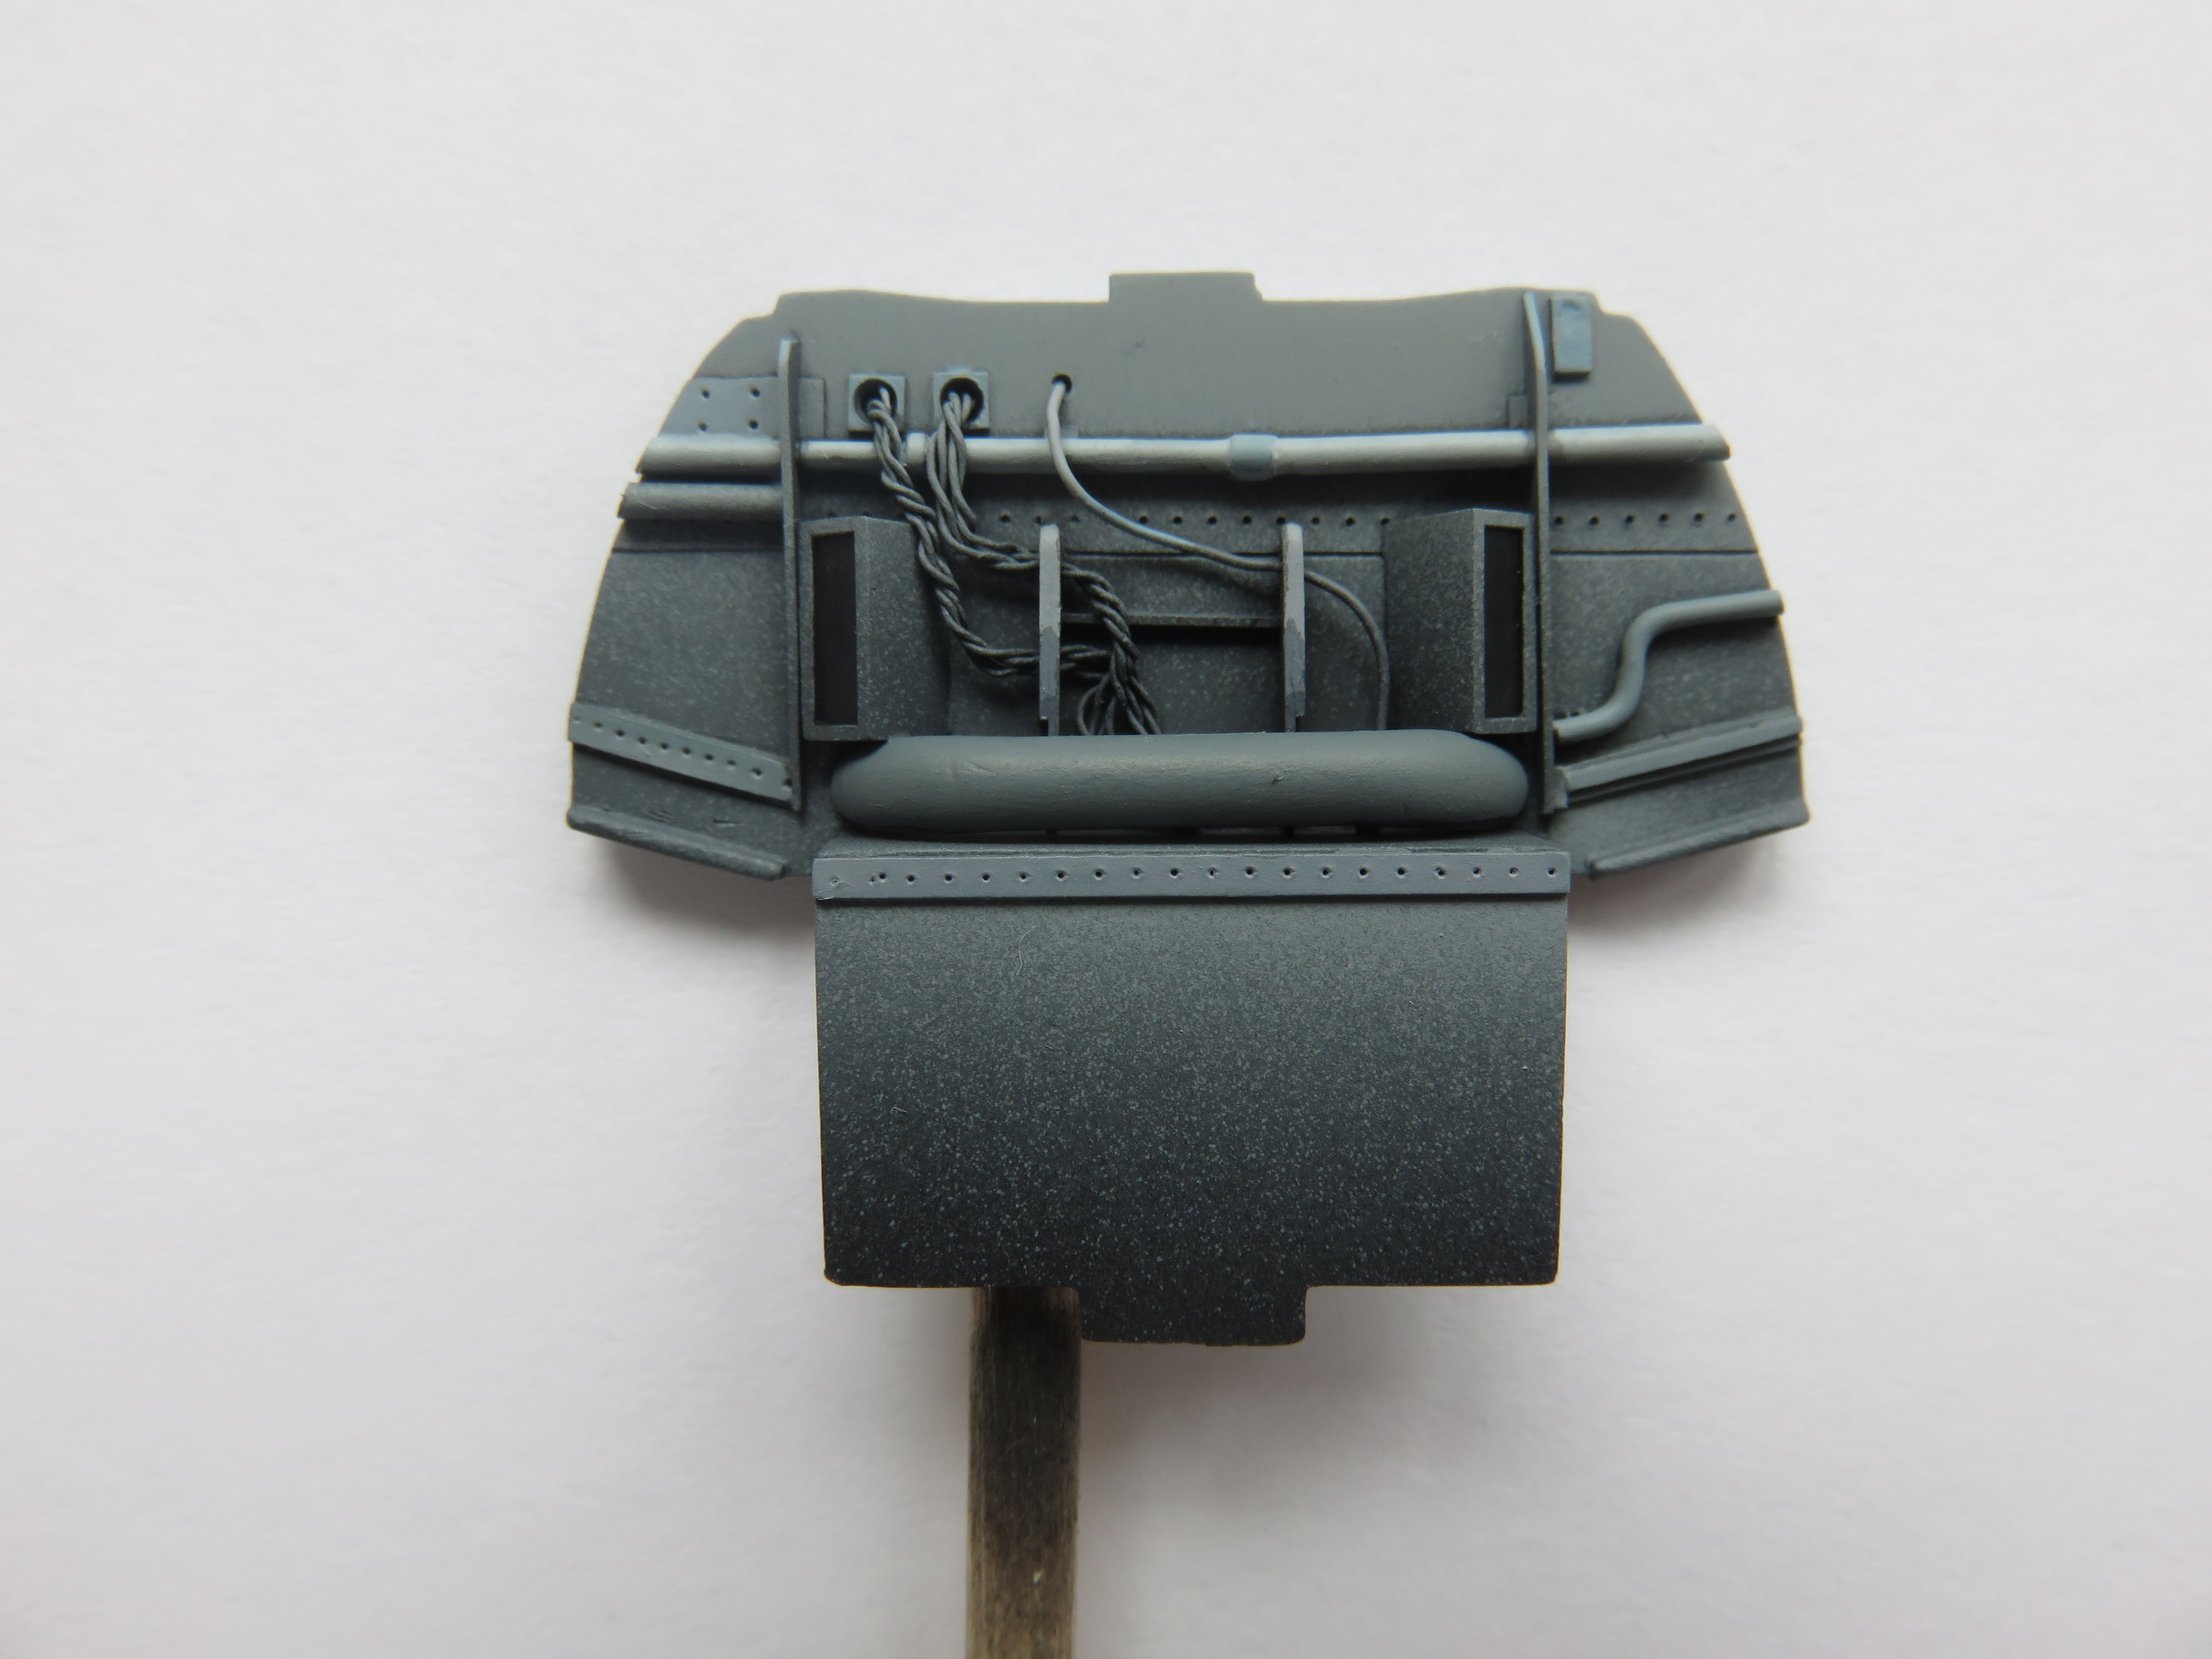
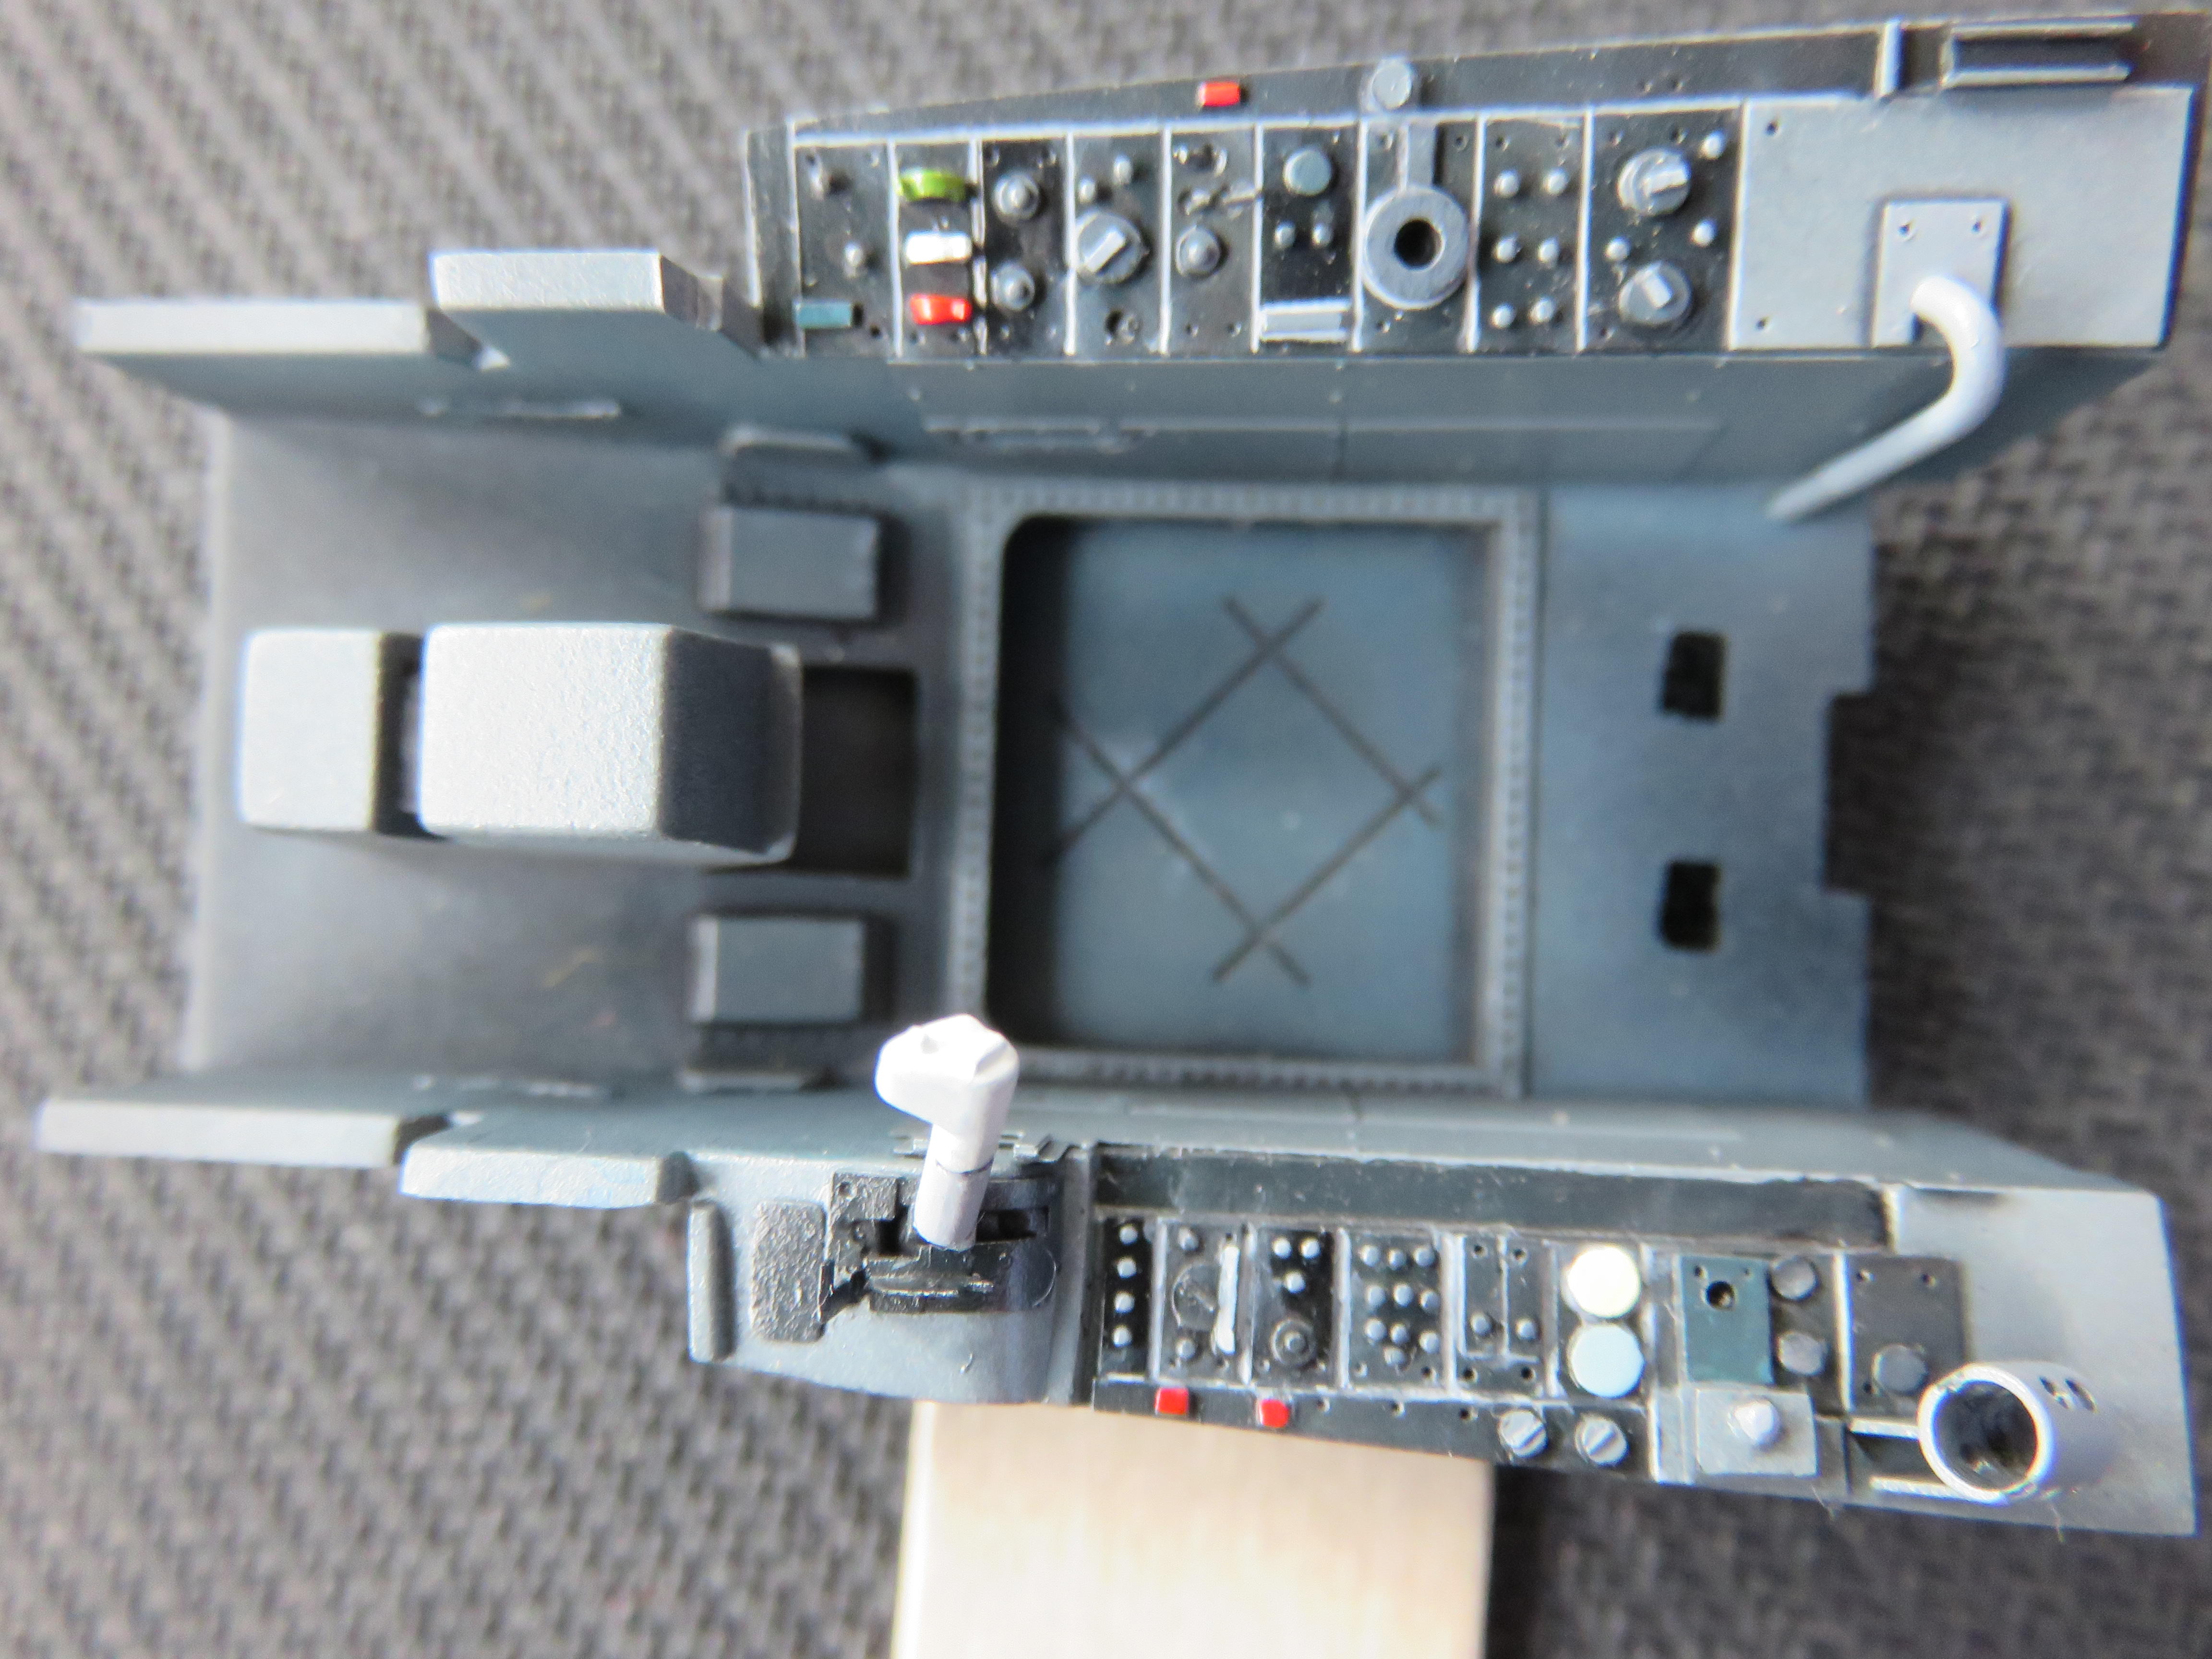
My colour modulation approach has me frolicking around various parts of the interior, based on nothing more than what Im in the mood to tackle; in the last day or so thats been the avionics behind the cockpit. I used this source as a reference:
http://www.rolfferch.de/F104G/html/avionik.html
Started with filters to adjust the colour of some of the boxes.
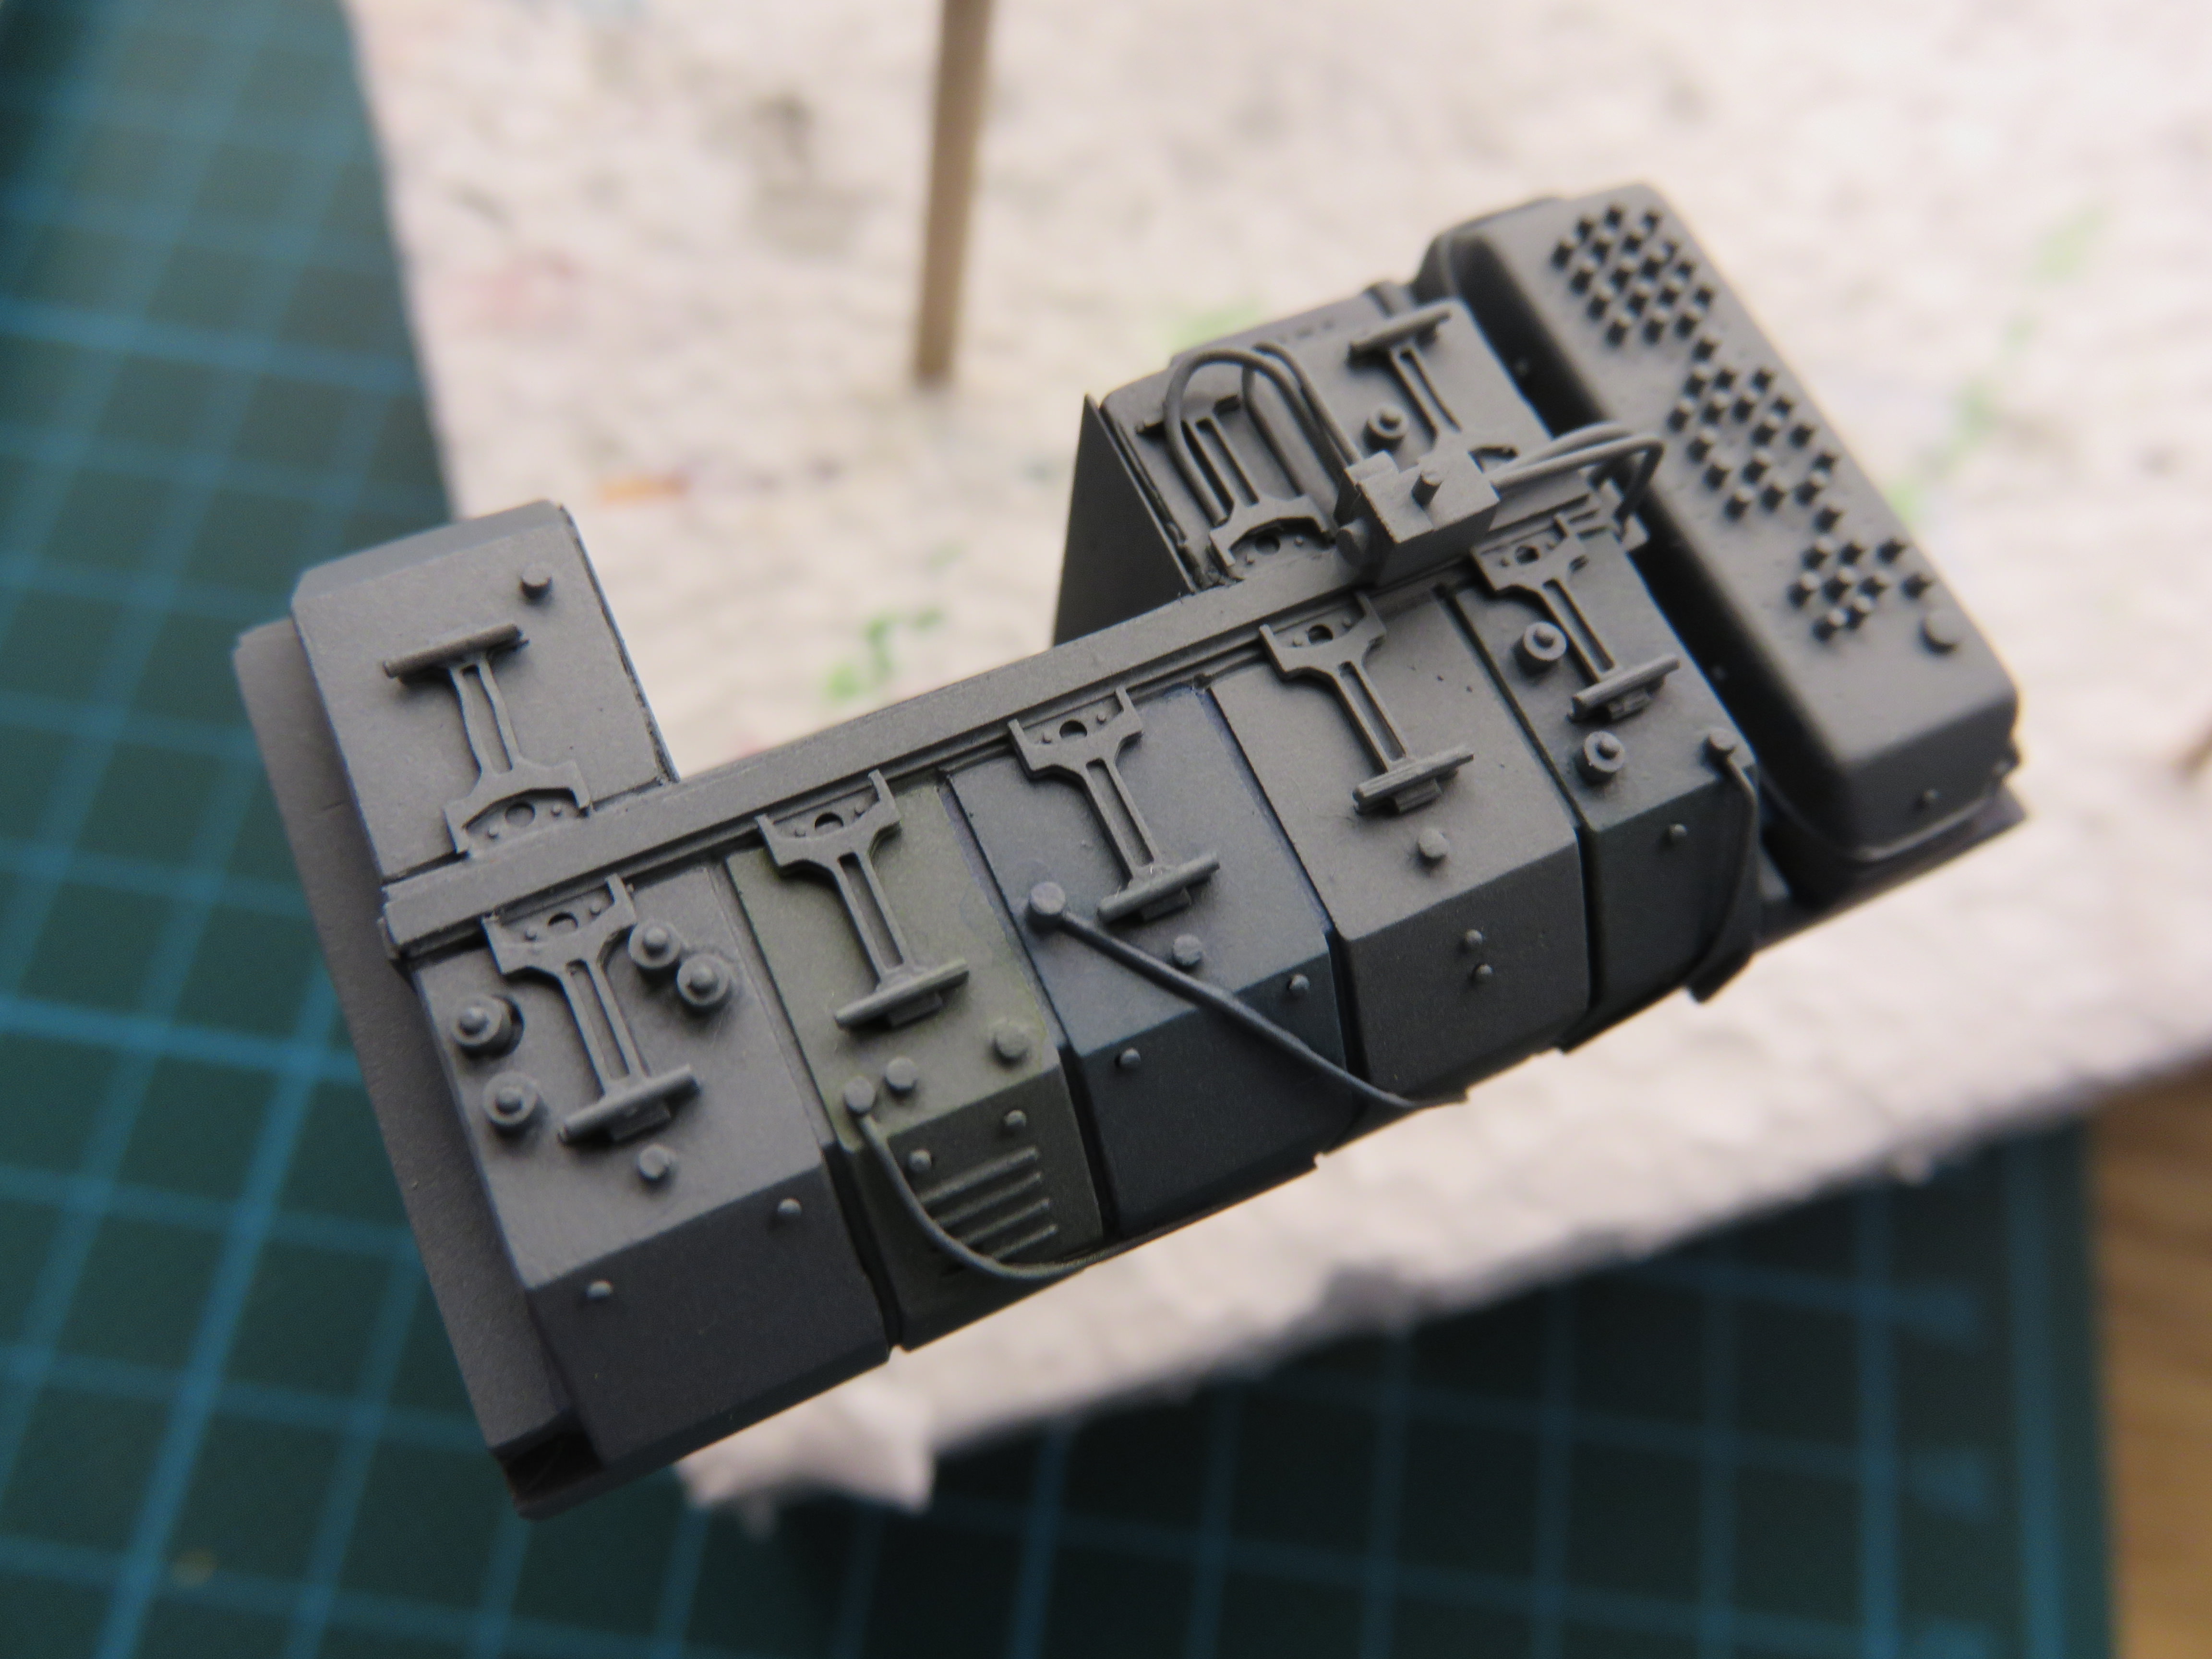
Then added highlights and painted the frame.

Finally, I picked out some of the bolts and fasteners, and put a white base on the little indicator lights so I get a vibrant colour when I paint them red and orange.
The next stages will be adding some more colour, a little decalling and pin washes.
If youre eager to finish a kit these techniques are not for you, but Im enjoying the process and like the results. Right now Im a happy modeller, even if the plastic is in danger of melting under europes crazy hot sun.
I hope youre enjoying this blog, and also also your own kits.
More soon,
Steve
My colour modulation approach has me frolicking around various parts of the interior, based on nothing more than what Im in the mood to tackle; in the last day or so thats been the avionics behind the cockpit. I used this source as a reference:
http://www.rolfferch.de/F104G/html/avionik.html
Started with filters to adjust the colour of some of the boxes.
Then added highlights and painted the frame.
Finally, I picked out some of the bolts and fasteners, and put a white base on the little indicator lights so I get a vibrant colour when I paint them red and orange.
The next stages will be adding some more colour, a little decalling and pin washes.
If youre eager to finish a kit these techniques are not for you, but Im enjoying the process and like the results. Right now Im a happy modeller, even if the plastic is in danger of melting under europes crazy hot sun.
I hope youre enjoying this blog, and also also your own kits.
More soon,
Steve
SteveAndrews
Joined: August 16, 2010
KitMaker: 693 posts
AeroScale: 551 posts
Posted: Tuesday, August 14, 2018 - 06:39 AM UTC
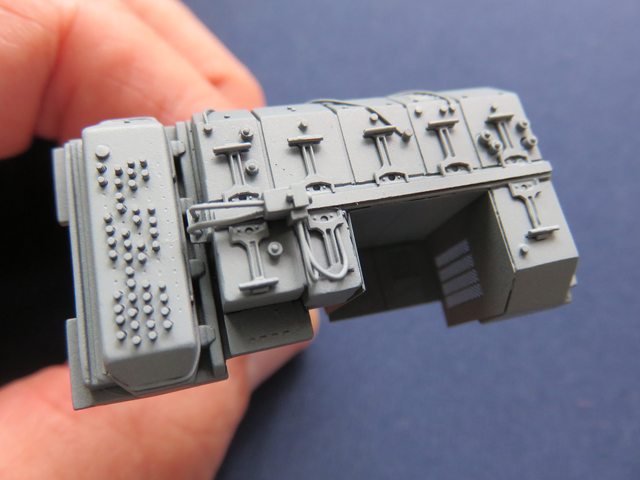
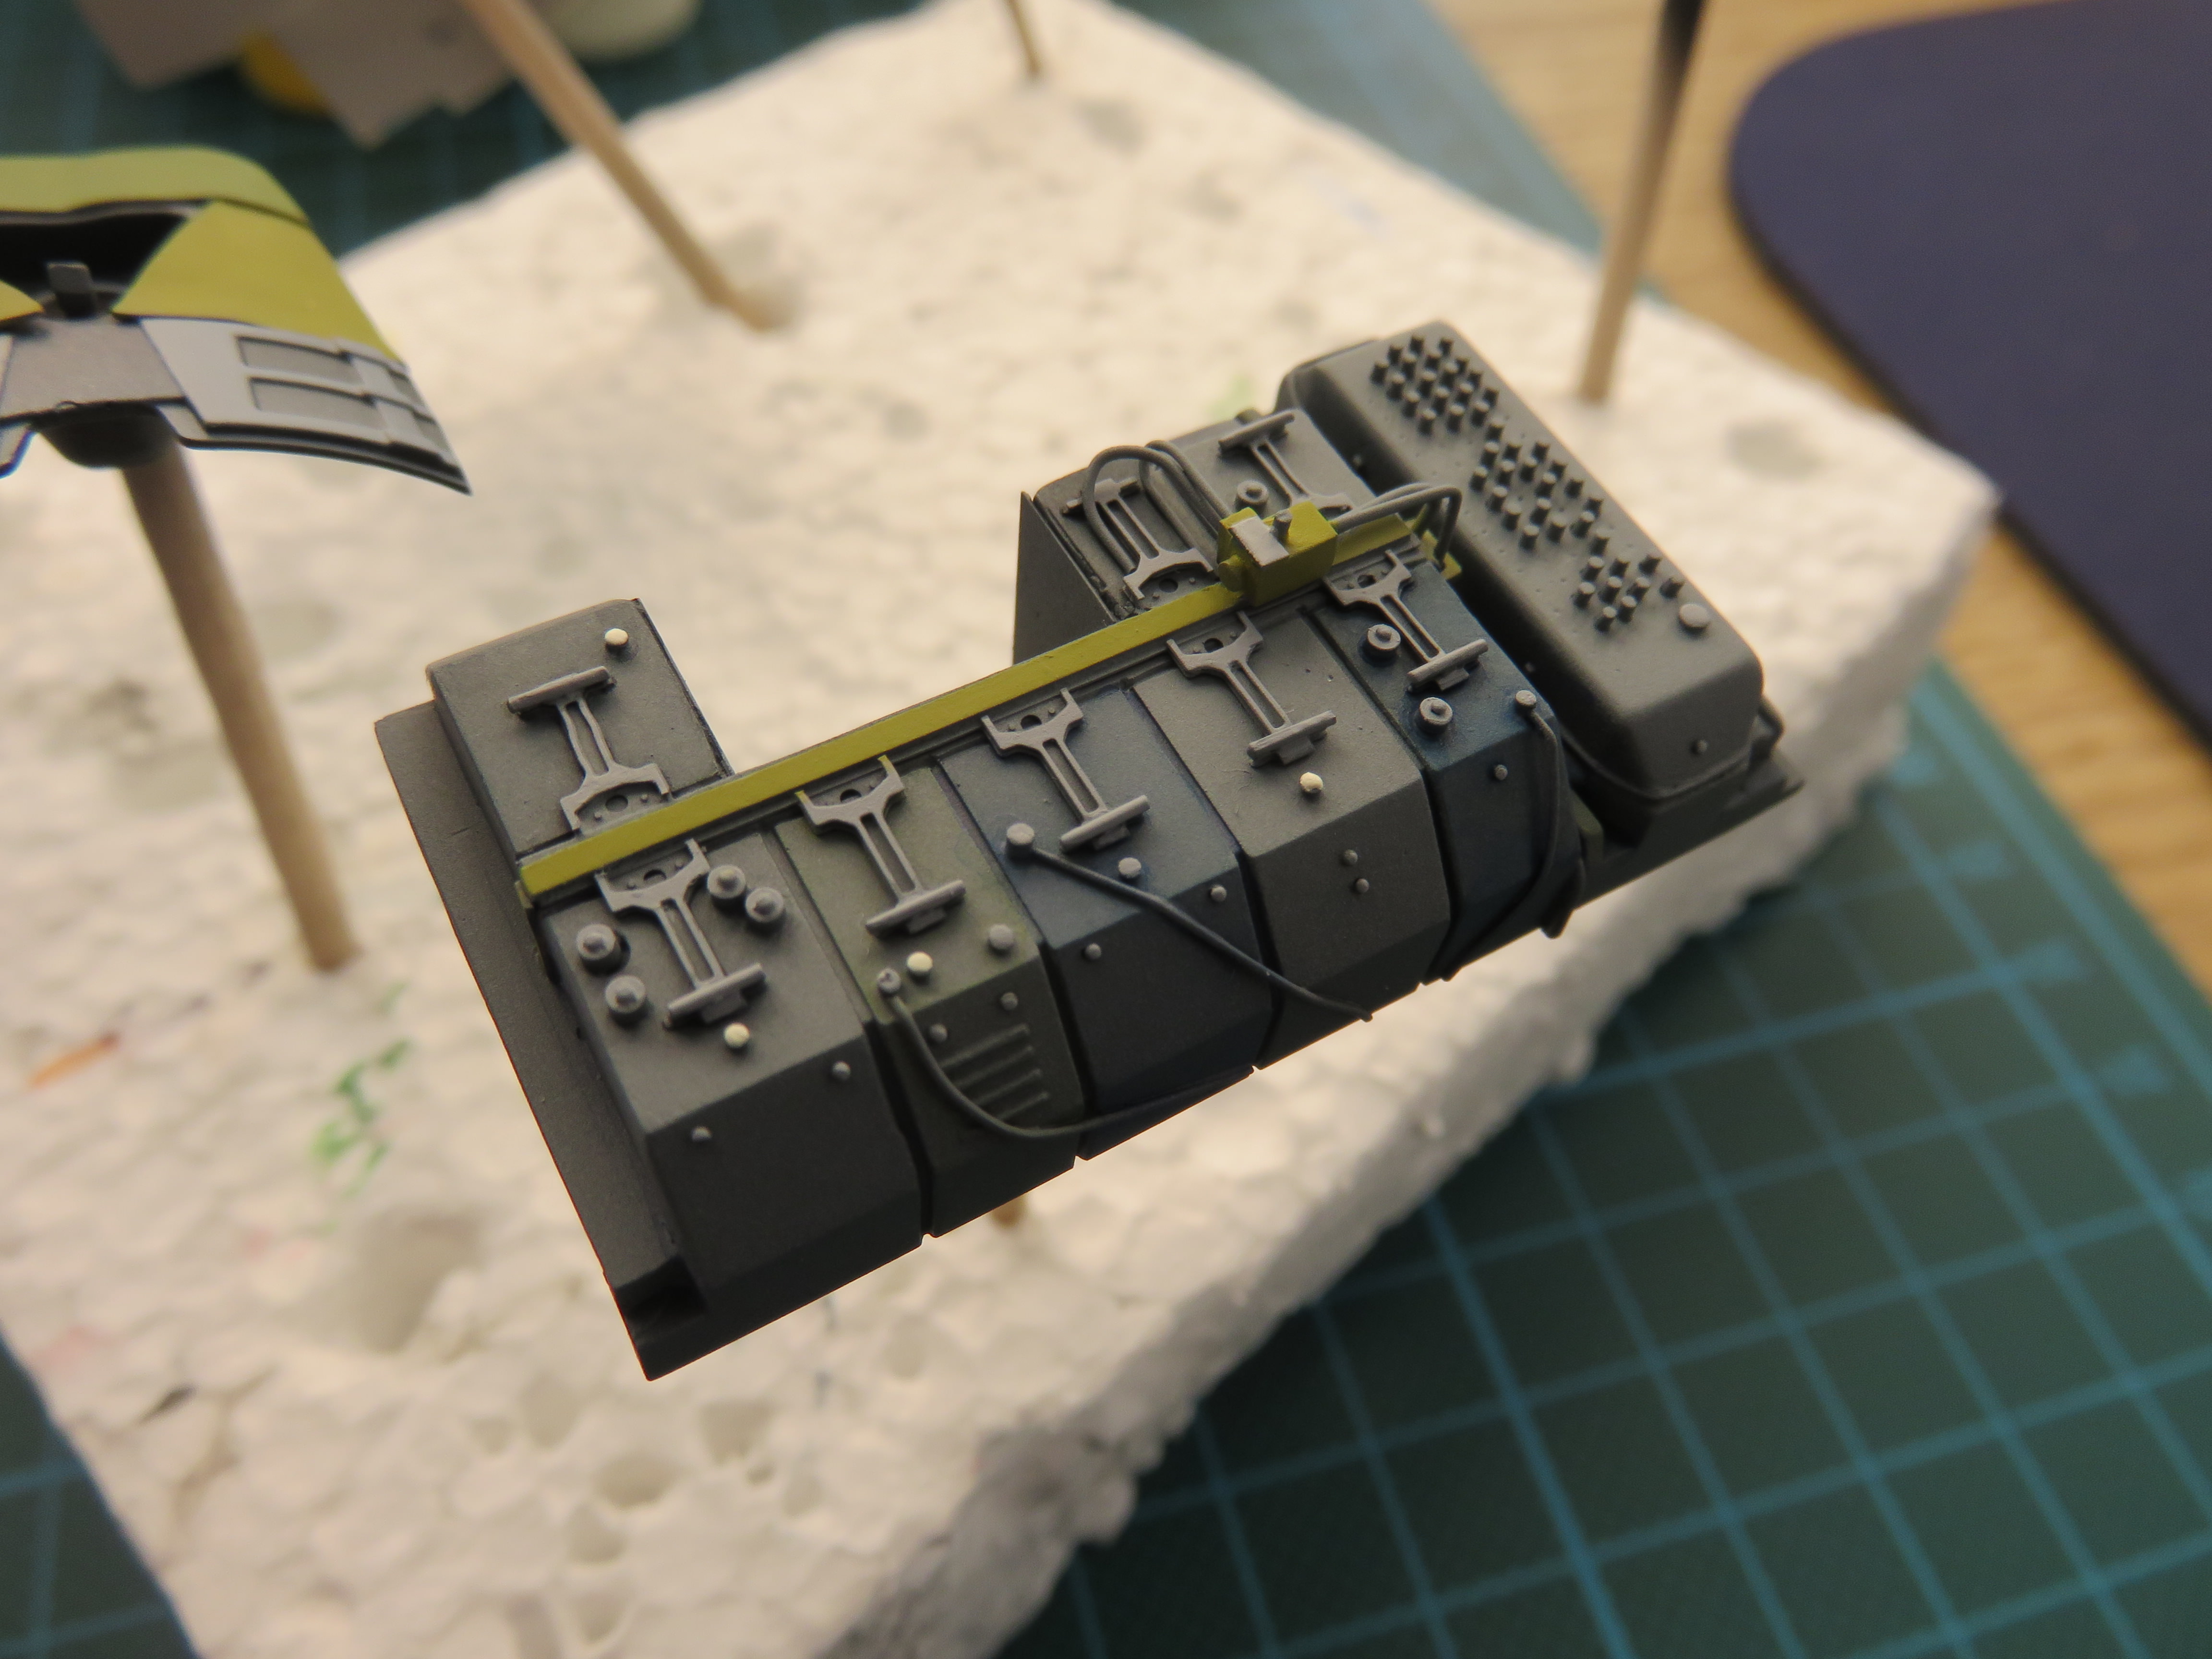
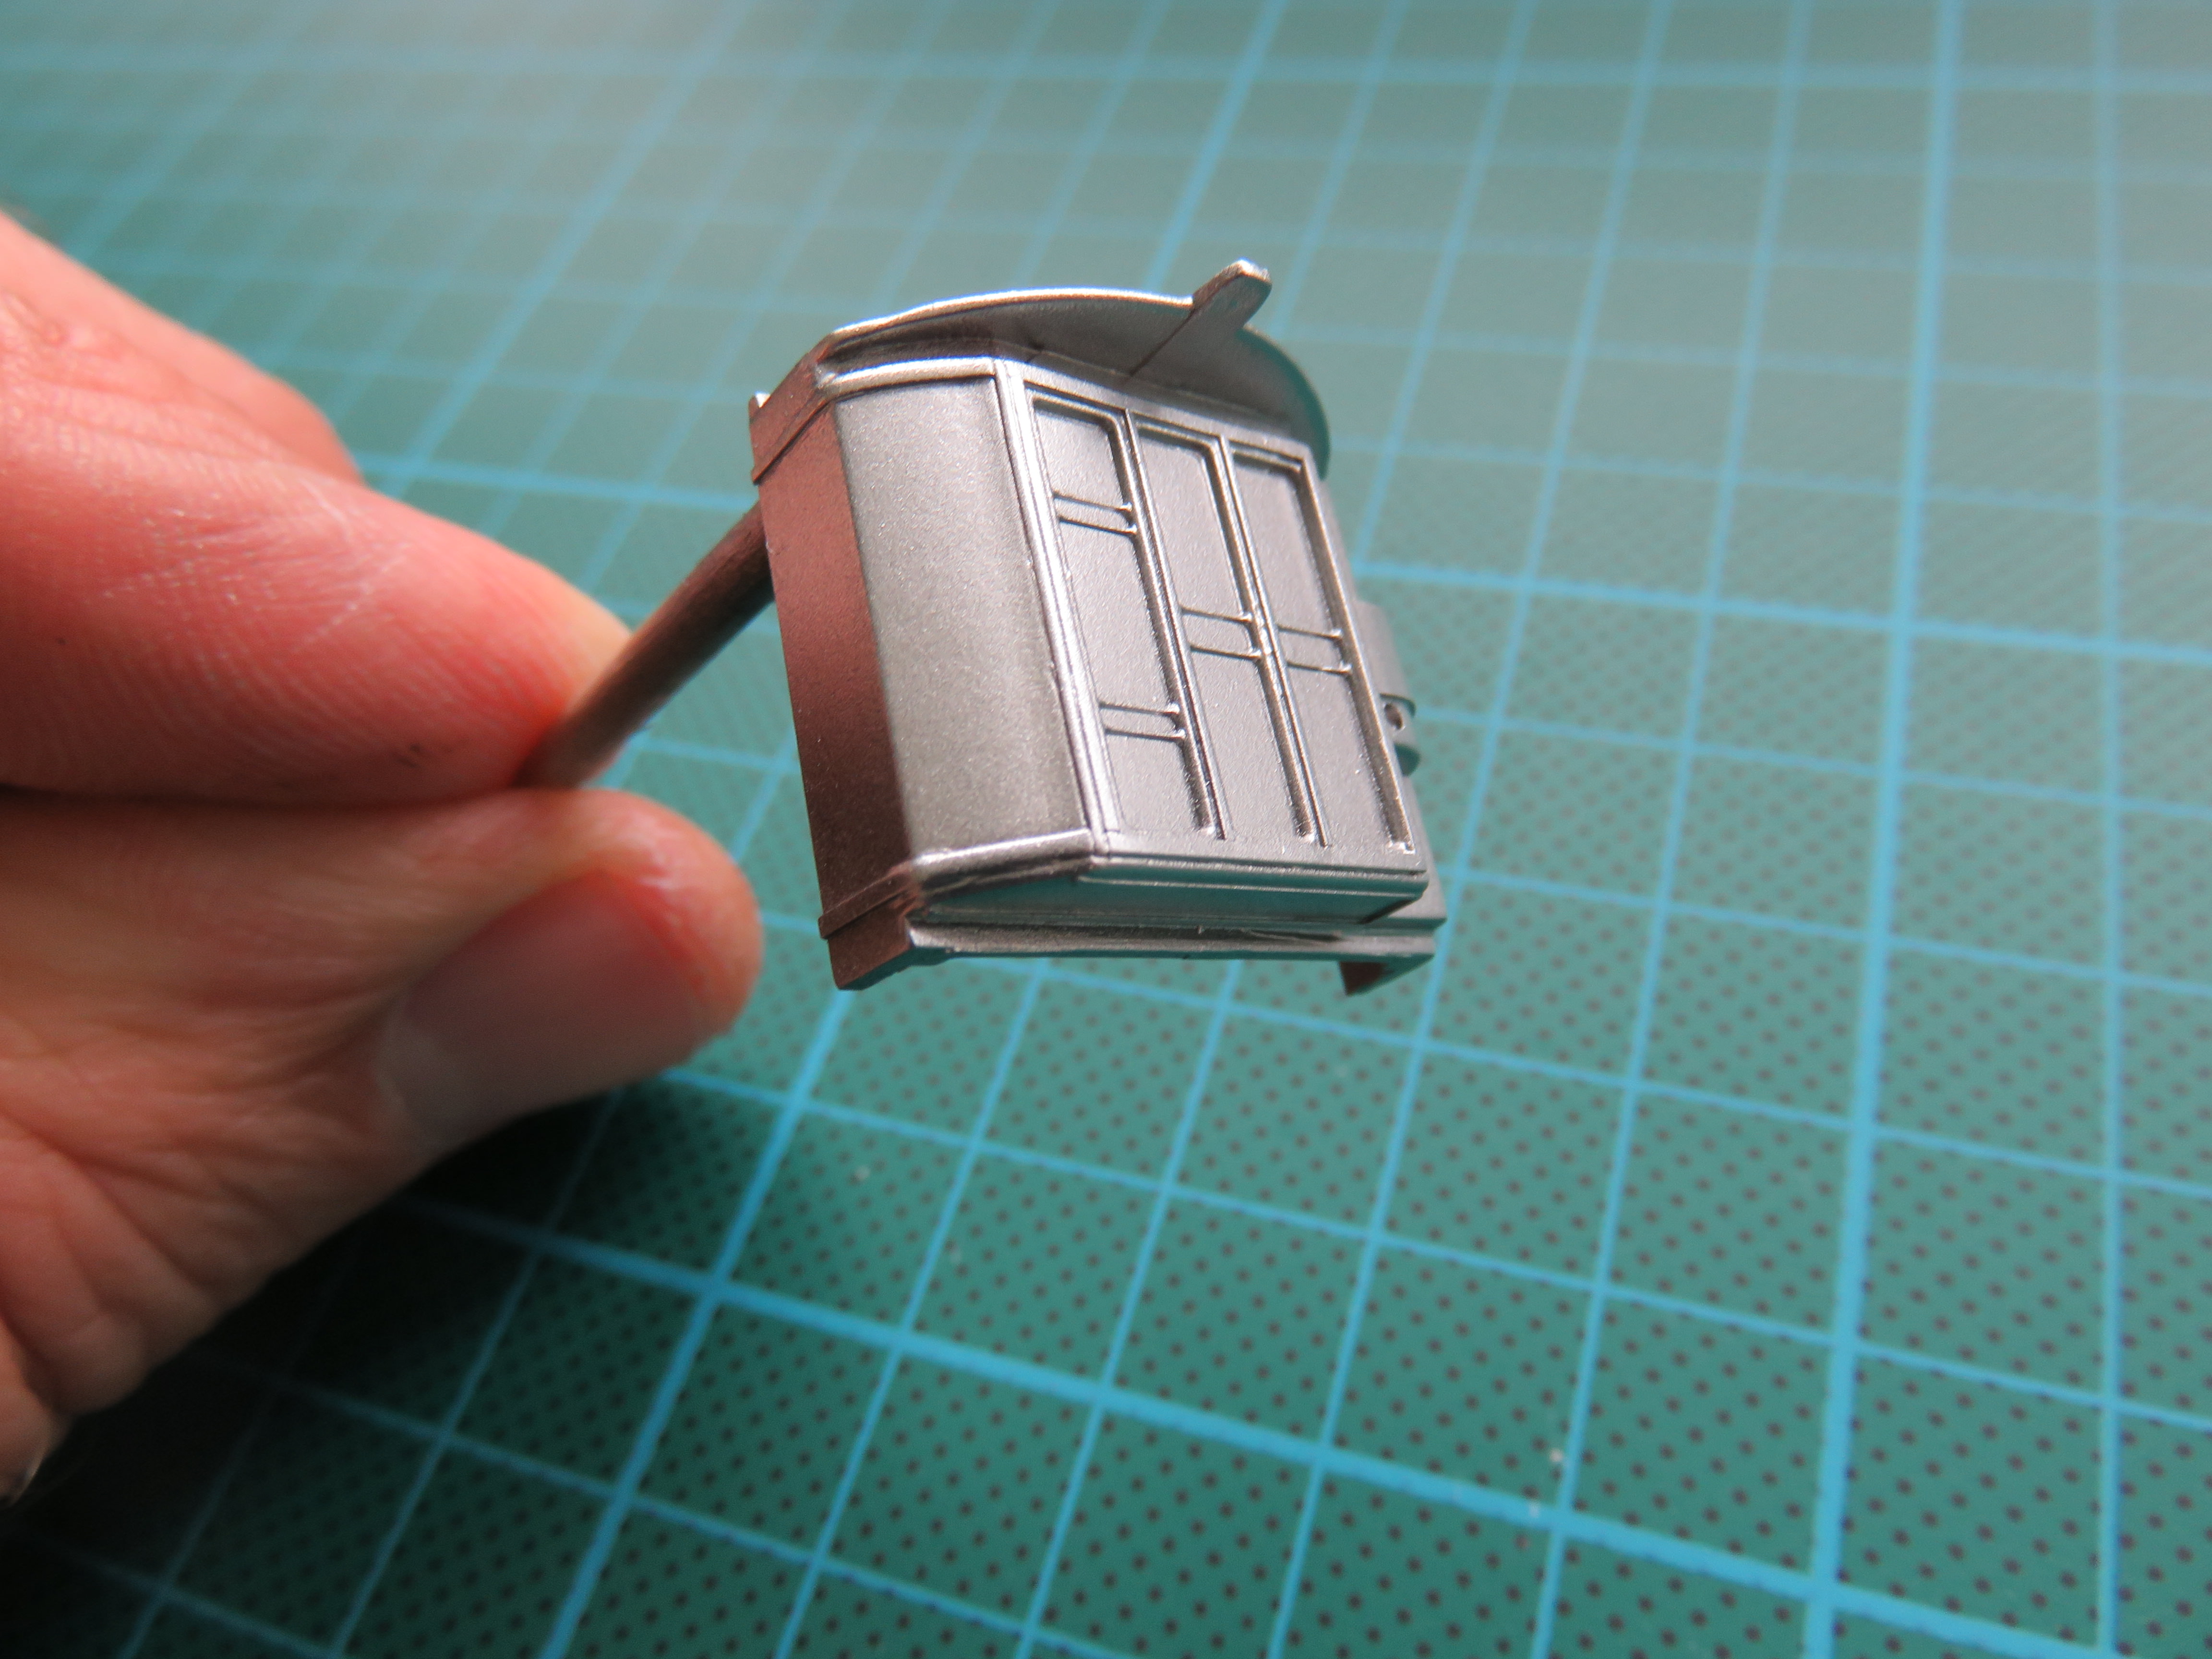
I might be in danger of sinking into a never ending search for the perfect finish, as is always a danger with my builds. Im never truly satisfied. In the interests of not going blind, insane or addicted to thinners, Im going to start calling some parts done. Finished are:
The avionics bay
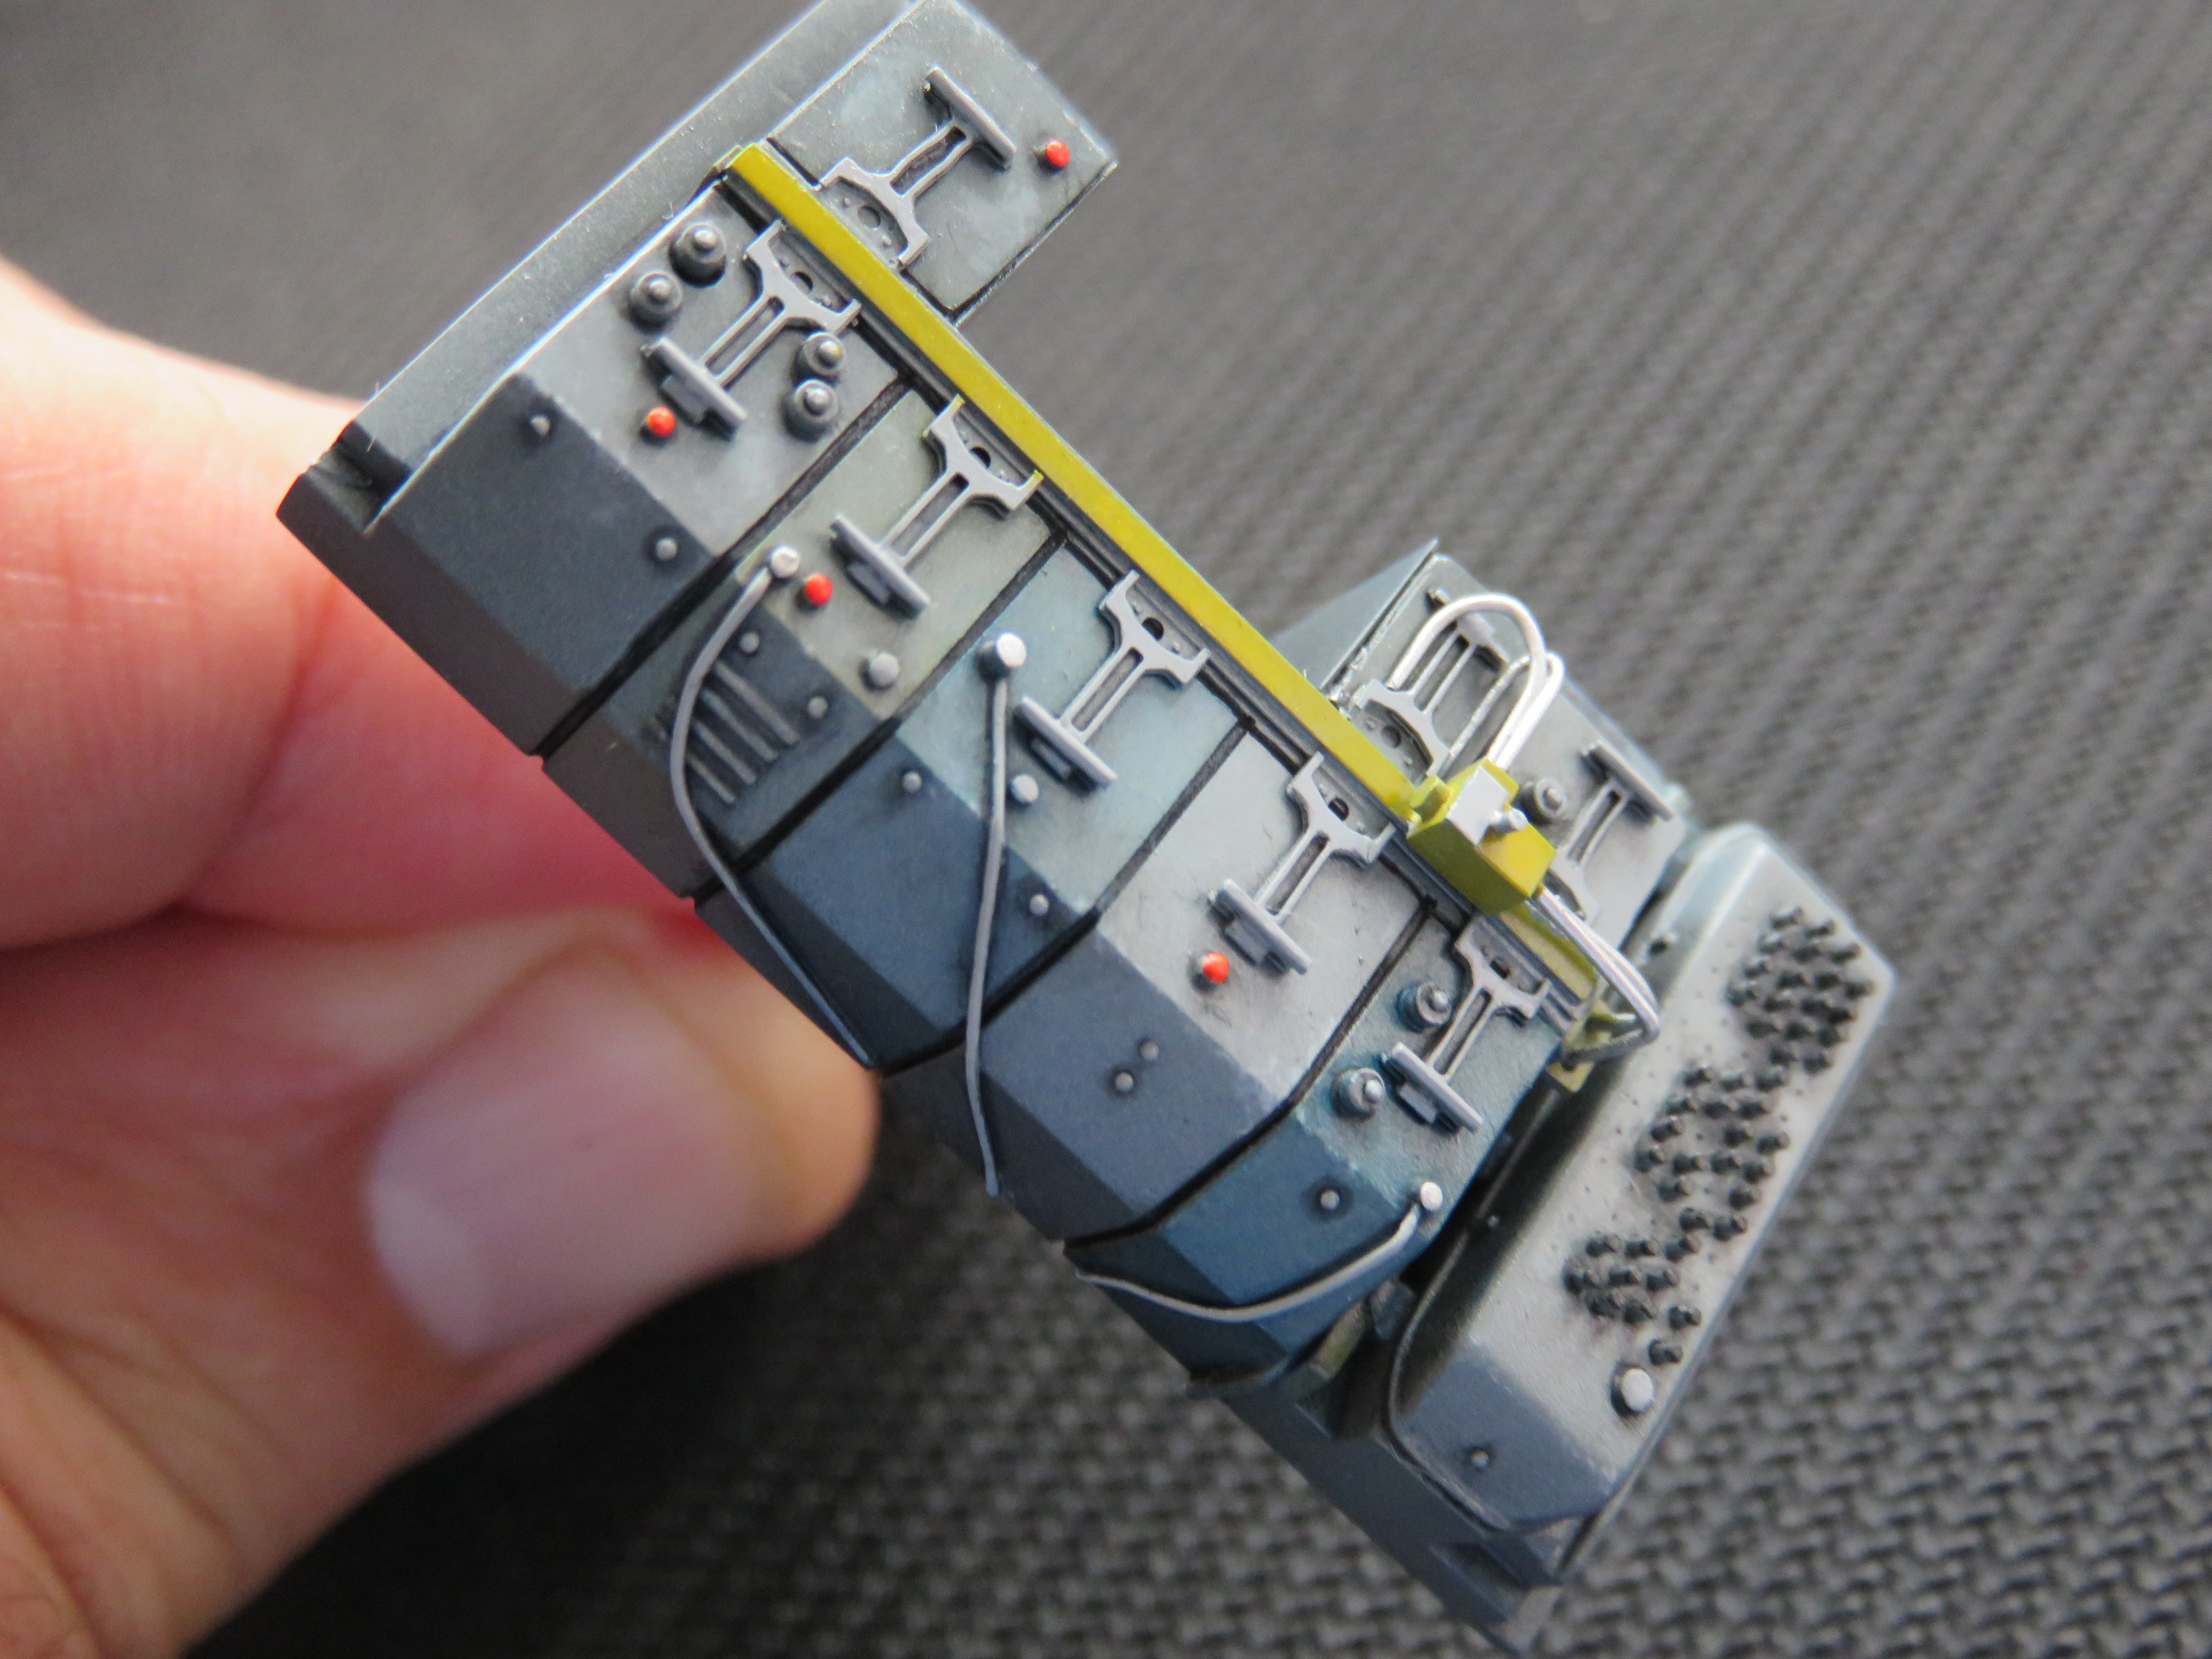
The cockpit rear bulkhead
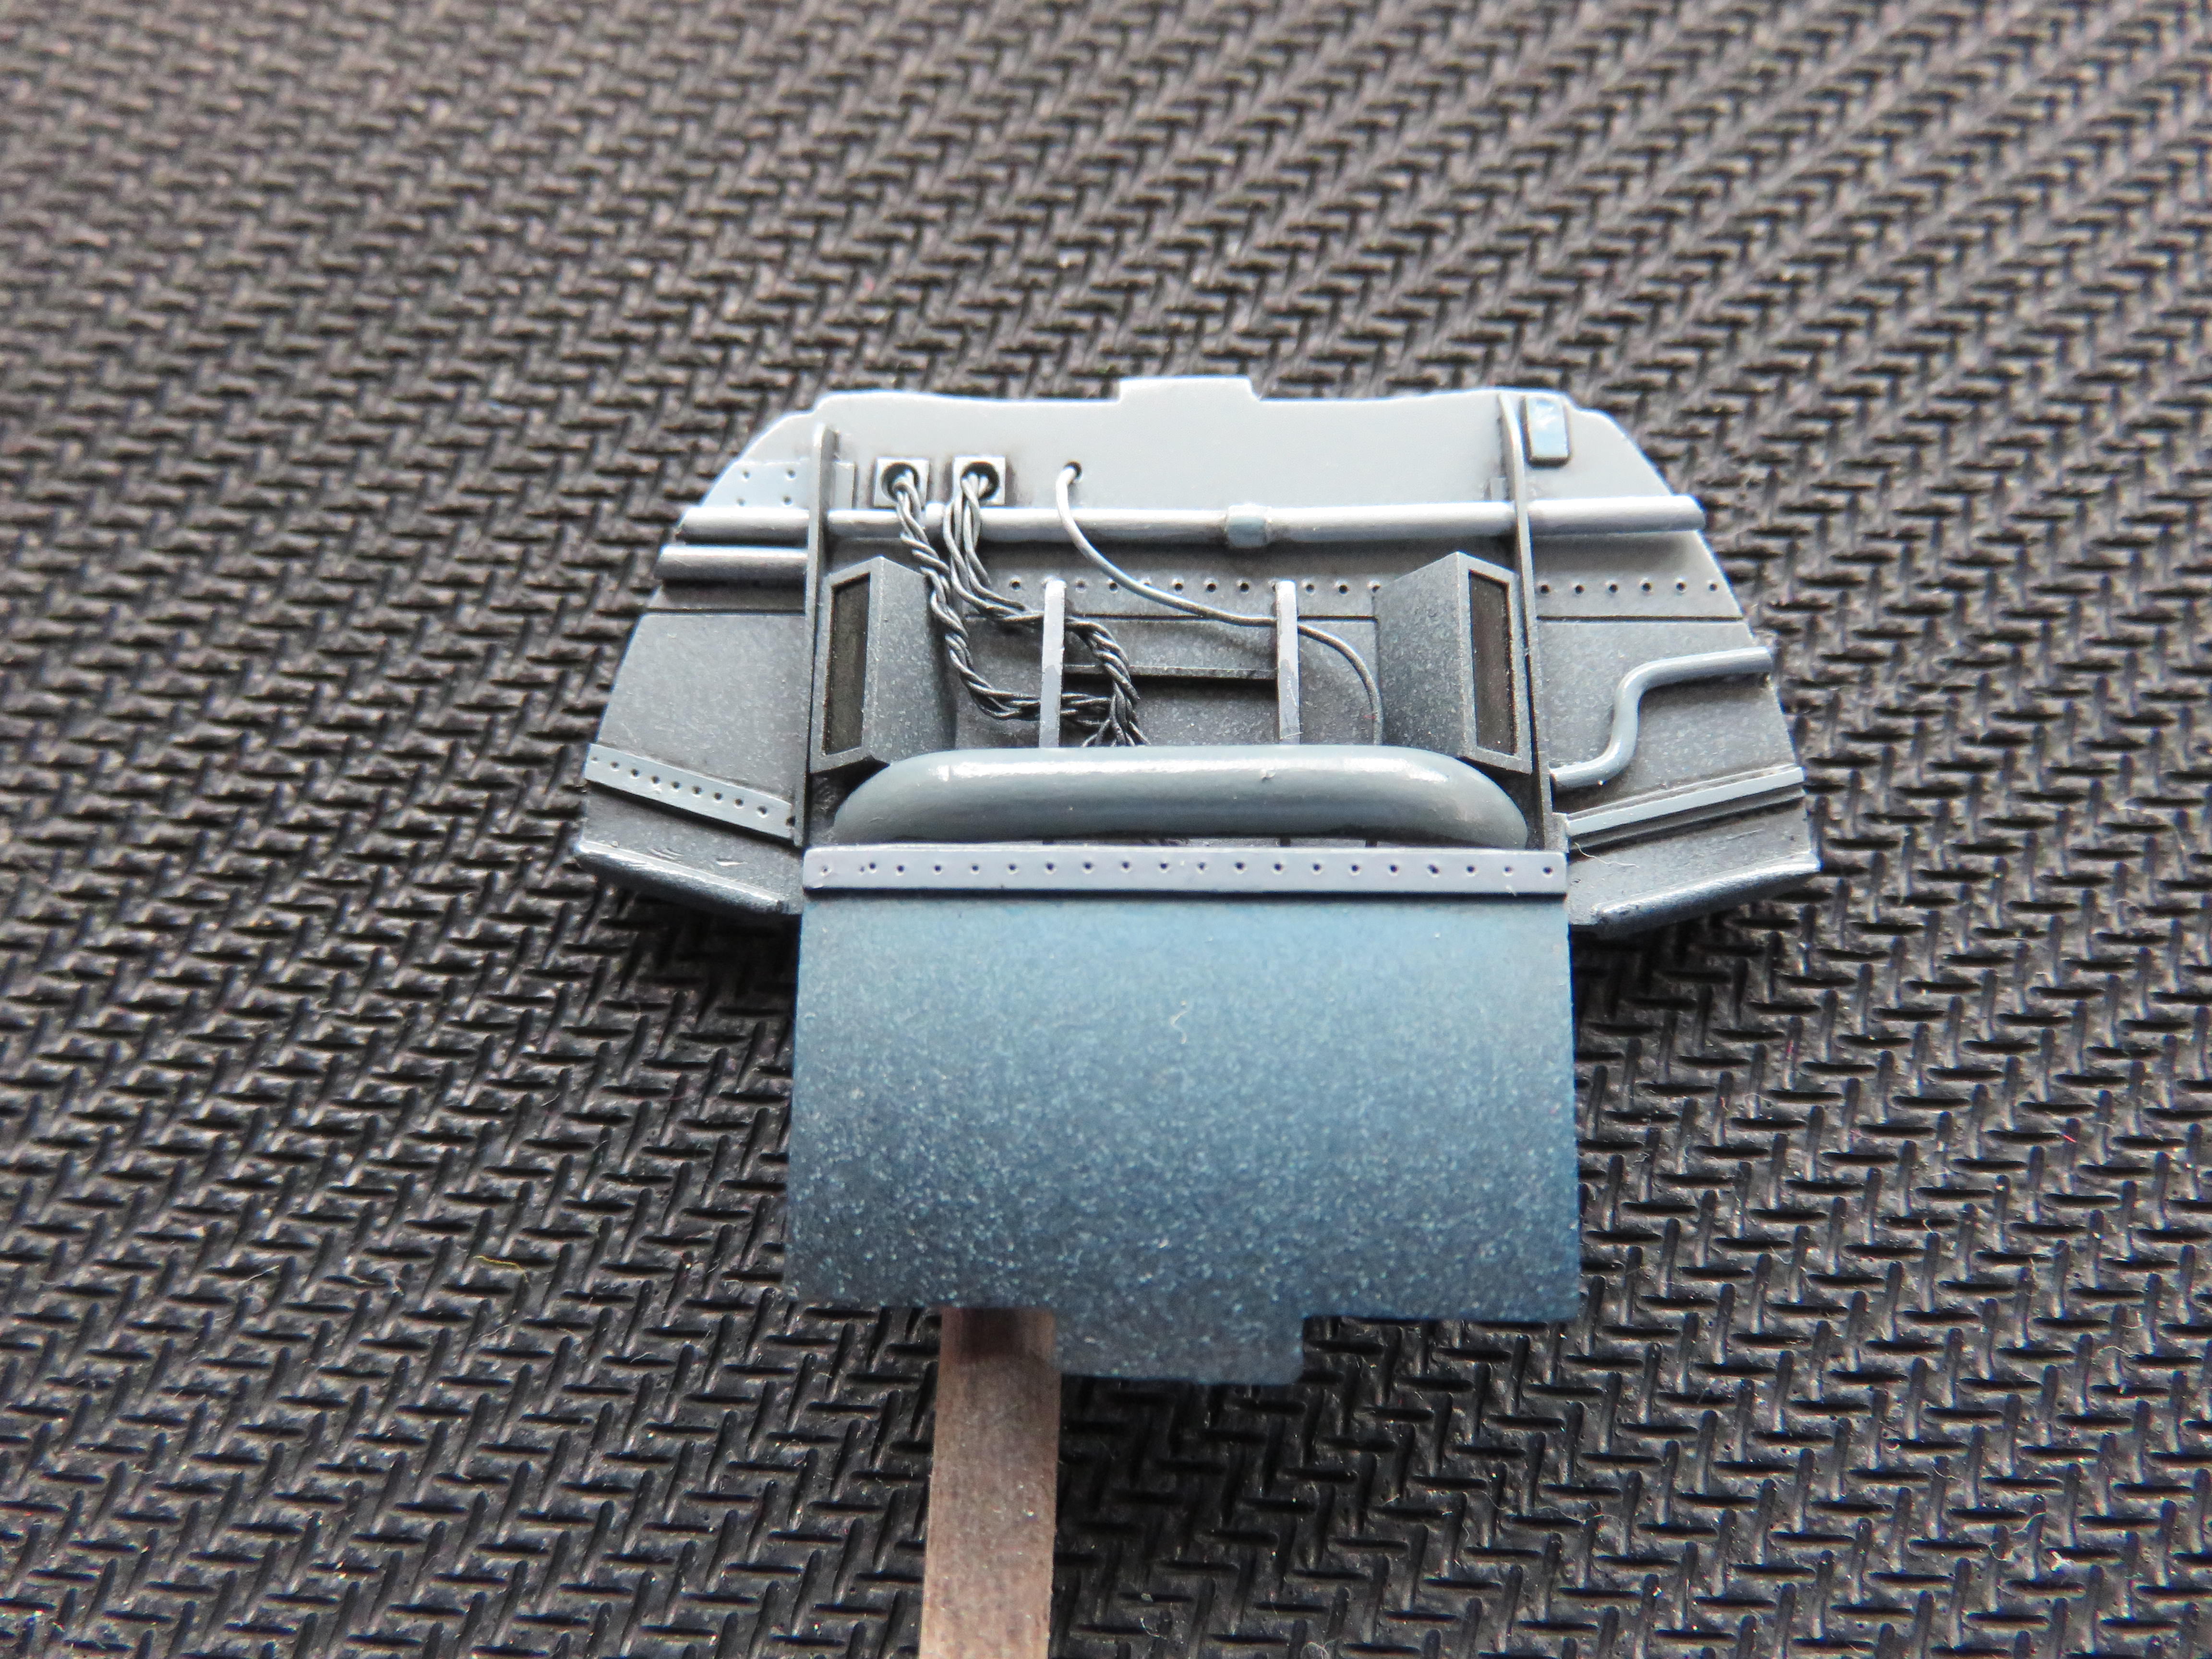
The seat (actually finished a few weeks ago)
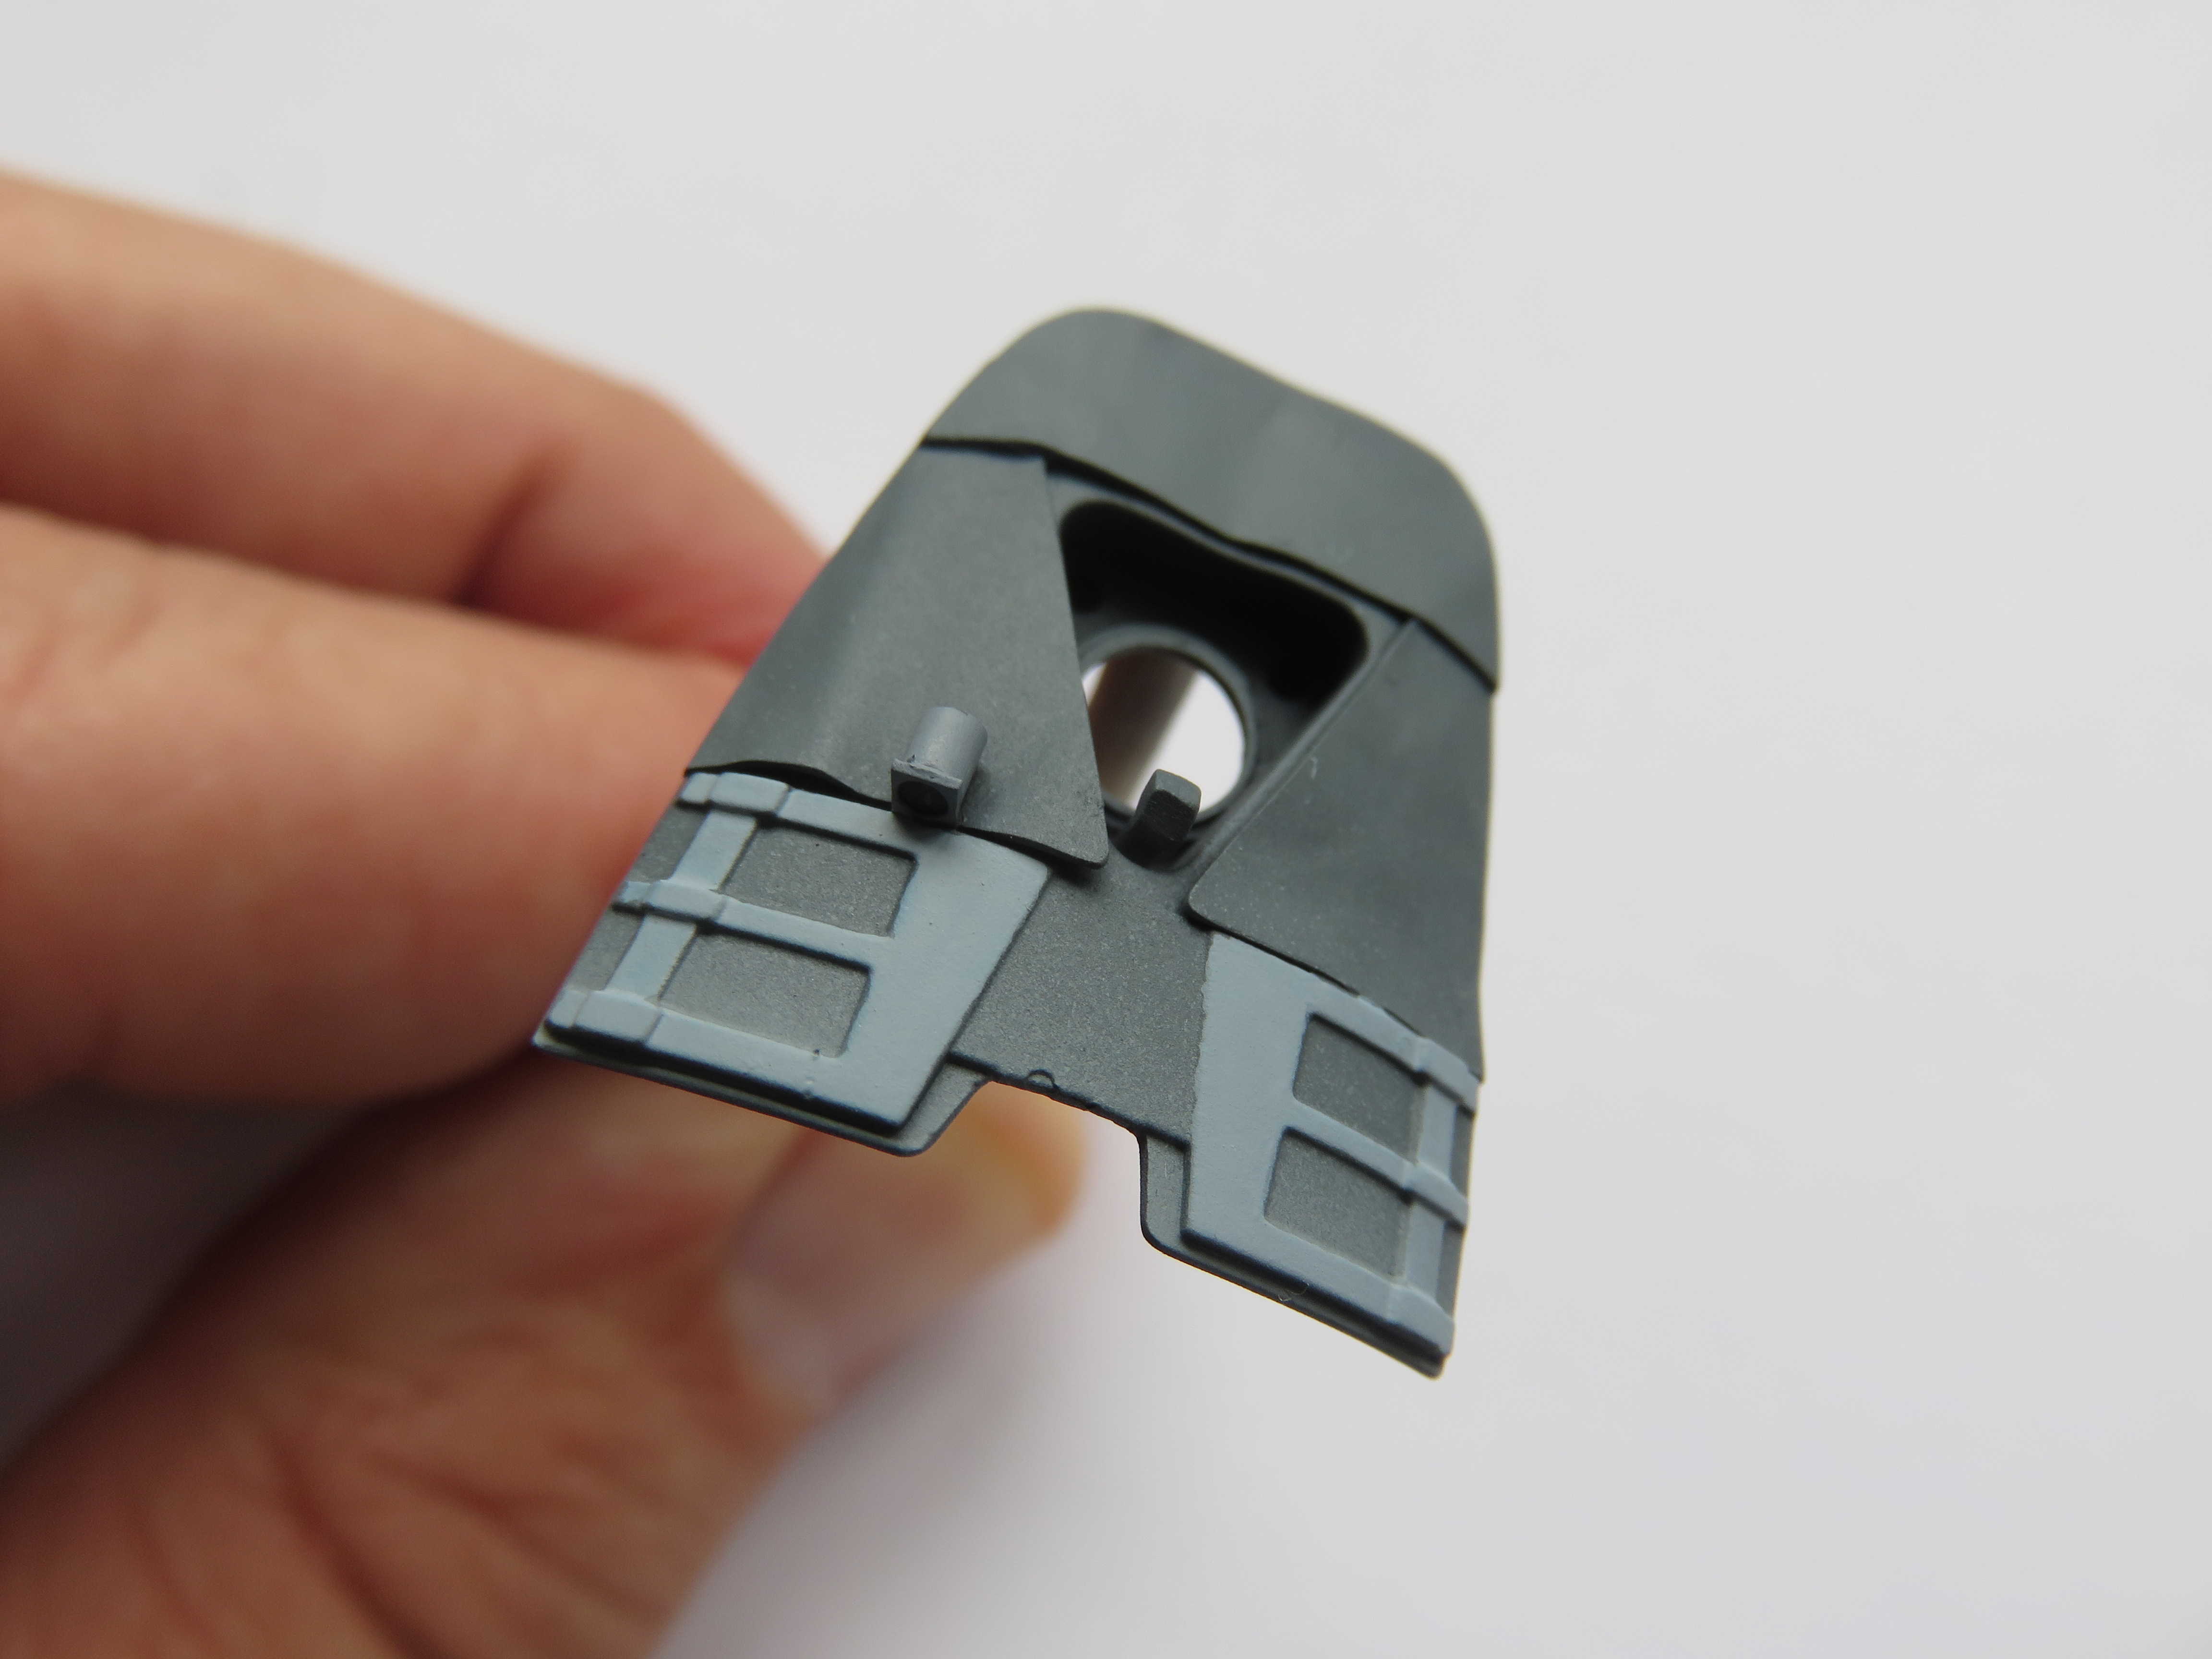
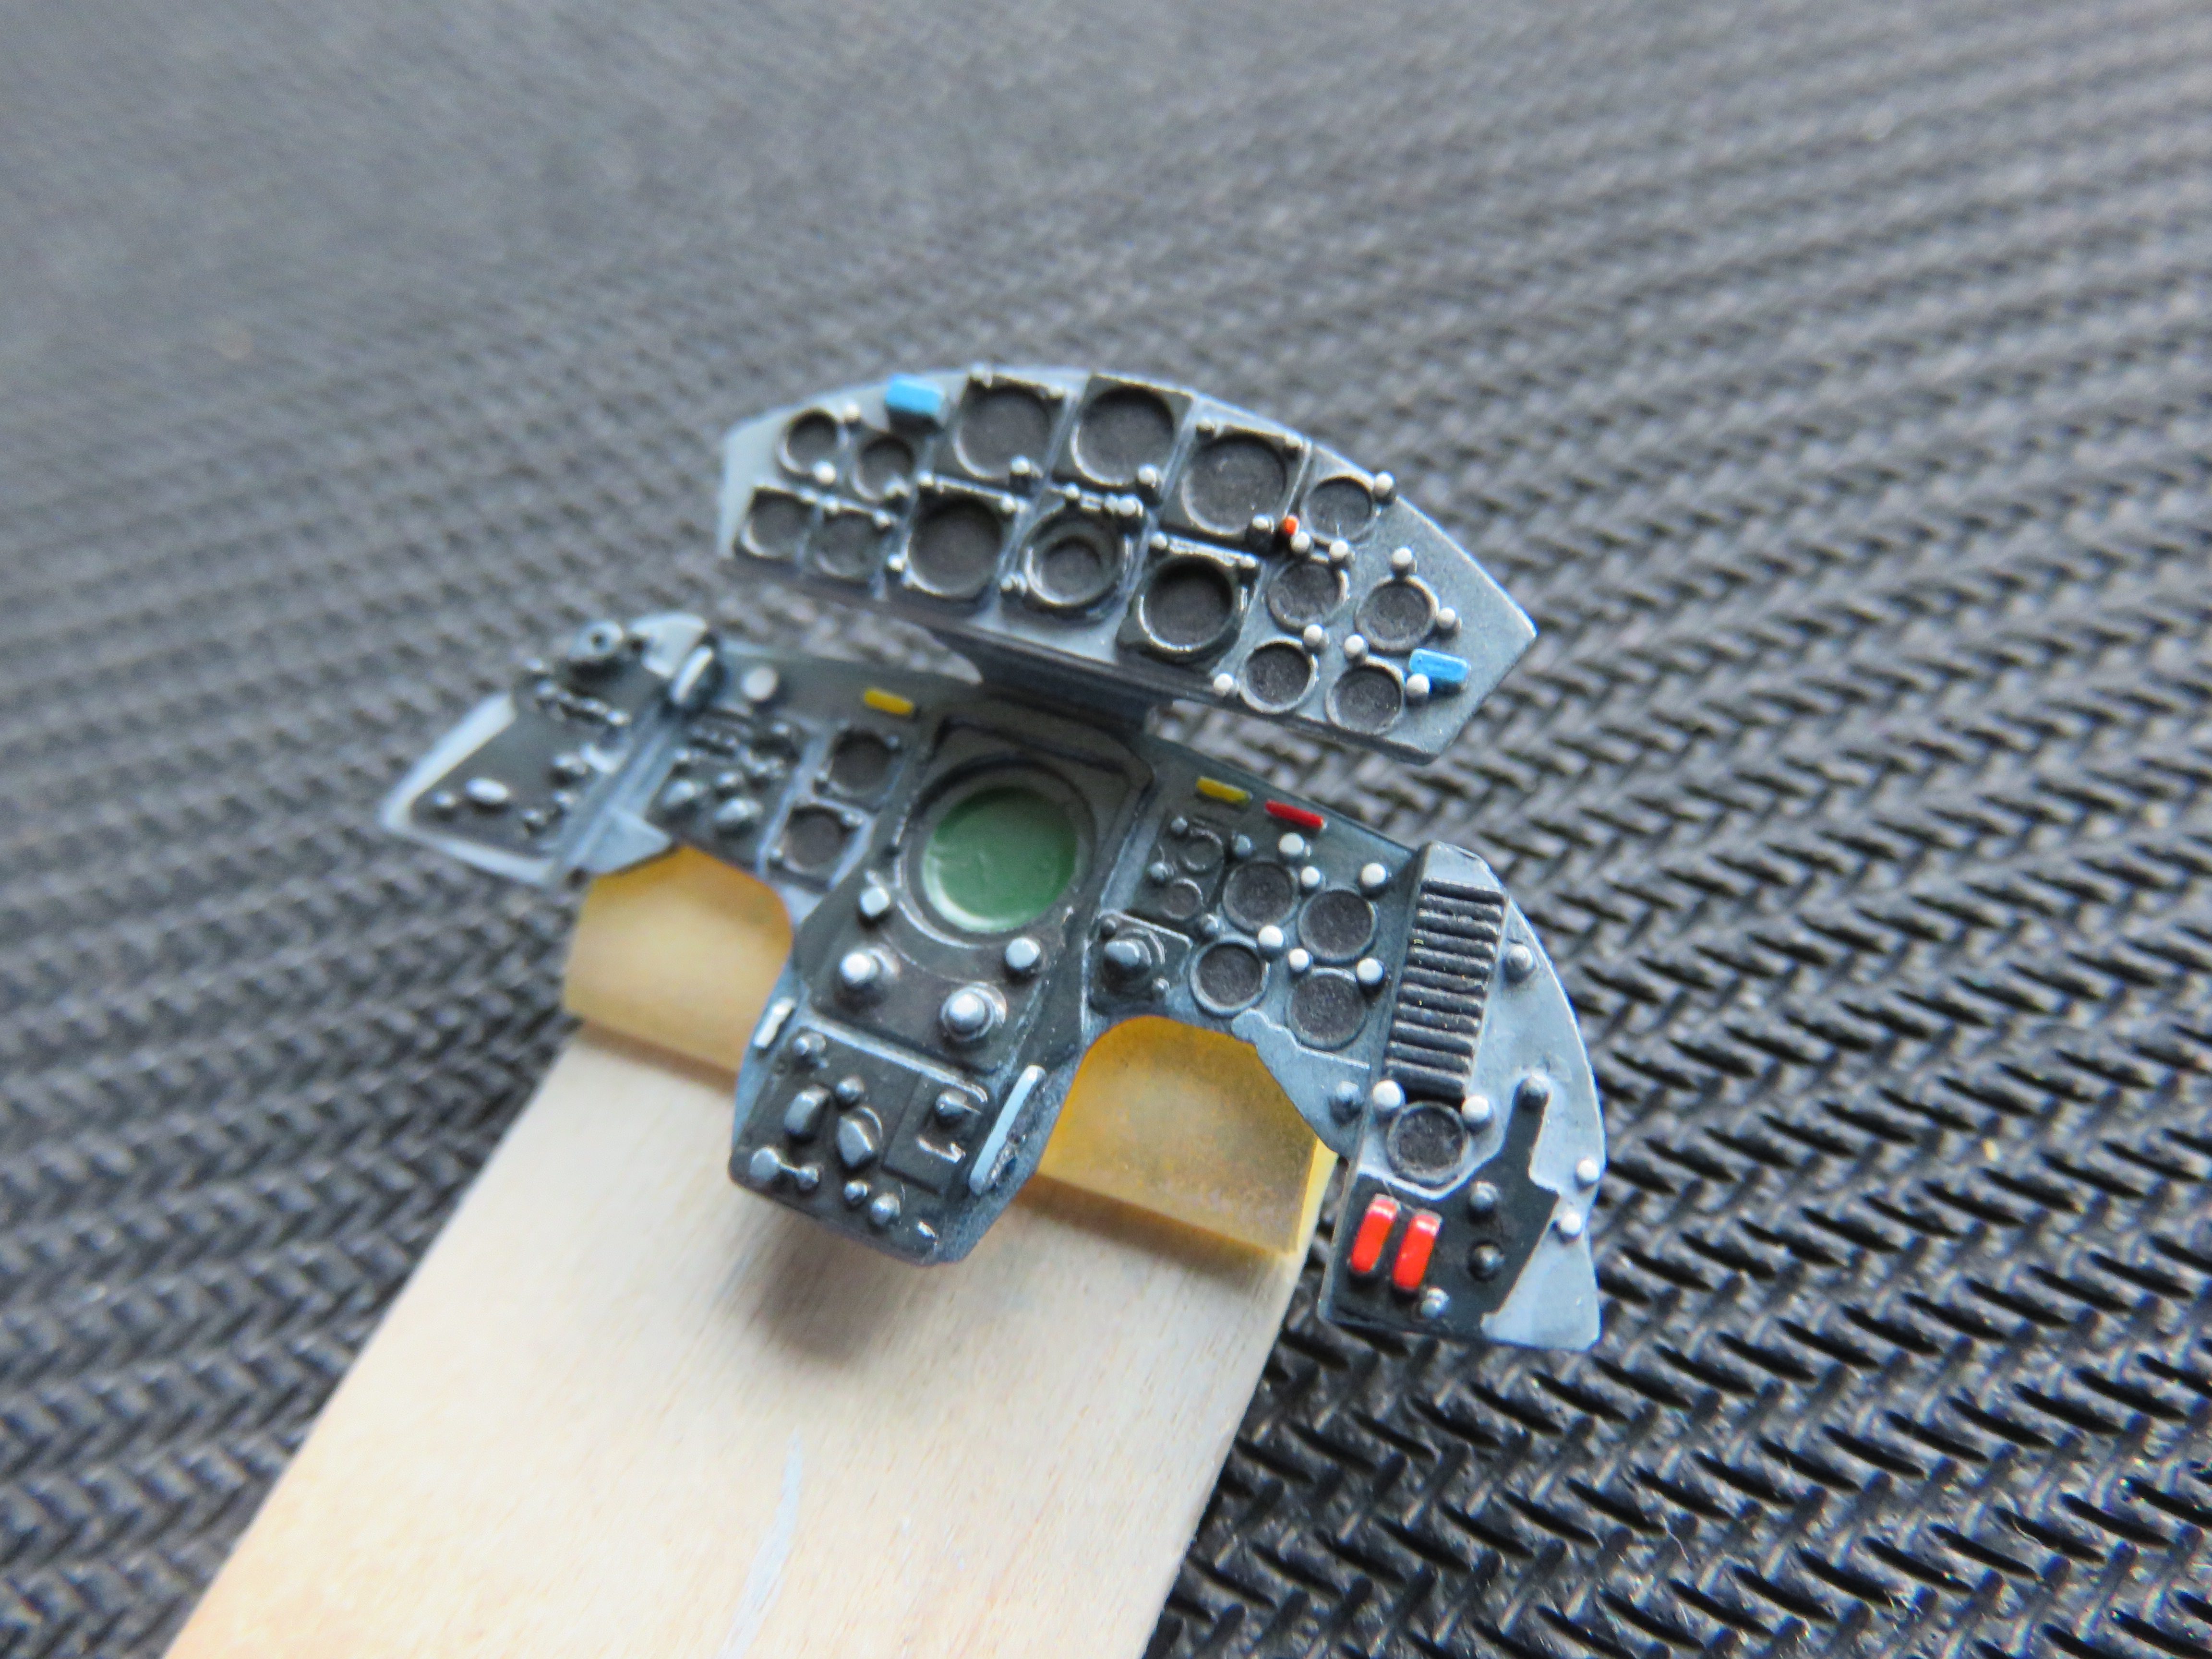
The instrument panel. Well, probably. Im still thinking about adding Airscale dials. When you see the part magnified like this the dials are obviously missing, but back in the real world theyll hardly show and a dab of gloss in the right place will create a passable impression. Im thinking about it because Im not sure the work is worth the reward. Hmmmm, to decal or not to decal? That is the question.
Still with some work to do are:
Cockpit tub - a bit of low key weathering and tidying up need.
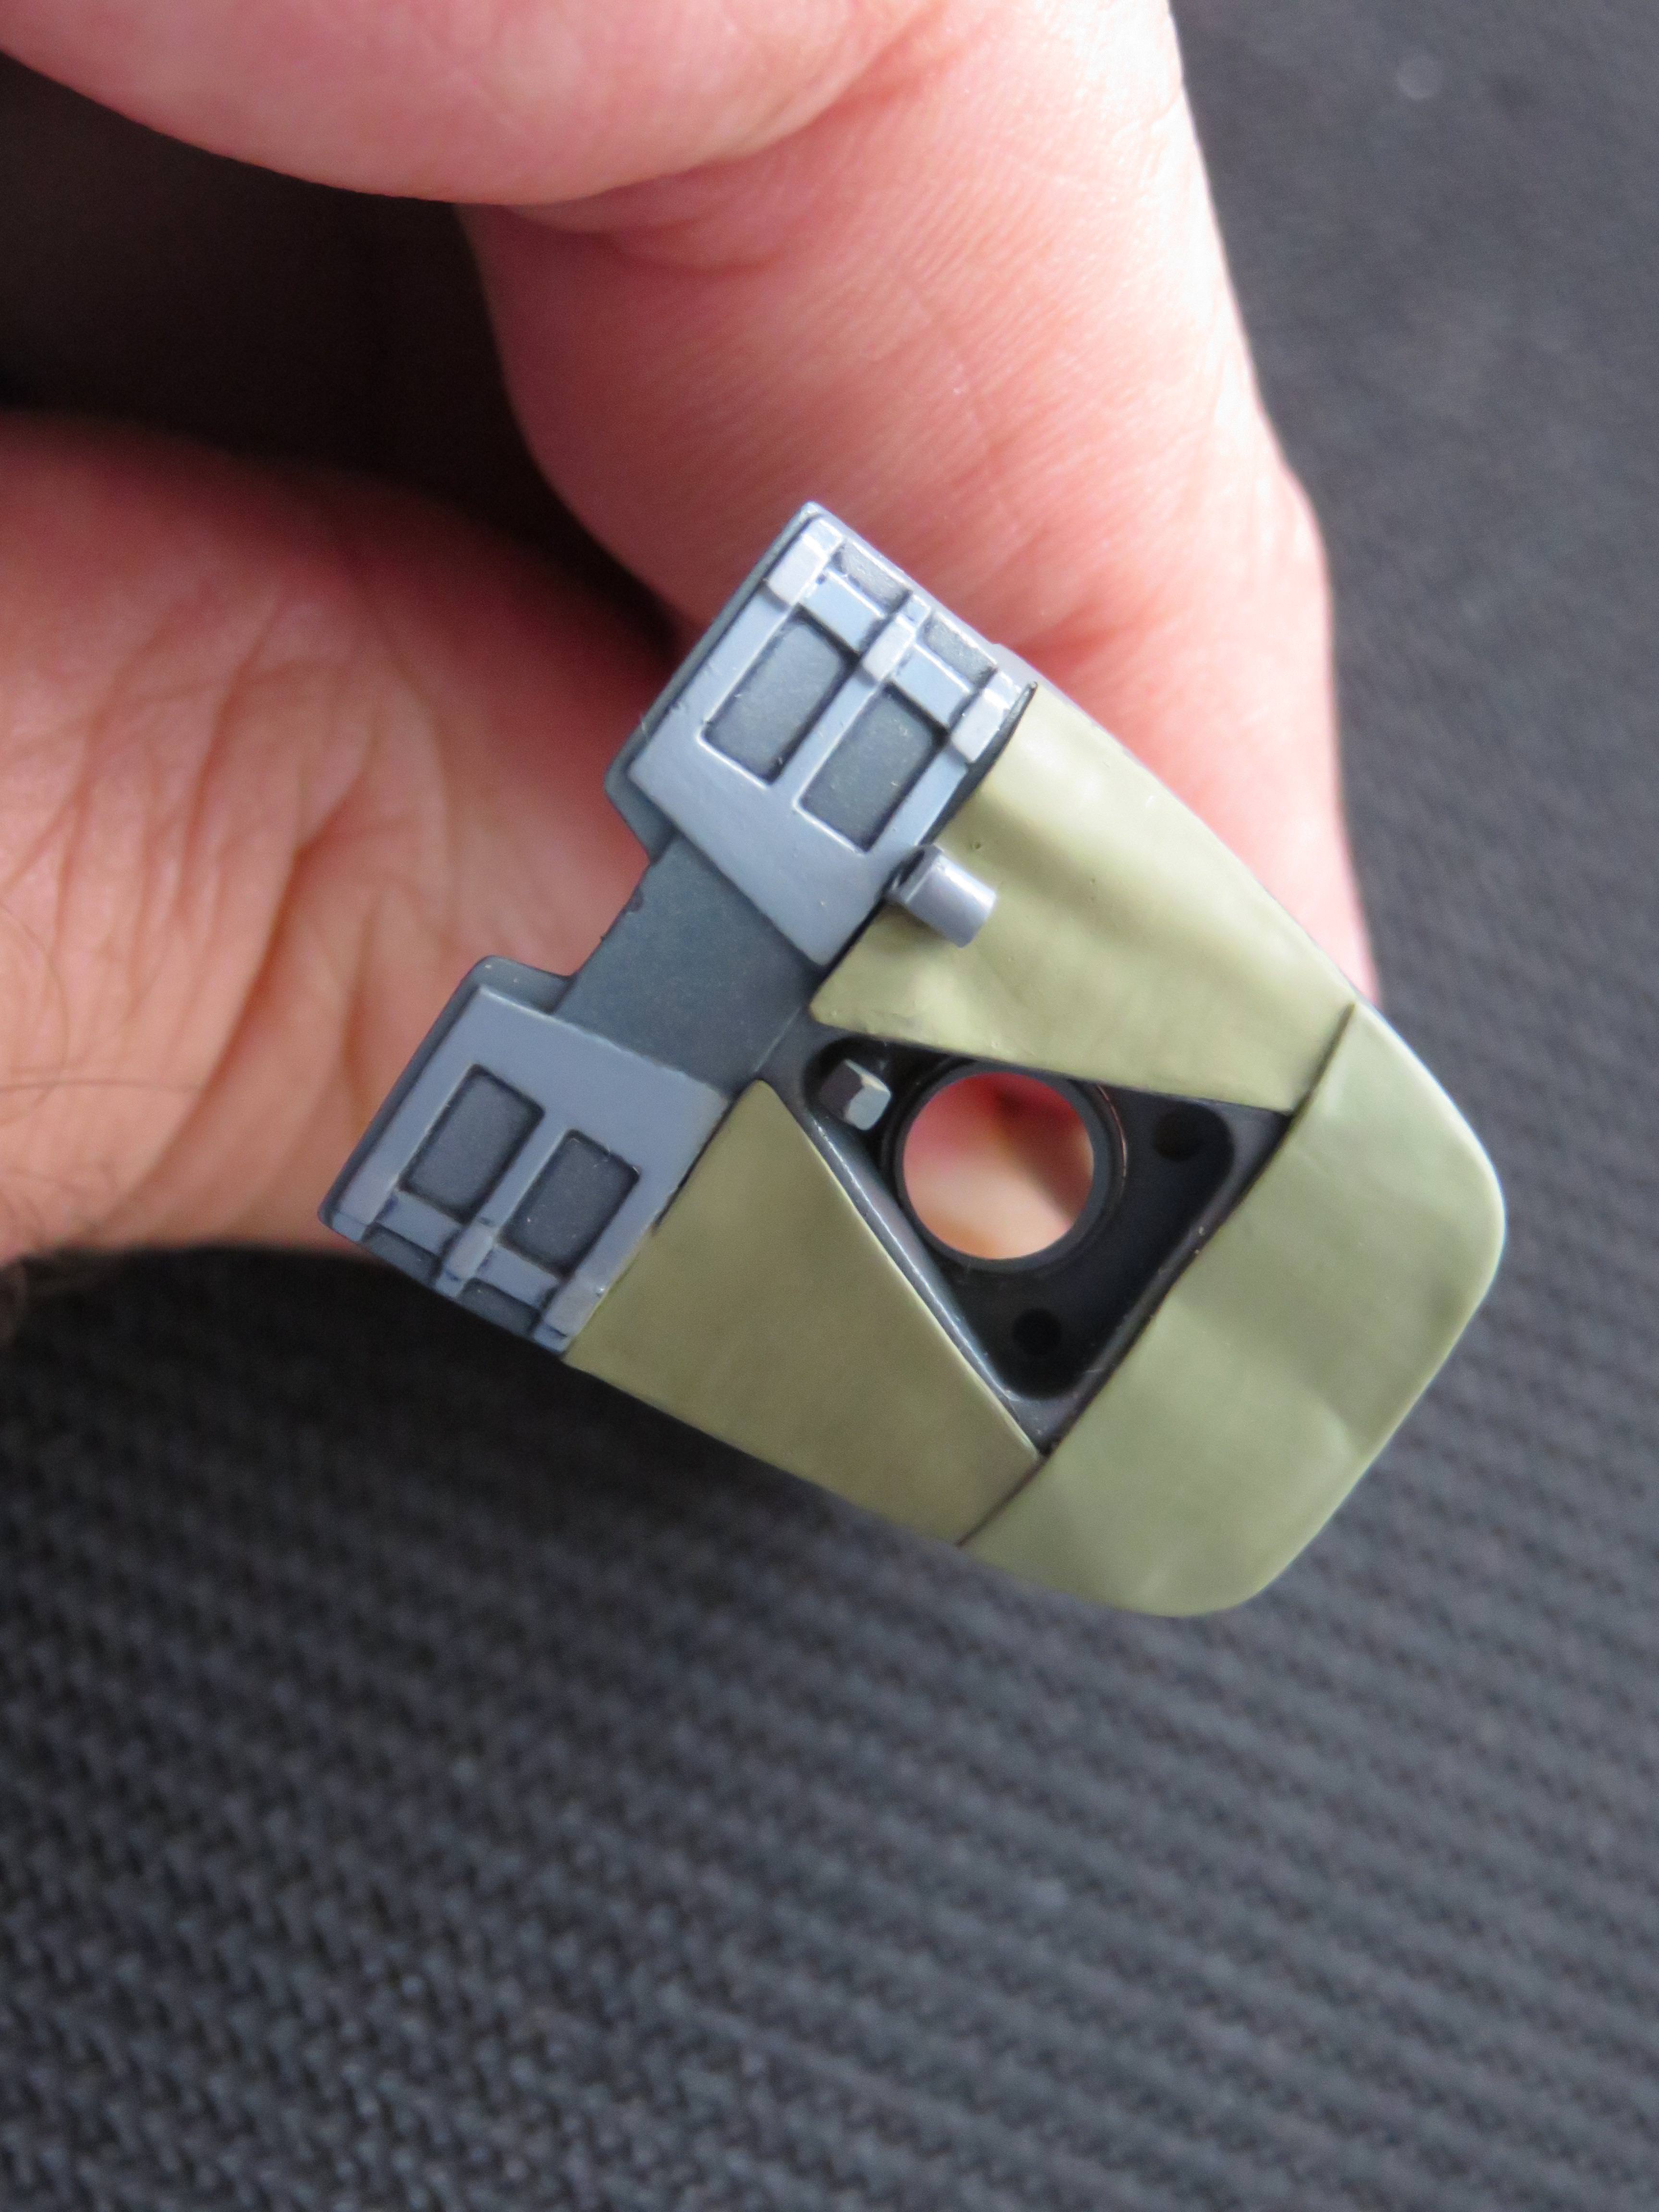
Area over the front of the instrument panel (not sure what its called). I want to add some variation in tone to those boring olive drab areas.
And finally the ammunition bay needs painting in NMF.

There are a few ancillary bits and pieces like the joystick and foot pedals that are done but not photographed. Oh, and the rather plain cockpit side walls are done too.
A bit more work here and Ill be able to turn my attention to the engine and eventually go back to scratch building the rear landing gear bay. Remember thats where this diversion started? I must admit Id almost forgotten too.
I hope your plastic and paint is cooperating.
Have a great day
Steve.
The avionics bay
The cockpit rear bulkhead
The seat (actually finished a few weeks ago)
The instrument panel. Well, probably. Im still thinking about adding Airscale dials. When you see the part magnified like this the dials are obviously missing, but back in the real world theyll hardly show and a dab of gloss in the right place will create a passable impression. Im thinking about it because Im not sure the work is worth the reward. Hmmmm, to decal or not to decal? That is the question.
Still with some work to do are:
Cockpit tub - a bit of low key weathering and tidying up need.
Area over the front of the instrument panel (not sure what its called). I want to add some variation in tone to those boring olive drab areas.
And finally the ammunition bay needs painting in NMF.
There are a few ancillary bits and pieces like the joystick and foot pedals that are done but not photographed. Oh, and the rather plain cockpit side walls are done too.
A bit more work here and Ill be able to turn my attention to the engine and eventually go back to scratch building the rear landing gear bay. Remember thats where this diversion started? I must admit Id almost forgotten too.
I hope your plastic and paint is cooperating.
Have a great day
Steve.
Joel_W
Joined: December 04, 2010
KitMaker: 11,666 posts
AeroScale: 7,410 posts
Posted: Wednesday, August 15, 2018 - 12:42 AM UTC
Steve,
Those assemblies are look really quite good. I really like the seat and the avionics bay with each electrical box a slightly different shade of the same color. Really makes quite a difference.
As for the IP, any time you can use Peter's instruments, I'd say go for it.
Joel
Those assemblies are look really quite good. I really like the seat and the avionics bay with each electrical box a slightly different shade of the same color. Really makes quite a difference.
As for the IP, any time you can use Peter's instruments, I'd say go for it.
Joel
SteveAndrews
Joined: August 16, 2010
KitMaker: 693 posts
AeroScale: 551 posts
Posted: Wednesday, August 15, 2018 - 07:16 AM UTC
Joel, you are a gentleman as ever. Yes, maybe I'll take the plunge and go for the decals, if only to stay true to my 'throw everything at it' approach to this kit.
Have a great day,
Steve.
Have a great day,
Steve.
SteveAndrews
Joined: August 16, 2010
KitMaker: 693 posts
AeroScale: 551 posts
Posted: Thursday, August 16, 2018 - 08:23 AM UTC
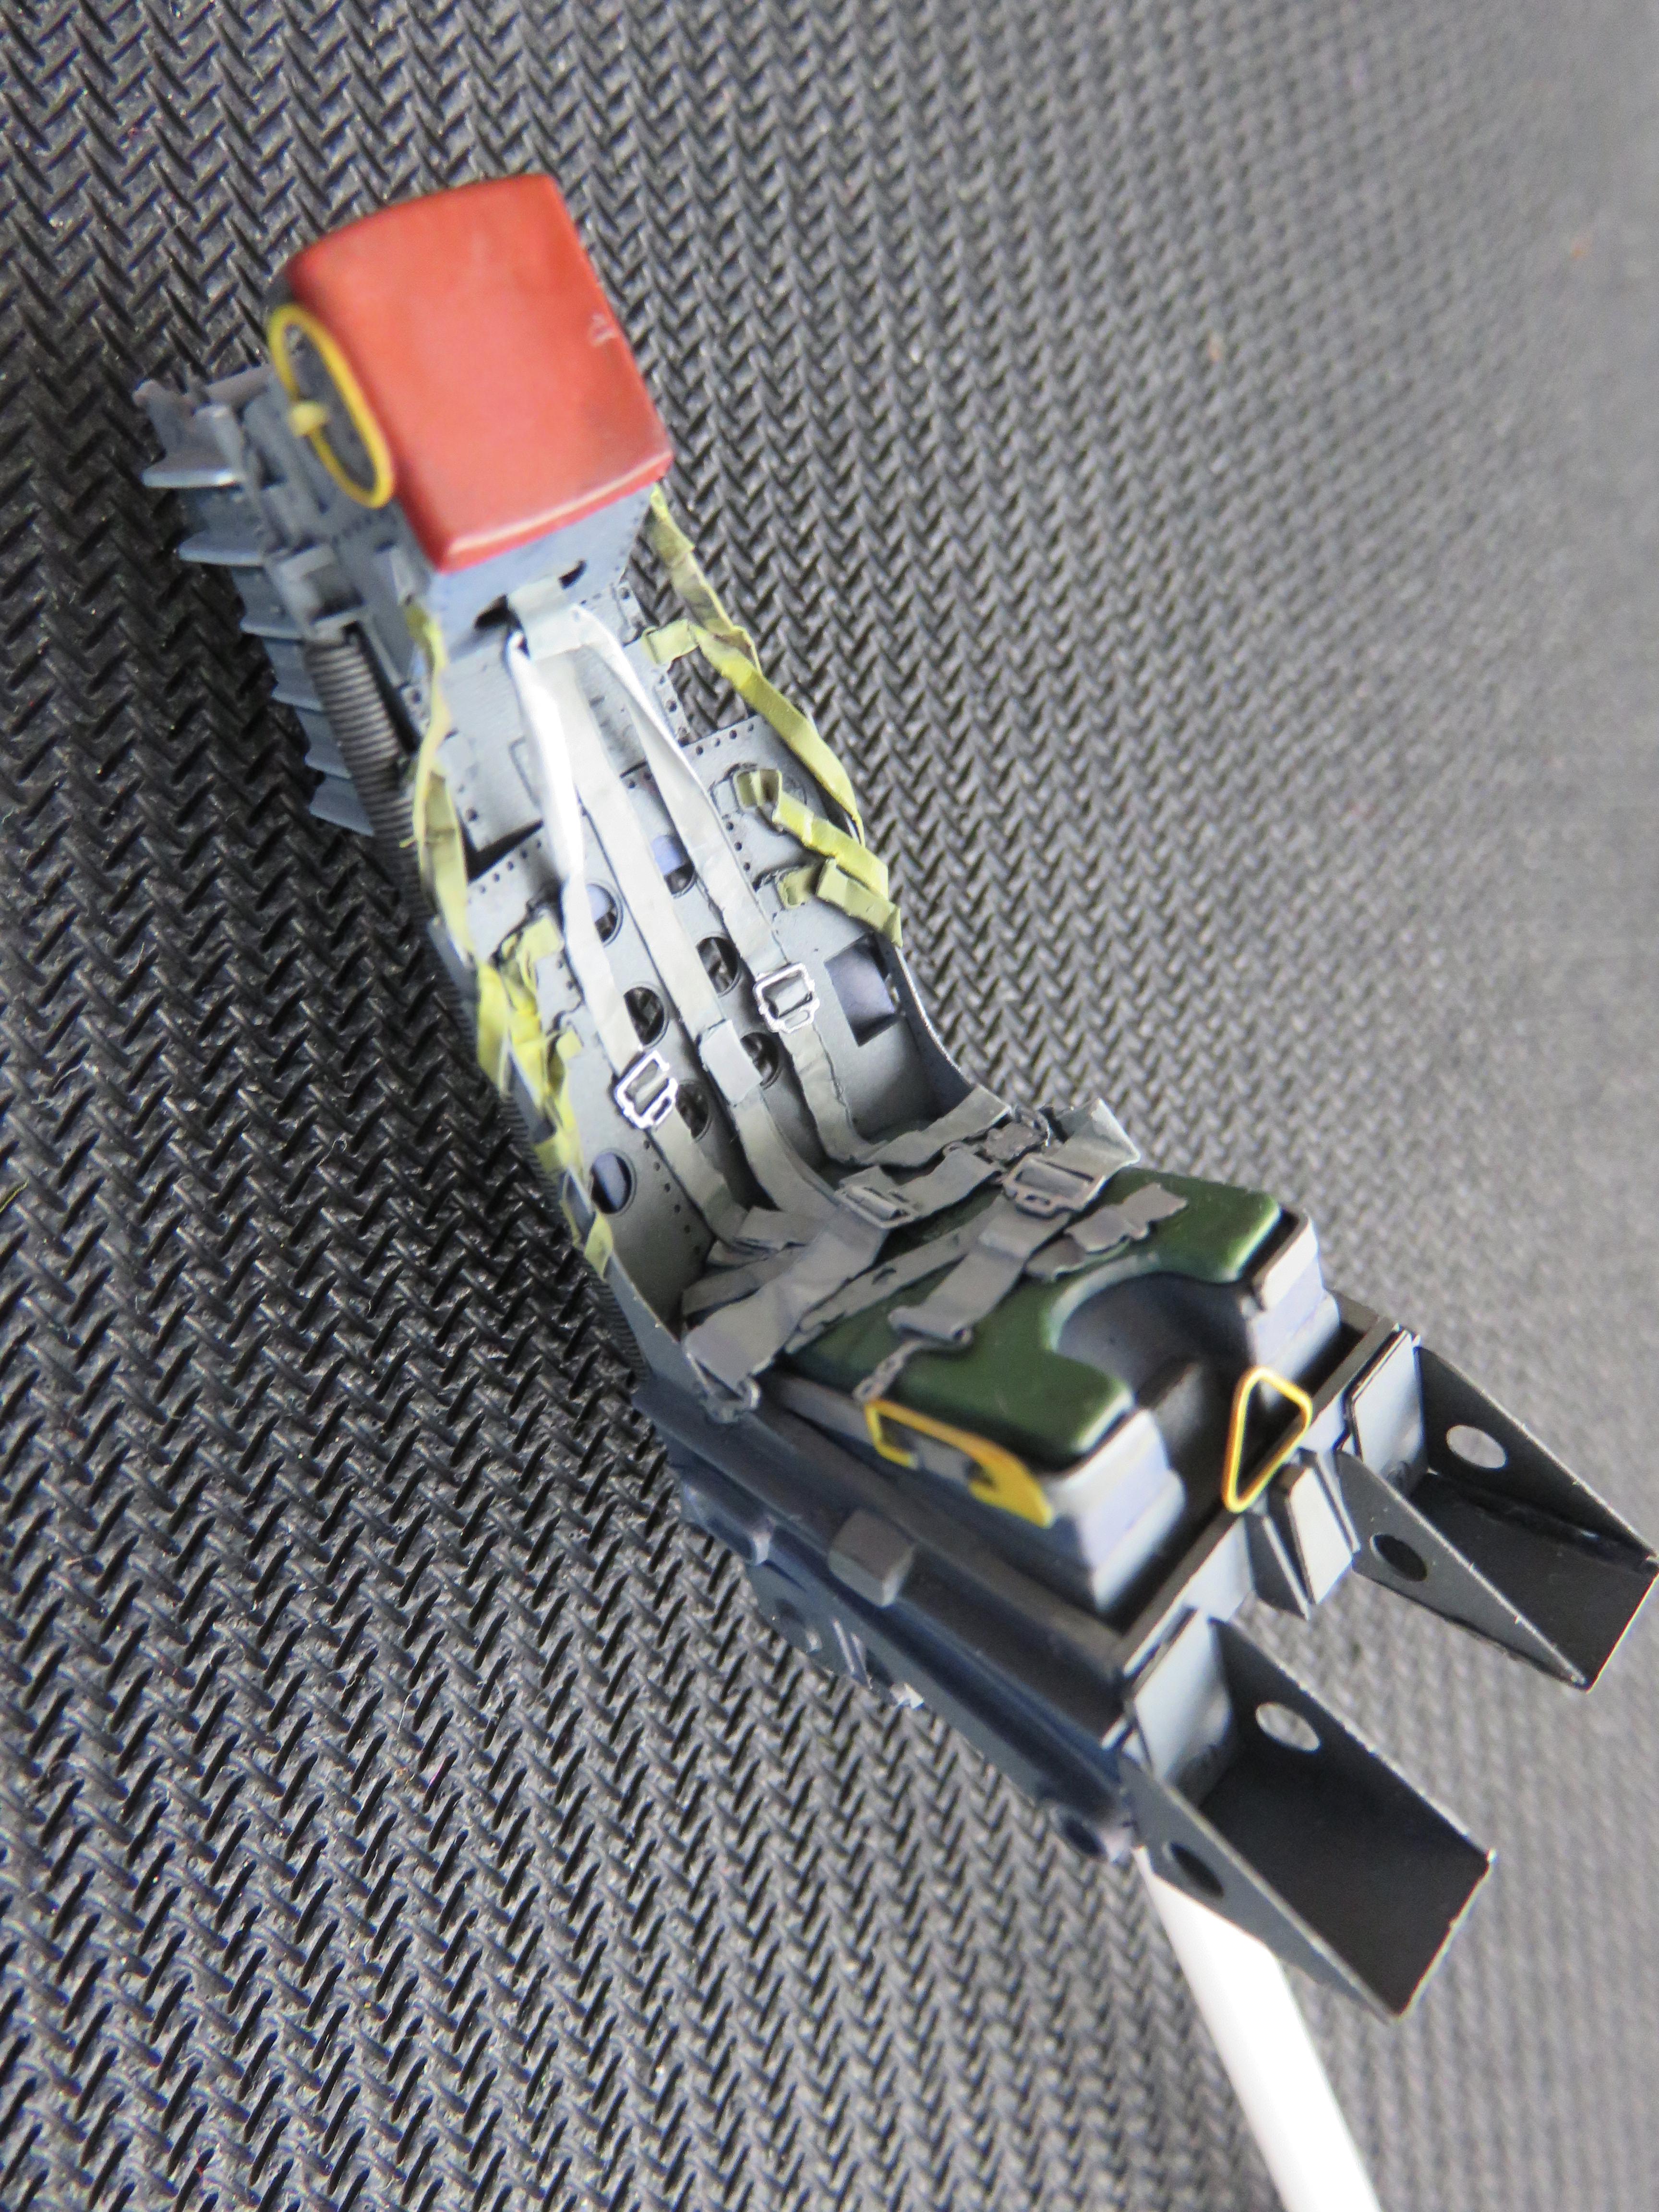
I couldn't resist a quick test fit. There's a busy cockpit emerging. Of course there's no instrument panel in place yet, and I think the gloss coat I put on before the wash needs toning down to satin or even matt.
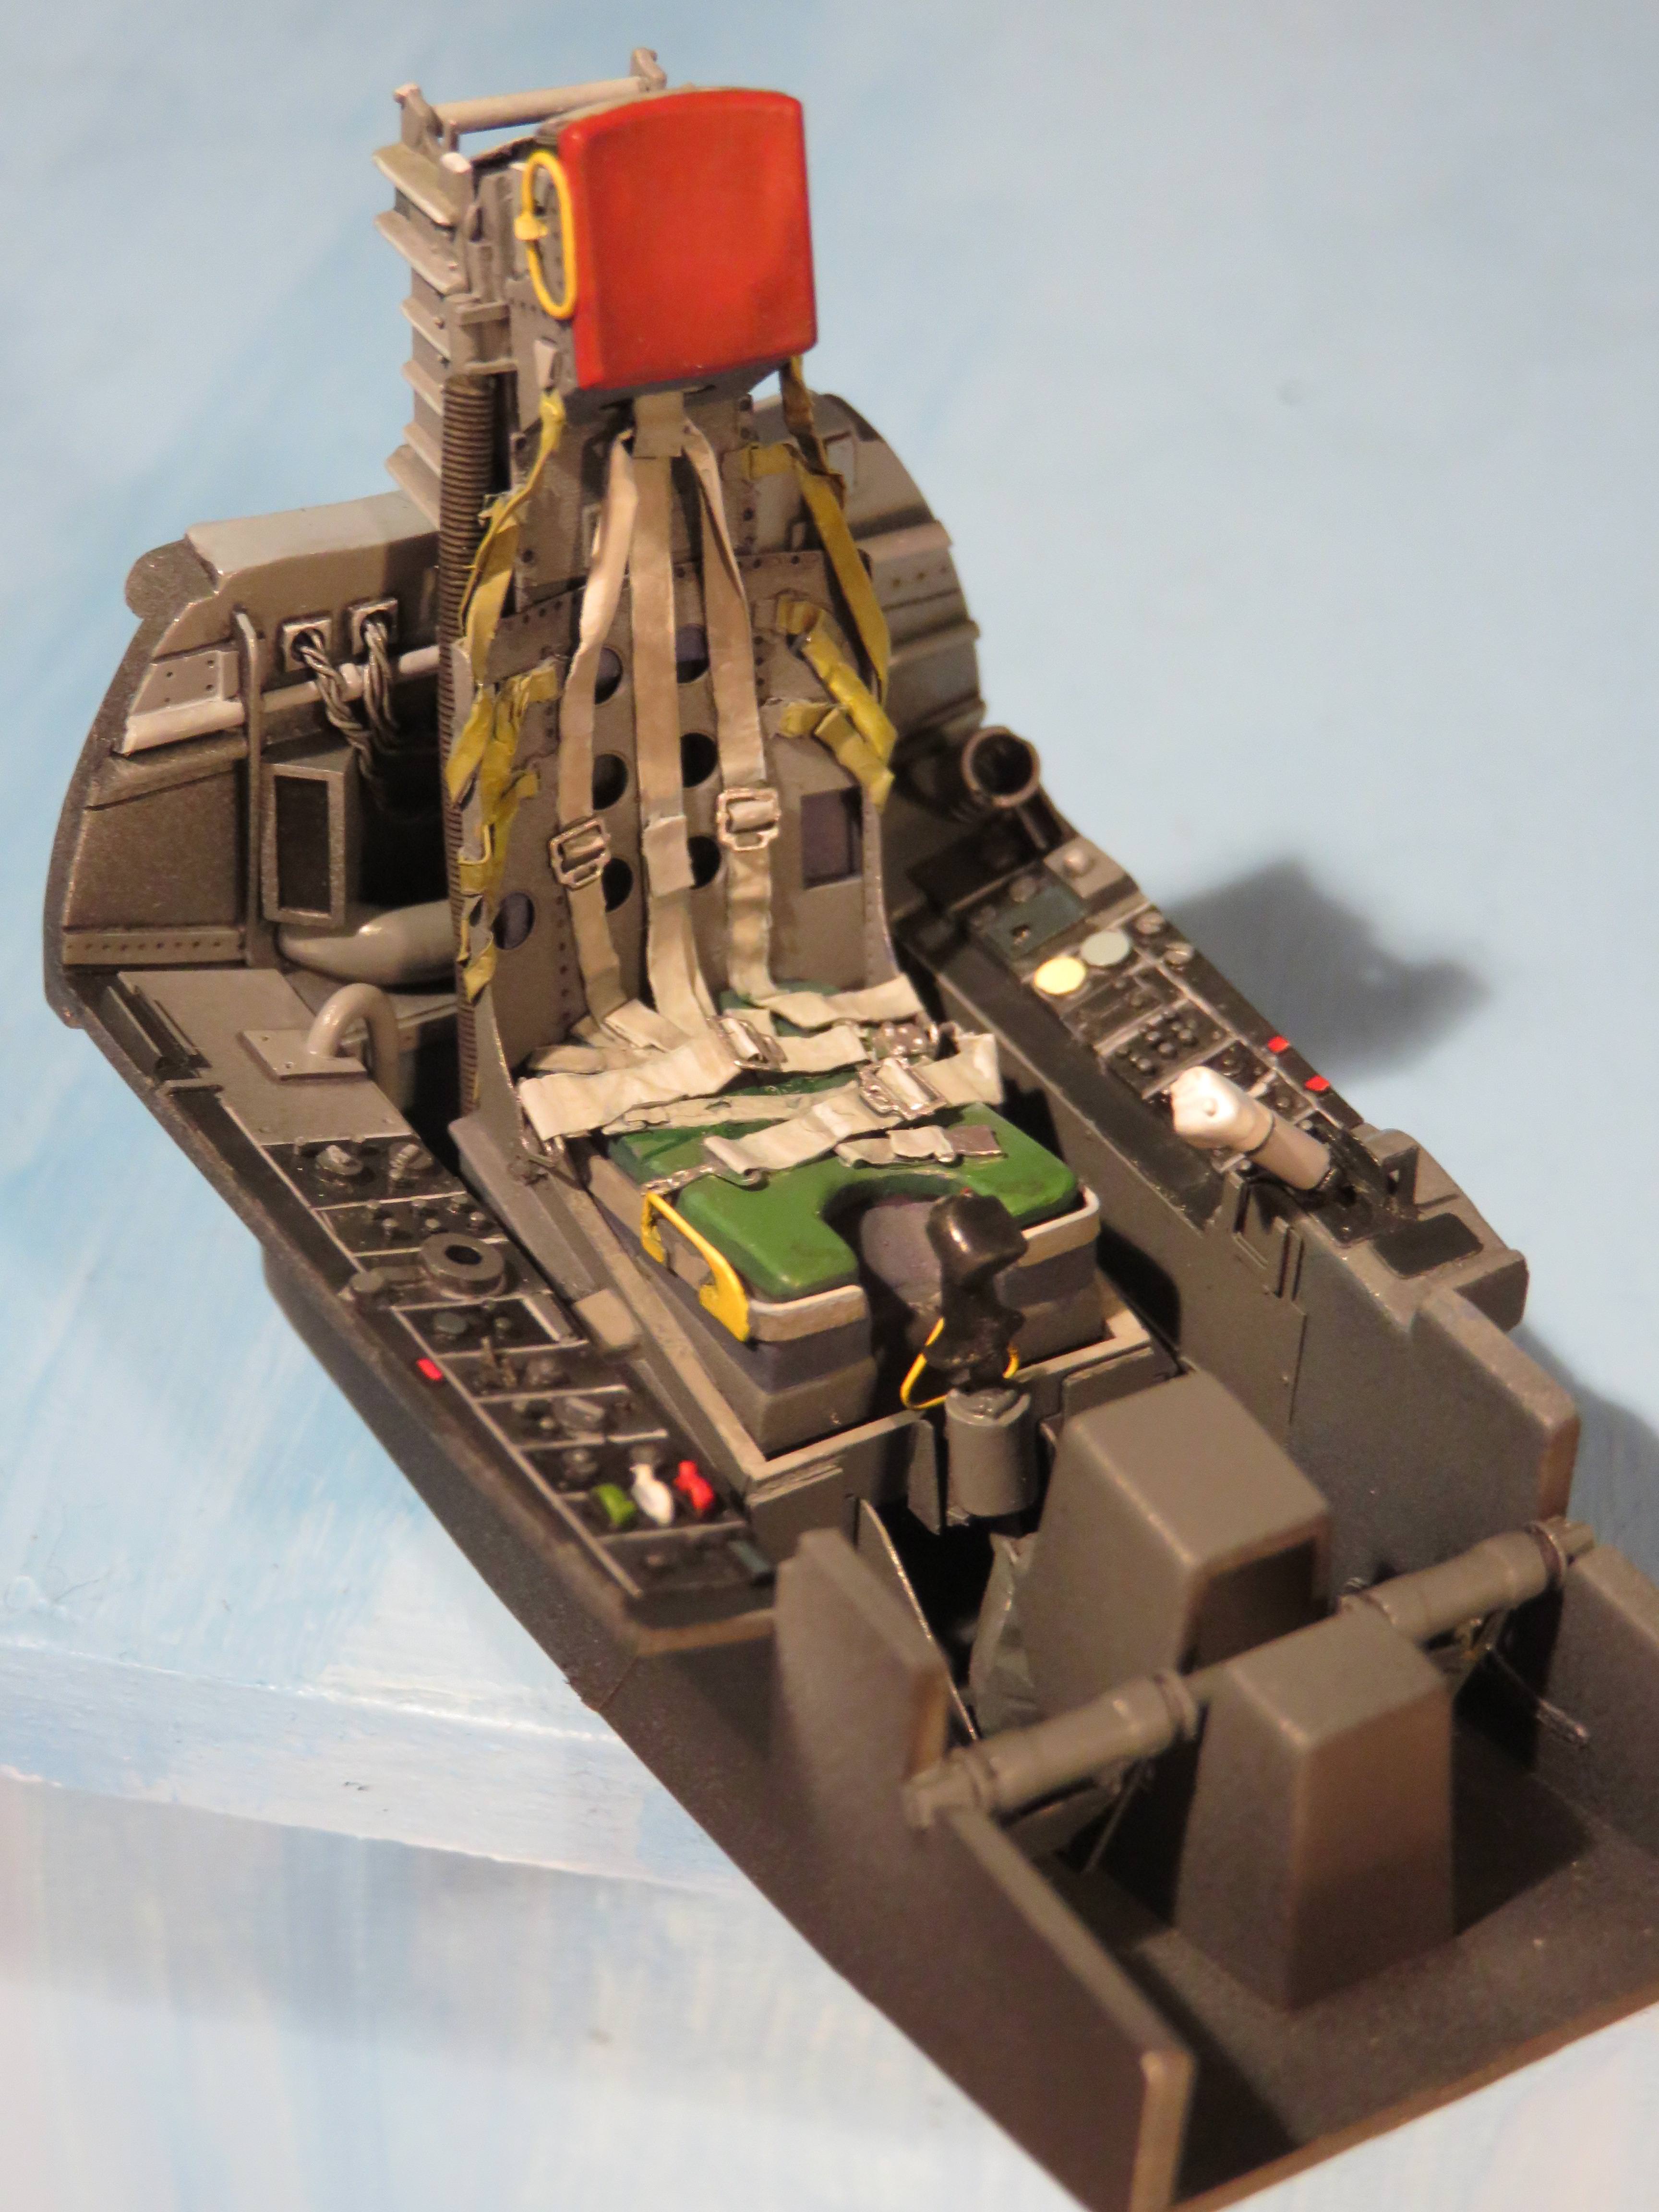
Happy modelling.
Steve.
Happy modelling.
Steve.
Joel_W
Joined: December 04, 2010
KitMaker: 11,666 posts
AeroScale: 7,410 posts
Posted: Saturday, August 18, 2018 - 08:38 AM UTC
Steve,
Simply outstanding. The seat is in a class of it's own, and that harness assembly looks as close to scaled fabric as humanly possible.
Joel
Simply outstanding. The seat is in a class of it's own, and that harness assembly looks as close to scaled fabric as humanly possible.
Joel
SteveAndrews
Joined: August 16, 2010
KitMaker: 693 posts
AeroScale: 551 posts
Posted: Saturday, August 18, 2018 - 08:51 PM UTC
Hey Joel,
Thank you very much. I can see all sorts that I could do better, but that's my nature I guess. I have to say that the laminated foil set belts did work out well. I think I've finally founds a technique I can stick with.
Have a great day,
Steve.
Thank you very much. I can see all sorts that I could do better, but that's my nature I guess. I have to say that the laminated foil set belts did work out well. I think I've finally founds a technique I can stick with.
Have a great day,
Steve.
SteveAndrews
Joined: August 16, 2010
KitMaker: 693 posts
AeroScale: 551 posts
Posted: Saturday, August 25, 2018 - 10:29 AM UTC
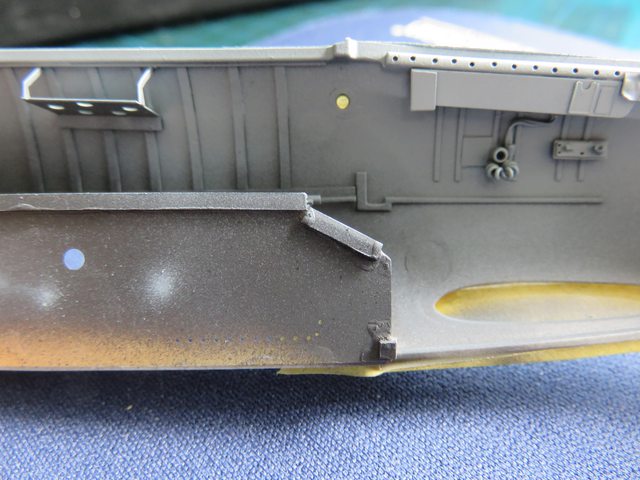
Ive been wondering how best to recreate the burnt and sooty look inside the engine. In the end I went with pre-shading, followed by several thin coats of dark grey brown. That got me from here
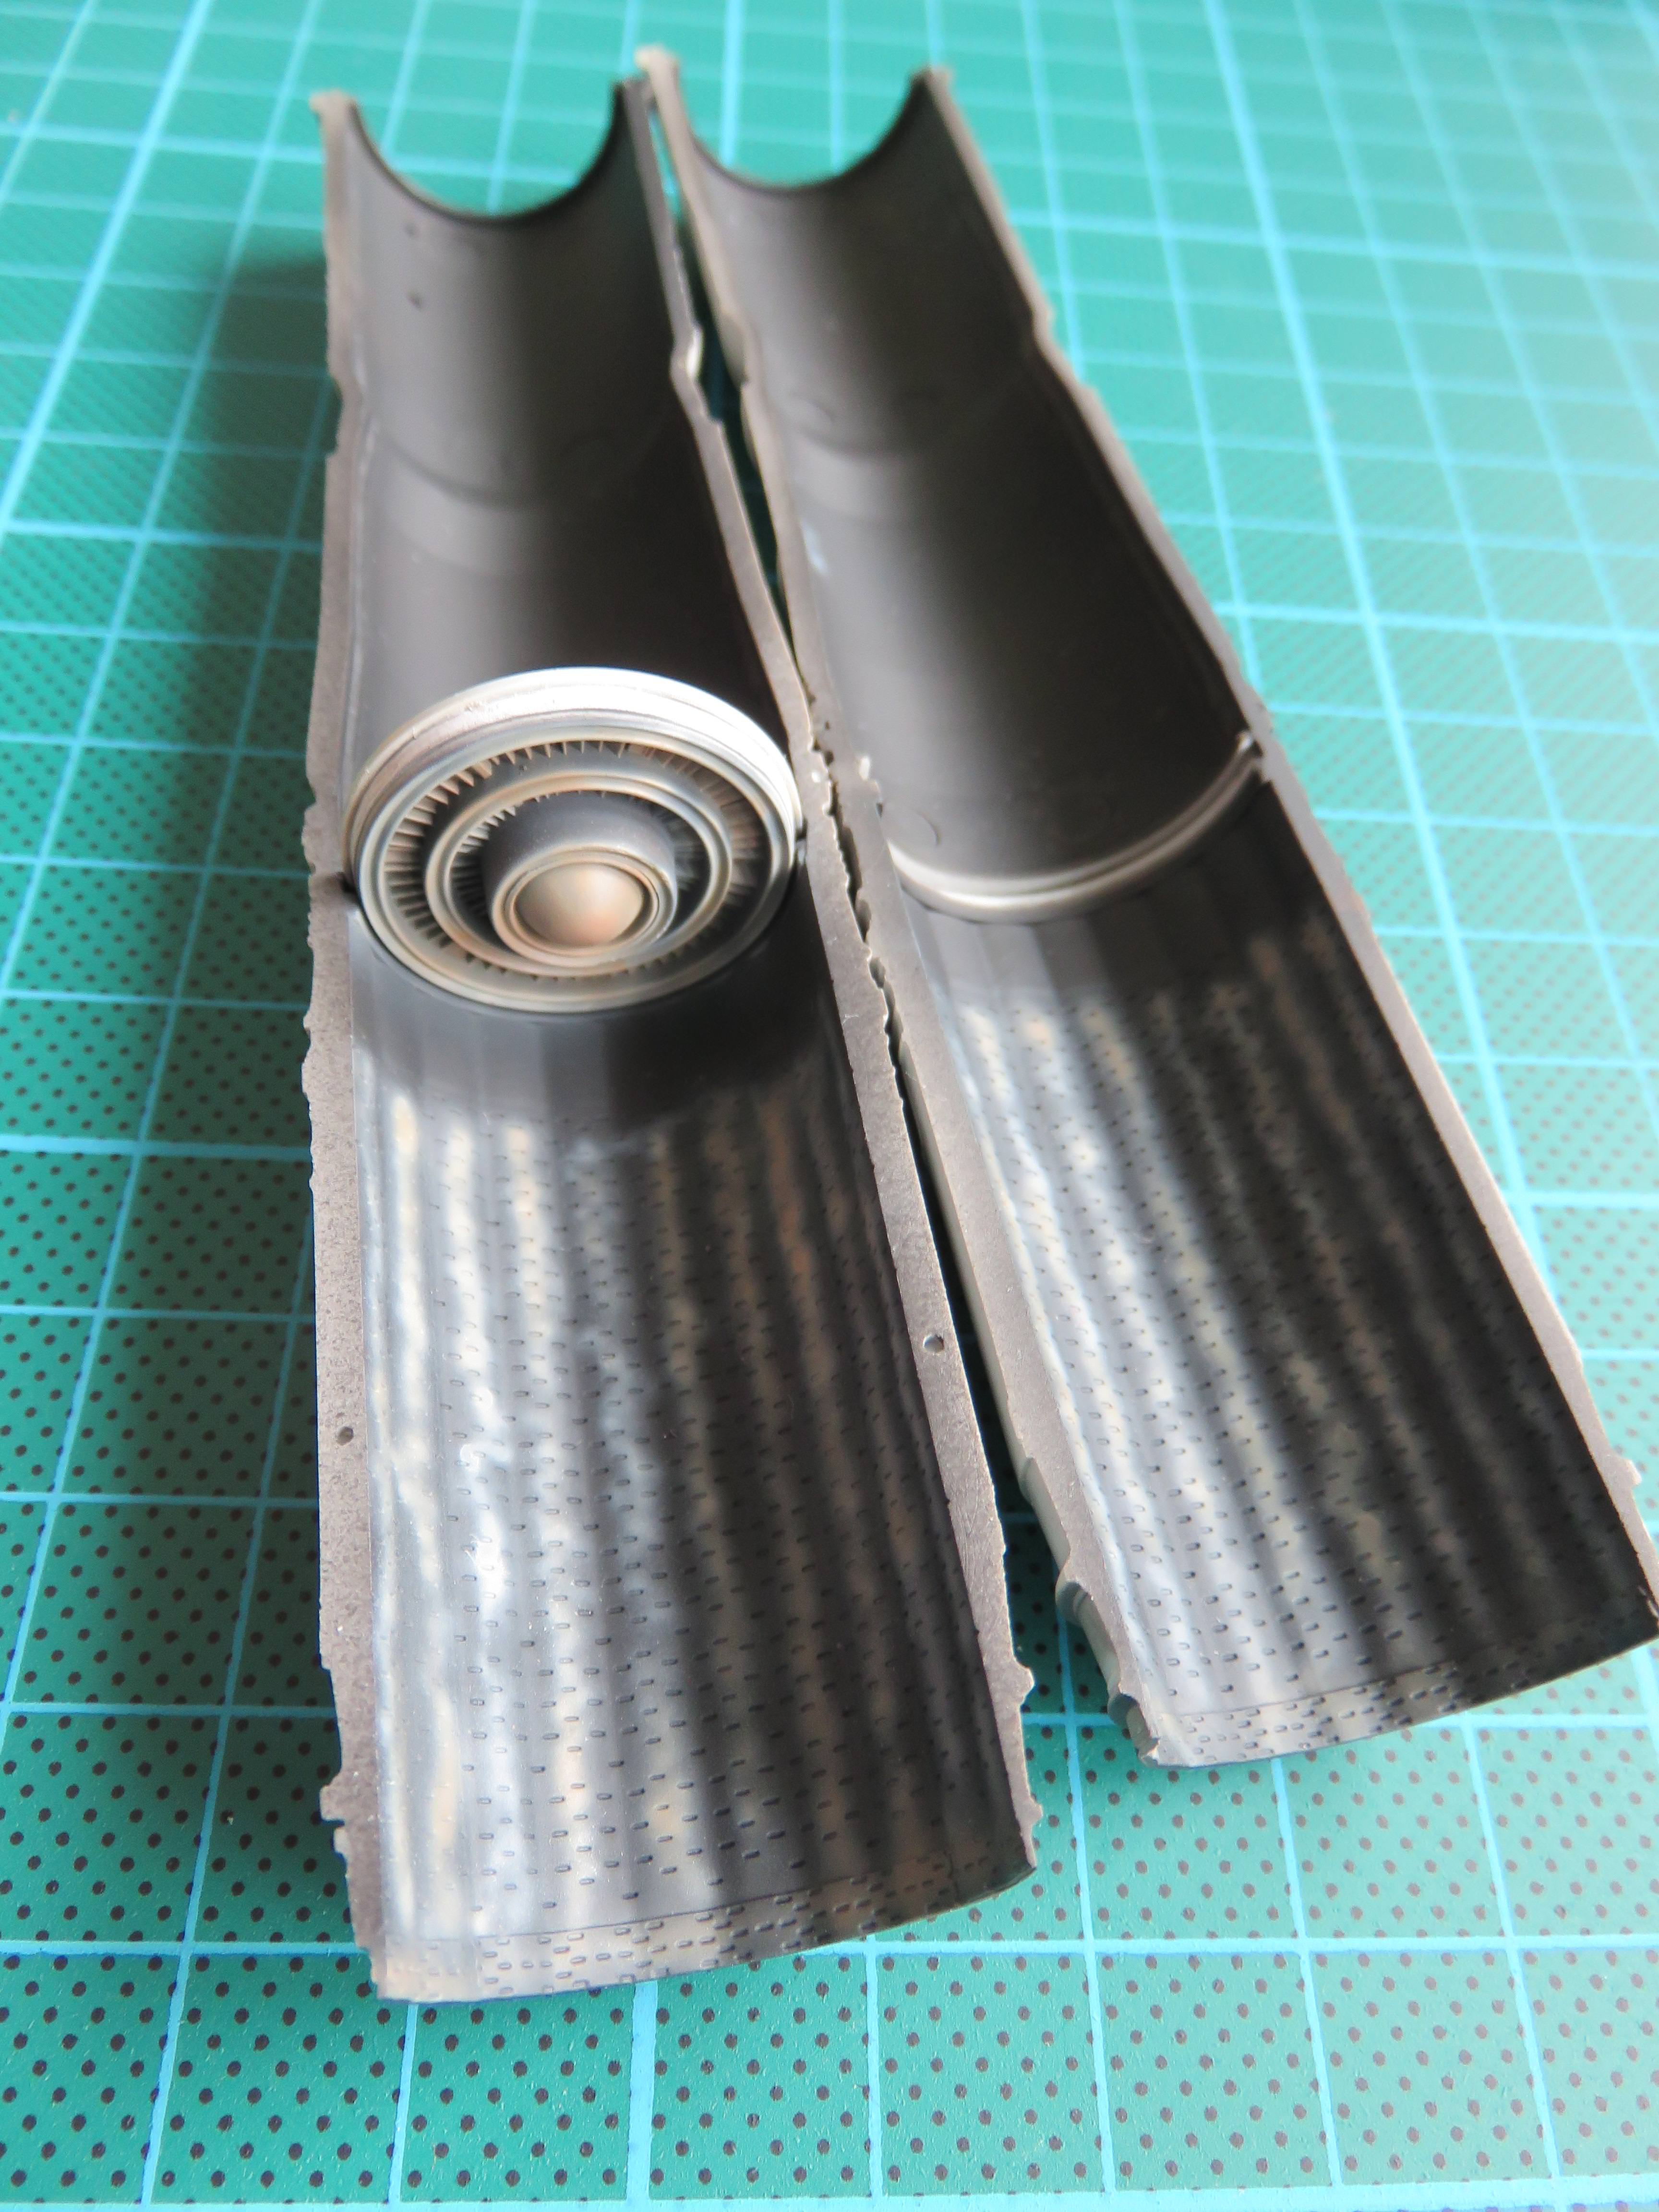
to here
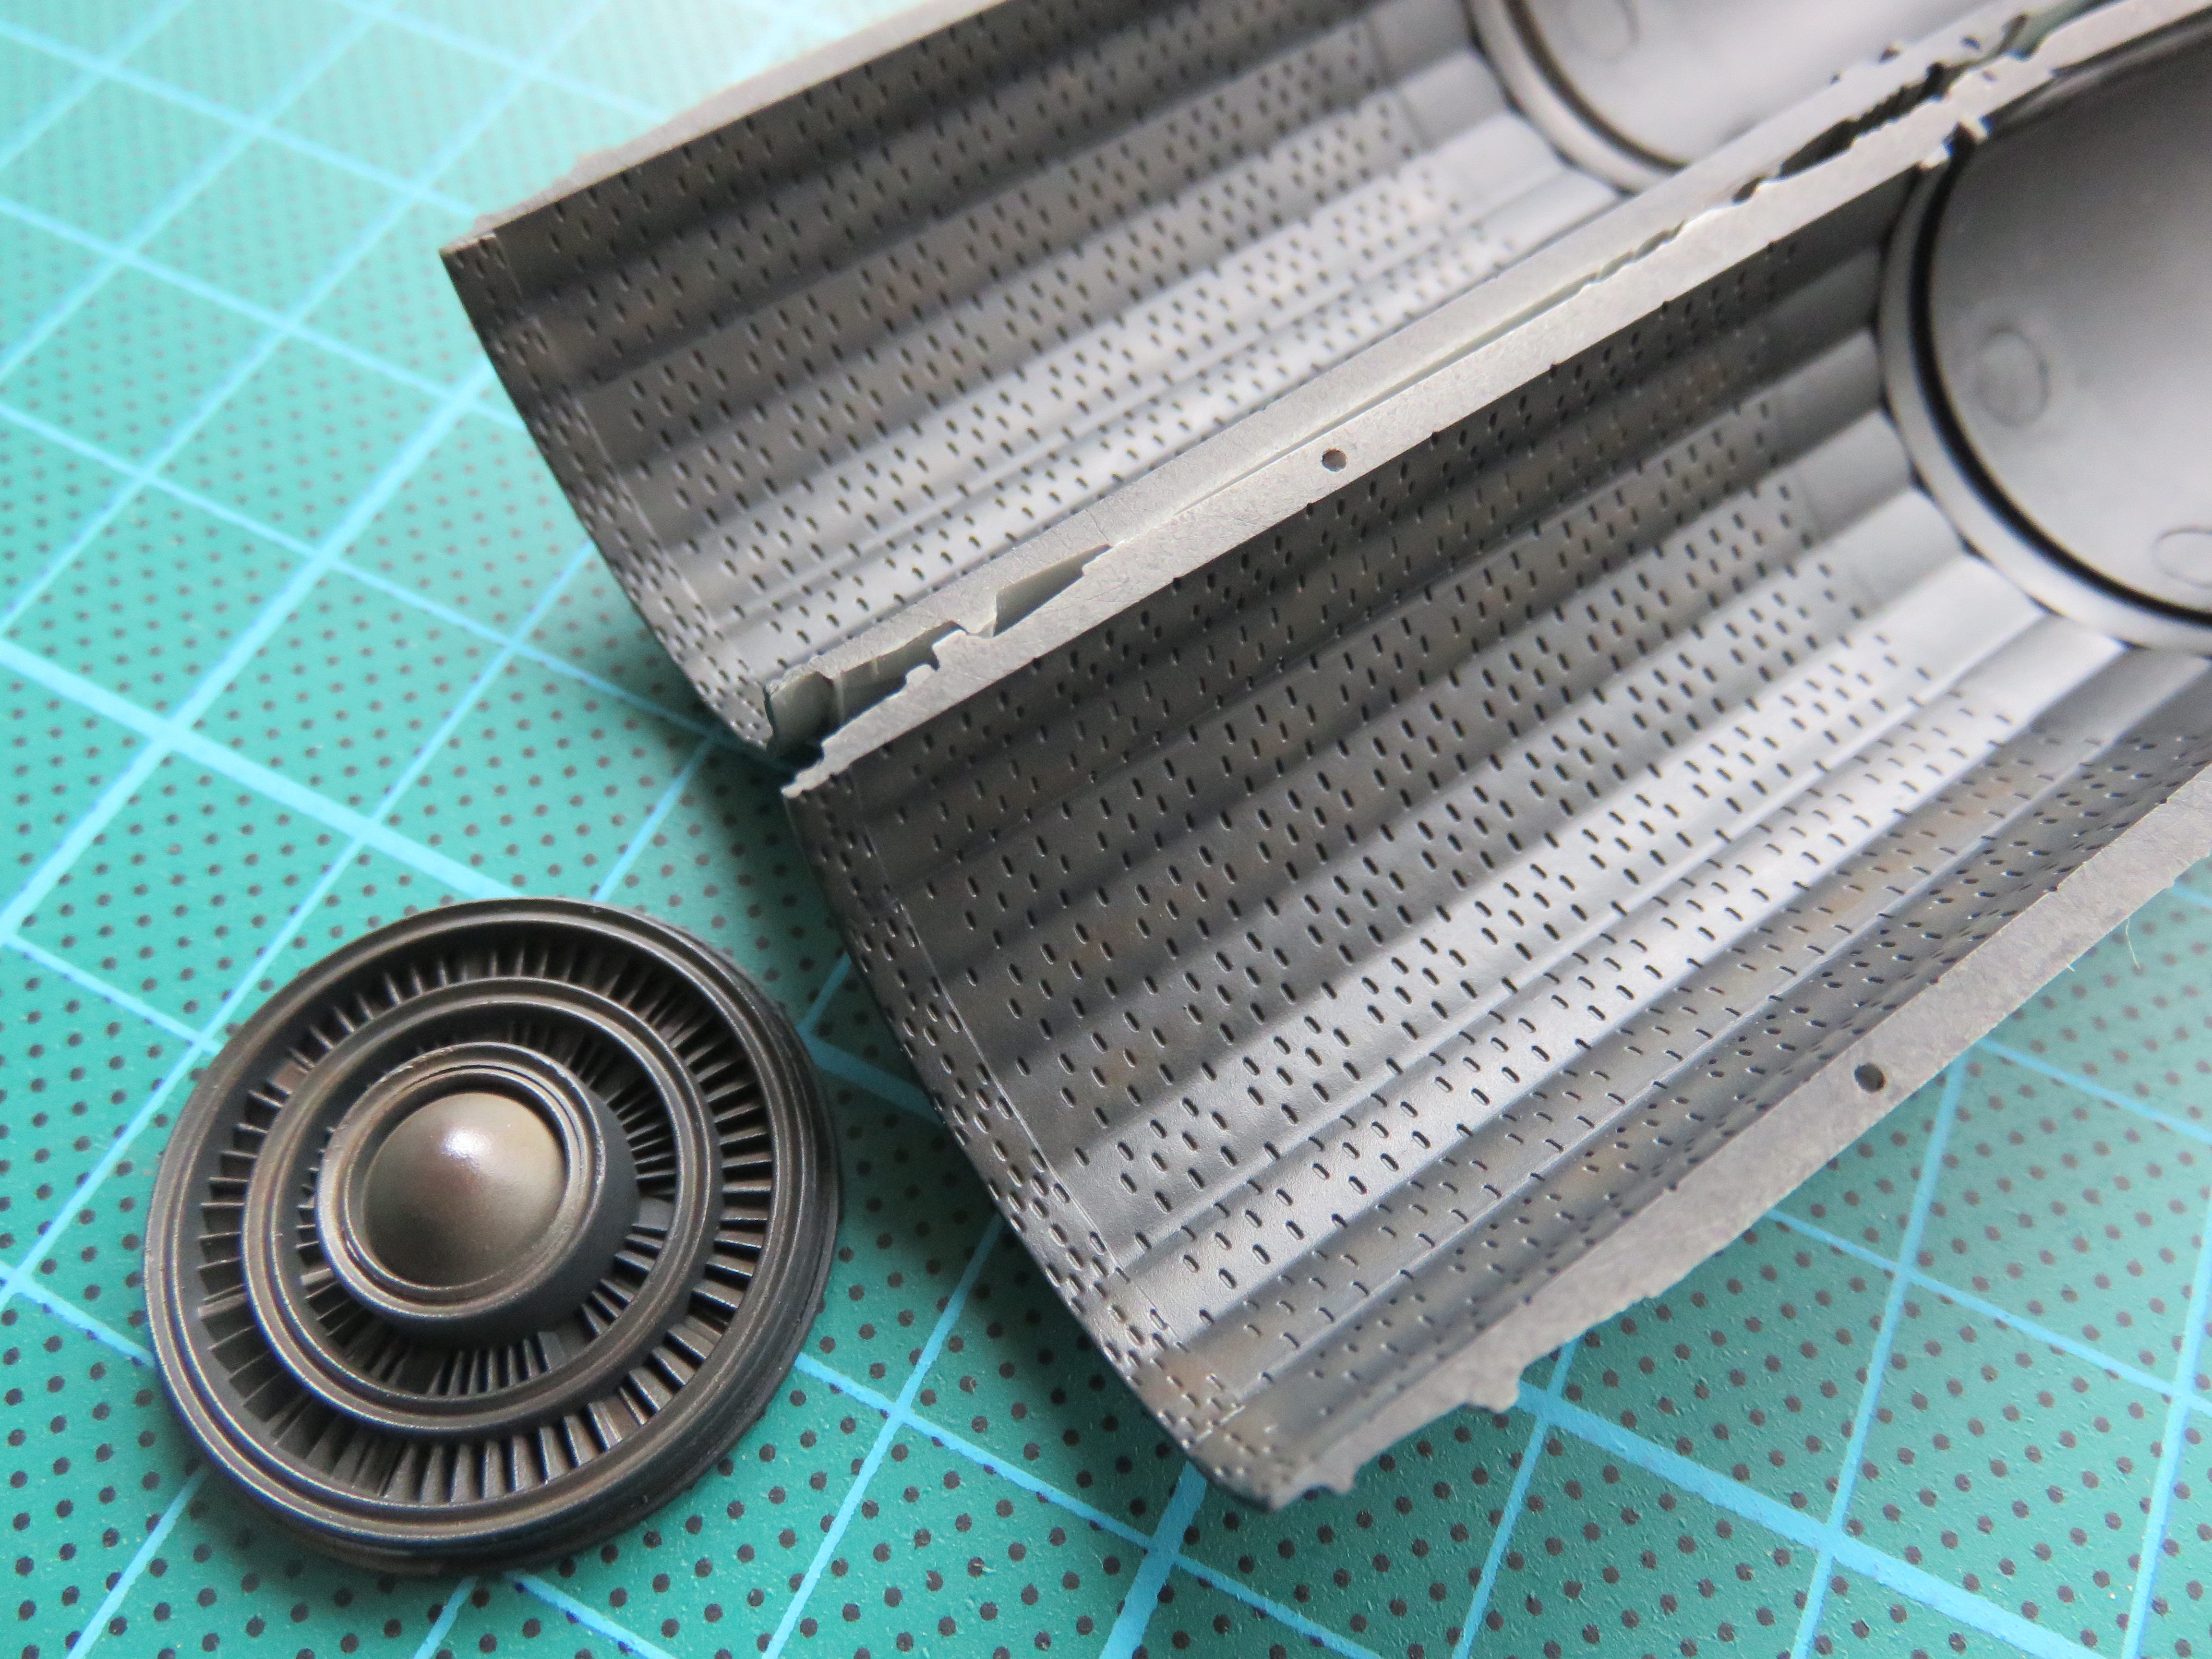
While I had the airbrush out I also gave the magazine a coat of AK Extreme Metal, Polished Aluminium.
Now I can sit back and watch the MotoGP qualifying while I wait for it all to dry. Next up Ill be adding some simple pin washes.
Happy modelling.
to here
While I had the airbrush out I also gave the magazine a coat of AK Extreme Metal, Polished Aluminium.
Now I can sit back and watch the MotoGP qualifying while I wait for it all to dry. Next up Ill be adding some simple pin washes.
Happy modelling.
 |

WEB HOSTING BY


Copyright ©2021 AeroScale and Kitmaker Network, a subsidiary of Silver Star Enterprises
All Rights Reserved. Please read our Conditions of Use and Privacy Policy.
All Rights Reserved. Please read our Conditions of Use and Privacy Policy.