Air Campaigns
Want to start or join a group build? This is where to start.
Fighters Under The Midnight Sun
Emeritus
_VISITCOMMUNITY
Uusimaa, Finland
Joined: March 30, 2004
KitMaker: 2,845 posts
AeroScale: 1,564 posts
Posted: Saturday, August 26, 2006 - 01:52 AM UTC
My little brewster's coming along nicely. I borrowed some reference material from the library, an issue of a Finnish modeling magazine from 1997. It has a great article about buiding this Hasegawa kit. According to the builder, the only major issues with the kit are the vertical stabilizers (easily corrected with a little filing) and a shape problem with the front fuselage. The cowling front should be more elliptical and fixing it requires some surgery on the parts. I got a hold of the magazine after I had already assembled the front fuselage and sanded the seams. Typical...
You're perfectly happy with something until you find out that there's something wrong with it that you could have fixed.
Anyway, the plane looks like a brewster, so I didn't choose to take the assembly apart for surgery.
Here's some pics:


The upper pic shows the front fuselage assembly, landing gear doors, and the vertical stabilizers after being filed. In the middle is the intake screen (E2) that was added by Finns on top of the front fuselage in the course of the continuation war. According to the instructions, this is a left-over part, but should be used, if you choose to build number 1 or 4 of the decal schemes.
The lower pic shows the wings after modifications needed, filling the landing light and the two nearest panel lines on the right wing, and the pressure gauge for the landing flaps on the left wing between the wing-walk area and the machine gun bulge.
Emeritus
_VISITCOMMUNITY
Uusimaa, Finland
Joined: March 30, 2004
KitMaker: 2,845 posts
AeroScale: 1,564 posts
Posted: Sunday, August 27, 2006 - 07:22 PM UTC
I'm about ready to install the cockpit and close the fuselage now.

Instead of trying to make dials and other details to the instrument panel I added between the rudder pedals (the original resin part has a different panel there), I just applied the corresponding piece cut from the instrument decal. Doesn't look very balanced but it's enough at this scale.
I wasn't compeletely sure about the paint job in the cockpit area, so I went for overall aluminium. (I've seen mentions of overall light grey and black and CA's kit instructions tell to paint the upper sections of the sides black...)

I think I've found a pretty good paint for the light grey used on undersides before the light blue was introduced. Vallejo's 986 deck tan.
Hasegawa's kit instructions tell to paint the undersides with Gunze's 325, which equals to 986, according to vallejo's paint chart.
JPTRR
Staff MemberManaging Editor
RAILROAD MODELING
#051
_VISITCOMMUNITY
Tennessee, United States
Joined: December 21, 2002
KitMaker: 7,772 posts
AeroScale: 3,175 posts
Posted: Thursday, August 31, 2006 - 05:47 AM UTC
Hi Gentlemen,

I am enjoying everyone's builds so far. Hope to see more!

Hope to post my recent work on the B-239 soon, too.

I have started reading the Osprey book on Finnish Aces. It is getting me pumped to finish my Buffalos! I'll be publishing a review on the book ASAP. Some interesting items:

* when Stalin’s hordes started their war of conquest, the Red Air Force attacked Finland with over 3,250 planes. The Finnish fighter defenses were a whopping 36 Fokker D.XXIs and ten Bristol Bulldogs. Yet by the end of the first month, one Finnish unit had 50+ kills for only one loss and one damaged!

* one Finnish pilot took on a bombing attack of seven SB-2s. In four minutes he shot down six with 2,000 rounds in his Fokker. The seventh was spared by his running out of ammo.

More ASAP!
Emeritus
_VISITCOMMUNITY
Uusimaa, Finland
Joined: March 30, 2004
KitMaker: 2,845 posts
AeroScale: 1,564 posts
Posted: Friday, September 01, 2006 - 07:54 PM UTC

Quoted Text

I have started reading the Osprey book on Finnish Aces. It is getting me pumped to finish my Buffalos! I'll be publishing a review on the book ASAP. Some interesting items:

* one Finnish pilot took on a bombing attack of seven SB-2s. In four minutes he shot down six with 2,000 rounds in his Fokker. The seventh was spared by his running out of ammo.


Some time ago I flew this mission in IL2 forgotten battles, "day one of continuation war. You're flying a brewster with on wingman and being sent to intercept a Russian bomber formation.
There was like 12 bombers attacking, and I managed to down eight of them! (with limited ammo, of course) I ran out of ammo exactly in the moment attacked the last bomber and got it's engine malfunctioning. My AI wingman got the rest.

I've made some progress with my build in the last few days.

The space where the landing gear retracts is devoid of detail so I scratch-built some framework and tubing detail so the area won't look empty if someone takes a peek. All reference I had for this was the 1:48 CA kit and a build-article of the same kit I'm building. Gizmology at large, baby!

Speaking of adding detail to that area, I came across this photo gallery while searching for reference. It features BW-372 that was shot down in the war and found in a lake in Russian Karelia in late '90s.
http://www.virtualpilots.fi/feature/photoreports/bw-372_photos/

That plane's in incredibly good condition after some 50 years in the bottom of a lake!
JPTRR
Staff MemberManaging Editor
RAILROAD MODELING
#051
_VISITCOMMUNITY
Tennessee, United States
Joined: December 21, 2002
KitMaker: 7,772 posts
AeroScale: 3,175 posts
Posted: Friday, September 01, 2006 - 09:08 PM UTC
Hi Eetu,

NICE!

Last night I painted the engine and for mine. I am slower on these than I am with shake-the-box kits!

Thanks for the URL to the recovery. I posted a link to the pix of the recovery operation a while ago. Great resources!
bf443
_VISITCOMMUNITY
Idaho, United States
Joined: May 16, 2003
KitMaker: 895 posts
AeroScale: 457 posts
Posted: Saturday, September 02, 2006 - 09:33 PM UTC
Hi everyone,

I made more progress on my P-36. It's a Hobby Craft kit. The directions and parts fit of the cockpit are both vague to say the least. I moved the pilots seat higher up than the illistrations show (it seemed way to low) I plan on adding an extra pilot from a Monogram P-38. I don't know if the flight uniforms or gear was similar but I don't think it will be a big deal if its not.


Hope you enjoy the pictures.

Brian
Emeritus
_VISITCOMMUNITY
Uusimaa, Finland
Joined: March 30, 2004
KitMaker: 2,845 posts
AeroScale: 1,564 posts
Posted: Tuesday, September 05, 2006 - 05:58 PM UTC

Quoted Text

I have started reading the Osprey book on Finnish Aces. It is getting me pumped to finish my Buffalos! I'll be publishing a review on the book ASAP.


Sounds good! I have the Finnish version borrowed from the library at the moment and looking at it, I noticed quite a big error in the 1:72 scale drawings of the B-239. It's not a B-239 at all! Someone must have goofed and drawings of a F2A-2 slipped into the book. Is the same error present in your copy too?

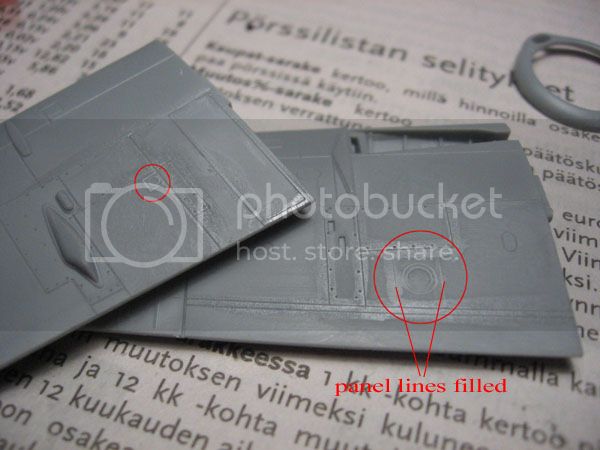
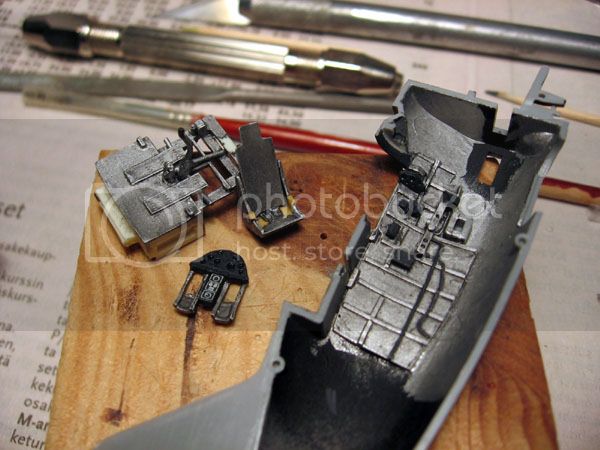
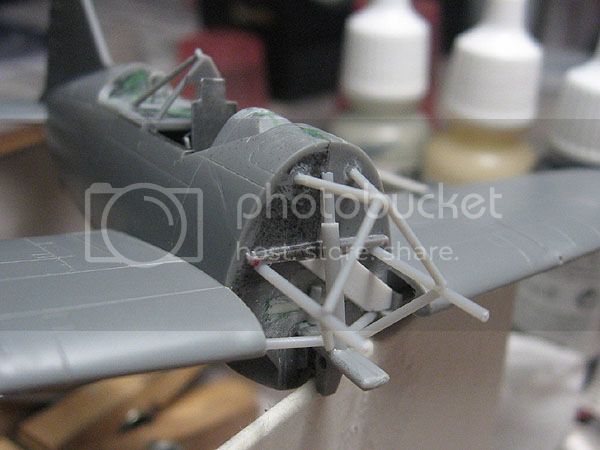
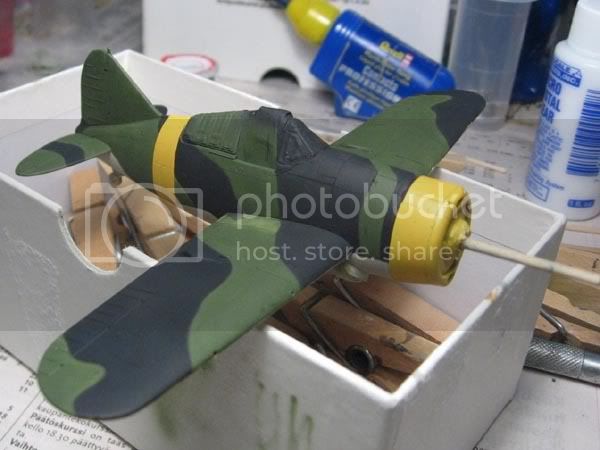
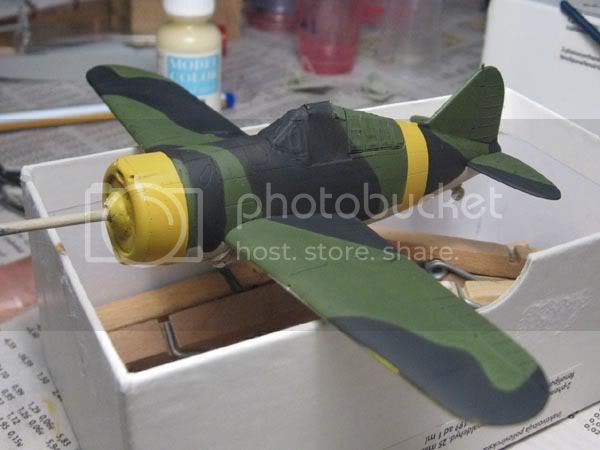
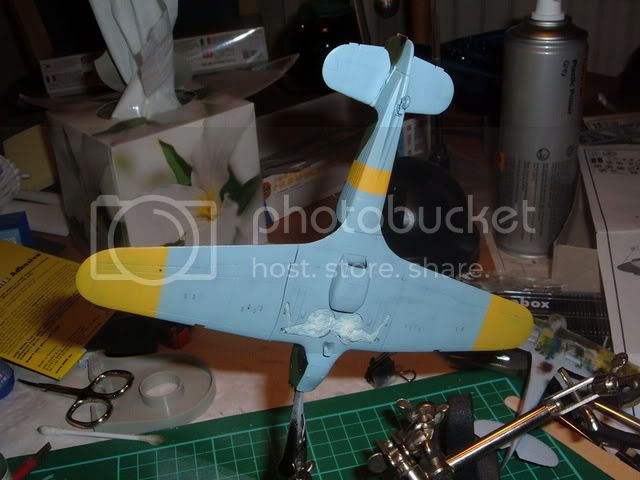
My Brewster's coming along nicely. The model's almost ready for priming, all I have to do is add the brake lines to the landing gear and make a new antenna mount on the rudder (I accidentally broke off the original).

To bf443:
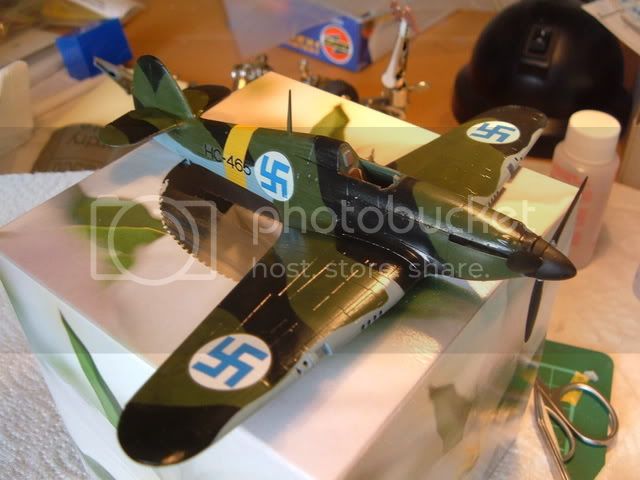
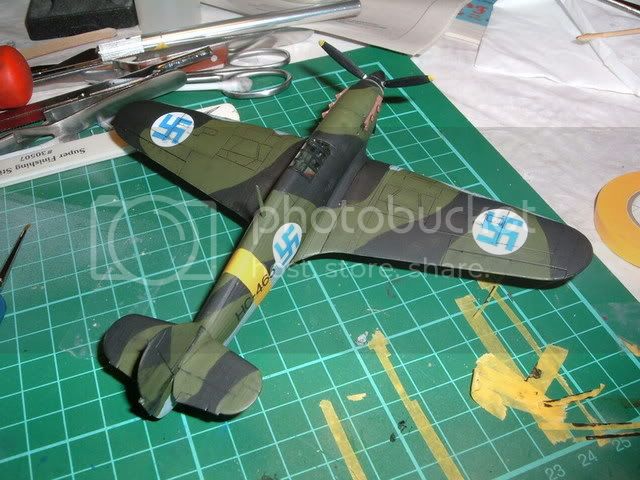
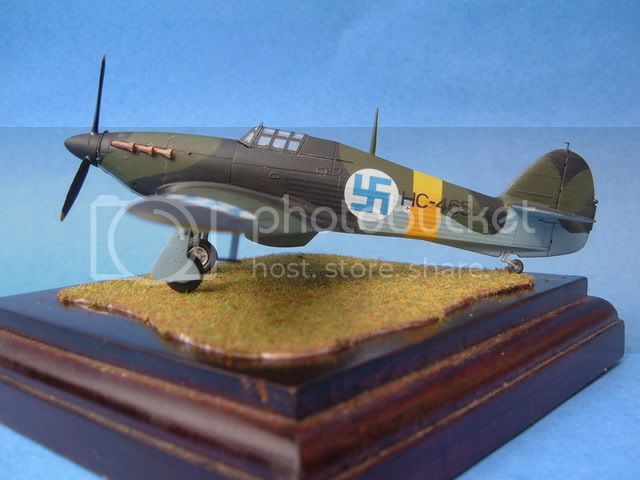
Your hawk looks very nice. Resizing the pics a little, like you did with the two last pics, would do wonders to make them easier to view, as now you have to scroll the browser screen to see everything.
Btw, you have that thread in the 'buy, sell or trade' section about aeromaster's Fiat G.50 decal sheet. I presume you're looking for Finnish markings?
If you don't succeed in finding that, I might be able to help. I got the hasegawa/secter kit and recently I purchased a decal sheet by AML that's got markings for several planes, including a G.50. I haven't quite decided what markings I'm going to use. It's probably going to be either FA-33 (AML decals) with the Italian camo (brown and dark green mottling over tan) or FA-21 (Italian camo on wings and cowling, rest in Finnish warpaint. Pictures of a built model HERE)
In both cases I'll end with left-overs. What particular aircraft are you thinking about building?

I've been looking at the styrene and it'll definately need some improvement. I already got eduard's PE and resin rudder that came that AML decal sheet. The windscreen has got to go too, it's way too thick. Falcon makes some vac-canopy sets but I don't feel like buying a set of a dozen canopies where I only need one. Also the engine, depicted in the kit with a single part, is laughable. I asked about AM engines in a LHS and the shopkeeper said that ordering Vector or Engines & things stuff is pretty much out of the questions, because of difficulties in ordering those brands from abroad.
I guess I should start a thread in the appropriate section here then.
bf443
_VISITCOMMUNITY
Idaho, United States
Joined: May 16, 2003
KitMaker: 895 posts
AeroScale: 457 posts
Posted: Thursday, September 07, 2006 - 12:14 PM UTC
Hello Eetu,

Sorry the pictures are not very good. For some reason (maybe lighting) the camera was not focusing well. The two pictures that are smaller I shot at a lower resolution. I closed up the fuselage halves a couple evenings ago so much of the detail is difficult to see now.

I also decided to paint the engine and add it. The kit engine and prop were not thought out well. The engine sits to far back in the cowling and the prop comes in contact with the cowl.

I "fixed" the problem by hand cutting a 1/8" piece of styrene and carved it in roughly the diameter of the front housing and then sanded it into a round shape. I then sanded down its thickness while checking the fit with the prop shaft cover every few sandings. Once it looked right I cut a piece of styrene tubing 2/16" and slid the prop into the shaft cover and glued it on the propeller shaft end (there was no kit provision to hold the shaft in place) and glued everything together.

Here are a couple of pictures of the kit so far and I put the pilot in just to see how it he will look.


About your question on the Fiat G.50 decals I want to model both an Italian (light and dark green aircraft) and eventually a Finnish version. I have one Sector kit and need to get a second. Your right about the engine, the detail is weak. I have been told that Engine and Things makes a replacement for reasonable price. I never purchased there products before. But if I find they're good and as cheap as I was told. I will send you the info and help you aquire one if you like.

Sincerely,
Brian

Emeritus
_VISITCOMMUNITY
Uusimaa, Finland
Joined: March 30, 2004
KitMaker: 2,845 posts
AeroScale: 1,564 posts
Posted: Thursday, September 07, 2006 - 04:43 PM UTC
Looking good, bf443!
The propeller seems peculiarly molded indeed. Most one-piece propellers have a horizontal seam, but it has it vertically. Must be a pain in rear to sand without losing roundness.

Help with the engine would be great, but I doubt I can purchase anything from online stores. I've tried it a couple of times but the shops' systems wouldn't accept my Visa Electron. I later found out that my bank is not with the "verified by visa" system anymore...
So buying from foreign online store is impossible.

Perhaps I should consider changing to a different bank...
lampie
#029
_VISITCOMMUNITY
England - East Midlands, United Kingdom
Joined: December 23, 2005
KitMaker: 6,249 posts
AeroScale: 3,270 posts
Posted: Friday, September 08, 2006 - 05:08 AM UTC
Hi guys!
Err,,sorry for the lack of progress,,I kinda got a bit sidetracked and ended up building 2 Sopwith Camels,, :-)
Anyway,,the Dazzle camo Camel is done and its full speed ahead on my FUMS Hurricane now.
No pics as yet,but Im finally happy with the filling on the outer machine guns.Wings and tailplane are attached and Im at the primer stage.A little bit of filling and rescribing and I'll be ready for painting.All my paints have arrived and are ready to go.
A question for you Finnish experts.
What would be the correct colour for the wheel wells and undercarriage doors on my Hurricane?
Im torn between RAF interior green and a metal finish at the moment.Any ideas?
Nige
JPTRR
Staff MemberManaging Editor
RAILROAD MODELING
#051
_VISITCOMMUNITY
Tennessee, United States
Joined: December 21, 2002
KitMaker: 7,772 posts
AeroScale: 3,175 posts
Posted: Friday, September 08, 2006 - 11:21 PM UTC
Brian, Eetu and Nigel,

We're getting a full flight ready!

Eetu, I'll check my Osprey book about the "B-239F2A".

Nigel, I have no idea about the wheel well color, but the Buffalos were painted aluminum; whether Finland's directive or Brewster's idea, I have no idea.

Brian, looking forward to more pix!

Unfortunately, my Buffalo is still stalled. So is completing the campaign ribbon--too many people competeing for my time off-site.

Emeritus
_VISITCOMMUNITY
Uusimaa, Finland
Joined: March 30, 2004
KitMaker: 2,845 posts
AeroScale: 1,564 posts
Posted: Saturday, September 09, 2006 - 05:51 PM UTC
I got my brewster painted just moments ago.


The light grey on bottom surfaces is vallejo's deck tan (986), camo on the upper sides is reflective green (890) and a mixture of black (950) and german grey (995). The eastern front band were painted with Xtracrylics RLM 04.

Next I'll have to do touch-ups and apply a gloss coat before going to decaling.
JPTRR
Staff MemberManaging Editor
RAILROAD MODELING
#051
_VISITCOMMUNITY
Tennessee, United States
Joined: December 21, 2002
KitMaker: 7,772 posts
AeroScale: 3,175 posts
Posted: Saturday, September 09, 2006 - 06:14 PM UTC
Eetu,

Niccccccccceee!

The Polipokovs and LaGGs will be shaking in their revetments.
Emeritus
_VISITCOMMUNITY
Uusimaa, Finland
Joined: March 30, 2004
KitMaker: 2,845 posts
AeroScale: 1,564 posts
Posted: Sunday, September 10, 2006 - 12:19 AM UTC
Just how absent-minded can you be? I forgot to paint a green area to the right wing (see first photo), and because of that, the tips ended up green instead of black...
Well, not a big chore to fix. Spray the tip black, apply masks, and spray green.

Edit:
...Or so I thought. Apparently there are no boundaries in human stupidity.
Okay, I painted the tip of the wing black and applied masks and painted away. Then, I looked at the model. I had painted the wing the same way wrong, again! Unbelievable...
But now I'm ready to apply the markings.
lampie
#029
_VISITCOMMUNITY
England - East Midlands, United Kingdom
Joined: December 23, 2005
KitMaker: 6,249 posts
AeroScale: 3,270 posts
Posted: Sunday, September 10, 2006 - 10:10 PM UTC
Hi guys.
No photos yet Im afraid but works going well on my Hurricane.
The underside and the yellow are sprayed,and Im half way through doing the camouflage.Lots of blue tac sausages :-)
The camo should be finished tonight and I'll be making a start on the bits and pieces.
Im hoping to have it all finished before I go away at the weekend for 6 weeks.
I'll post pics soon,,,honest!,,,LOL
Nige
lampie
#029
_VISITCOMMUNITY
England - East Midlands, United Kingdom
Joined: December 23, 2005
KitMaker: 6,249 posts
AeroScale: 3,270 posts
Posted: Monday, September 11, 2006 - 12:53 AM UTC
Hi guys.
Really managed to get moving on the Hurricane today!
Camos all done,just a couple of small bits of paint bleed to touch up tomorrow and I can Klear it ready for decaling.
Pics at last!


Nige
bf443
_VISITCOMMUNITY
Idaho, United States
Joined: May 16, 2003
KitMaker: 895 posts
AeroScale: 457 posts
Posted: Monday, September 11, 2006 - 11:18 AM UTC
Hello Everyone,

I was able to do a little more work toward my P-36. I primed it day before and since then after seeing Eetus pre-shading I decided to go ahead and give it a try myself (another first for me here at Aeroscale). I don't have a clue what I'm doing but I'm enjoying it !


I hope to start painting tomorrow, well good night all .

Brian
Emeritus
_VISITCOMMUNITY
Uusimaa, Finland
Joined: March 30, 2004
KitMaker: 2,845 posts
AeroScale: 1,564 posts
Posted: Monday, September 11, 2006 - 03:42 PM UTC
Looking good, both of you!

I got most of the decals appied to my brewster yesterday. Now there's only the right side of the fuselage and some small stenciling decals left to do.
lampie
#029
_VISITCOMMUNITY
England - East Midlands, United Kingdom
Joined: December 23, 2005
KitMaker: 6,249 posts
AeroScale: 3,270 posts
Posted: Monday, September 11, 2006 - 11:14 PM UTC
Looks like were both at about the same stage Eetu!
Decals are on,apart from the 2 on the underside,and its really looking like a proper Hurricane now. I must admit it does seem a bit odd putting these markings on a Hurri,but its really going to stand out among the growing collection.

I'll finish the decals tonight and carry on with the details.
Im finding the fact that the ariel mast is moulded into the fusalage a bit of a pain,and Im having to be very carefull to avoid breaking it.
Nige
Emeritus
_VISITCOMMUNITY
Uusimaa, Finland
Joined: March 30, 2004
KitMaker: 2,845 posts
AeroScale: 1,564 posts
Posted: Tuesday, September 12, 2006 - 10:18 PM UTC
Looks superb so far!
Did the decals work okay?

I understand your odd feeling about the markings. I think I would feel the same if I were building a Brewster with U.S markings! :-)
lampie
#029
_VISITCOMMUNITY
England - East Midlands, United Kingdom
Joined: December 23, 2005
KitMaker: 6,249 posts
AeroScale: 3,270 posts
Posted: Wednesday, September 13, 2006 - 12:43 AM UTC
Hi guys.
Im just about finished on my entry,,finally.
Just the ariel to add and touch ups with fresh eyes tomorrow then I'll take some proper photos and declare it done!
Eetu,,yes the decals worked fine,and I managed quite a nice wash over the wing markings particularly. Many thanks again for sending them to me.
General question,,where do I post the finished entry pics?
Heres how it looks right now,,99% done.


Nige
TedMamere
_VISITCOMMUNITY
Moselle, France
Joined: May 15, 2005
KitMaker: 5,653 posts
AeroScale: 4,347 posts
Posted: Wednesday, September 13, 2006 - 01:05 AM UTC
Hi Nigel!

Sorry if I jump in like that, but this is in my opinion the best model you've made since you have joined Aeroscale! I think it's just perfect!

Jean-Luc
bf443
_VISITCOMMUNITY
Idaho, United States
Joined: May 16, 2003
KitMaker: 895 posts
AeroScale: 457 posts
Posted: Wednesday, September 13, 2006 - 02:54 PM UTC
Hi Everyone,

I really am excited about this build. I got some free time to continue with my P-36 (Hawk 75). According to Squadron Book 'Finnish Air Force' There is a B/W picture of this plane on page 46. The aircraft were purchased from Germany and they were delivered in German colors. They were not repainted until they went in for overhaul. The early P-36 was RML 71 Dark Green over RML 65 Blue/Gray. The Yellow is RML 4? The black is a mix that was discussed on this forum topic 50% flat black and 50% burnt sienna.
This is the first model I have tried 'Pre-shading' and I guess it worked okay. I sprayed the RML 65, 71 and 04 full strength first, then I mixed a small amount of each color and added ten drops of flat white to each paint color and went back over the model to lighten the color and make the appearance worn.
I still have much to do, any sugggestions would be helpful.


Sincerely,
Brian


lampie
#029
_VISITCOMMUNITY
England - East Midlands, United Kingdom
Joined: December 23, 2005
KitMaker: 6,249 posts
AeroScale: 3,270 posts
Posted: Wednesday, September 13, 2006 - 03:11 PM UTC
Thankyou JeanLuc!
Im quite pleased with the Hurricane myself! Praise indeed from someone whos work I admire so much.
My entry is now finished!!,,but,,,,,today the heavens have opened and the light is terrible,so until the sun pokes through the rain clouds I wont be able to take any finished photos.
Brian your P36 is looking the business! Once you get the hang of preshading you'll wonder why you ever painted a model without it.I love it!
Nige
I will post them as soon as I can.
lampie
#029
_VISITCOMMUNITY
England - East Midlands, United Kingdom
Joined: December 23, 2005
KitMaker: 6,249 posts
AeroScale: 3,270 posts
Posted: Wednesday, September 13, 2006 - 06:19 PM UTC
Hi all.
A break in the clouds and I was able to get outside and snap a few photos.
Finished Entry For Fighters Under The Midnight Sun
Revell Hurricane MkIIB


I will post the other photos over in the Preflight Check Forum.
Nige