

FUMS Gallery of Completed Models
Hi Everyone,
How goes your Fighters Under the Midnight Sun efforts?
My Classic Airframes B239 Buffalo is coming along. Hope to have cockpit shots posted in a day or so.
How's everyone doing?
Looking forward to your models,
FRed
Air Campaigns
Want to start or join a group build? This is where to start.
Want to start or join a group build? This is where to start.
Hosted by Frederick Boucher, Michael Satin
Fighters Under The Midnight Sun

JPTRR

#051


Joined: December 21, 2002
KitMaker: 7,772 posts
AeroScale: 3,175 posts
Posted: Tuesday, July 25, 2006 - 03:20 AM UTC


lampie
#029

Joined: December 23, 2005
KitMaker: 6,249 posts
AeroScale: 3,270 posts

Posted: Tuesday, July 25, 2006 - 04:17 AM UTC
Hi Fred!
Ive made a very small start on my MKIIB Hurricane but Im up to my neck in a couple of other builds at the moment.
Im into my summer break now so I should be starting to make progress as soon as Ive cleared some space on the bench, and the Hurri is next in line.
Nige
Ive made a very small start on my MKIIB Hurricane but Im up to my neck in a couple of other builds at the moment.
Im into my summer break now so I should be starting to make progress as soon as Ive cleared some space on the bench, and the Hurri is next in line.
Nige


bf443
Vendor
Joined: May 16, 2003
KitMaker: 895 posts
AeroScale: 457 posts

Posted: Tuesday, July 25, 2006 - 09:58 AM UTC
Hi everyone,
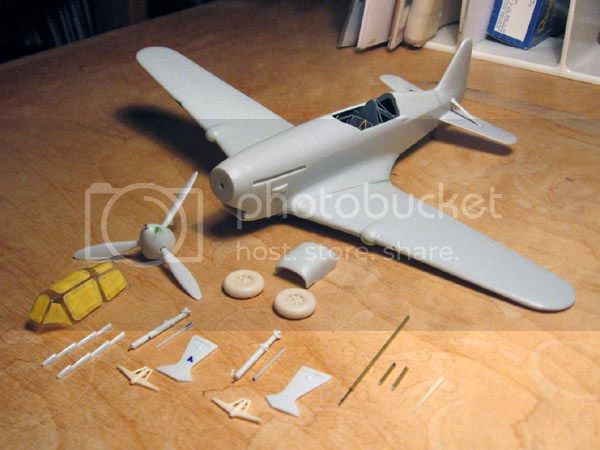
I started on my P-36 tonight. Here is the progress not much but a start. I was concerned the cockpit would not line up well so I went ahead attached it to one side and dry fitted with the other half until it set.


Sincerely,
Brian
I started on my P-36 tonight. Here is the progress not much but a start. I was concerned the cockpit would not line up well so I went ahead attached it to one side and dry fitted with the other half until it set.
Sincerely,
Brian

Emeritus

Joined: March 30, 2004
KitMaker: 2,845 posts
AeroScale: 1,564 posts

Posted: Tuesday, July 25, 2006 - 04:01 PM UTC
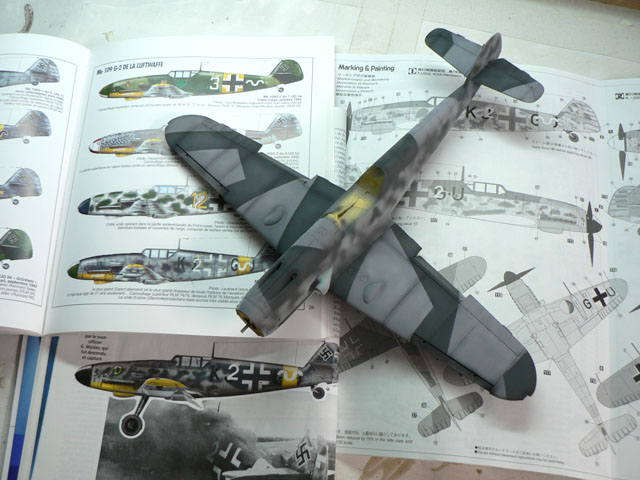
,My 'Mörkö' Morane is coming along nicely.

Now it's almost ready for painting. Yesterday I dipped the canopy in future and today I'll probably mask and attach it to the fuselage. Btw, what's your glue of choice when attaching vacform canopies? This is my first so tips are welcome.
And here's what appeared in the mailbox today:
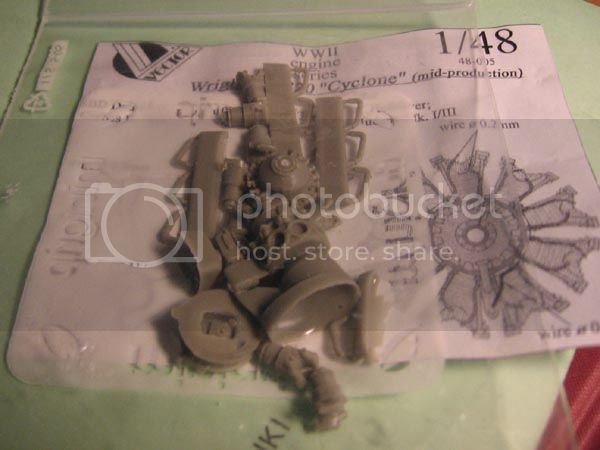
A vector engine for CA's B-239 that I bought from a fellow modeler. Now I got pretty much everything I need for my 1:48 Buffalo.
Now it's almost ready for painting. Yesterday I dipped the canopy in future and today I'll probably mask and attach it to the fuselage. Btw, what's your glue of choice when attaching vacform canopies? This is my first so tips are welcome.
And here's what appeared in the mailbox today:
A vector engine for CA's B-239 that I bought from a fellow modeler. Now I got pretty much everything I need for my 1:48 Buffalo.
lampie
#029
Joined: December 23, 2005
KitMaker: 6,249 posts
AeroScale: 3,270 posts
Posted: Tuesday, July 25, 2006 - 04:36 PM UTC
Hi Eetu.
I generally use a small dab of Humbrol Clear Fix,same as I use for normal injected canopies.
Nige
Quoted Text
Btw, what's your glue of choice when attaching vacform canopies? This is my first so tips are welcome.
I generally use a small dab of Humbrol Clear Fix,same as I use for normal injected canopies.
Nige

TedMamere

Joined: May 15, 2005
KitMaker: 5,653 posts
AeroScale: 4,347 posts

Posted: Tuesday, July 25, 2006 - 06:55 PM UTC
Quoted Text
Btw, what's your glue of choice when attaching vacform canopies? This is my first so tips are welcome.
Hi Eetu!
It depends on the fit of the canopy. if the fit is good, I use White Glue for wood (PVA). It is acrylic based and you can take the excess away when needed.
If the fit is poor, I use more stronger glue or, like Nigel said, Humbrol Clear Fix, and then add filler. After some sanding it looks generally ok. But always mask the canopy first of course!
Jean-Luc

Emeritus
Joined: March 30, 2004
KitMaker: 2,845 posts
AeroScale: 1,564 posts
Posted: Tuesday, July 25, 2006 - 11:21 PM UTC
^ thanks for the tips.
I think I'll use PVA, since the canopy fits very well. I was in fact a little surprised of the good fit, especially as this is my first attempt with a vac canopy.
One more question popped in my mind. I'm thinking about trying to do some preshading with the paint job.
But there's one thing that puzzles me. What about the black on the upper surfaces? The light blue undersides and green upper camo should behave well, but black preshading won't show through the black camo. When washing panel lines, I've seen people do it with grays on black, but will it look weird if I preshade everything else and wash the black areas with gray?
(I presume preshading with gray and going over with black won't look good or even show through properly?)
lampie
#029
Joined: December 23, 2005
KitMaker: 6,249 posts
AeroScale: 3,270 posts
Posted: Wednesday, July 26, 2006 - 12:03 AM UTC
Hi Eetu.
I got an idea for this problem from one of the Osprey books.
Its called "scale black" and its a 50/50 mix of Tamiya XF1 Flat black and XF64 Red Brown. This will allow the preshading to show up and also let a plain black wash bring out the detail as well.
Its something Im planning on a future build and I havent actually tried it myself yet,but from the photos in the book it looks very effective.
Hope this helps.
Nige
TedMamere
Joined: May 15, 2005
KitMaker: 5,653 posts
AeroScale: 4,347 posts
Posted: Wednesday, July 26, 2006 - 12:27 AM UTC
Hi Eetu!
I would do what Nigel said. Spray black for pre-shading and then a coat of "lighter" black. XF1 + XF64 seems good, I will try that in the future. Thanks Nigel!
Jean-Luc
I would do what Nigel said. Spray black for pre-shading and then a coat of "lighter" black. XF1 + XF64 seems good, I will try that in the future. Thanks Nigel!
Jean-Luc
Emeritus
Joined: March 30, 2004
KitMaker: 2,845 posts
AeroScale: 1,564 posts
Posted: Wednesday, July 26, 2006 - 01:17 AM UTC
Okay, I'll try mixing some scale black and see what colors give the best results. I'm mainly using Vallejo now so I'll have to experiment a little.
Thanks for the tips guys!
Btw, what do you think, should I also lighten the black with a little dark grey, or will red brown be enough to create the scale effect?
Thanks for the tips guys!
Btw, what do you think, should I also lighten the black with a little dark grey, or will red brown be enough to create the scale effect?
TedMamere
Joined: May 15, 2005
KitMaker: 5,653 posts
AeroScale: 4,347 posts
Posted: Wednesday, July 26, 2006 - 09:57 AM UTC
Quoted Text
Btw, what do you think, should I also lighten the black with a little dark grey, or will red brown be enough to create the scale effect?
Hi Eetu!
Red Brown is a very dark color. In the Dark Grey there is white wich will lighten the black much more. So don't add too much. You can also use the Black/Red Brown as basic color over the black pre-shading and then spray a lighter mix (with dark grey) in the center of the panels to achieve a weathering effect.
It's basically what I did for my Bf 109 G-4... with other colors.
Hope this helps!
Jean-Luc
Emeritus
Joined: March 30, 2004
KitMaker: 2,845 posts
AeroScale: 1,564 posts
Posted: Friday, July 28, 2006 - 12:50 AM UTC
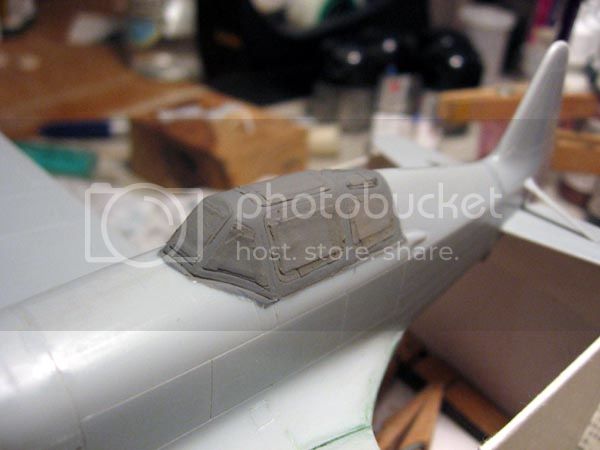
The plane's ready for painting now. I finally got the canopy masked then!

That was tedious I say.

Since nearly all corners in the framework are rounded (and I wasn't that confident to cut the tape on canopy itself), I had to make the corner pieces separately. I was able to make the half-round piece on the windscreen with a perforator. The two small windows on the rear canopy were trickier, as the half-round ends were much smaller. I decided to cover them with liquid masking material after I attach the canopy in place.
Strangely, no company seems to make aftermarket masks for this kit. Instead the market is flooding with canopy masks for planes that are dead easy to mask. (like Bf-109's, most canopies on those have hardly any curved framework). Is Ms.406 really such and esoteric subjet that there's no point in making pre-cut masks?

lampie
#029
Joined: December 23, 2005
KitMaker: 6,249 posts
AeroScale: 3,270 posts
Posted: Friday, July 28, 2006 - 12:55 AM UTC
Hi Eetu.
Have you tried ParafilmM for masking canopies.Its great stuff
Nige
Have you tried ParafilmM for masking canopies.Its great stuff
Nige
Emeritus
Joined: March 30, 2004
KitMaker: 2,845 posts
AeroScale: 1,564 posts
Posted: Friday, July 28, 2006 - 01:36 AM UTC
No, I haven't. I've heard it's good stuff too. I think I should give it a try.
Actually, the problem wasn't about the masking material, but the shapes of the framework. if I cut the tape after placing it on the canopy I tend make mistakes and end up with ugly scratches on the canopy. I guess the problem is closely related to the sharp pointed knife blades I use.

I guess it would be easier to cut along curved frames with this kind of blade:

Actually, the problem wasn't about the masking material, but the shapes of the framework. if I cut the tape after placing it on the canopy I tend make mistakes and end up with ugly scratches on the canopy. I guess the problem is closely related to the sharp pointed knife blades I use.
I guess it would be easier to cut along curved frames with this kind of blade:

Clanky44

Joined: September 15, 2005
KitMaker: 1,901 posts
AeroScale: 133 posts

Posted: Friday, July 28, 2006 - 01:56 AM UTC
Quoted Text
Yesterday I dipped the canopy in future and today I'll probably mask and attach it to the fuselage. Btw, what's your glue of choice when attaching vacform canopies? This is my first so tips are welcome.
Hi Eetu,
You are halfway there, after dipping your vacform canopy in future, you can use a fine bead of C.A. glue to attach it without fear of the glue attacking the clear plastic.
Frank


alpha_tango

Joined: September 07, 2005
KitMaker: 5,609 posts
AeroScale: 5,231 posts
Posted: Friday, July 28, 2006 - 02:04 AM UTC
Quoted Text
No, I haven't. I've heard it's good stuff too. I think I should give it a try.
Actually, the problem wasn't about the masking material, but the shapes of the framework. if I cut the tape after placing it on the canopy I tend make mistakes and end up with ugly scratches on the canopy. I guess the problem is closely related to the sharp pointed knife blades I use.
I guess it would be easier to cut along curved frames with this kind of blade:
Well I would always use the first blade. I never had real problems with that except when they are not fresh: ALWAYS use brand new blades for cutting masks!!!!!!
When you are unsure abou the shape .. draw a line with a pencil (or what you prefer), remove the mask from the model and then cut it. ... you could also try bare metal foil for masking .. but it is also not forgiving
HTH
cheers
Steffen

Emeritus
Joined: March 30, 2004
KitMaker: 2,845 posts
AeroScale: 1,564 posts
Posted: Friday, July 28, 2006 - 02:50 AM UTC
Yeah, before I started masking, I changed a new blade to my modelin knife. Because of the sharp point it's hard to make small curved cuts. I always slip and have to retry, which makes ugly marks on the clear plastic. That's why I usually prefer to make the cuts along framework, whenever possible to minimize the danger of ruining the parts.
I should have tried that... Well, doesn't matter anymore since I got the canopy masked now.
Quoted Text
When you are unsure abou the shape .. draw a line with a pencil (or what you prefer), remove the mask from the model and then cut it
I should have tried that...
Well, doesn't matter anymore since I got the canopy masked now.Emeritus
Joined: March 30, 2004
KitMaker: 2,845 posts
AeroScale: 1,564 posts
Posted: Saturday, July 29, 2006 - 07:20 PM UTC
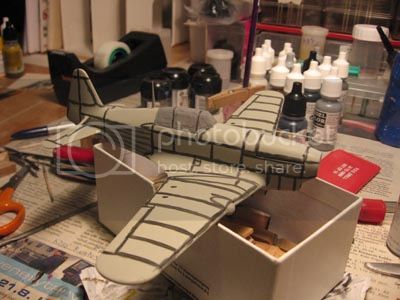
Don't you just love the occasional "lightbulb going on in your head" experience? I had one yesterday when I was rummaging through my box of spare parts. My Morane was still missing it's landing light as most pics I've seen show it installed under the wing. Then I found this sprue from a Tamiya German motorcycle kit I probably got from fellow modeler in return for some parts. It happened to have just the right part for the landing light in the form of a headlight. I filled the slot and after little filing it was ready to go.
I also glued the pitot tube to the wing as it goes deep inside the wing and being metal can withstand handling better than plastic. The canopy was primed with grey primer that's close to the cockpit interior color. Next I'll mask the canopy and prime the rest of the plane.

I also glued the pitot tube to the wing as it goes deep inside the wing and being metal can withstand handling better than plastic. The canopy was primed with grey primer that's close to the cockpit interior color. Next I'll mask the canopy and prime the rest of the plane.
JPTRR
#051
Joined: December 21, 2002
KitMaker: 7,772 posts
AeroScale: 3,175 posts
Posted: Sunday, July 30, 2006 - 04:22 AM UTC
Hi Guys,
Great! You are doing great!
Despite my best efforts, my Buffalo is still 'grazing in the pasture' instead of stampeding to completion! Unless (another!) unexpected crisis developes around here, tommorow should have nothing to steal away my time and I'll have the engine & cockpit done.
Great! You are doing great!
Despite my best efforts, my Buffalo is still 'grazing in the pasture' instead of stampeding to completion!
Unless (another!) unexpected crisis developes around here, tommorow should have nothing to steal away my time and I'll have the engine & cockpit done. Emeritus
Joined: March 30, 2004
KitMaker: 2,845 posts
AeroScale: 1,564 posts
Posted: Tuesday, August 01, 2006 - 01:17 AM UTC

I got the model primed and preshading done. I had the intention of airbrushing it, but It didn't spray out well straight from the bottle. It spattered at around 10 PSI (properly thinned paints spray just fine at that pressure to my experience), and I didn't want to start mixing and experimenting with mixing rations at the moment so I did the preshading the old fashioned way with diluted paint and a paintbrush. The pictures don't show it yet, but I carefully toned down the shading on the areas that will be painted yellow by sanding carefully with fine sandpaper. Next I'll be painting the yellow areas like the fuselage band, under the wingtips & cowling.
TedMamere
Joined: May 15, 2005
KitMaker: 5,653 posts
AeroScale: 4,347 posts
Posted: Tuesday, August 01, 2006 - 02:17 AM UTC
Hi Eetu!
Your Frankenstein Morane looks very good so far! I'm impatient to see how it will look like with the camo and markings!
Jean-Luc
Your Frankenstein Morane looks very good so far! I'm impatient to see how it will look like with the camo and markings!
Jean-Luc
Removed by original poster on 08/02/06 - 19:01:35 (GMT).
Emeritus
Joined: March 30, 2004
KitMaker: 2,845 posts
AeroScale: 1,564 posts
Posted: Tuesday, August 01, 2006 - 05:04 PM UTC
Okay, now I got the yellow areas painted and they look something like this:
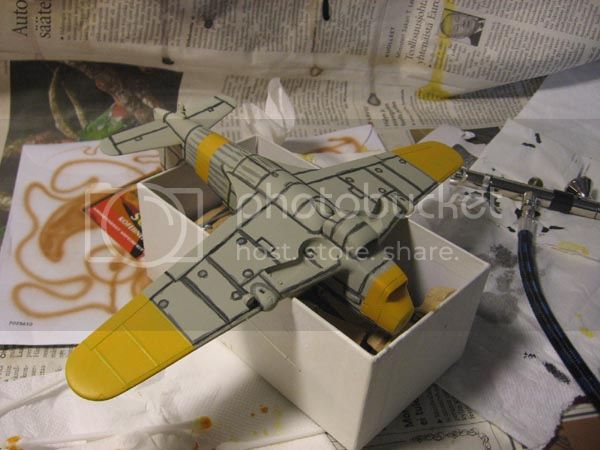
I'm pretty happy with the preshading effect, but I've better be carefull to spray light coats. I got a little paint build-up at edges of masking tape, but I think those can be dealt with a little sanding with fine sandpaper.
PS. Because of the reformation of the site, I decided to report my FUMS builds over here to reduce confusion and to keep at the topic. (Btw, there seems to be no campaign section in Aeroscale, only in armorama. Is it coming later?) You can find the earlier in-progress pics of my Mörkö-Morane on this thread over here: POW!

Lucky13

Joined: June 01, 2006
KitMaker: 1,707 posts
AeroScale: 1,119 posts

Posted: Tuesday, August 01, 2006 - 08:49 PM UTC
Looking good Eetu!


Emeritus
Joined: March 30, 2004
KitMaker: 2,845 posts
AeroScale: 1,564 posts
Posted: Wednesday, August 02, 2006 - 09:40 PM UTC
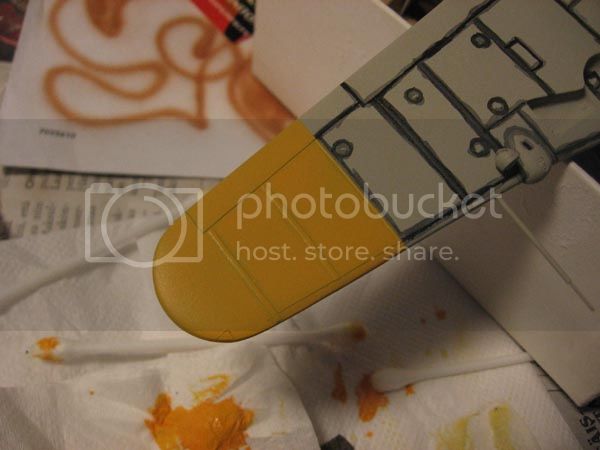
The light blue for the underside is on:

I'm starting to really like this new tool of mine. I always hated painting the color demarkation lines on wing upper and lower surfaces. No matter how carefully I worked, I nearly always ended up with ugly smudges on the other side. Now I can just mask one side and spray the other. Sweet!
I'm starting to really like this new tool of mine. I always hated painting the color demarkation lines on wing upper and lower surfaces. No matter how carefully I worked, I nearly always ended up with ugly smudges on the other side. Now I can just mask one side and spray the other. Sweet!
 |

WEB HOSTING BY


Copyright ©2021 AeroScale and Kitmaker Network, a subsidiary of Silver Star Enterprises
All Rights Reserved. Please read our Conditions of Use and Privacy Policy.
All Rights Reserved. Please read our Conditions of Use and Privacy Policy.