World War II: USA
Aircraft of the United States in WWII.
Hosted by Rowan Baylis
Thunderbolts
lampie
#029
_VISITCOMMUNITY
England - East Midlands, United Kingdom
Joined: December 23, 2005
KitMaker: 6,249 posts
AeroScale: 3,270 posts
Posted: Wednesday, August 16, 2006 - 03:38 PM UTC

Quoted Text

It started getting boring so I put it away for a bit now I can`t get started again.


I reckon this group build should give you the perfect excuse to get moving again on your P47 Dennis! 1:32?,,I bet thats going to be huge when its finished. Are you going to share some photos with us?
Two 1:48 and a 1:32 so far. I think this build needs a 1:72 representative.
Anybody going to step up?
Keep up the great work guys.
Nige
newtothegame
_VISITCOMMUNITY
Washington, United States
Joined: October 05, 2003
KitMaker: 588 posts
AeroScale: 468 posts
Posted: Thursday, August 17, 2006 - 05:14 AM UTC
Wayne, or should I say Speedy Gonzales. Wow, you are cruising. Things look good. I especially like shot of the engine in the cowling - looks really nice with the wiring. I am curious to hear what you are learning about seams since it is something that constantly is a headache for me.

Nige, Let's just face it now, you are our 1/72 representative. Help us Lampie, you're our only hope Really, maybe someone will join in with one of the really nice 1/72 t-bolts.

Dennis, I (and I'm sure Wayne) would love to have you join us. I would really enjoy seeing your progress up to this point and I am sure pick up some scratch building tips from you. Hopefully, you decide to pick your thunderbolt up again and join us.

Hope all is well with everyone.
Leon
Wad_ware
_VISITCOMMUNITY
Illinois, United States
Joined: September 09, 2002
KitMaker: 537 posts
AeroScale: 437 posts
Posted: Thursday, August 17, 2006 - 07:45 AM UTC
It would be great it Dennis were to join up with us With all the work you have and are going to put into that big jug I would really like to see some pics. And if this gives you the incentive to break that back out and get working on it again that would be wonderful

And Nigel .. this would give you the opportunity to give that 1/72nd wiring on the engine a try Man... I have only done 1 1/72nd scale plane before but it didn't have an enigine. The body was completely closed off. I just can't imagine how small that would be. I would need magnification with the power of the Hubble telescope for me to wire up one of those little bitty things :-) :-) I am sure it could be done and it would be a very nice accomplisment (wink, wink

Thanks Leon -- I have a lot of time to spare on my hands here lately. I won't go into boring details but work has been reallllllllly slow for about a month and will be for a little while longer. I have been putting a lot of my idle time into my P-47.
The seams so far, at least to my eye, are coming along ok. I am still working with some of the smaller pieces such as the landing gear. I have given the main body a break. I am getting close to masking everything off to put on a coat of flat white and see for real how I have done with the seams. That in the end should be a good base coat for underneath the gloss black that I need to put underneath the alcalad.

I have kind of a silly question for all of you that I just can't seem to make up my mind on. There are two pieces that attach to the landing gear that make up part of the well door. In the end they will be metal and then I am sure some part of that will end up with invasion stripes painted on it.
I am debating on whether or not to attach those pieces to the landing gear before or after I put the alclad on them. Attached would be kind of a pain but very possible to cover up and mask off the gear and back sides of the door pieces. But some of that will be fragile with pe brake lines. Unattached would just make them a lot easier to paint but then take the risk of messing up the alclad with gluing and handling. Which way would the rest of you do it?

Good modeling all,
Wayne
lampie
#029
_VISITCOMMUNITY
England - East Midlands, United Kingdom
Joined: December 23, 2005
KitMaker: 6,249 posts
AeroScale: 3,270 posts
Posted: Thursday, August 17, 2006 - 02:50 PM UTC
Hi guys.
Leon,you sound like Princess Lea,,LOL. Very tempted guys, if this is an open ended build then I'll see what I can do,but the 2 Campaign builds must get finished first.
Wayne.

Quoted Text

I am getting close to masking everything off to put on a coat of flat white and see for real how I have done with the seams. That in the end should be a good base coat for underneath the gloss black that I need to put underneath the alcalad.


No need for the white primer as a base coat.The black acrylic will serve as a primer and you'll be able to check any areas that need attention easily at this stage.
As for the undercarriage.What I would do is definately leave this off til the end.With the 2 wheel well covers. Try tacking them in place in the closed position with a tiny drop of white glue.You can then apply the invasion stripes with everything in situ,and just pop them off with a toothpick when its all dry and continue with the undercarriage assembly.
Hope this helps.
Have fun guys!
Nige
newtothegame
_VISITCOMMUNITY
Washington, United States
Joined: October 05, 2003
KitMaker: 588 posts
AeroScale: 468 posts
Posted: Thursday, August 17, 2006 - 08:11 PM UTC
Nige, Princess Leia popped into my head when I typed it too. :-) Obviously, we are from the star wars generation.

Wayne, I agree with Nige; I would skip the white and just use the gloss black as a way to detect seams. I believe that seams show up incredibly well under a gloss coat of paint too. So you can paint, find mistakes, fix mistakes, and touch up the fixes with more gloss black. I also agree with him on the gear doors. I would leave them off until later. I imagine they won't be hard to attach and still protect the finish.

Leon
Wad_ware
_VISITCOMMUNITY
Illinois, United States
Joined: September 09, 2002
KitMaker: 537 posts
AeroScale: 437 posts
Posted: Friday, August 18, 2006 - 08:00 AM UTC
That is a great idea with the wheel well pieces Not only will that get the invasion stripes all lined up properly, but that also helps mask off the wheel well itsself. Even tho I will still put some protective pieces of tissue paper or rag to be really safe with the well interor. Thanks a lot guys

Thanks also for the advice on the primer coat too. That will save me time and effort not using the white also. Nigel, you say acrylic. What actual paint did you use for your base coat for your P-47? The bits I read so far they recommend Tamiya TS-14 gloss black and the TS is their spray can line which I believe is a laquer based paint. Not 100% sure about that yet. Did you use a spray can or is there the same paint in a bottle that can be airbrushed? I would much prefer that over spray cans.

Thanks again guys,
Wayne

lampie
#029
_VISITCOMMUNITY
England - East Midlands, United Kingdom
Joined: December 23, 2005
KitMaker: 6,249 posts
AeroScale: 3,270 posts
Posted: Friday, August 18, 2006 - 02:34 PM UTC
Hi Wayne.
Tamiya X1 Black will do you just fine
While we're talking undercarriage. The main legs on my P47 are technically still on a dry run,,the fit is so good I didnt need any glue.
It wouldnt surprise me if the 1:48 is the same.
My Tamiya Razorback is looking very tempting,but I must get these campaign builds done first. Ive already been distracted too much by a Sopwith Camel,,,LOL
Nige
newtothegame
_VISITCOMMUNITY
Washington, United States
Joined: October 05, 2003
KitMaker: 588 posts
AeroScale: 468 posts
Posted: Saturday, August 19, 2006 - 05:18 AM UTC
Nige, Don't worry, I will still be working on mine for a long time, so you will be able to finish all of your current builds, probably start and finish a few new ones, join in with your razorback, and probably still beat me . Anytime you can join, it would be great.

Wayne, another thing I have done when I have been faced with the choice of using a spray can is to take a fat (say milkshake) straw and cut a couple inch piece from it. Then I place that right at the nozzle of the spray can and spray a little of the paint into an empty film canister or something. Then the pre-thinned paint can be used in an airbrush. I think they call the process decanting. But I am guessing tamiya x-1 would be easier...

Anyway, I am pretty much done with detailing my wheel wells. Sorry the pictures aren't very good, but I was too lazy to set up the whole lighting setup.

Here are the pieces. I added wire, some with insulation still on and some with it stripped. It definately is not all that is in a true wheel well, but it serves as a decent (I hope) representation.


A closer shot of one of the wells.


Now I need to be completely honest here for my conscience. I did look at and try to use pictures of real wheel wells, but when it came down to it, I used a nice build-up article from Tony Bell to really help me decide what to do.

Leon
lampie
#029
_VISITCOMMUNITY
England - East Midlands, United Kingdom
Joined: December 23, 2005
KitMaker: 6,249 posts
AeroScale: 3,270 posts
Posted: Saturday, August 19, 2006 - 05:55 AM UTC
Well guys,,it looks like nobodys going to represent 1:72,so I guess Im in
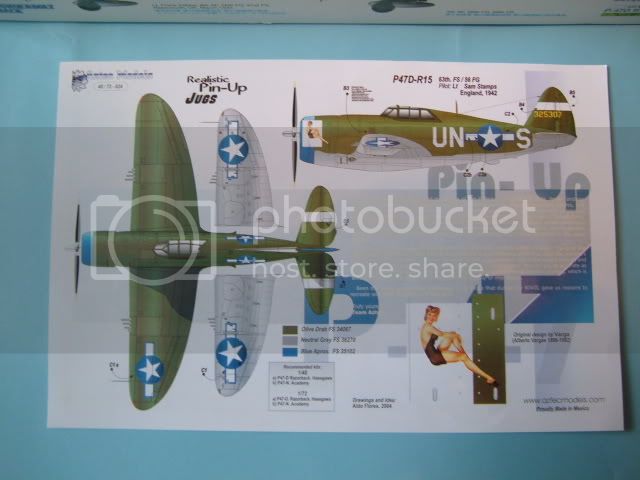
I must finish my 2 Campaign builds though before I think about starting a P47. Ive had this in my stash since about halfway through the bubbletop build, and its a "pin up" decal set. It'll be opposite to the NMF finish build.Nice and faded and wings full of ordnance
I'll probably end up starting this towards December as the diary is filling up with work again.
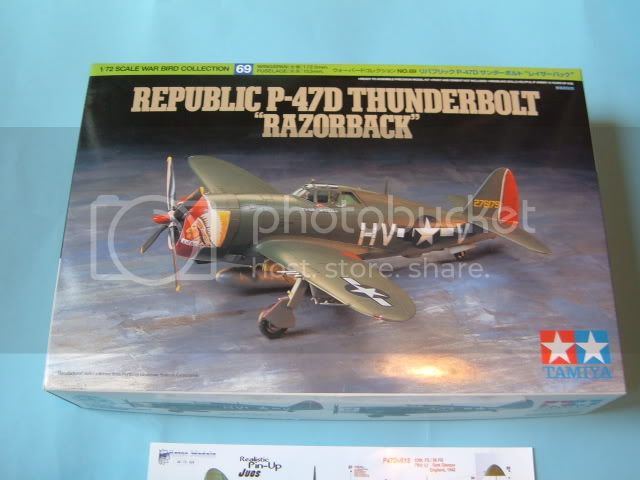
So heres my P47 for the group build.The Tamiya Razorback in 1:72 with pin up custom decals.


Happy now?,,,,LOL
Nige
newtothegame
_VISITCOMMUNITY
Washington, United States
Joined: October 05, 2003
KitMaker: 588 posts
AeroScale: 468 posts
Posted: Saturday, August 19, 2006 - 07:26 AM UTC

Quoted Text


Happy now?,,,,LOL
Nige


Yes! Looking forward to it
Leon
Wad_ware
_VISITCOMMUNITY
Illinois, United States
Joined: September 09, 2002
KitMaker: 537 posts
AeroScale: 437 posts
Posted: Saturday, August 19, 2006 - 10:37 AM UTC
Leon - The wheel wells look good and your wiring definitely adds a nice touch. Nice work. Thanks for the tip on the spray cans. That is a handy tip to have available.

Nigel - Glad we were able to finally talk you into this. There is no hurry whatsoever to get started. I'm happy now too
Your pin-up scheme will go along great with my Georgia Peach scheme with the naked lady. Cool.

I have a little bit of progress. I have just been gluing together the ordnance and drop tank. I am going with the ground support/attack look with the large center drop tank and the two 500 lb. bombs on the wings.
I don't know if your razorback kit is the same as mine Leon but my bubbletop has four complete propellers. There is symmetric and asymmetric, one has long thin blades, one has long fat blades, one has shorter thin blades, and the other has shorter fat blades. According to what I read on the pic for my Georgia Peach II I need to use the 'Curtiss Electric asymmetric propellar'. Now I just have to figure out which of the four that is.

Good modeling,
Wayne

newtothegame
_VISITCOMMUNITY
Washington, United States
Joined: October 05, 2003
KitMaker: 588 posts
AeroScale: 468 posts
Posted: Sunday, August 20, 2006 - 04:26 AM UTC
Thanks Wayne,
Sounds like you have possibly figured out the propeller question. Actually, I'm glad you put it forth, it is nice to get some idea what they all are. Way to help me learn
Leon
betheyn
Staff MemberSenior Editor
AEROSCALE
#019
_VISITCOMMUNITY
England - South East, United Kingdom
Joined: October 14, 2004
KitMaker: 4,560 posts
AeroScale: 2,225 posts
Posted: Monday, August 21, 2006 - 12:26 AM UTC
I have been watching this thread with interest, and i have got to comment on the great work you all have been doing on your respective builds so far. Great work, i am really looking forward to seeing this finished.
I knew you would give in Nige. When i was browsing through your stash the other day, and spotted a P-47, i knew you would submit to your desires :-) .
Andy
Wad_ware
_VISITCOMMUNITY
Illinois, United States
Joined: September 09, 2002
KitMaker: 537 posts
AeroScale: 437 posts
Posted: Monday, August 21, 2006 - 05:57 AM UTC
Thanks Andy that is nice of you to say and... by chance.... if you have any interest in starting up a P-47 .... well ...... we would be happy to have you join up with us

I am on a slight holding pattern with my jug. I was debating on whether to drive 100 miles roundtrip with todays gas prices to my nearest hobby store to get the alclad and supplies, or to order things online. Online was a $1 cheaper per bottle on the alclad and a little cheaper on everything else too. Even with the price of shipping I was better off ordering online even tho now I have to wait a little bit for it to arrive
I have my 'Georgia Peach II' decals on order too so I am really eager for things to arrive.

I am still working on little fiddly things like the bombs and the prop now since I have it figured out which prop to use. Decals, some weathering etc..etc... I can also go ahead and mask off my canopy and get that painted too I just realize as I am typing this. Excellent!!

Good modeling,
Wayne
newtothegame
_VISITCOMMUNITY
Washington, United States
Joined: October 05, 2003
KitMaker: 588 posts
AeroScale: 468 posts
Posted: Monday, August 21, 2006 - 07:31 PM UTC
Andy, Thanks for the comment / viewing - really appreciate it.

Wayne, It is amazing there seems to always be something that you can be doing. Of course, if it were me I would probably crack open a new kit and start working on its cockpit. Then before I knew it I would be in WAY over my head with 4 builds . You are much smarter than me to just work on the little elements.

Leon
Wad_ware
_VISITCOMMUNITY
Illinois, United States
Joined: September 09, 2002
KitMaker: 537 posts
AeroScale: 437 posts
Posted: Monday, August 21, 2006 - 07:54 PM UTC

Quoted Text

. You are much smarter than me to just work on the little elements.


:-) :-) :-) :-) Intelligence :-) I don't think that has anything to do with it......just ask my wife :-)8 Just kidding :-)

I just can't bring myself to be a more-than-one-model-at-a-time kind of guy :-) :-)

Good Modelig
Wayne
betheyn
Staff MemberSenior Editor
AEROSCALE
#019
_VISITCOMMUNITY
England - South East, United Kingdom
Joined: October 14, 2004
KitMaker: 4,560 posts
AeroScale: 2,225 posts
Posted: Monday, August 21, 2006 - 08:42 PM UTC

Quoted Text

Thanks Andy that is nice of you to say and... by chance.... if you have any interest in starting up a P-47 .... well ...... we would be happy to have you join up with us
Good modeling,
Wayne


Looking at the great work you all have been doing has peeked my interest in this remarkable plane, so as i did visit my LHS yesterday, I picked this up for a grand total of £5. I will accept your invitation on joining . Its Academy's 1/72 P-47D Bubble top. I'll be building it in the markings on the box.
Better keep this a secret from Nige as he thinks he is building the only 1/72 P-47 :-) .
I'll start her as soon as i have finished my target I'm building for the " Bucket Bonanza 2006 - Rest of the World M113´s" campaign.
Andy
lampie
#029
_VISITCOMMUNITY
England - East Midlands, United Kingdom
Joined: December 23, 2005
KitMaker: 6,249 posts
AeroScale: 3,270 posts
Posted: Monday, August 21, 2006 - 11:21 PM UTC
Hi Guys.
Andy.

Quoted Text

I knew you would give in Nige. When i was browsing through your stash the other day, and spotted a P-47, i knew you would submit to your desires .
Andy


LOL,,you only spotted one P47?,,You couldnt have been looking very hard,, :-)

Quoted Text

I will accept your invitation on joining . Its Academy's 1/72 P-47D Bubble top. I'll be building it in the markings on the box.
Better keep this a secret from Nige as he thinks he is building the only 1/72 P-47 .


Cool!! Good to have you on my wing Andy. About time you delved into the wacky world of 1:72! Have fun with the kit,,the Academy ones go together really well,,but beware the decals of doom
Nige
newtothegame
_VISITCOMMUNITY
Washington, United States
Joined: October 05, 2003
KitMaker: 588 posts
AeroScale: 468 posts
Posted: Tuesday, August 22, 2006 - 12:51 AM UTC

Quoted Text

Looking at the great work you all have been doing has peeked my interest in this remarkable plane, so as i did visit my LHS yesterday, I picked this up for a grand total of £5. I will accept your invitation on joining . Its Academy's 1/72 P-47D Bubble top. I'll be building it in the markings on the box.


Yes, we got another one!!
Glad to have you along. Looking forward to when you can start.
Leon
CRS
_VISITCOMMUNITY
California, United States
Joined: July 08, 2003
KitMaker: 1,936 posts
AeroScale: 1,168 posts
Posted: Tuesday, August 22, 2006 - 01:23 AM UTC
Here are a couple of T-Bolts I've had setting around for a while, even in a 1/72 collection the T-Bolt is a stand out aircraft.

Airfix

Heller
betheyn
Staff MemberSenior Editor
AEROSCALE
#019
_VISITCOMMUNITY
England - South East, United Kingdom
Joined: October 14, 2004
KitMaker: 4,560 posts
AeroScale: 2,225 posts
Posted: Tuesday, August 22, 2006 - 01:29 AM UTC

Quoted Text


Cool!! Good to have you on my wing Andy. About time you delved into the wacky world of 1:72! Have fun with the kit,,the Academy ones go together really well,,but beware the decals of doom
Nige


Glad to be your wing-man Nige, I'll circle the airfield waiting for you :-).
This will be my 5th 1/72 plane, so it doesn't surprise me how small they are anymore ( apart from a certain Camel :-) ). 1/72 gets really wacky when you start adding P.E :-) .
Yeah, i remember the decals from the Hawker Hunter i built .

Quoted Text

Yes, we got another one!!
Glad to have you along. Looking forward to when you can start.
Leon


Glad to be aboard, errr in flight, well around .
Andy
Wad_ware
_VISITCOMMUNITY
Illinois, United States
Joined: September 09, 2002
KitMaker: 537 posts
AeroScale: 437 posts
Posted: Tuesday, August 22, 2006 - 05:52 AM UTC
Lookie what I made today Mom


:-)8 Mom would be so proud ... she always told me if I applied myself that someday I could become one of those nuklear fizzassists :-) :-) :-)

Andy - Welcome to the squad pssssssssst.... I won't tell Nige about it being 1/72nd if you don't
That is cool now also for we so far have two razorbacks and two bubbletops. Will be looking forward hopefully before too long for yours and Nige's progress once you get some of your other modeling irons out of the fire.

Chuck - Those are a couple of nice looking P-47s. You are right too, the P-47 has an intimidating presence. Especially if you happen to be on the receiving end of the firepower and damage just one of those planes could dish out Thanks for adding the pics. That is the kind of thing I was hoping for that will make this thread fun.

Good modeling everyone,
Wayne
newtothegame
_VISITCOMMUNITY
Washington, United States
Joined: October 05, 2003
KitMaker: 588 posts
AeroScale: 468 posts
Posted: Wednesday, August 23, 2006 - 05:47 AM UTC
Nice Thunderbolts Chuck. Thanks for adding them.

Wayne,
Good looking bombs. Are the yellow rings decals from the kit or did you paint them? Either way they look nice, and the stencils definately went on well - look painted on. I assume they are from the kit.

Hope all is well.
Leon
Wad_ware
_VISITCOMMUNITY
Illinois, United States
Joined: September 09, 2002
KitMaker: 537 posts
AeroScale: 437 posts
Posted: Wednesday, August 23, 2006 - 07:35 AM UTC
Thanks Leon
The yellow rings are the decals. I debated on painting them. A lot of pics of the real thing I see have the yellow bands actually kind of sloppily hand painted on. I opted to go for the decals anyway.

The stencils are the kit decals too. They really did set down well. I did the whole bit with the future, decals, decal solvent, and then another coat of future to tie in the edges of the decals.
Once that was done I added the stains and paint chipping. My oil stains have set up pretty good now so all I want to do now is spray it with flat to take off any lasting shine from the future.

There is a little bit ot PE to add to the bombs too, two different wires that connect up to each end of the bomb and run up to the bottom of the P-47.
The PE set also came with new fins for the bombs which I didn't use. I tried using those on an earlier kit and I break those darn things every time. I never have much problems with any other pe stuff, just those crazy bomb fins.

Wayne
Wad_ware
_VISITCOMMUNITY
Illinois, United States
Joined: September 09, 2002
KitMaker: 537 posts
AeroScale: 437 posts
Posted: Thursday, August 24, 2006 - 05:25 AM UTC
I am thrilled to the gills even tho I don't think I have any :-)
I ordered my alclad and Tamiya gloss black the middle of Monday afternoon. It showed up on my doorstep today. Man that was fast

I can't wait to try it out but am going to start slow and small at first. I am going to work on the big center-line drop tank and get a feel for the alcad.
I still have to mask off the body of the plane and who knows, after the gloss black I am preparing myself to probably have to fix up some of the seams or spots here and there. I want to take my time on that too and really try to get it good the first time around.

Nige, I read through your thread on your NMF P-47 again. Your experience through that is some good reading. A quick question or two for you - The alclad dries pretty quick, at least according to the label. How long did you let yours set up before you started taping off for the other colors? I'll be wearing latex gloves or using protection from my hands, but how long do I really have to let that sit before I can pick it up to move it around safely? Any last final thoughts or advice on airbrushing the alclad as far as air pressure, etc . I know nothing can help more than just doing and experimenting but I'll be glad for any final advice you may have.

Thanks and good modeling,
Wayne