World War II: USA
Aircraft of the United States in WWII.
Hosted by Rowan Baylis
Thunderbolts
betheyn
Staff MemberSenior Editor
AEROSCALE
#019
_VISITCOMMUNITY
England - South East, United Kingdom
Joined: October 14, 2004
KitMaker: 4,560 posts
AeroScale: 2,225 posts
Posted: Friday, September 01, 2006 - 07:05 PM UTC

Quoted Text

Andy, I can't believe how fast your thunderbolt has gone together. You are setting speed records... I was excited to see that you picked up the tamiya 1/72 thunderbolt, too. That is by far my favorite build up to this point - a really excellent kit. I am sure you will really enjoy it.
Leon


Only because i have a week off work :-) . Looking forward to starting the Tamiya Razorback, Nige has already told me I'm going to love it :-).

Nice work so far Fred. How well does the resin cockpit fit into the Academy kit. Will you have to thin the inside walls ?
Andy
newtothegame
_VISITCOMMUNITY
Washington, United States
Joined: October 05, 2003
KitMaker: 588 posts
AeroScale: 468 posts
Posted: Friday, September 01, 2006 - 07:46 PM UTC
Nice work Fred. The sidewall, especially, are going to be a big improvement over the academy pieces. Looking forward to more...
Leon
Wad_ware
_VISITCOMMUNITY
Illinois, United States
Joined: September 09, 2002
KitMaker: 537 posts
AeroScale: 437 posts
Posted: Sunday, September 03, 2006 - 04:35 AM UTC
I finally made some worthwhile progress and have the pics to prove it.
I have all invasion stripes painted on and all the rest of the main camo.
I had some very slight bleed through on the stripes which I have no intention of fixing. These were pretty much sloppily hand painted on almost overnight on thousands of aircraft. This gives it a little of a realistic touch. Plus when I was taping some of the stuff to paint other colors I had just a little bit of unintentional paint chipping because of the tape. I am leaving that because it actually doesn't look bad at all. Sometime in the future I have to try and do that on purpose.
I am getting ready to mask off and paint the cockpit pieces.
Before too long I should be ready for decals. I just wish those would hurry up and show up on the mail. I am also going to experiment a little bit with some oil washes on this to add some rust and oil spots etc..etc...

EDIT: Darn.... I just realized by looking at my reference pic that I still need to paint the blue stripes on the bottoms of the tail wings. AAAARRRRRRGGGGGGGG!!!!


lampie
#029
_VISITCOMMUNITY
England - East Midlands, United Kingdom
Joined: December 23, 2005
KitMaker: 6,249 posts
AeroScale: 3,270 posts
Posted: Sunday, September 03, 2006 - 10:15 PM UTC
Hi Wayne!
Your P47 is looking the business!!
I hope you think it was worth all the masking to do panels in different shades of Alclad,because its made a huge difference.Looks great!
Nearly there now I guess?
I wouldnt worry about going overboard on doing different panels different shades.Recently on a flight I counted 11 different shades of metal on the engine panels of the aircraft!
Going to be a real stunner when its done!
Nige
Wad_ware
_VISITCOMMUNITY
Illinois, United States
Joined: September 09, 2002
KitMaker: 537 posts
AeroScale: 437 posts
Posted: Monday, September 04, 2006 - 05:53 AM UTC
Thanks Nige - It was very much worth the masking for the shaded panels. On a later one I would like to do even more shades. Maybe not as many as you counted on your flight :-) But it would be fun to do three or four different shades of panels. A P-51 in alclad with many shaded panels might be an idea sometime a little later on.
I am getting sort of close to the end. I finally have all the camo painted along with the cockpit frame now. I have just little odds and ends such as gun barrells to put in. The bombs and drop tank I am going to wait until I get the decals. Those might be in the way or I might accidently bust them off while doing the decals which would really not be a good thing ;-)
Gosh, I just keep hoping my decals will show up soon. I am getting to a point where I can't really do much at all with washes and things until I get the decals done. I ordered them from Eagle Strike on the same day I ordered my alclad from Squadron. I havn't ordered any of their decals before so I really don't know how quick they are at getting orders out. I am sure they are probably pretty busy. ...Tomorrow, tomorrow, there's always tomorrow. Tomorrow's just a day a way..... sorry I just felt like singing there :-) :-)

Wayne
newtothegame
_VISITCOMMUNITY
Washington, United States
Joined: October 05, 2003
KitMaker: 588 posts
AeroScale: 468 posts
Posted: Tuesday, September 05, 2006 - 01:15 AM UTC
Your thunderbolt is looking really good Wayne. I hope the decals come soon too, so we can see how those look . Right now I am intentionally trying the chipping method that you mention on my ki-84, my hope is that I don't get chipping where I don't want it. What kind of tape / masking did you use?
Anyway, looks good.
Leon
Wad_ware
_VISITCOMMUNITY
Illinois, United States
Joined: September 09, 2002
KitMaker: 537 posts
AeroScale: 437 posts
Posted: Tuesday, September 05, 2006 - 06:14 AM UTC
Thanks Leon, I am really happy so far at how things are turning out on my thunderbolt. I called on my decal order and was told they were put in the mail this last Friday. So taking in account no mail Monday because of Labor Day, there is a chance they might show up tomorrow - or at least by the end of the week which would make me really happy.
The masking tape I was using is just the regular blue painters tape from the hardare store. I stuck it and unstuck it off my hand a few times to take some of the extra stick off of it. Even tho, I did still end up with some chipping. But I am sure that is because that right at the spots I really did not want any bleed through I pressed down fairly firmly just to make sure I had good edges on my camo. Plus, I was getting anxious to get my painting done since I was having so much fun, I really didn't wait as long as I probably should have to mask over some of the previous painted areas. At least the chipping that I ended up with actually looks pretty good for an accident.

Wayne
newtothegame
_VISITCOMMUNITY
Washington, United States
Joined: October 05, 2003
KitMaker: 588 posts
AeroScale: 468 posts
Posted: Tuesday, September 05, 2006 - 07:11 PM UTC
Thanks Wayne. I'm giving paint I don't want to chip a day to cure and also trying the stick it to your hand trick. So far so good, but everytime I pull off the tape my heart slows and I expect the worst!
Hope all is well.
Leon
lampie
#029
_VISITCOMMUNITY
England - East Midlands, United Kingdom
Joined: December 23, 2005
KitMaker: 6,249 posts
AeroScale: 3,270 posts
Posted: Tuesday, September 05, 2006 - 09:33 PM UTC
Hi guys.
Although its expensive,Tamiya tape is definately the way to go.(unless of course your deliberately wanting a chipped effect)
Nige
JPTRR
Staff MemberManaging Editor
RAILROAD MODELING
#051
_VISITCOMMUNITY
Tennessee, United States
Joined: December 21, 2002
KitMaker: 7,772 posts
AeroScale: 3,175 posts
Posted: Friday, September 08, 2006 - 05:42 AM UTC
Hi Juggies,

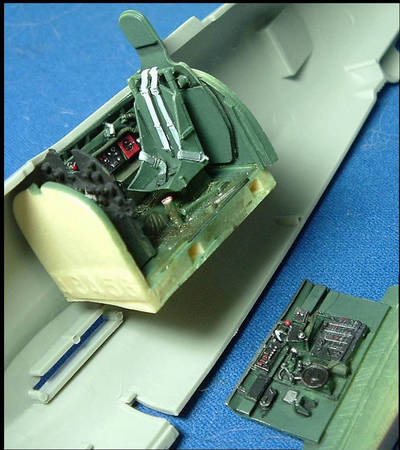
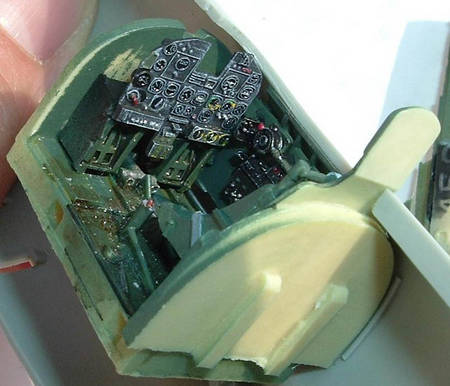
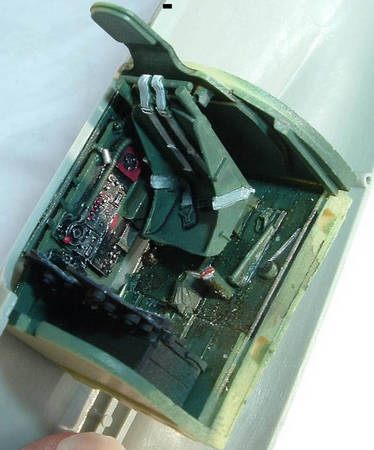
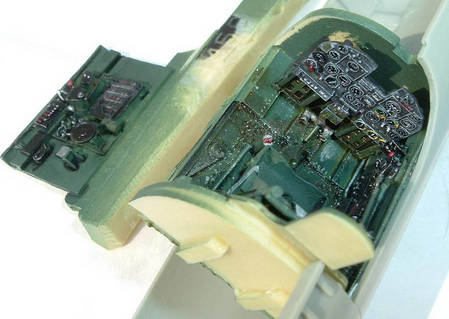
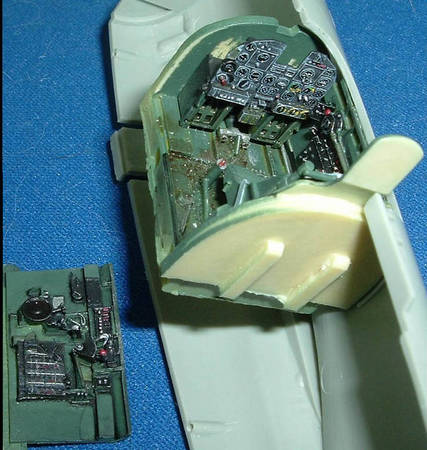
My 'Bolt's front office:


Wad_ware
_VISITCOMMUNITY
Illinois, United States
Joined: September 09, 2002
KitMaker: 537 posts
AeroScale: 437 posts
Posted: Friday, September 08, 2006 - 08:00 AM UTC
That is one great looking front office there Fred. The detailing in that resin cockpit is outstanding. Very nice job at painting and detailing it up too.
Is there any photo etch at all in there or is that all the detail that in in the resin? Man, I really have to try one of those on one of my next kits if there is one available for it.

Wayne
JPTRR
Staff MemberManaging Editor
RAILROAD MODELING
#051
_VISITCOMMUNITY
Tennessee, United States
Joined: December 21, 2002
KitMaker: 7,772 posts
AeroScale: 3,175 posts
Posted: Saturday, September 09, 2006 - 08:27 PM UTC
Hi Wayne,

That is 100% True Details resin. It is my first full resin cockpit.

Pros: the resin is soft and cuts pretty easy. The instrument panel is very thin for good scale.

Cons: the resin is soft and 'squishes'; the cockpit sides warped and bent while holding them. Despite that it is also brittle. The instrument panel broke in half top to bottom I glued it back with good alignment--find the seam? The arm rests on the seat broke off when I looked at them! The panel attachment to the front of cockpit is crooked, exacerbating the warped (but seamlessly rejoined) panel

The floor is made with slots for the model's cockpit. But they don't line up well and despite an eternity trying to align it, the cockpit is slightly off-center (don't tell anyone )

Good experience. Just wait until I put the resin cockpit into my 1/32 P-40C!

In a day or so perhaps the wing will be affixed.

More ASAP!

FRed
lampie
#029
_VISITCOMMUNITY
England - East Midlands, United Kingdom
Joined: December 23, 2005
KitMaker: 6,249 posts
AeroScale: 3,270 posts
Posted: Saturday, September 09, 2006 - 10:11 PM UTC
Your P47's looking great Fred.
Ive never tried a resin cockpit,but I need to do one before I tackle my Eduard Spit.
Did you need to sand away the fusalage interior to get the cockpit to fit?

My P47 picked up 3rd at a show today.Certificate goes nicely with the Commended I got for it last week
Nige
JPTRR
Staff MemberManaging Editor
RAILROAD MODELING
#051
_VISITCOMMUNITY
Tennessee, United States
Joined: December 21, 2002
KitMaker: 7,772 posts
AeroScale: 3,175 posts
Posted: Saturday, September 09, 2006 - 10:27 PM UTC
Hi Nige,

Quoted Text

Did you need to sand away the fusalage interior to get the cockpit to fit?


No, they engineered it to fit as would the kit pieces.


Quoted Text

:[]-- My P47 picked up 3rd at a show today.


You go, man! Well done! It is a fine looking Thunderbolt. Must have been some tough competition!

Looking forward to working on my Jug and the Brewster for FUMS.

Regards,

Fred
newtothegame
_VISITCOMMUNITY
Washington, United States
Joined: October 05, 2003
KitMaker: 588 posts
AeroScale: 468 posts
Posted: Sunday, September 10, 2006 - 07:21 PM UTC
Great work on the cockpit. I really like it especially the left wall and instrument panel - they look sweet. Despite the problems it sounds like were involved that is going to make the final t-bolt look really, really nice.
Leon
betheyn
Staff MemberSenior Editor
AEROSCALE
#019
_VISITCOMMUNITY
England - South East, United Kingdom
Joined: October 14, 2004
KitMaker: 4,560 posts
AeroScale: 2,225 posts
Posted: Sunday, September 10, 2006 - 09:31 PM UTC
Hi Fred,
That is great work on the cockpit. It gives it a really busy look to it.
Can't wait to see the rest of the build.

Quoted Text


:[]-- My P47 picked up 3rd at a show today.Certificate goes nicely with the Commended I got for it last week
Nige


Well done Nige. Next comp it will get first.
Our Nige also entered the Dazzle Camel as well, but the judges were either overpowered by the colour scheme or blind as it didn't even place .
Andy
lampie
#029
_VISITCOMMUNITY
England - East Midlands, United Kingdom
Joined: December 23, 2005
KitMaker: 6,249 posts
AeroScale: 3,270 posts
Posted: Monday, September 11, 2006 - 01:21 AM UTC
Maybe I should do a NMF Camel,,or an anti dazzle P47....
Oh,,,now thats got me thinking,,LOL
I hope this threads going to run for a while,because I reckon it'll be the New Year before I get started on my next P47
Nige
Wad_ware
_VISITCOMMUNITY
Illinois, United States
Joined: September 09, 2002
KitMaker: 537 posts
AeroScale: 437 posts
Posted: Monday, September 11, 2006 - 05:06 AM UTC
Congratulations on your P-47 Nige Nice rewards for a very nice job
Anti Dazzle on a P-47 - very interesting-That would have been a perfect idea for the 'Double Take' campaign that I ran a ways back. There were some wild and colorful paint schemes in WWII but there just never seemed to be much of the really truely wild and colorful schemes like your camel.
I guess one of the main reasons would be a change of attitude to actual 'hidden, hard to see me' camo for WWII instead of the 'in your face, here I am to shoot you out of the sky' schemes from WWI.
I'm sure there are a lot more and varied reasons for it but that is something I was always curious about.


Quoted Text

I hope this threads going to run for a while,because I reckon it'll be the New Year before I get started on my next P47


If I never get my decals you won't have anything to worry about there Nige :-) This thread may carry on forever :-) :-)
I still havn't got them. I ordered them on the 8/21. Didn't get them by 9/6. Called 9/6. Was told they were mailed 9/1. Still don't have them. The frustrating part is that it is really hard for me to get a hold of them. I ordered them from Eagle Strike directly. They don't have an email address, only a phone number. I live in a different time zone which is two hours behind them. So by the time I get off of work at 4:00 they are all ready closed because it is now 6:00 there, and no answer at all on the weekend. AARRRGGGGGHHH I am getting so frustrated.

g ...g.g... g good m m ... m.. modeling everyone
:-) :-) Wayne
Wad_ware
_VISITCOMMUNITY
Illinois, United States
Joined: September 09, 2002
KitMaker: 537 posts
AeroScale: 437 posts
Posted: Tuesday, September 12, 2006 - 08:28 AM UTC
I have a question about a couple of the decals. One the side of the plane where the invasion stripes are there is going to be the big circle with the star it in. This will overlap the invasion stripes. I am a little worried and wondering if the stripes are going to show through the white areas on the decal and that I should paint silver where the decal is going to lie. What do you all think? Is this anything to really worry about?
On page 4 of our thread is a pic that shows the invasion stripes and the area in question.

I finally got a hold of someone at Eagle Strike about my decal set. If I don't get them in the mail by this Friday they are going to mail me a new set at no charge. That is really good of them as I figured they would be. It just sucks for the extra waiting time for this second set to show up if I don't get the first. Oh well, this extra time sure gives that Future coat time to REALLY cure up for those darn decals.

Wayne
newtothegame
_VISITCOMMUNITY
Washington, United States
Joined: October 05, 2003
KitMaker: 588 posts
AeroScale: 468 posts
Posted: Tuesday, September 12, 2006 - 08:41 AM UTC

Quoted Text

I have a question about a couple of the decals. One the side of the plane where the invasion stripes are there is going to be the big circle with the star it in. This will overlap the invasion stripes. I am a little worried and wondering if the stripes are going to show through the white areas on the decal and that I should paint silver where the decal is going to lie. What do you all think? Is this anything to really worry about?
On page 4 of our thread is a pic that shows the invasion stripes and the area in question.

I finally got a hold of someone at Eagle Strike about my decal set. If I don't get them in the mail by this Friday they are going to mail me a new set at no charge. That is really good of them as I figured they would be. It just sucks for the extra waiting time for this second set to show up if I don't get the first. Oh well, this extra time sure gives that Future coat time to REALLY cure up for those darn decals.

Wayne


Wayne, honestly I wondered that when I saw your pics. Not because I have any expertise or anything but because I masked an area off for under my stars and bars on my p-47 that had the full stripes. I don't know that it will, but I wouldn't be surprised if it did show through. I would probably be tempted to try to cut a reverse mask for just the area the decal will cover and the stripes now are. This would definately be something I would practice though and would probably wait for a better modeler than me to come along and say its a good idea (I would hate for anything to go wrong on your beautiful build.) Whether you do something or don't, I definately wish you the best of luck with it.

Leon
lampie
#029
_VISITCOMMUNITY
England - East Midlands, United Kingdom
Joined: December 23, 2005
KitMaker: 6,249 posts
AeroScale: 3,270 posts
Posted: Tuesday, September 12, 2006 - 04:59 PM UTC
Hi Wayne.
Its good to hear youve sorted out your decal issue. I hate waiting for stuff to arrive,especially when you need it for a current build.
Decals over invasion stripes?
I may be able to help you as I have painted a few stripes myself recently,,LOL.
I would expect your going to have an issue with the stripes showing through the decal.On my P47 the area of the fusalage invasion stripes had a curve missing to accomodate the decal so I didnt have that problem.Next time Im going to paint the stripes.
I had this problem with my Dazzle Camo.

With so many stripes all over the place,leaving the area under the decal wasnt really an option so I had to deal with it when the decals went on.
Because the kit was so cheap,£3,I just bought another one and put another decal on top which did the trick. Good job I bought the other kit as when I went to fit the undercarriage I realised Id built it the wrong way round,,LOL.
Another way of doing it,as you suggested,is to mask and spray silver over the area of the stripes that the decal would cover.
Your going to need a Compass Cutter for this. The circles you can see on the Camel photo were done with one. I used paper for the mask.Cut the circular lines out and then wet the paper to make it stick to the Klear/Future, and then sprayed them on. All the black curves you see on the photo were done with one mask to ensure the circles run parallel to each other.
Hope this helps a little,and doesnt just confuse the issue for you.
All the best
Nige
Wad_ware
_VISITCOMMUNITY
Illinois, United States
Joined: September 09, 2002
KitMaker: 537 posts
AeroScale: 437 posts
Posted: Wednesday, September 13, 2006 - 08:21 AM UTC
Thanks guys, You both are thinking the way I was leaning towards. I am going to mask around and silver paint the areas under the decals. I think I would regret it if I don't, especially after seeing Nige's example.
I might be able to go the double decal routine. But there is no guarantee yet that the eagle strike decals will match exactly to the kit decals. Technically in scale they should, but reality is another thing. I feel a little safer, even tho it will be a little more work, to mask off and paint.

Excellent and thanks again,
Wayne
29Foxtrot
_VISITCOMMUNITY
Victoria, Australia
Joined: September 19, 2003
KitMaker: 708 posts
AeroScale: 674 posts
Posted: Wednesday, September 13, 2006 - 06:32 PM UTC
G'day Wayne,

I have 3x P 47's on the go, 1x Tamiya 'Razorback', 1x Academy 'Bubbletop' and 1x Hasegawa 'Bubbletop' all of which are at between 60 - 80% finished. The Hasegawa 'Bubbletop has a most unusual cam scheme applied to it and has a resin cockpit tub fitted.

I'd like to join in this with these 3 birds, or start on 1 of another 3 48 scale kits, in the stash either the Tamiya 'Bubbletop' or the P 47m and the Monogram Pro-Modeller P 47n.

I'll sort some pix out of the P 47's 'In progress' and post them here later.
newtothegame
_VISITCOMMUNITY
Washington, United States
Joined: October 05, 2003
KitMaker: 588 posts
AeroScale: 468 posts
Posted: Wednesday, September 13, 2006 - 07:19 PM UTC
Wow Rob. Can't wait to see your shots. Show us them all
Leon
lampie
#029
_VISITCOMMUNITY
England - East Midlands, United Kingdom
Joined: December 23, 2005
KitMaker: 6,249 posts
AeroScale: 3,270 posts
Posted: Wednesday, September 13, 2006 - 07:27 PM UTC
Great news Rob!
Cant wait for the pics,,build them all!! :-)
It looks like this thread is going to run and run.
As people start to finish their Thunderbolts it might be an idea to start a seperate thread for finished photos with a link back to this "build" thread.
One more Campaign build to do and I can start my Razorback
Nige