Mark Sharpe official Modern Campaign Thread
New York, United States
Joined: January 29, 2004
KitMaker: 3,836 posts
AeroScale: 1,036 posts
Posted: Saturday, October 13, 2007 - 10:23 AM UTC
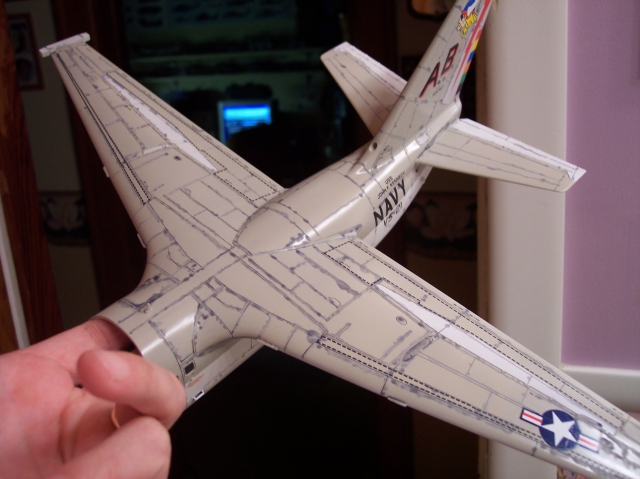
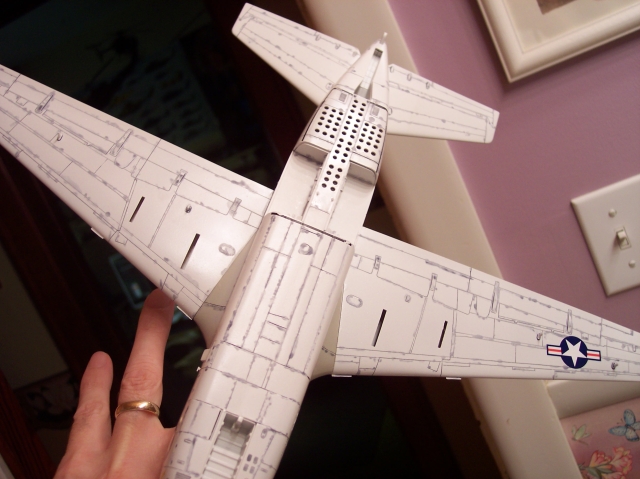
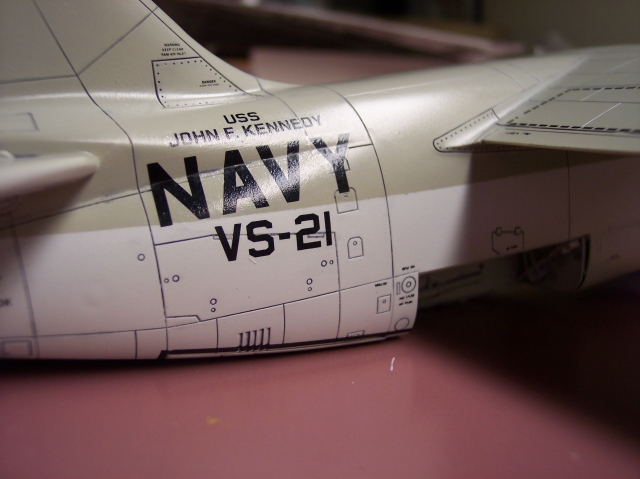
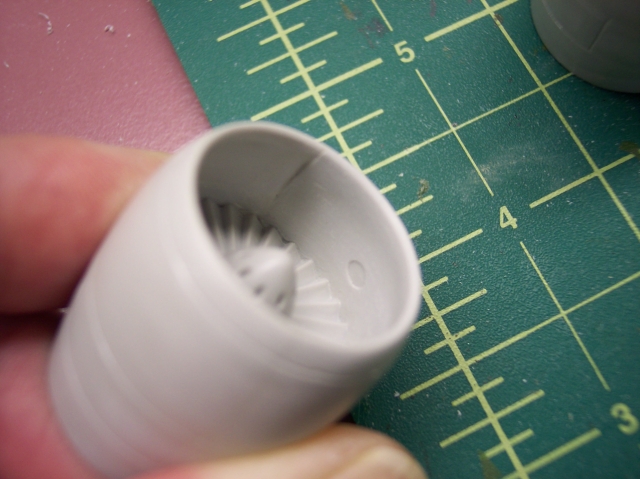
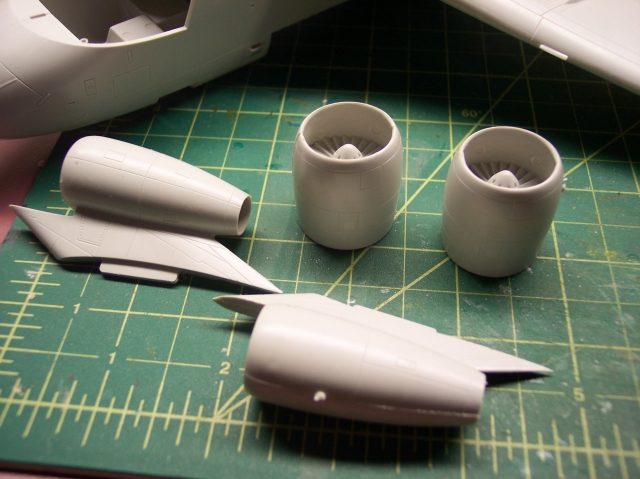
Here is my update, 1/48th AMT S-3A Viking. Most of the fuselage is togather. Very little putty was needed, some sanding. The biggest problem are the intakes, there are some nasty pin marks and seams that are hard to get at. So I'll be scrathing FOD covers.
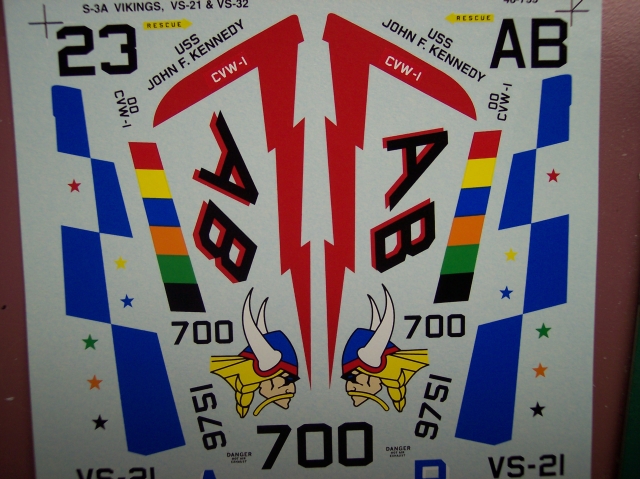
Super Scale decals
More about the kit
hereMore to follow,
Joe
It feels like bible camp
Only Im not crying pretending Im somewhere else.
Happy Modeling
Joe

#041
Kobenhavn, Denmark
Joined: July 20, 2006
KitMaker: 10,069 posts
AeroScale: 3,788 posts
Posted: Sunday, October 14, 2007 - 08:59 PM UTC
Joe, looks good. Only when you see the kit in parts do you realise how big the engines are on the Viking

Looking forward to see more - especially with those colourful decals.
I have been in Denmark over the weekend and retrieved my old Mirage 2000D kit from my ex-girlfriend withoutany drama.

It is a kit from the manufacturer LEE, which is completely unknown to me. Looks like it could be an old Heller kit(?). Anyway the markings look very strange and I am worried about if they will work. So a little help would be appreciated.
I am looking after an aftermarket decal set for a Mirage 2000D in 1/72. Anybody has some good links to any sites that offer this?
I have tried Jadar Hobby and Hannants without luck.
Campaign'oholic - 252+ campaigns completed
#041
Kobenhavn, Denmark
Joined: July 20, 2006
KitMaker: 10,069 posts
AeroScale: 3,788 posts
Posted: Tuesday, October 16, 2007 - 10:44 PM UTC
A small update on my Mirage build which is going to start today.
The kit is of the brand LEE which is unknown to me. The kit parts look good although the recessed lines seem to be a little overdone and too deep. The decals looks bad as can be seen below. The red dot in the French roundels are of to one side, but it could be build as a Greek version as a back up plan.
However, the plan right now is to build it as an anniversary aircraft in French colours with a chraging boar on the side of the fuselage

I will wait a little before I order the decals to ensure I am not using 18 Euros on decals for a 5 euro kit of bad quality.
More updates to follow when I get started.


Campaign'oholic - 252+ campaigns completed
New York, United States
Joined: January 29, 2004
KitMaker: 3,836 posts
AeroScale: 1,036 posts
Posted: Wednesday, October 17, 2007 - 04:58 PM UTC
It feels like bible camp
Only Im not crying pretending Im somewhere else.
Happy Modeling
Joe
New York, United States
Joined: January 29, 2004
KitMaker: 3,836 posts
AeroScale: 1,036 posts
Posted: Wednesday, October 17, 2007 - 05:18 PM UTC
Hey Jasper,
Sorry I cant help you out with the kit, I not up on the Mirage aircraft. But this may help some...
Mirage Builds Looking at your parts sprues, it seem to be a good little kit. Hope it builds nice for you and you find the decals your after. Keep us posted.
Joe
It feels like bible camp
Only Im not crying pretending Im somewhere else.
Happy Modeling
Joe
Victoria, Australia
Joined: June 28, 2007
KitMaker: 171 posts
AeroScale: 113 posts
Posted: Wednesday, October 17, 2007 - 06:38 PM UTC
Hey Joe I am very interested in your wash technique. I have very little experience in washes, infact i have only ever done one on my recent tank (which was thinned out by water, because my thinners just burns the paint in experiment washes ive done. do i have to do a coat of future (pascoes long life is the best match ive found in australia) and then apply my pin/wash with a wash thinned out with thinners or accrylic thinners? (will the thinners burn the coat of future?) this applies to tanks and aircraft for me. If the pascoes is to thick for the airbrush what can i thin it out with? Thanks

kits in progress: 1/72 F-4S
: 1/72 F-4F
#041
Kobenhavn, Denmark
Joined: July 20, 2006
KitMaker: 10,069 posts
AeroScale: 3,788 posts
Posted: Wednesday, October 17, 2007 - 09:03 PM UTC
Quoted Text
Hey Jasper,
Sorry I cant help you out with the kit, I not up on the Mirage aircraft. But this may help some...Mirage Builds
Joe
Hi Joe
Thanks for the Mirage links. Some quite good inspiration there. Especially since the instructions are a little unclear on the colours and camouflage patterns. I think my kit is a cheap copy of the Italeri kit. The quality is rather bad, but on the other hand then there is no pressure if I screw up

I will not have ruined a 60$ kit.
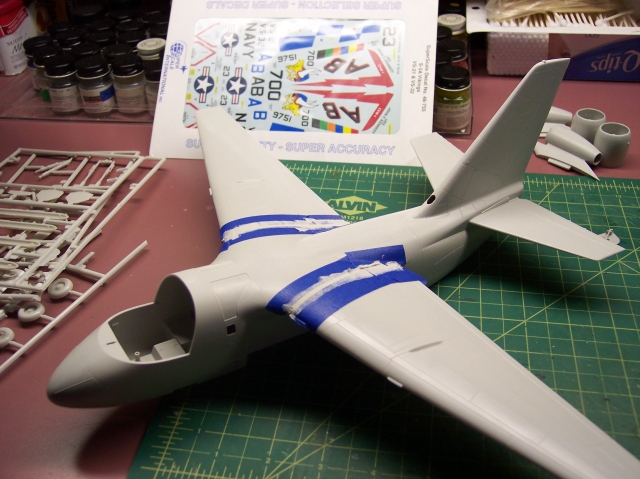
Great progress on your Viking. Your results are fantastic. I think I will experiment with my Mirage and try to dublicate your oil wash technique to see how it turns out. Here are some progress pictures of the kit build. I painted the cockpit and finished basic construction while I heard the qualifying round of football on the radio: Denmark won 3-1 against Latvia
A quick 3 hour build.


Campaign'oholic - 252+ campaigns completed
New York, United States
Joined: January 29, 2004
KitMaker: 3,836 posts
AeroScale: 1,036 posts
Posted: Monday, October 29, 2007 - 04:53 PM UTC
It feels like bible camp
Only Im not crying pretending Im somewhere else.
Happy Modeling
Joe
Moselle, France
Joined: May 15, 2005
KitMaker: 5,653 posts
AeroScale: 4,347 posts
Posted: Monday, October 29, 2007 - 07:41 PM UTC
Hi Joe!
Fantastic looking model as usual!

It seems there was too much light during the photo session. Maybe you should use different settings on your camera.
I will try to find some time to do a Campaign table in the next couple of days...

Jean-Luc

Better think one hour and build five minutes...
Than think five minutes and build an hour!
Östergötland, Sweden
Joined: April 18, 2006
KitMaker: 708 posts
AeroScale: 678 posts
Posted: Monday, October 29, 2007 - 08:27 PM UTC
Hi all!
@ Joe;
Another top-notch build from you!

As a real Navy-aircraft fan (in the Gull Grey/White, Hi-Viz era, that is), the Viking always have had a special place in my heart!
Your model have made me eager to start one of my two Vikings I have.
Guess It will be next, after the Trumpeter Viggie I have on the bench right now!
I had already started building the RA-5C, so It couldn´t qualify for this campaign, bummer!
I have done some progress on the Tamiya F-16, pics coming soon!
Cheers!
Stefan E
#041
Kobenhavn, Denmark
Joined: July 20, 2006
KitMaker: 10,069 posts
AeroScale: 3,788 posts
Posted: Tuesday, October 30, 2007 - 01:53 AM UTC
Great build, Joe. I will try your oil "wash" technique on my Mirage. A Viking with a Viking on the tail fin - very logical
Stefan, looking forward to see pictures of your F-16.
Campaign'oholic - 252+ campaigns completed
New York, United States
Joined: January 29, 2004
KitMaker: 3,836 posts
AeroScale: 1,036 posts
Posted: Tuesday, October 30, 2007 - 02:37 PM UTC
James
Quoted Text
"Do i have to do a coat of future"
Well it works the best for me, do i suggest it...yeah I do!
Heres how I do it
spray on a coat of the floor wax; wait like ten minutes spray on a second coat. Ill repeat to the sheen (gloss) Im after. Once my floor wax is sprayed on Ill wait 24 hours or better before I start my weathering. All of my weathering is done in oils, and for thinning Ill use odorless turpentine or some other alternative. Before I weather Ill decal first and then start weathering. One word of caution here
some will spray the clear coat (floor wax) over the decals to protect them from the oils and thinners. Me I usually dont bother coating over the decals. But thats up to you and what you think is best for your decals. Does the oils and thinners burn through my paint or gloss coat
no
knock on wood. I will say when decaling over floor wax is to watch yourself, see if youre taking your time laying down the decal and using plenty of water, well this will loosen the floor wax and it will become sticky, same goes when using decal solutions.
Happy Modeling,
Joe
It feels like bible camp
Only Im not crying pretending Im somewhere else.
Happy Modeling
Joe
Uusimaa, Finland
Joined: March 30, 2004
KitMaker: 2,845 posts
AeroScale: 1,564 posts
Posted: Friday, November 16, 2007 - 05:25 AM UTC
Cheers everyone.
I've made a start with my entry, a Mig-21.
Not to clog up this official thread, I chose to start up an own build thread for it.
Check it out over
HERE. Östergötland, Sweden
Joined: April 18, 2006
KitMaker: 708 posts
AeroScale: 678 posts
Posted: Saturday, November 17, 2007 - 04:54 AM UTC
Hi all!
Like Eetu, I have made a good start on my "slightly" more modern jet, the Tamiya F-16CJ Fighting Falcon in 1/48.

The cockpit tub was an easy assembly, with the panels from Eduard.

The instrument panel was a rather fiddly thing with (too) many parts, but the pre-painted etch makes it very realistic!
There´s no way I could do any painting anywhere close to this!

Here´s the tub with the (still unfinished) bang seat in place.

You get a lot of weaponry in this box, here are the weapons and some sub-assemblies laid out.

More pics to come...
Cheers!
Stefan E
United Kingdom
Joined: September 26, 2004
KitMaker: 1,008 posts
AeroScale: 106 posts
Posted: Saturday, November 17, 2007 - 02:22 PM UTC
This is my first Jet, i m making the Razor back from Academy. After seeing all the quality of models here i think mine look kinda super amateur. I was wondering whether dark skin aircraft like the F-16 ship grey color could have panel lines visible.

I ve got some fitting problems too. i think its a bit too late for me to add putty at the front. i was too happy with the decals, that i forgotten to wash the aircraft before i apply it.
"If you strike me down now, i will be more powerful than you can ever imagine"
Obi Wan Kenobi -StarWars A New hope.
"I see no reason to be angered by those who are blinded by the fear of me"
Germany
Joined: September 07, 2005
KitMaker: 5,609 posts
AeroScale: 5,231 posts
Posted: Sunday, November 25, 2007 - 03:53 AM UTC
I started this weekend on my F-2A
This is a very nice and detailed model .. only problem so far is the air intake ... I guess it's a lack of experience


the seat is not yet finished and I will use the pilot, the pit will also get a layer of flat ..
hope I make it in time, even if I try to keep this OOB .... to finish 4 campaign entries in a month or so is pretty much
cheers
Steffen
DULCE ET DECORUM EST PRO HOBBY MORI
Moselle, France
Joined: May 15, 2005
KitMaker: 5,653 posts
AeroScale: 4,347 posts
Posted: Sunday, November 25, 2007 - 07:33 AM UTC
Aaaah! Steffen is building a jet!
Can't wait to see the Hinomarus on it... hopefully soon!
Good luck with your project!

Jean-Luc
Better think one hour and build five minutes...
Than think five minutes and build an hour!
United Kingdom
Joined: September 26, 2004
KitMaker: 1,008 posts
AeroScale: 106 posts
Posted: Monday, November 26, 2007 - 11:40 AM UTC
Hi Steffen
Nice work, i m looking forward to see ur project, I never seen a Mitsubishi F-2A model before. This is my current progress with my F-16.

I accidentally smudge paint at the undercarriage..have to start all over again below
"If you strike me down now, i will be more powerful than you can ever imagine"
Obi Wan Kenobi -StarWars A New hope.
"I see no reason to be angered by those who are blinded by the fear of me"
Germany
Joined: September 07, 2005
KitMaker: 5,609 posts
AeroScale: 5,231 posts
Posted: Saturday, December 01, 2007 - 09:23 AM UTC
Hi all
Here are two more pix of my F-2A ... I needed a little help for the weapons load out, but luckily I found it on another great forum so I could drill the holes in the lower wing. It will be armed with 4 ASM (mayby 1/2 mixed or just one type) and 2 AAM-3 .. also the 2 large tanks will be attached.
@eerie: thanks ..I think this is the coolest looking Viper derivate .. maybe besides the LAVI/J-10 -- it almost has the Flanker look (my favorite jet)
@J-L : not my first one .. remember the Rafale
Here is what i did this week.


I forgot to take pix of the optimized pit .. the seat is still not glued in and the flaps and slats of the wing not attached yet, not to mention that I have to smooth the radome which had a small gap (because I did not pay enough attention .. I used a lot of clamps to get a good fit) .. a lot to do but this weekend the Steyr has priority so that I can finish my "Wheels" entry
best wishes
Steffen
DULCE ET DECORUM EST PRO HOBBY MORI
Ontario, Canada
Joined: August 17, 2003
KitMaker: 753 posts
AeroScale: 174 posts
Posted: Thursday, December 06, 2007 - 10:12 PM UTC
Hi All,
This is my campaing entry Italeri Mig-29A in 1/72 scale.
I am classicaly started to built cockpit. It is very detailed, but same details are not on side panels.

Here is some fitting problems on model.

Ontario, Canada
Joined: August 17, 2003
KitMaker: 753 posts
AeroScale: 174 posts
Posted: Thursday, December 06, 2007 - 10:15 PM UTC
I am masking radom and then applying Tamiya putty.

Ontario, Canada
Joined: August 17, 2003
KitMaker: 753 posts
AeroScale: 174 posts
Posted: Thursday, December 06, 2007 - 10:18 PM UTC
Ontario, Canada
Joined: August 17, 2003
KitMaker: 753 posts
AeroScale: 174 posts
Posted: Thursday, December 06, 2007 - 10:19 PM UTC
And then i am applying camouflage colors on model. It painted gunze and tamiya acrylics.

Ontario, Canada
Joined: August 17, 2003
KitMaker: 753 posts
AeroScale: 174 posts
Posted: Thursday, December 06, 2007 - 10:25 PM UTC
After the gloss varnish i am applying decals.

United Kingdom
Joined: September 26, 2004
KitMaker: 1,008 posts
AeroScale: 106 posts
Posted: Thursday, December 13, 2007 - 12:56 AM UTC
"If you strike me down now, i will be more powerful than you can ever imagine"
Obi Wan Kenobi -StarWars A New hope.
"I see no reason to be angered by those who are blinded by the fear of me"