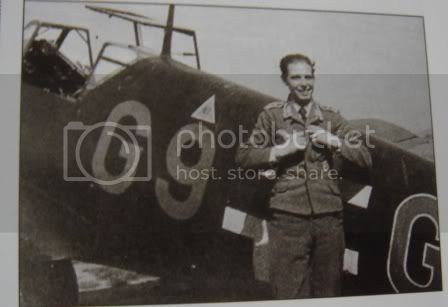
Black magic! Love the red trim tabs I better not forget those.
I forgot I was doing GV. Damn the masking is harder for that
I'll try my own decals instead. I think the all grey lettering
looks more plausible but we seen this in all red and all grey
so just for experimentation I'll try the red a/c letter.
Watch this space.
I think jesper must be the most decorated modeller here.
Hats off to him.
Air Campaigns
Want to start or join a group build? This is where to start.
Hosted by Frederick Boucher, Michael Satin
Rumblings in the Dark
jaypee
Scotland, United Kingdom
Joined: February 07, 2008
KitMaker: 1,699 posts
AeroScale: 1,384 posts
Joined: February 07, 2008
KitMaker: 1,699 posts
AeroScale: 1,384 posts
Posted: Monday, April 27, 2009 - 11:03 PM UTC
Posted: Tuesday, April 28, 2009 - 01:09 AM UTC
Thanks a lot for the comments, guys. I really appreciate it. I am also quite satisfied with this one.
Campaigns are a great way to share the hobby and it adds another dimension to the hobby to research a specific topic.
Looking forward to see more builds for this campaign.
Campaigns are a great way to share the hobby and it adds another dimension to the hobby to research a specific topic.
Looking forward to see more builds for this campaign.
Nito74
Lisboa, Portugal
Joined: March 04, 2008
KitMaker: 5,386 posts
AeroScale: 635 posts
Joined: March 04, 2008
KitMaker: 5,386 posts
AeroScale: 635 posts
Posted: Tuesday, April 28, 2009 - 05:38 AM UTC
Great job on that Black Me Jesper !
Looks great.
With all those campaigns, do you have a warehouse for your builds ?
Anyway I started my Pe-3bis yesterday, and I haven't found any other kit with so much clean up to do. I will but some pics tonight I hope, no battery on the camera..
It's my first WW2 bird, I hope it turns out ok..
Looks great.
With all those campaigns, do you have a warehouse for your builds ?
Anyway I started my Pe-3bis yesterday, and I haven't found any other kit with so much clean up to do. I will but some pics tonight I hope, no battery on the camera..
It's my first WW2 bird, I hope it turns out ok..
jaypee
Scotland, United Kingdom
Joined: February 07, 2008
KitMaker: 1,699 posts
AeroScale: 1,384 posts
Joined: February 07, 2008
KitMaker: 1,699 posts
AeroScale: 1,384 posts
Posted: Tuesday, April 28, 2009 - 08:13 AM UTC
Before I commit ink to paper I thought I'd throw this out here.
What do you think of the colour /shape of this code letter?
Too dark, too red, white too thick, too thin?
Rather than cut out the decal I'll print a dark grey background and blend it in.
It scales to 8mm x 5mm in 600dpi. For 1/72 is that big enough? I'll try to match it
to the owl decal size anyway.
God this could get very addictive. Must resist AMS!
Posted: Wednesday, April 29, 2009 - 02:49 AM UTC
Quoted Text
Great job on that Black Me Jesper !
Looks great.
With all those campaigns, do you have a warehouse for your builds ?
Anyway I started my Pe-3bis yesterday
Thanks a lot. Well, I actually lost and sold quite a lot of my models 8 months ago moving from Latvia to Denmark. My new display cabinet are filling up quickly though
Looking forward to see more on you Pe-3.
Posted: Wednesday, April 29, 2009 - 02:54 AM UTC
Quoted Text
Before I commit ink to paper I thought I'd throw this out here.
What do you think of the colour /shape of this code letter?
Too dark, too red, white too thick, too thin?
Rather than cut out the decal I'll print a dark grey background and blend it in.
It scales to 8mm x 5mm in 600dpi. For 1/72 is that big enough? I'll try to match it
to the owl decal size anyway.
God this could get very addictive. Must resist AMS!
The style looks very good and the colour also looks fine, although the red might be a bit to dark. But that could just as well be my computer screen so difficult to judge.
For size it is probably best to measure the other letters in the aircraft code.
Looks good, glad you did not get lazy and used the kit supplied all grey numbers like I did
jaypee
Scotland, United Kingdom
Joined: February 07, 2008
KitMaker: 1,699 posts
AeroScale: 1,384 posts
Joined: February 07, 2008
KitMaker: 1,699 posts
AeroScale: 1,384 posts
Posted: Wednesday, April 29, 2009 - 05:04 AM UTC
yeah jesper I've been asking some questions and I'm beginning to think all grey is
correct in any case.
Here is a theory propounded with references
http://www.luftwaffe-experten.org/forums/index.php?showtopic=6075&pid=42214&mode=threaded&show=&st=#entry42214
The gist is that they are really 10.staffel bearing a 11.staffel code. due to the 10.staffel
code being assigned to a training unti.
Generally NJG1 used a coloured letter rather than an outline but I think these 109s
are an exception due to their staffel letter having been already assigned.
As it is I think your all grey codes are correct but the red will give a nice contrast.
and also a test to compare when shot black and white.
Red outlined in white, with other letters grey is probably totally wrong, it will
look the best though. (I can hear already Steffen's teeth grinding)
All red is probably less wrong but I now believe they could be all grey.
JP
Nito74
Lisboa, Portugal
Joined: March 04, 2008
KitMaker: 5,386 posts
AeroScale: 635 posts
Joined: March 04, 2008
KitMaker: 5,386 posts
AeroScale: 635 posts
Posted: Wednesday, April 29, 2009 - 03:07 PM UTC
Here are some shots of the Pe-3.
When you'll reach the 100 Campaign mark let me know, I'll send you a kit
Yeti123
Michigan, United States
Joined: February 11, 2008
KitMaker: 311 posts
AeroScale: 278 posts
Joined: February 11, 2008
KitMaker: 311 posts
AeroScale: 278 posts
Posted: Wednesday, April 29, 2009 - 09:32 PM UTC
Bravo Jesper. I love the black 109, You and JP have made me realize a big gap in my 109 collection. Great stuff gentelman
Taylor
Taylor
Posted: Wednesday, April 29, 2009 - 09:45 PM UTC
JP, difficult to say for certain what colours the numbers were. You are right more red will give a nice contrast to the overall black camouflage. If it looks good, go for it. After all it is a hobby.
John, that looks like an interesting kit. I have not seen it before. What company makes the kit? I cannot make out the name on the box, despite having a little knowledge of the Cryrilic alphabet.
Thanks for the comments, Taylor. It is a nice kit to have next to all the other Bf 109s.
John, that looks like an interesting kit. I have not seen it before. What company makes the kit? I cannot make out the name on the box, despite having a little knowledge of the Cryrilic alphabet.
Thanks for the comments, Taylor. It is a nice kit to have next to all the other Bf 109s.
jaypee
Scotland, United Kingdom
Joined: February 07, 2008
KitMaker: 1,699 posts
AeroScale: 1,384 posts
Joined: February 07, 2008
KitMaker: 1,699 posts
AeroScale: 1,384 posts
Posted: Wednesday, April 29, 2009 - 09:51 PM UTC
icm do one in 1/72 if you interested in that scale.
Is hard to beat this tamiya kit plus owl decals though esp if you can pick the
kit up 2nd hand.
Is hard to beat this tamiya kit plus owl decals though esp if you can pick the
kit up 2nd hand.
Nito74
Lisboa, Portugal
Joined: March 04, 2008
KitMaker: 5,386 posts
AeroScale: 635 posts
Joined: March 04, 2008
KitMaker: 5,386 posts
AeroScale: 635 posts
Posted: Wednesday, April 29, 2009 - 11:17 PM UTC
Jesper it's a Russian company, Gran ,Ltd.
I had build a Mig-15 a few years ago, great detailing (cockpit, air brakes, panels,etc ) and a much better fit than A-model...
But this kit has tons of clean up to do, the plastic is a little stiff, but much better than some A-model kits.
Edited post:
Well after a weekend working on this bird... the clean up was a mess, very hard to clean without damaging some parts, some instructions aren't very clear, left parts go for the right side and vice-versa...
The detailing is quite good, but the plastic quality of 2 sprues are quite strange, the plastic is almost transparent and very thin.
Posted: Tuesday, May 05, 2009 - 10:13 AM UTC
Strutter proceeding slowly, first two decals completely disintegrated, I read Rodens decals weren't good, but I didn't think they were that bad. I think one of our local shops sells Micro products so I will see if I can get MicroFilm. Meanwhile the PE rigging bracketsare half fitted (PITA) the undercarriage bungees fitted.
CMOT70
Victoria, Australia
Joined: August 23, 2007
KitMaker: 629 posts
AeroScale: 539 posts
Joined: August 23, 2007
KitMaker: 629 posts
AeroScale: 539 posts
Posted: Tuesday, May 05, 2009 - 02:42 PM UTC
Quoted Text
Strutter proceeding slowly, first two decals completely disintegrated, I read Rodens decals weren't good, but I didn't think they were that bad. I think one of our local shops sells Micro products so I will see if I can get MicroFilm. Meanwhile the PE rigging bracketsare half fitted (PITA) the undercarriage bungees fitted.
I recently built Rodens He111B and was forwarned that it's decals had the same problem that you mention. So before i used any of them i sprayed the sheet with one of the Tamiya Clear Laquer spray cans (in this case i used their clear flat). It worked for me quite well in the end. Of course i never checked any of the decals before i sprayed them, so my sheet may even have been okay to begin with. Who knows.
Micro Film would probably be better than my method, but i'd thought i'd just let you know incase you can't get it.
Andrew
Posted: Wednesday, May 06, 2009 - 12:11 PM UTC
Thanks for that Andrew, I probably won't get anything done next week although I should get the MjcroFilm on Friday or Saturday
cmbeal317
Pennsylvania, United States
Joined: March 08, 2009
KitMaker: 18 posts
AeroScale: 4 posts
Joined: March 08, 2009
KitMaker: 18 posts
AeroScale: 4 posts
Posted: Sunday, May 10, 2009 - 12:57 PM UTC
I just signed up. For this campaign I am going to build a Revell 1/48 P-61B.
Chris
Chris
Bigrip74
Texas, United States
Joined: February 22, 2008
KitMaker: 5,026 posts
AeroScale: 2,811 posts
Joined: February 22, 2008
KitMaker: 5,026 posts
AeroScale: 2,811 posts
Posted: Sunday, May 10, 2009 - 06:02 PM UTC
Chris welcome to the thread, cant wait to see some pics of your build.
Robert
Robert
jaypee
Scotland, United Kingdom
Joined: February 07, 2008
KitMaker: 1,699 posts
AeroScale: 1,384 posts
Joined: February 07, 2008
KitMaker: 1,699 posts
AeroScale: 1,384 posts
Posted: Monday, May 11, 2009 - 11:50 AM UTC
Bigrip74
Texas, United States
Joined: February 22, 2008
KitMaker: 5,026 posts
AeroScale: 2,811 posts
Joined: February 22, 2008
KitMaker: 5,026 posts
AeroScale: 2,811 posts
Posted: Monday, May 11, 2009 - 01:33 PM UTC
JP your 109 is looking really good, it scares me. My spit might not be able to see you when aloft. All kidding aside JP your 109 is looking awsome!!!!!!!
Robert
Robert
jaypee
Scotland, United Kingdom
Joined: February 07, 2008
KitMaker: 1,699 posts
AeroScale: 1,384 posts
Joined: February 07, 2008
KitMaker: 1,699 posts
AeroScale: 1,384 posts
Posted: Monday, May 11, 2009 - 07:28 PM UTC
thanks robert. i've tried hard to introduce some variation in the black which makes
it easier on the eye. some of that is lost in the direct light needed for photography
at 11pm also i over did the chipping around the fuselage balkenkreuz. but you get the idea.
what i'm most pleased about is that tamiya engineering
lets you get to this stage with the minimum of fuss.
Next up finish the decalling a coat of future
then my first attempt at an oil dot filter.
i've also neglected the canopy. i'll attempt a smash mould of it to see if i can pose it open.
that is the plan at least.
JP out.
Nito74
Lisboa, Portugal
Joined: March 04, 2008
KitMaker: 5,386 posts
AeroScale: 635 posts
Joined: March 04, 2008
KitMaker: 5,386 posts
AeroScale: 635 posts
Posted: Friday, May 15, 2009 - 02:29 AM UTC
The fitting on the Pe-3 isn't the best.
The plastic is awful, and requires tons of clean up.
Anyway fitted the wings and filled most of the gaps and seams.
Will paint most of it this weekend, I was hoping to finish it this weekend, not sure yet.
Posting more pics would help I know...
The plastic is awful, and requires tons of clean up.
Anyway fitted the wings and filled most of the gaps and seams.
Will paint most of it this weekend, I was hoping to finish it this weekend, not sure yet.
Posting more pics would help I know...
jaypee
Scotland, United Kingdom
Joined: February 07, 2008
KitMaker: 1,699 posts
AeroScale: 1,384 posts
Joined: February 07, 2008
KitMaker: 1,699 posts
AeroScale: 1,384 posts
Posted: Saturday, May 16, 2009 - 11:07 AM UTC
change of plan again. after a conversation with Lynn Ritger over on hyperscale,
and a bit of experimentation with colours. All red codes seem to be the most accurate
and also the most attractive. I got some white decal paper and printed my own.
I needed the white to get the outline of the G a/c code
The printing went rather well and the red looked nice. But the decal paper (experts choice)
is very thick. I don't know if this is due to it being laser paper of what. Bur I'm a little
disappointed with them. Also being white this leaves some touch ups to do. I'll
try inkjet and clear paper again, to see if this is any different.
Here are the results.
Either a dark grey or a red was used for these codes based on the two photos. The red makes for quite a striking scheme though.
With two early waking toddlers in the house the old eyes are too tired to mask canopies so that will have to wait.
Any advice on how to deal with the decals appreciated.
and a bit of experimentation with colours. All red codes seem to be the most accurate
and also the most attractive. I got some white decal paper and printed my own.
I needed the white to get the outline of the G a/c code
The printing went rather well and the red looked nice. But the decal paper (experts choice)
is very thick. I don't know if this is due to it being laser paper of what. Bur I'm a little
disappointed with them. Also being white this leaves some touch ups to do. I'll
try inkjet and clear paper again, to see if this is any different.
Here are the results.
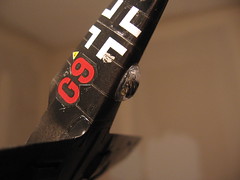
Either a dark grey or a red was used for these codes based on the two photos. The red makes for quite a striking scheme though.
With two early waking toddlers in the house the old eyes are too tired to mask canopies so that will have to wait.
Any advice on how to deal with the decals appreciated.
CMOT70
Victoria, Australia
Joined: August 23, 2007
KitMaker: 629 posts
AeroScale: 539 posts
Joined: August 23, 2007
KitMaker: 629 posts
AeroScale: 539 posts
Posted: Saturday, May 16, 2009 - 02:43 PM UTC
Hi Jaypee. I've only used Experts choice clear inkjet decal paper so far. So i don't know if the Laser stuff is thicker or not. Actually i didn't even know there was a Laser version, i've never seen that type in my LHS yet anyway.
The printing looks nice and sharp though, and the white definately seems to make the colour denser. If you use the clear stuff like i have then you really need to paint a white undercoat anyway- or the colours change when you apply them over a different colour.
Anyway, the inkjet clear version that i have uded, i definately would not class as being overly thick- but it depends on what you use to clear coat it with, since most inks have to be protected with a clear coat to prevent running.
Unfortunately, printing home decals takes lots of trial and error.
Andrew
jaypee
Scotland, United Kingdom
Joined: February 07, 2008
KitMaker: 1,699 posts
AeroScale: 1,384 posts
Joined: February 07, 2008
KitMaker: 1,699 posts
AeroScale: 1,384 posts
Posted: Saturday, May 16, 2009 - 09:41 PM UTC
thanks i'll try inkjet next time as for this one it looks ok from 6ft so i'll touch it up and seal with future and dullcote and chalk it down as a lesson learnt. the layers of varnish might smooth it out a bit anyway.
Posted: Monday, May 18, 2009 - 12:02 AM UTC
Nice progress, JP
Too bad about the decal paper - the thinkness really shows. On the up side the colours look great and crisp and it really adds some contrast to the camouflage scheme.
Looking forward to see it finished.
Too bad about the decal paper - the thinkness really shows. On the up side the colours look great and crisp and it really adds some contrast to the camouflage scheme.
Looking forward to see it finished.