

Hello Richard,
I don't have blueprints for this thing. So your saying that the Roden depiction is wrong also? All the reference photos I have show this basic configuration. Can you post a correct front plate setup? Like I said, right now, I'm at a point where i can make changes.
Regards
Steve
Early Aviation
Discuss World War I and the early years of aviation thru 1934.
Discuss World War I and the early years of aviation thru 1934.
Hosted by Jim Starkweather
1/32 Roden GB 2008 SE5a - Steve
Hatter50

Joined: June 17, 2006
KitMaker: 478 posts
AeroScale: 391 posts

Posted: Tuesday, August 19, 2008 - 11:33 PM UTC

thegirl

Joined: January 19, 2008
KitMaker: 6,743 posts
AeroScale: 6,151 posts
Posted: Wednesday, August 20, 2008 - 02:31 AM UTC
Hi Steve , I have the blue prints , just shoot me your e-mail . 
Hatter50
Joined: June 17, 2006
KitMaker: 478 posts
AeroScale: 391 posts
Posted: Wednesday, August 20, 2008 - 04:19 AM UTC
PM sent
Regards
Steve
Regards
Steve

cohiba

Joined: March 19, 2007
KitMaker: 42 posts
AeroScale: 20 posts
Posted: Wednesday, August 20, 2008 - 01:27 PM UTC
Quoted Text
Hello Richard,
I don't have blueprints for this thing. So your saying that the Roden depiction is wrong also? All the reference photos I have show this basic configuration. Can you post a correct front plate setup? Like I said, right now, I'm at a point where i can make changes.
Regards
Steve
Steve,
The radiator you've got looks great. I was referring to the Hisso style oil filler cover (located just above the rear undercarriage strut in your image) on the Memorial Flight's Viper engined SE.5a. Just one of the things to look out for when using a restoration/new build for reference.
As opposed to the Vintage Aviator where they seam to have got this sort of thing right.
Hatter50
Joined: June 17, 2006
KitMaker: 478 posts
AeroScale: 391 posts
Posted: Thursday, August 21, 2008 - 10:13 AM UTC
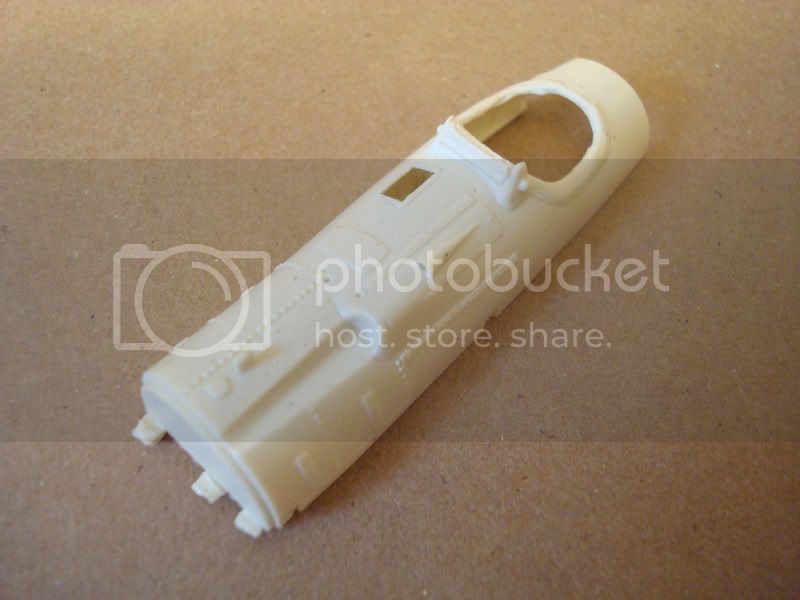
Hit a snag today. I'm using the Mastercaster SE5 Cockpit Coaming........  it's "short".
Yes, short by 1/16 inch. I't not a piece that lends itself to lengthening.........right now I'm scratching my head. I have 2 options as I see it. Use the kit part..........Use the Mastercaster coaming and add styrene fill....and sand.
Can't do the fill on the AFT end, complex curves. When you look at it, you'll see what I mean.
The ONLY option is to lengthen the firewall. Bummer since I've already detailed the firewall and lip extension for the new coke can cowling.
Just a HEADS UP for this issue before you decide to use the Mastercaster Cokpit Coaming.

Steve
it's "short".Yes, short by 1/16 inch. I't not a piece that lends itself to lengthening.........right now I'm scratching my head. I have 2 options as I see it. Use the kit part..........Use the Mastercaster coaming and add styrene fill....and sand.
Can't do the fill on the AFT end, complex curves. When you look at it, you'll see what I mean.
The ONLY option is to lengthen the firewall. Bummer since I've already detailed the firewall and lip extension for the new coke can cowling.
Just a HEADS UP for this issue before you decide to use the Mastercaster Cokpit Coaming.
Steve
Hatter50
Joined: June 17, 2006
KitMaker: 478 posts
AeroScale: 391 posts
Posted: Friday, August 22, 2008 - 09:44 AM UTC
OK, I had all but decided to go back to the Roden Kit Cockpit part for my build because of the MasterCaster Cockpit Coaming issue. I shot Jay at Mastercaster a quick note just to let him know of a problem. I was not looking for any fix as I didn't think there was a fix to a bum "master". Well...............I was in for a surprise today. A new part will be coming shortly. Jay spoke of a "shrinkage" issue that happens periodically. Hmmmm shades of "Seinfeld" 
Now......I have the orig kit part sitting waiting for me to continue "dressing" the firewall up......and a Mastercaster cockpit "in the mail". Well, i have time to "play" with other things until i have to make that final decision.
I just wanted to let folks know about the good customer service that Jay is providing from Mastercasters. The last shot took only a few days and that was from the UK. I was impressed then and impressed now.
I'm BACK IN BUSINESS.
Regards
Steve
Hatter50
Joined: June 17, 2006
KitMaker: 478 posts
AeroScale: 391 posts
Posted: Friday, August 22, 2008 - 12:30 PM UTC
OK for today, the main thing i got done was get a new cockpit coaming coming from Mastercasters. "good show"
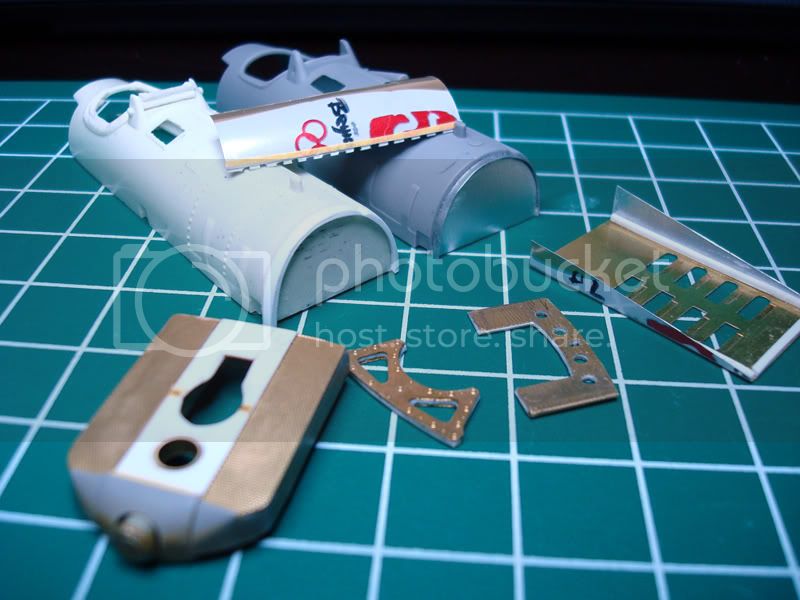
You can see that I have worked on the firewall to the Kit part, and attempted a repair (lengthening) of the resin cockpit.........I'm unhappy with the repair. So the cockpit will be the "inbound" resin part or the kit part. We shall see. I have a lot to do, so I'm not in a hurry.
I cut out the lower cowling (sides) on the 2 kit fuselage halves. I started the build-up of the PE lower cowl, louvers still to go as well as the hinges for attaching to the fuselage. Mine will hang down approximately at the fowd landing gear strut location.
You can also see the beginnings of the right hand cowl with it's upper Fwd/Aft hinge.
I guess I'll have to break down and start on that PE interior work.
Regards
Steve

MerlinV

Joined: November 26, 2006
KitMaker: 608 posts
AeroScale: 602 posts

Posted: Friday, August 22, 2008 - 01:50 PM UTC
Steve,
Seriously cool stuff. I see you are going to great lengths to get every thing just right.
And another very effective use of a large multinational soft drink corporations' cast offs. Always nice to see.
For your first bipe, this promises to show us all a thing or two.
Cheers,
Hugh
Seriously cool stuff. I see you are going to great lengths to get every thing just right.
And another very effective use of a large multinational soft drink corporations' cast offs. Always nice to see.
For your first bipe, this promises to show us all a thing or two.
Cheers,
Hugh
Hatter50
Joined: June 17, 2006
KitMaker: 478 posts
AeroScale: 391 posts
Posted: Friday, August 22, 2008 - 09:54 PM UTC
 I was gonna use a multinational beer can castoff..........but this is a family show!
Steve
Hatter50
Joined: June 17, 2006
KitMaker: 478 posts
AeroScale: 391 posts
Posted: Saturday, August 23, 2008 - 11:32 AM UTC
August 23 progress...........Like I said, a "Slow" build. I have the lower engine cowling pretty much built and primed. It will be hinged at the rear and laid open down from the front. It's hinged on all 4 sides. As far as the inside, I will keep it bare metal, but will naturally be a "bit" dirty.
Come on Stephen............lets see your work on the upper engine cowling........thats a bit harder to do.
Regards
Steve
Come on Stephen............lets see your work on the upper engine cowling........thats a bit harder to do.
Regards
Steve
cohiba
Joined: March 19, 2007
KitMaker: 42 posts
AeroScale: 20 posts
Posted: Saturday, August 23, 2008 - 12:49 PM UTC
Quoted Text
And I'll be using the Mastercasters SE5 Coaming.
Regards
Steve
Hi Steve,
Following this with interest. For a 'slow build' it's progressing pretty dam fast, and looking great too. One extra thing to look out for is the 'air scoop' on the Mastercasters and Roden cockpit/cowling above the Vickers gun.
SQ Signal's in action called it an air scoop (or something similar) which has been faithfully represented on the Master Casters cockpit fairing, but as far as I can work out it's just a 'bump fairing' to cover the Vickers synchronizing gear used on US operated machines. This fairing/scoop doesn't appear on any photos of RFC/RAF operated ones (as far I can ascertain).
Keep up the good work.
Hatter50
Joined: June 17, 2006
KitMaker: 478 posts
AeroScale: 391 posts
Posted: Saturday, August 23, 2008 - 01:07 PM UTC
Hello Richard,
Going Fast??? One part a day? Once i go crosseyed in my magnifyer then I slow down...
  I'm still "messing" in the engine compartment area. I'm actually amazed at how "busy" it will be in there with wires, tubes, hoses, etc. I'm want to know what I'm putting in there instead of just throwing in a bunch of wire.
Good call on the Bump on the Resin Cockpit Coaming. Of the reference pix I've looked at here recently....it ain't there. But I'll do a little more looking before i cand it off. Easier to sand it than to build it. I might ask Jay with Mastercasters what his reference was......
I appreciate the kind words. I really do HATE to post such large pix of very small parts.....all the warts come out. I have found that when i personally see them for the first time in giant scale, I find flaws that i can fix.....or hide.
Regards
Steve
Going Fast??? One part a day?
Once i go crosseyed in my magnifyer then I slow down... I'm still "messing" in the engine compartment area. I'm actually amazed at how "busy" it will be in there with wires, tubes, hoses, etc. I'm want to know what I'm putting in there instead of just throwing in a bunch of wire.Good call on the Bump on the Resin Cockpit Coaming. Of the reference pix I've looked at here recently....it ain't there. But I'll do a little more looking before i cand it off. Easier to sand it than to build it. I might ask Jay with Mastercasters what his reference was......
I appreciate the kind words. I really do HATE to post such large pix of very small parts.....all the warts come out. I have found that when i personally see them for the first time in giant scale, I find flaws that i can fix.....or hide.
Regards
Steve

JackFlash
Joined: January 25, 2004
KitMaker: 11,669 posts
AeroScale: 11,011 posts
Posted: Saturday, August 23, 2008 - 01:41 PM UTC
Quoted Text
". . .Come on Stephen............lets see your work on the upper engine cowling........thats a bit harder to do. Regards Steve
Mine will be in the works as it were. My chin panel in place is but closed. I will see if I can do some images later. Now that the two in-box reviews are done I can get back to my builds. Then I have to get ready for the Eduard Spad XIII. That will be in the box as well but, I really want to see how that one stacks up against the old DML kit. So I may have to build it too! Busy busy busy! Not complaining mind you. I like it!
thegirl
Joined: January 19, 2008
KitMaker: 6,743 posts
AeroScale: 6,151 posts
Posted: Sunday, August 24, 2008 - 04:57 AM UTC
Your talents of this hobby are truly inspirational Steve !  I always look forward on viewing your last progress and am just amazed on your craftsmanship .
I always look forward on viewing your last progress and am just amazed on your craftsmanship . Hatter50
Joined: June 17, 2006
KitMaker: 478 posts
AeroScale: 391 posts
Posted: Sunday, August 24, 2008 - 11:46 AM UTC
Hello Teri,
I don't know about any inspiration..... But i thank you for the kind words. If somebody finds something that works for them...GREAT. I know that's why I peek around to all the builds....
Regards
Steve
I don't know about any inspiration.....
But i thank you for the kind words. If somebody finds something that works for them...GREAT. I know that's why I peek around to all the builds.... Regards
Steve

RAGIII
Joined: June 19, 2007
KitMaker: 604 posts
AeroScale: 600 posts
Posted: Sunday, August 24, 2008 - 03:28 PM UTC
Steve,
So far an absolutely incredible build! Looking forward to more !
RAGIII
So far an absolutely incredible build! Looking forward to more !
RAGIII
Hatter50
Joined: June 17, 2006
KitMaker: 478 posts
AeroScale: 391 posts
Posted: Monday, August 25, 2008 - 10:30 AM UTC
Appreciate that Rick.........I try to learn from the masters here.......
Steve
Steve
67foxtrot
Joined: February 13, 2008
KitMaker: 36 posts
AeroScale: 35 posts
Posted: Monday, August 25, 2008 - 11:21 AM UTC
Quoted Text
Appreciate that Rick.........I try to learn from the masters here.......
Steve
Steve,
I'm a new guy in these parts and I'm trying to learn from you (and I'm no master by any means).
Your doing a beautiful build, keep it up! Oh, and more pictures please.
How did you do the hinges running along the rear edge of the engine belly pan. And how did you cut out the louvres?
Thanks,
Dave

Hatter50
Joined: June 17, 2006
KitMaker: 478 posts
AeroScale: 391 posts
Posted: Monday, August 25, 2008 - 11:35 AM UTC
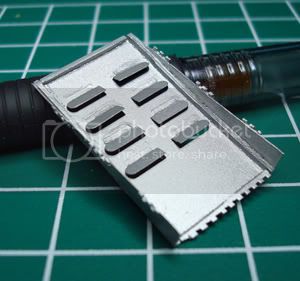
Ah, the easy answers first. Louvers are Part of Poland PE. If you get the SE5, you HAVE to have that set.
Hinges, just cut small piece of styrene. I use a metal ruler, cut the "teeth" then cut the long strip, bingo, got lots of hinges. Dont ask me to put the pin in.
I'll get back to work on it.........pix later.
Regards
Steve
Hinges, just cut small piece of styrene. I use a metal ruler, cut the "teeth" then cut the long strip, bingo, got lots of hinges. Dont ask me to put the pin in.
I'll get back to work on it.........pix later.
Regards
Steve
67foxtrot
Joined: February 13, 2008
KitMaker: 36 posts
AeroScale: 35 posts
Posted: Monday, August 25, 2008 - 01:49 PM UTC
Quoted Text
Ah, the easy answers first. Louvers are Part of Poland PE. If you get the SE5, you HAVE to have that set.
Hinges, just cut small piece of styrene. I use a metal ruler, cut the "teeth" then cut the long strip, bingo, got lots of hinges. Dont ask me to put the pin in.
I'll get back to work on it.........pix later.
Regards
Steve
Steve,
Thanks for the info. The silver paint had me thinking that you had cut it all out of the beer can aluminum. Make more sense now.
And the rectangular vents on the belly pan are acid etched? How did you cut out the holes for them? I thought you made the belly pan from beer can aluminum too.
Thanks again,
Dave
Hatter50
Joined: June 17, 2006
KitMaker: 478 posts
AeroScale: 391 posts
Posted: Monday, August 25, 2008 - 11:07 PM UTC
David,
The bottom of the pan is PE, the louvers are PE the sides of the pan are beer can. The PE is intended to just represent a closed cowl. Took me forever to figure out how the cowl was attached and then how the engine was serviced. Cowl/pan was held on to all 4 sides by hinge pins that can be pulled and then safety wired closed. Now there isn't just a whole lot to look at underneigth, just the oil pan and a few cooling system hoses. My intent is to try to show just how "delicate" these things are.
Steve
Hatter50
Joined: June 17, 2006
KitMaker: 478 posts
AeroScale: 391 posts
Posted: Tuesday, August 26, 2008 - 03:43 AM UTC
No new photos yet. Soon.....
Shaved all the interior detail off. Cut down the lower-upper cowling LH side (it's gonna be open). I shaved all the interior engine cowling area detail off. (I think Stephen advised this in one of his early SE5a posts). Good call there.
Taped the whole she-bang up for a test fit (fuselage only). Engine was tight with my added cabling, PE parts look like they will fit well. The Cockpit Coaming part is going to be a key player.....so I will have to hope that the Mastercaster Coaming will be the correct "size" this go-round (reshipment of part).
I needed 14 hands for this test fit............didn't have the hands...........so i am REASONABLY confident of the fit. Adjustments will be necessary I'm sure. I needed a pix of that test fit......but since I was already short a few hands....couldn't.
Regards
Steve
JackFlash
Joined: January 25, 2004
KitMaker: 11,669 posts
AeroScale: 11,011 posts
Posted: Tuesday, August 26, 2008 - 06:37 AM UTC
Been there, done that. . .
Hatter50
Joined: June 17, 2006
KitMaker: 478 posts
AeroScale: 391 posts
Posted: Tuesday, August 26, 2008 - 07:05 AM UTC
I hear ya Stephen,
Here is a part of my "Test Fit" of the fuselage; engine; radiator; lower cowl; and pieces of the PE and the cockpit coaming. This what's know as an "exploded view". It just exploded out of the tape.
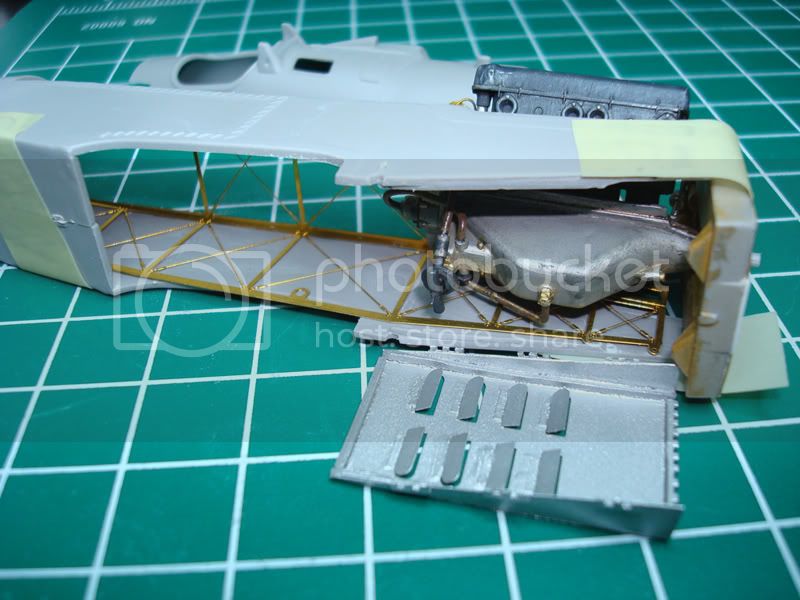
I guess i need to get with the program and put all those fiddley pieces together for the cockpit area.
Regards
Steve
Here is a part of my "Test Fit" of the fuselage; engine; radiator; lower cowl; and pieces of the PE and the cockpit coaming. This what's know as an "exploded view". It just exploded out of the tape.
I guess i need to get with the program and put all those fiddley pieces together for the cockpit area.
Regards
Steve
67foxtrot
Joined: February 13, 2008
KitMaker: 36 posts
AeroScale: 35 posts
Posted: Tuesday, August 26, 2008 - 07:29 AM UTC
Steven,
Thanks for spelling it out for me. Not having any of the PE parts left me with few clues as to what part was and wasn't PE.
Thanks again for enlightening me.
And very nice build, explanation and photos for us newbies.
Dave
Thanks for spelling it out for me. Not having any of the PE parts left me with few clues as to what part was and wasn't PE.
Thanks again for enlightening me.
And very nice build, explanation and photos for us newbies.
Dave
 |

WEB HOSTING BY


Copyright ©2021 AeroScale and Kitmaker Network, a subsidiary of Silver Star Enterprises
All Rights Reserved. Please read our Conditions of Use and Privacy Policy.
All Rights Reserved. Please read our Conditions of Use and Privacy Policy.