

Early Aviation
Discuss World War I and the early years of aviation thru 1934.
Discuss World War I and the early years of aviation thru 1934.
Hosted by Jim Starkweather
1/32 Roden GB 2008 SE5a - Steve

JackFlash

Joined: January 25, 2004
KitMaker: 11,669 posts
AeroScale: 11,011 posts
Posted: Thursday, September 11, 2008 - 08:26 AM UTC
Excellent work Steve! I like where you are going here. Model on!
Hatter50
Joined: June 17, 2006
KitMaker: 478 posts
AeroScale: 391 posts

Posted: Thursday, September 11, 2008 - 09:35 AM UTC
Because of ME??? 
Thats ironic..........Stephen's build got me off the dime to get the SE5a......but it's because of YOU that has an "Abbie" sitting next in line in my stash. I kinda like engines and i do like that Mercedes engine.
So many talented builders running around here...............all offering really sound advice.
Regards
Steve

MerlinV

Joined: November 26, 2006
KitMaker: 608 posts
AeroScale: 602 posts

Posted: Thursday, September 11, 2008 - 11:25 AM UTC
WOW!
Looking great Steve! That would be a b@stard to paint!
The more I see though, The more I am determined to start the one in my stash!
You see how easliy jet building skills translate?
Cheers,
Hugh
Looking great Steve! That would be a b@stard to paint!
The more I see though, The more I am determined to start the one in my stash!
You see how easliy jet building skills translate?
Cheers,
Hugh
Hatter50
Joined: June 17, 2006
KitMaker: 478 posts
AeroScale: 391 posts
Posted: Thursday, September 11, 2008 - 11:53 AM UTC
Hugh,
I have used Helicopter and WWII skills to get mine going. Rigging? eh, whats that? I've had to learn a whole new subset. What got me really interested was watching some 1:1 builds and just seeing how "simple" yet so very compicated they are. I really enjoy the "Back to the Basics" approach.
I just got through reading the Stephen Lawson thread on Lozenge Camo. WOW....one could take a college course on that topic alone and still not get it right.
This is an interesting genre.
Regards
Steve
Hatter50
Joined: June 17, 2006
KitMaker: 478 posts
AeroScale: 391 posts
Posted: Friday, September 12, 2008 - 04:01 AM UTC
Some progress..................
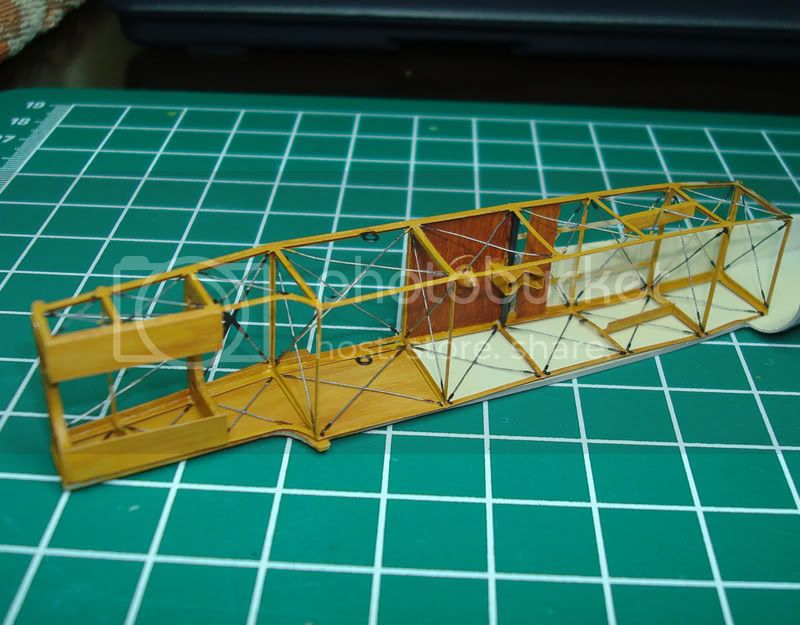
Worked on the fuselage Part PE framework. It's still a bit damp. Minor disaster yesterday while drying parts over a lamp. Bumped into same and did a little damage to the framework that has been now repaired. Today painted some of the details before I start adding on the fiddley little cockpit components,
So far, the majority of this build is the Part PE. I can't say how much I really REALLY like this set. I might change my mind when i start the rigging.
Today's update:
Regards
Steve
Worked on the fuselage Part PE framework. It's still a bit damp. Minor disaster yesterday while drying parts over a lamp.
Bumped into same and did a little damage to the framework that has been now repaired. Today painted some of the details before I start adding on the fiddley little cockpit components,So far, the majority of this build is the Part PE. I can't say how much I really REALLY like this set. I might change my mind when i start the rigging.
Today's update:
Regards
Steve
Hatter50
Joined: June 17, 2006
KitMaker: 478 posts
AeroScale: 391 posts
Posted: Friday, September 12, 2008 - 09:15 AM UTC
Bringing the PE parts together inside the fuselage framework. A lot of "Juggling" and "Fiddling" needed. I found that the PE framework does not fit into the lower wing (PE is a little too wide)........more fiddling and sanding of the wing sides.
I'm still not sure what seat I will put inside. Whatever I decide, it will be a newly build seat.
Regards
Steve
I'm still not sure what seat I will put inside. Whatever I decide, it will be a newly build seat.
Regards
Steve
Hatter50
Joined: June 17, 2006
KitMaker: 478 posts
AeroScale: 391 posts
Posted: Friday, September 12, 2008 - 09:33 AM UTC
Here is some of that "Coming together" update shot. Hate the up close hi-res photos that show the warts and all................this is still the Fiddling stage, with a large Pry Bar in some cases.
Regards
Steve
Regards
Steve
MerlinV
Joined: November 26, 2006
KitMaker: 608 posts
AeroScale: 602 posts
Posted: Friday, September 12, 2008 - 01:11 PM UTC
Wow! Again!
All I can say is that I would be terrified that all this work would be for nought if it didn't fit in the fuselage!
It is looking spectacular Steve.
Cheers,
Hugh
All I can say is that I would be terrified that all this work would be for nought if it didn't fit in the fuselage!
It is looking spectacular Steve.
Cheers,
Hugh
Hatter50
Joined: June 17, 2006
KitMaker: 478 posts
AeroScale: 391 posts
Posted: Friday, September 12, 2008 - 10:52 PM UTC
Appreciate that Hugh.........
Oh it WILL fit into the fuselage. I suspect that during my putting together the lower fuselage framework PE that I allowed it to widen slightly. I'm just going through a slow sanding of the inner lower wing. The Roden fuselage parts fit ONTO the wing so again, not a show stopper. I already had to grind down a fair amount on the inside fuselage walls to get the PE to fit.
So.........note to self.........for my next SE5..........Make sure that the framework PE fits tightly together. Grow more hands as they will be needed.
Hugh, if you do the SE5a, you HAVE to use the PE.
Regards
Steve

Repainted

Joined: April 04, 2006
KitMaker: 1,058 posts
AeroScale: 1,004 posts
Posted: Friday, September 12, 2008 - 11:15 PM UTC
That framework is awesome. Almost a sad too throw that inside the fuselage. If someone is into making this Se5a without the linnen it will turn to a showstopper
The quality of the build and your phototecnique just for the book, If Osprey could see this build we had a book from them. Awesome
Larsa Q
The quality of the build and your phototecnique just for the book, If Osprey could see this build we had a book from them. Awesome
Larsa Q
MerlinV
Joined: November 26, 2006
KitMaker: 608 posts
AeroScale: 602 posts
Posted: Friday, September 12, 2008 - 11:35 PM UTC
Quoted Text
Hugh, if you do the SE5a, you HAVE to use the PE.
Oh, I have it... But I also have a propensity for doing things the hard way... Maybe you have noticed!
Cheers,
Hugh

thegirl

Joined: January 19, 2008
KitMaker: 6,743 posts
AeroScale: 6,151 posts
Posted: Saturday, September 13, 2008 - 01:59 AM UTC
Awesome build Steve . I'm enjoying your progress . Simply out standing !
Hatter50
Joined: June 17, 2006
KitMaker: 478 posts
AeroScale: 391 posts
Posted: Saturday, September 13, 2008 - 02:48 AM UTC
Hey Guys and Gals............thanks for the kind words. Helps keep me motivated too.
Larsa, I came VERY close to opening the laced area a bit for a peek inside. I didn't do that because
1) Could not find a photo of that area rolled down.
2) the PE only goes back so far, so could only roll down the forward portion (thus providing only a very limited peek for all the work). Those are MY reasons for not doing it, but my NEXT SE5a "Maybe".
Hugh, YOU do things the hard way? So do I. It's only after I've "done it" that I find an easier way. Like.........allowing the framework PE to get a little space to it, and now grinding.
The availability of the PE with the Roden kit motivated me to buy the thing. I do not regret it as it is providing the detail that i NEED.
I'm glad someone is enjoying the updates. I have wondered if anyone was interested in the "issues" that I was having and how i was fixing them.............most of them self-inflicted.
I'll post a photo later, but I wound the pilot's stick "circular" handle with fine thread. Semi-pleased with that tribulation.
Regards
Steve
Larsa, I came VERY close to opening the laced area a bit for a peek inside. I didn't do that because
1) Could not find a photo of that area rolled down.
2) the PE only goes back so far, so could only roll down the forward portion (thus providing only a very limited peek for all the work). Those are MY reasons for not doing it, but my NEXT SE5a "Maybe".
Hugh, YOU do things the hard way?
So do I. It's only after I've "done it" that I find an easier way. Like.........allowing the framework PE to get a little space to it, and now grinding.The availability of the PE with the Roden kit motivated me to buy the thing. I do not regret it as it is providing the detail that i NEED.
I'm glad someone is enjoying the updates. I have wondered if anyone was interested in the "issues" that I was having and how i was fixing them.............most of them self-inflicted.
I'll post a photo later, but I wound the pilot's stick "circular" handle with fine thread. Semi-pleased with that tribulation.
Regards
Steve
thegirl
Joined: January 19, 2008
KitMaker: 6,743 posts
AeroScale: 6,151 posts
Posted: Saturday, September 13, 2008 - 03:12 AM UTC
Steve , I'm sure we are all enjoying your work , we would responed if we didn't . I have been enjoying this so much I'm thinking about giving 1/32 scale a try . Having to kits in my stash Battle Axe's kit of the Fokker E.V and Hobby Craft's Camel crying to be built ! It's because of fine folks as your self that help me improve on my skills .
Hatter50
Joined: June 17, 2006
KitMaker: 478 posts
AeroScale: 391 posts
Posted: Saturday, September 13, 2008 - 07:24 AM UTC
Today's update is a mixed bag. I finally finigled the PE framework into the lower wing. The bad news is the lower wing which is one piece is a little weaker now. The wing also was and still is a bit warped. Warped in that one wing doesn't have the required dihedral. The wing is sitting in a jig right now trying to get the dihedral back. I'm gonna need some strong Thread for the rigging............
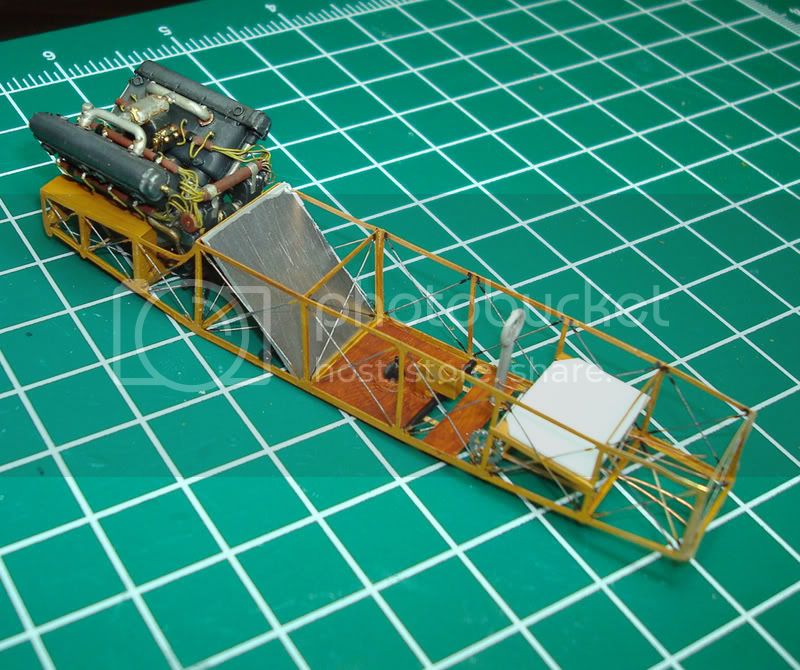
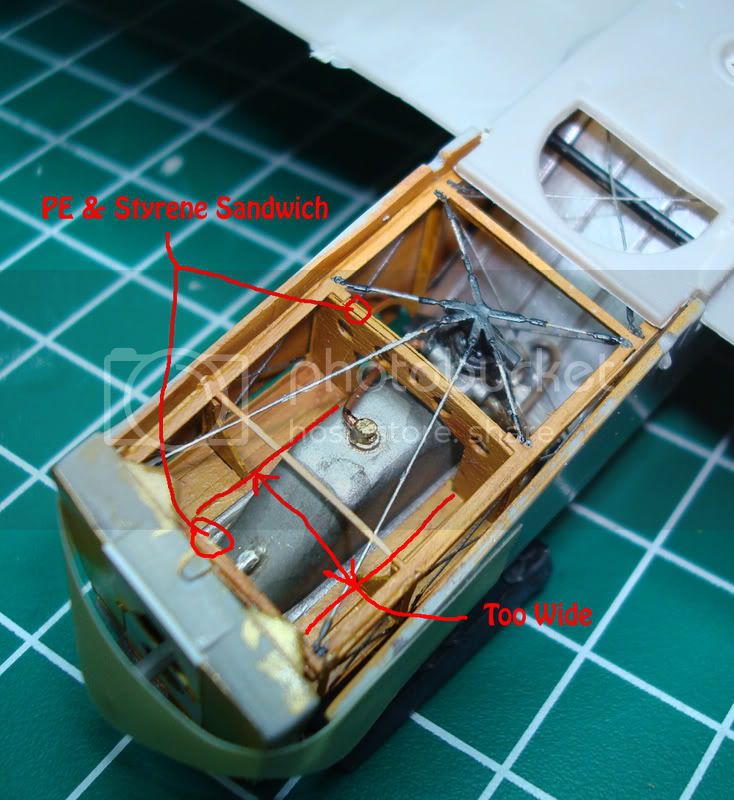
First photo is just showing up under the engine. Will do some washes here much later. The arrows pointing to "too wide" means that the engine would not fit on the Part PE, I had to layer on a piece of beer can as a layer of wood.
Here is a photo with all the main parts taped together. Note the MasterCasters Cockpit. And thats all we shall see of that framework. I shaved the extra scoop from just above the Vickers gun.
The framework got a little "beat-up" in the fitting process as it's very delicate.
Regards
Steve

RAGIII
Joined: June 19, 2007
KitMaker: 604 posts
AeroScale: 600 posts
Posted: Saturday, September 13, 2008 - 11:36 AM UTC
Steve,
Only one word I can use, OUTSTANDING!
RAGIII
Only one word I can use, OUTSTANDING!
RAGIII
Hatter50
Joined: June 17, 2006
KitMaker: 478 posts
AeroScale: 391 posts
Posted: Sunday, September 14, 2008 - 05:20 AM UTC
Interesting issue:
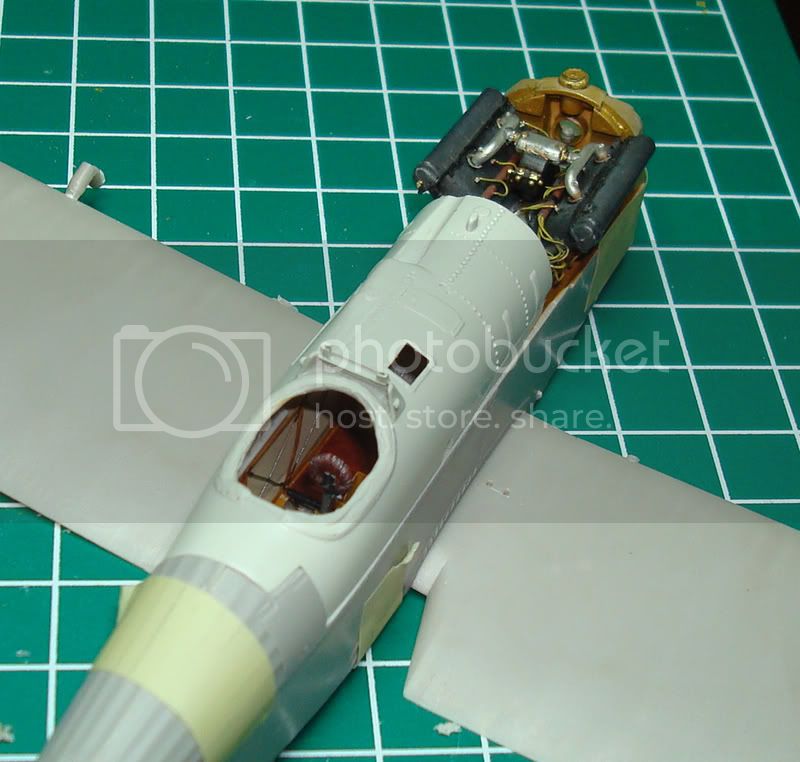
In my this photo , where you see the firewall installed.........or at least fitted, you see the forward wing "attachment bar". That bar should be behind the firewall. Thats where it "fits" with the PE installed.
I attempted to:
1. Attempted to move the current firewall forward of the bar.
2. Build a new firewall and install it forward of the bar.
3. Both these options interfered with the PE wire supports.
4. The firewall needs to stay where it is.
Question for you guys and gals.
1. Keep the bar forward of the firewall?
2. Cut out the bar altogether?
I like option #1 because it adds to the busyness of that area looking up through the lower opening. I personally like it there. I'll give you an opportunity to talk me out of it.
Regards
Steve
thegirl
Joined: January 19, 2008
KitMaker: 6,743 posts
AeroScale: 6,151 posts
Posted: Sunday, September 14, 2008 - 07:07 AM UTC
Hi Steve . If this was my build I would leave the bar where it is ...to replace the fire wall and move it even the bar will be a lot of work reworking the PE parts and if they are delicate this could open up a whole can of worms . With the work that you have accomplished so far this could be a bigger chore .
Repainted
Joined: April 04, 2006
KitMaker: 1,058 posts
AeroScale: 1,004 posts
Posted: Sunday, September 14, 2008 - 05:54 PM UTC
Hi
I´ll agree with Terri. If the firewall doesn´t you any more troubble in tha later stages off the build, let it be. My guess is the PE will takes some serius warpings iff you start to take things apart again.
Larsa
I´ll agree with Terri. If the firewall doesn´t you any more troubble in tha later stages off the build, let it be. My guess is the PE will takes some serius warpings iff you start to take things apart again.
Larsa
Hatter50
Joined: June 17, 2006
KitMaker: 478 posts
AeroScale: 391 posts
Posted: Sunday, September 14, 2008 - 11:28 PM UTC
Well, unless there is some violent "realism" issues, I'll probably leave it there. I have until I close up the fuselage anyway.
I will say that it isn't hard to just clip that bar off. I could even put it behind the firwall, no problem. The problem would be if i wanted to REBUILD the firewall and put those lower Support wires THROUGH the firewall as is in the living examples. I KNOW that one really doesn't want to have a wing spar forward of the firewall unless one really has to, though it is a rather porus sheet of aluminum with a lot of access holes cut in it.
The spar stays for now. "Onward"...............
Regards
Steve
RAGIII
Joined: June 19, 2007
KitMaker: 604 posts
AeroScale: 600 posts
Posted: Monday, September 15, 2008 - 01:35 AM UTC
Quoted Text
Well, unless there is some violent "realism" issues, I'll probably leave it there. I have until I close up the fuselage anyway.
I will say that it isn't hard to just clip that bar off. I could even put it behind the firwall, no problem. The problem would be if i wanted to REBUILD the firewall and put those lower Support wires THROUGH the firewall as is in the living examples. I KNOW that one really doesn't want to have a wing spar forward of the firewall unless one really has to, though it is a rather porus sheet of aluminum with a lot of access holes cut in it.
The spar stays for now. "Onward"...............
Regards
Steve
Just curious if you are certain that the spar is out of place? If so it has nothing to do with the PE as the 1/48th kit and 1/32nd kit built out of the box has the spar located where yours ended up ??
RAGIII
Repainted
Joined: April 04, 2006
KitMaker: 1,058 posts
AeroScale: 1,004 posts
Posted: Monday, September 15, 2008 - 02:06 AM UTC
Good thinking. Correcting this means too repair something else.
Larsa Q
Larsa Q
RAGIII
Joined: June 19, 2007
KitMaker: 604 posts
AeroScale: 600 posts
Posted: Monday, September 15, 2008 - 02:11 AM UTC
Just answered my own question. Went to the WW1 modelers site and looked at the photos of the SE5e. The spar is definantly behind the fire wall ! Still no real reason to create all of the pain of changing the thing now. At least IMHO,
RAGIII
RAGIII
Hatter50
Joined: June 17, 2006
KitMaker: 478 posts
AeroScale: 391 posts
Posted: Monday, September 15, 2008 - 02:14 AM UTC
Am I certain about the wing spar placement? I'm only as sure as my limited resources. This photo shows the forewall placement a little forward of the spar. You can see the spar support bracket. The difficult thing to "rebuilding" the Roden kit along with the Part PE is that I cant "easily" put the support wires THROUGH the firewall.
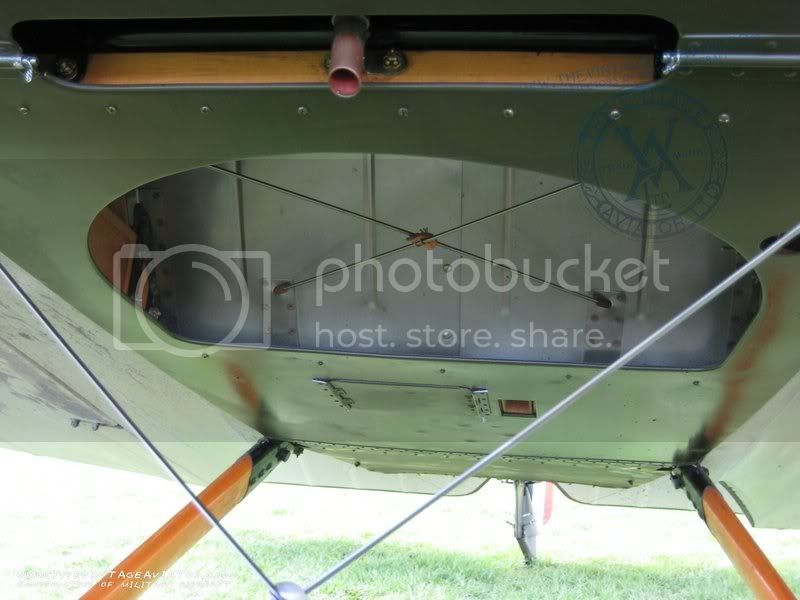
Like I said, the firewall STAYS. Thats just too hard to fix. Now I COULD just remove the spar or remove it and place it behind the firewall. Couldnt see it anyway. Clipping the spar out is no big deal. So unless there is some real "Realism" debate on that spar being forward, I'm going to let it stay. The build is ultimately for my enjoyment, but if people think that this is a BIG gotcha, then I'm listening.
I'm going to be soliciting ideas on markings for this thing. I am going to need to get "involved" in that issue shortly. My plan is for a mildly weathered machine. Not mud covered or battle scarred. Just sun and rain weathered. Clean and presentable but having lived in the elements for a while.
I know I should have chosen a scheme at the very beginning, but I am more interested in the technical aspects of the machine itself..................at least until I get to the point of WHO flew it.
Regards
Steve
thegirl
Joined: January 19, 2008
KitMaker: 6,743 posts
AeroScale: 6,151 posts
Posted: Monday, September 15, 2008 - 03:05 AM UTC
All in all Steve you said it best ( this is for my enjoyment ) which is the only thing that matters . Besides with every one opening beer cans here lately , well I won't get into that .
Fantastic work on this project , as for markings I can scan some more things for you if that will help ?
Here open another one , Cheers
Fantastic work on this project , as for markings I can scan some more things for you if that will help ?
Here open another one , Cheers
 |

WEB HOSTING BY


Copyright ©2021 AeroScale and Kitmaker Network, a subsidiary of Silver Star Enterprises
All Rights Reserved. Please read our Conditions of Use and Privacy Policy.
All Rights Reserved. Please read our Conditions of Use and Privacy Policy.