1/32 Roden GB 2008 SE5a - Steve
North Carolina, United States
Joined: June 17, 2006
KitMaker: 478 posts
AeroScale: 391 posts
Posted: Thursday, August 28, 2008 - 10:20 AM UTC
No photographic updates lately. I've been spending a lot of time inside the cockpit with the PE and on my hands and knees looking for same in the carpet. Had to "make" some new parts due to the carpet monster. Am adding the cabling and pullies in the cockpit where i can fit/see them.
That cockpit PE is great stuff..........just microscopic. Hopefully get some pix when i get something pix-worthy. Started with my wood finish, I'll be asking for "opinions" on that later...........

Regards
Steve
1/350 USS San Francisco on Slipways
1/350 HMS Warspite in Research Mode
1/32 P-39D stalled
North Carolina, United States
Joined: June 17, 2006
KitMaker: 478 posts
AeroScale: 391 posts
Posted: Sunday, August 31, 2008 - 08:34 AM UTC
Took a little time off. Got back to tedious "stuff" in the cockpit.
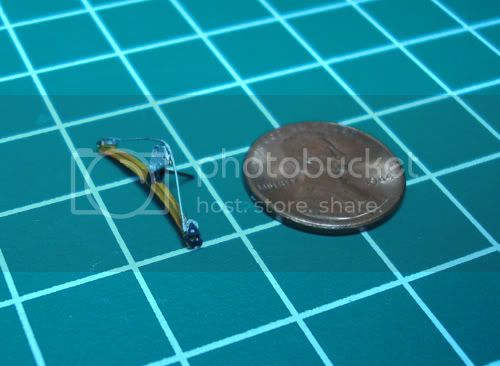
Working on the Control Stick support with aileron cable with pulleys. No washes yet. Cable will be installed reaching forward. Stick with elevator cables to go. I need a microscope.

Gonna try to get motivated tomorrow and get some more done.
Regards
Steve
1/350 USS San Francisco on Slipways
1/350 HMS Warspite in Research Mode
1/32 P-39D stalled
North Carolina, United States
Joined: June 17, 2006
KitMaker: 478 posts
AeroScale: 391 posts
Posted: Sunday, August 31, 2008 - 11:05 AM UTC
For those building the SE5 WITH the Part of Poland PE, beware:
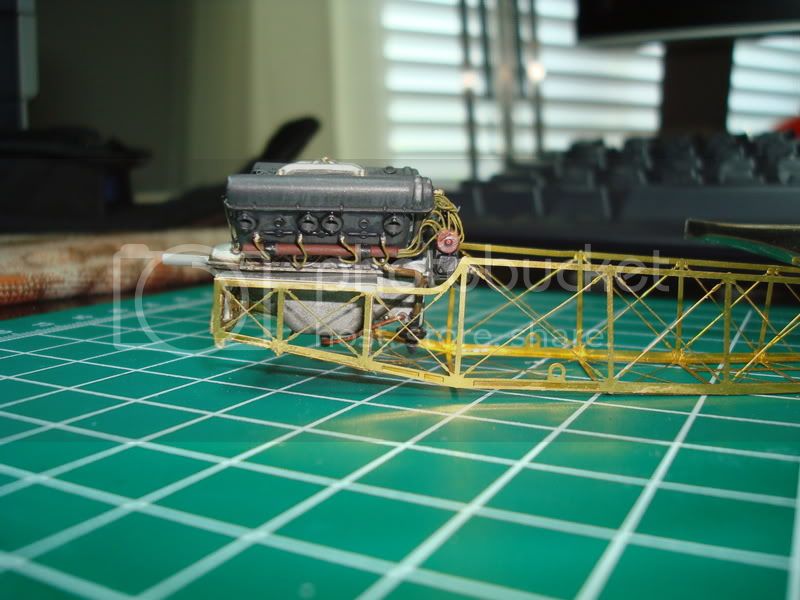
Stephen mentioned earlier in his build notes that the engine was too BIG. Ahhhhhhhhh, but it's the PE that's too Large. Actually...........the PoP parts #8 and #9 should be deepened to allow for the "larger" engine (it's the water pump that is having issues with the PoP PE parts). Since i didn't heed Stephen's caution, I too have a too large engine. Since I kinda like the engine the way it is, I'll try motor tooling the 2 parts and deepen them. (I'm sure that they will break away from the CA anyway at that point.
The framework looks great.........just that the engine kinda hangs out.

Oh well.........

Regards
Steve
1/350 USS San Francisco on Slipways
1/350 HMS Warspite in Research Mode
1/32 P-39D stalled
Colorado, United States
Joined: January 25, 2004
KitMaker: 11,669 posts
AeroScale: 11,011 posts
Posted: Sunday, August 31, 2008 - 03:25 PM UTC
". . .The most important thing is to know why you build and then get the most that you can out of building." via D.D.
North Carolina, United States
Joined: June 17, 2006
KitMaker: 478 posts
AeroScale: 391 posts
Posted: Sunday, August 31, 2008 - 10:16 PM UTC
Hello Stephen,
Pain? Some.............but after studying the "issue" of the large engine (large PE).........waiting for all the glue to dry.

What I'm gonna do is carefully cut off the water pump hoses, then cut off the pump itself and remove 1/8 inch of upper pump, test fit, and then reconnect those hoses. Fortunately the "hoses" are made from flexible solder, so i can adjust them.
Grinding out the PE parts would not have solved the water pump banging into the lower PE fuselage wires.
Regards
Steve
1/350 USS San Francisco on Slipways
1/350 HMS Warspite in Research Mode
1/32 P-39D stalled
North Carolina, United States
Joined: June 17, 2006
KitMaker: 478 posts
AeroScale: 391 posts
Posted: Monday, September 01, 2008 - 03:40 AM UTC
OK Guys and Gals,
The Engine as been "adjusted" to fit the PE fuselage frets.

1. All waterpump pipes had to be removed and "adjusted". Note to self: Leave these off in the future until the engine is installed.
2. The lower Engine support member PoP part #9 assembly was successfully ground down about 1/16th of an inch (or less).
3. The waterpump was removed from the engine and about 1/8th inch was removed from that part and re-installed. The upper portion was removed as was the "bump" on the bottom.
4. All piping was reinstalled................after testfits of course.
5. The PE engine supports were too wide for the engine to be installed, so a top-plate installed onto those supports (these were there for some of the restorations. Don't know if it was there when first manufactured).
The engine bumps up against the forward lower engine support (PoP part #8). If the engine needs to scoot forward any, then that "bump" on the chin of the engine will need to be partly shaved off.
The Adjustment wasn't as painfull as i thought it would be. As it is, I have room to adjust in the final construction.
Regards
Steve
1/350 USS San Francisco on Slipways
1/350 HMS Warspite in Research Mode
1/32 P-39D stalled
Colorado, United States
Joined: January 25, 2004
KitMaker: 11,669 posts
AeroScale: 11,011 posts
Posted: Monday, September 01, 2008 - 07:24 AM UTC
Quoted Text
". . .Grinding out the PE parts would not have solved the water pump banging into the lower PE fuselage wires. Regards Steve
Agreed. it would have just pushed the engine down through the area for the chin pan. This is the reason I believe the motor too large. The placement of the motor even on the stock installments seems a bit questionable. Maybe Hugh or Rick could comment here.
". . .The most important thing is to know why you build and then get the most that you can out of building." via D.D.
North Carolina, United States
Joined: June 19, 2007
KitMaker: 604 posts
AeroScale: 600 posts
Posted: Tuesday, September 02, 2008 - 12:36 PM UTC
Quoted Text
Quoted Text
". . .Grinding out the PE parts would not have solved the water pump banging into the lower PE fuselage wires. Regards Steve
Agreed. it would have just pushed the engine down through the area for the chin pan. This is the reason I believe the motor too large. The placement of the motor even on the stock installments seems a bit questionable. Maybe Hugh or Rick could comment here.
Stephen and Steve,
Yes, I had a great deal of difficulty with the fit of the engine on the kit bearers even built OOB with the hood on! I ended up removing all of the piping, removing the cylinder banks, and inserting through the openings in the hood. I then replaced what piping I could through the front and bottom.
RAGIII
North Carolina, United States
Joined: June 17, 2006
KitMaker: 478 posts
AeroScale: 391 posts
Posted: Wednesday, September 03, 2008 - 11:04 PM UTC
The Build just got put back into the boxes. Batt'ning down the hatches for Hurricane "Hanna". Into the storm preps right now. Will emerge later............unless old "Ike" takes aim also.

Regards
Steve
1/350 USS San Francisco on Slipways
1/350 HMS Warspite in Research Mode
1/32 P-39D stalled
Victoria, Australia
Joined: November 26, 2006
KitMaker: 608 posts
AeroScale: 602 posts
Posted: Wednesday, September 03, 2008 - 11:42 PM UTC
Best of luck Steve,
Hope the Hurricanes don't belt you about too much.
I, fortunately live in a temporate climate where the worst that happens is a few gum trees getting uprooted and the odd house losing part of a roof.
I cannot begin to imagine the trepidation that you must feel every hurricane season...
Best wishes to you and yours.
Cheers,
Hugh
North Carolina, United States
Joined: June 17, 2006
KitMaker: 478 posts
AeroScale: 391 posts
Posted: Thursday, September 04, 2008 - 12:39 AM UTC
Will do, thanks.
Been through them before so I kinda know what i need to do. Used to live almost ON the water before and figured out that you just can't defend against water, the surge. Winds and rain one has some control over. Forunately Hanna appears to be a "1". Now IKE concerns me a bit flirting with 4 or 5.
Regards from sunny North Carolina

Steve
1/350 USS San Francisco on Slipways
1/350 HMS Warspite in Research Mode
1/32 P-39D stalled
Östergötland, Sweden
Joined: April 04, 2006
KitMaker: 1,058 posts
AeroScale: 1,004 posts
Posted: Thursday, September 04, 2008 - 02:35 AM UTC
You make it look like it´s so easy, but you have a sharp eye for the details. Keep up the work my friend
Larsa
North Carolina, United States
Joined: January 09, 2008
KitMaker: 20 posts
AeroScale: 14 posts
Posted: Thursday, September 04, 2008 - 03:25 AM UTC
Hatter50,..I hope you are further inland than I am,....I live down at Ft.Fisher south of Wilmington.
North Carolina, United States
Joined: June 17, 2006
KitMaker: 478 posts
AeroScale: 391 posts
Posted: Thursday, September 04, 2008 - 06:39 AM UTC
gott-cha...........
1. Live only a bit north of ya. Use the BIG nails down there now, hear!
2. Keeping a warry eye out for ex-presidents.

3. Shutters......check

4. Beer............check

5. Keep eye on SE5a......check

6. Maybe find time to glue some more of those hate-full small PE pieces check

Regards
Steve
1/350 USS San Francisco on Slipways
1/350 HMS Warspite in Research Mode
1/32 P-39D stalled
Victoria, Australia
Joined: November 26, 2006
KitMaker: 608 posts
AeroScale: 602 posts
Posted: Thursday, September 04, 2008 - 11:08 AM UTC
Quoted Text
6. Maybe find time to glue some more of those hate-full small PE pieces check
This is the reason that I have NOT purchased any Etch to go with my own 1/32 SE5a...
I used to always buy etch to go with a kit... Now I only do if I think it is really going to enhance things beyond what my ham fists can scratch build...
Ex Presidents?
Cheers,
Hugh
North Carolina, United States
Joined: June 17, 2006
KitMaker: 478 posts
AeroScale: 391 posts
Posted: Thursday, September 04, 2008 - 11:28 AM UTC

Ex-Presidents??? Hurricane "Ike" thats next in line for the East Coast. Sorry about that.
I've got to say that the PoP PE for the SE5a is just outstanding. And I'm even TRYING to use it all.

Some unfortunately now resides in my carpet, but the majority is just super. I bought the kit BECAUSE of the PE. Now I will say that I'm not finished it yet, but it is keeping my enthusiasm going and thats what counts. I've tried to complete a few parts a day. Sometimes more. Sometimes rebuilding the PE parts to fit my needs.
I will also say that my hat is OFF to all you guys working in 1/48.........much less 1/72.

Regards
Steve
1/350 USS San Francisco on Slipways
1/350 HMS Warspite in Research Mode
1/32 P-39D stalled
North Carolina, United States
Joined: June 17, 2006
KitMaker: 478 posts
AeroScale: 391 posts
Posted: Saturday, September 06, 2008 - 10:52 AM UTC
Tropical Storm Hanna was kind of a non-event (for our loaction at least). Hurricane Plan executed, lessons learned, SE5a is back out of the box. Back to work on it tomorrow.

"Ex-President" IKE off to other locations....I think. Plan still available.

Regards
Steve
1/350 USS San Francisco on Slipways
1/350 HMS Warspite in Research Mode
1/32 P-39D stalled
North Carolina, United States
Joined: June 17, 2006
KitMaker: 478 posts
AeroScale: 391 posts
Posted: Sunday, September 07, 2008 - 11:29 AM UTC
With the SE5a back out of the box, I'm now grinding down some of the interior to allow the PE framework to fit. Framework was too large, Interior too small, or I allowed a little too much space in gluing the framework together. My guess is the latter. I'm liking the way it's fitting now. A few more test fits and I think I can start painting the framework PE and then the Roden interior.
Slow process. I've got to keep the correct pace.

Nothing photo worthy for a while.
Regards
Steve
1/350 USS San Francisco on Slipways
1/350 HMS Warspite in Research Mode
1/32 P-39D stalled
North Carolina, United States
Joined: June 17, 2006
KitMaker: 478 posts
AeroScale: 391 posts
Posted: Monday, September 08, 2008 - 10:46 AM UTC
Today was a whiney day for me. Should have been winey.........

A day that could have seen the SE5a re-boxed and put back into the stash (or at the receiving end of a 10 LB sledge). As much as I LOVE the PE for this kit, they are also very "Hateful". The fuselage framework is so delicate and unforgiving when working with it. Anyway, I survived and so did the SE5a.
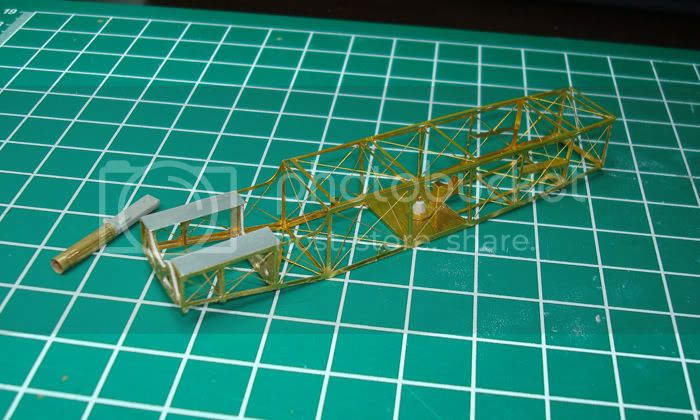
Here is a shot of the Fuselage Frets so far. The top layer is just resting on the "box" so I can get inside and keep adding control cables and other equipment. I "Rolled" the Vickers just to keep my morale up. The tip was "hateful" (not pictured).....whine whine... 1/8" drill bit worked fine for the jacket. Barrel and other detail later.

I'm almost to the point of throwing on a layer of primer and making "Wood". I have never "made wood" before so that experience might be kinda like the PE.
It’s been very educational learning a bit about just how these things were built through on-line research. Have been following a guy in GA building a 1:1 Curtiss Jenny.
Great blog:
http://curtissjennyrestoration.blogspot.comRegards
Steve
1/350 USS San Francisco on Slipways
1/350 HMS Warspite in Research Mode
1/32 P-39D stalled
Alberta, Canada
Joined: January 19, 2008
KitMaker: 6,743 posts
AeroScale: 6,151 posts
Posted: Monday, September 08, 2008 - 12:25 PM UTC
Oh I know the feeling of PE parts . Some of the older Eduard kits are like that . Lots of bending and folding to do .

However , I do enjoy building them tremedously .
You got me going on this SE5.A , I have Rodens kit of one in 1/48 and coming inn the mail is PE parts from a friend . I believe it's Parts set . If it's anything like the 1/32 then wow My work will be cut out for me !
The famous wood grain ! lots on the subject on the forums here . So many different methods . I haven't tried artist oil's yet , but to share with you I have been trying it this way starting with a base coat of desert yellow and dry brushing with a red brown or just brown and then I either use a clear orange or yellow over coat some times tinted with Tamiya smoke . So far I have gotten not bad results .


North Carolina, United States
Joined: June 17, 2006
KitMaker: 478 posts
AeroScale: 391 posts
Posted: Monday, September 08, 2008 - 12:41 PM UTC
Appreciate that Terri. I'm gonna start testing here shortly with the wood and see what I come up with.
As for Part's PE. Folds aren't that hard with them, they have a fold line to almost all folds. 1/48? I'm going crosseyed as it is with my magnifyer. I had a surprise today, one of those tiny parts that I spent so much time looking for................seems that i put it someplace SAFE..........and found it today, right where I left it.

1/48 and i wouldnt have even SEEN it.
Regards
Steve
1/350 USS San Francisco on Slipways
1/350 HMS Warspite in Research Mode
1/32 P-39D stalled
North Carolina, United States
Joined: June 17, 2006
KitMaker: 478 posts
AeroScale: 391 posts
Posted: Thursday, September 11, 2008 - 01:28 AM UTC
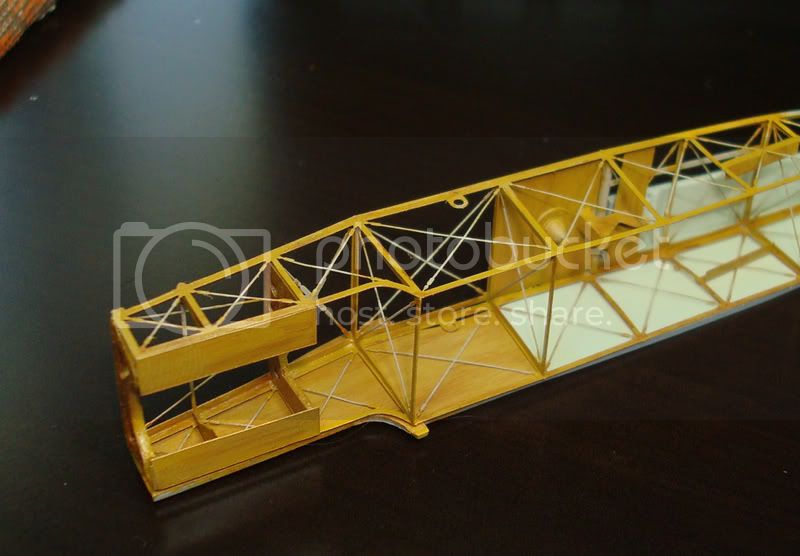
Rght now, I'm watching paint dry. I made wood and linen yesterday. First time for both. I'm ok with both, but not in love with either. I took a photo of the framework wood, but with the flash it's just WAY too yellow. It's much better in real life. Basically enamel primer; acrilic deck tan; several artist oils for the wood. Will take forever to dry.
Back to the fiddley bits. There is a TON of PE for this thing.
I also received my recast MasterCasters Cockpit Coaming from Jay. The first suffered from "shrinkage"............ala "Seifeld". Measured the new coaming and seems right on. Thanks Jay.
Regards
Steve
1/350 USS San Francisco on Slipways
1/350 HMS Warspite in Research Mode
1/32 P-39D stalled
North Carolina, United States
Joined: June 17, 2006
KitMaker: 478 posts
AeroScale: 391 posts
Posted: Thursday, September 11, 2008 - 05:33 AM UTC
Waiting on MORE paint to dry now. This thing is going to take a year to dry.
Here is a photo of it just kinda sitting there. Yes there is a BIG fingerprint on it, but once I saw that, it somehow disappeared.

Note that the rigging and fittings have not been done yet. Just the wood. And the top piece of PE framework is drying elsewhere.

Like I said before, this thing isn't quite that yellowie golden.
Working on the Vickers gun a bit since it will be going inside shortly. The PE for that is just superb.
Regards
Steve
1/350 USS San Francisco on Slipways
1/350 HMS Warspite in Research Mode
1/32 P-39D stalled
Alberta, Canada
Joined: January 19, 2008
KitMaker: 6,743 posts
AeroScale: 6,151 posts
Posted: Thursday, September 11, 2008 - 05:54 AM UTC
Very nice Steve , Turned out really well . ( what finger print .... I didn't see any finger print )

Östergötland, Sweden
Joined: April 04, 2006
KitMaker: 1,058 posts
AeroScale: 1,004 posts
Posted: Thursday, September 11, 2008 - 06:08 AM UTC
Hi Terry
Go for the oilpaint. Heres a link for you
How too
http://www.ipmsstockholm.org/magazine/2003/03/stuff_eng_tech_wood_grain.htmI hope I can start my se5 build late this year. All because this chap and he awesome build. Taking notes everday, so let them come.


Larsa


 What I'm gonna do is carefully cut off the water pump hoses, then cut off the pump itself and remove 1/8 inch of upper pump, test fit, and then reconnect those hoses. Fortunately the "hoses" are made from flexible solder, so i can adjust them.


 Ex-Presidents??? Hurricane "Ike" thats next in line for the East Coast. Sorry about that.
 Some unfortunately now resides in my carpet, but the majority is just super. I bought the kit BECAUSE of the PE. Now I will say that I'm not finished it yet, but it is keeping my enthusiasm going and thats what counts. I've tried to complete a few parts a day. Sometimes more. Sometimes rebuilding the PE parts to fit my needs.


 However , I do enjoy building them tremedously .


 1/48 and i wouldnt have even SEEN it.


