


Air Campaigns
Want to start or join a group build? This is where to start.
Want to start or join a group build? This is where to start.
Hosted by Frederick Boucher, Michael Satin
OFFICIAL: Big Beautiful Bombers Campaign

retiredyank

Joined: June 29, 2009
KitMaker: 11,610 posts
AeroScale: 79 posts
Posted: Tuesday, October 26, 2010 - 12:08 AM UTC
Going to my lhs to pick up a couple of paints. I should be finished as soon as I get the express mask. Think I'm going to leave the aircraft kits to all of the knowledgable people here and stick to armor. Unless they make a flying tank, I'm out.


bdanie6
Joined: November 09, 2008
KitMaker: 615 posts
AeroScale: 459 posts

Posted: Tuesday, October 26, 2010 - 05:52 AM UTC
Matt 
Does the work "Sturmovick" mean anything to you?
(re:the flying tank)
Does the work "Sturmovick" mean anything to you?
(re:the flying tank)
retiredyank
Joined: June 29, 2009
KitMaker: 11,610 posts
AeroScale: 79 posts
Posted: Tuesday, October 26, 2010 - 10:14 PM UTC
Quoted Text
Matt
Does the work "Sturmovick" mean anything to you?
(re:the flying tank)
Yes it does. I have an Accurrate Miniatures IL2M3 on my workbench. Just waiting for a replacement part.

SGTJKJ

#041

Joined: July 20, 2006
KitMaker: 10,069 posts
AeroScale: 3,788 posts

Posted: Wednesday, October 27, 2010 - 12:47 AM UTC
Thanks for the comments, Matt and Bruce. I appreciate it.
The testing of different weathering on the JU 86 is actually turning out quite nice, so I will take a few pictures in day light during the weekend.
More to follow
The testing of different weathering on the JU 86 is actually turning out quite nice, so I will take a few pictures in day light during the weekend.
More to follow

SGTJKJ
#041
Joined: July 20, 2006
KitMaker: 10,069 posts
AeroScale: 3,788 posts
Posted: Saturday, October 30, 2010 - 08:55 PM UTC
Here are some pictures of my finished Ju 86. A lot of things went wrong. Some of it due to the low quality of the kit and especially the kit decals, some of it due to my own mistakes.
Anyway, it has been a struggle and I will never be completely satisfied with this one, but I tested some new techniques and I am sure the next aircraft will be better.
It has been fun to participate and to follow a lot of cool builds. Looking forward to see even more before the campaign ends.
Comments welcome
retiredyank
Joined: June 29, 2009
KitMaker: 11,610 posts
AeroScale: 79 posts
Posted: Monday, November 01, 2010 - 11:41 PM UTC
I will be working on the clear fuselage half and landing gear today. Should be posting more photos soon. Found out how well liquid masking works. Just have to be patient while it dries.
MikeMx

Joined: May 22, 2008
KitMaker: 649 posts
AeroScale: 434 posts

Posted: Tuesday, November 02, 2010 - 04:54 AM UTC
I've been very busy with other builds so I've not done much on my entry. I'm doing Hasegawa's 1/72 HEIIIH-6, with eduard zoom etch/mask and True Detail replacement wheels.
I've managed to pretty much do the interior (did some more last night) so hopefully I'll have a bit more done soon.
Jesper, I've also recently done the old JU86 kit and I agree, the decals were awful. I did mine in the same splinter scheme but I think I used different colours. Due to the lack of info, I guessed the camou at RLM 65 undersides and 02/61 and 70 on top. Looks ok apart from the decals.
thanks
Mike
SGTJKJ
#041
Joined: July 20, 2006
KitMaker: 10,069 posts
AeroScale: 3,788 posts
Posted: Wednesday, November 03, 2010 - 03:05 AM UTC
Thanks for the comments, Michael. Glad to hear I am not the only one with problems with the decals.
The JU 86 was initially painted with prewar colours which were a bit different than early war colours. I think my colours are a bit of. The green is a bit to light and the brown to redish. Anyway, it is done now
Looking forward to see pictures of your build.
The JU 86 was initially painted with prewar colours which were a bit different than early war colours. I think my colours are a bit of. The green is a bit to light and the brown to redish. Anyway, it is done now
Looking forward to see pictures of your build.

Watimena

Joined: May 09, 2010
KitMaker: 39 posts
AeroScale: 33 posts

Posted: Saturday, November 06, 2010 - 08:41 AM UTC
Your Ju-86 looks prety good to me. It would have been cold being that ventral gunner! Out of curiosity, how did you do the pin wash? It is not a technique I've tried before, I usually just do a basic "sludge" wash with acrylics.
By the way, "Mild and Bitter" looks the goods as well. I am hanging to see some in progress shots of that Polish bomber.
I have been slow on the betty, having to clear some older kits in the production line, but have made some progress. Next step with masking and fuselage assembly. Look at all that glass !! No after market pre cut masks either, so out with the tape and knife.....


Siderius
Joined: September 20, 2005
KitMaker: 1,747 posts
AeroScale: 1,673 posts
Posted: Saturday, November 06, 2010 - 01:15 PM UTC
Jesper, great JU 86! I would be proud to have something that good in my collection! Great job, especially with all the problems you overcame. Russell


AussieReg
#007
Joined: June 09, 2009
KitMaker: 8,156 posts
AeroScale: 3,756 posts
Posted: Saturday, November 06, 2010 - 01:52 PM UTC
Jesper I think your Ju 86 looks great ! It is always good to see some of the less common aircraft being built, especially with colour schemes that are not mainstream.
Jeremy the progress on your Betty looks good so far, but looking at that glass reminds me of the masking I had to do on my P-61 recently, patience my friend. On my next P-61 I'm going to try a new method, using fine strips of Tamiya tape to outline the window areas, then fill in the centre with a masking fluid. It will certainly be quicker to mask, so we will see how it turns out.
Cheers, D


doubtingthomas
Joined: March 17, 2009
KitMaker: 156 posts
AeroScale: 153 posts
Posted: Monday, November 08, 2010 - 03:36 PM UTC
Jesper - I like your Ju86, and respect the fact that you persevered and finished it.
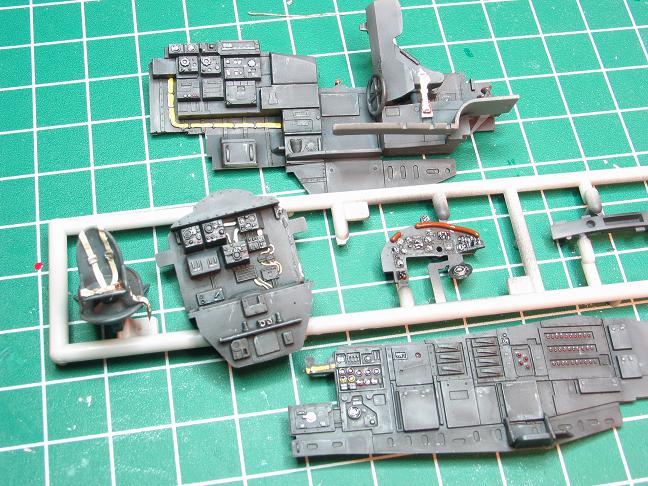
I'm finally getting on the bandwagon with my entry - Promodeler/Revell 1:48 Dornier Do217E-5. So far - with a week of work - it's a great kit, with fantastic cokpit detail and a good dry-fit of major components.
Here's my cockpit work so far:
The components:
And dry-fit into the fuselage:
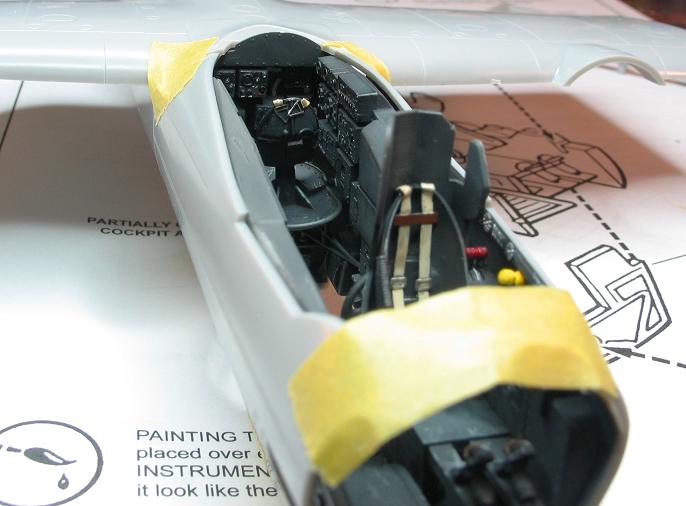
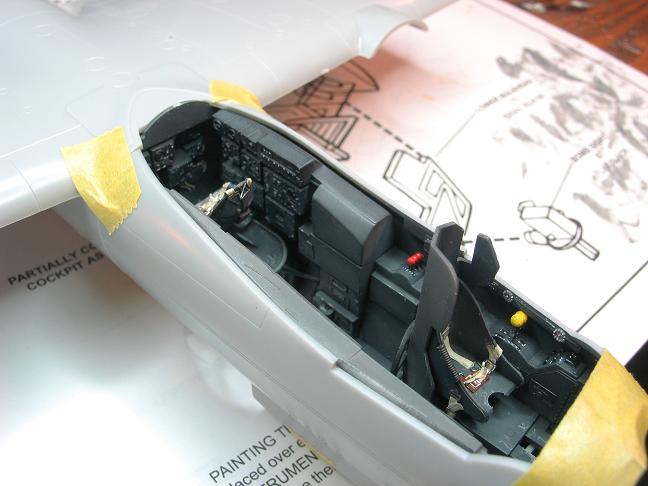
I guess it remains to be seen whether any of this will be...seen!
More later -
Keep up the good work, all!
Regards-
Tom
I'm finally getting on the bandwagon with my entry - Promodeler/Revell 1:48 Dornier Do217E-5. So far - with a week of work - it's a great kit, with fantastic cokpit detail and a good dry-fit of major components.
Here's my cockpit work so far:
The components:
And dry-fit into the fuselage:
I guess it remains to be seen whether any of this will be...seen!
More later -
Keep up the good work, all!
Regards-
Tom
AIRGUNNER

Joined: September 27, 2006
KitMaker: 246 posts
AeroScale: 234 posts

Posted: Thursday, November 11, 2010 - 12:57 AM UTC
After a hiatus of nearly nine months due to life getting in the way, I have finally had time to put some work into the Stirling:-

Just one photo, now just waiting for a warmish day so I can get some paint on at last.
Just one photo, now just waiting for a warmish day so I can get some paint on at last.
retiredyank
Joined: June 29, 2009
KitMaker: 11,610 posts
AeroScale: 79 posts
Posted: Thursday, November 11, 2010 - 10:18 PM UTC
I have been distracted by a Tiger for the past week; but should be posting some more progress photos within the next couple of days. Should have the wings finished by my birthday(the 18th) and then to add the decals.
Siderius
Joined: September 20, 2005
KitMaker: 1,747 posts
AeroScale: 1,673 posts
Posted: Monday, November 15, 2010 - 10:47 AM UTC
Hi guys and any gals out there. I originally was going to post photos of a B-29 I was working on. I switched up and am instead going for a B-24. I will be posting some photos soon. Thanks, Russell
Siderius
Joined: September 20, 2005
KitMaker: 1,747 posts
AeroScale: 1,673 posts
Posted: Monday, November 15, 2010 - 02:32 PM UTC
Well, it's going together alright. I hope to have it finished inside a week if I can get the time. Take a look so far. Russell


Whitey
Joined: September 20, 2010
KitMaker: 137 posts
AeroScale: 28 posts

Posted: Wednesday, November 17, 2010 - 12:34 PM UTC
My wife's Grandfather flew a B-26 in WWII, and her father has asked me to build a model of one for him. I'm trying to get it done in time to give it to him for Christmas, so it's a little bit of a rush; but it certainly fits in nicely with the remaining time in this campaign, so...


Siderius
Joined: September 20, 2005
KitMaker: 1,747 posts
AeroScale: 1,673 posts
Posted: Wednesday, November 17, 2010 - 02:34 PM UTC
Well, I posted on the general site, thought I would take some more photos and post on the campaign section. Here is my Consolidated B-24L in 490th bomb group markings, 8th air force, based of course in good old England.
I enjoyed the kit although I had to sand down several internal structural components to fit the fuselage halfs together.
Painting was accomplished with Model Master Acryl paints, since Polly Scale is being discontinued. Decals were very good, produced by Cartograph. Hope to find some codes to put on the tail sometime but just haven't found any in my collection of decals as of yet. Hope you all enjoy looking, some of you for the second time I'm sure. Thanks again. Russell


P.S. I used Krystal Clear from Micro Sol to make all the small windows, was much easier than masking!
I enjoyed the kit although I had to sand down several internal structural components to fit the fuselage halfs together.
Painting was accomplished with Model Master Acryl paints, since Polly Scale is being discontinued. Decals were very good, produced by Cartograph. Hope to find some codes to put on the tail sometime but just haven't found any in my collection of decals as of yet. Hope you all enjoy looking, some of you for the second time I'm sure. Thanks again. Russell
P.S. I used Krystal Clear from Micro Sol to make all the small windows, was much easier than masking!
SGTJKJ
#041
Joined: July 20, 2006
KitMaker: 10,069 posts
AeroScale: 3,788 posts
Posted: Friday, November 19, 2010 - 01:34 AM UTC
Thanks for all the comments on my JU86, Guys. I really appreciate it. I have another kit in the stash of this bird and that should definitely result in a better model when finished. I know the pitfalls now.
Jeremy, the pin wash is made up of small dots of oil paint added to selected areas of the fuselage and wings. The dots are then drawn in the direction of flight with a brush with a bit of turpentine on it. Do not add too much turpentine or you will end up with a sludge wash.
Axel, nice choice with the B-26. A nice gesture to give a model of it to an old veteran. Looking forward to see more.
Siderius
Joined: September 20, 2005
KitMaker: 1,747 posts
AeroScale: 1,673 posts
Posted: Saturday, November 20, 2010 - 12:52 PM UTC

A comparison in size difference between the 24 and 109. Russell

Delbert
#073
Joined: October 05, 2002
KitMaker: 2,659 posts
AeroScale: 209 posts
Posted: Saturday, November 27, 2010 - 02:59 PM UTC
howdy all
just thought I'd throw in a couple of photos to show I was working on something..
progress pics on the Arado AR 234C
First pic is the body just test fitted at the moment not completly glued in..

and a photo of the cockpit in progress, this is the most complicated cockpit i've done to date, a lot of small peices.. and the decals for the gauges is crazy, and yes I know one pilot seat arm is missing, I'm still looking for it but I don't thnk i'll find it.... its a really tiny bit..

laters
Delbert
just thought I'd throw in a couple of photos to show I was working on something..
progress pics on the Arado AR 234C
First pic is the body just test fitted at the moment not completly glued in..
and a photo of the cockpit in progress, this is the most complicated cockpit i've done to date, a lot of small peices.. and the decals for the gauges is crazy, and yes I know one pilot seat arm is missing, I'm still looking for it but I don't thnk i'll find it.... its a really tiny bit..
laters
Delbert

Nito74

Joined: March 04, 2008
KitMaker: 5,386 posts
AeroScale: 635 posts
Posted: Sunday, November 28, 2010 - 11:23 AM UTC
Great builds so far !!
I didn't start mine..
I have 5 or 6 models on the shelve waiting to be finished.
The choice for this Campaign was a 1:72 Tupolev Tu-16 from Trumpeter.
I'm also selling my house soon so, it will all packed for sometime..
I didn't start mine..
I have 5 or 6 models on the shelve waiting to be finished.
The choice for this Campaign was a 1:72 Tupolev Tu-16 from Trumpeter.
I'm also selling my house soon so, it will all packed for sometime..
Red4
Joined: April 01, 2002
KitMaker: 4,287 posts
AeroScale: 1,164 posts

Posted: Friday, December 03, 2010 - 09:53 AM UTC
Again, great work thus far all. We still have a few weeks left to get those big beautiful bombers taken care of  Looking forward to seeing everybody's efforts at the end of the month. Thanks...and keep building! "Q"
Looking forward to seeing everybody's efforts at the end of the month. Thanks...and keep building! "Q" Whitey
Joined: September 20, 2010
KitMaker: 137 posts
AeroScale: 28 posts
Posted: Sunday, December 05, 2010 - 03:18 AM UTC
Some progress pics


Mr. Daniels, I wonder, did you have as much trouble with the fit of the nacelles to the wing on this kit as I seem to be having?
Mr. Daniels, I wonder, did you have as much trouble with the fit of the nacelles to the wing on this kit as I seem to be having?
bdanie6
Joined: November 09, 2008
KitMaker: 615 posts
AeroScale: 459 posts
Posted: Sunday, December 05, 2010 - 07:42 AM UTC
Axel, I'm afraid so And I dont have the industrial size clamps that you do, what I did was use plastic weld and glue an inch, hold it for a minute or three then move on. Then came a lot of putty and sanding.  But, it was worth it in the end. The work was not unexpected, it is after all a Monogram But it does make up into a great model
  Hang in there Axel, it's worth it
And I dont have the industrial size clamps that you do, what I did was use plastic weld and glue an inch, hold it for a minute or three then move on. Then came a lot of putty and sanding. But, it was worth it in the end. The work was not unexpected, it is after all a Monogram But it does make up into a great model Hang in there Axel, it's worth it  |

WEB HOSTING BY


Copyright ©2021 AeroScale and Kitmaker Network, a subsidiary of Silver Star Enterprises
All Rights Reserved. Please read our Conditions of Use and Privacy Policy.
All Rights Reserved. Please read our Conditions of Use and Privacy Policy.