


Air Campaigns
Want to start or join a group build? This is where to start.
Want to start or join a group build? This is where to start.
Hosted by Frederick Boucher, Michael Satin
Made in Italy

RedwingNev

Joined: February 07, 2004
KitMaker: 911 posts
AeroScale: 415 posts

Posted: Wednesday, October 21, 2009 - 05:48 AM UTC
Beautiful model Andrew

AussieReg

#007

Joined: June 09, 2009
KitMaker: 8,156 posts
AeroScale: 3,756 posts
Posted: Wednesday, October 21, 2009 - 09:27 AM UTC
Lovely job Andrew,as you say the Fiats are a very elegant looking aircraft. even my little G.50 has a certain appeal with the same forward canted wings and humped fuselage.
Nice work mate, love it !!
Nice work mate, love it !!


TedMamere

Joined: May 15, 2005
KitMaker: 5,653 posts
AeroScale: 4,347 posts

Posted: Wednesday, October 21, 2009 - 11:00 AM UTC
Hi Andrew,
Superb work! Feature? please...
Jean-Luc
Superb work!
Feature? please... Jean-Luc

TuomasH

Joined: September 10, 2008
KitMaker: 470 posts
AeroScale: 279 posts
Posted: Wednesday, October 21, 2009 - 10:19 PM UTC
I've finished the office of my Fiat G.50. Click pictures for larger photos.


The seatbelts look too dirty in pictures, they are much cleaner really.


The seatbelts look too dirty in pictures, they are much cleaner really.

cinzano

Joined: January 13, 2009
KitMaker: 419 posts
AeroScale: 378 posts
Posted: Thursday, October 29, 2009 - 11:51 AM UTC
Wow!!
There are some nice birds on the bench!
(Sorry for being away so long. I'm in the middle of Cyclo-cross season and it will run for another 6 weeks. After that I'll be dutifully at my bench and checking in on what everyone else is up to)
Until then I beg your collective indulgences to excuse my absence.
Cheers,
Fred
TedMamere
Joined: May 15, 2005
KitMaker: 5,653 posts
AeroScale: 4,347 posts
Posted: Sunday, November 01, 2009 - 08:27 PM UTC
Hi Frederick,
Good luck for your Cyclo Cross season!
I made a start on my entry for the Campaign. It chose to do Italeri's "excellent" 1:48 scale Re.2002. Rowan has wrote a "nice" review about the kit that can be found here. I know, I have masochistic tendencies sometimes...
In fact, I plan to build two kits. One will be modified in an attempt to correct most of the errors of the kit and the other will be build out of the box. This way it will be possible to compare both results at the end.
I've started the build by reducing the thickness of the wings of the first model. To do this, I've cut the ailerons away, as well as the leading edge of the underwings. Then I've sanded away as much plastic as I could inside of both wing halves, without alterating their outline. Finally I've placed some pieces of plasticard inside to have something for the upperwing to grab onto while gluing it in place.


The result, though not spectacular, is that the wing looks less bulbous than the original, which really gave the impression it had been inflated from the inside!
The ailerons have been thinned down and a piece of round plasticard was added to replace the lost plastic and give it a more realistic appearance. Later, all the movable surfaces will be glued in dynamic positions on the model to give it more life. The areas in the wings were the ailerons are supposed to go, have been hollowed accordingly.

That's all for today. More to come soon...
Jean-Luc
Good luck for your Cyclo Cross season!
I made a start on my entry for the Campaign. It chose to do Italeri's "excellent" 1:48 scale Re.2002. Rowan has wrote a "nice" review about the kit that can be found here. I know, I have masochistic tendencies sometimes...
In fact, I plan to build two kits. One will be modified in an attempt to correct most of the errors of the kit and the other will be build out of the box. This way it will be possible to compare both results at the end.
I've started the build by reducing the thickness of the wings of the first model. To do this, I've cut the ailerons away, as well as the leading edge of the underwings. Then I've sanded away as much plastic as I could inside of both wing halves, without alterating their outline. Finally I've placed some pieces of plasticard inside to have something for the upperwing to grab onto while gluing it in place.
The result, though not spectacular, is that the wing looks less bulbous than the original, which really gave the impression it had been inflated from the inside!
The ailerons have been thinned down and a piece of round plasticard was added to replace the lost plastic and give it a more realistic appearance. Later, all the movable surfaces will be glued in dynamic positions on the model to give it more life. The areas in the wings were the ailerons are supposed to go, have been hollowed accordingly.
That's all for today. More to come soon...
Jean-Luc

Merlin
#017


Joined: June 11, 2003
KitMaker: 17,582 posts
AeroScale: 12,795 posts

Posted: Sunday, November 01, 2009 - 09:38 PM UTC
Hi Jean-Luc
You must be the only person I can think of who'd tackle a pig's ear like this as light relief from the "chore" of having to build Tamiya's new Spit Mk. IX!
I can already tell this is going to be another of your miracle builds, like the way you transformed the ancient Smer (ex Artiplast) C.R.32 .
All the best
Rowan

TedMamere
Joined: May 15, 2005
KitMaker: 5,653 posts
AeroScale: 4,347 posts
Posted: Sunday, November 01, 2009 - 11:26 PM UTC
Hi Rowan,
Yes, the Tamiya Spit is too boring to build...
Jean-Luc
Quoted Text
You must be the only person I can think of who'd tackle a pig's ear like this as light relief from the "chore" of having to build Tamiya's new Spit Mk. IX!
Yes, the Tamiya Spit is too boring to build...
Jean-Luc
TedMamere
Joined: May 15, 2005
KitMaker: 5,653 posts
AeroScale: 4,347 posts
Posted: Wednesday, November 04, 2009 - 04:46 AM UTC
Hi all,
Here is another update.
Obviously, Italeri have mixed the references for their kit as there are elements of a Re.2000 in their Re.2002 cockpit. The rudder pedals are all wrong as well as the layout of the instrument panel. The gun covers that are visible on both sides are missing as well. It is necessary to have some good references to correct all the mistakes and omissions. The cockpit walls are much more busy in the real aircraft than the kit part show. I've made a first attempt at correcting the kit by modifying the parts and adding scratchbuilt details, including a new vacuformed seat since the one provided in the kit is not really convincing...

Below is a picture which shows that if Eduard's PE set improves the overall level of detail of the cockpit, in doesn't correct all the mistakes. However, it is a big improvement over the original kit parts...

Sadly, there is nothing to do for the seat as it's complex shape is impossible to reproduce with PE parts. Therefore, the only way to correct it is to make a new one by yourself. On the accompanying photo I haven't added the seatbelts. I'll do that later...

The Eduard PE set is interesting in that it makes the cockpit look much more busier...

Once finished, though not 100% correct, it looks much better than if done with only the kit's parts!

I don't know when I will make the next update. I just realized that I have to build a Bugatti 100 for the Mareseillaise Campaign before the 11th...
Jean-Luc
Here is another update.
Obviously, Italeri have mixed the references for their kit as there are elements of a Re.2000 in their Re.2002 cockpit. The rudder pedals are all wrong as well as the layout of the instrument panel. The gun covers that are visible on both sides are missing as well. It is necessary to have some good references to correct all the mistakes and omissions. The cockpit walls are much more busy in the real aircraft than the kit part show. I've made a first attempt at correcting the kit by modifying the parts and adding scratchbuilt details, including a new vacuformed seat since the one provided in the kit is not really convincing...
Below is a picture which shows that if Eduard's PE set improves the overall level of detail of the cockpit, in doesn't correct all the mistakes. However, it is a big improvement over the original kit parts...
Sadly, there is nothing to do for the seat as it's complex shape is impossible to reproduce with PE parts. Therefore, the only way to correct it is to make a new one by yourself. On the accompanying photo I haven't added the seatbelts. I'll do that later...
The Eduard PE set is interesting in that it makes the cockpit look much more busier...
Once finished, though not 100% correct, it looks much better than if done with only the kit's parts!
I don't know when I will make the next update. I just realized that I have to build a Bugatti 100 for the Mareseillaise Campaign before the 11th...
Jean-Luc
TuomasH
Joined: September 10, 2008
KitMaker: 470 posts
AeroScale: 279 posts
Posted: Wednesday, November 04, 2009 - 05:43 AM UTC
Nice progress Jean-Luc! I like your modified cockpit, it was really worth the effort.
AussieReg
#007
Joined: June 09, 2009
KitMaker: 8,156 posts
AeroScale: 3,756 posts
Posted: Saturday, November 07, 2009 - 11:53 AM UTC
A little progress, underside grey painted and base camo colour on top

Cheers, D
Cheers, D

lawlzw

Joined: April 05, 2009
KitMaker: 120 posts
AeroScale: 26 posts

Posted: Monday, November 16, 2009 - 04:27 PM UTC
Hi guys, found this excellent website on Regia Aeronautica's paint colours and camouflage scheme:
http://www.stormomagazine.com/RegiaAeronauticaColorsinWWII_3a.htm
http://www.stormomagazine.com/RegiaAeronauticaColorsinWWII_3a.htm

edoardo

Joined: November 30, 2007
KitMaker: 642 posts
AeroScale: 382 posts
Posted: Sunday, November 29, 2009 - 08:58 PM UTC
Hi all,
I was wondering if it is possible to join the campaign with an already completed build.
It is a Folgore MC200 I did last year and never presented before.
ciao
Edo
I was wondering if it is possible to join the campaign with an already completed build.
It is a Folgore MC200 I did last year and never presented before.
ciao
Edo
AussieReg
#007
Joined: June 09, 2009
KitMaker: 8,156 posts
AeroScale: 3,756 posts
Posted: Sunday, November 29, 2009 - 09:03 PM UTC
Hi Edo,
My understanding is that your kit has to be started and finished within the time frame outlined on the campaign page, so anything even started before October 1 this year would not be allowed. I have copied the Campaign page for this build below.
http://aeroscale.kitmaker.net/modules.php?op=modload&name=Campaigns&file=index&req=showcontent&id=356
Cheers, D
edoardo
Joined: November 30, 2007
KitMaker: 642 posts
AeroScale: 382 posts
Posted: Sunday, November 29, 2009 - 10:13 PM UTC
Hi Damian!
you're right, of course!
How could I have forget??
Never mind, I'l, take the next occasion!
you're right, of course!
How could I have forget??
Never mind, I'l, take the next occasion!
TedMamere
Joined: May 15, 2005
KitMaker: 5,653 posts
AeroScale: 4,347 posts
Posted: Monday, November 30, 2009 - 09:13 PM UTC
Hi Edoardo,
That's too bad about the MC 200. But maybe you can submit it for a feature on Aeroscale?
I have made some more progress on the Re.2002...
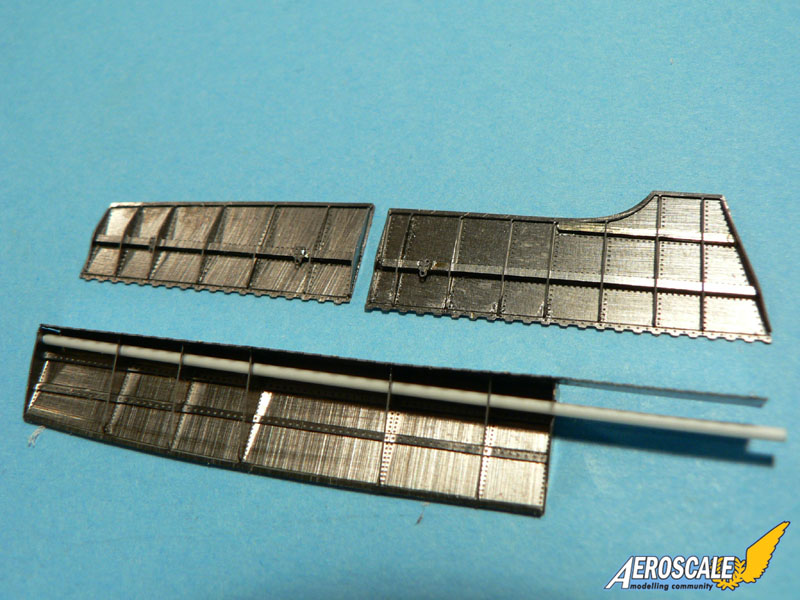
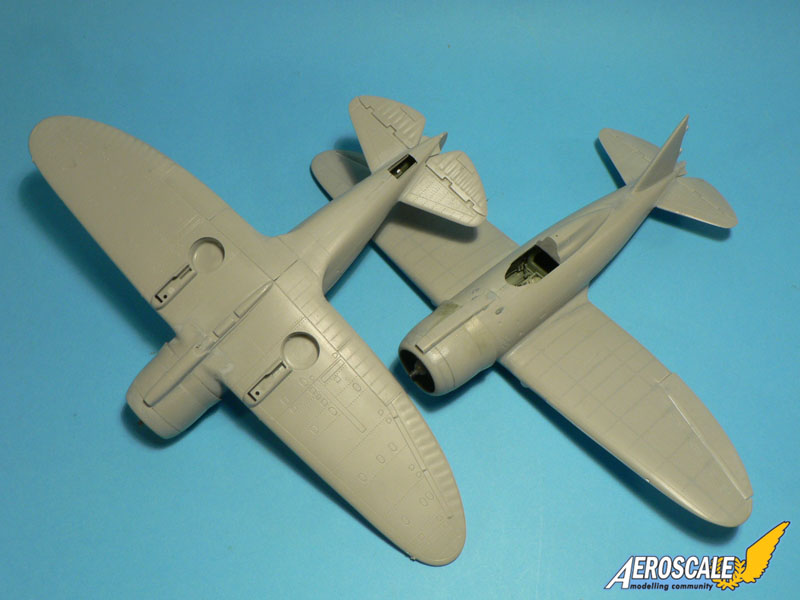
The rivets on the kit are a problem, so rather than eliminate them all I have chose... to add some more! If you want to hide a tree, plant it in the middle of the forest! To do so I have used Trumpeter's rivet tool fitted with the wheel B ...

However, the difference between the rivet lines was so obvious that I finally had to tone down the original ones by brush painting Mr. Surfacer 1000 to achieve a more coherent finish...

The engine of the kit is acceptable I think. I only added some ignition wires but they won't be very visible because they go behind the engine on the Re.2002's Piaggio P.XIX. In fact I think it was a waste of time because this sub-assembly will be hidden inside the cowling and behind the propeller hub later anyway...

I've also modified the fuselage hump behind the cockpit. While it still not looks 100% like the one of the real aircraft, this is the closest you can get when working only with the kit part. If I had sanded just a little further, I would have gone through the plastic! However, when compared to the original part provided by Italeri it is a big improvement I think...

Voilà! That's all for now,
Jean-Luc
That's too bad about the MC 200. But maybe you can submit it for a feature on Aeroscale?
I have made some more progress on the Re.2002...
The rivets on the kit are a problem, so rather than eliminate them all I have chose... to add some more! If you want to hide a tree, plant it in the middle of the forest! To do so I have used Trumpeter's rivet tool fitted with the wheel B ...
However, the difference between the rivet lines was so obvious that I finally had to tone down the original ones by brush painting Mr. Surfacer 1000 to achieve a more coherent finish...
The engine of the kit is acceptable I think. I only added some ignition wires but they won't be very visible because they go behind the engine on the Re.2002's Piaggio P.XIX. In fact I think it was a waste of time because this sub-assembly will be hidden inside the cowling and behind the propeller hub later anyway...
I've also modified the fuselage hump behind the cockpit. While it still not looks 100% like the one of the real aircraft, this is the closest you can get when working only with the kit part. If I had sanded just a little further, I would have gone through the plastic! However, when compared to the original part provided by Italeri it is a big improvement I think...
Voilà! That's all for now,
Jean-Luc

alpha_tango

Joined: September 07, 2005
KitMaker: 5,609 posts
AeroScale: 5,231 posts
Posted: Monday, November 30, 2009 - 09:39 PM UTC
Hi Jean-Luc
do you think it is possible to start an own wip thread for your Re2002 .. that might be handy for my build .. one day.
Good work so far though I will probably shorten the whole hump by a few mm at the front .. OTOH maybe there will be a "correction set" ( I know a new kit would be better) by then ...
cheers
Steffen

TedMamere
Joined: May 15, 2005
KitMaker: 5,653 posts
AeroScale: 4,347 posts
Posted: Friday, December 04, 2009 - 05:48 AM UTC
Hi Steffen,
Are you sure you don't have a problem with your computer keyboard?
I think I will write a feature about the build once it is finished.
Jean-Luc
Quoted Text
do you think it is possible to dtartz an own wip thread for your Re2002
Are you sure you don't have a problem with your computer keyboard?
I think I will write a feature about the build once it is finished.
Jean-Luc
Merlin
#017
Joined: June 11, 2003
KitMaker: 17,582 posts
AeroScale: 12,795 posts
Posted: Friday, December 04, 2009 - 06:34 AM UTC
Hi Jean-Luc
Lovely work! The only think I'm left wondering is how many of these beasts you're building?! You seem to have three versions going side by side at times!
All the best
Rowan
Lovely work!
The only think I'm left wondering is how many of these beasts you're building?! You seem to have three versions going side by side at times! All the best
Rowan
alpha_tango
Joined: September 07, 2005
KitMaker: 5,609 posts
AeroScale: 5,231 posts
Posted: Friday, December 04, 2009 - 07:24 AM UTC
Quoted Text
Are you sure you don't have a problem with your computer keyboard?
FAT FINGERS!

TedMamere
Joined: May 15, 2005
KitMaker: 5,653 posts
AeroScale: 4,347 posts
Posted: Friday, December 04, 2009 - 07:49 AM UTC
Hi Rowan,
Not three, only two. I wanted to do one from the box and a second with modifications to compare them at the end. In the meantime the Eduard PE sets arrived and I added them to the builds. The from the box one will have an Eduard PE cockpit and the modified one the external parts and the flaps... easy to follow?
Jean-Luc
Quoted Text
The only think I'm left wondering is how many of these beasts you're building?! You seem to have three versions going side by side at times!
Not three, only two. I wanted to do one from the box and a second with modifications to compare them at the end. In the meantime the Eduard PE sets arrived and I added them to the builds. The from the box one will have an Eduard PE cockpit and the modified one the external parts and the flaps... easy to follow?
Jean-Luc
AussieReg
#007
Joined: June 09, 2009
KitMaker: 8,156 posts
AeroScale: 3,756 posts
Posted: Friday, December 04, 2009 - 08:04 PM UTC
Got a little bit done on the Z506 today . . . . .


The interior detail was almost non-existent, so I raided the junkbox and made up some stuff for the drivers to play with !! I'm not too worried about the interior on this one, I'm going to focus on the finish and markings.

Cheers, D
The interior detail was almost non-existent, so I raided the junkbox and made up some stuff for the drivers to play with !! I'm not too worried about the interior on this one, I'm going to focus on the finish and markings.
Cheers, D
AussieReg
#007
Joined: June 09, 2009
KitMaker: 8,156 posts
AeroScale: 3,756 posts
Posted: Sunday, December 06, 2009 - 11:49 AM UTC
Hi again. Had my first go at freehand camo with the airbrush on my G50. I'm going to call it "Reggia Artistica Licensia" haha. A little bit of overspray, I think the aperture on my number 1 cone is slightly out of round. Not to worry, it looks ok to me !!

Also got the wings on the Z506, the fuselage is very slightly bowed but not enough to bother with

The big worry is the fit of the turret surround. I think I will hit this with a hairdryer and try to soften and pull it back into position. Stay tuned for


Cheers, D
Also got the wings on the Z506, the fuselage is very slightly bowed but not enough to bother with
The big worry is the fit of the turret surround. I think I will hit this with a hairdryer and try to soften and pull it back into position. Stay tuned for
Cheers, D
TedMamere
Joined: May 15, 2005
KitMaker: 5,653 posts
AeroScale: 4,347 posts
Posted: Tuesday, December 15, 2009 - 12:11 AM UTC
Hi Damian,
Nice camo you've done on the G50. I don't know if it is accurate but it looks very nice...
I have assembled the PE Flaps from Eduard. I must say they are great and not too difficult to put together. You just have to bend the pieces to shape with a flat plier and add some liquid CA glue. It is not necessary to add too much and it is better to work with capillarity action...

I have assembled the fuselage and the wings together and glued the flaps in place. I think they are a big improvement over the original plastic parts...

Now it's time to get the models ready for the painting stage...
Jean-Luc
Nice camo you've done on the G50. I don't know if it is accurate but it looks very nice...
I have assembled the PE Flaps from Eduard. I must say they are great and not too difficult to put together. You just have to bend the pieces to shape with a flat plier and add some liquid CA glue. It is not necessary to add too much and it is better to work with capillarity action...
I have assembled the fuselage and the wings together and glued the flaps in place. I think they are a big improvement over the original plastic parts...
Now it's time to get the models ready for the painting stage...
Jean-Luc
TedMamere
Joined: May 15, 2005
KitMaker: 5,653 posts
AeroScale: 4,347 posts
Posted: Wednesday, December 16, 2009 - 06:35 AM UTC
Hi all,
Both models are now ready for the painting. I will make one with the Eduard flaps down and the other with the flaps up...

On the "improved" model, I have added two small bulges and two airscopes that Italeri have omitted...
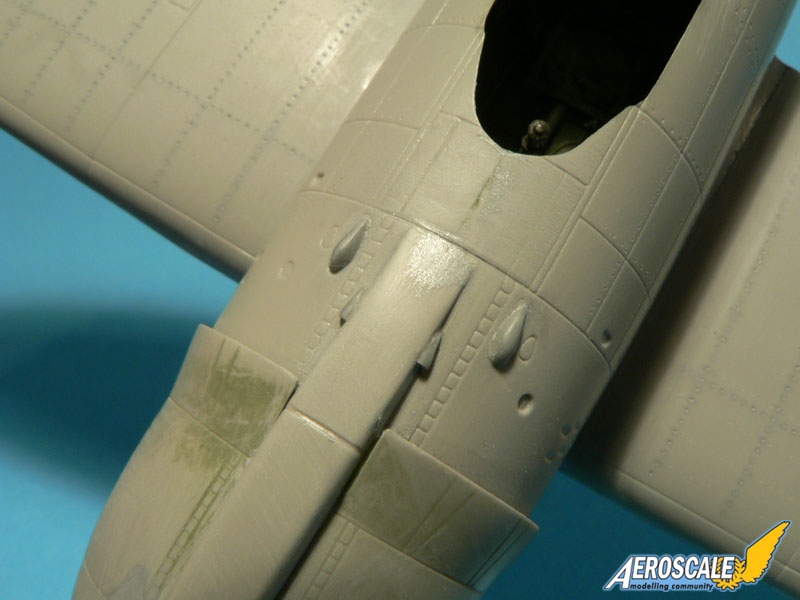
I have also reworked the machine guns openings on the cowling which were a real shame on the original model. For this, I have used self adhesive aluminium foil...

Next I will do some painting...
Jean-Luc
Both models are now ready for the painting. I will make one with the Eduard flaps down and the other with the flaps up...
On the "improved" model, I have added two small bulges and two airscopes that Italeri have omitted...
I have also reworked the machine guns openings on the cowling which were a real shame on the original model. For this, I have used self adhesive aluminium foil...
Next I will do some painting...
Jean-Luc
 |

WEB HOSTING BY


Copyright ©2021 AeroScale and Kitmaker Network, a subsidiary of Silver Star Enterprises
All Rights Reserved. Please read our Conditions of Use and Privacy Policy.
All Rights Reserved. Please read our Conditions of Use and Privacy Policy.