Wow, that needs a basecoat or two, Matty Really nice decal sheet though. A lot of attractive versions.
Looking forward to see more.
Air Campaigns
Want to start or join a group build? This is where to start.
Hosted by Frederick Boucher, Michael Satin
Made in Italy
Posted: Thursday, February 04, 2010 - 03:24 AM UTC
cinzano
Indiana, United States
Joined: January 13, 2009
KitMaker: 419 posts
AeroScale: 378 posts
Joined: January 13, 2009
KitMaker: 419 posts
AeroScale: 378 posts
Posted: Friday, February 05, 2010 - 01:45 AM UTC
All is well. I finally managed to get our campaign ribbon formatted and uploaded to enlistment page (with some much appreciated advice from our friendly Aero Scale administrators).
The folgore is progressing nicely. (Managed to spend some time with the landing gear and radiator housing last night.
Cheers,
Fred
NickZour
Attica, Greece / Ελλάδα
Joined: May 01, 2008
KitMaker: 1,437 posts
AeroScale: 1,241 posts
Joined: May 01, 2008
KitMaker: 1,437 posts
AeroScale: 1,241 posts
Posted: Friday, February 05, 2010 - 08:27 AM UTC
Quoted Text
Hi everyone,
I was looking back through the thread and didn't see any seaplanes so I've decided to do the 1/72 Italeri Cant Z.501 for my entry.
I'll be doing the profile with the red stripes on the wings.
Mark
Wow, that's very nice theme!
Are there any detail sets for this??
Cheers Nick
Phantom2
Östergötland, Sweden
Joined: April 18, 2006
KitMaker: 708 posts
AeroScale: 678 posts
Joined: April 18, 2006
KitMaker: 708 posts
AeroScale: 678 posts
Posted: Sunday, February 07, 2010 - 03:16 AM UTC
FIAT C.R.42 ”Falco”
Hi all!
Well, now I have a good base to work from in the cockpit!
All the Etch comes from Eduard (pre-painted) and I have picked out some details with paint!
Starting to look the part!
More detail-painting, all etched parts assembled, the pit was dry brushed with silver paint and finally, a black wash!
Even the engine got the treatment!
Engine done!
This is my best reference on the Swedish J.11, a one-book reference about the C.R.42, and the whole story about how this Italian aircraft ended up in Sweden!
We got 60 of these machines, so it was not a small order (for Sweden).
If you have the slightest interest in this aircraft and its service in the Swedish Air Force during the war, get it!
More to come!
Cheers!
Stefan
cinzano
Indiana, United States
Joined: January 13, 2009
KitMaker: 419 posts
AeroScale: 378 posts
Joined: January 13, 2009
KitMaker: 419 posts
AeroScale: 378 posts
Posted: Sunday, February 07, 2010 - 09:01 AM UTC
Progress.
Seams checked, primed, preshaded, and the white elements of the airframe added. While that's drying its time to go back and work on the landing gear.
Cheers,
Fred
doubtingthomas
Wisconsin, United States
Joined: March 17, 2009
KitMaker: 156 posts
AeroScale: 153 posts
Joined: March 17, 2009
KitMaker: 156 posts
AeroScale: 153 posts
Posted: Sunday, February 07, 2010 - 04:35 PM UTC
Andrew - Nice job on your Falco. I think the smoke rings turned out well. The photos of the real things didn't always look like Mike Grant decals, so good job!
Posting this as proof that I am making some progress. Looks like Fred and I are at the same stage. I'm working hard to hit the end date, but not sure if I will make it, with 1 imminent work trip and sick kids. I may be the guy asking for a slight extension! A fool I was - to think I could finish a Classic Airframes kit in 60 days
Looking at the photos of Andrew's build made me see an error in the Classic Airframes kit I am building - there are no openings for the wing root oil cooler! I guess I'll go back and fix that - and hope I don't split some seams while doing so. Grrrr....
Looking forward to seeing everyone else's progress!
Posted: Monday, February 08, 2010 - 10:13 AM UTC
Nice pit Stefan.
cinzano
Indiana, United States
Joined: January 13, 2009
KitMaker: 419 posts
AeroScale: 378 posts
Joined: January 13, 2009
KitMaker: 419 posts
AeroScale: 378 posts
Posted: Tuesday, February 09, 2010 - 11:15 AM UTC
Stay with it Tom. I know what you mean about Classic Airframes kits though. I have a Bloch MB-155 that is almost finished. (its been "almost" finished for about 6 months, long past the "Stripes in the Sky" campaign deadline.
I managed to coat and post shade the underside of the airframe this morning. Tonight I'll see about masking and applying the upper surface colors.
Tom, when we hit about a week to go in the campaign I'll check everyone's status. Anyone who has trouble making the deadline can PM me. If we have more than one or two stragglers I'll extend the deadline another 14 days (but I'd really like to avoid it if I can).
Cheers,
Fred
cinzano
Indiana, United States
Joined: January 13, 2009
KitMaker: 419 posts
AeroScale: 378 posts
Joined: January 13, 2009
KitMaker: 419 posts
AeroScale: 378 posts
Posted: Wednesday, February 10, 2010 - 04:08 AM UTC
A little more progress this morning. Lots of blems and touch ups do be done (had a devil of a time keeping the dust down with the humidity so low lately). So far I feel I'm on schedule.
Cheers,
Fred
Cheers,
Fred
Posted: Wednesday, February 10, 2010 - 10:12 PM UTC
Looks good, Frederick. Looking forward to see more.
cinzano
Indiana, United States
Joined: January 13, 2009
KitMaker: 419 posts
AeroScale: 378 posts
Joined: January 13, 2009
KitMaker: 419 posts
AeroScale: 378 posts
Posted: Thursday, February 11, 2010 - 03:25 AM UTC
Thanks Jesper.
I'm looking to finish this kite by the weekend (first part of next week at the outside).
Today: Trial final fitting, then decals, weathering, then final assembly!
Cheers,
Fred
I'm looking to finish this kite by the weekend (first part of next week at the outside).
Today: Trial final fitting, then decals, weathering, then final assembly!
Cheers,
Fred
Matty_K
Nordrhein-Westfalen, Germany
Joined: January 31, 2010
KitMaker: 103 posts
AeroScale: 71 posts
Joined: January 31, 2010
KitMaker: 103 posts
AeroScale: 71 posts
Posted: Friday, February 12, 2010 - 05:25 AM UTC
Hi all,
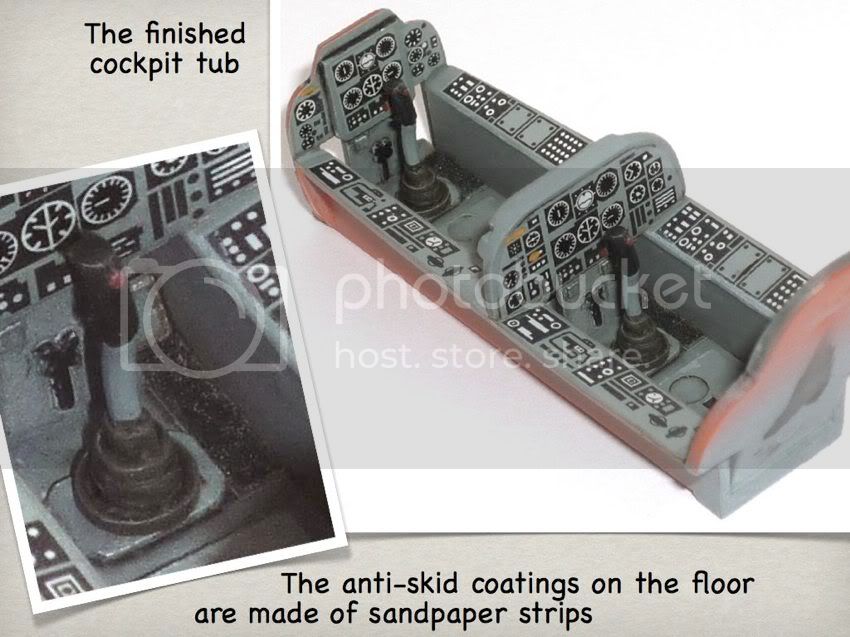
here are the first picts of my Aermacchi MB.326 build. Meanwhile, I‘m working on two kits in parallel - more or less. My objective is to have at least one kit finished by end of this month. As always, construction started with the cockpit.
The tip tanks and the wings are glued and sanded already.
Originally, this build was intended as a quick OOTB build, but in the „heat of the battle“ my enthusiasm increases...
... by highlighting the intruments‘ glasses with glossy clear coat
... and by simulating the anti-skid mats on the floor by using small strips of sandpaper - OOTB in these areas the floor has nice recessions screaming for that!
The seats will need some additional work - I'll keep you updated.
Cheers
*Matty
magnusf
Stockholm, Sweden
Joined: May 02, 2006
KitMaker: 1,953 posts
AeroScale: 1,902 posts
Joined: May 02, 2006
KitMaker: 1,953 posts
AeroScale: 1,902 posts
Posted: Saturday, February 13, 2010 - 03:28 AM UTC
Matty! Some very nice work there! I have a soft spot for the MB 326.
I have started a build blog for my Ba 65. I doubt I will be able to finish it in time but I will at least try!
Magnus
I have started a build blog for my Ba 65. I doubt I will be able to finish it in time but I will at least try!
Magnus
Matty_K
Nordrhein-Westfalen, Germany
Joined: January 31, 2010
KitMaker: 103 posts
AeroScale: 71 posts
Joined: January 31, 2010
KitMaker: 103 posts
AeroScale: 71 posts
Posted: Saturday, February 13, 2010 - 08:24 AM UTC
Hi Magnus,
Yep, the MB.326 is a classic beauty in my eyes - just „form follows function“ principle: a streamlined design with no frills from the golden age of jet aviation.
Your Breda is a nice subject, not beaten to death as well. I‘m looking forward to seeing your work - but it doesn‘t seem to be a weekend project...
I‘ve some AZUR kits of French planes in my stash, too. They look very nice in the box. Maybe we should have a „Made in France“ campaign in the future so I‘ll have to start one.
Cheers
*Matty
cinzano
Indiana, United States
Joined: January 13, 2009
KitMaker: 419 posts
AeroScale: 378 posts
Joined: January 13, 2009
KitMaker: 419 posts
AeroScale: 378 posts
Posted: Sunday, February 14, 2010 - 08:07 AM UTC
Magnus,
I'd really like to see that Breda built. If you're gonna have trouble making the deadline don't be afraid to PM me.
@ everyone: Don't forget to put pics of your completed birds in the "Made in Italy" campaign folder. (its listed in the 2009 campaign file).
In the home stretch with my machine (another gloss coat, weathering, final detailing and matte coat and I'm there!
Matty_K
Nordrhein-Westfalen, Germany
Joined: January 31, 2010
KitMaker: 103 posts
AeroScale: 71 posts
Joined: January 31, 2010
KitMaker: 103 posts
AeroScale: 71 posts
Posted: Monday, February 15, 2010 - 09:52 AM UTC
Hi all,
just a small update on my Aermacchi - should be finished just in time...
@Fred: very nice Folgore by the way - what a striking mediterranean scheme!
Cheers
*Matty
just a small update on my Aermacchi - should be finished just in time...
@Fred: very nice Folgore by the way - what a striking mediterranean scheme!
Cheers
*Matty
Posted: Tuesday, February 16, 2010 - 01:20 AM UTC
Good technical stuff that radar. Aermacchi looking good. My Fiat is uploaded to campaign gallery, only 4 models there yet
Posted: Tuesday, February 16, 2010 - 01:48 AM UTC
Hi Fred, your build is looking great. In fact all of the builds in this campaign are coming along really well !! I've uploaded some pics of my little G50 to the Campaign Gallery, here's a link to get there quicker
Made in Italy Campaign Gallery
Cheers, D
Made in Italy Campaign Gallery
Cheers, D
Matty_K
Nordrhein-Westfalen, Germany
Joined: January 31, 2010
KitMaker: 103 posts
AeroScale: 71 posts
Joined: January 31, 2010
KitMaker: 103 posts
AeroScale: 71 posts
Posted: Tuesday, February 16, 2010 - 10:50 AM UTC
Hi all,
today I've completed the airframe...
The painting step is getting closer now!
Cheers
*Matty
today I've completed the airframe...
The painting step is getting closer now!
Cheers
*Matty
cinzano
Indiana, United States
Joined: January 13, 2009
KitMaker: 419 posts
AeroScale: 378 posts
Joined: January 13, 2009
KitMaker: 419 posts
AeroScale: 378 posts
Posted: Tuesday, February 16, 2010 - 03:20 PM UTC
I gotta say, Matty. Your construction is super clean. Its almost a shame to cover it in paint (almost).
Cheers,
Fred
Cheers,
Fred
Posted: Tuesday, February 16, 2010 - 08:06 PM UTC
Quoted Text
I gotta say, Matty. Your construction is super clean. Its almost a shame to cover it in paint (almost).
Yes, I agree, excellent job!
Jean-Luc
Matty_K
Nordrhein-Westfalen, Germany
Joined: January 31, 2010
KitMaker: 103 posts
AeroScale: 71 posts
Joined: January 31, 2010
KitMaker: 103 posts
AeroScale: 71 posts
Posted: Wednesday, February 17, 2010 - 07:47 AM UTC
Hi Fred and Jean-Luc,
Thanks for your kind words!
I‘m not unhappy with the construction. The fit is quite good, so the seams were no problem up to now.
Honestly I‘m not really satisfied with the photo quality - it seems that my digicam hates the orange coloured plastic and doesn‘t manage to focus clearly.
Finally I start thinking of flying carrots...
Cheers
*Matty
cinzano
Indiana, United States
Joined: January 13, 2009
KitMaker: 419 posts
AeroScale: 378 posts
Joined: January 13, 2009
KitMaker: 419 posts
AeroScale: 378 posts
Posted: Wednesday, February 17, 2010 - 09:32 AM UTC
Woohoo!
The bird is finally finished (buttoned up last few elements this morning before work!). I'll post some pictures and some final thoughts on this build when I get a chance to set up a proper picture shoot (hopefully tonight.)
Is it my best build to date? No, not really. (It is far from my worst though either). Made some errors. I tried some new materials and tricks (something I really strive to do with each build, take chances that is.) I am, however, pleased with it overall.
Cheers,
Fred
cinzano
Indiana, United States
Joined: January 13, 2009
KitMaker: 419 posts
AeroScale: 378 posts
Joined: January 13, 2009
KitMaker: 419 posts
AeroScale: 378 posts
Posted: Wednesday, February 17, 2010 - 02:51 PM UTC
Well,
She's done. As a kit, I can recommend the Hasegawa Folgore readily. ( I had heard of fit problems but I had few to none with this one.)
Notes:
I had trouble with my Walther's Solvaset and the Cartograph decals (even with testing it first) They didn't want to lay down and then the setting solution burned the decals a bit. In my frustration I picked up some Mr. Mark Setter and things improved a lot.
I had been meaning to try Aleene's Clear Gel Tacky Glue for a while. I used this for attaching clear parts and I am very impressed!!! I can't recommend this product strongly enough.
I also tried thinning Future with alcohol for the first time on the final clear coats. I wanted a satin sheen and the alcohol not only made the Future spray well but dulled the sheen enough that I decided to forgo the final matte coat.
Anyway, I'm really enjoying this campaign, the great planes everyone is contributing and the chance to get another finished kite into the cabinet.
Cheers,
Fred
doubtingthomas
Wisconsin, United States
Joined: March 17, 2009
KitMaker: 156 posts
AeroScale: 153 posts
Joined: March 17, 2009
KitMaker: 156 posts
AeroScale: 153 posts
Posted: Wednesday, February 17, 2010 - 05:20 PM UTC
Matty - I'm impressed with the speed of your build, yet it looks so good. I would take 5x as long with a fourth a tube of putty and a brace of sanding sticks to get to that point.
Fred - Nice job on the Folgore. Seeing your paintwork makes me bummed that I'm away on business and can't finish my painting yet (I'm at the mottling stage).
Keep 'em coming!
Fred - Nice job on the Folgore. Seeing your paintwork makes me bummed that I'm away on business and can't finish my painting yet (I'm at the mottling stage).
Keep 'em coming!